
Fine line looks gorgeous fresh but does not always age the way trend feeds promise. The tattoos that last look deliberate in scale and placement, not accidental. When you pick a tiny flash design, think about where the skin moves, what you wear most, and the touch-up timeline you are willing to sign up for. Read on for 21 tiny flash drawings with practical notes for consultation, healing, and showing them off.
1. Fine Line Arrow on Inner Forearm
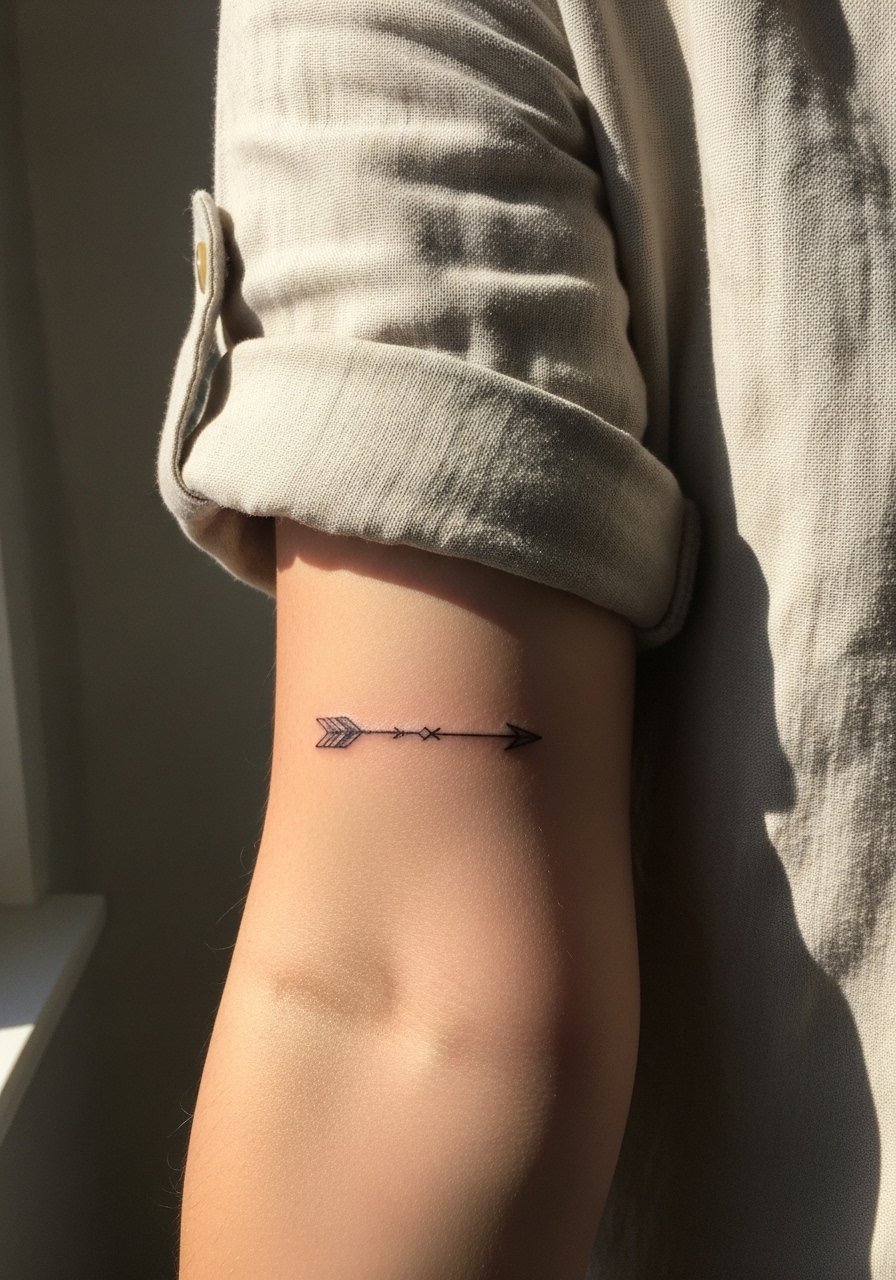
I recommend the inner forearm when you want a tidy linear flash that reads for years. Tell your artist you want a slightly heavier spine line and single-needle accents only where needed. The biggest mistake is asking for hairline single-needle across the full length, which can blur by year three. Pain is low and the session is 20 to 40 minutes. Expect the linework to look crisp at six months, soften a bit by two years, and need a touch-up around year three if you want needle-sharp edges. For showing off, rolled sleeves and a rolled linen shirt keep the arm neat and let the arrow read without competition.
2. Mini Constellation on Side Wrist
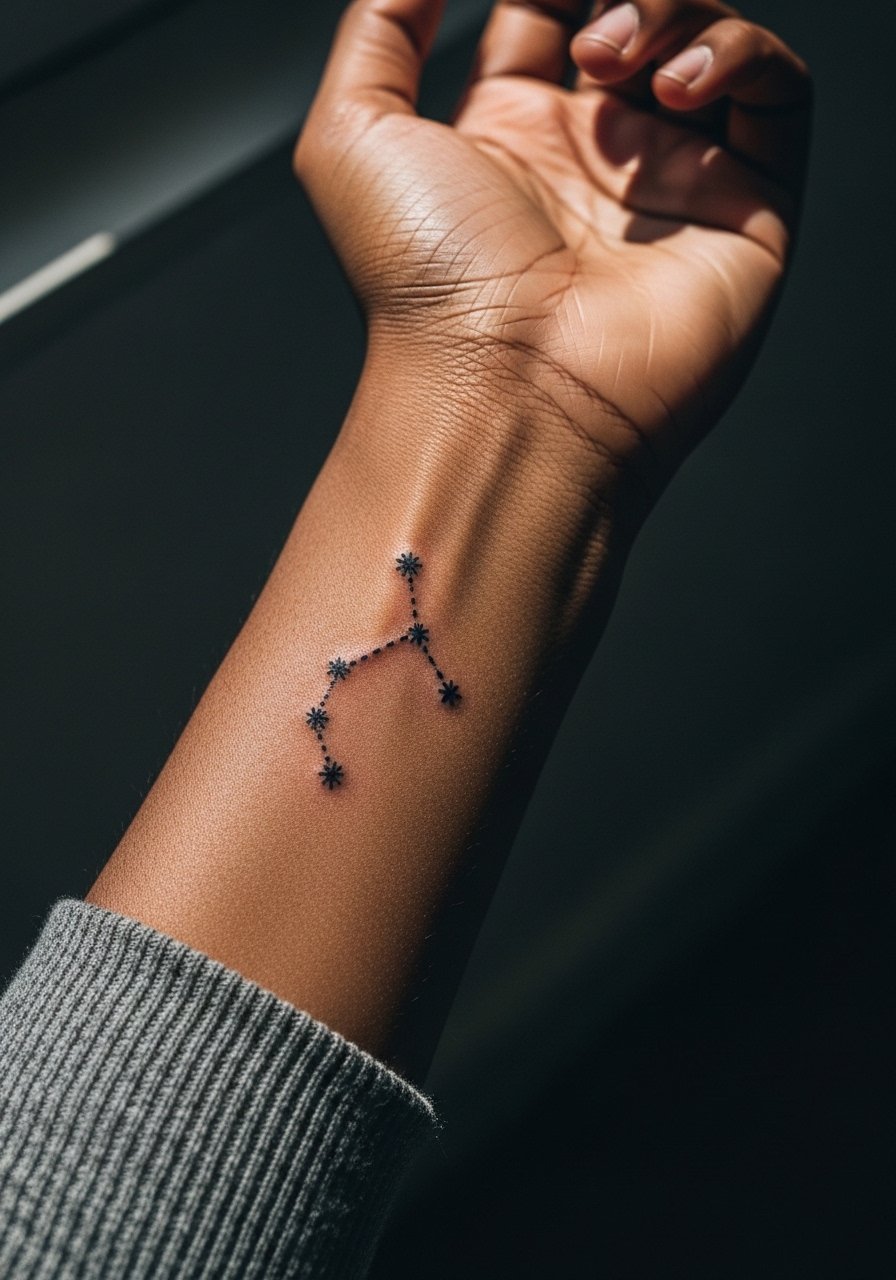
Wrist tattoos look delicate but live in a high-friction zone. Fair warning, constant washing and bracelets wear the dots down faster than forearm work. Ask for slightly larger dots and spaced micro guideline stars so the constellation keeps shape after a year. Session time is short, about 15 to 30 minutes, but expect touch-up talk during the consultation. The main mistake is going microscopic and dense, which leads to merging dots within two years. For styling, pair the piece with stacked dainty bracelets or a thin chain bracelet so the constellation has context without being crowded.
3. Tiny Anchor at Ankle
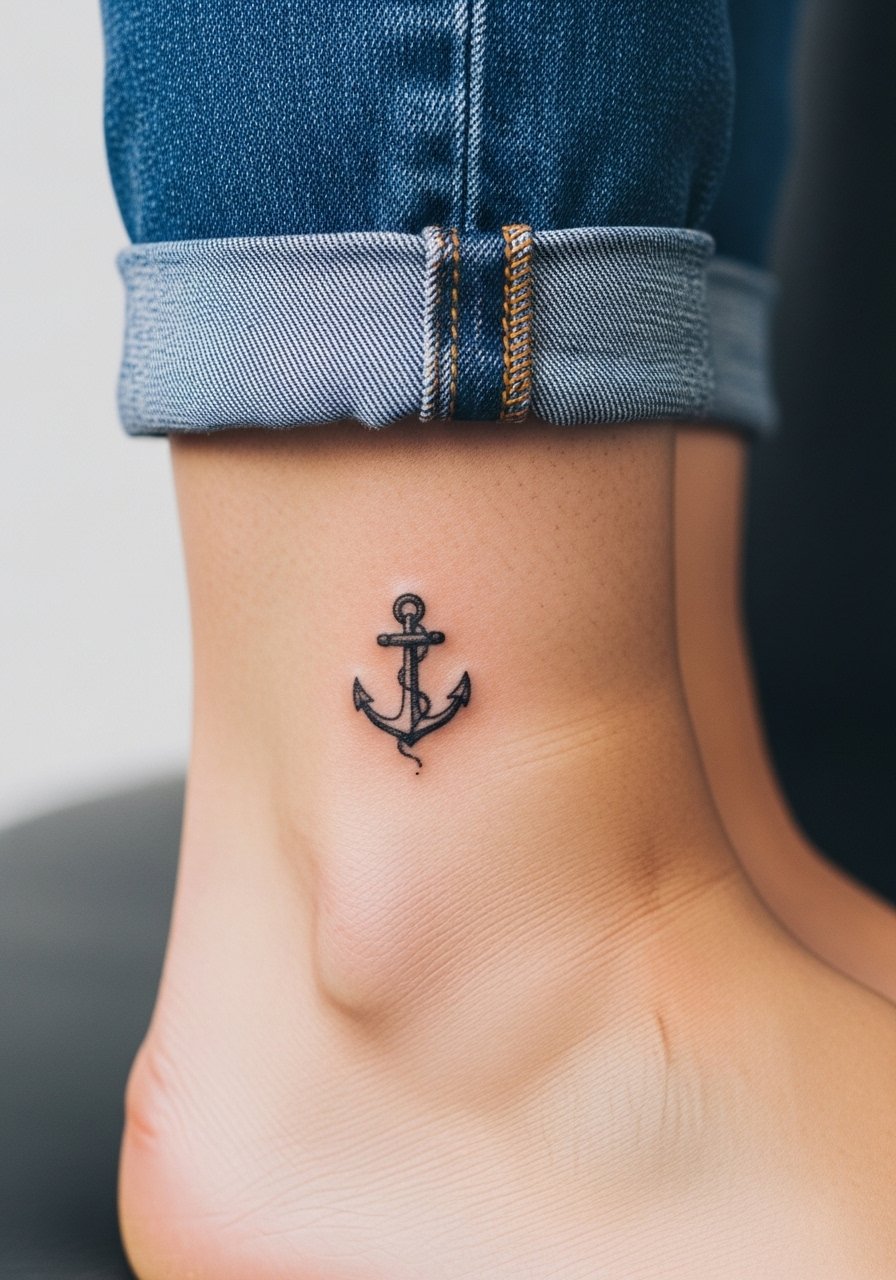
Ankle tattoos sit low and take hits from socks and shoes. Pain is moderate and the session will be quick. Tell your artist you want clean linework with a little negative space inside the anchor rather than full saturation. That negative space helps the anchor keep definition as the skin moves. A common error is packing color or heavy black into a tiny anchor, which can create blowout over time. For session wear, slide into shoes that are easy to remove and wear a pair of rolled socks so the area is accessible. The piece pairs well with cropped trousers or sandals to show it off without competing.
4. Delicate Script Along Collarbone
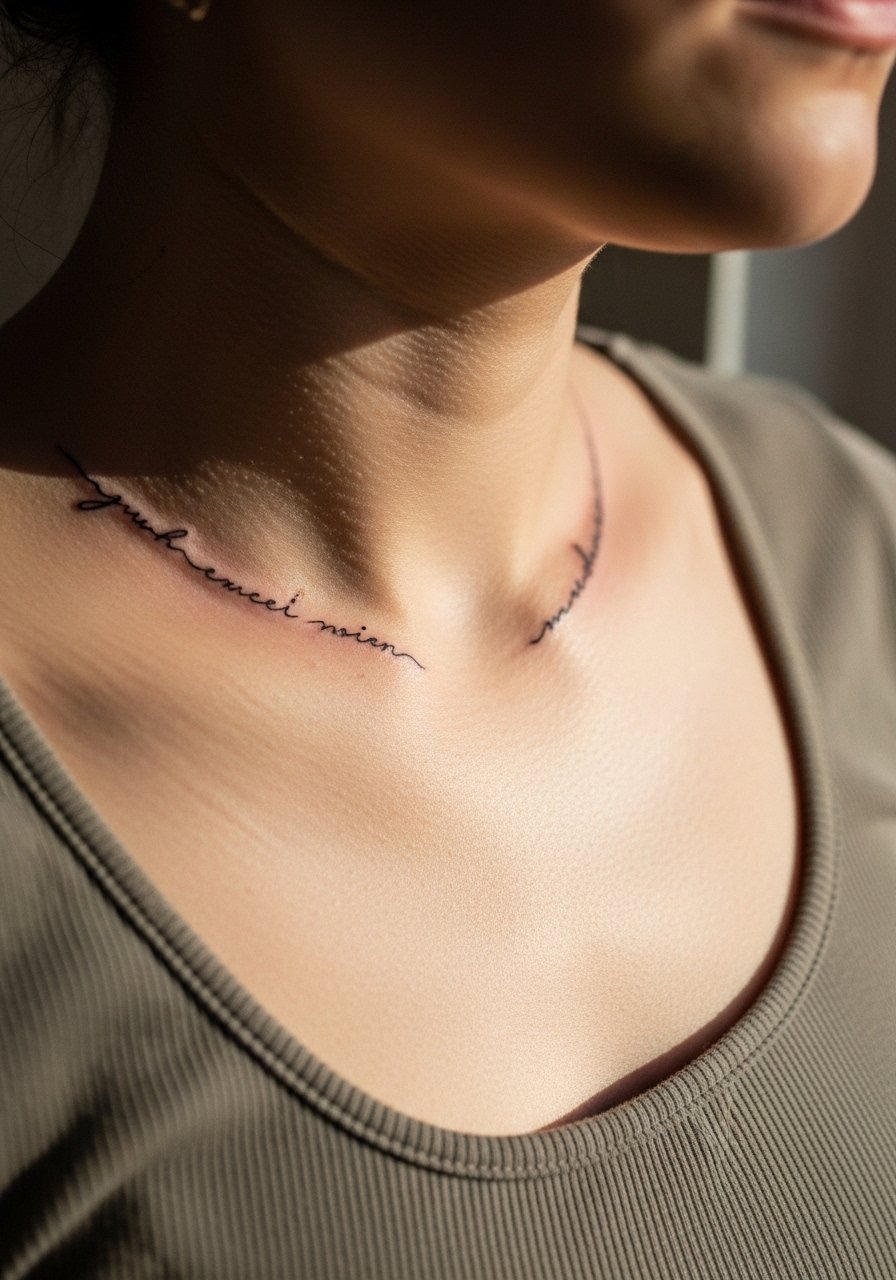
Collarbone script reads elegant when letter spacing is generous. The highest risk is putting tiny lettering right on the bone with tight kerning. Ask for increased letter spacing and slightly bolder hairlines so the script holds as the skin shifts and sunlight hits the area. Expect light to moderate pain and a 30 to 45 minute session. At six months the letters should look crisp, at two years you may notice slight softening. Show this off with open-neck tops or a thin chain pendant necklace that sits above the line so the typography remains the focal point.
5. Micro-Realism Single Leaf on Ribcage
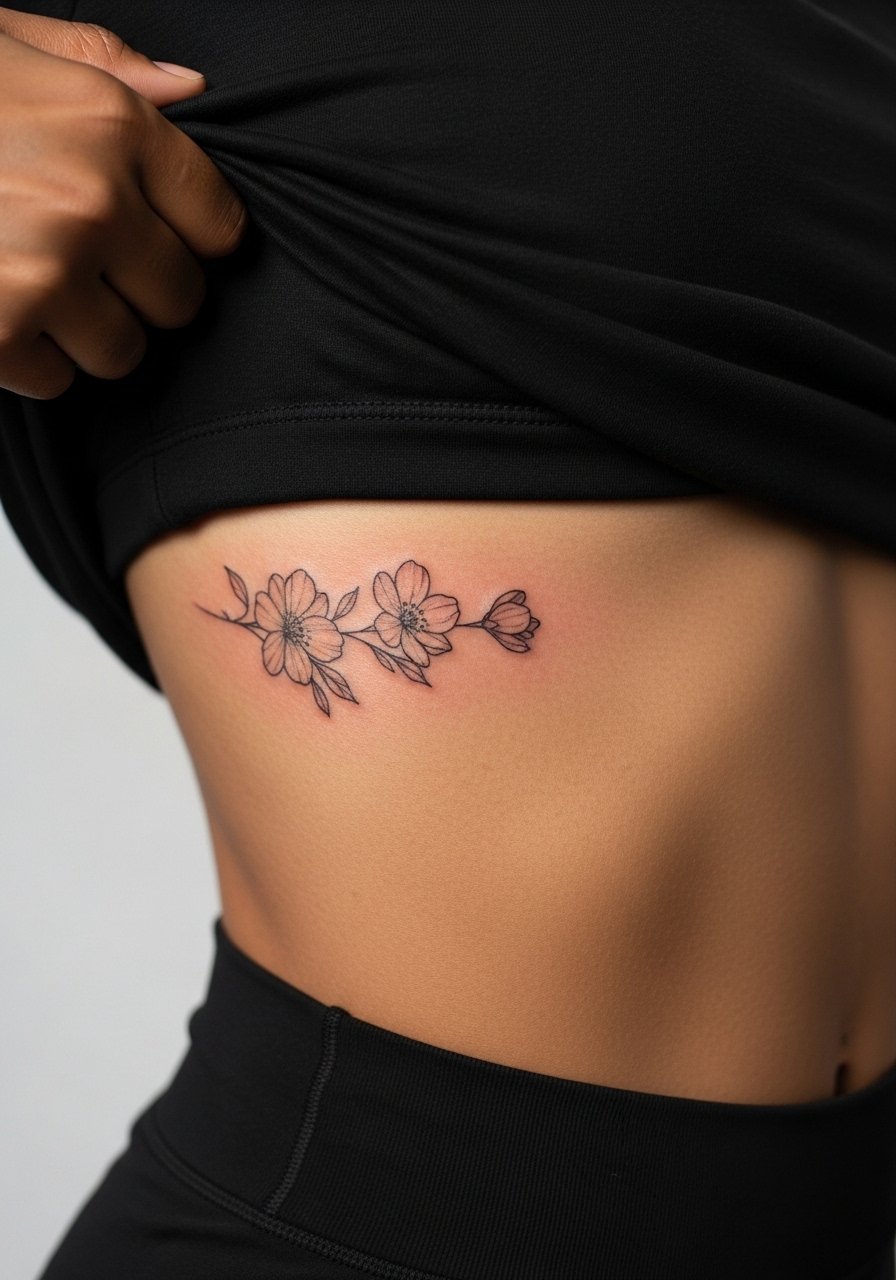
Rib pieces are intimate and age unpredictably because the skin stretches when you breathe. Pain is high and sessions can be interrupted by breath cycles. Artists are divided on fine line here. One camp says the ribs stretch and blur lines within two years. The other camp argues that with proper needle depth and spacing the lines settle fine. Name both camps to your artist and ask which approach they use. Make the leaf slightly larger than you think so stipple shading and negative space have room to breathe. Expect a touch-up conversation at the one to three year mark.
6. Tiny Keyhole on Side Finger
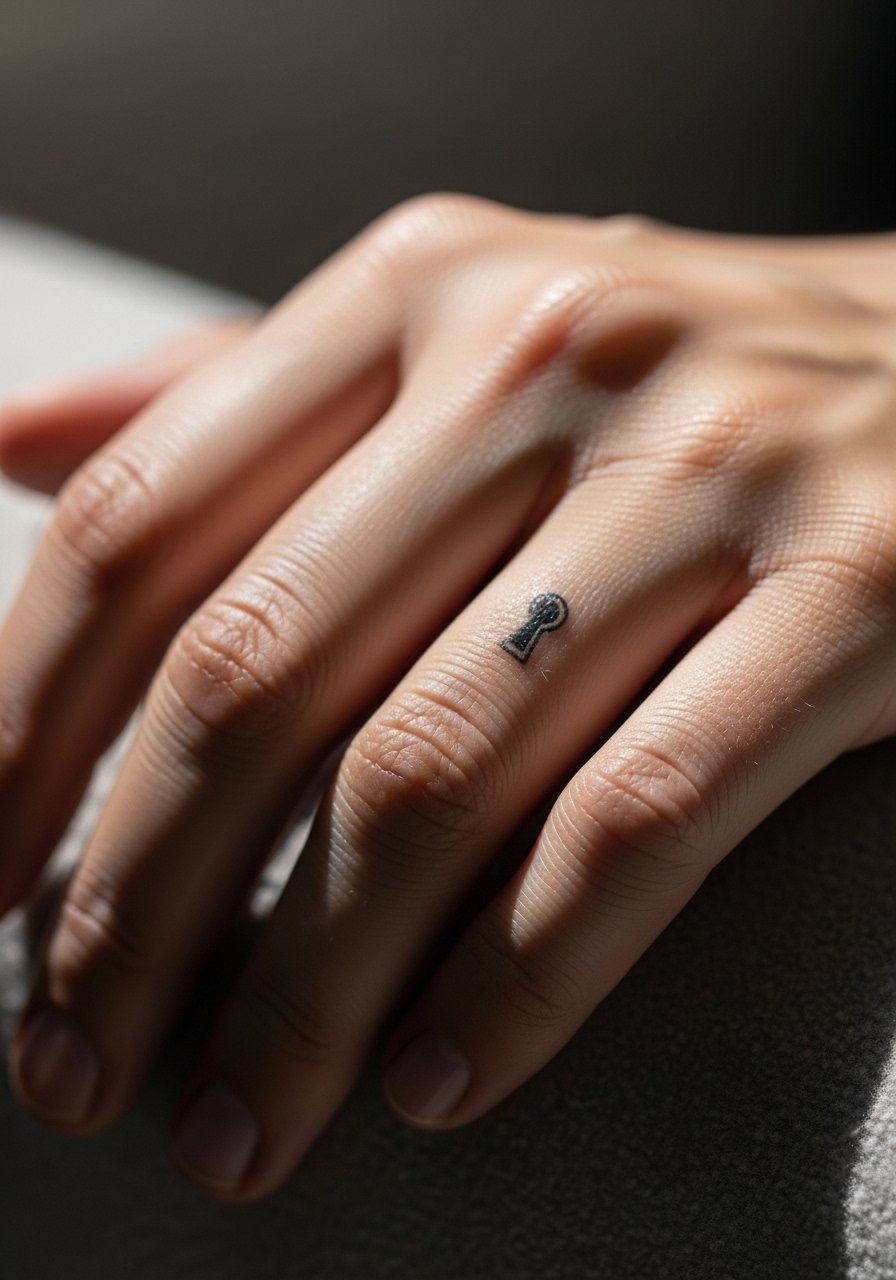
Finger work is notoriously high maintenance because of constant washing and skin turnover. Pain is sharp for a few minutes and the session is often split into touch-up scheduling from the start. The mistake people make is expecting single sessions to last. Ask for slightly deeper placement and plan on a touch-up within six months. For day-of considerations, avoid rings that squeeze the finger and wear a thin silicone ring during the healing window if you need to keep a ring on. Remember that workplace policies still affect hand and finger tattoos in some industries.
7. Tiny Geometric on Shoulder Cap
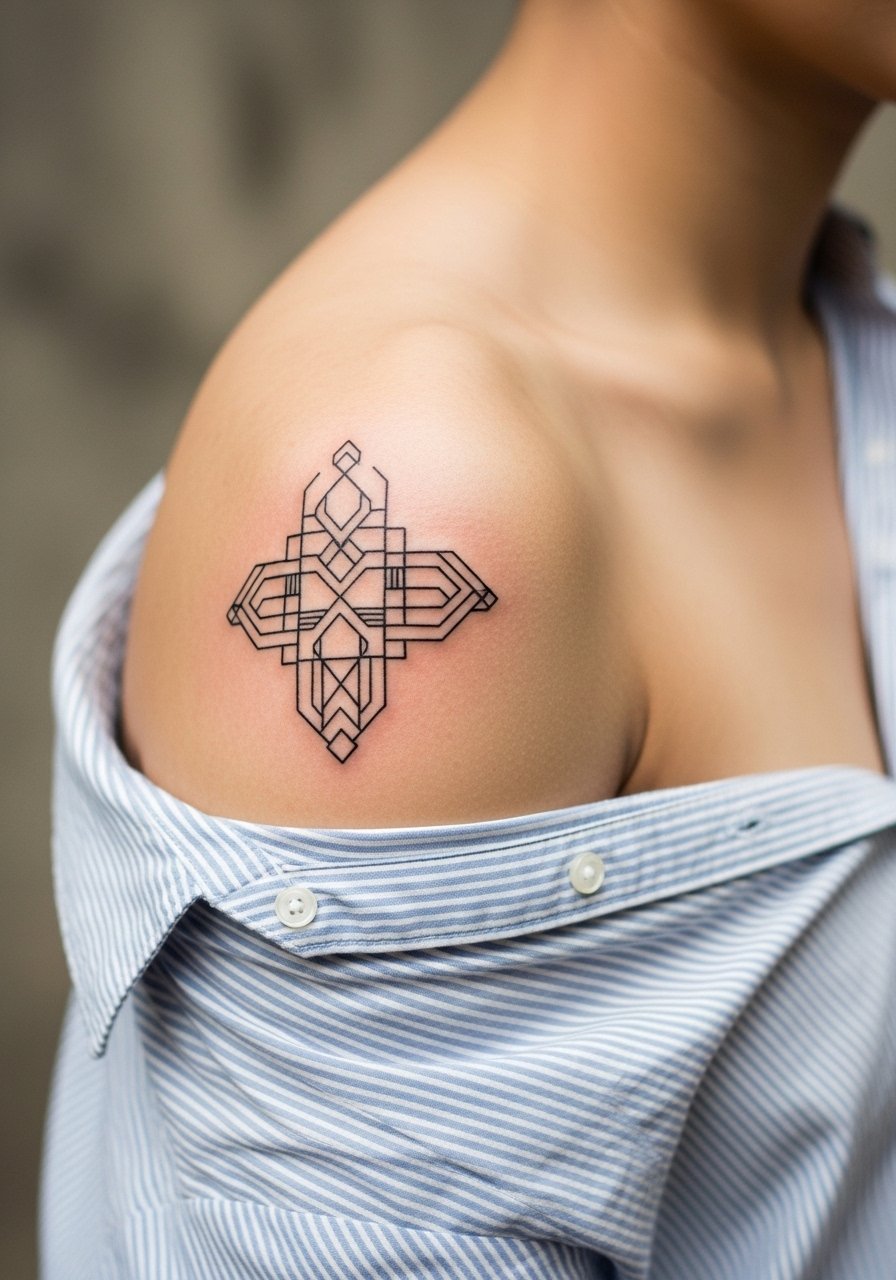
The shoulder handles tiny blackwork well because the skin there is stable and keeps saturation intact. Tell your artist you want bold outlines with small internal negative spaces so the geometry resists blending. Sessions are comfortable and short. A common mistake is overloading the interior with stipple that crowds the negative space. At year two the black should still read solid if the piece was sized right. For showing it off, a loose button-down shirt or tank top gives the shoulder room to be visible without exposing other areas.
8. Tiny Moon Behind the Ear
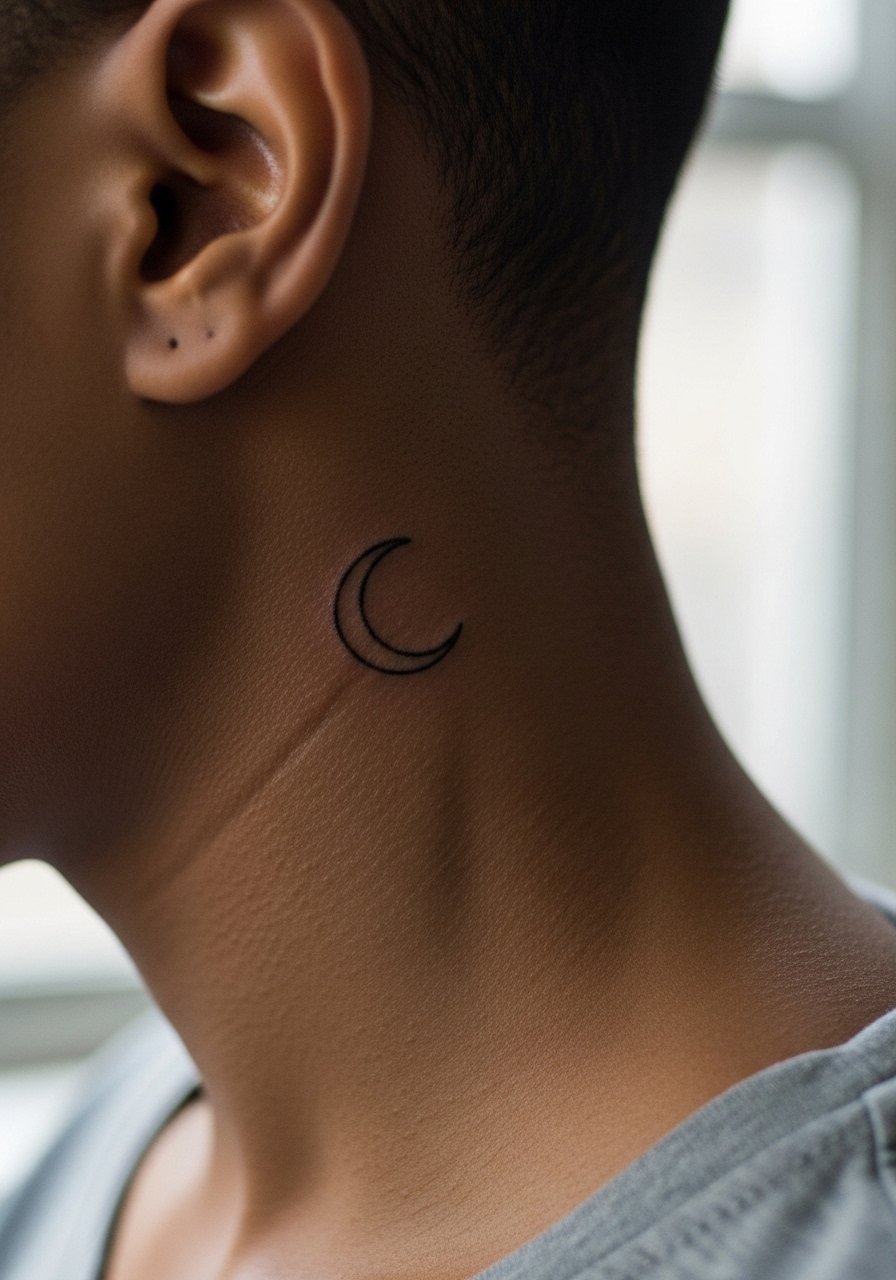
Behind the ear is subtle and shows only when hair is up. Pain is low to moderate and sessions are brief. The main technical warning is that the area has thin skin, so single-needle work done too shallow can fade quickly. Ask for a slightly bolder line than you think so the crescent stays legible. Plan on touching up between year one and year three depending on how exposed the area is to sun and shampoo. For the appointment, pull your hair into a high clip so the artist has a clear view. This placement is best with visible hair styling rather than relying on clothing.
9. Mini Traditional Rose on Ankle
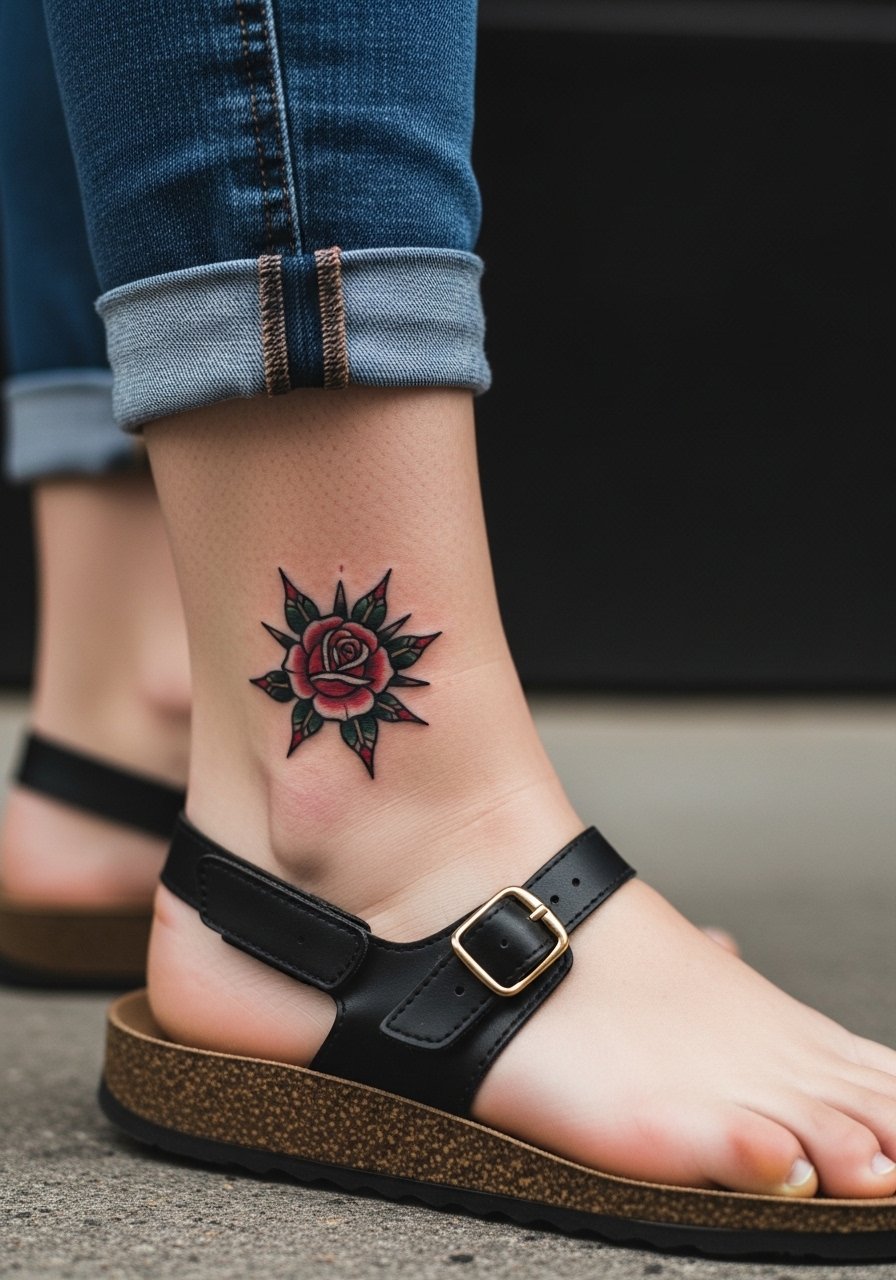
Tiny traditional pieces age better than airy single-needle work because their saturation holds up. For a rose on the ankle, ask the artist to keep outlines confident and color blocks small but solid. Pain is moderate and the session sits around 30 minutes. A common mistake is asking for overly fine shading inside the petal. That detail can melt into the outline with time. This size usually keeps readable color for five years before a touch-up is typical. Pair it with low-cut boots or sandals to let the rose peek out, and consider wearing a flat leather ankle bracelet to frame the design.
10. Micro Dot Work Sun on Back of Neck
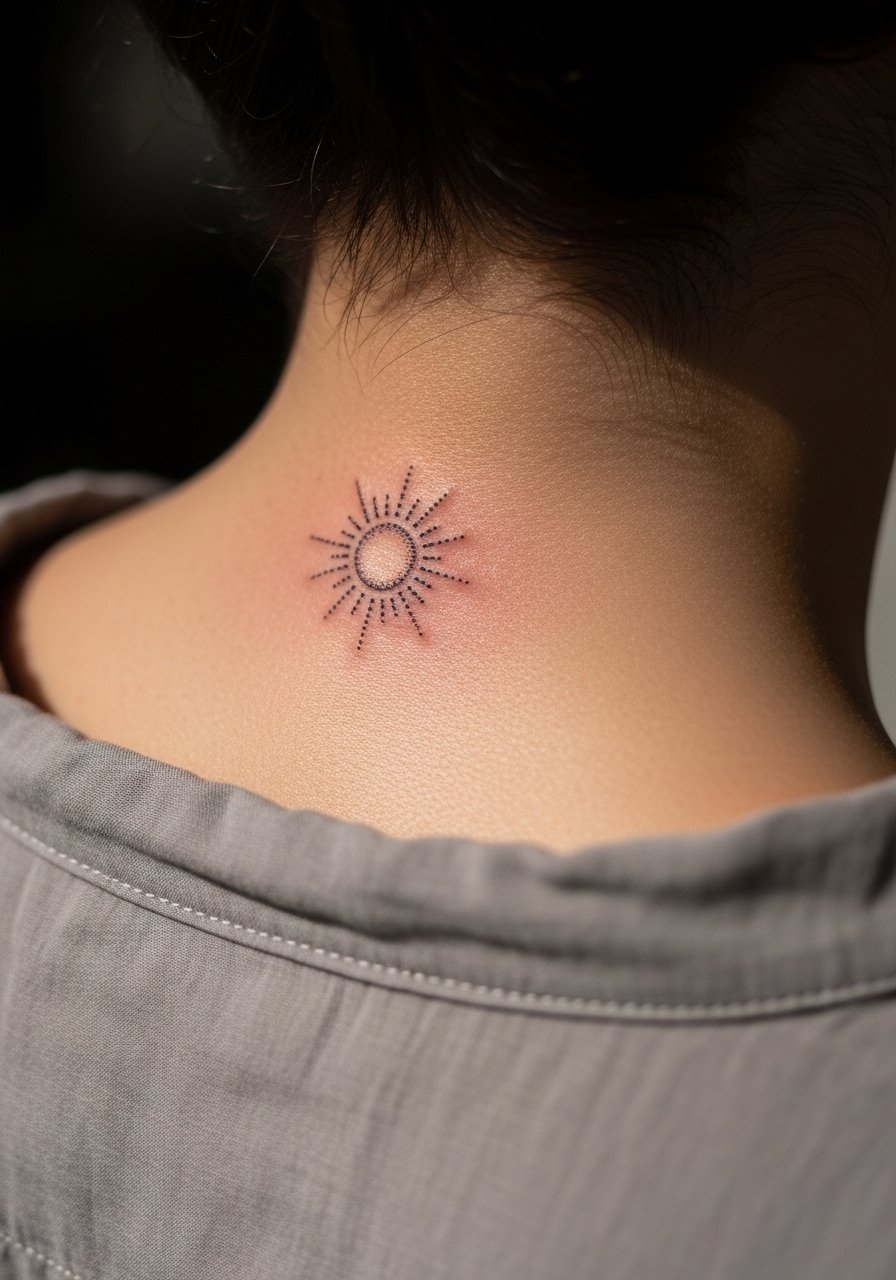
The back of the neck is visible and discrete. Dot work sits well here if the dots are sized for distance. A frequent error is using ultra-dense dot patterns that merge after healing. Ask for spaced dot work with a small halo of negative space so the sun stays distinct at six months and after. Pain is moderate and sessions are short. For showing it off, a wide-neck shirt pulled to one side frames the piece and keeps the look intentional.
11. Tiny Paw Print on Upper Foot

Top-of-foot tattoos see a lot of sun and shoe friction. They look adorable fresh and then slowly fade if you are not careful. Request slightly bolder dots and minimal shading so the paw keeps definition. The session is short but expect some discomfort. The usual error is packing too much fine shading into a small area. For the appointment, wear easy slip-on shoes and consider sandals that do not brush the tattoo. A light summer shoe and shorts show this piece off nicely.
12. Tiny Botanical on Inner Bicep
Inner bicep skin is forgiving and hides well, making it a great spot for micro botanical flash. The main consultation point is how visible you want the piece to be when your arm is down. Ask for slightly stronger stems and a small block of stipple shading so the leaf structure reads at arm's length. Pain for this area is moderate and sessions are comfortable. Avoid asking for extremely tight detail because the inner arm can blur in high-density areas. For showing off, a racerback tank or sleeveless top highlights the inner bicep without exposing more skin than necessary.
13. Tiny Compass on Sternum
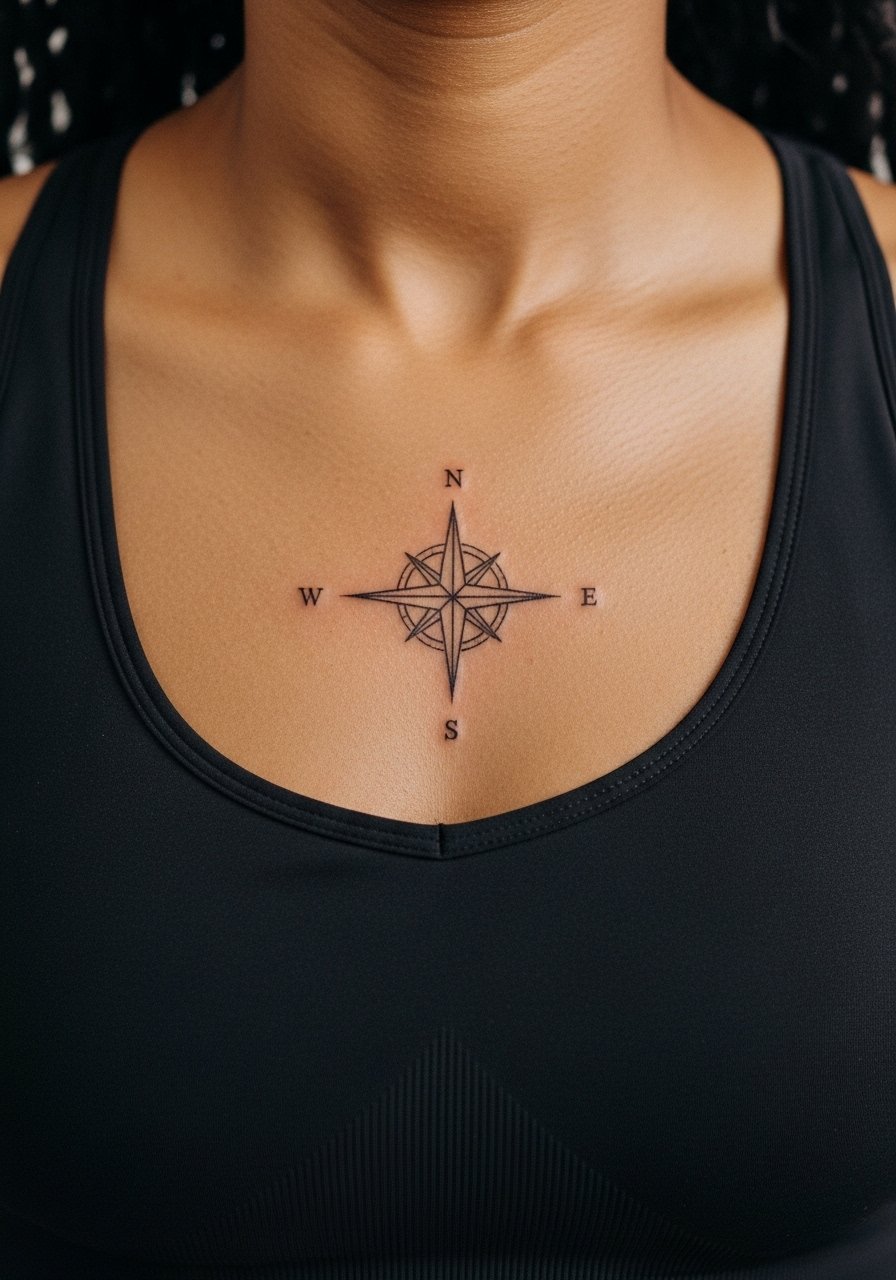
Sternum tattoos are sensitive and demand an artist comfortable with the anatomy there. Expect high pain and a session that may be broken into shorter intervals. The mistake people make is shrinking compass points too small so the center loses definition as the skin moves. Ask for clear negative spacing between the points and slightly heavier inner nodes so the compass keeps direction years later. Some artists prefer slightly thicker linework here to combat the high-movement area. Consider a fitted top on the day of the session so the artist can access the sternum without exposing excess skin.
14. Mini Wave at Side Hip
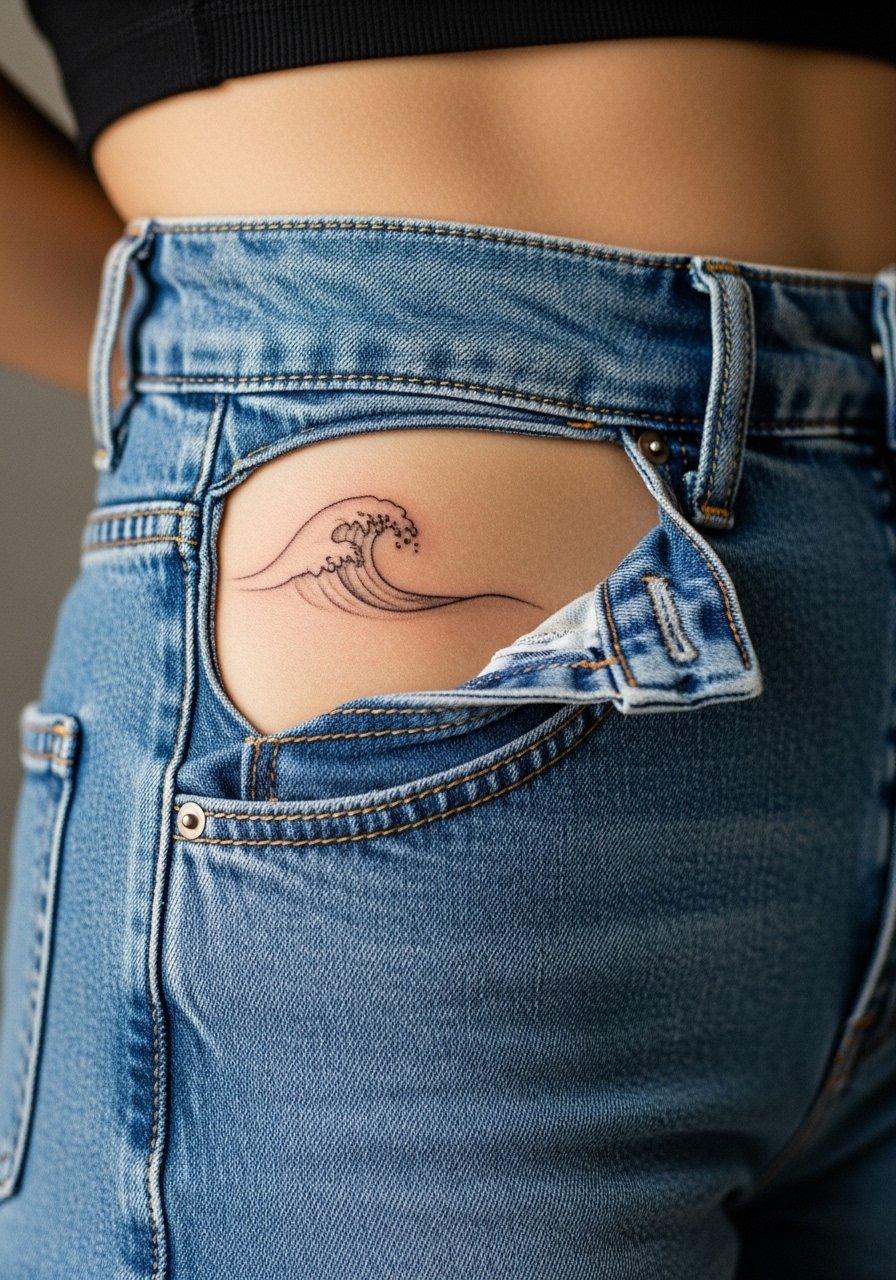
Hip tattoos sit near clothing seams so friction matters. For a tiny wave, request an open curve with a small amount of negative space inside the crest so the shape persists. The main error is placing the design too close to a waistband seam, which causes rubbing during healing. Pain is moderate and the session is brief. Plan to wear high-rise bottoms that sit clear of the piece while it heals. For showing it off, high-cut swimwear or low-rise jeans that reveal just the curve make the wave read intentional.
15. Tiny Planet on Back of Arm
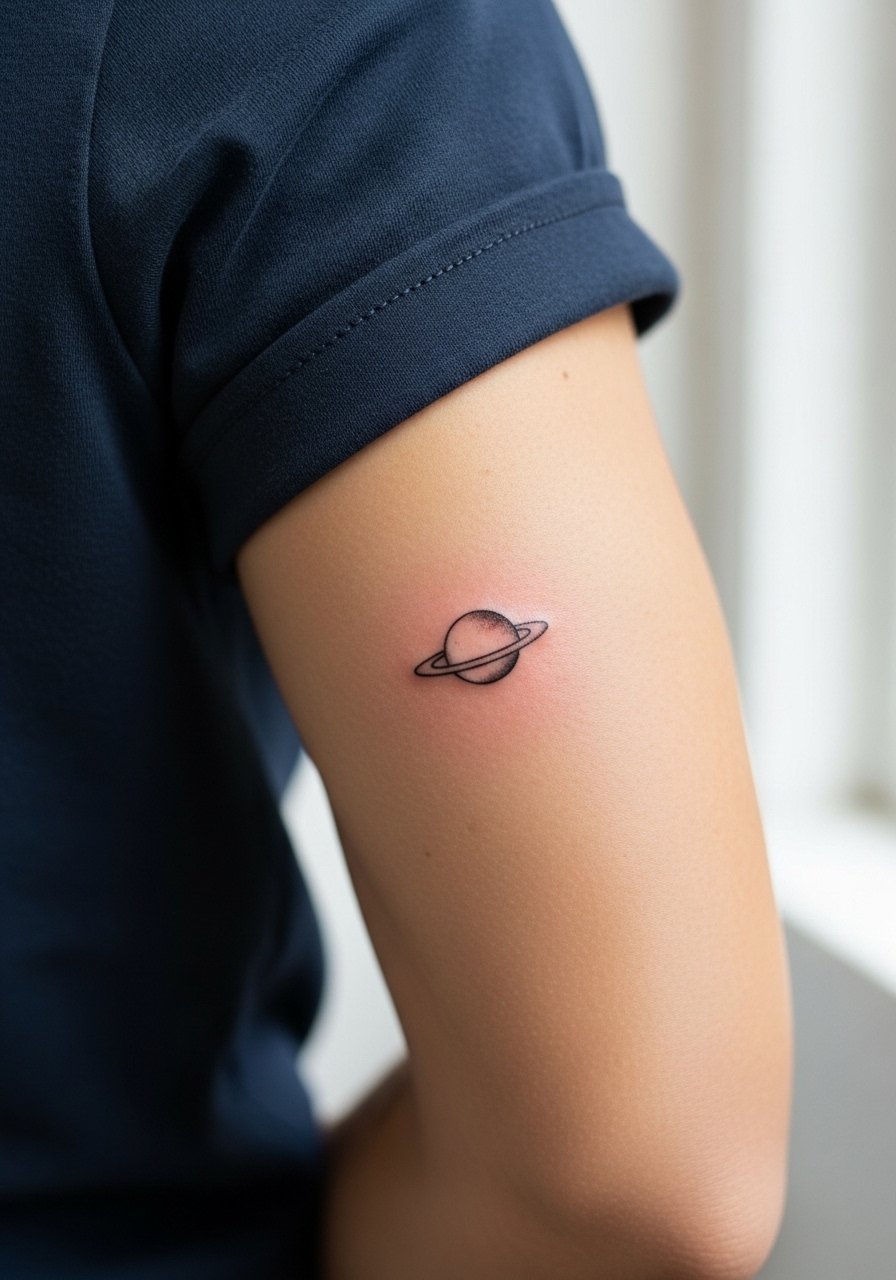
The outer tricep is forgiving for tiny circular motifs because it rarely stretches like inner-arm zones. Ask for a tiny halo of stipple around the planet to keep contrast without heavy saturation. People often ask for pure single-needle rings which can fade unevenly. Sessions are low pain and quick. The planet should keep form at two years with a light touch-up as needed. For everyday wear, rolled sleeves or short sleeves keep the piece visible and neat.
16. Tiny Lightning Bolt on Side of Rib
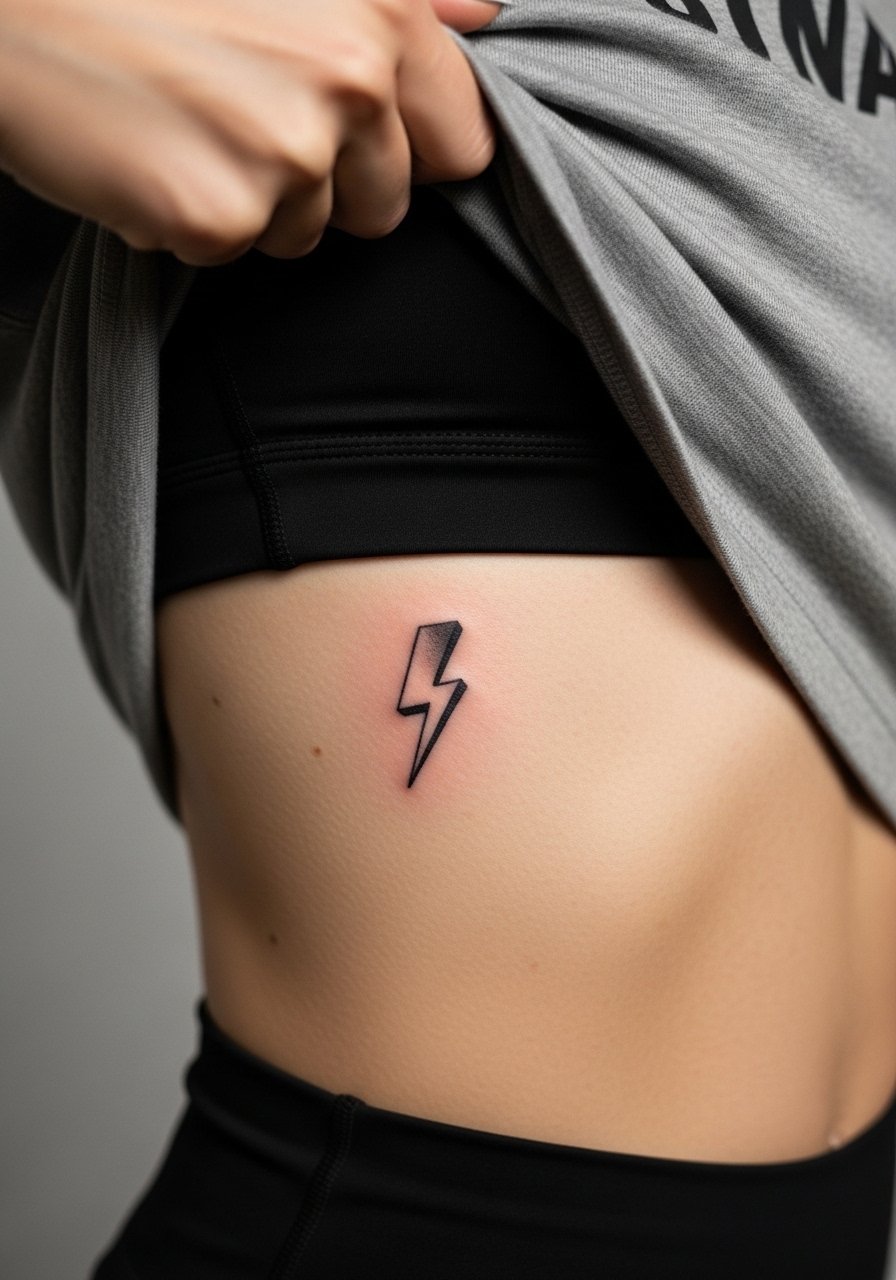
Rib placements are divisive. One school says fine line on ribs blurs fast because of skin movement and breathing. The opposing school says careful spacing and confident depth make small symbolic work last. State both positions when you book and ask which technique your artist prefers. For a lightning bolt, give the artist room to make the bolt a bit thicker in key areas so it keeps graphic impact. Pain is high and the session may require breaks. Expect a touch-up conversation within a couple of years for lasting crispness.
17. Tiny Anchor on Behind the Ear
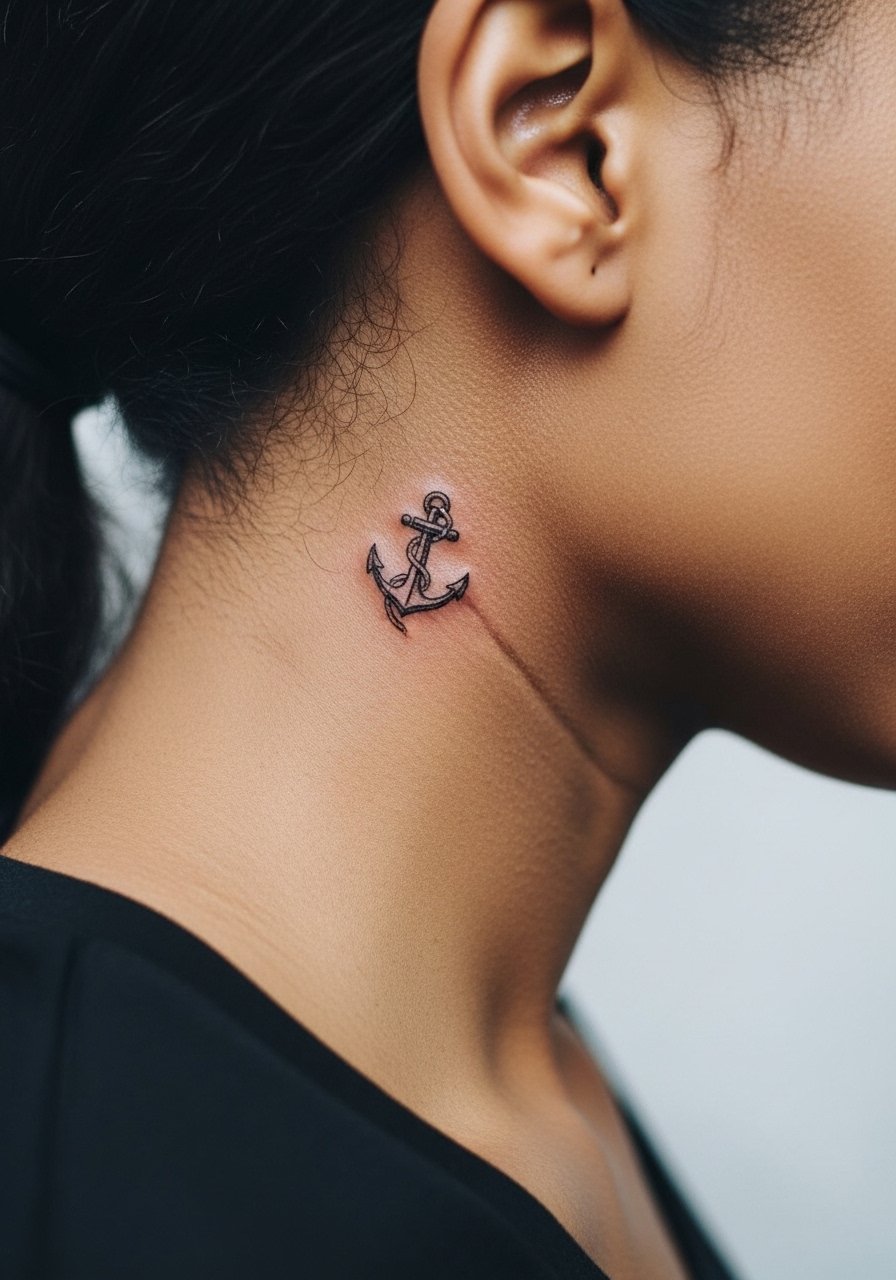
Behind-the-ear placements are tiny and discreet, which many people like. The trade-off is shallow skin that can lose detail faster than fleshy sites. Ask for slightly bolder anchor lines and minimal internal shading. Pain is low to moderate and the session is very short. A common mistake is assuming it will read from a distance. This is a close-view piece best revealed with hair up. For the appointment, pull hair into a neat clip so the artist can work without interruptions.
18. Tiny Arrowhead on Calf
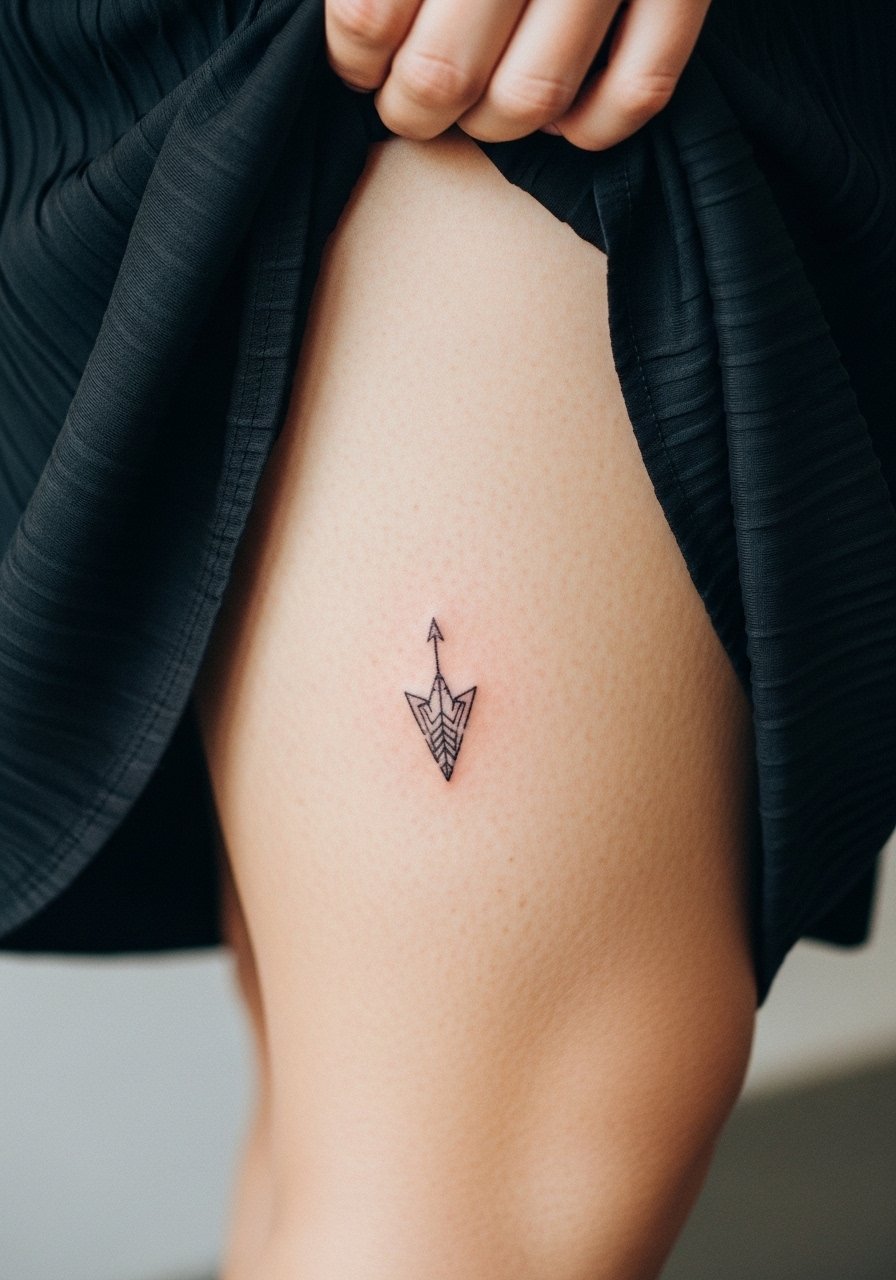
Calf skin is steady and keeps tiny shapes well. For an arrowhead, ask your artist to keep the geometric edges slightly blunt so they do not soften into indistinct shapes over time. Sessions are easy on pain and short. The usual mistake is over-detailing with tiny hatch lines that become indistinguishable. This placement works with skirts and cropped pants so you can show it off when you choose. Pair with sandals or cropped denim for a casual reveal.
19. Tiny Abstract Line Cluster on Inner Wrist
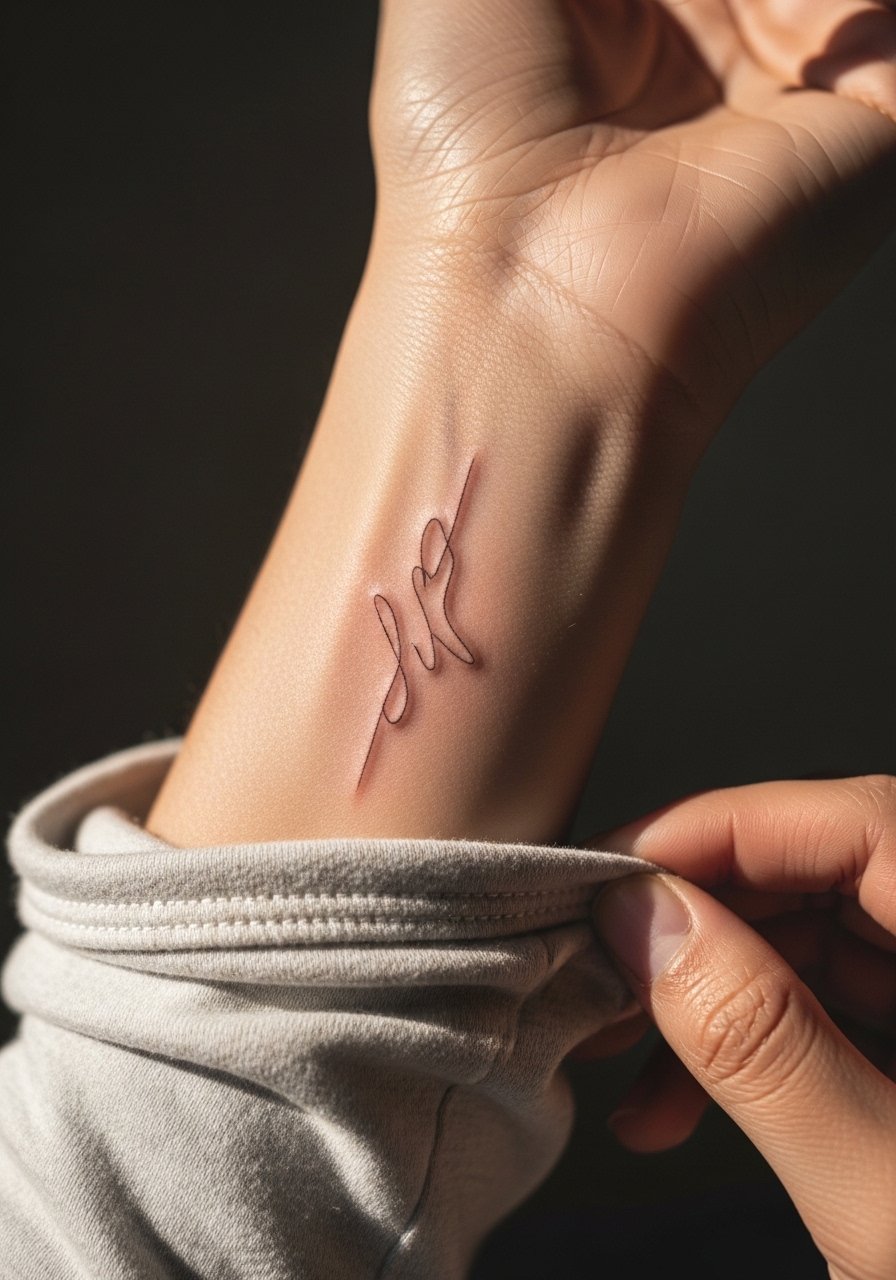
Inner wrist pieces are visible and exposed to sunlight, which accelerates fading. Tell your artist you want slightly increased line weight and small gaps between intersecting lines. The common mistake is cramming a cluster too tight which leads to muddled lines at the six to twelve month mark. Pain is low and sessions are quick. To show it off, roll sleeves and pick light neutral tops so the wrist remains the focal point. A rival minimalist watch can sit nearby without stealing attention.
20. Tiny Stippled Mushroom on Upper Thigh

Inner thigh pieces age well when spaced properly because they are sheltered from sun. The inner thigh requires gentle session wear and privacy during healing. Ask for a slightly wider base in the stipple so the mushroom cap keeps contrast. Pain is moderate and sessions can be private and restful. Avoid dense micro shading that can merge with movement. For the appointment, opt for loose shorts or a wrap skirt so the artist can access the area without fabric bunching.
21. Tiny Crescent and Stars on Collarbone Edge
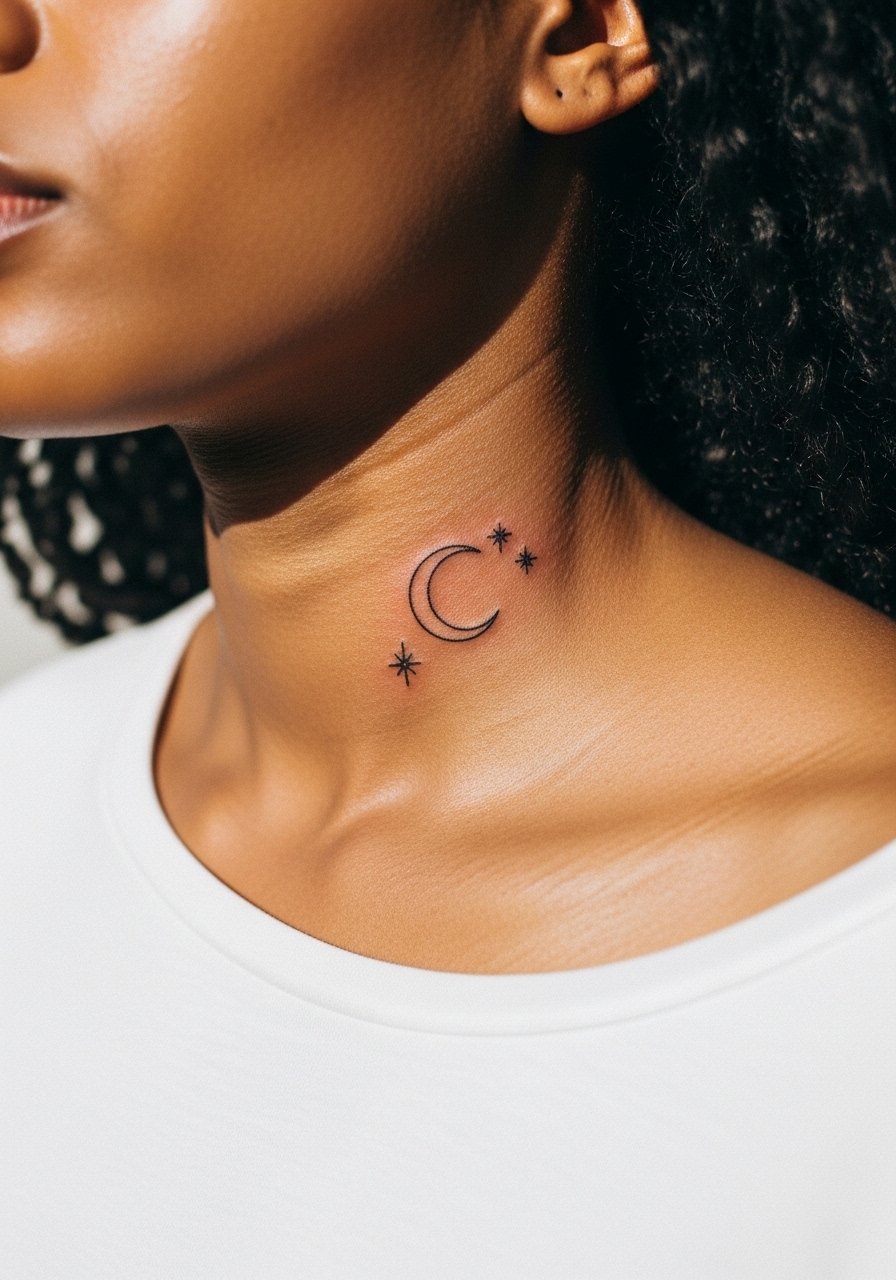
A small celestial grouping on the collarbone reads well when given breathing room. The biggest mistake is tight clustering of the stars against the crescent which blurs when the skin stretches. Ask for spacing and a touch of stipple around the largest star to create depth. Pain is light to moderate and the session is short. This placement glances well under open-neck tops and with layered necklaces, though keep necklace width thin so it does not graze the new ink.
Session Day Picks
The wrist, collarbone, and rib pieces above call for different session-day prep than casual arm work, so a few targeted items make chair time and the first week easier.
-
Disposable stencil transfer paper kit. Lets you preview placement on skin and check scale for delicate designs like collarbone script and tiny botanicals.
-
Topical numbing cream. Applied as directed before high-pain spots such as ribs or sternum to soften the edge of the session without altering linework when used responsibly.
-
Thin protective film roll. Useful for finger and wrist pieces that face constant washing and friction during the first few days.
-
Fragrance-free gentle body wash. Cleanses sensitive new tattoos without irritating the skin on areas like the inner arm and ankle where fine line depends on cleanliness.
-
Aquaphor healing ointment. A thin layer in the earliest phase helps protect tiny linework while the skin closes, especially on exposed wrist or collarbone pieces.
Frequently Asked Questions
Q: Will fine line tattoos on the ribs or sternum blur faster than on the forearm?
A: In my experience ribs and sternum are higher-risk because breathing and torso movement change the skin continuously. Some artists say careful spacing and confident depth keep fine line work readable on rib skin. Others think the area asks for slightly bolder lines from the start. Ask the artist which camp they belong to and request a mock placement to judge scale.
Q: How often should I expect touch-ups for tiny finger or wrist tattoos?
A: Finger and wrist pieces usually need touch-ups sooner than forearm work because of washing and friction. Expect to plan for a touch-up within the first year for fingers, and within two to three years for wrists depending on sun exposure. If you want minimal maintenance, choose slightly larger dots and avoid ultra-thin single-needle work.
Q: What should I wear to a sternum or rib session to make it easy for the artist?
A: Wear a fitted sports bra or a zip-up hoodie for chest and sternum sessions so the artist has access without full exposure. For ribs pick a cropped top or a shirt you can lift just enough to show the side. If you prefer, a zip front sports bra gives quick access and privacy.
Q: Are there workplace implications for hand, finger, or neck tattoos?
A: Yes, hand and finger tattoos remain noticeable and some employers maintain policies about visible ink. Neck pieces can also be visible depending on wardrobe choices. Think through your job environment before committing to highly visible tiny flash, and consider placements that can be covered during interviews or client-facing days.
Q: Do tiny traditional-style pieces like small roses age better than fine line botanicals?
A: Often yes. Traditional saturation and confident outlines tend to hold contrast longer than ultra-fine single-needle botanicals. If longevity is a priority, ask for slightly bolder outlines and reserved interior detail so the shape survives years of movement and sun.
Q: How do I find an artist who specializes in tiny flash work without naming names?
A: Use discovery pathways like local shop directories, convention guest lists, and community forums to narrow candidates. Look for portfolios that show healed photos of small work and ask shops about healed images. During consultation, ask to see healed examples of pieces similar in scale to what you want.
Q: Is there a safe size below which a geometric or mandala will not hold up?
A: From what I have seen, very dense geometry done under one inch tends to lose internal detail within a couple of years. If you want precise mandala structure, scale up so centers have breathing room, or choose simpler geometry with fewer internal lines to keep the motif readable.
