
Fine line sacred heart work looks amazing on saved boards, but the pieces that actually look lived in five years later are usually the ones planned with spacing, placement, and wardrobe in mind. Trends push tiny, dense motifs and that choice affects how the heart reads after a few touch-ups. Keep that in mind as you scroll these options, and the first section shows a wearable way to keep detail alive.
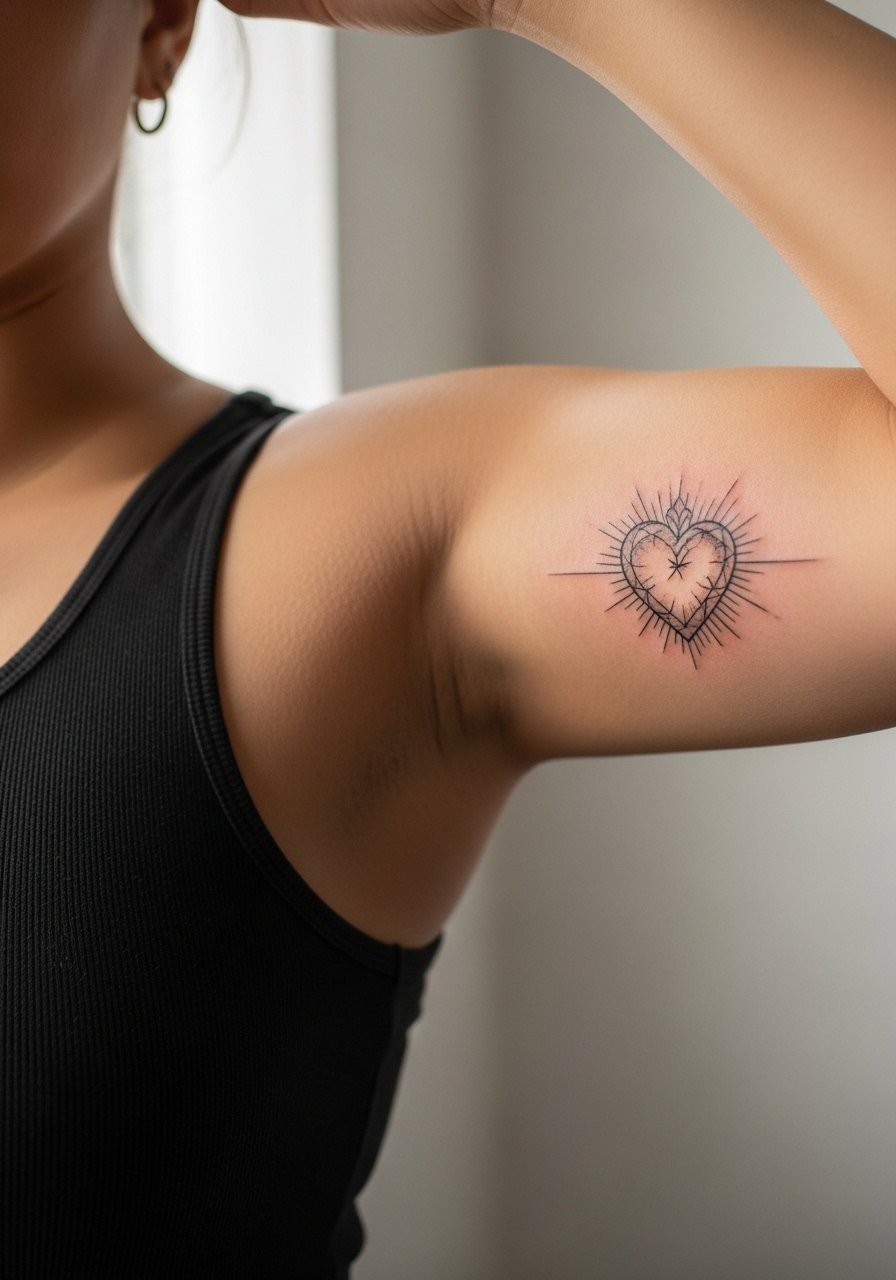
1. Fine Line Sacred Heart on Inner Forearm
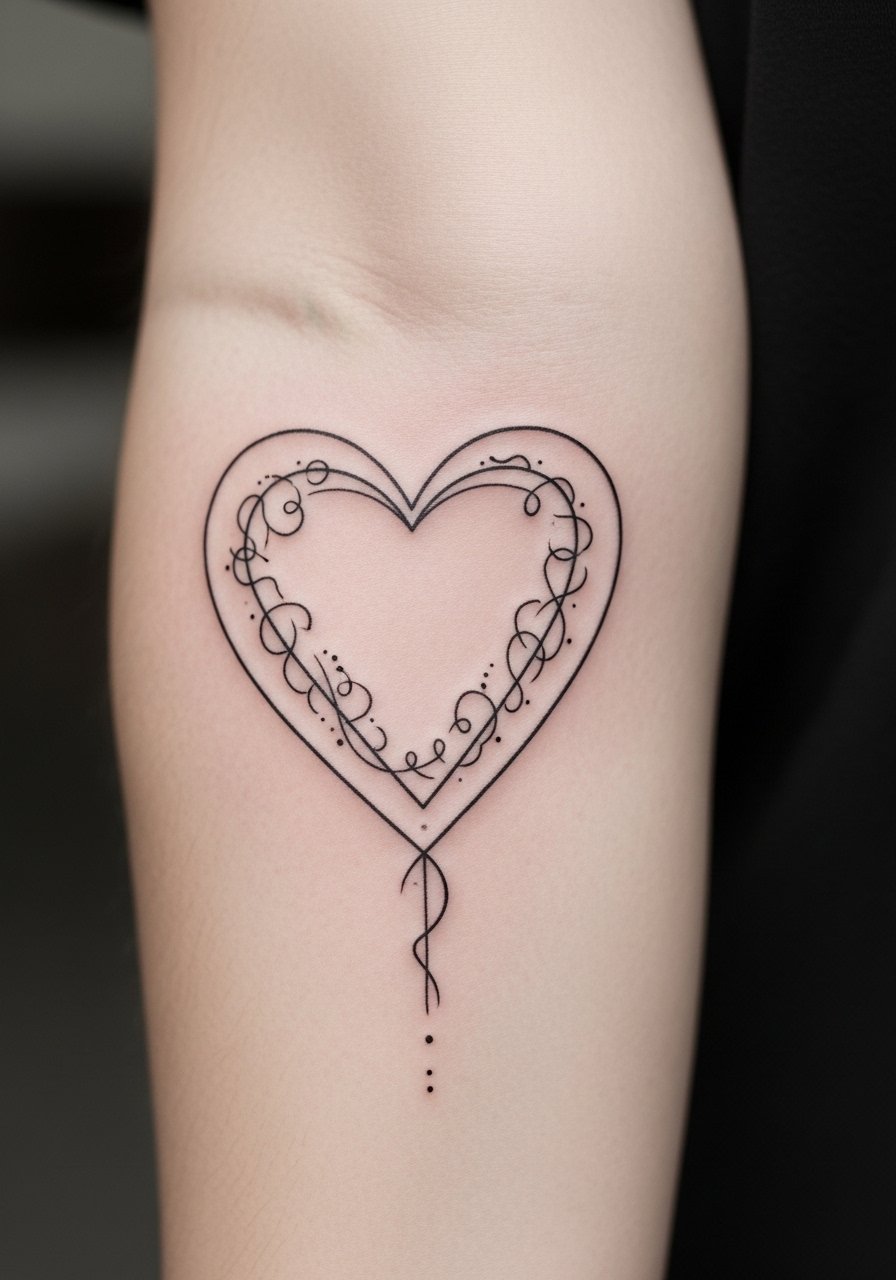
I see this placement on people who want something visible but easy to hide with a long sleeve. The inner forearm holds fine line well when the heart is scaled to the forearm length and given breathing room around the edges. Tell your artist you want single-needle linework with slightly stronger contour lines so the heart keeps its shape as the thin internal details soften over time. Common mistakes include packing too much tiny stipple into the center, which blurs by year three. Expect a 2 to 3 hour session, moderate pain, and a touch-up often around year two for crispness. For showing it off, pair with a rolled sleeve linen shirt so the tattoo gets framed, not crowded.
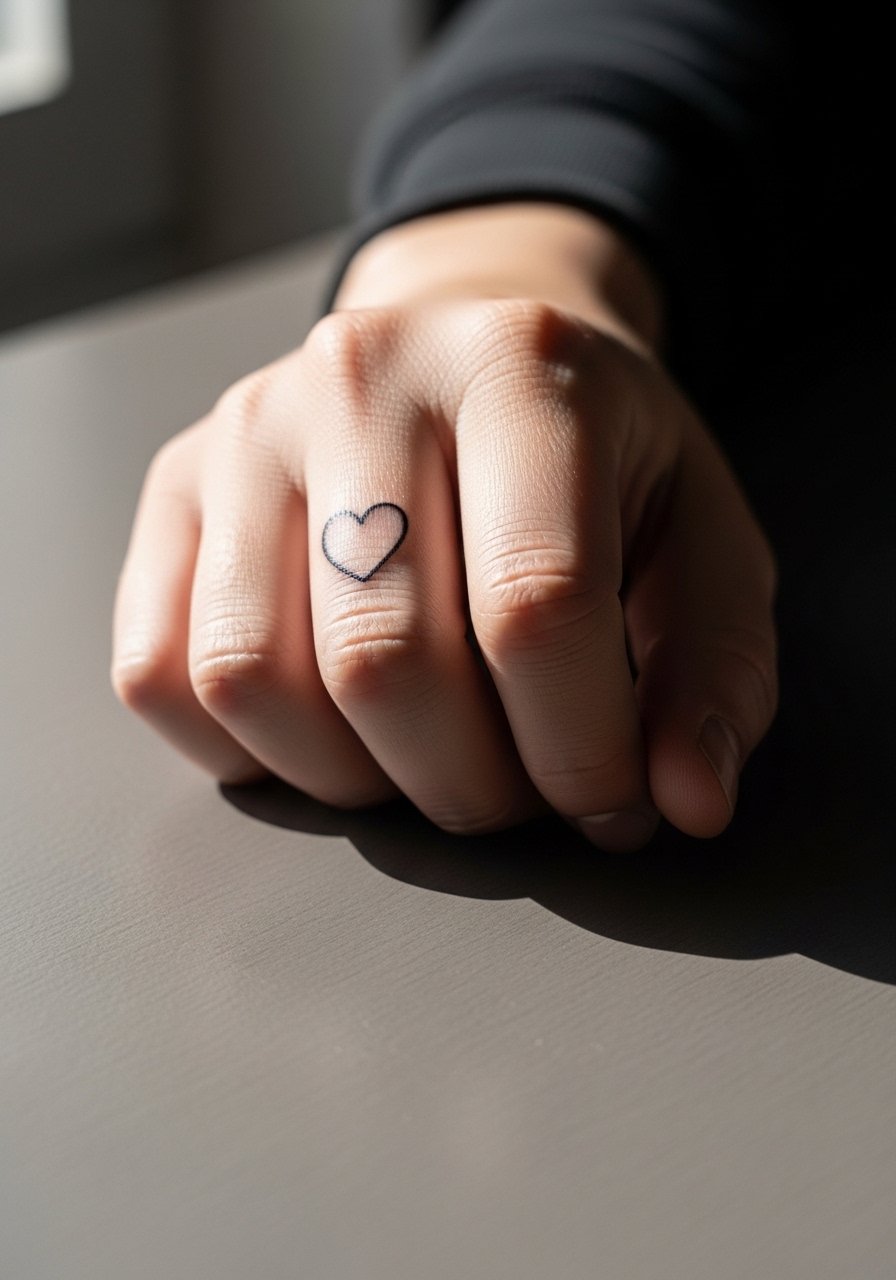
2. Micro Sacred Heart on the Side of a Finger

Fair warning, finger work is one of the more fragile options. The skin there gets constant washing and friction, so this micro heart often needs touch-ups sooner than forearm pieces. The biggest mistake is asking for interior shading in a space that cannot hold saturation. Ask for a solid outline and minimal interior dots instead of filled shading. Expect a 30 to 60 minute session, sharp but brief pain, and a likely retouch at year one. For styling, pair the tiny heart with a dainty stackable ring set to draw attention without overwhelming the small scale.
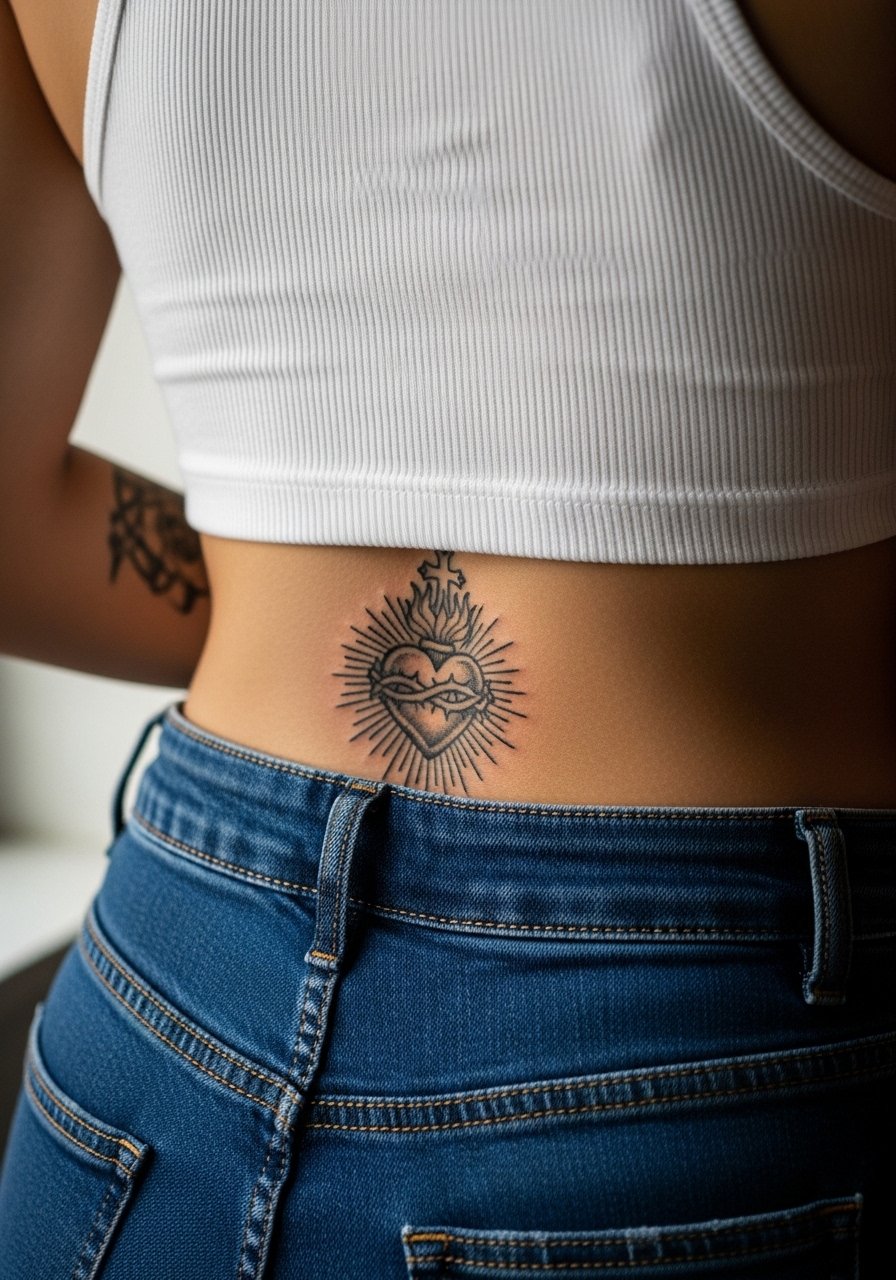
3. Saturated Sacred Heart Near the Collarbone
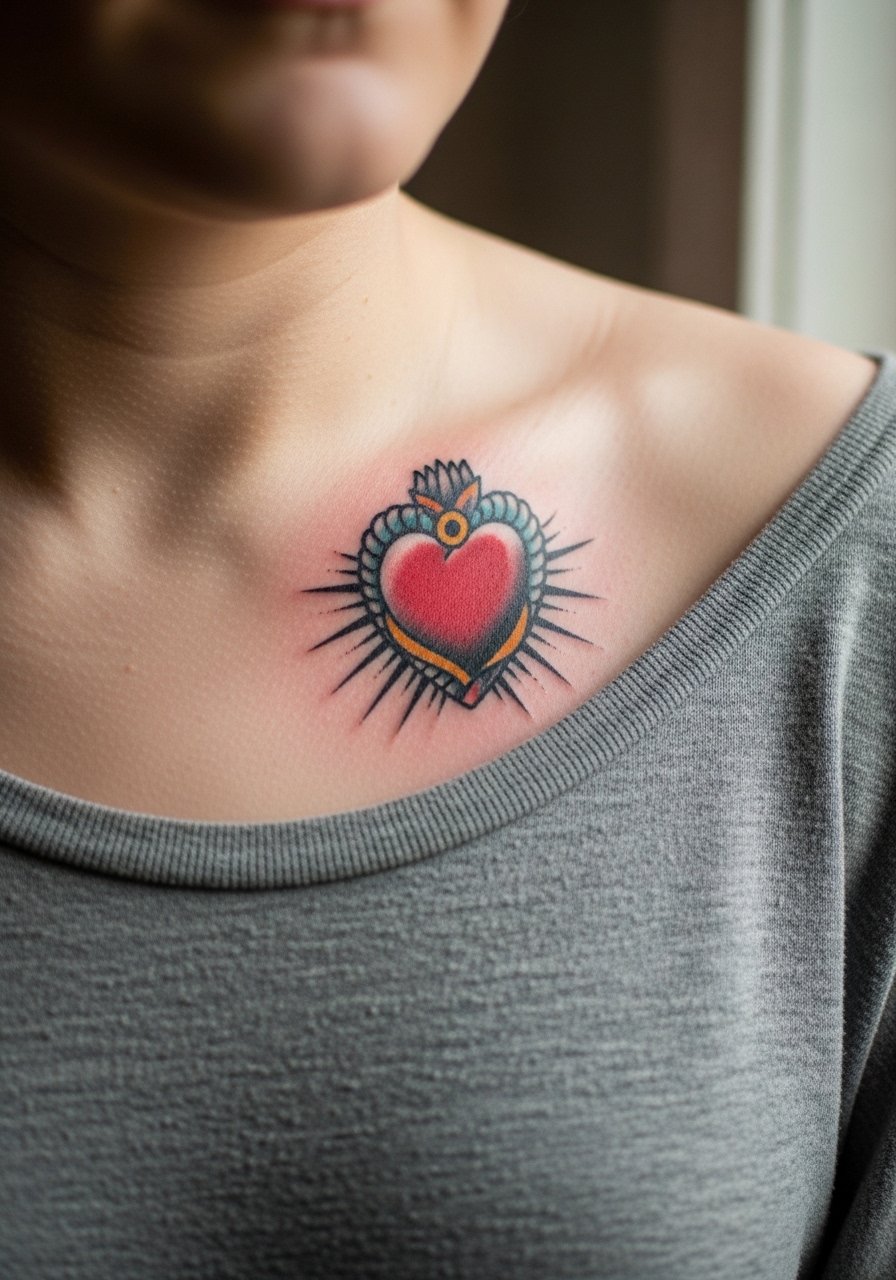
A saturated, slightly traditional sacred heart reads boldly across clothing gaps. Most people underestimate how large a neck-adjacent piece will look in mirrors. In consultations I tell clients to bring photos of the exact collarbone width they want covered so the banner and flames sit proportionally. The controversy around collarbone detail is simple. One group prefers heavy saturation that ages into a solid badge of ink. The other camp favors lighter fills to avoid hard edges migrating beneath the skin. Both approaches work, depending on the artist's experience with collarbone tissue. Session time varies from two to four hours. Pain is moderate to high near bone. For evenings out, this piece pairs well with a wide-neck shirt that reveals the heart cleanly.
4. Micro-Realism Sacred Heart on the Sternum
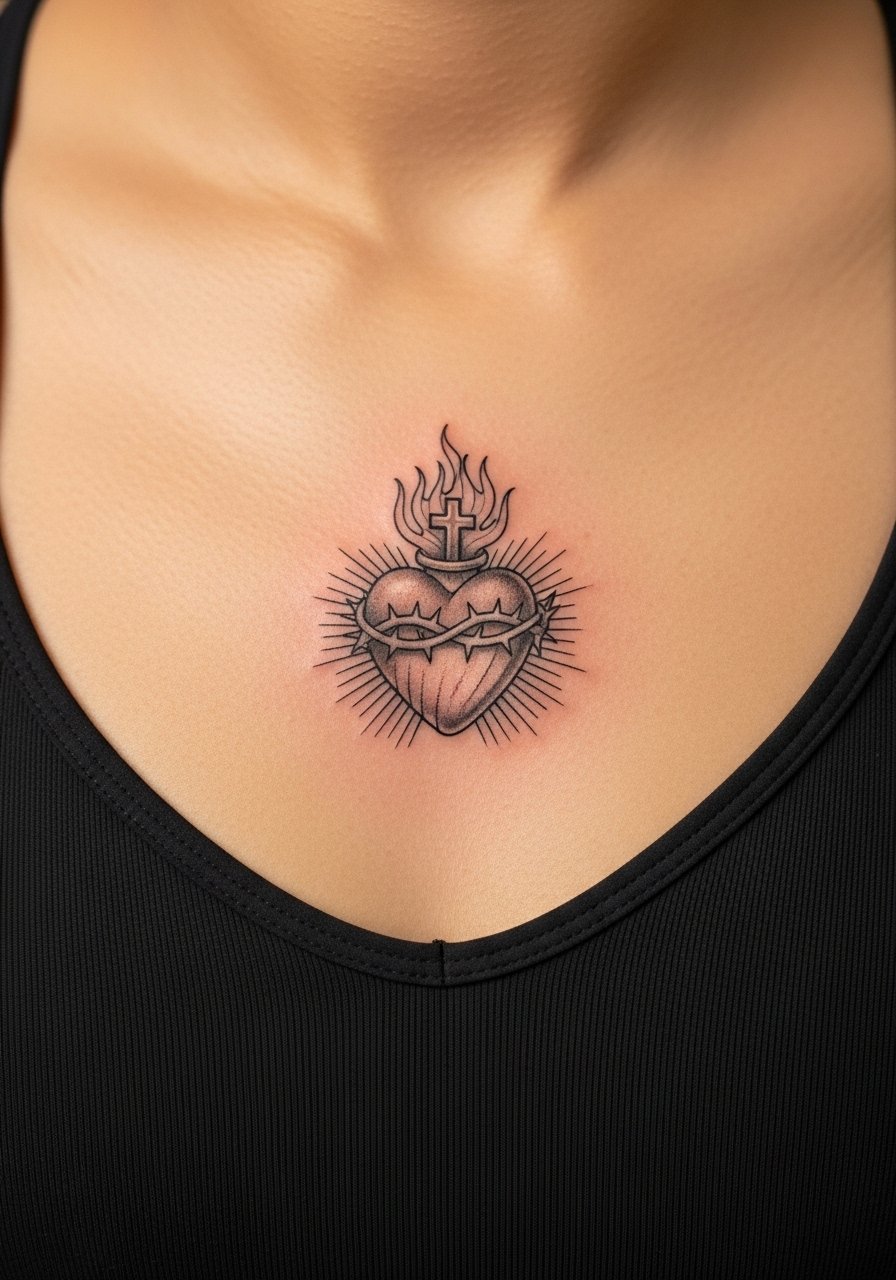
Sternum work has a reputation for being painful and intimate. Expect a higher pain score and longer breathing breaks during the session. The common version that ages poorly is a hyper-detailed micro-heart packed too tightly on the sternum. I recommend slight spacing between the smallest details so stipple shading keeps its texture as healing progresses. Tell your artist you want needle depth consistent across the central linework to avoid patchy saturation. Book an experienced custom artist who has done sternum pieces before because skin stretch and curvature matter here. Session time is often three hours or more. For professional reasons many people pick a slightly higher placement that reads well under a bandeau or sports bra.
5. Blackwork Sacred Heart Between the Shoulder Blades
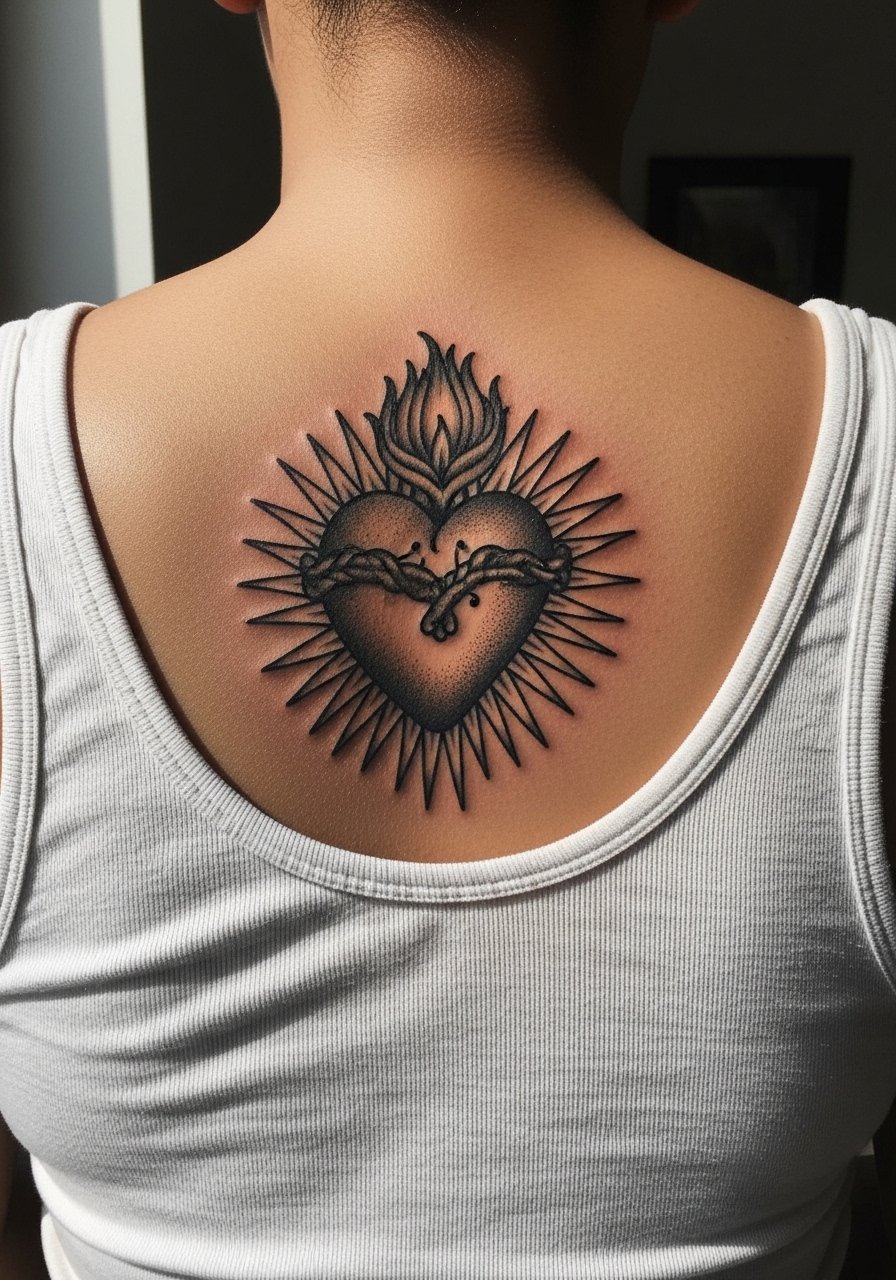
There is real visual impact when a saturated black heart sits on the upper back. It reads from a distance and ages into a bold silhouette. One practical tip is to design the heart with a clean outer border and simplified internal motifs so the piece holds up even if inner stipple loses crispness. The session is long and the area can be awkward to position in the chair. Pain is moderate because muscle cushions the needle, but expect numbness from the posture after hours. For nights when you want the back to show, an open-back dress frames the space without competing with the linework.
6. Dot Work Sacred Heart on the Ankle
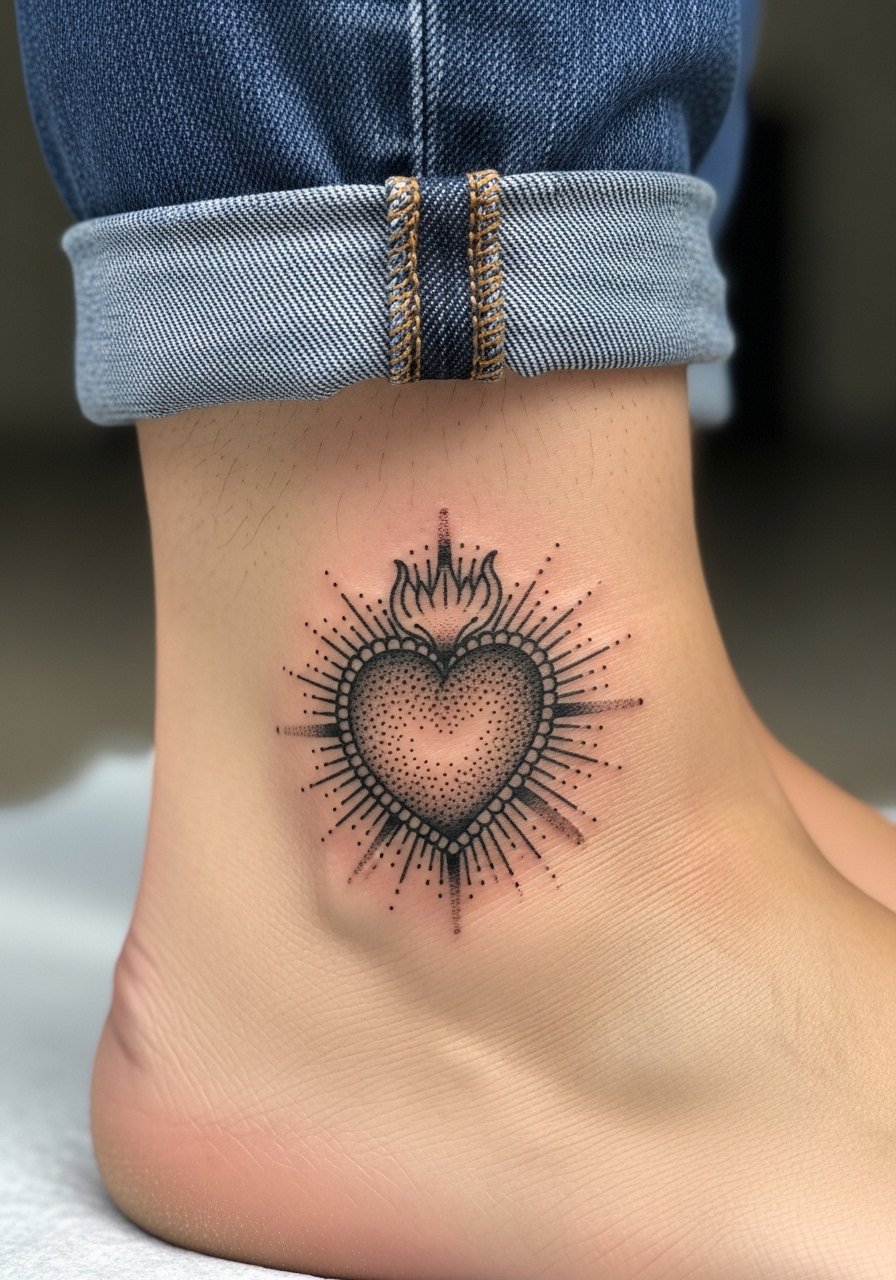
Ankle tattoos bruise and swell more than forearm work, so the first two weeks can look heavier than the healed result. Consultation notes I give people include avoiding tiny dots that are too close together near the bone. Dot work needs breathing room or it will merge as the skin heals. The session is typically one to two hours and pain ranges from moderate to high over the bone. For the appointment wear jeans you can roll up and a pair of slip-on shoes. After you heal, the design looks great with low-cut sneakers or sandals. Try pairing with jeans rolled up for a casual showcase.
Studio Day Picks
Those first six ideas include a lot of small-scale and bone-adjacent placements, so a few targeted items make the session and the first week of healing easier.
-
Stencil transfer paper kit. Lets you preview placement directly on skin during consults for the wrist, ankle, and collarbone pieces above.
-
Topical numbing cream. Applied before the session it takes the edge off ankle and sternum sensitivity without obscuring linework.
-
Thin protective film roll. Useful for covering tiny finger and wrist hearts that face constant friction during the first four days.
-
Fragrance-free gentle body wash. Cleans the healing area without stripping delicate dot work or fine lines.
-
Aquaphor healing ointment. A thin layer for the early days helps the fine line forearm and collarbone pieces retain clarity without overly occluding the skin.
7. Narrow Band Sacred Heart as a Wrist Cuff
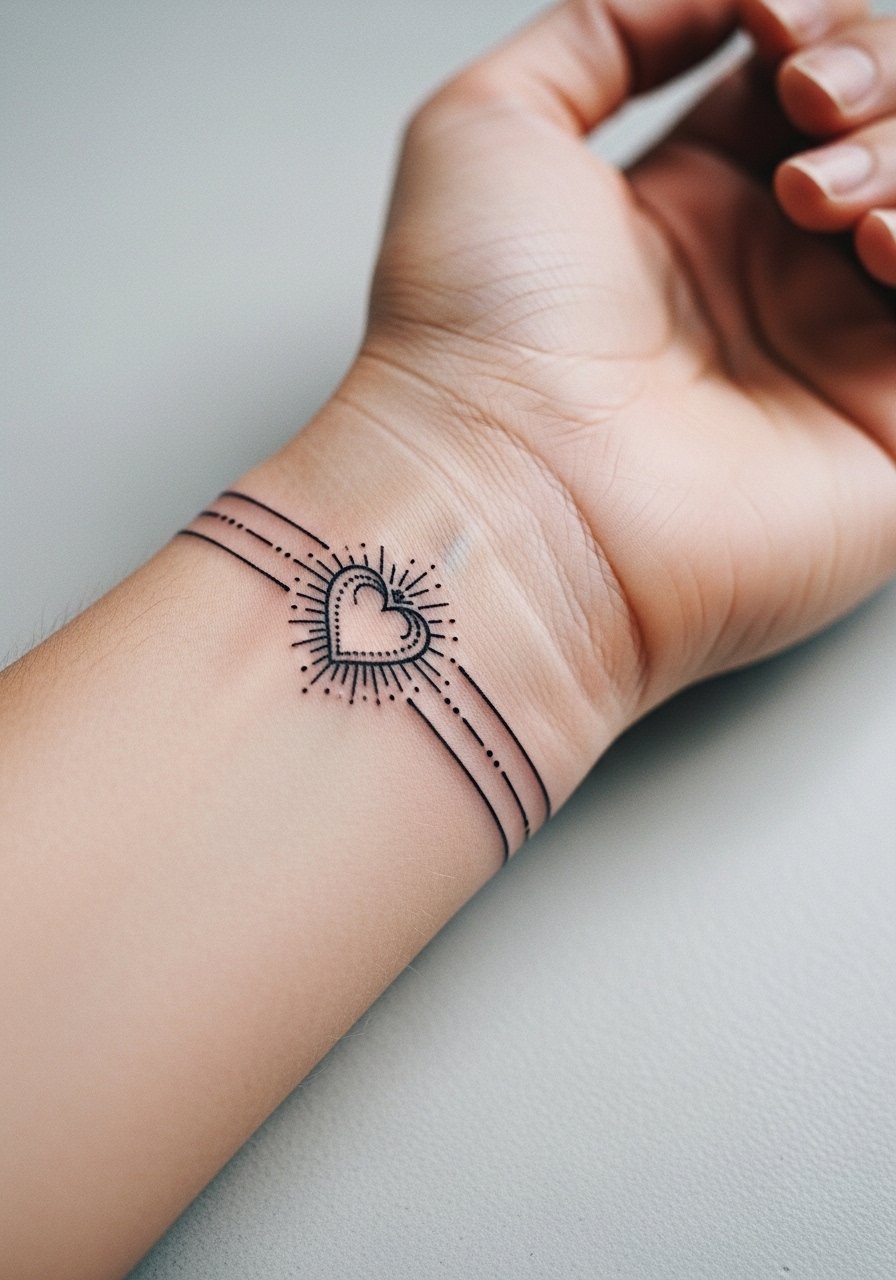
Wrist cuffs are showy and they age faster in high-movement zones. Artists split on the best approach. One camp says keep linework slightly thicker for the wrist so it holds; the other prefers ultra-fine lines for an elegant look knowing touch-ups are likely. Both have merit. If you want longevity, ask for a slightly bolder outer contour and minimal internal hatching. Expect one to two hours of work and a likely touch-up at year two. For accessories that highlight the cuff without crowding it, a minimalist watch sits beside the band and keeps attention on the wrist.
8. Sacred Heart Wrapped in Thorns on the Ribcage
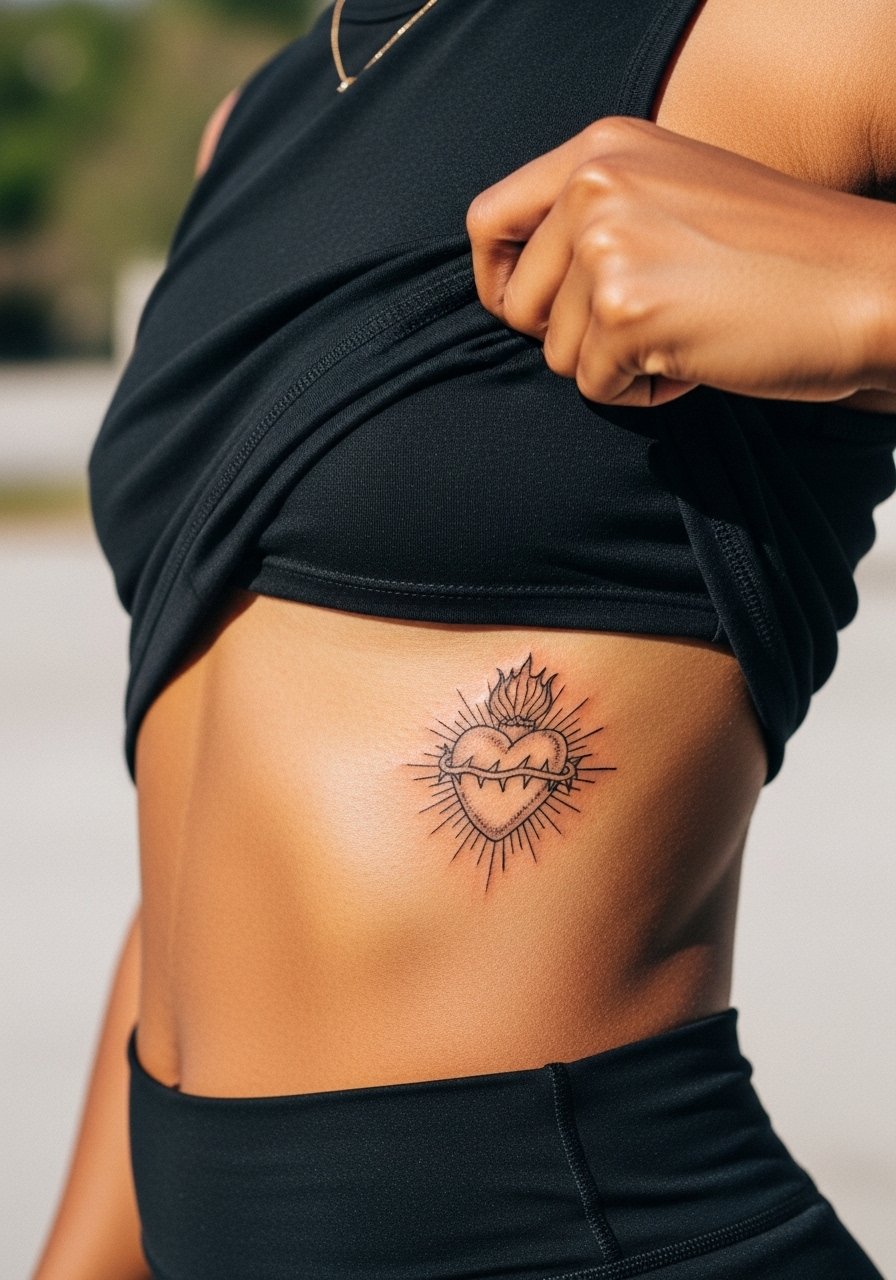
Fair warning, ribcage sessions are often among the most painful placements. The biggest mistake is insisting on tiny dense details in a curved area that sees a lot of stretch. I recommend spacing the thorns and simplifying inner shading so the pattern settles as skin moves. There is a debate about fine line on ribs. One camp believes the constant expansion and contraction blurs delicate lines fast. The other camp says experienced artists can compensate with precise depth and spacing. Ask your artist where they stand and review healed rib photos in their portfolio. Sessions here can run long, wear loose bottoms to the appointment and expect soreness for a few days.
9. Geometric Sacred Heart on the Calf
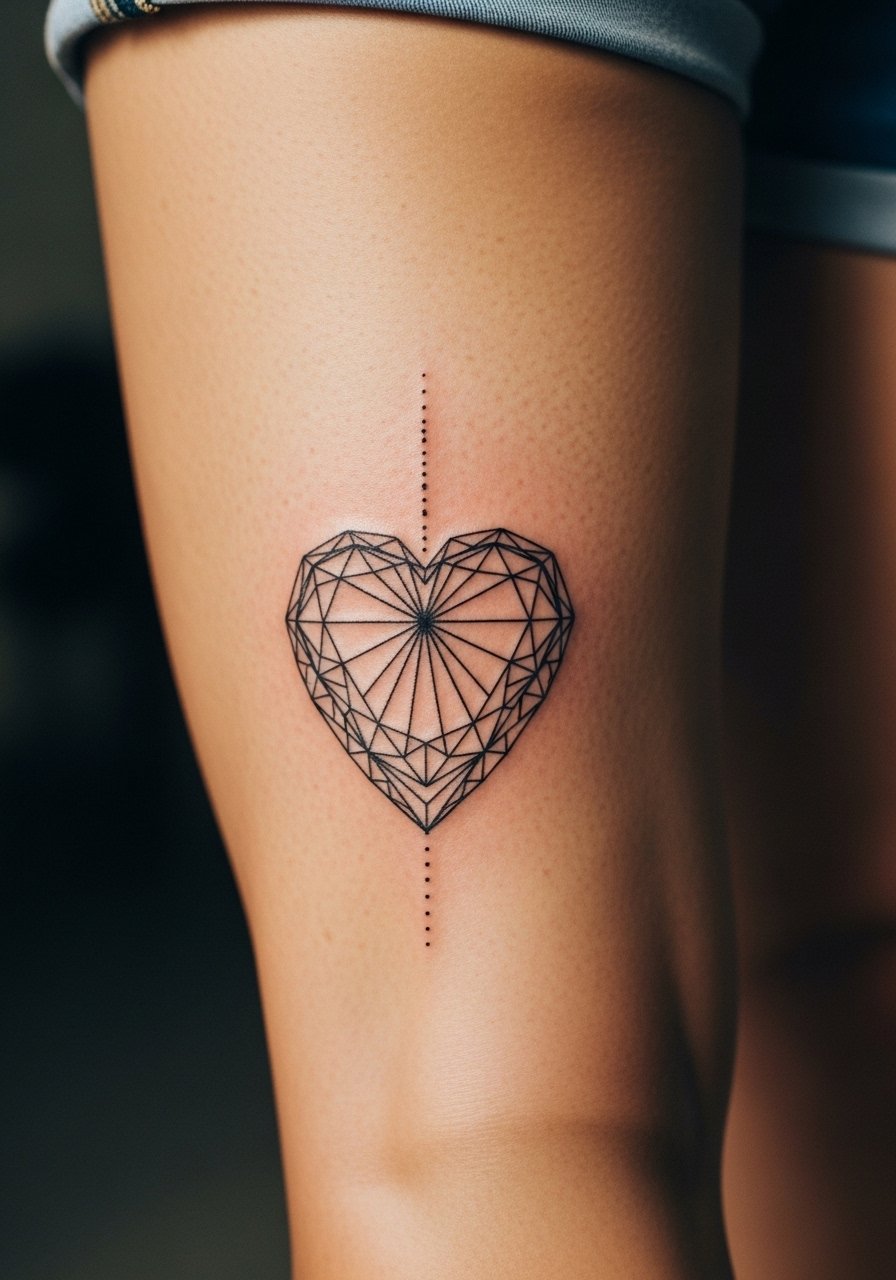
The calf is a forgiving canvas. It tolerates both linework and moderate saturation without the same blowout risk as the inner arm. If you want a geometric take, tell your artist to design with radial spacing so the heart reads clearly from multiple angles. A common error is making the geometry too dense, which looks sharp initially but merges under skin movement. The session takes around two hours and pain is generally low to moderate. For footwear pairings, calf hearts look excellent with low boots or a midi skirt. Try an ankle boot to frame the tattoo neatly.
10. Watercolor Sacred Heart on the Inner Thigh
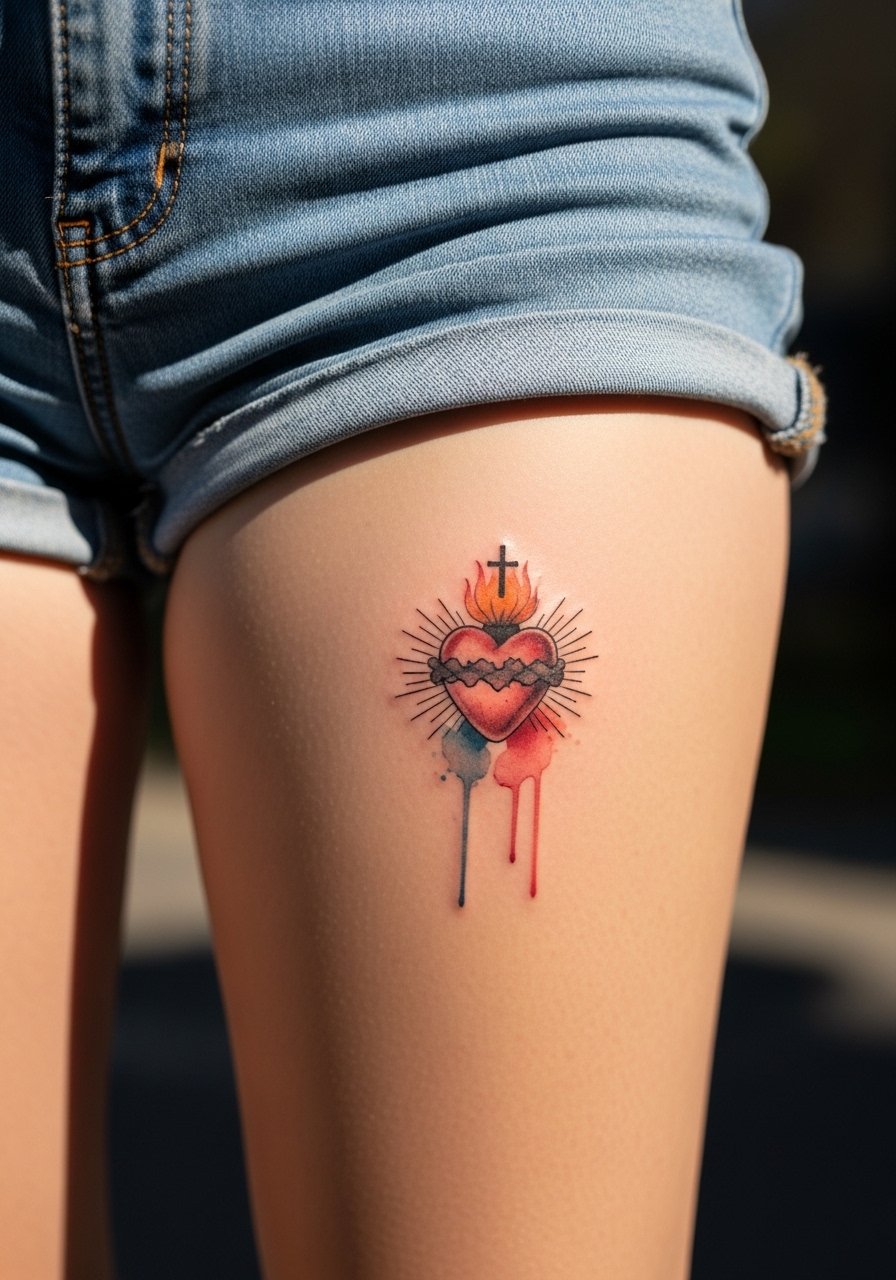
Inner thigh pieces are intimate and require trust in an artist who understands flesh tension there. The most common mistake is overly thin watercolor washes that fade into a bruise-like appearance with frequent friction. Ask for slightly more concentrated saturation near focal points and softer washes around the edges to preserve the painterly feel. Sessions vary but plan for two to three hours. Pain can be moderate to high depending on proximity to nerve bundles. Many choose this placement because it is easy to hide and shows beautifully with high-cut swimwear.
11. Tiny Sacred Heart Behind the Ear
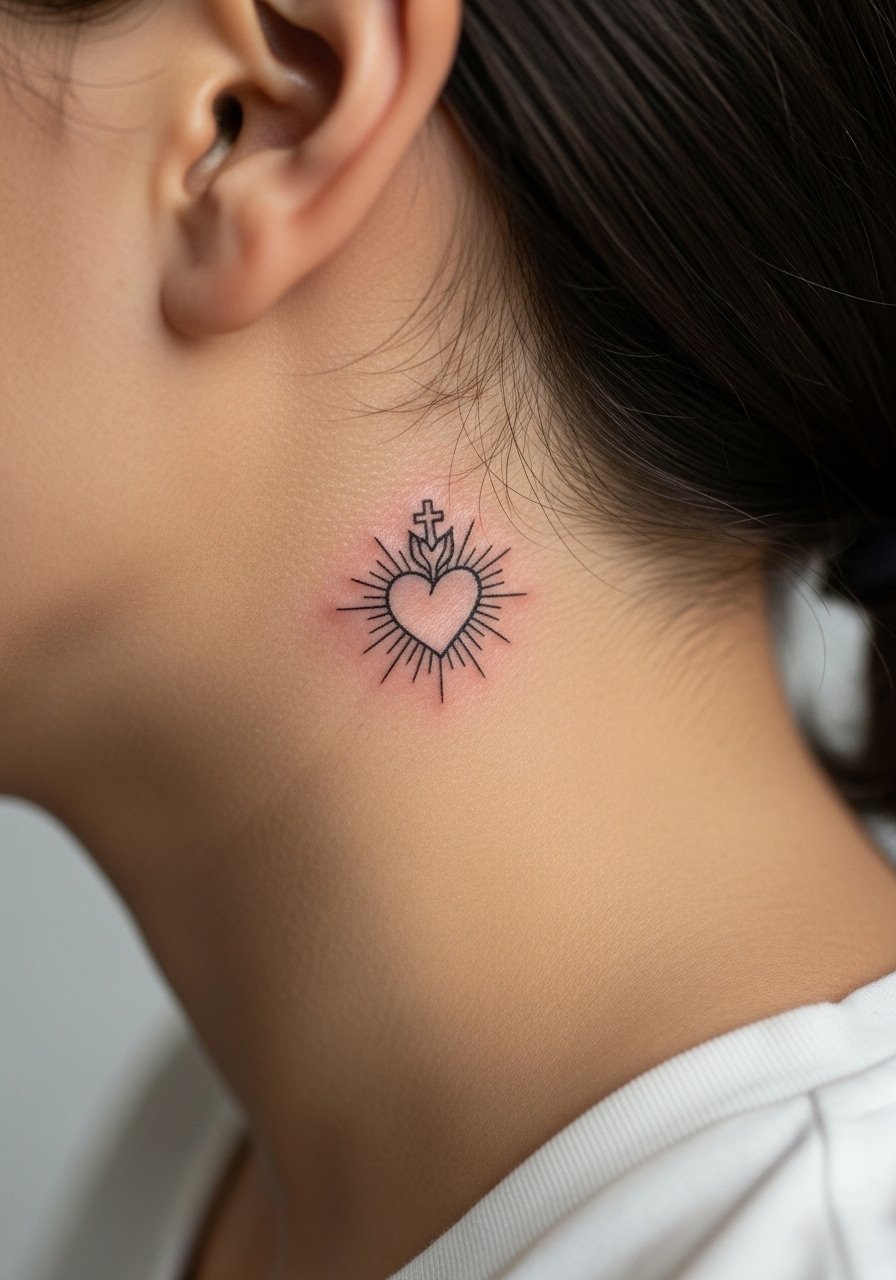
Behind-ear tattoos are discreet and feel like a secret accent. The area is sensitive and the hair can obscure the design once it grows out. When you ask for this placement, request a slightly stronger outline rather than internal detail so the heart reads when hair moves. Artist experience with hairline placements matters because stencil positioning changes with each head tilt. Session time is short and pain is sharp. For styling, pull hair back with a claw hair clip when you want the tattoo to be visible without committing to a permanent cut.
12. Ring Wrap Sacred Heart Across Two Fingers
Designing a wrap that crosses knuckles is tricky. The skin over joints moves and stretches, and the detail is prone to early softening. The common version that disappoints is one with micro shading over knuckles. I recommend a clear connecting line with small negative space to preserve definition. Bring photos of the exact finger placement during consultation so the artist can map where the lines will sit when your hand is relaxed. Sessions are brief but require steady hands. Expect touch-ups more often than for flat areas. For minimal distraction, keep other finger jewelry thin and consider switching ring metals to avoid rubbing the ink.
13. Sacred Heart Accent in a Forearm Sleeve Cluster
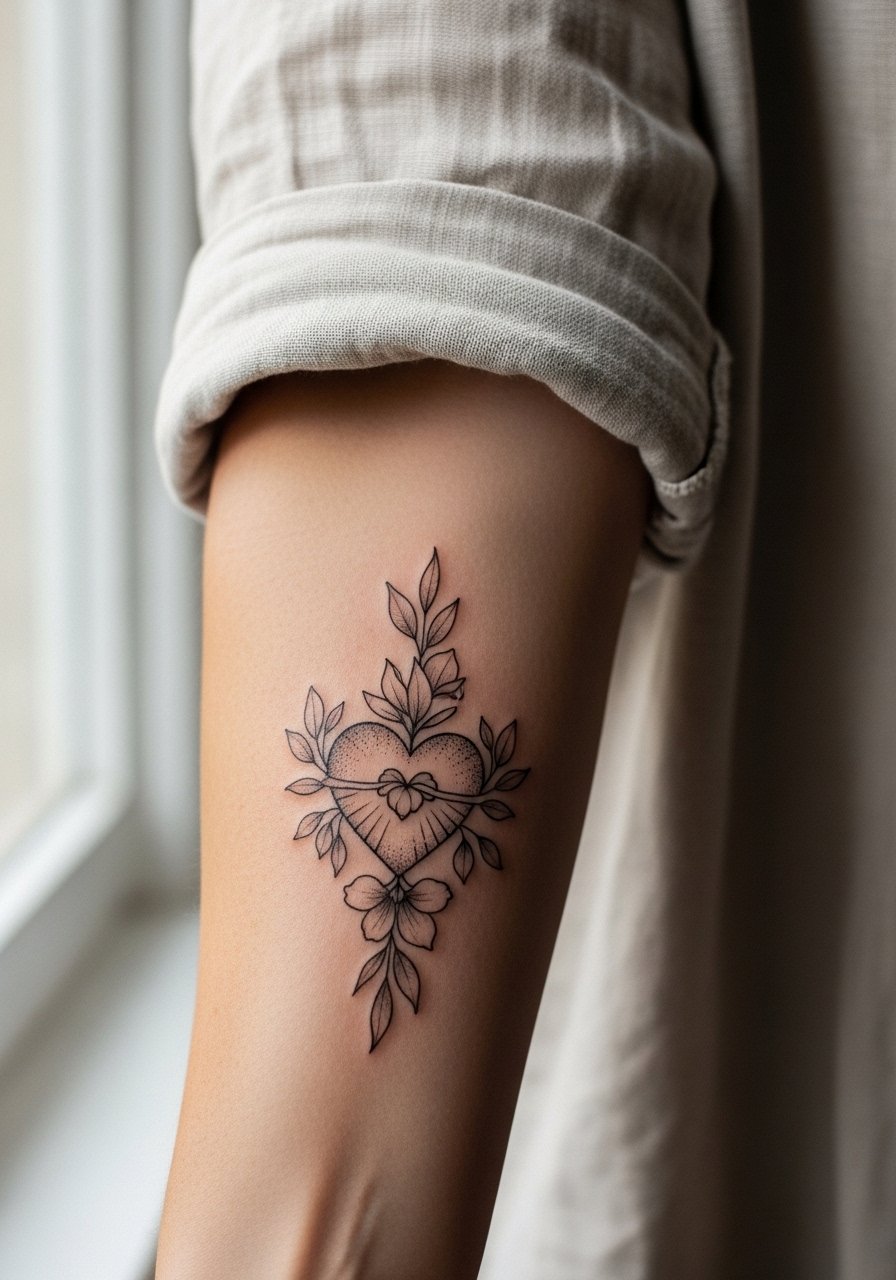
When integrating a small sacred heart into a sleeve, design is about negative space and hierarchy. The mistake is making the heart the same visual weight as larger floral elements. Tell your artist you want it to be a focal accent, with slightly bolder outlines around the heart and softer stipple in surrounding motifs. Compared to isolated forearm hearts, a sleeve accent ages better because surrounding pieces protect the outline from looking lonely as it softens. The session could be part of a longer multi-hour build or a single two-hour touch-up run. For everyday wear, cuffed linen shirts frame the sleeve gracefully, so try a rolled sleeve linen shirt to show the art without competing.
14. Minimal Sacred Heart Near the Ankle Bone

Ankle bones are unforgiving. The region takes ink shallowly and that can lead to patchy fill if the artist overcompensates. I advise a crisp contour with minimal interior detail when placing close to bone. Sessions are short and the pain can be sharp at the point. Seasonality matters because swelling and footwear interact with healing. For the final look, delicate sandals highlight the piece without covering it, so consider a flat leather sandal for summer reveals.
15. Bannered Sacred Heart with Script on the Upper Arm
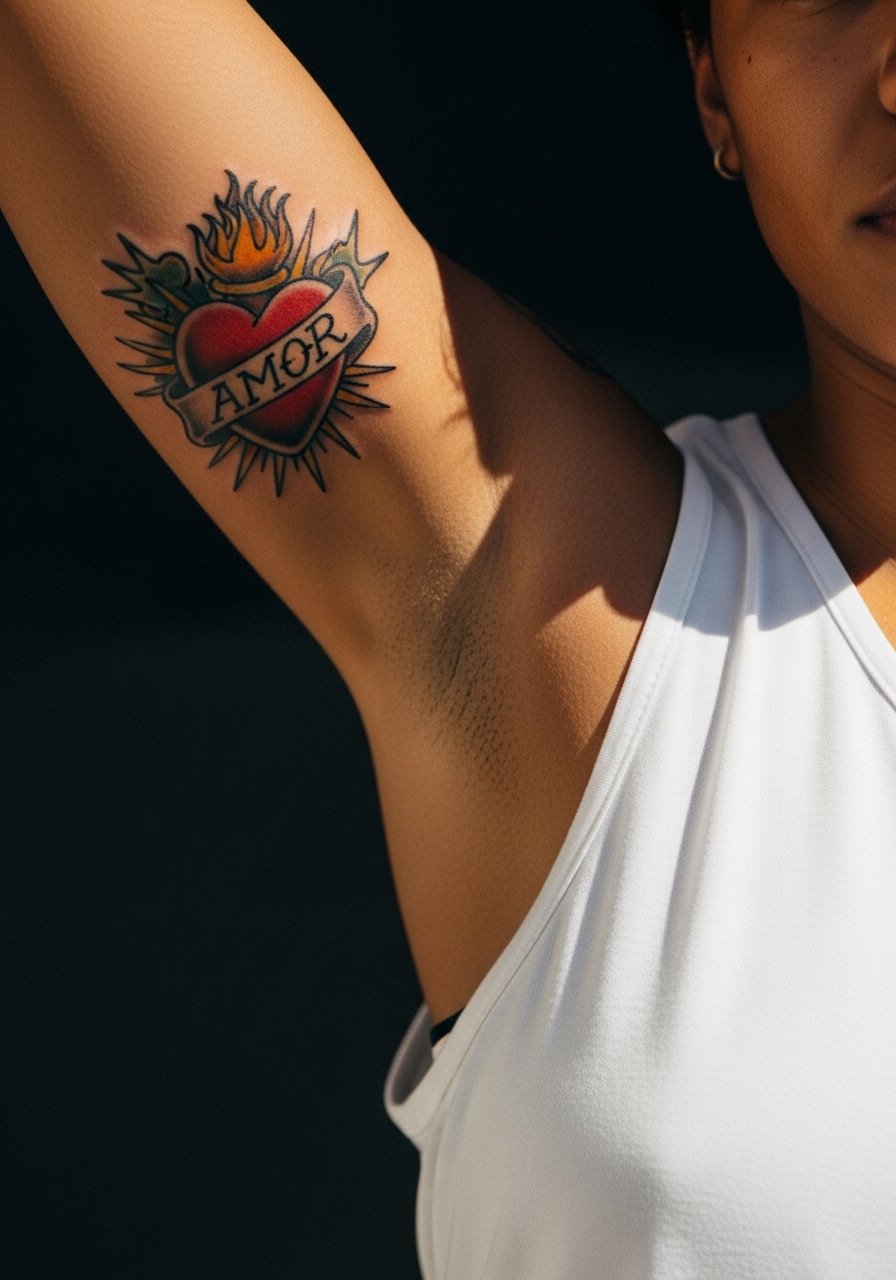
Text adds another layer of planning. The image here includes the banner text "Amor" so you can see how wording sits with the heart. The common error is tight script that becomes illegible when the hand moves. Ask for slightly larger letterforms and a clean sans or classic serif that your artist has tattooed before. Upper arm flesh tolerates saturation well so the piece ages into a bold statement if executed with clear contours. Sessions range from one to three hours depending on color. For the appointment wear a loose tank top so the artist has unhindered access.
16. Neo-Traditional Sacred Heart on the Shoulder Cap
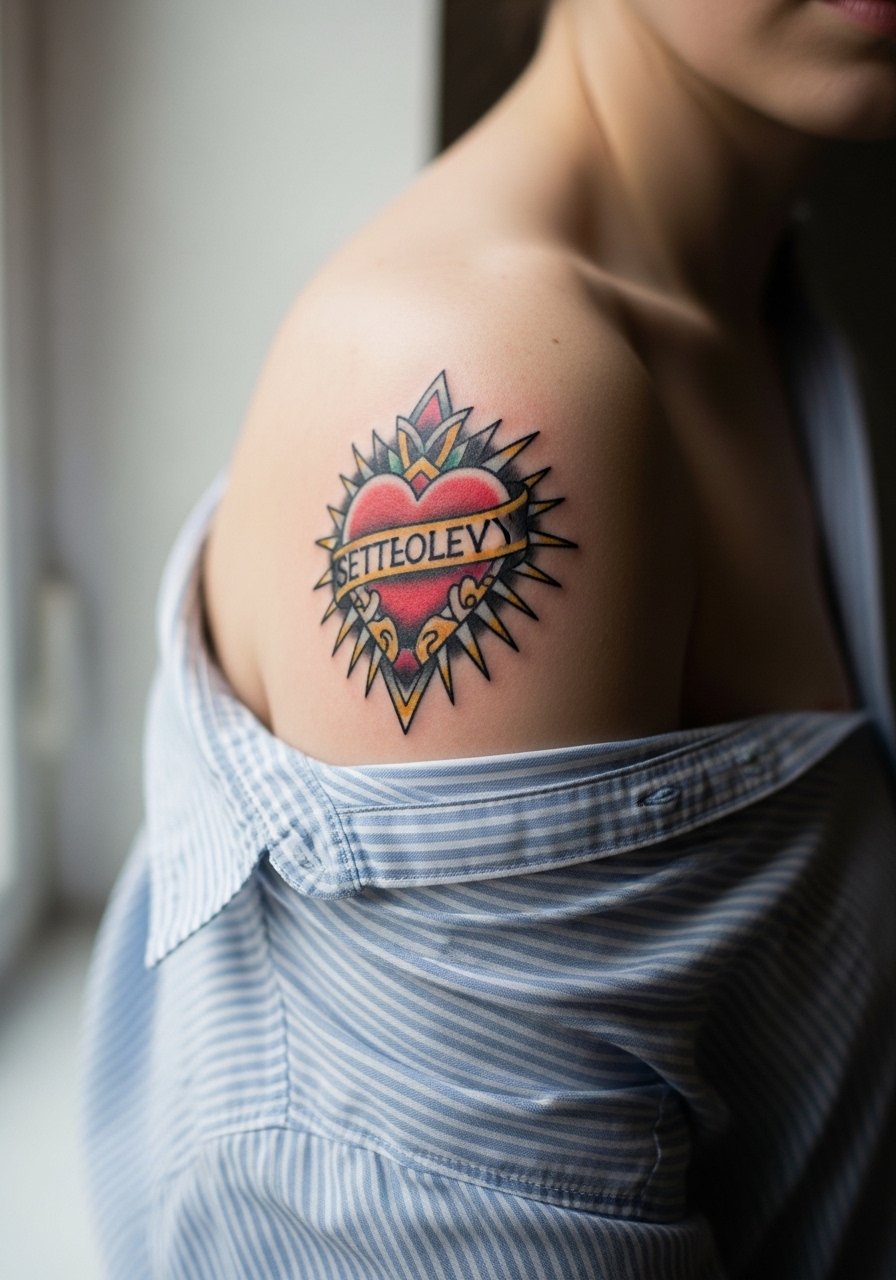
Shoulder cap pieces are forgiving and great for bold color. The trick is to plan the heart so it reads when your arm moves. A common mistake is placing the heart too close to the deltoid fold where movement distorts details. Ask your artist to mock the design while your arm is in motion so placement accounts for muscle flex. Sessions are one to three hours. For showing the shoulder, a loose button-down you can pull aside frames the piece well during summer, and that helps you visualize how the heart will read under clothing.
17. Micro Sacred Heart Along the Collarbone Ridge

Collarbone ridges wear detail differently than the flat chest. Most mistakes come from placing tiny inner shading directly over bone. I prefer defining the external contour and keeping inner detail airy so movement does not fill it in. Expect a short session and a moderate pain level near bone. For jewelry that complements without covering, a thin chain pendant necklace sits above the heart and balances the composition.
18. Sacred Heart Accent on the Inner Bicep
The inner bicep can be tender and is subject to skin stretch. The visual risk is packing too much micro realism into a narrow vertical space. I advise artists to simplify internal shading and use stipple to suggest texture instead of dense fills. This placement shows differently when the arm is relaxed versus flexed, so preview the stencil in both positions during consultation. Sessions are generally one to two hours and discomfort varies with positioning. For the appointment wear a loose tank top so the artist can access the area cleanly.
19. Tiny Sacred Heart on the Side of the Forefinger
Forefinger placements face constant contact and work-related wear. The usual mistake is adding interior shading that cannot survive daily friction. For longevity, ask for a crisp outline and accept that touch-ups will be part of the plan. Sessions are quick and pain is sharp. If you like subtle wrist accessories, balance the finger heart with a thin chain around the wrist rather than heavy rings. A delicate thin chain bracelet keeps the focus on the finger art without rubbing the area.
20. Ornamental Sacred Heart on the Lower Back
Lower back placements heal well when the client avoids tight waistbands in the first two weeks. The common error is placing the heart too low where constant waistband friction causes scabbing and loss of detail. Ask your artist to map the stencil with you in standing and seated positions so the final location avoids daily rub. Session length is moderate and pain is low to moderate because of muscle padding. For shows that reveal the area, low-back details pair with high-waisted bottoms and an open-back dress that highlights the ornament without exposing too much.
21. Tiny Sacred Heart Just Below the Collarbone
A tiny heart below the collarbone is subtle and elegant. The usual mistake is choosing lettering or tiny filigree that competes with the heart; keep the composition simple and allow negative space above the design. This spot reads well with minimal jewelry. Session time is short and pain is moderate near bone. If you want a polished look when wearing jewelry, a thin chain sits above the heart without covering it. For appointments wear something with a wide neck so the artist can easily access the area.
Frequently Asked Questions
Q: Will a fine line sacred heart on the ribs blur faster than one on the forearm?
A: It depends on placement and the artist's approach. Ribs move and stretch more, so ultra-fine internal detail tends to soften sooner there. If longevity matters, ask for slightly bolder contour lines and more spacing between internal dots so the design ages like the forearm pieces discussed above.
Q: How should I prepare wardrobe-wise for a sternum or chest sacred heart session?
A: Wear a fitted sports bra or a wide-neck shirt you can pull aside. That gives the artist clean access while keeping you covered. Bring a loose layer to put on after the session to avoid fabric sticking while the area starts to heal.
Q: Are small sacred heart finger tattoos worth it if I want them to last?
A: Small finger tattoos are beautiful but expect more frequent touch-ups. If you want a long-lived look, choose a strong outline and minimal interior work, and plan for a retouch at about year one or two depending on wear.
Q: How do I find an artist comfortable with religious iconography and cultural sensitivity?
A: Use discovery routes like tattoo directories, local convention lists, and community forums to find artists who list relevant experience. I have noticed that portfolios showing healed images of similar iconography are the most honest indicators of their comfort and results.
Q: Can I get a tiny sacred heart tattoo during the same appointment as a larger piece to tie a sleeve together?
A: Yes, but plan the session timing and pain management. Small accents often work best when the artist has time to step back and adjust scale relative to the larger work. Discuss placement as part of the sleeve layout so the heart reads as an intentional motif, not an afterthought.
