
Fine line wing trends are everywhere on feeds right now, and the reality is harsher than the grid. Fine single wings can fade into ghost lines within a year, forearm pieces stretch and warp when weight shifts, and color on darker skin often reads muddy if the artist uses subtle washes. I wrote this list to pair minimalist wing drawings with practical notes on placement, aging, consultation language, and how to show them off.
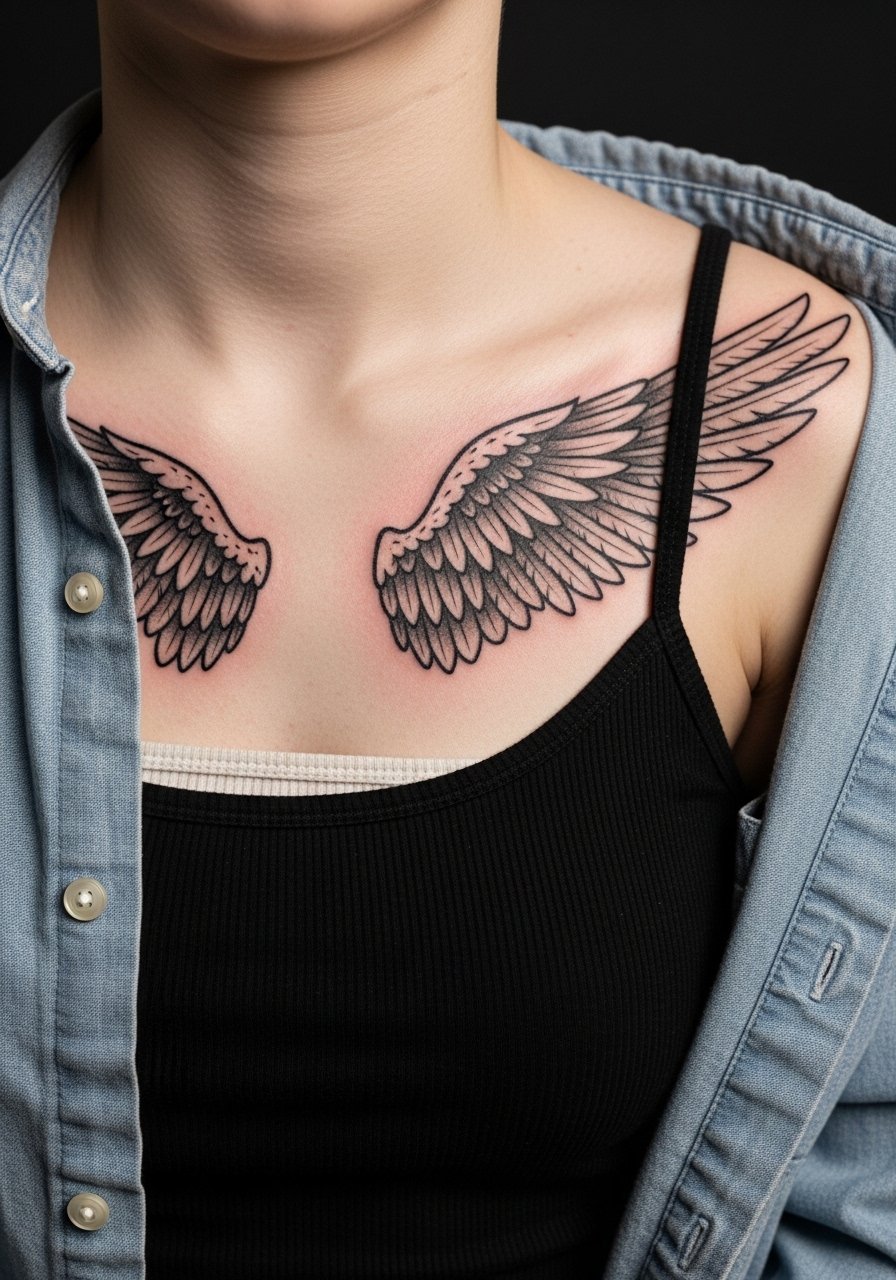
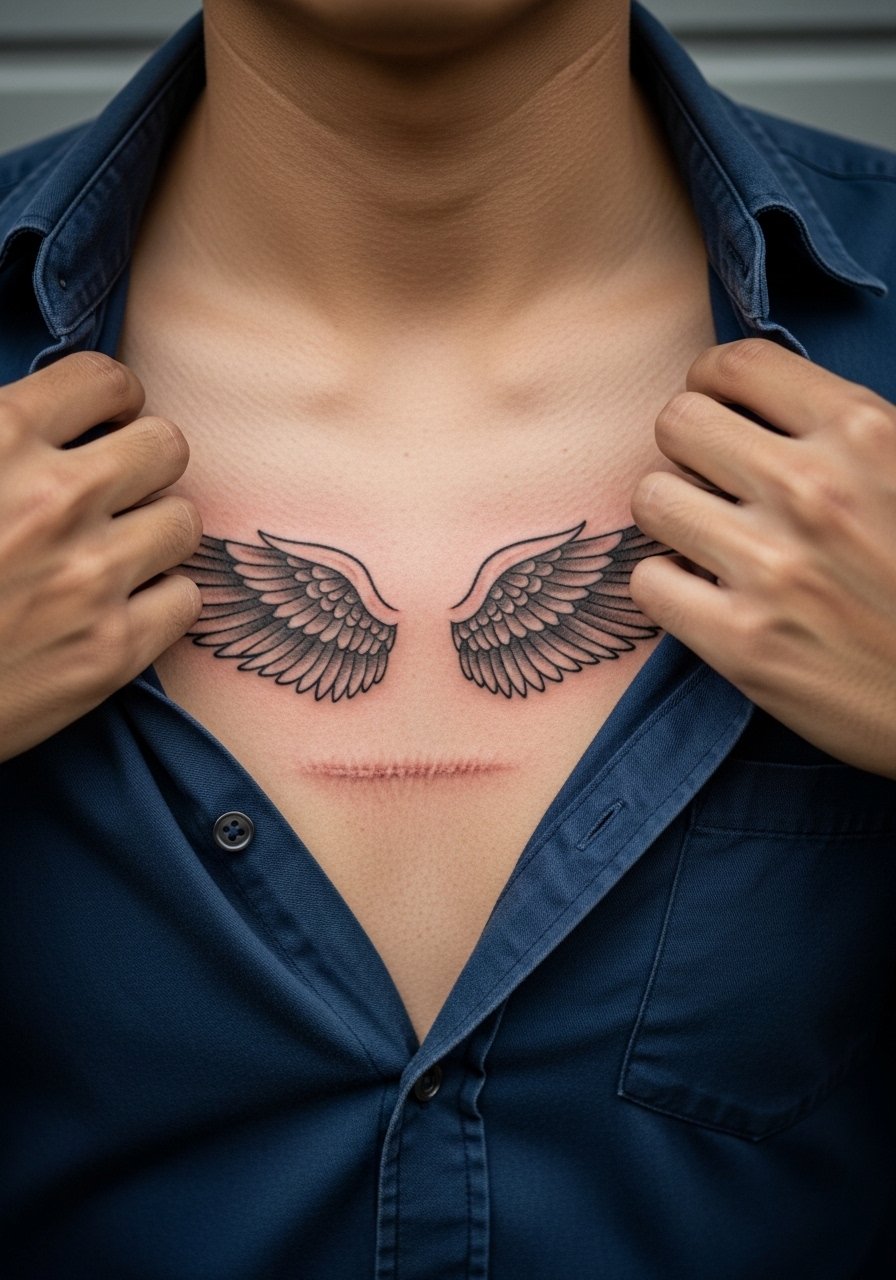
1. Minimalist Single Wing on Chest

I recommend this when you want a discreet piece that reads clean under shirts. Tell your artist you want single-needle lineweight with a slightly stronger outer contour so the wing keeps its shape after healing. Common mistake is asking for ultra-thin lines across a curved pectoral without compensating for stretch, which softens the silhouette after a few years. Pain is moderate and session time is short, usually under an hour. For the appointment wear an open button-down shirt you can pull aside without getting fabric in the stencil. Expect a touch-up at 12 to 18 months for crisp outer lines.
2. Fine Line Butterfly Wing on Inner Bicep
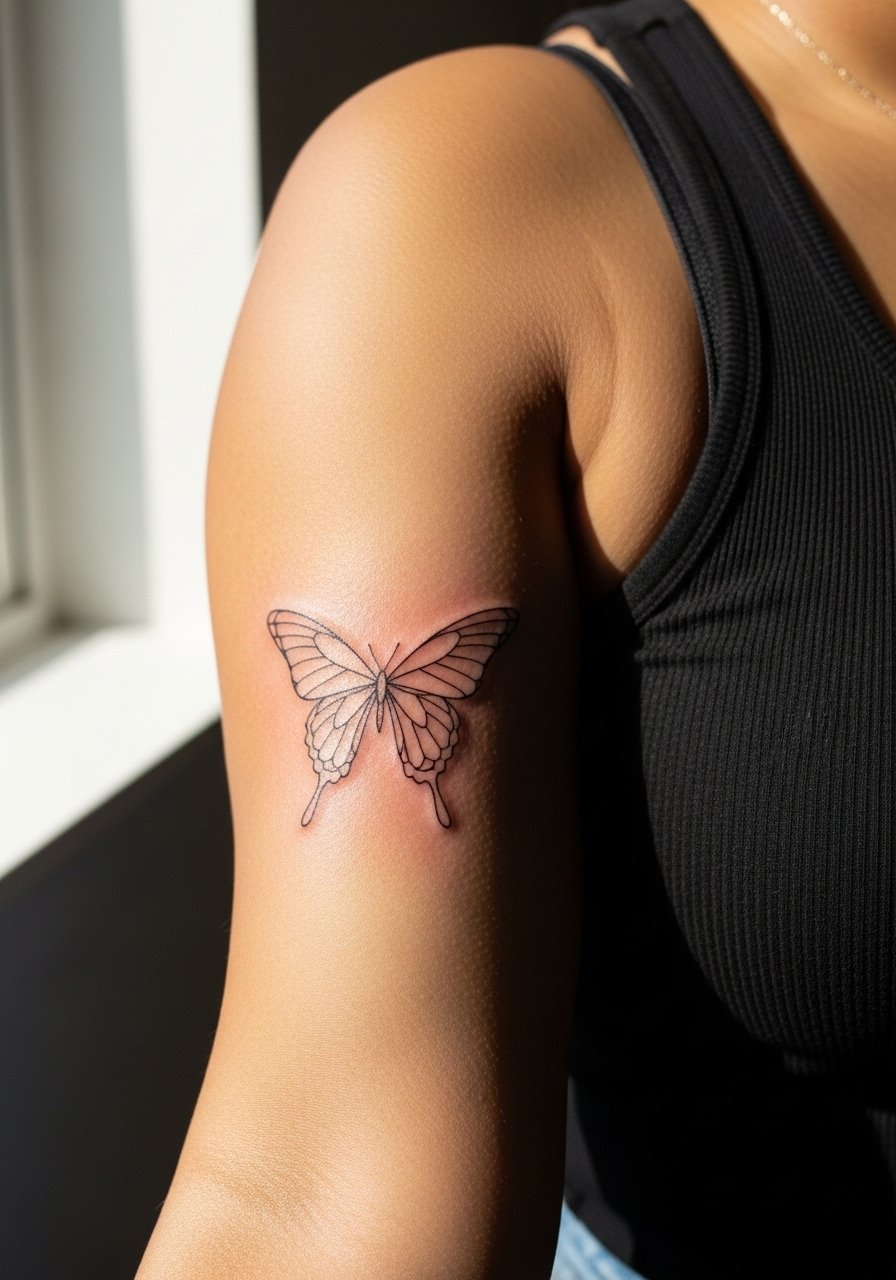
This placement is intimate and ages gently if spaced properly. In consultation, ask for slightly wider spacing between feather lines so stipple shading does not merge as the skin shifts. The inner bicep is sensitive but manageable, with sessions often under two hours. Common mistake is packing too many tiny feather barbs into a small zone, which leads to blurring at year two. For the session wear a tank top so the artist has full access and you stay comfortable. Expect a lighter healed look by six months with potential softening by year three, and budget a touch-up if you like high crispness.
3. Micro-Realism Twin Wings on Upper Back
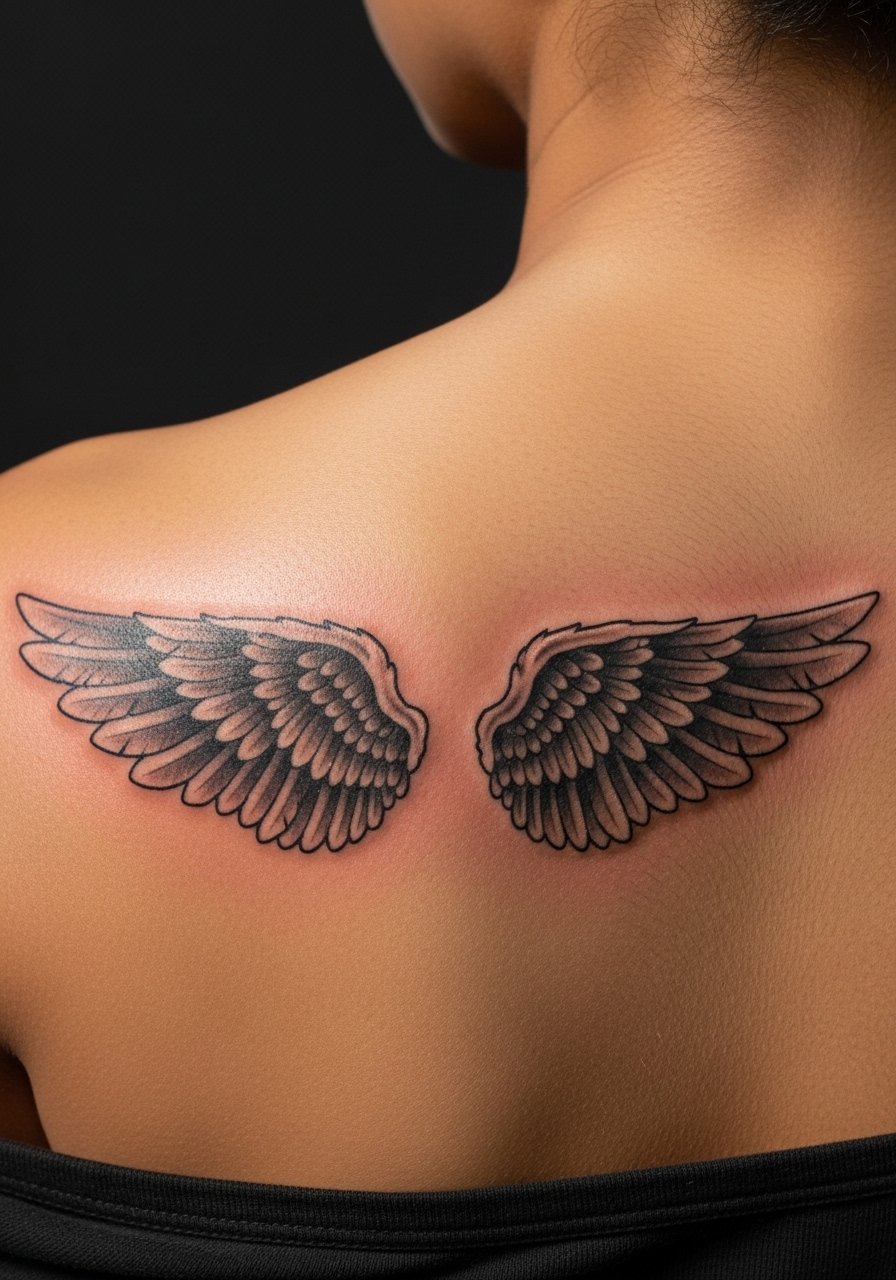
Back wings scale well and last because skin there is stable. Tell your artist you want full black and gray saturation with layered stipple for depth rather than tiny crosshatch. Mistake to avoid is forcing micro detail in a span that will need four to six sessions to finish. Expect multiple sessions and heavier pain during long shading passes, but the payoff is a piece that reads from a distance even after years. For showing this off, fitted tanks in dark colors frame the span well. Plan for a major session day with loose clothing and a recovery window for soreness.
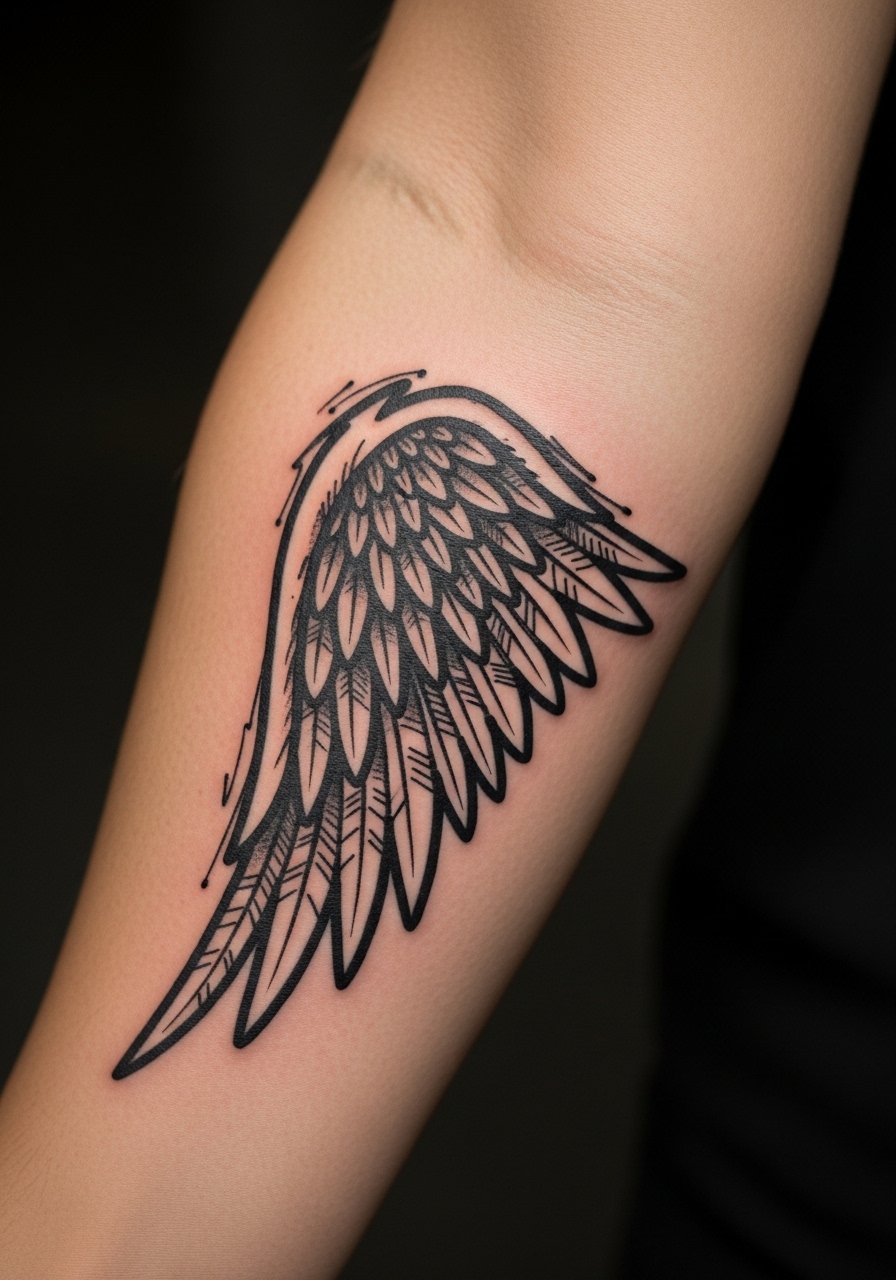
4. Blackwork Tribal Wing Along Outer Forearm
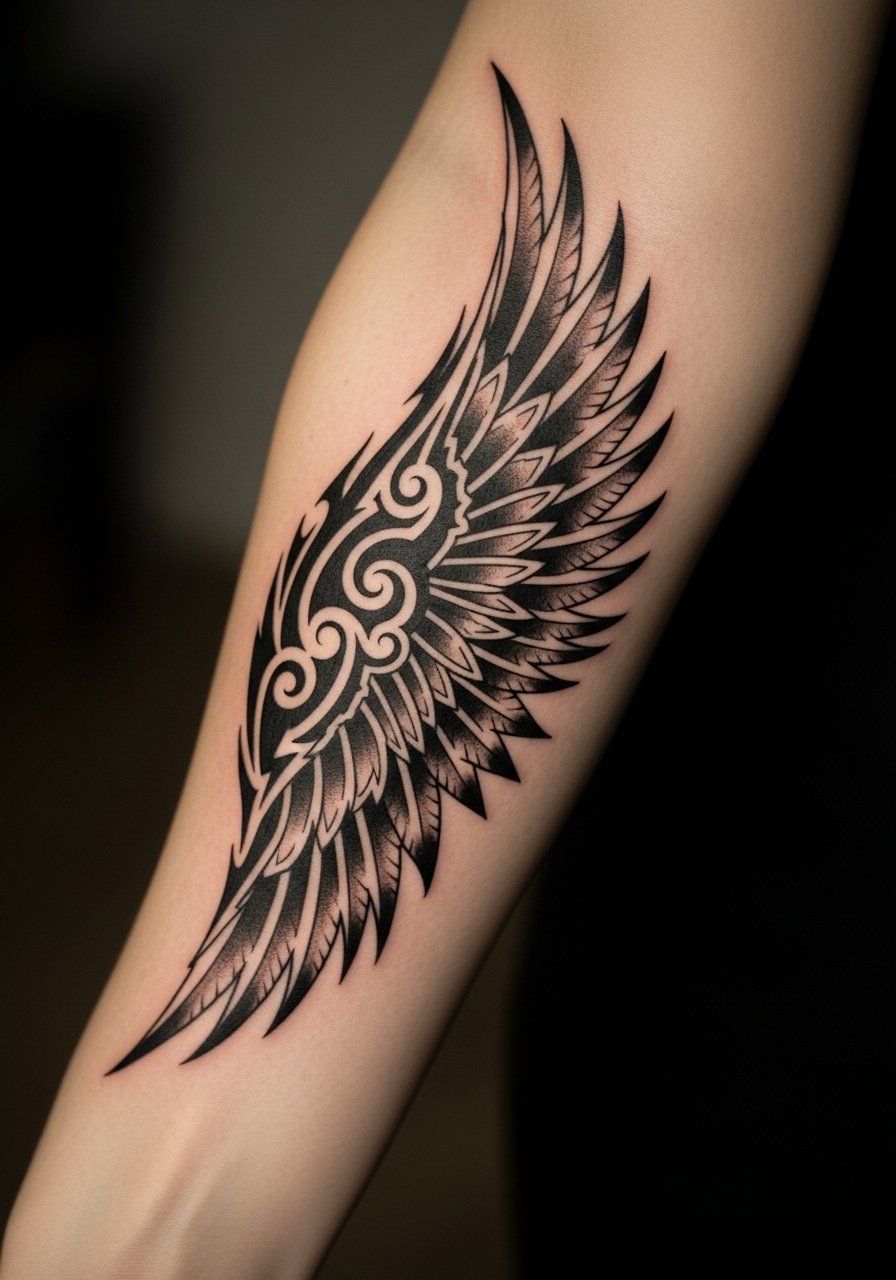
Outer forearm tribal wings are built to age. The strong edges and saturated black reduce the need for early touch-ups. In consultation specify solid fill and broader outer feathers to resist blowout. Common complaint is asking for a tribal motif that borrows too many fine inner lines, which softens on active arms. Session time is mid-range, usually two to three hours. For showing it off, roll up a henley shirt to mid-forearm and add a rugged leather cuff on the opposite arm for contrast. For gym-goers, remember repeated friction can matt the edges slightly over time.
5. Neo-Traditional Eagle Wing on Calf

Calf placements are visible when you want them to be and hideable otherwise. Neo-trad saturation holds up if the artist packs color densely. The mistake is using pale washes on darker skin without high-contrast outlines. Sessions are two to three hours and the area tolerates longer sittings. For summer reveal pair the piece with men's athletic shorts cuffed high and high-top sneakers. Expect color to mellow slightly by year two, but bold outlines will keep the shape readable. If you lift heavy or run often, give the calf a few days to recover before intense workouts.
6. Ornamental Geometric Wing on Ribcage
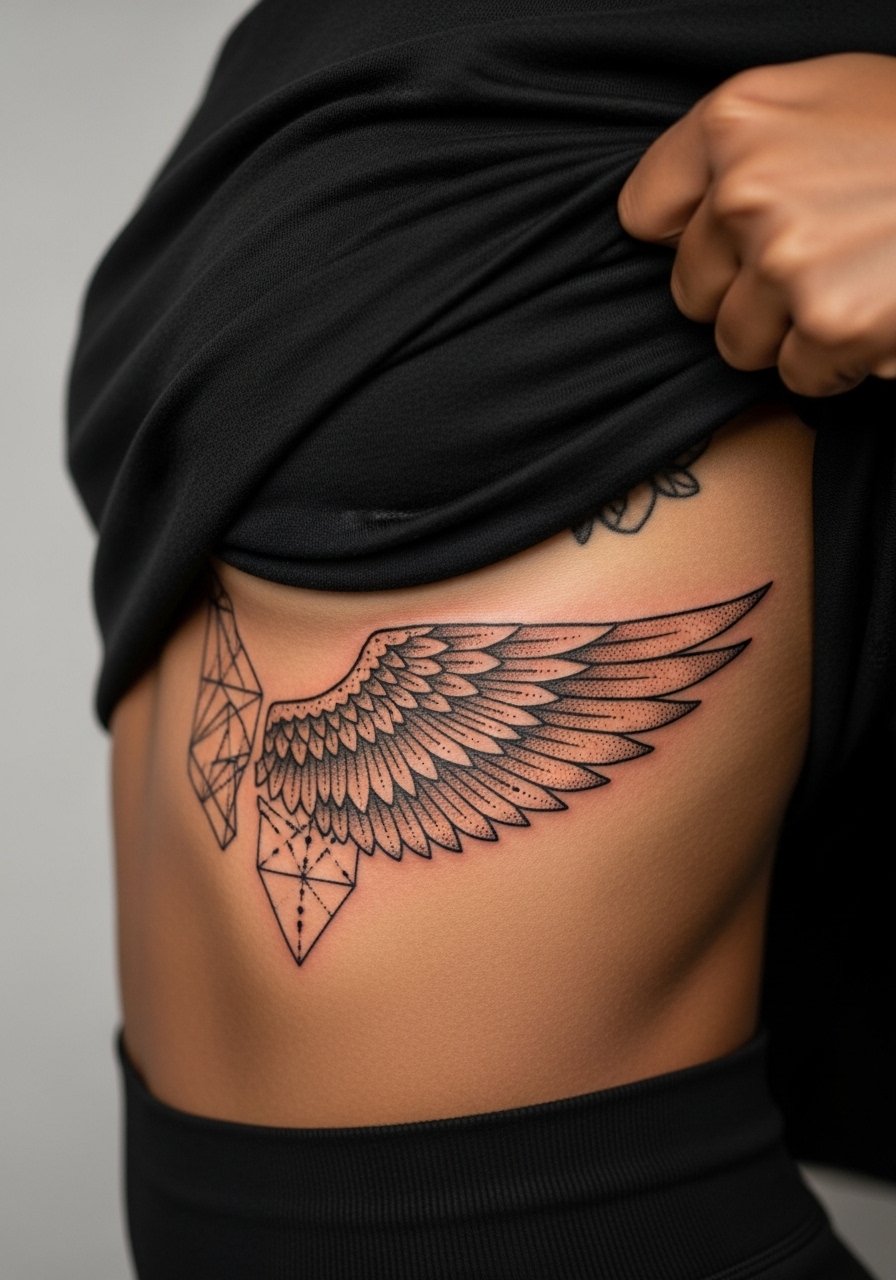
Fair warning, rib work rates high on pain scales, often around seven out of ten, but it reads sculptural once healed. Tell your artist you want geometric spacing with dot work and negative space so lines do not merge when the torso moves. A common mistake is compressing complex geometry into a small rib panel, which blurs after a year. Artists split on fine line here. One camp says ribs stretch and blur fine work quickly. The other camp says careful depth and spacing can make fine line last. Ask your artist which approach they use. Session times vary and may be split. For the appointment wear a side-open shirt you can lift without discomfort.
Studio Day Picks
The chest, forearm, and ribcage examples above each demand different prep. These items smooth the session and the first healing week.
-
InkSafe balm. A thinner balm that leaves less greasy residue, helpful when you plan to be active and want minimal transfer onto clothing during initial healing.
-
Australian Gold H2O Aftercare. A non-petroleum option that keeps pores clear while maintaining moisture for larger black and gray back pieces.
-
Japanese Kurosumi ink conditioner. Used as a topical extender for bold blackwork, it helps the saturation hold on darker skin tones where small color washes can look muddy.
-
Indie Dotwork Salve. Herbal formula that reduces itch without a shiny film, good for ornamental dot work on ribs and sides.
-
Aquaphor healing ointment. Thin layer use during the first 48 hours prevents excessive scabbing on tiny single-needle wings while keeping the linework moist.
7. Tiny Wing on the Wrist
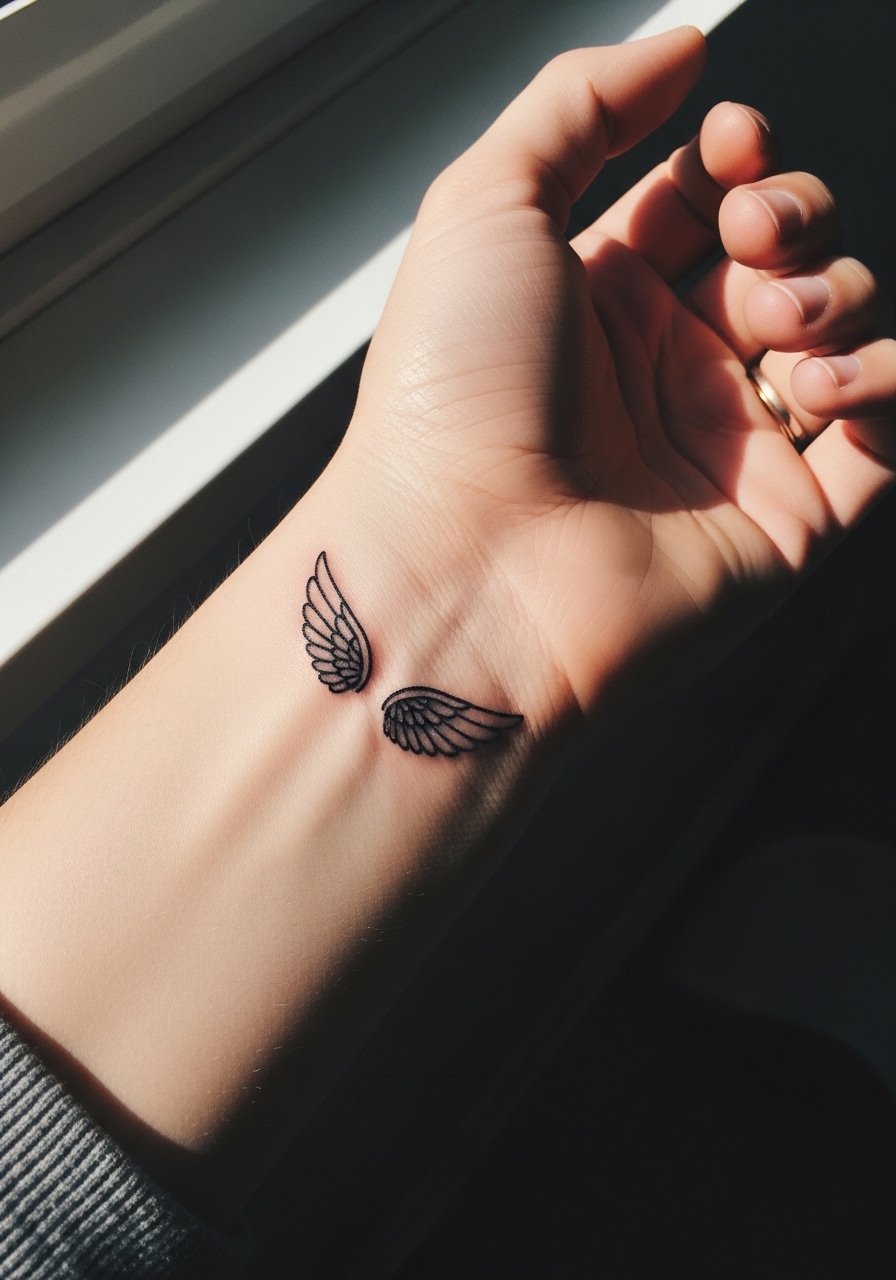
Wrist pieces are high-contact, so protect your investment with design choices that account for wash and movement. Ask for a slightly bolder outer contour and spacing between feathers. The common failure is the ultra-delicate wrist wing that disappears after a year. Sessions are quick but you should expect a touch-up at year one. For session comfort and display, wear a short-sleeve performance tee so sleeves do not rub the area while it heals. Wrist tattoos can still look great after five years if the linework is set deeper upfront.
8. Ignorant Style Abstract Wing on Outer Forearm
This raw, sketchy approach embraces texture and will age into character rather than blur into mush. Tell the artist you want visible tool marks and uneven stroke weight to keep the look intentional as it softens. A mistake is requesting too many tiny infills that mask the roughness and then blur. The forearm tolerates this work well and sessions are generally two hours. No styling link here to keep flow varied. Expect the piece to mellow gracefully and gain a lived-in quality by year three.
9. Blackwork Demon Wing on Outer Thigh
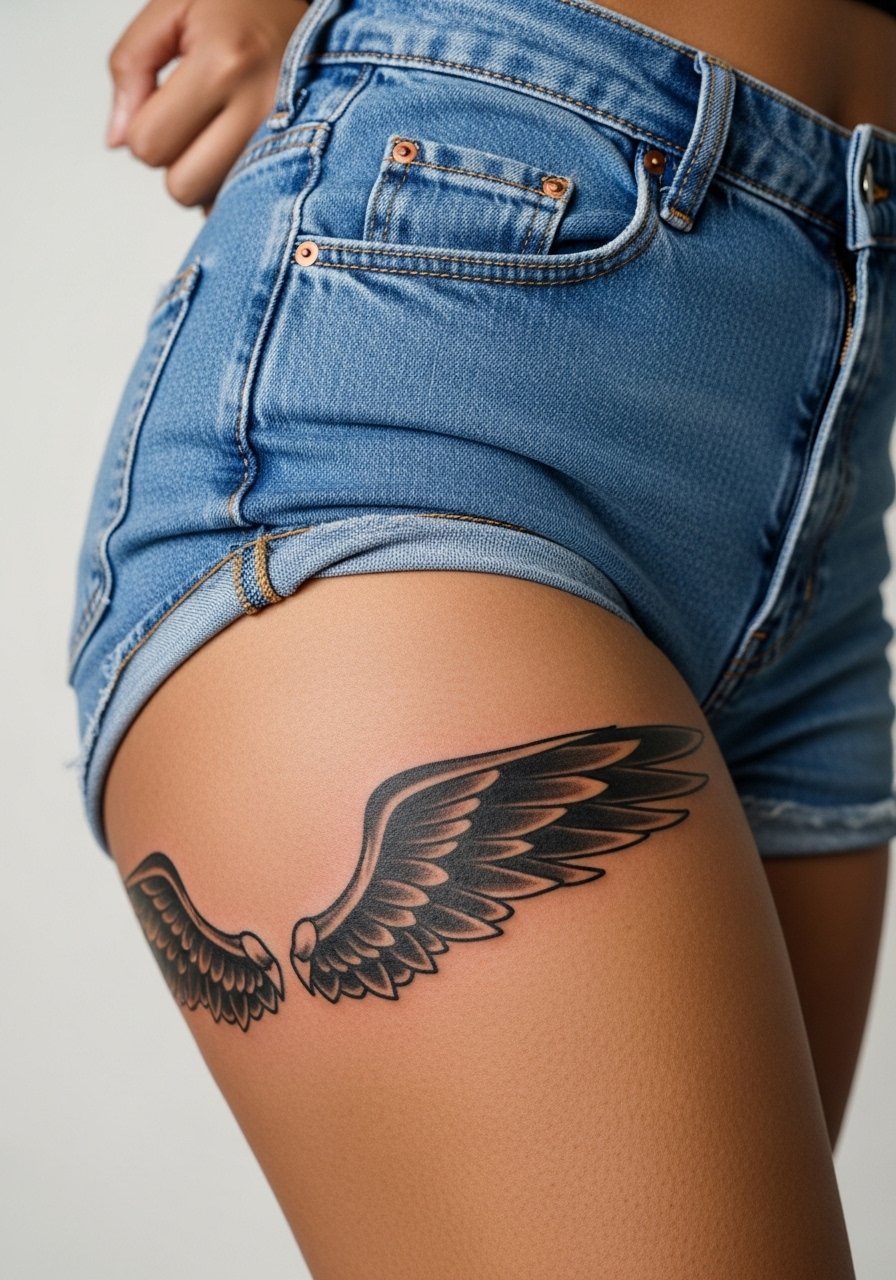
Thigh pieces are forgiving and hideable, making them ideal for dense blackwork. Ask the artist to map the span for natural muscle curves so the wing reads when you walk and sit. A common mistake is placing a large solid piece too close to seams where jean rubbing causes irritation during healing. Session times vary and you can handle longer passes. For session wear choose loose basketball shorts so the artist can roll the leg and you stay comfortable. Expect the saturation to remain strong if packed correctly.
10. Watercolor Phoenix Wing on Shoulder Cap
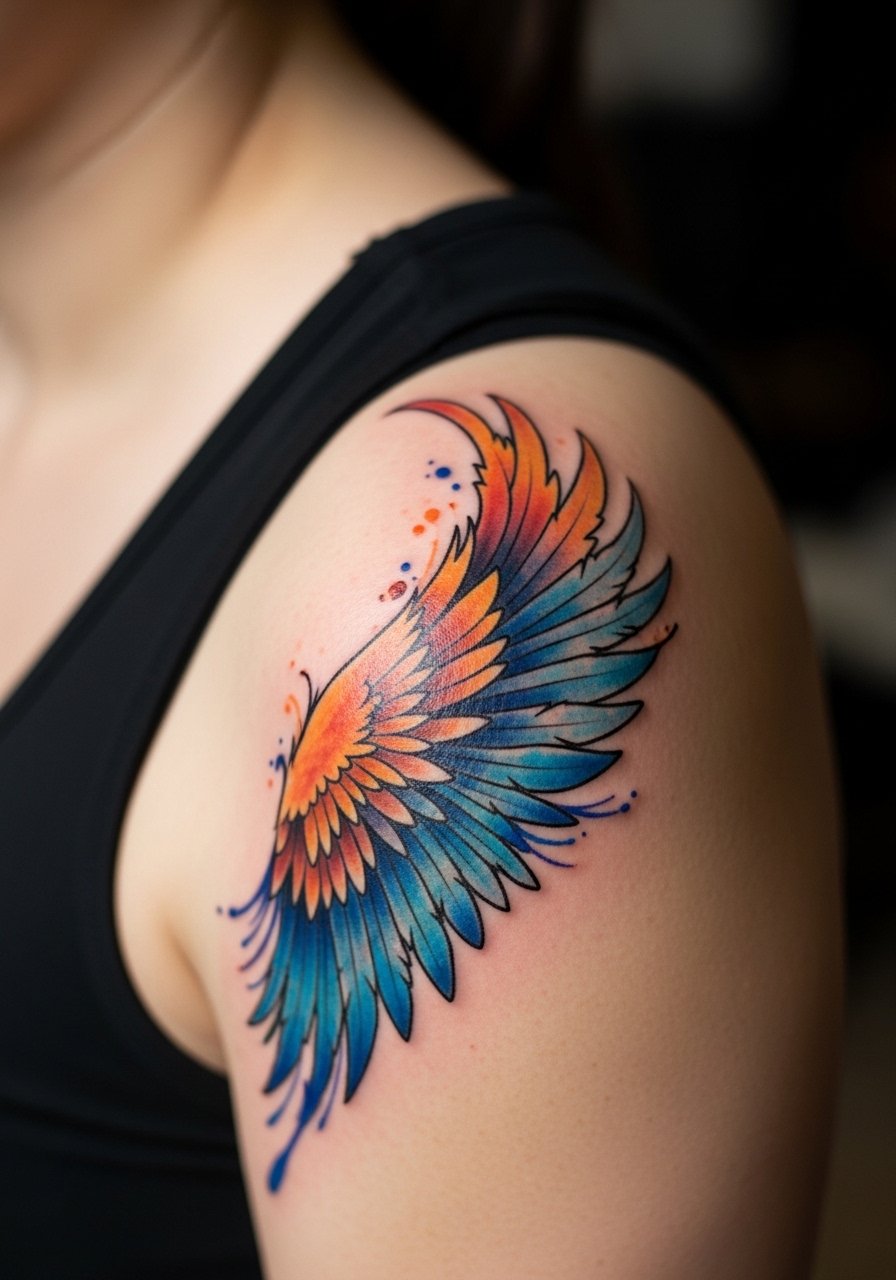
Watercolor effects look remarkable fresh but need maintenance. If you like color, insist on bold outlines or high-contrast neo-trad elements to anchor the washes. The shoulder tolerates color well and sessions are often two sittings. The common complaint is delicate washes placed over motion zones that bleed out and wash away. For the session wear a muscle tank so the artist has access and you avoid fabric rubbing against fresh ink. Expect color to soften by year two and to require refreshing if you want saturation maintained.
11. Tiny Geometric Wing at Collarbone

Collarbone placements show or hide based on wardrobe, and they require careful line spacing. Tell the artist you want negative space between feather lines to avoid merging with natural skin texture. A mistake is shrinking complex geometry to a pinhead, which loses definition as it heals. Sessions are short and pain is mild to moderate. For showing this off pair it with an unbuttoned flannel shirt or a deep V tee. Expect narrowing of some lines by year two and plan a touch-up if you want razor edges.
12. Asymmetrical Pair: One Wing on Chest, One on Shoulder
Asymmetry tells a story if scaled right. Before booking explain to your artist how you want visual balance so the two pieces read as deliberate rather than mismatched. A frequent error is copying the same scale for different canvases, which makes the smaller zone look lost. Sessions may be scheduled separately. Consider how clothing choices will reveal the pair and plan for slightly bolder chest lines to match shoulder saturation. The pieces age differently so expect the chest wing to soften faster than the shoulder cap.
13. Minimalist Wing with Embedded QR Code
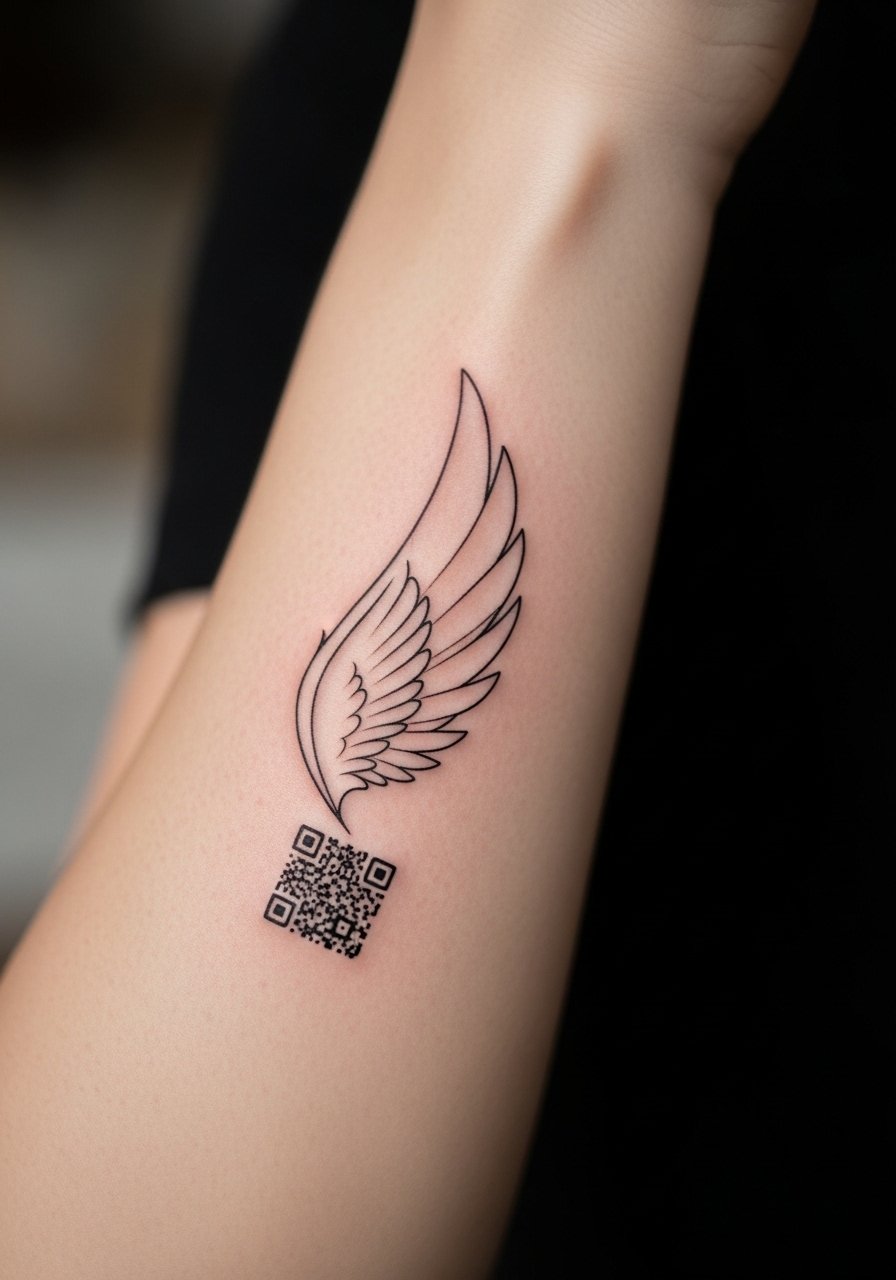
This tech-forward idea needs precision. Tell the artist you want the QR block tested at life-size on skin and scanned before inking. A common failure is shrinking the QR area until the code becomes unreadable after slight spreading. The forearm is a stable place for this, and session time rises slightly because of testing. For the session wear a short-sleeve performance tee you can roll without pressing the code. Aftercare is crucial for the block to remain scannable, and plan a touch-up if scanners fail after healing.
14. Stipple-Shaded Ornamental Wing on Lower Back

Lower back pieces let you use density without constant exposure. Stipple shading reads very well on this canvas when artists use spaced dots rather than tiny lines. Mistake to avoid is overcompacting dot work which merges into a blotch. Sessions are moderate in length and healing is straightforward. For session wear a tank top you can pull up at the waist. Stipple tends to age gracefully because the dots retain contrast longer than thin threads of linework.
15. Tiny Ankle Wing for Subtle Flash
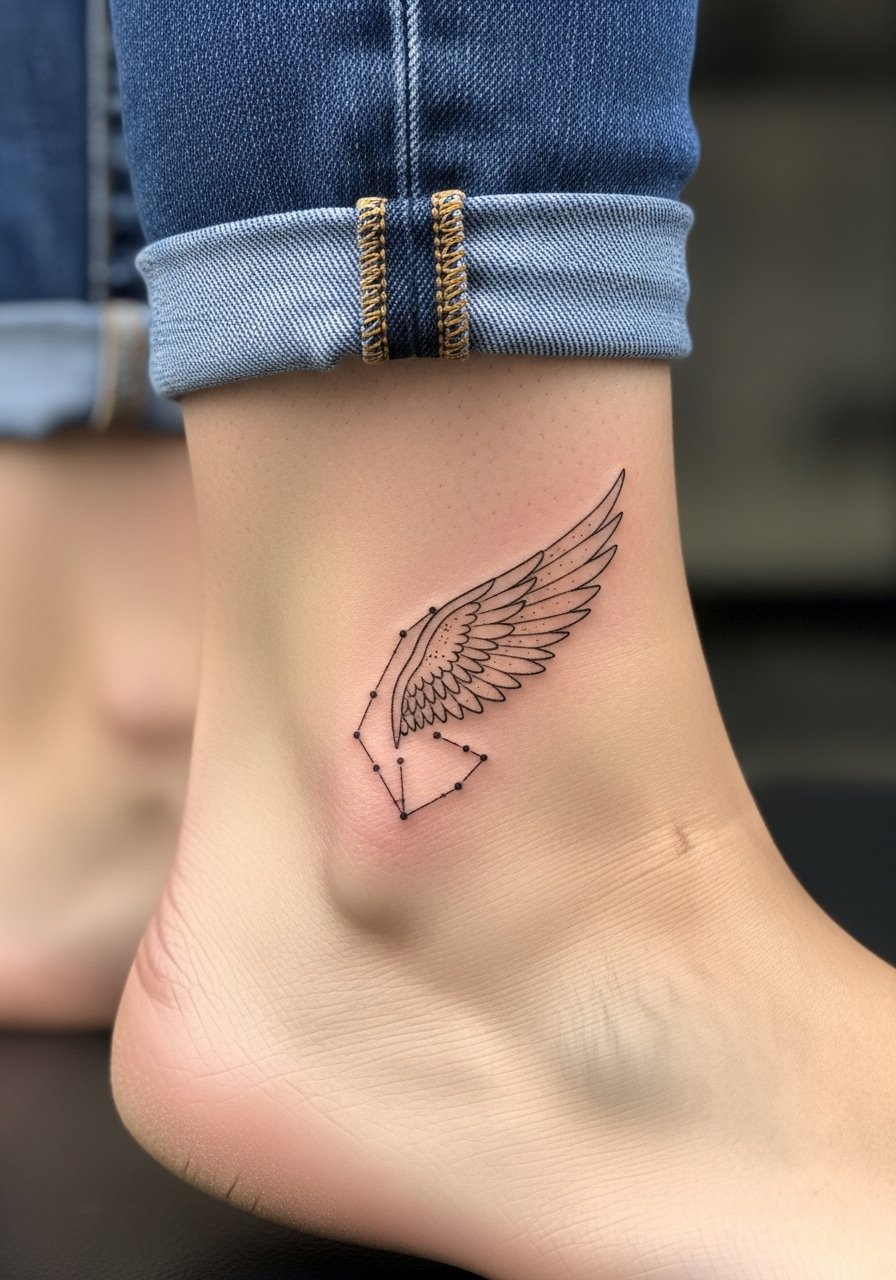
Ankle placements face constant friction and water exposure, so design accordingly. Ask for a slightly bolder outline and minimal interior strokes to resist wash and abrasion. The common issue is expecting ultra-fine detail to survive constant shoe and sock contact. Session time is brief but healing needs vigilance. For showing it off pick cuffed pants or high top sneakers that let the ankle peek out. Plan a touch-up at year one if you want the lines razor sharp.
16. Winged Collar Script on Side Neck
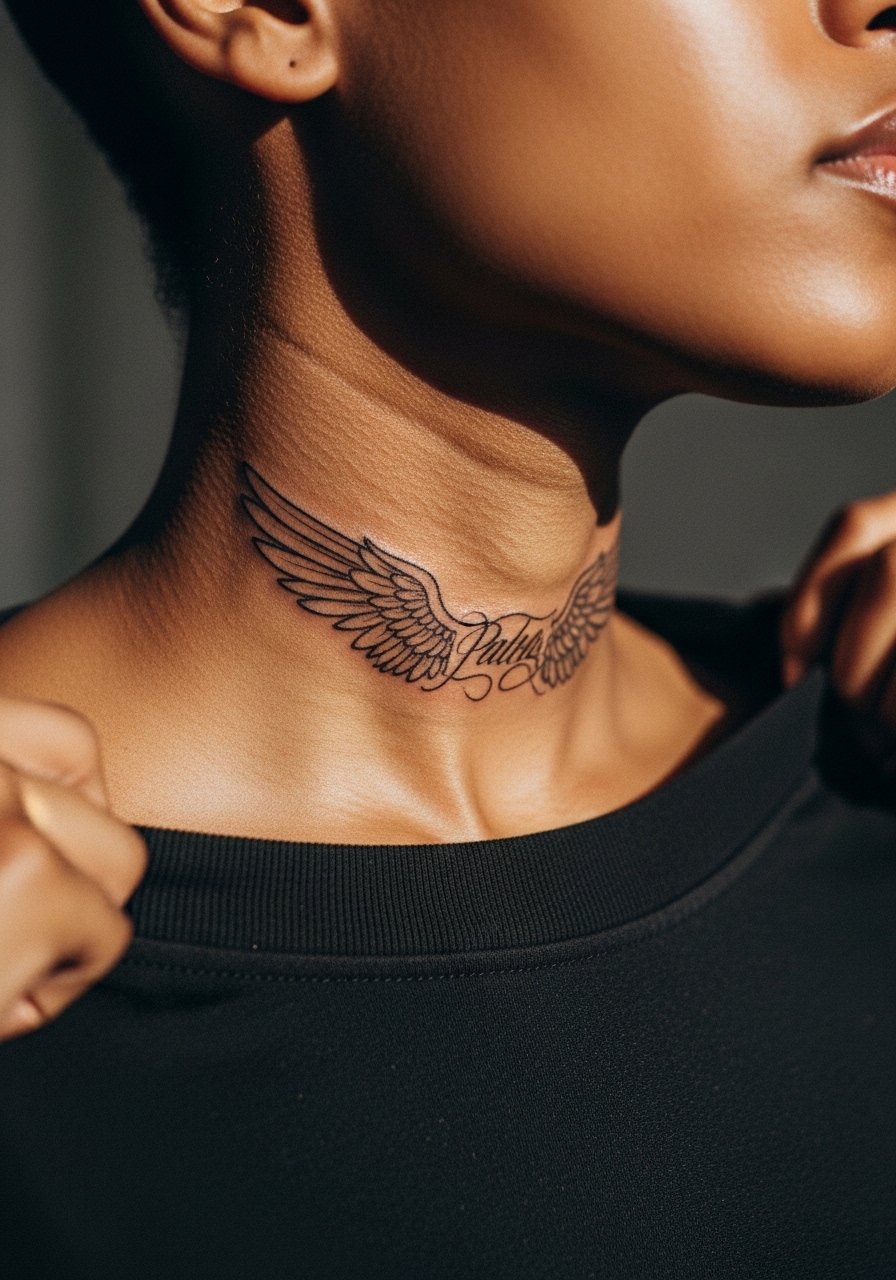
Neck work is visible and requires careful discussion about future visibility. Ask your artist to test placement with a stencil in different neck positions so the wing and script sit naturally when you move. Hand placement errors here look obvious later. Session time is short and the area is sensitive. Consider career implications before committing. The neck often needs more frequent touch-ups if exposed to sun and friction from collars.
17. Adaptive Wing for Scar or Prosthetic Areas
This is an under-covered option. When working around scars or prosthetic edges, bring clear photos and ask for a custom layout that uses negative space to flow with tissue changes. Artists need to see healed scar texture to plan needle depth. A common mistake is asking for mirror-image symmetry across scarred zones, which rarely reads natural. Sessions may be longer and staged. Mention prosthetic interfaces during consultation so the piece complements rather than interferes with fittings. Expect the healed look to vary based on scar type, and plan a follow-up for minor adjustments.
Frequently Asked Questions
Q: Will fine line wings on forearms blur faster than blackwork, and what should I expect for touch-ups?
A: Fine line wings on active forearms generally soften faster than solid blackwork. In my experience you should expect a light touch-up at around year one to restore crispness, and perhaps another touch-up by year three if you want razor edges. If longevity matters, ask the artist for slightly bolder outer lines and wider spacing between feather strokes.
Q: How does skin tone affect color choices for wing tattoos, especially watercolor or neo-trad pieces?
A: Darker skin tones often need higher contrast and denser saturation for color to read well in photos. From what I have seen, sticking to black and gray or using high-contrast neo-trad outlines keeps color from looking muddy. If you want color, test a temporary patch or discuss pigment choices with an artist experienced on your skin tone.
Q: Is the ribcage worth the pain for an ornamental wing, and how do artists split sessions for large rib pieces?
A: Ribs are painful for many people but offer a dramatic canvas. Artists often split large rib pieces into multiple sessions of one to two hours to manage discomfort. If you have low pain tolerance, plan short sittings and bring a partner for moral support. Ask the artist how they stage shading versus linework so you know when healing windows fall.
Q: Between Saniderm and dry healing, which method helps wings keep fine line detail better during the first week?
A: Artists and clients split into two camps. One camp favors protective film like Saniderm because it keeps the area clean and reduces scab formation. The other camp prefers dry healing to let scabs form naturally and avoid trapping moisture. The right choice depends on the artist's technique and the placement. Discuss both options and follow the method your artist recommends for their style.
Q: Can a QR code embedded in a wing remain scannable after healing, and what precautions should I take?
A: Yes, a QR can stay scannable if it is drawn at printer size and given space around it. Make the artist test-scan the stencil on skin before inking. Avoid tiny modules and keep the code away from high-friction zones. Plan a touch-up if scanning fails after healing.
Q: How should I dress on session day for a calf or thigh wing to make the artist's job easier?
A: For calf work wear men's athletic shorts you can pull up or cuff without pressure. For thigh pieces pick loose shorts that allow the leg to extend and the artist to reach the outer thigh comfortably. Comfortable, adjustable clothing speeds setup and reduces stencil smudging.
Q: Are there discovery paths that help find artists who do masculine blackwork wings without browsing portfolios endlessly?
A: Yes. Search hashtags such as #BlackworkWings and #WingTattooMen on social platforms, and use booking apps with filters for style and city. Reddit threads with "artist recs [city] wings" and location-filtered TikTok searches also surface recent work and guest spots.
