
Fine line trends look great on saved boards, but what holds up on real skin is a different conversation. Small traditional pieces rely on bold linework and measured saturation to age cleanly, and placement often matters more than the flash. Read these 17 placement ideas with practical notes on pain, touch-up timelines, and what to ask for in your consultation so the piece still reads well after a few summers of sun.
1. Tiny Anchor on the Inner Wrist
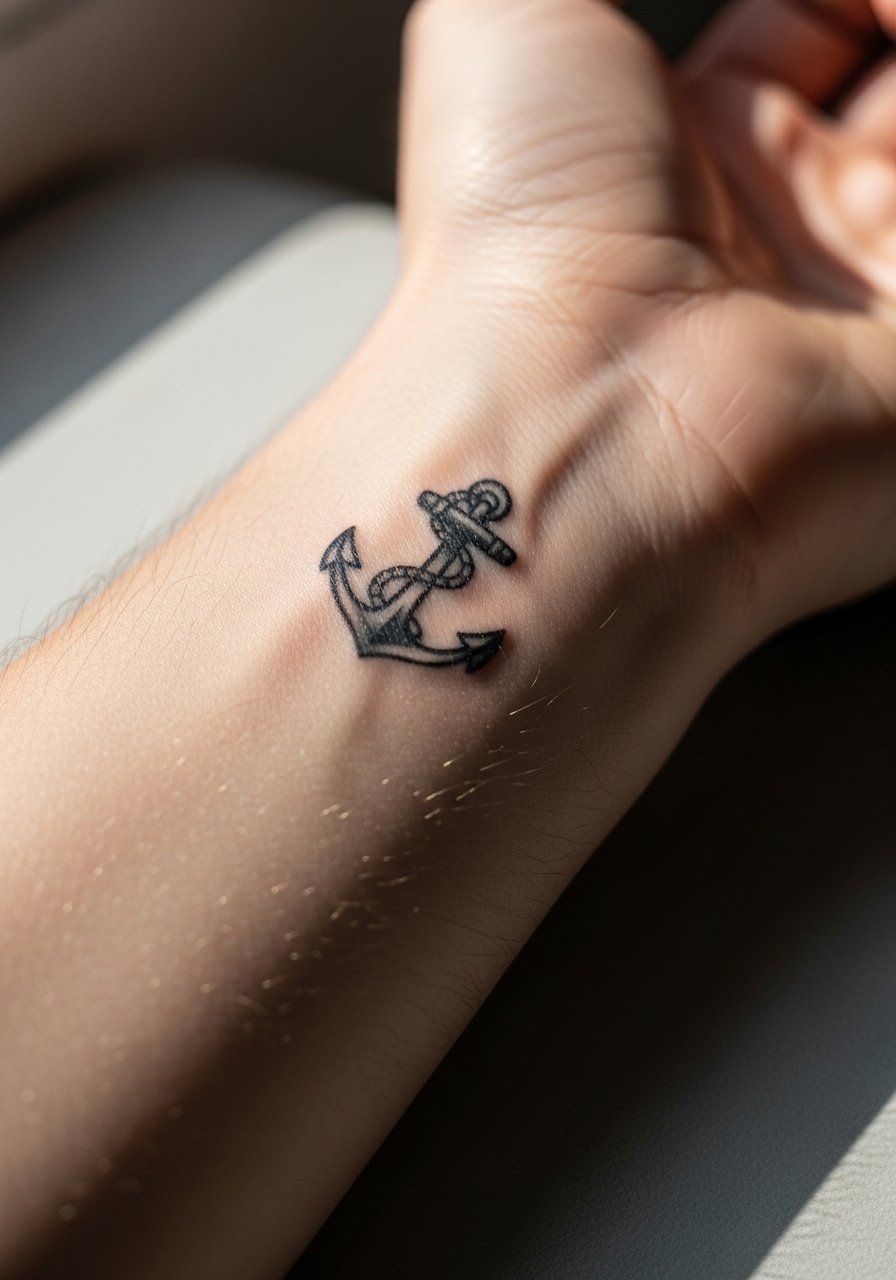
A classic anchor reads like a compact emblem on the inner wrist. Expect low to moderate pain and a 20 to 40 minute session for linework and a touch of saturation. Ask your artist for slightly heavier linework than a fine line version so the anchor keeps its silhouette as the skin moves and ages. Common mistakes are booking it too small and using fragile lineweight, which leads to blurring in the first few years. For the first week, the wrist sees a lot of washing and friction from watches. Pair this placement with a thin chain bracelet when showing it off. Plan a touch-up around year two to three if lines soften.
2. Micro Rose on the Outer Forearm
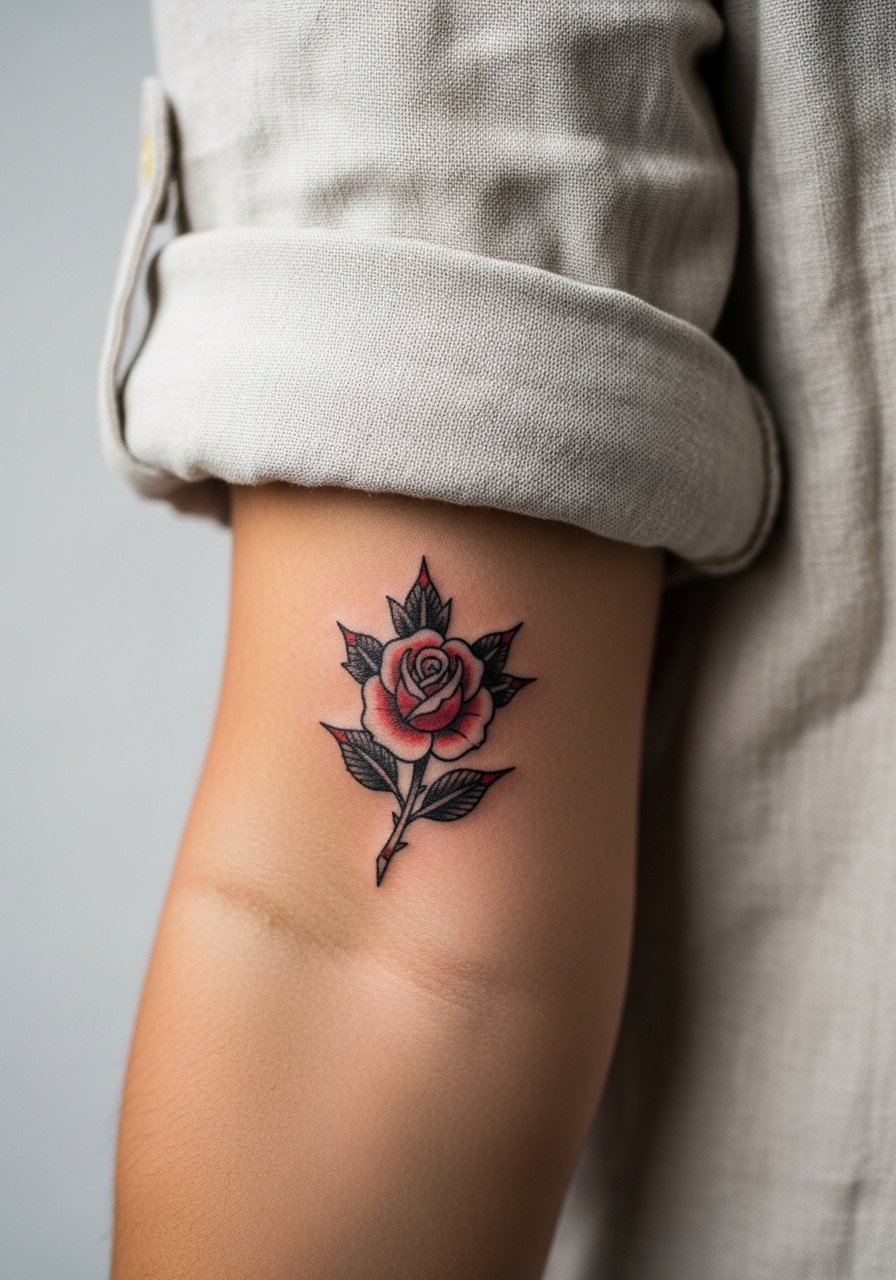
The outer forearm is forgiving on linework and a sensible spot for a small traditional rose. Pain is low and sessions run 30 to 60 minutes depending on shading. Tell your artist you want compact saturation and stipple shading rather than dense packed color for longer visual separation between petals. A common error is overfilling tiny petals so they merge after a year. At six months the saturation looks deep, and by year three you may notice softer edges, not a loss of form. Show it off with a rolled-up linen shirt so the tattoo is visible without excessive sun exposure. Expect a minor touch-up at year three if you get heavy sun exposure.
3. Small Swallow Near the Collarbone
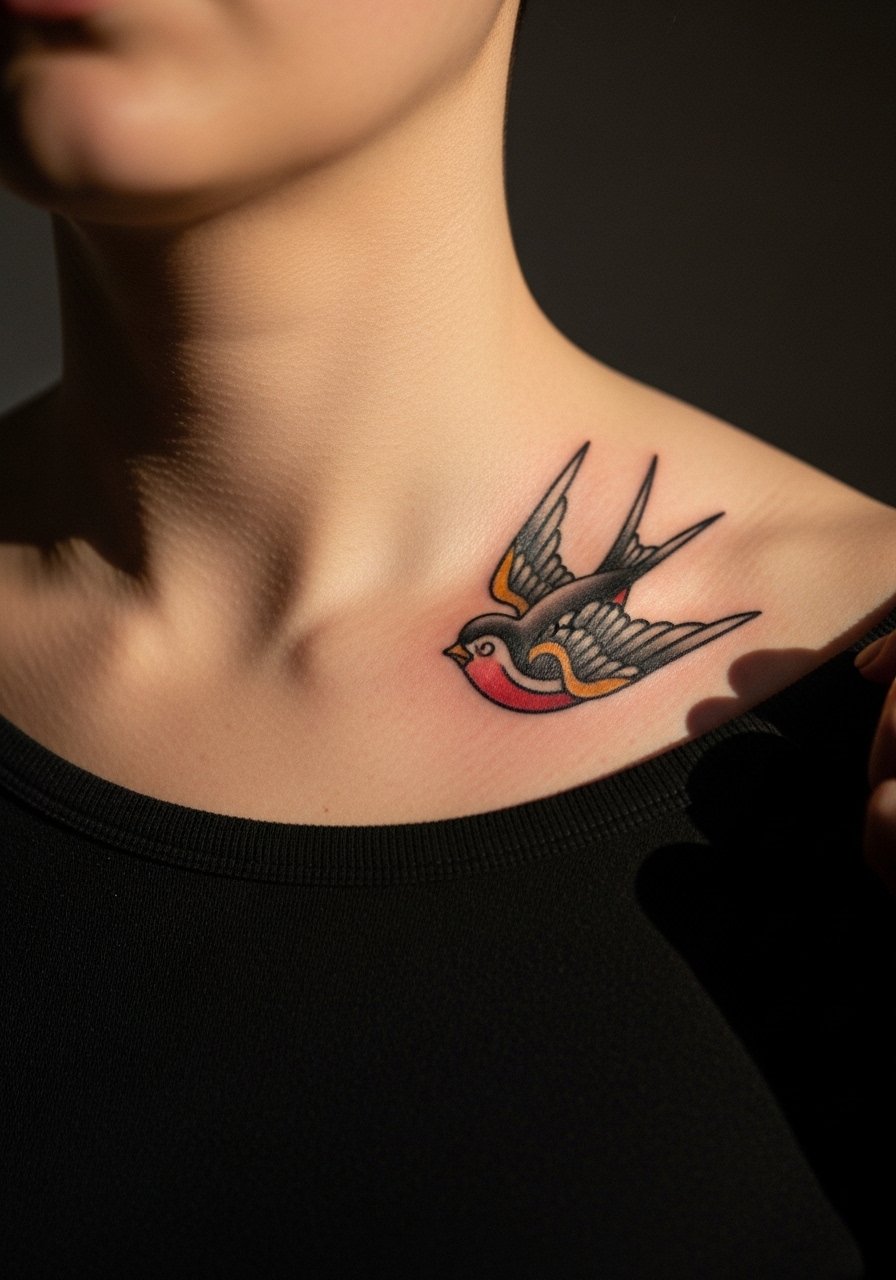
The collarbone makes a small swallow feel deliberate and wearable. Pain is moderate because the bone is close to the surface and session time is usually under an hour for a compact design. Ask for a slightly bolder outline and clean saturation that does not overcrowd the interior. A mistake is pushing too much interior detail into the tight space, which clouds with time. The piece looks crisp at six months and holds shape well if you avoid heavy sun. For evenings wear a thin chain pendant to frame the area without covering the work. If you plan on showing it off regularly, factor in sunscreen on exposed skin after healing.
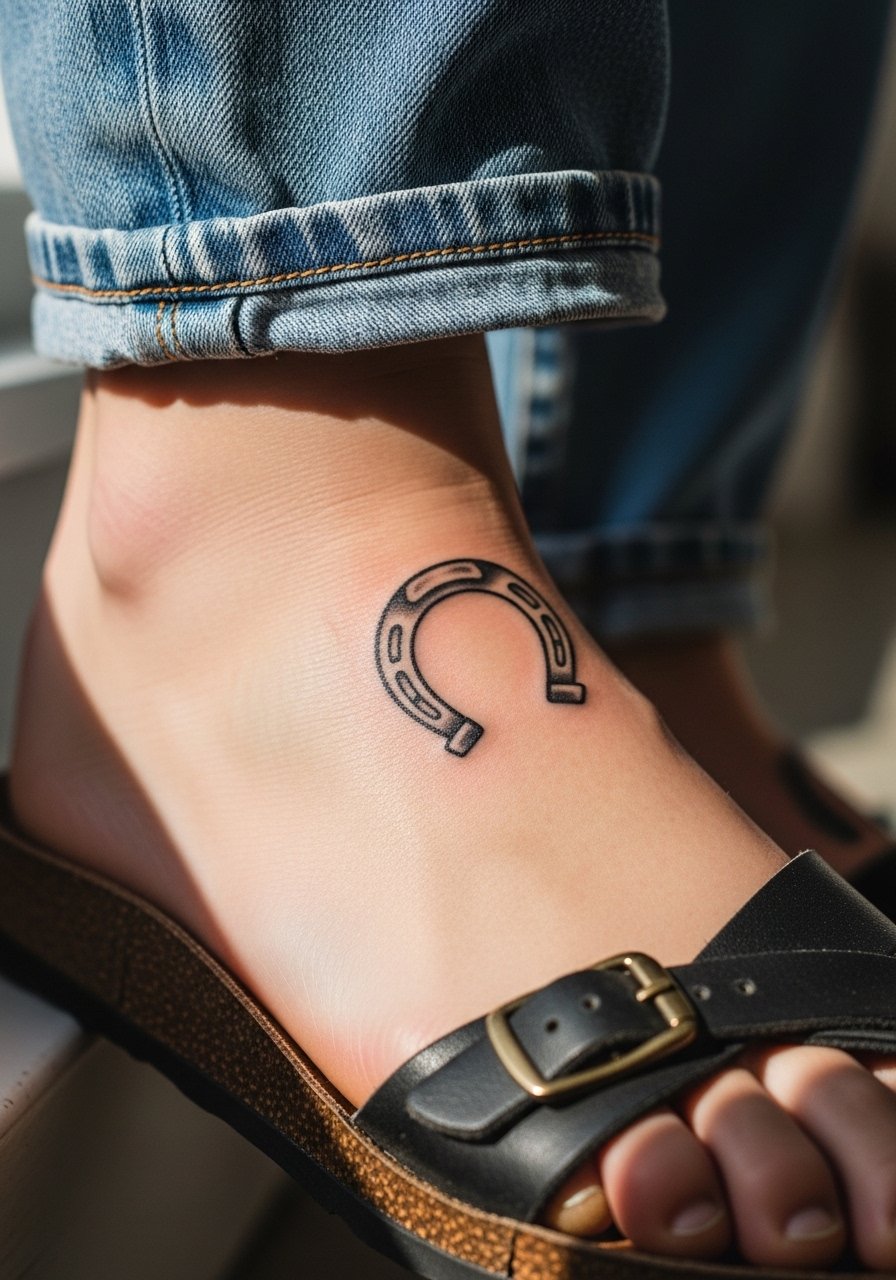
4. Classic Star on the Ankle
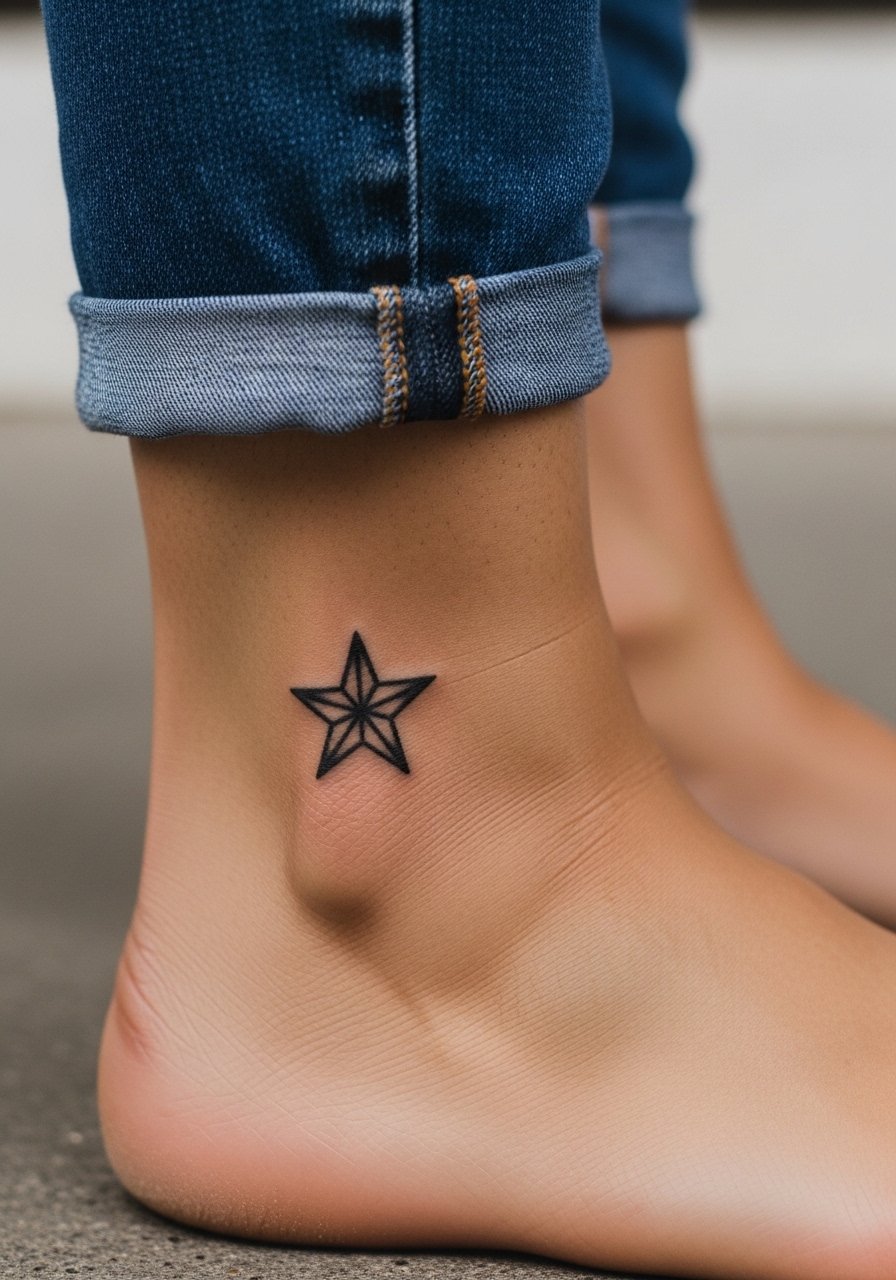
Ankle placements are visible and playful but sit in a high-friction zone. The session is quick, often under 30 minutes, and pain is moderate given low fat around the bone. Request clean, simple linework with enough gap between lines so the star does not merge after months of shoe rubbing. A frequent error is underestimating daily abrasion from socks and shoes. Expect a faded patchier look early if you wear closed shoes constantly. Pair this with open sandals or strappy sandals when you want to showcase the piece. Plan for a touch-up in year one to restore edge crispness if you wear closed shoes a lot.
5. Tiny Dagger on the Side of the Hand
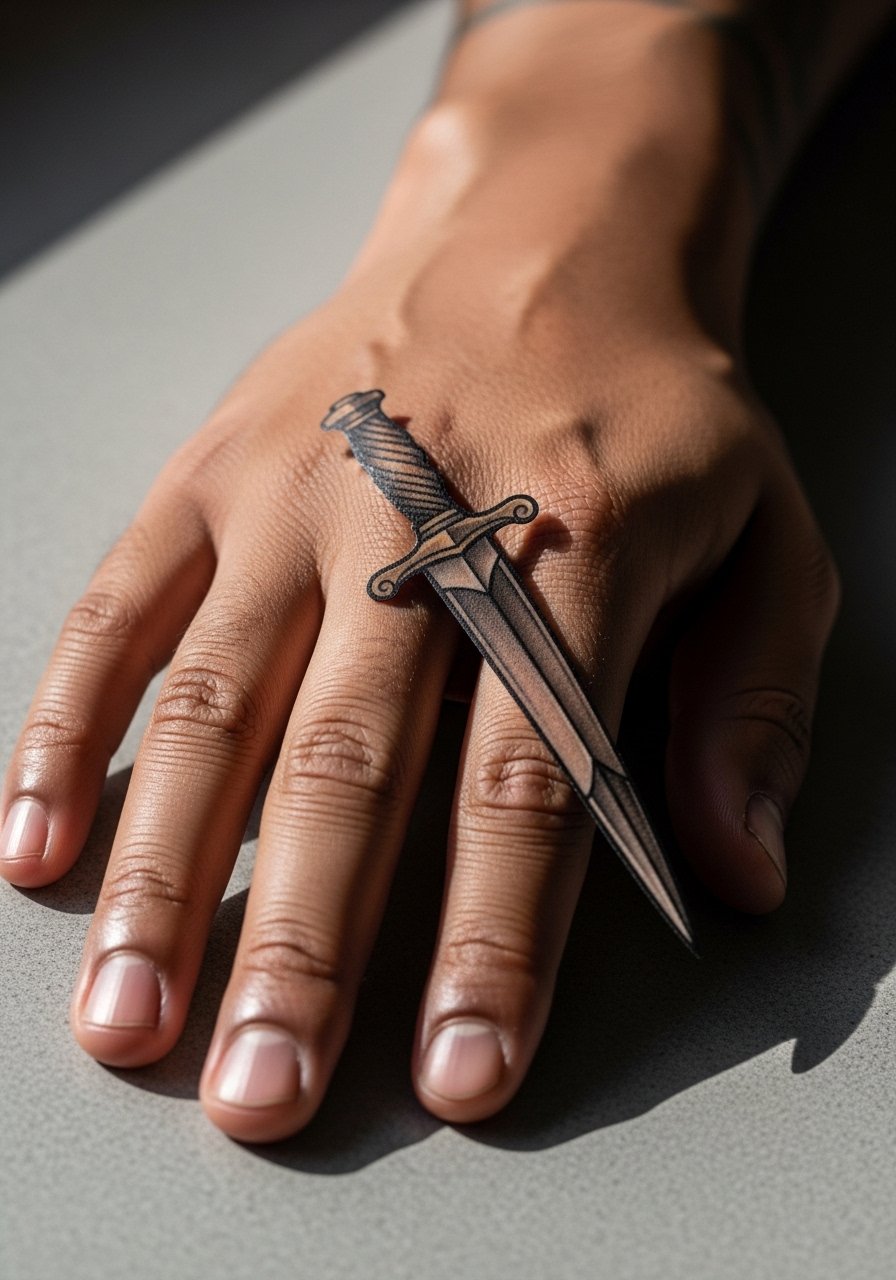
Hand tattoos still divide workplaces and social settings, so consider long term visibility before committing. The side of the hand is high on pain and exposure and sessions are short but intensive for clean linework. Artists split into two camps on tiny hand work. One group says the constant washing and thin skin mean lines will blur or fade quickly. The other group argues that with heavier outlines and bold saturation small pieces can remain readable for years. Ask the artist which approach they favor and expect a touch-up within one to two years. Style this area with minimal rings to keep attention on the work and try a simple stackable ring set that does not cover the tattoo. Be prepared for more frequent touch-ups than forearm pieces.
6. Micro Sailor on the Calf
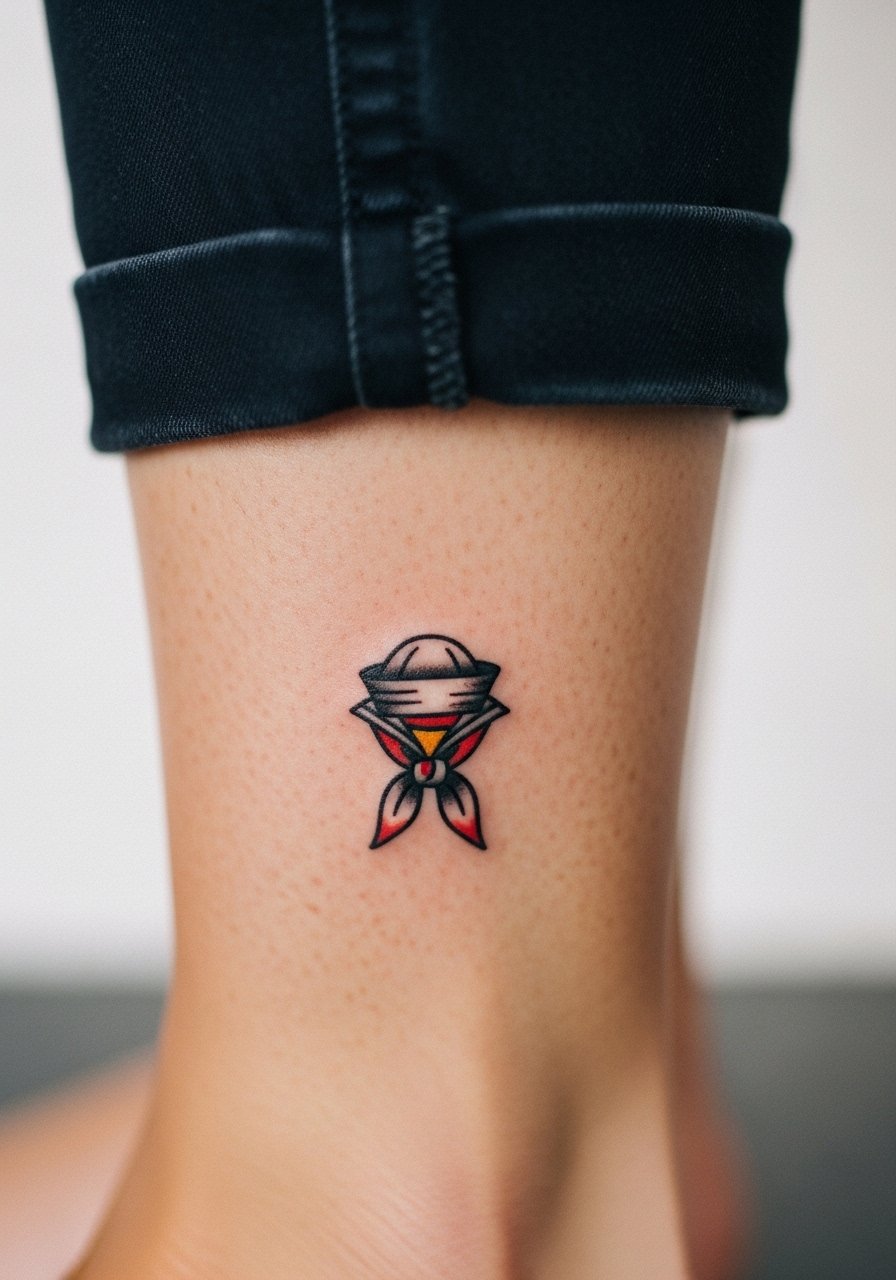
The calf is low on pain and forgiving when it comes to blowout risk, making it a good place for a compact traditional sailor or ship wheel. Sessions are typically 30 to 45 minutes. Ask for medium saturation with whip shading to keep texture without overloading the tiny shape. A common mistake is cramming too many elements into a small silhouette, which flattens as the skin moves. At two years the piece will hold better than wrist or hand placements because of reduced friction. Pair it with cropped trousers or canvas sneakers when you want it visible. Touch-ups are usually optional and depend on how often you expose it to sun.
Pre-Session Essentials
The wrist and hand pieces above heal differently from the thigh and calf work, so a few targeted items make checking in at the studio and the first week more comfortable.
-
Stencil transfer paper kit. Lets you preview the linework on skin prior to committing, which is helpful for small script and constellation ideas in the early list.
-
Topical numbing cream. Applied before shorter sessions eases hand and rib sensitivity without changing how the linework reads.
-
Thin protective film roll. Useful for ankle and finger placements that face constant friction in the first week.
-
Fragrance free gentle body wash. Cleanses areas like the forearm and calf without stripping natural oils that help saturation settle.
-
Aquaphor healing ointment. Thin application in the first few days keeps small linework supple and reduces scabbing that can pull pigment.
7. Mini Nautical Wheel on the Inner Bicep
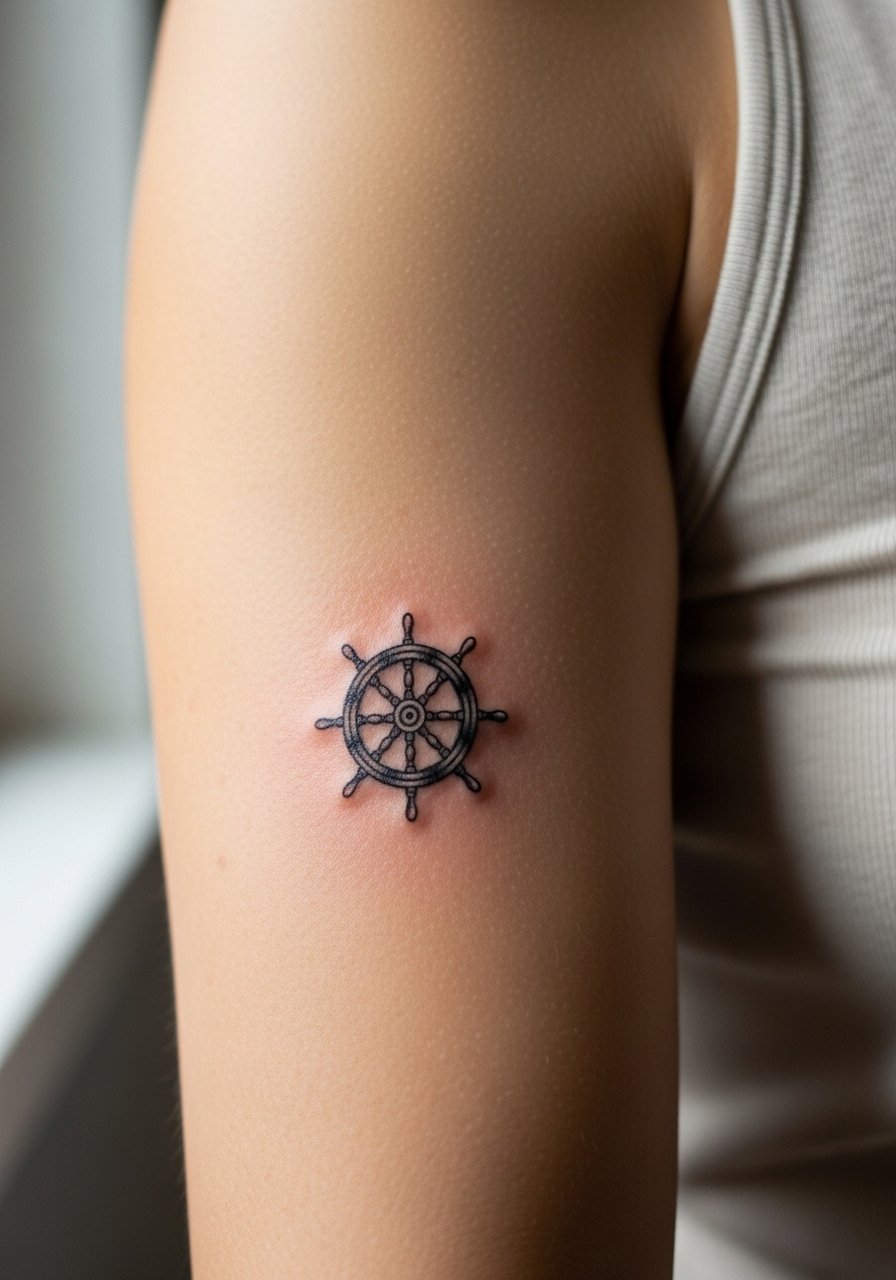
The inner bicep can hide a piece well but it is a touch tender. Pain ranges moderate to high depending on sensitivity and sessions run 30 to 50 minutes. For this spot ask for slightly deeper dot work instead of solid fill to avoid patches that blur with time. A misstep is requesting dense black fill in a tight area which can cause saturation pooling. At six months you will see defined linework and by two years dot-texture will keep form without turning into a block. For the appointment wear a loose tank top you can lift or pull aside for clean access. If you plan to keep the tattoo private, this placement is ideal.
8. Tiny Traditional Script at the Nape
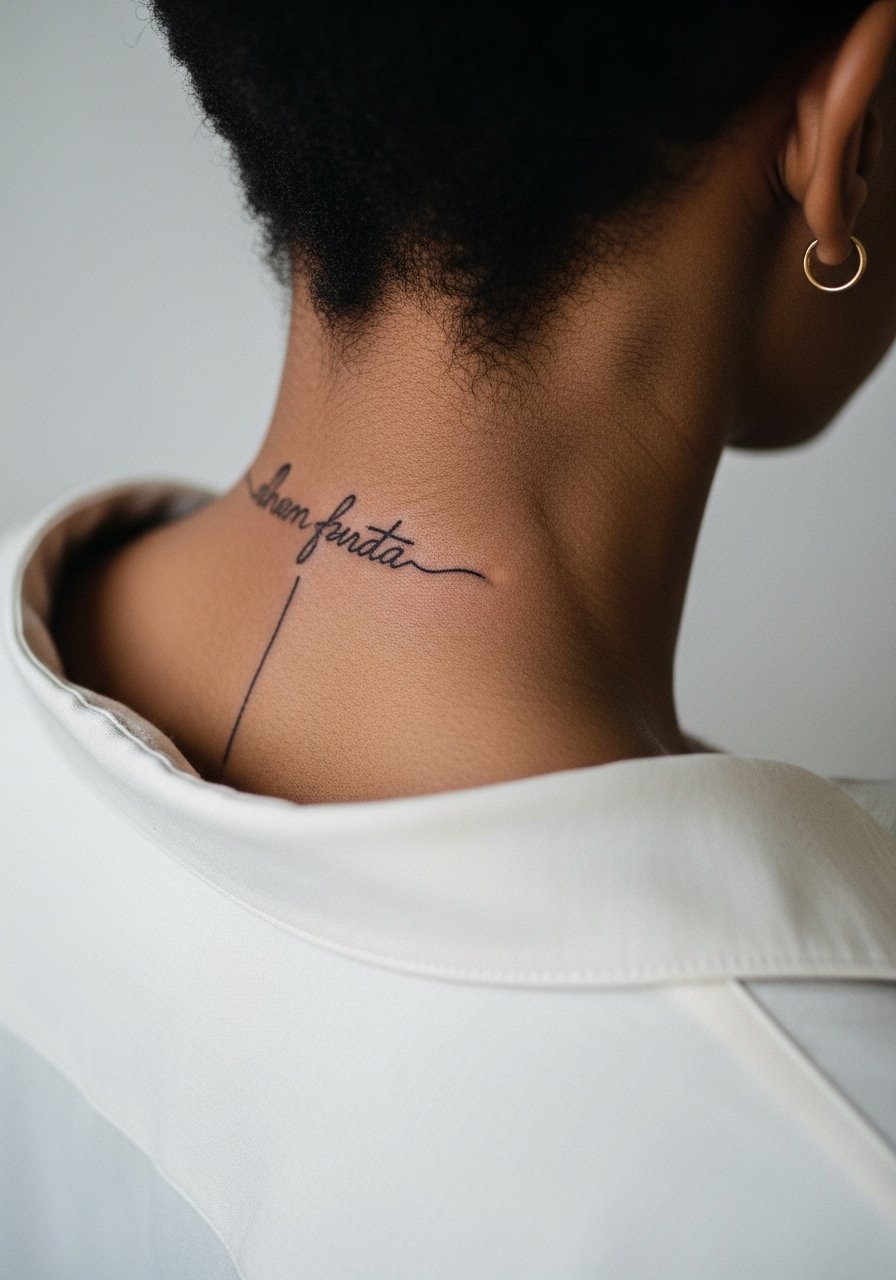
A short word or single name at the nape reads discreet and personal. Expect moderate pain and a session that often runs under 30 minutes. Ask for slightly bolder linework in script than you might for a wrist script to account for hair pulling and collars. A typical error is choosing an ultra-fine script that fades into legibility issues within eighteen months. The nape is prone to rubbing from collars and hair, so plan gentle styling in the first weeks. Wear a wide-neck shirt to the session so the artist can access the area without tugging on hair. Consider the work semi-visible with certain hair styles.
9. Micro Pin-Up on the Ribcage

Ribcage pieces are gorgeous when done with enough spacing, but fine line work there sparks debate. One camp says the skin stretch and breathing blur fine lines within two years. The other camp argues proper needle depth and spacing keeps fine work stable. For a traditional small pin-up pick bold outlines and avoid overly intricate facial detail that will smudge. This placement has higher pain and sessions vary from 40 minutes to two hours depending on shading. Expect the piece to look sharp at six months and to soften over several years. Wear a fitted sports bra to the session so the artist can access the area easily. If you want long term clarity, ask about spacing and outline weight during your consultation.
10. Tiny Horseshoe on the Top of the Foot
Top of foot tattoos face friction from shoes and frequent movement which can affect saturation. Expect a sharp sting during the session and 20 to 40 minutes of work. Ask your artist for a crisp outline and minimal interior fill to limit early fading. A common mistake is asking for heavy color here which often wears unevenly. At two years the outline is usually still visible but may need a touch-up due to daily abrasion. Show the piece off in summer with strappy sandals. Budget a possible touch-up at year one if you wear closed shoes often.
11. Micro Script Between the Fingers
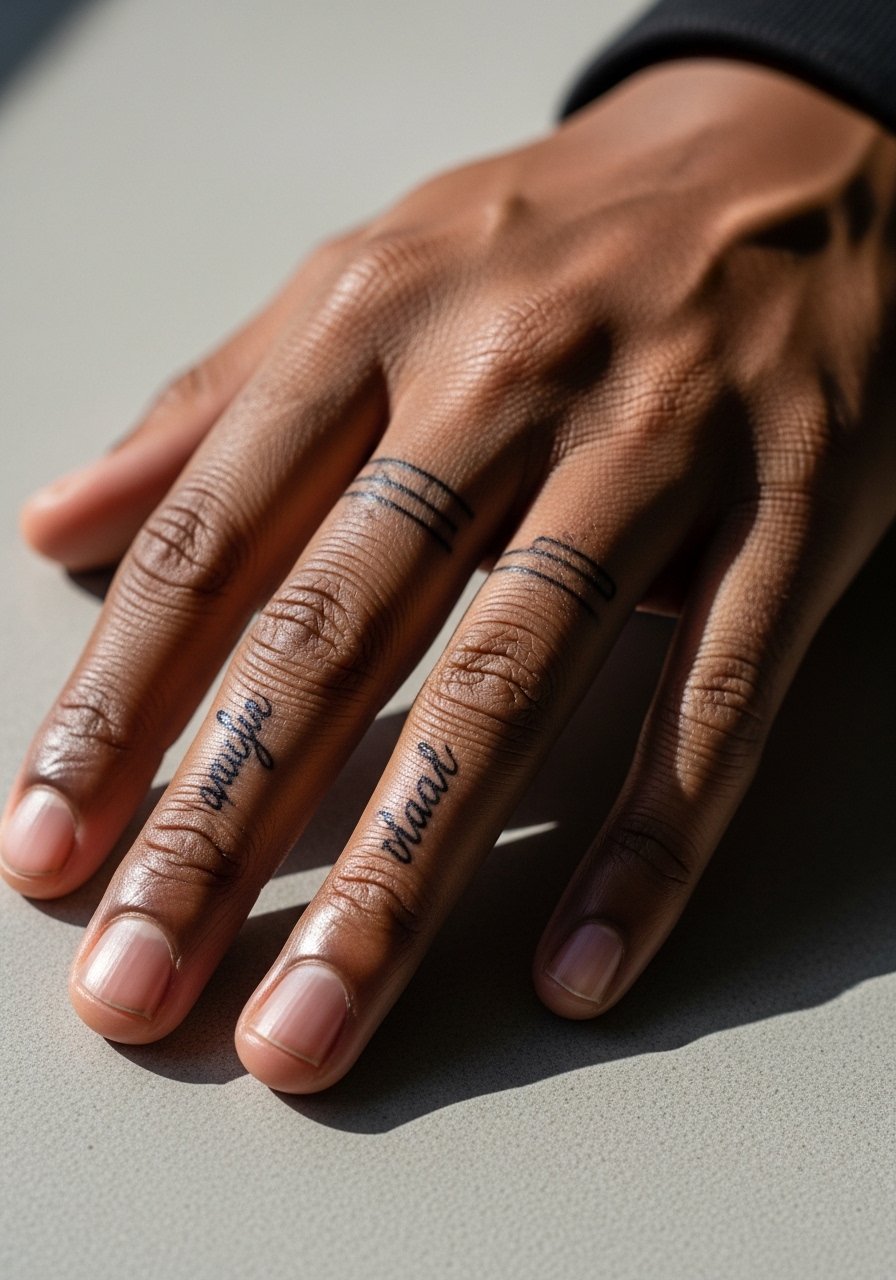
Finger and interstitial scripts are intimate and fade faster than forearm work. Pain is concentrated and sessions are short. Artists divide on whether these hold up cleanly. One group favors bolder letters and forgiving spacing, the other recommends avoiding script there at all. If you proceed, choose very simple lettering, ask for slightly heavier strokes, and accept touch-ups may be needed every one to two years. A typical mistake is requesting delicate cursive that becomes unreadable quickly. Pair small finger work with a stackable ring set that frames the area without covering the script. Think of this placement as high maintenance compared to arm pieces.
12. Tiny Sunburst on the Sternum
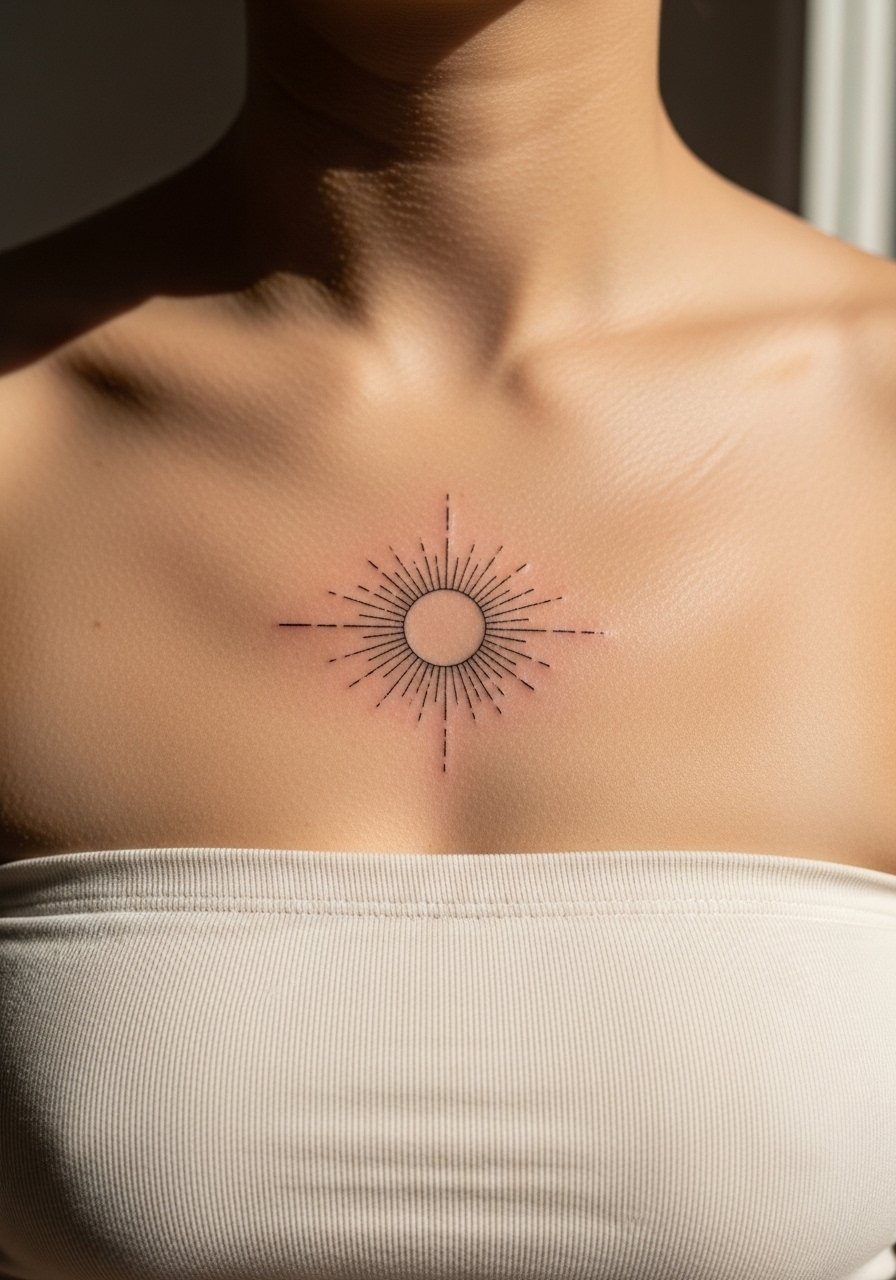
Sternum work sits between visibility and private wear and requires specialized experience. Pain can be high and session time varies by shading and size. For a small traditional sunburst request compact spacing and moderate saturation to avoid dense patches that darken. A common error is pushing too much black into the center which can become a heavy spot as it heals. Plan a fitted bandeau or sports bra to the session so the artist has clean access without full exposure. If you think career considerations matter, this placement is semi-hidden under clothing. Expect touch-ups depending on how often the area sees friction from clothing.
13. Tiny Anchor Behind the Ear
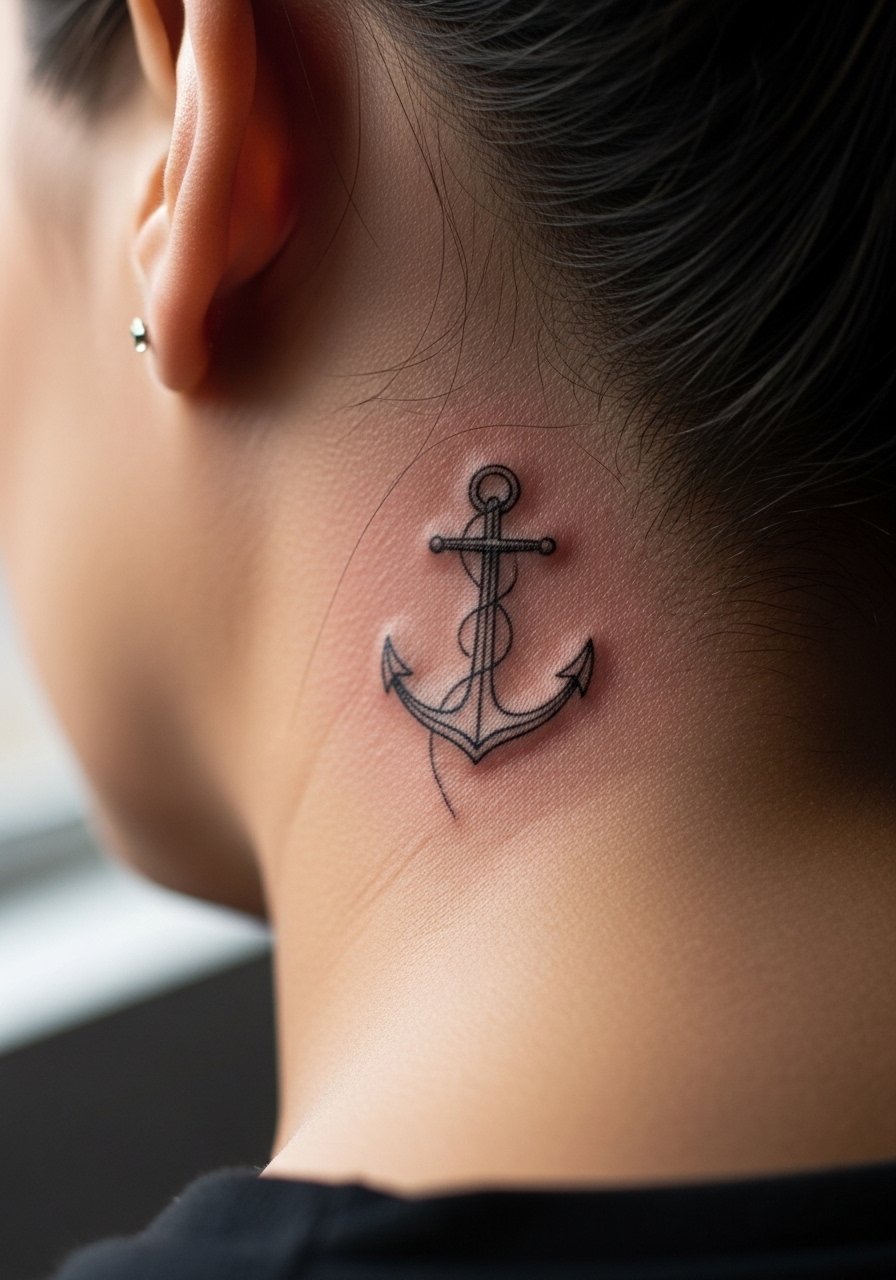
Behind the ear pieces are discrete and quick to execute. Expect moderate tenderness and a session under 30 minutes. The area responds well to bold outlines rather than ultra-fine detail. A frequent mistake is requesting tiny, intricate designs that fade into blur behind hair. For the session pull your hair back with a minimal claw clip so the artist has steady access without tugging. Note that visibility is mostly with short hair or updos, which makes this placement a choice for people who want optional exposure.
14. Mini Traditional Ship on the Shoulder Blade
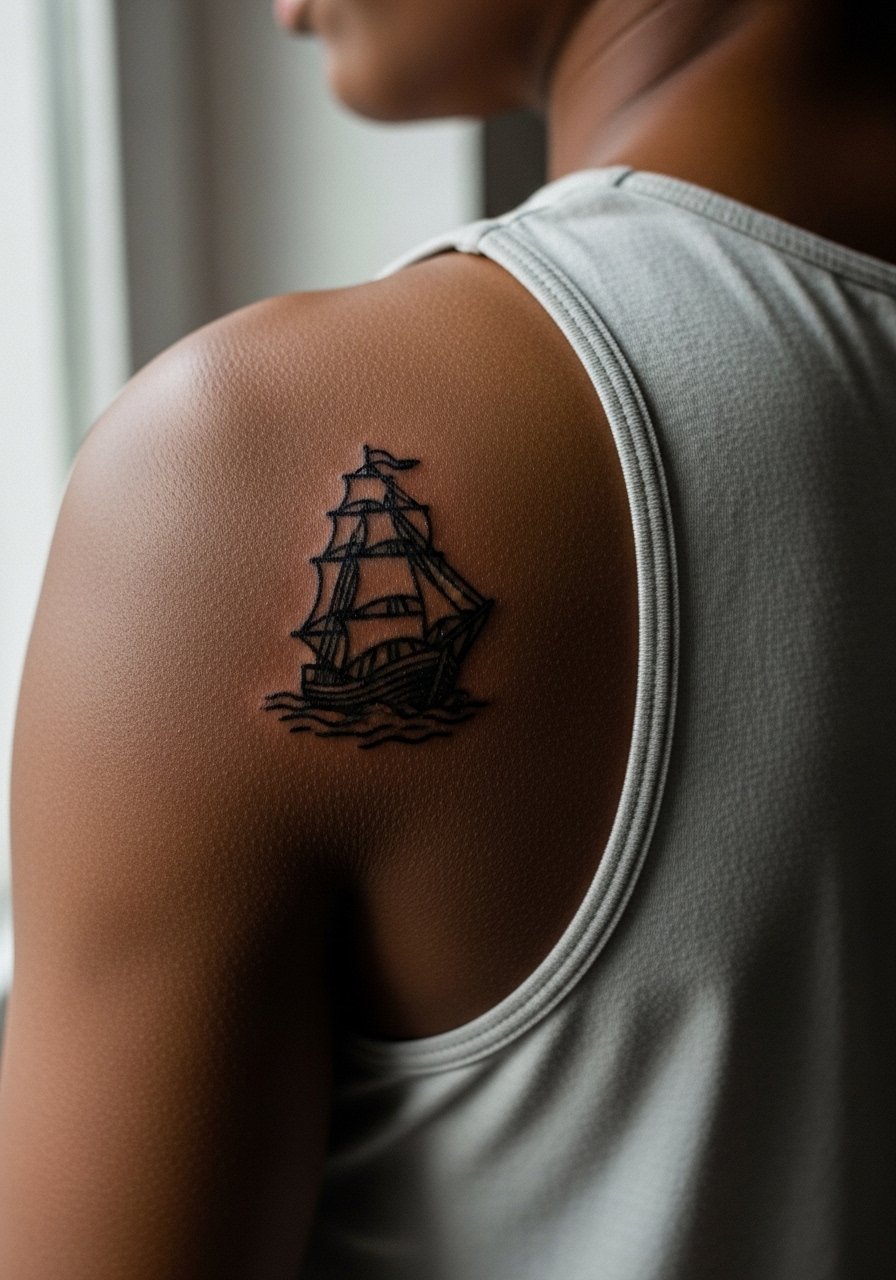
The shoulder blade is a forgiving canvas with low blowout risk and moderate pain. Sessions are comfortable and usually under an hour for small traditional pieces. Ask for crisp linework and controlled saturation that complements the curvature of the shoulder blade rather than fighting it. A mistake is clustering too much detail into a small ship silhouette. At two years the design tends to maintain shape reliably because friction is low. Wear a loose tank top to the appointment so access is simple and you avoid stretching the skin during the session. Touch-ups are typically cosmetic and infrequent.
15. Tiny Compass on the Lower Back
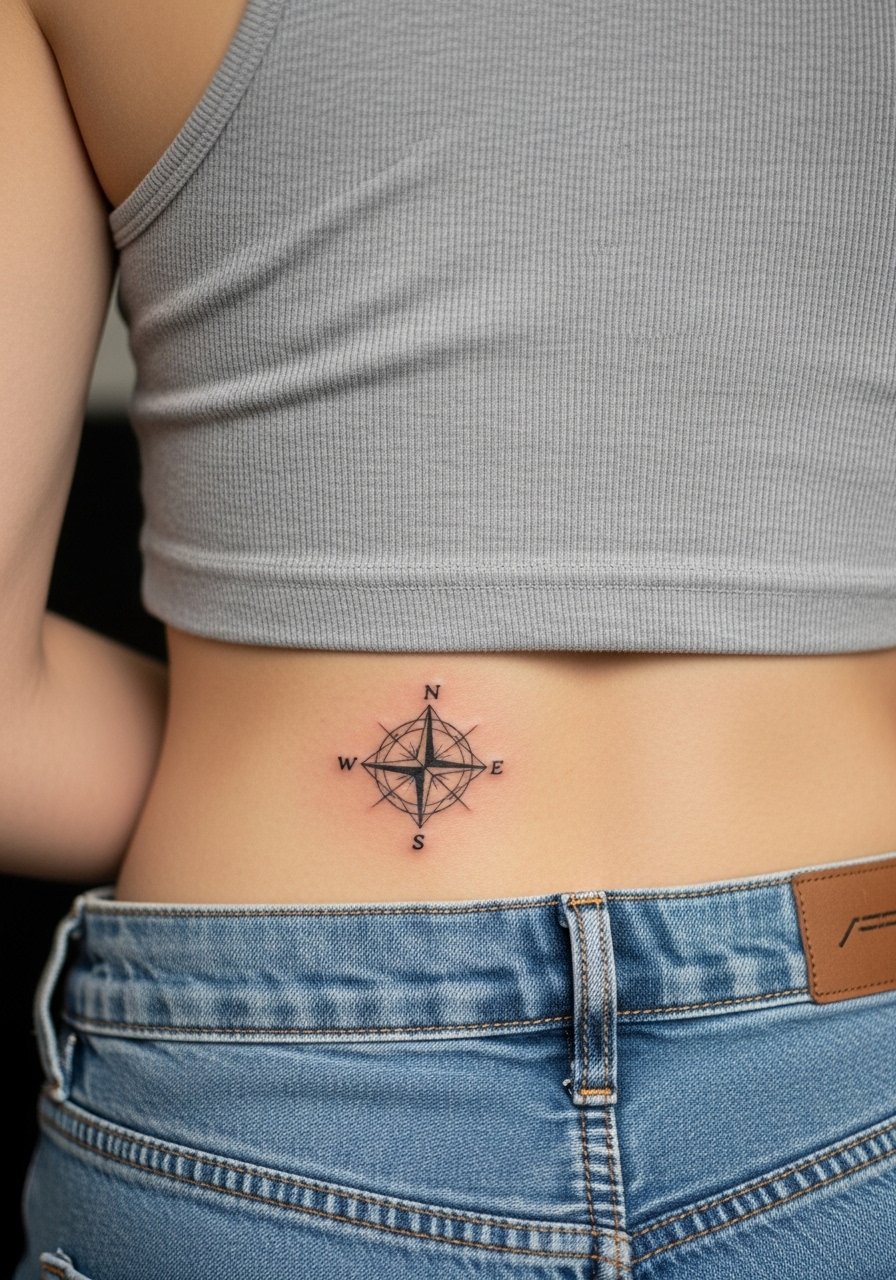
Lower back placements sit in a mid-friction zone and are discreet under most clothing. Pain is moderate and sessions are brief for small marks. For a tiny compass request balanced linework and negative space rather than dense black that can pool. A common error is over-detailing which reduces legibility once the skin settles. Show-off pairings include low-rise or high-waisted silhouettes that reveal a strip when desired. Try high-waisted jeans to frame the area without constant exposure. Expect a touch-up if you notice spreading after a year or so.
16. Micro Botanical on the Hip
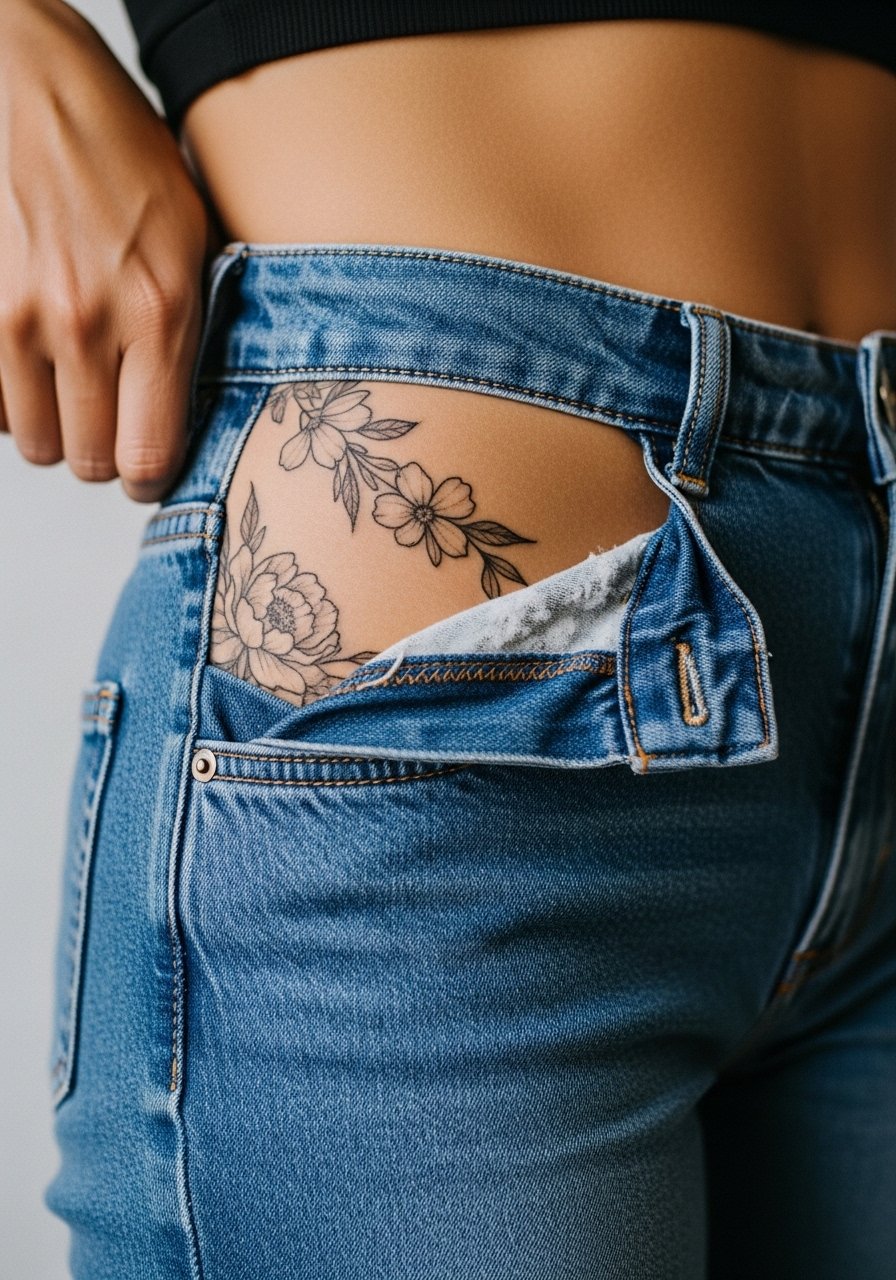
Hip placements are intimate and sit in a spot that changes with body movement. Pain ranges from moderate to high and the session is often brief for small botanicals. Ask for a mix of linework and dot work to keep delicate stems readable over time. A frequent mistake is cramming dense shading into the curve which can flatten as the skin stretches. For the session wear high-cut shorts or a swimsuit bottom so the artist can reveal only the needed area. Since this is a lower-visibility placement you can preserve it by limiting frequent sun exposure during the first year.
17. Tiny Lighthouse on the Outer Forearm Near the Elbow
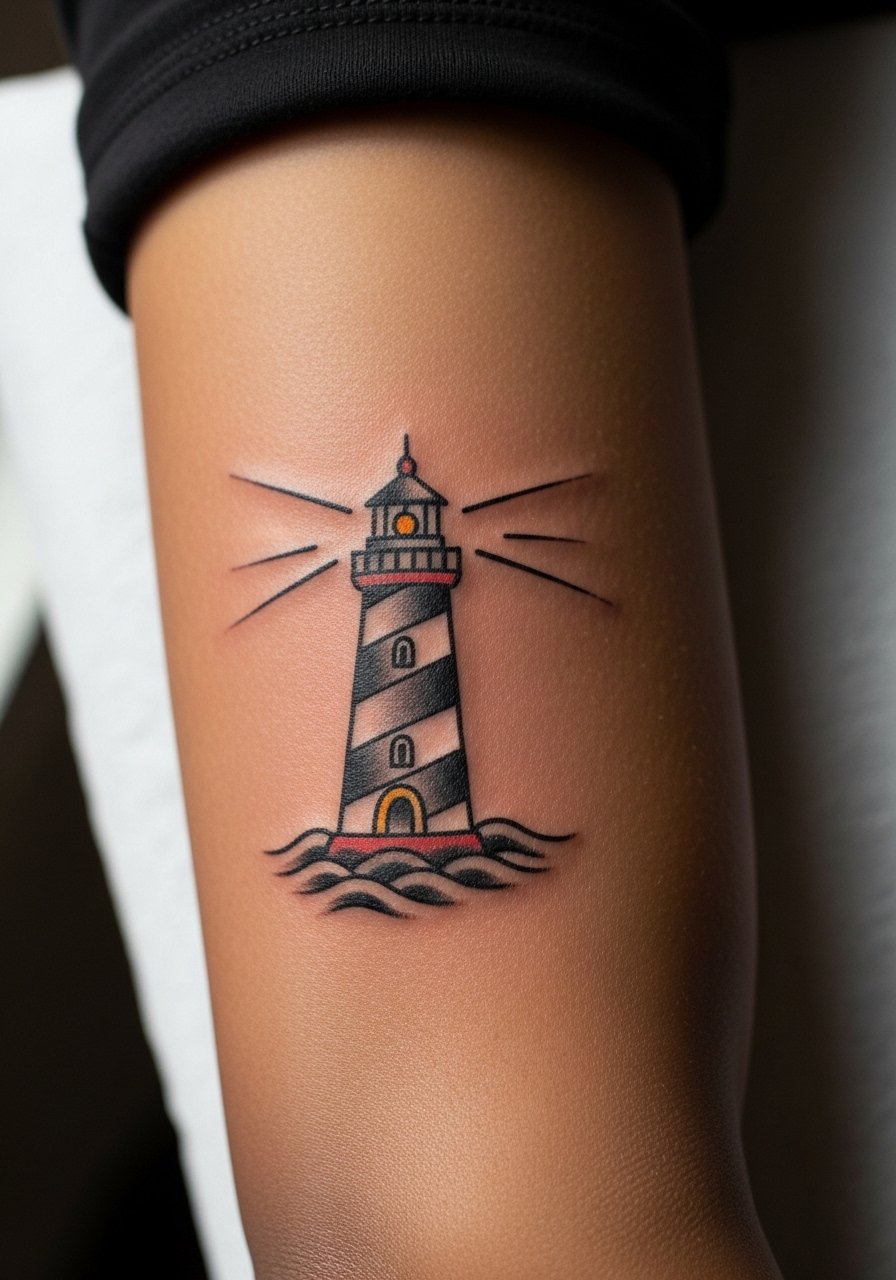
The outer forearm near the elbow offers a nice flat plane for a small lighthouse and delivers good visibility with low blowout risk. Expect mild to moderate pain and a session of 30 to 60 minutes depending on shading. Ask for clear negative space and medium saturation so the structure reads from a distance without turning into a block. A mistake is placing too much tiny detail near the crease where movement will distort small elements. At two years the piece generally retains its shape if you protect it from long periods of sun. For the appointment wear a loose button-down shirt you can roll up or pull aside without tugging the skin.
Frequently Asked Questions
Q: Will small traditional linework on the wrist need touch-ups more often than a forearm piece?
A: Yes, wrist work typically faces more washing and friction so it can require touch-ups sooner than the forearm. I usually tell people to expect a possible touch-up around year two to three for tight linework. Keeping the area protected from sun helps prolong clarity.
Q: How painful is a ribcage micro tattoo compared to the outer forearm?
A: The ribcage is generally more painful because the needle rides close to bone and the skin stretches with breath. Outer forearm sessions are lower pain and more comfortable. If you care about pain management ask about short breaks and topical numbing in consultation.
Q: Are finger and hand tattoos professional risks in 2026 style-conscious workplaces?
A: Some industries remain conservative and count visible hand work against applicants. From what I have seen, creative and service fields are more tolerant than corporate settings. Consider placement carefully if career flexibility matters.
Q: What should I wear to a sternum or ribcage session to make access simple?
A: Bring a fitted sports bra or bandeau that you can lift slightly without exposing more than needed. A fitted sports bra makes the session easier for both you and the artist and reduces wardrobe hassle during touch-ups.
Q: How do I find an artist who specializes in small traditional pieces without relying on a single Instagram handle?
A: Use discovery paths like local shop directories, hashtag searches for traditional pinups or sailor tattoos, convention portfolios at shows near you, and community forums where people post healed photos and recommendations. Look for healed photos in portfolios rather than just fresh work.
