
The tattoos that actually look good after five years are not always the ones that earned the most likes the day they were posted. Heavy outlines and saturated primaries tend to hold their form where pin-sharp fine work softens into a blur. If you want forearm ink that still reads clean after gym seasons, travel, and sun, these traditional forearm ideas focus on placements, line weight, and wardrobe choices that help your piece age the way you hope.
1. Swallow on Outer Forearm
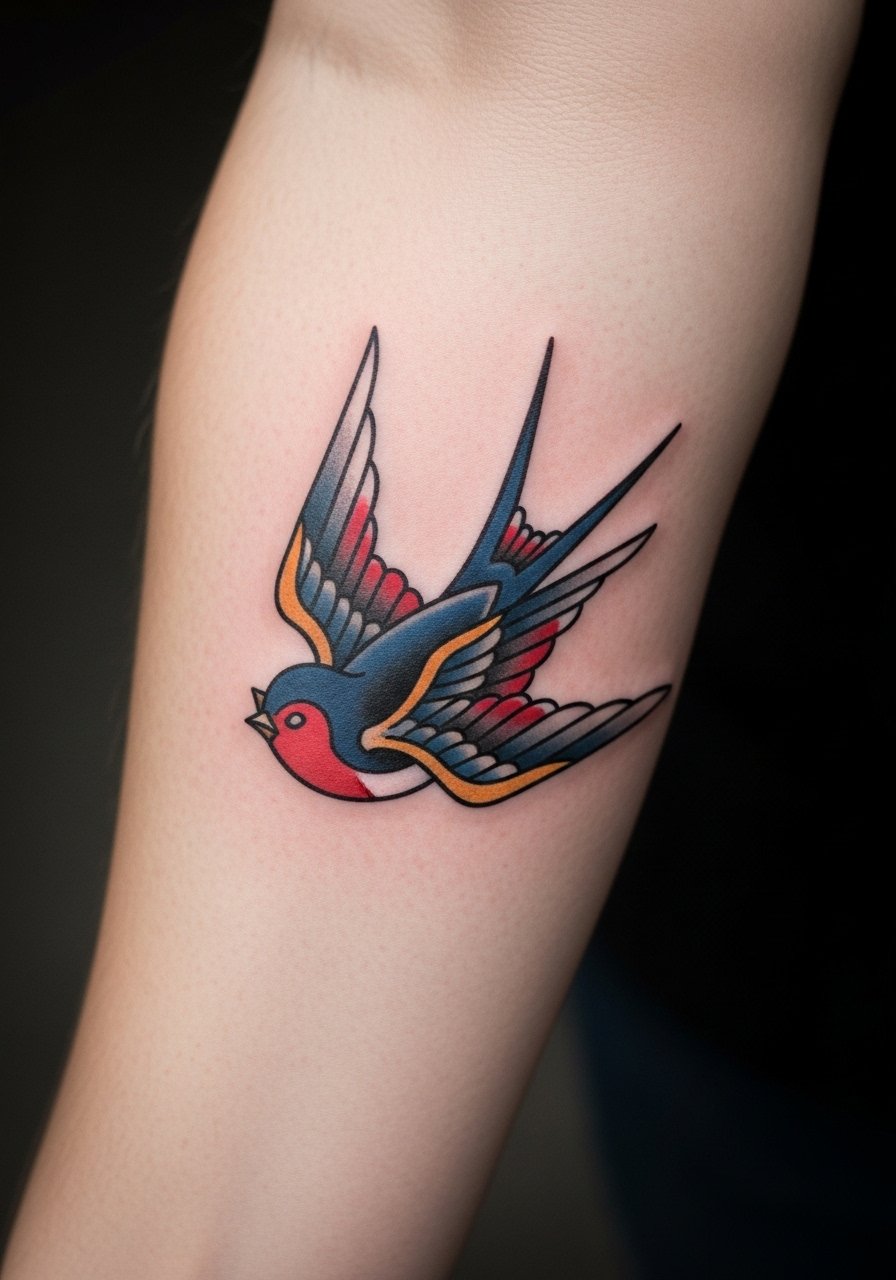
A swallow along the outer forearm reads nautical and personal without being over-the-top. Tell your artist you want a 4-6 inch layout that follows the arm curve so the wing tips sit where you naturally roll a sleeve. The big debate here is fine line versus thick trad outlines. One camp argues fine details look modern and delicate. The other camp says thick black outlines survive sweat, gym friction, and time. I lean toward stronger linework for forearm swallows if you plan to show them while you lift. For session wear, a short-sleeve crew works fine. Pair the healed piece with a leather wrap bracelet to balance the nautical vibe.
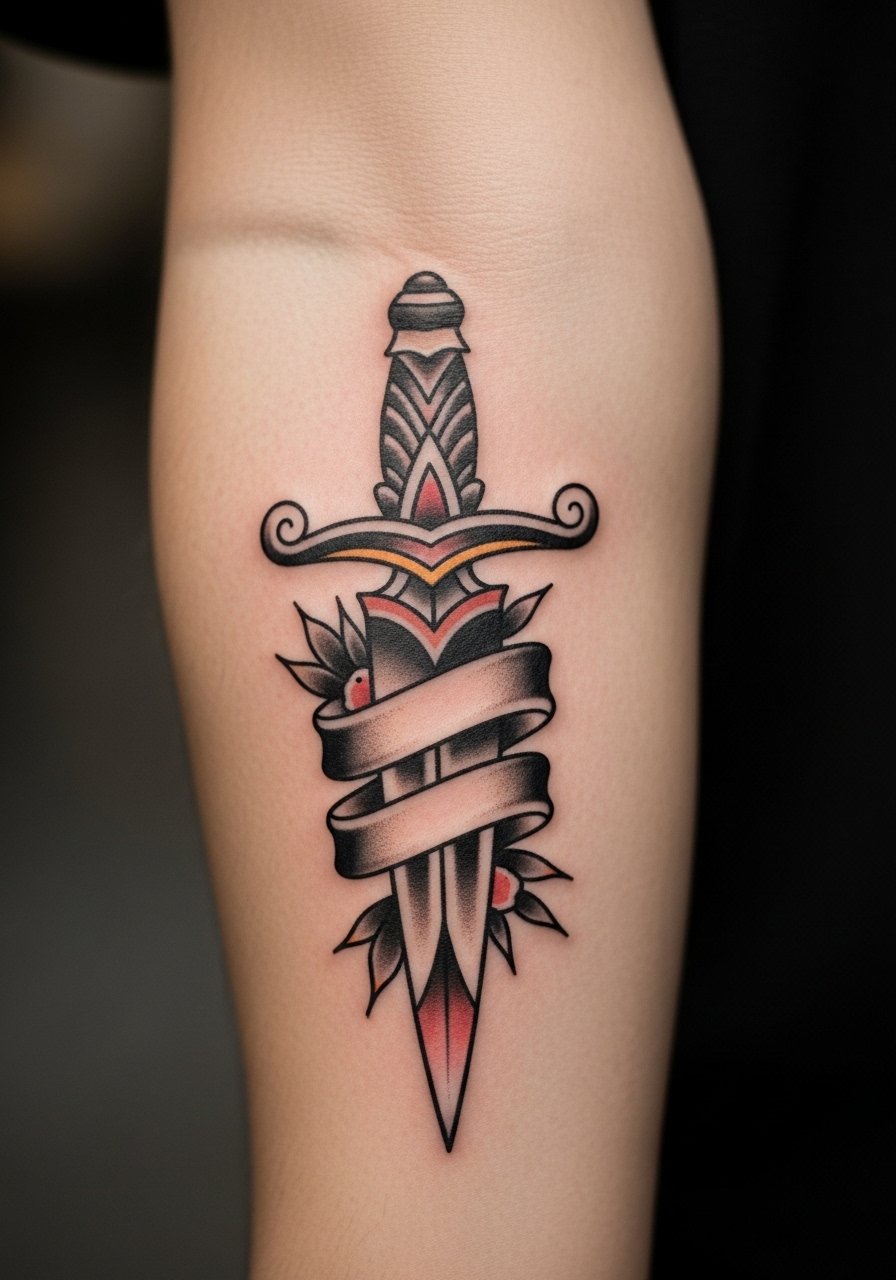
2. Dagger Through Rose on Inner Forearm
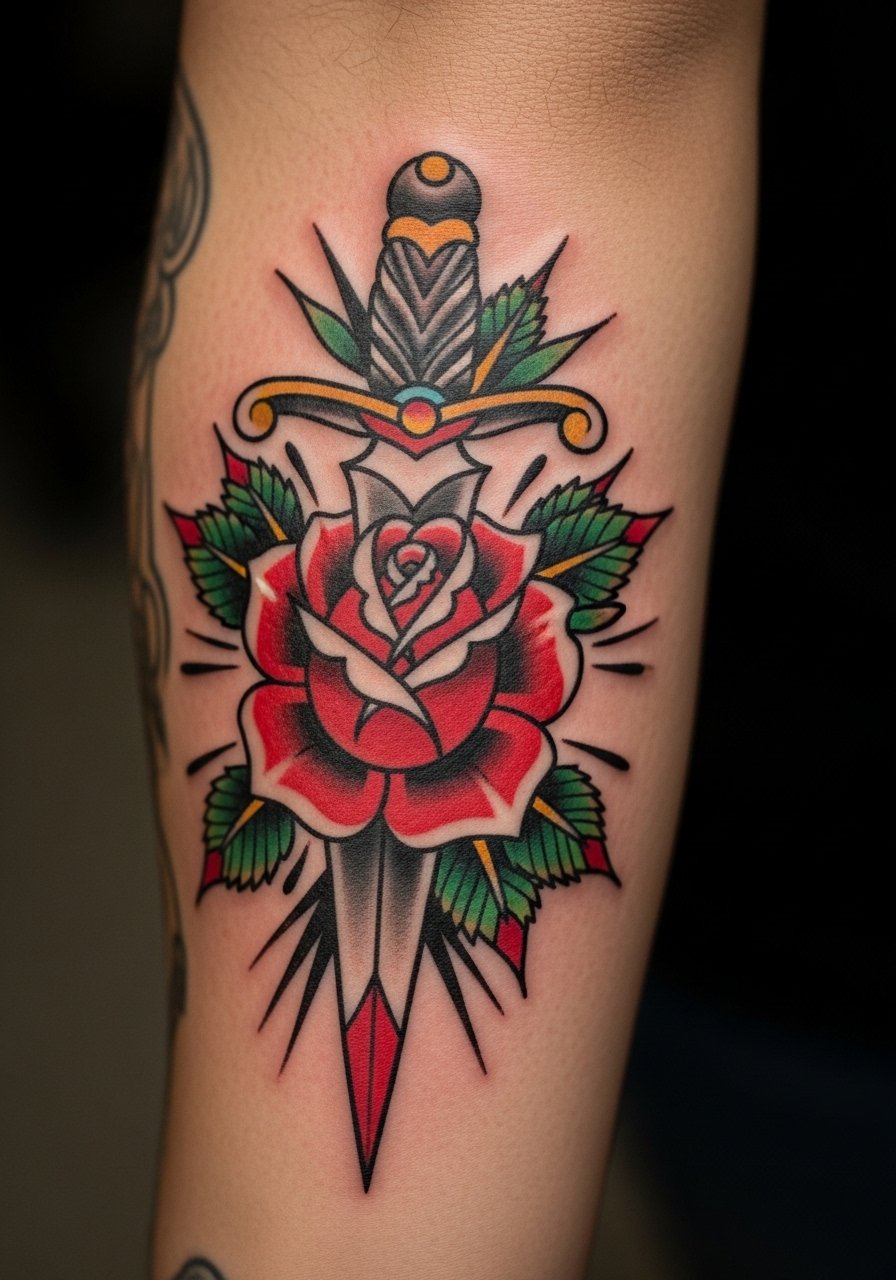
This vertical dagger-through-rose sits well on the inner forearm because the skin there moves less when you flex. Ask your artist for a slightly narrowed banner and deeper black outlines around the blade so the contrast stays crisp as the ink settles. Fair warning on pain: the inner forearm is less painful than ribs but the shading near the muscle belly can sting on long fills. A common mistake is asking for tiny lettering on the banner; the text will blur if it is too small. For showing it off, a rolled chambray shirt frames the inner arm nicely. Try a chambray button down shirt when you want people to glance at the piece.
3. Panther Prowling Across Outer Forearm
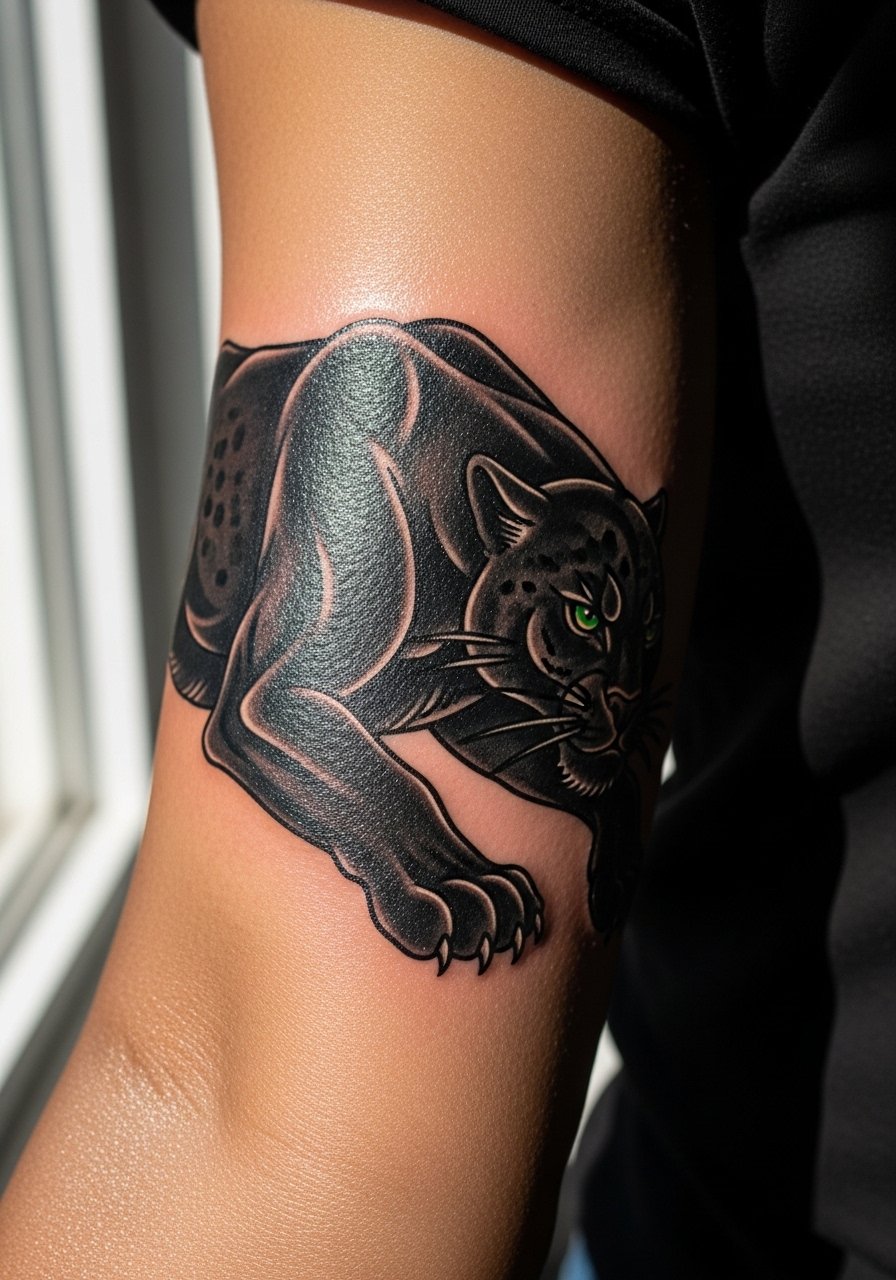
The panther is the forearm's "granddad spot" hero for good reason. Use a 6-8 inch horizontal layout that follows the arm's natural line so the cat looks like it's moving across your limb. This design is also useful as a cover-up because heavy black saturation conceals older scripts. Expect two sessions if you want deep saturation and eye details. A real mistake is trying to make a panther too small; the spots and whisker shading need room. If you want a casual show-off look, roll the sleeves on a fitted white tee and add a vintage bandana in your back pocket for a retro edge.
4. Anchor with Banner Wrap
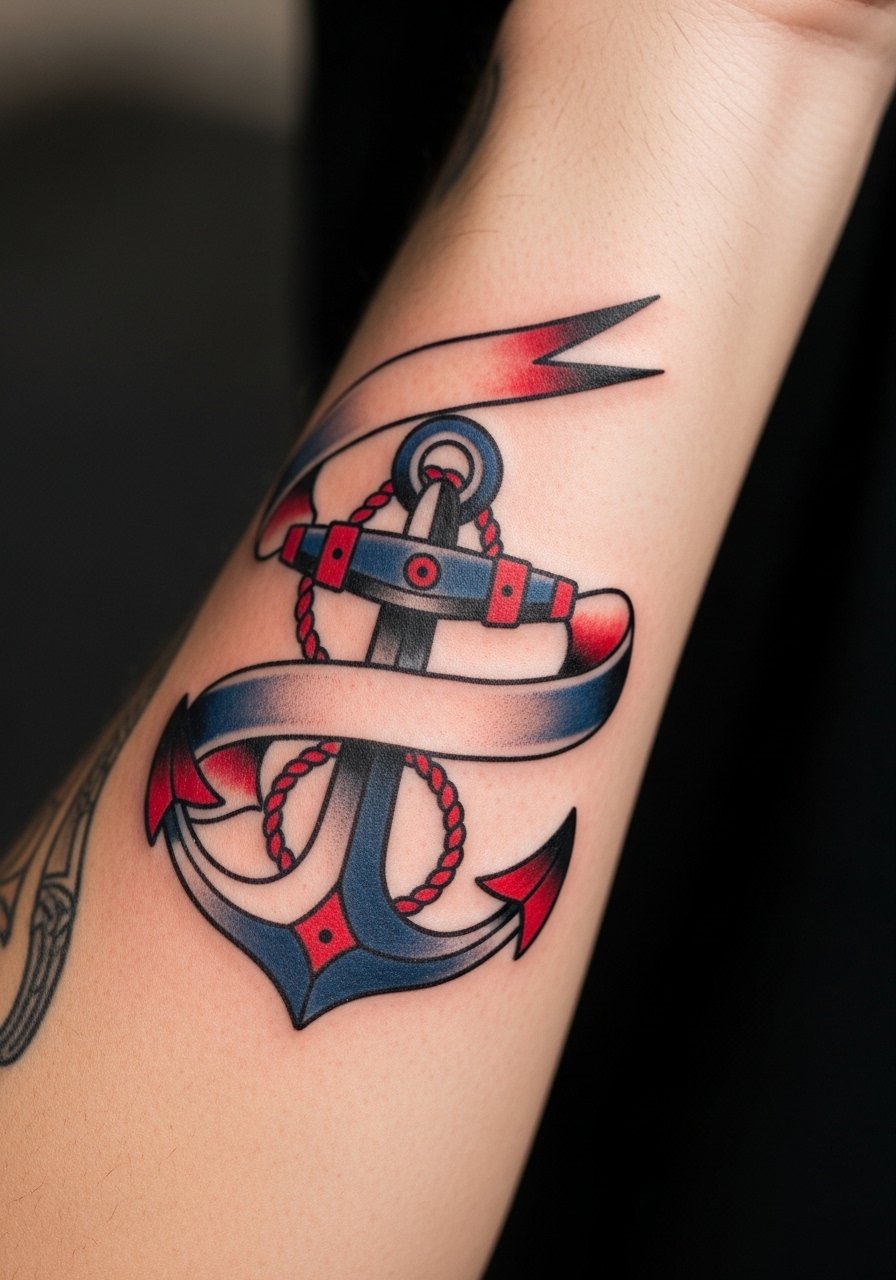
Anchors wrap neatly around the forearm, which makes them ideal for people who want something that looks balanced from any angle. When consulting, specify whether you want the anchor to sit lengthwise or as a wrap. Horizontal banners across the muscle can warp if you gain or lose significant weight, so ask for a vertical or slightly diagonal banner to resist distortion. One common regret is placing the banner exactly along a muscle crease. For sessions, wear an open flannel you can pull aside. For show-off outfits try an open flannel shirt men layered over a plain tee.
5. Eagle Head on Upper Forearm

An eagle head that lands near the elbow reads strong and works well for veterans or those wanting a patriotic edge. Go 5-7 inches with heavy black anchors and gold highlights for beak and eye areas. The elbow transition deserves an experienced hand because the skin and motion there can cause blowout if the artist pushes too deep. A frequent error is letting an artist crowd the beak with tiny feathers; give the elements breathing room. Pair the finished piece with a partially zipped bomber or a fitted bomber jacket men olive to draw attention upward without exposing the elbow seam.
6. Heart with "MOM" Banner on Inner Forearm
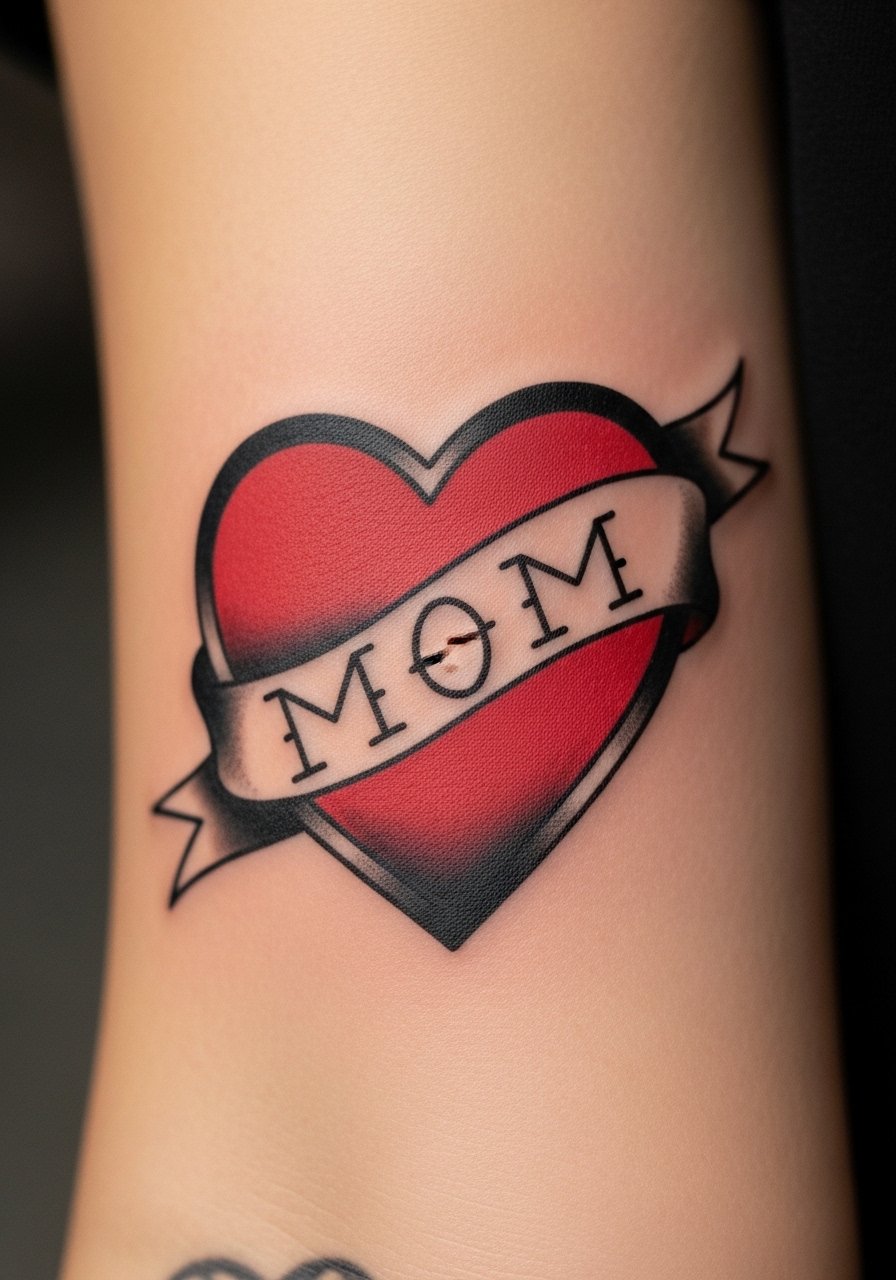
The heart with a "MOM" banner is a staple for a reason. Keep the heart around four inches so the banner lettering stays legible for years. A common early mistake is asking for filigree around the banner that creates too much fine detail close to the edge. For inner-forearm placement, hydration helps the ink settle. Show it off with a rolled-sleeve oxford or leather cuff on the opposite wrist. A slim fit oxford shirt looks effortless with an inner-arm tribute and gives the artist clear access on session day.
Studio Day Picks
The first six designs above span outer and inner forearm work and ask for different healing approaches. These items help with friction zones, color packing, and the first-week routine that traditional forearms demand.
-
Tattoo Goo aftercare balm. A matte, non-greasy option people mention for color-packed trad pieces, useful during hot weeks when heavy ointments feel clogged.
-
Australian Gold H2O Splash. A lighter foam alternative for showers during summer heals, handy if your anchor or swallow sits where sweat and salt can irritate.
-
Frida Aftercare Spray. Sterile mist that lets you clean outer forearm pieces without rubbing delicate linework in the first days.
-
Coco Butter Lotion. Gentle hydration for winter months when healed saturation needs a little extra skin support, especially around elbows and bend zones.
-
Hustle Butter. A thinner balm many people use instead of heavier ointments to avoid pore-clogging on color-packed trad tattoos.
7. Skull with Crossed Swords

A skull with crossed swords makes a strong forearm center that can be expanded into a sleeve. Aim for a 6 inch composition with white highlights for contrast. The mistake that ages poorly is packing too many tiny teeth lines and small shading strokes; over time those areas can merge. For session feeling, expect heavier buzz during the fill and a second visit for saturation. It pairs well with dark denim and workwear aesthetics. Wear a plain white tee slim on reveal days so the skull reads clearly against neutral fabric.
8. Ship at Sea on Outer Forearm
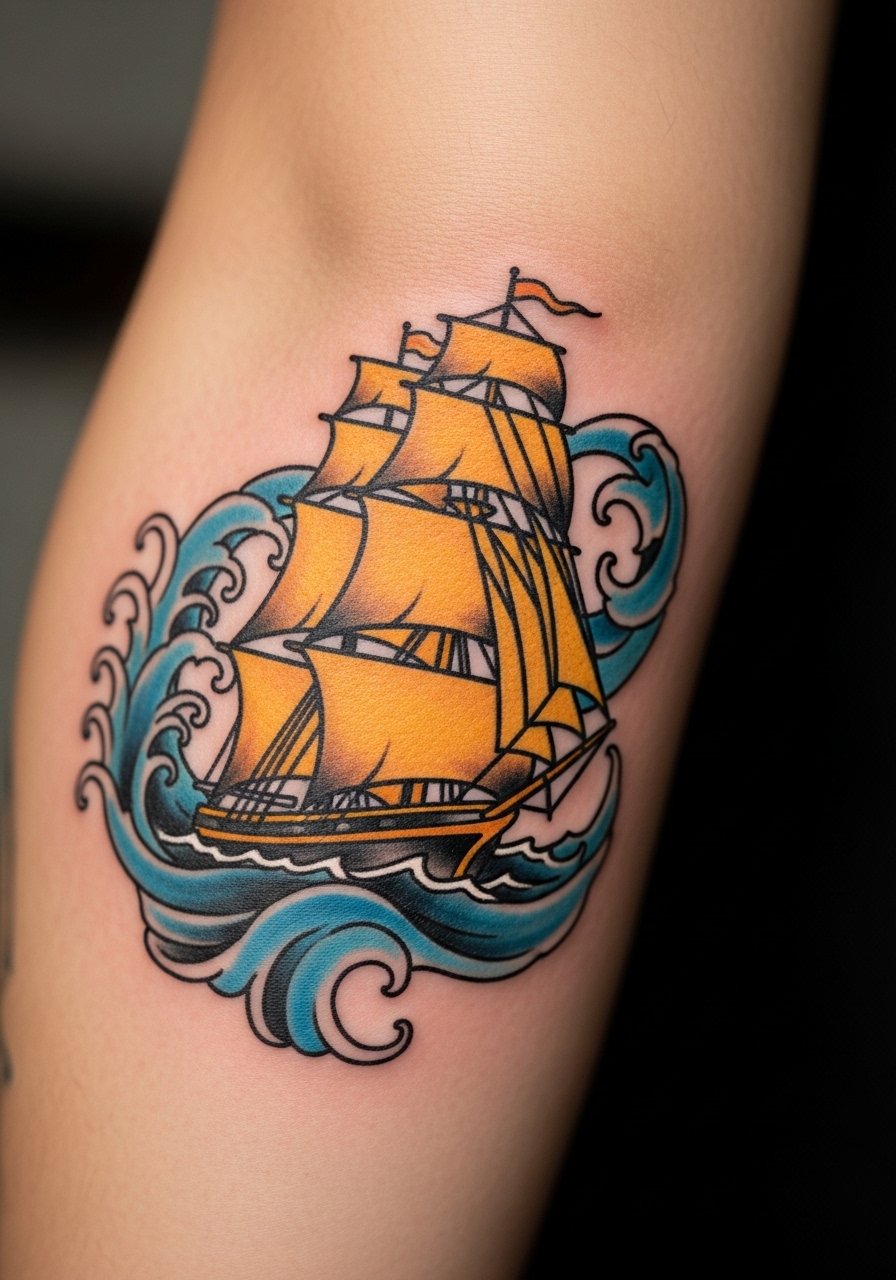
A ship at sea works best as a 6-7 inch horizontal piece that rides the forearm curve. Ask for simplified rigging lines and strong wave shapes so detail does not fill in over time. The design ages well if the sails use solid primaries and the hull has heavy outlines. A common error is asking for tiny text on the sail. For the session, wear a loose short-sleeve shirt that slides up easily. For nights out, an open button shirt over a henley keeps the work visible. Try a slim henley shirt to balance vintage sailor vibes.
9. Pin-Up Girl Waving Along Forearm Curve

Pin-up figures demand careful placement because the body curve either flatters or distorts the pose. Place the design so the torso follows the forearm bulge and the hand sits near the wrist or elbow depending on how you want it seen. Expect two sessions for shading and skin tones. A mistake is compressing the figure too much to fit a narrow space; the proportions will not translate. For show-off outfits, short sleeves and a retro band tee make this look feel period-appropriate. Add a vintage bandana red to keep the aesthetic coherent.
10. Wolf Head Howling on Inner Forearm
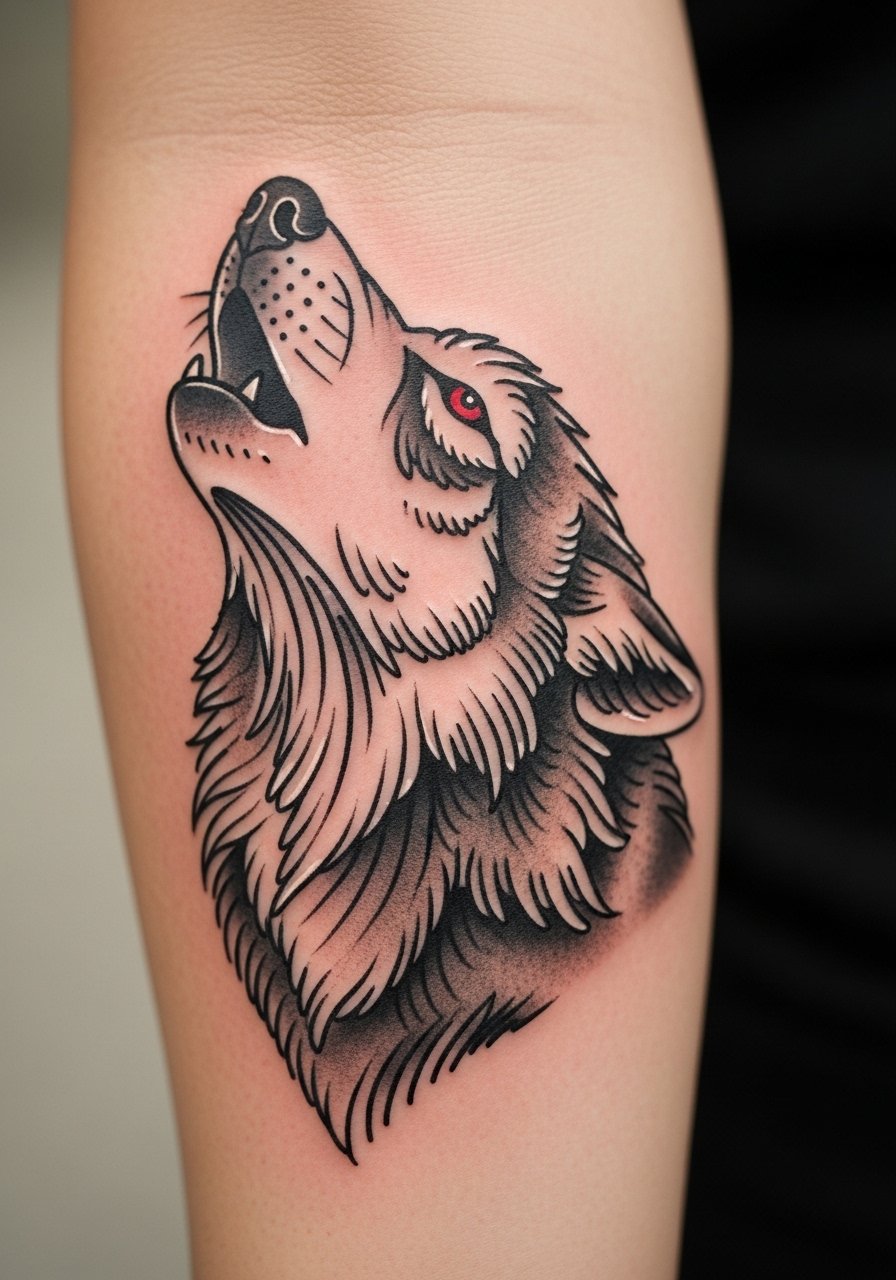
A howling wolf on the inner forearm gives a vertical focal point that reads well when you hold your arm out. Ask for stipple shading for fur texture and a clear margin of black around the eye to prevent softening. This style trends toward neo-traditional saturation, which helps it age better than thin gray washes. Common mistakes include over-detailing fur too finely close to the outline. For session day, wear a sleeveless tank so the artist has clean access. Pair the healed piece with an olive muscle tee fitted on casual days.
11. Compass Rose Near Wrist
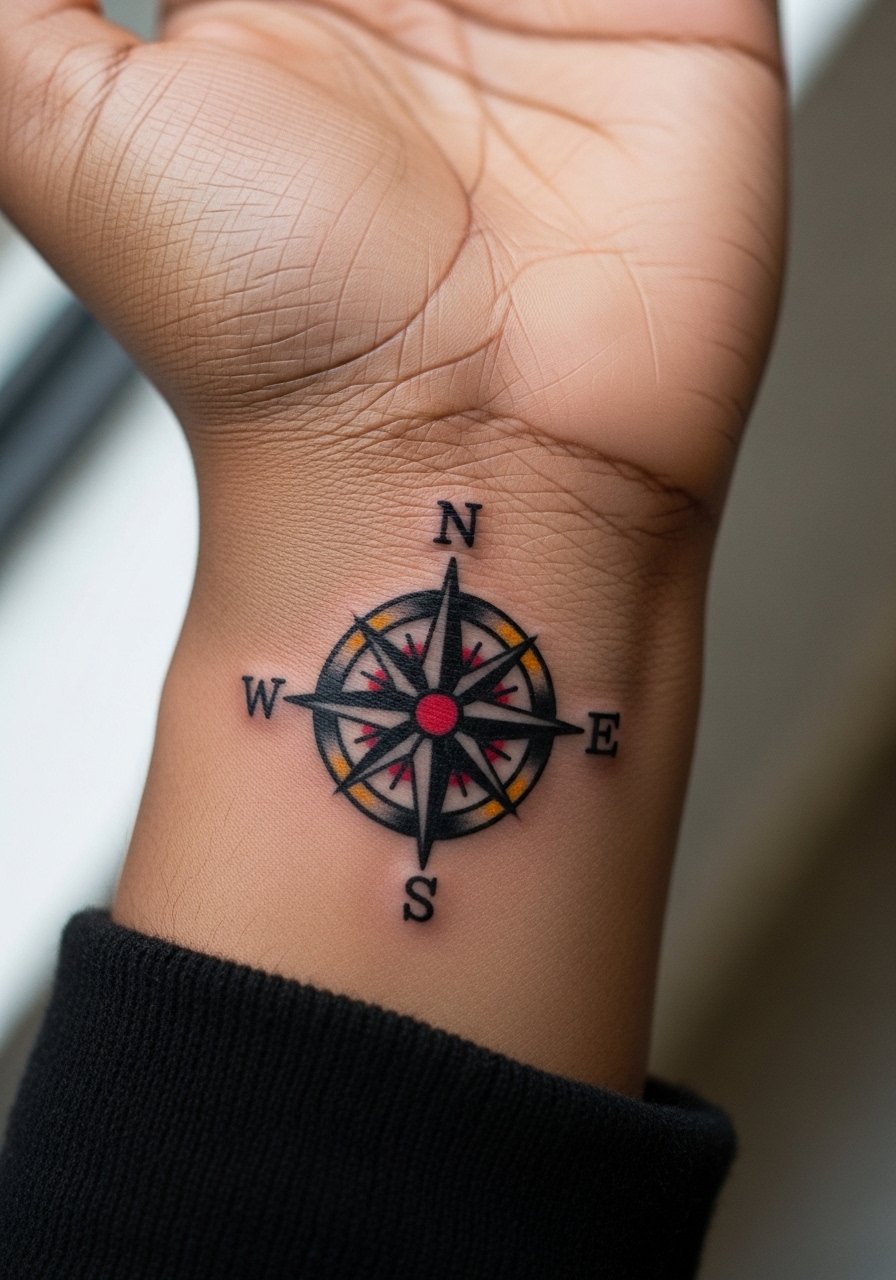
A compass rose near the wrist reads travel-ready and works best at 2-3 inches. The blowout risk is higher close to the wrist because the skin is thin and mobile. Ask for a slightly bolder outline and avoid tiny inner lines. On session day, remove watches and wear a short-sleeve or cuff-rolled tee. To show it off without overcrowding, keep wrist accessories minimal and try a leather wrap bracelet men on the opposite wrist.
12. Rope-and-Dagger Vertical Piece

This vertical rope-and-dagger plays to the forearm's strength by using negative space between elements. Tell your artist you want the rope thicker than usual so the twist reads as texture after a few years. A frequent mistake is letting the rope sit too close to the blade, which blurs as the skin stretches. For the session, a loose tank gives easy access. For styling, roll an oxford sleeve to the elbow and add a leather cuff bracelet men to frame the outer arm.
13. Nautical Star Cluster
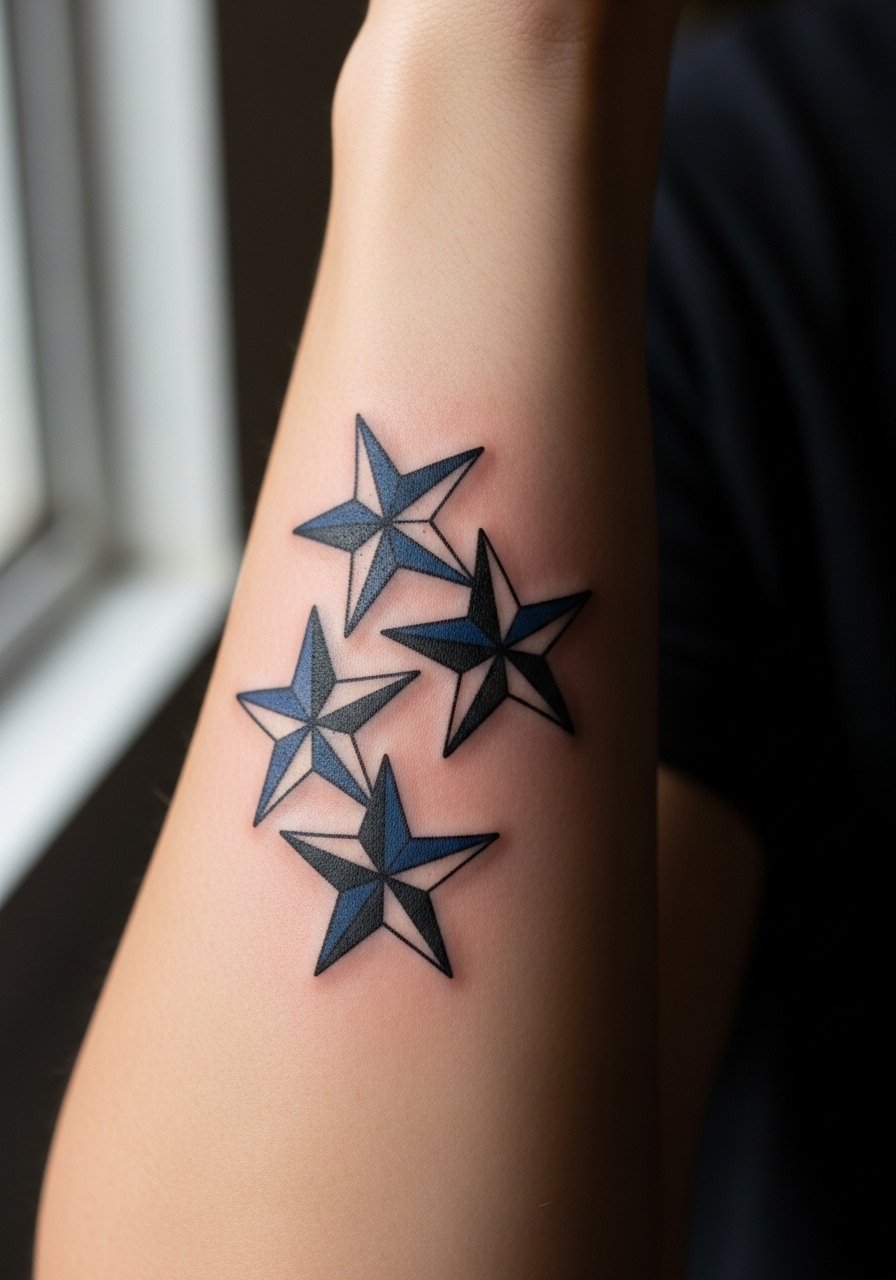
A cluster of nautical stars can be spaced across the forearm to avoid dense linework that blurs. Ask for stars of two sizes with thicker outer points to maintain shape with time. Common aging issues come from placing tiny stars too close together. The session is quick for each star but the overall cluster can add up. For a clean show-off look, cuff your sleeves and pair with dark jeans. Consider a rolled sleeve henley shirt to show the group without competing patterns.
14. Snake Coiling Up the Forearm
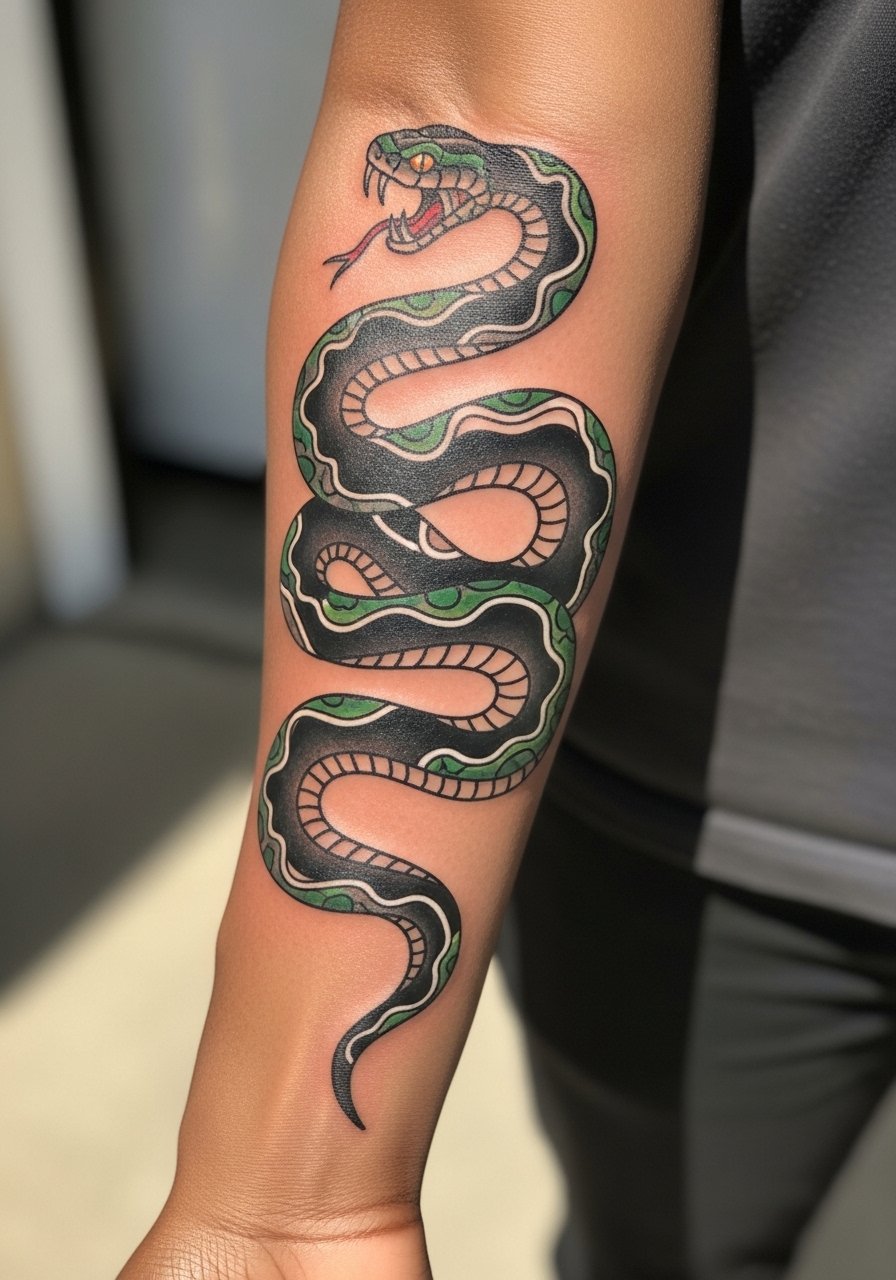
A coiling snake benefits from a design that reads at arm length. Ask for bold bands and a clear head-to-tail contrast so the silhouette stays readable when you glance at it across a room. One mistake I see is over-detailing scales in a way that loses definition as the ink settles. Expect a longer session for deep blacks and eye color. For outfits, a fitted white tee with rolled sleeves showcases the coil. Try a fitted white crewneck tee to keep the focus on the silhouette.
15. Horseshoe with Stars
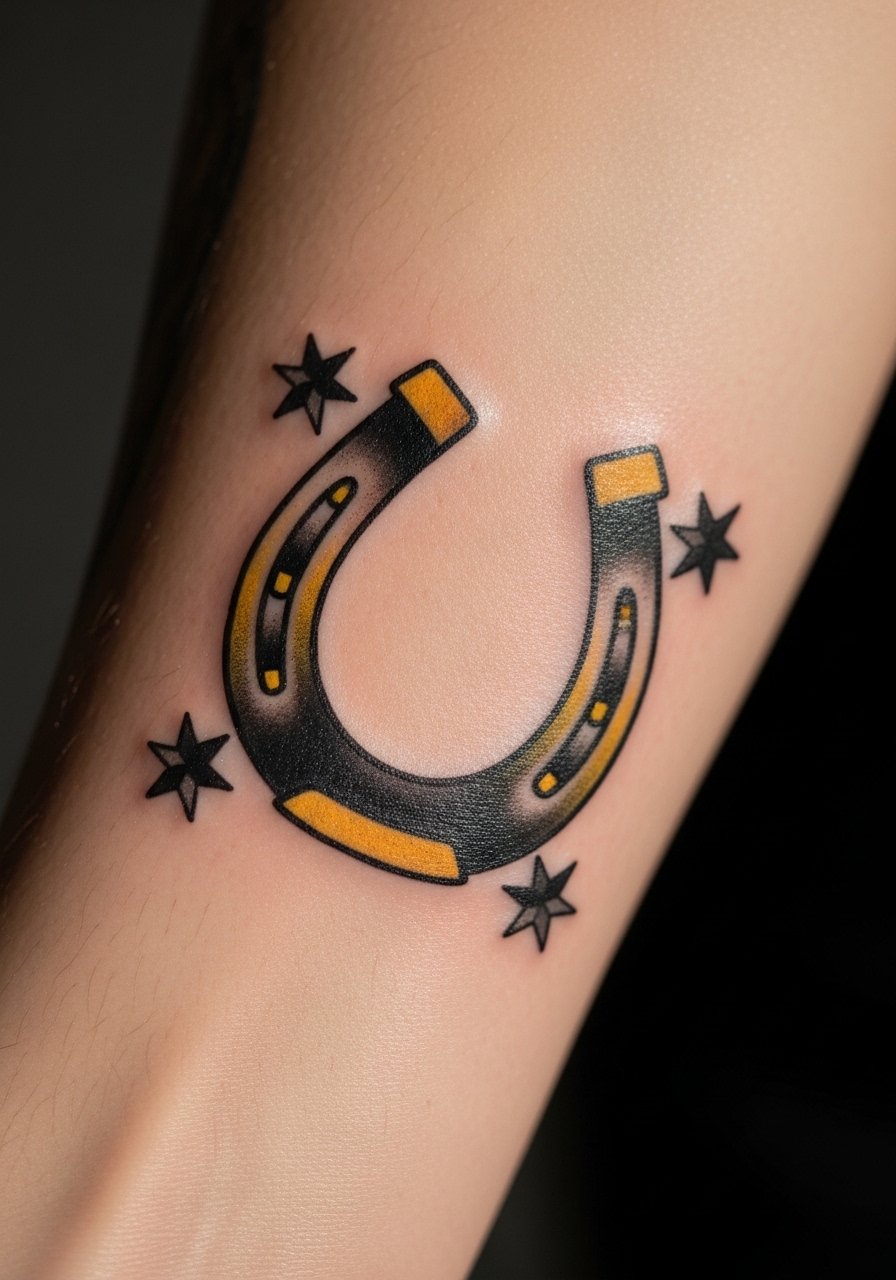
A horseshoe near the wrist reads luck-forward and works well as a compact piece at 3-4 inches. Keep the horseshoe opening upward if meaning matters. Avoid tiny decorative dots around the rim because they can blur into a single gray patch over time. Session time is short, but placement near the wrist means extra movement during healing. Wear short sleeves and keep accessories light for the first week. A simple slim henley shirt helps the horseshoe sit in a classic casual wardrobe.
16. Anchor Paired with Minimalist Banner (Hybrid)

This hybrid anchors classic imagery with a modern, minimalist banner. The banner should be slightly wider and sans-serif to resist blurring. I recommend a vertical anchor placement if you lift weights often to avoid banner distortion along muscle creases. For the session, a long sleeve you can pull up fully is easiest. Show it off with an open flannel shirt men layered over a tee to highlight nautical tones without overcomplication.
17. Forearm Flash Rose, Vein-Aware Curve
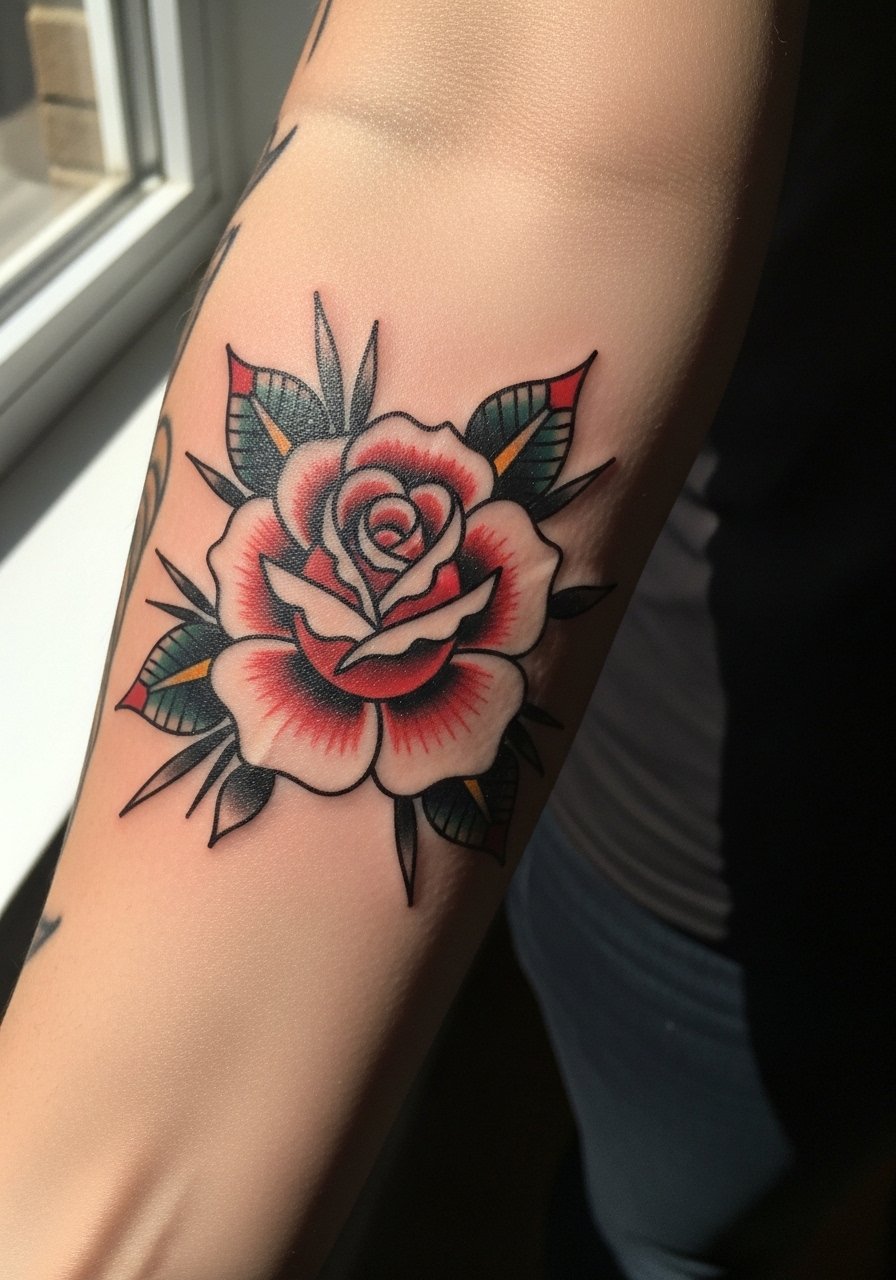
A rose that follows the forearm vein pattern gives 3D pop when you flex. Ask your artist for a mockup that maps the vein and sits the petals so the bloom flares naturally on flex. The common mistake is ignoring anatomical lines, which makes the rose flatten with movement. For session prep, spare tight sleeves and consider a short-sleeve top you can roll. When wearing streetwear, a rolled sleeve henley shirt keeps the blossom unobstructed and pairs with denim.
18. Small Traditional Matchstick or Tool Near Wrist

Tiny trad tools or matchsticks near the wrist have charm but high blur risk. If you want small pieces here, keep outlines noticeably thicker than a typical micro line. Expect touch-ups sooner than with larger designs. A mistake is asking for complex shading inside a two-inch motif. Session time is short but monitor friction from watches. For showing off a small wrist piece, avoid heavy watches and consider a thin chain or minimalist bracelet, like a thin chain pendant necklace worn higher up on the arm.
19. Sparrow Pair Around the Wrist

Paired sparrows around the wrist are classic for movement. Keep the birds spaced enough so their wings do not overlap once healed. Small feathers and tiny beak lines are common problem areas that can soften, so ask for slightly bolder wing outlines. The session is quick for each bird but the ring around the wrist means constant motion during healing. For styling, avoid watches for the first month and wear a cuff-rolled tee. A slim henley shirt keeps the birds visible without clutter.
20. Vertical Dagger for Gym-Goers
A vertical dagger is the practical choice for people who pump iron and worry about horizontal banners warping. Place the blade along lengthwise muscle fibers and ask for a narrow, clean banner or none at all. The common error is rotating the dagger off-axis so it intersects a flex point. During consults, mention your training routine so the artist can map around muscle movement. For session day wear a sleeveless tank for full access. Pair the healed dagger with a chambray button down shirt casually rolled when you want to show it without looking like a gym flex.
21. Sailor's Swallow Cluster with Memorial Accents

A cluster of memorial swallows is meaningful without being literal. For memorial ribbons include dates or initials in a font size that remains legible; avoid script tighter than three millimeters. Expect touch-ups earlier for small text near feathers. The controversy around placement is real when siblings prefer a single large motif versus multiple small birds; discuss whether you want one piece that grows or several small flashes. For showing a cluster, leather bracelets on the opposite wrist balance the visual weight. A leather wrap bracelet men paired with a cuff-rolled shirt looks considered without trying too hard.
Frequently Asked Questions
Q: Will fine line traditional motifs on the forearm blur faster than bold outlines?
A: Fine line work can soften sooner on the forearm, especially if it sits near high-movement zones. Two camps disagree: some artists say proper depth and spacing keep fine lines intact, others insist thick outlines are the only reliable option for long-term clarity. In practice, pick the approach that matches your daily wear and exposure, and expect touch-ups earlier with very fine work.
Q: How should I dress for a forearm appointment to make the session easier?
A: Wear something you can pull up or off without rubbing the area, like a sleeveless tank or a loose button-down you can slide aside. For outer-forearm pieces a fitted tee with easy-sleeve rolls works. If you want a single recommended item, a loose button-down shirt gives the artist clean access and keeps you comfortable.
Q: If my forearm tattoo looks blurry after five years, what are realistic next steps?
A: A common fix is a targeted touch-up to restore outlines and saturation; many trad pieces get refreshed between years three and seven. For heavy blur caused by past thin work, a modest redesign that adds thicker linework and selective saturation often improves legibility without a full cover-up.
Q: Does healing approach matter for color-packed traditional forearms?
A: Yes. There is a split: some people prefer protective films that accelerate healing, while others avoid occlusive covers to prevent trapped moisture. Both camps have valid points. Pick a method you can follow consistently and check how your skin type reacts during the first 48 hours.
Q: Can dark skin hold traditional primary reds and blues on the forearm?
A: Darker tones often need higher saturation and slightly adjusted palettes so primaries read clean in photos and daylight. Ask your artist to show healed examples on similar skin tones and to plan thicker outlines and denser fills where necessary.
