
Fine line bumble bees rule inspiration boards right now, but the tattoos that still read crisp after a few years are the ones planned around placement and spacing, not just the prettiest flash. I have seen artists quietly advise clients on line weight and skin movement in five shops across Brooklyn. Below are small bumble bee options that balance the look you want with how they age.
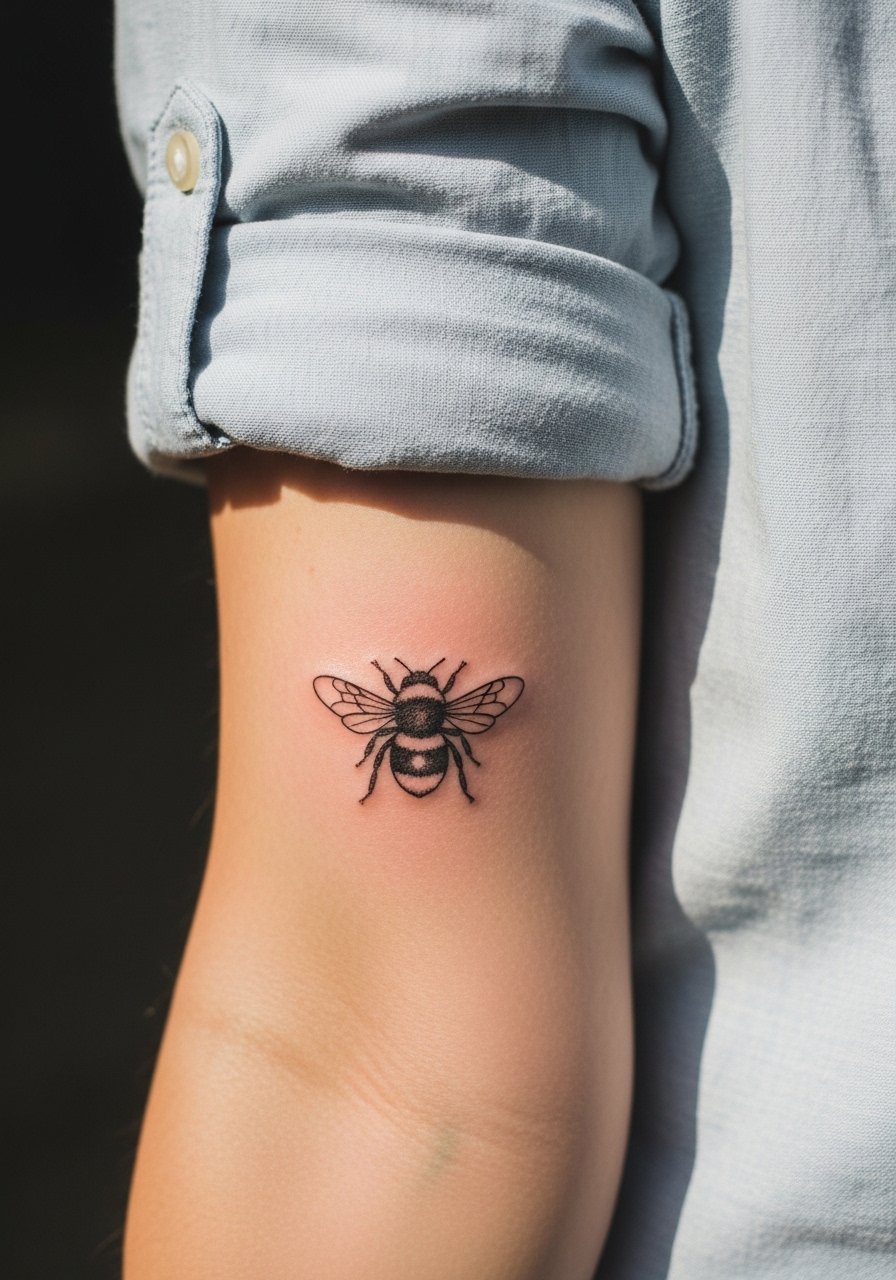
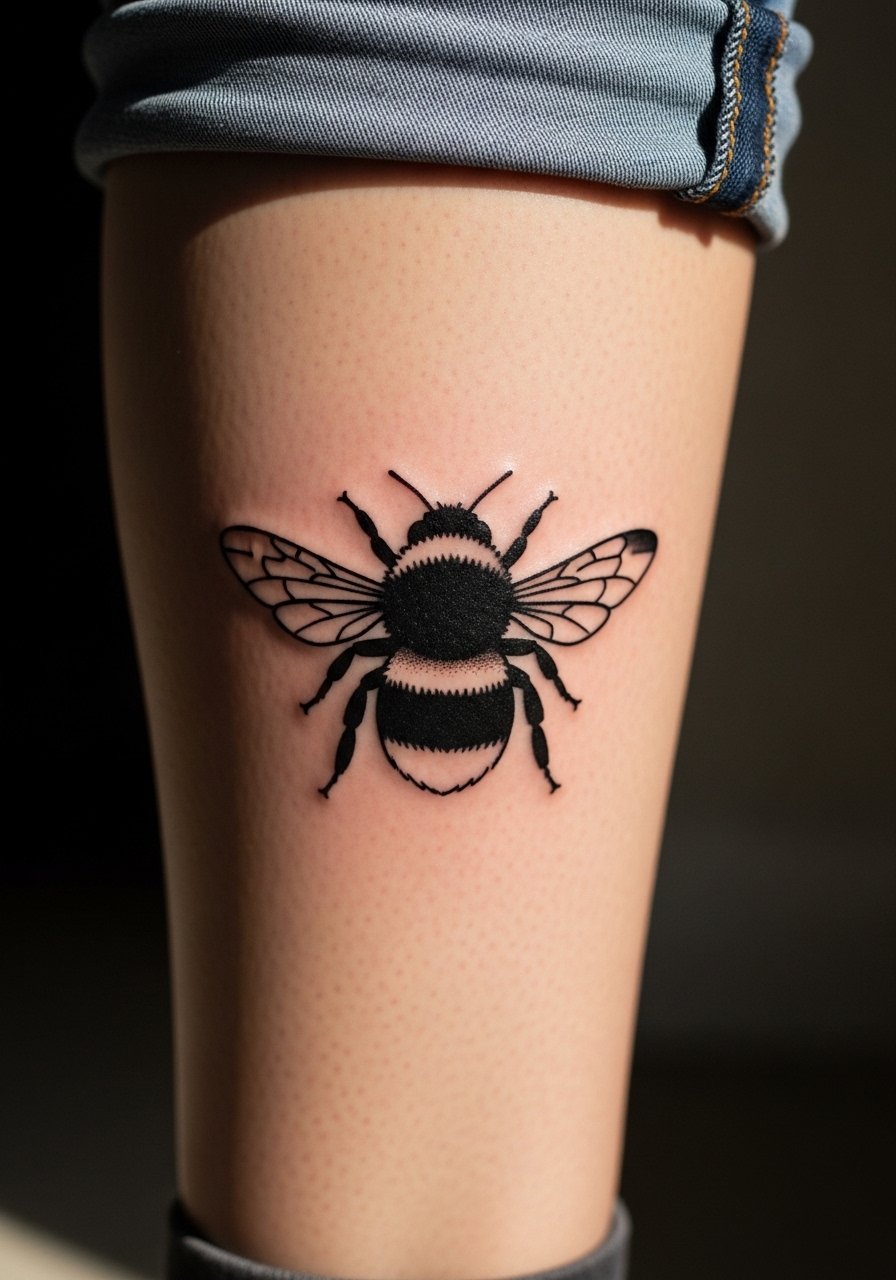
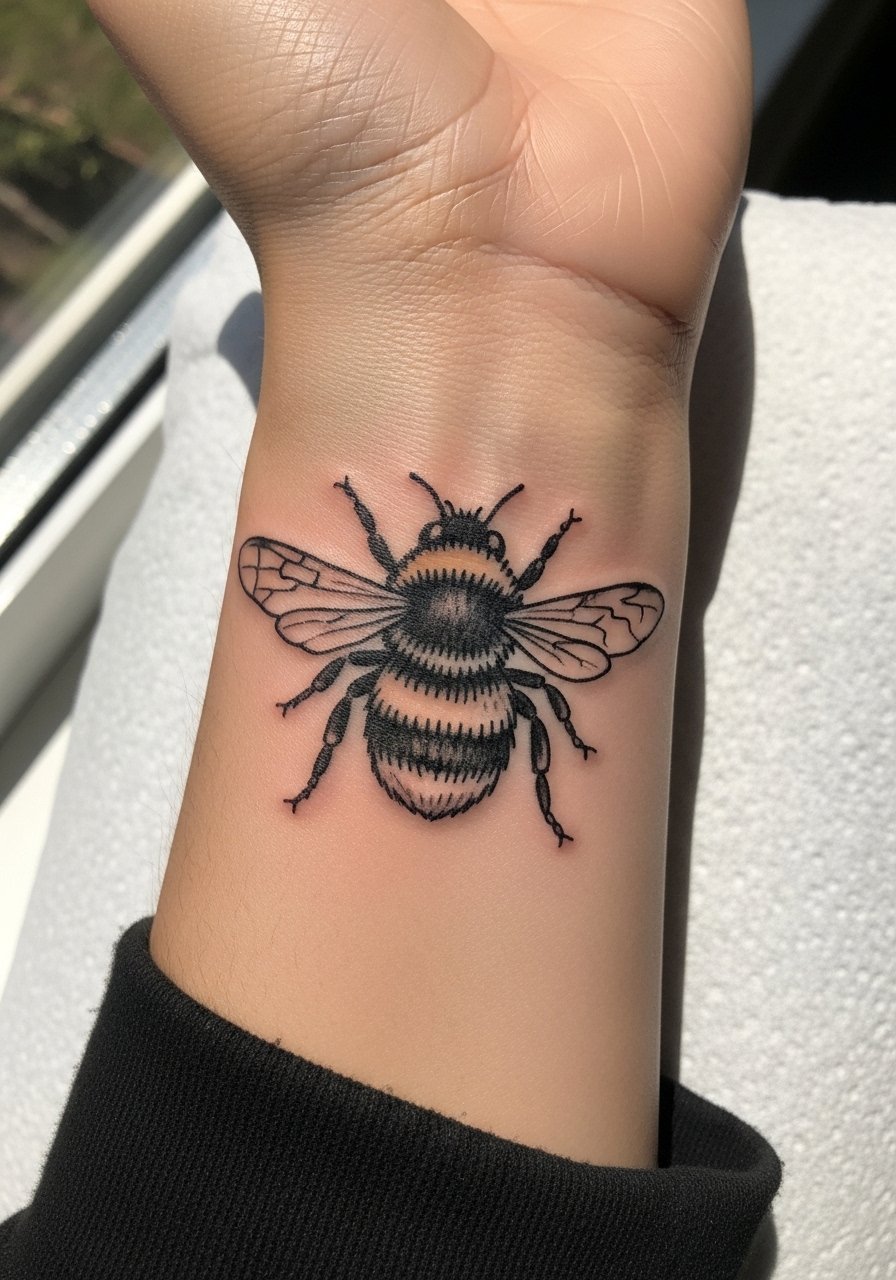
1. Fine Line Single Bumble Bee on the Wrist

I recommend this when you want a discreet symbol that reads clean with minimal color. Tell your artist you want slightly heavier outer linework and single-needle wing veins so the tiny anatomy holds at one to two centimeters. The session is short and the wrist is a 3 to 4 on most pain scales, with light buzzing during shading. Common mistake is requesting hairline thin lines across the entire piece. At six months the linework should soften gently. Expect a touch-up around year two to three for crisp edges. For showing it off, pair the wrist with a thin gold chain bracelet on the opposite wrist so the tattoo reads without being crowded.
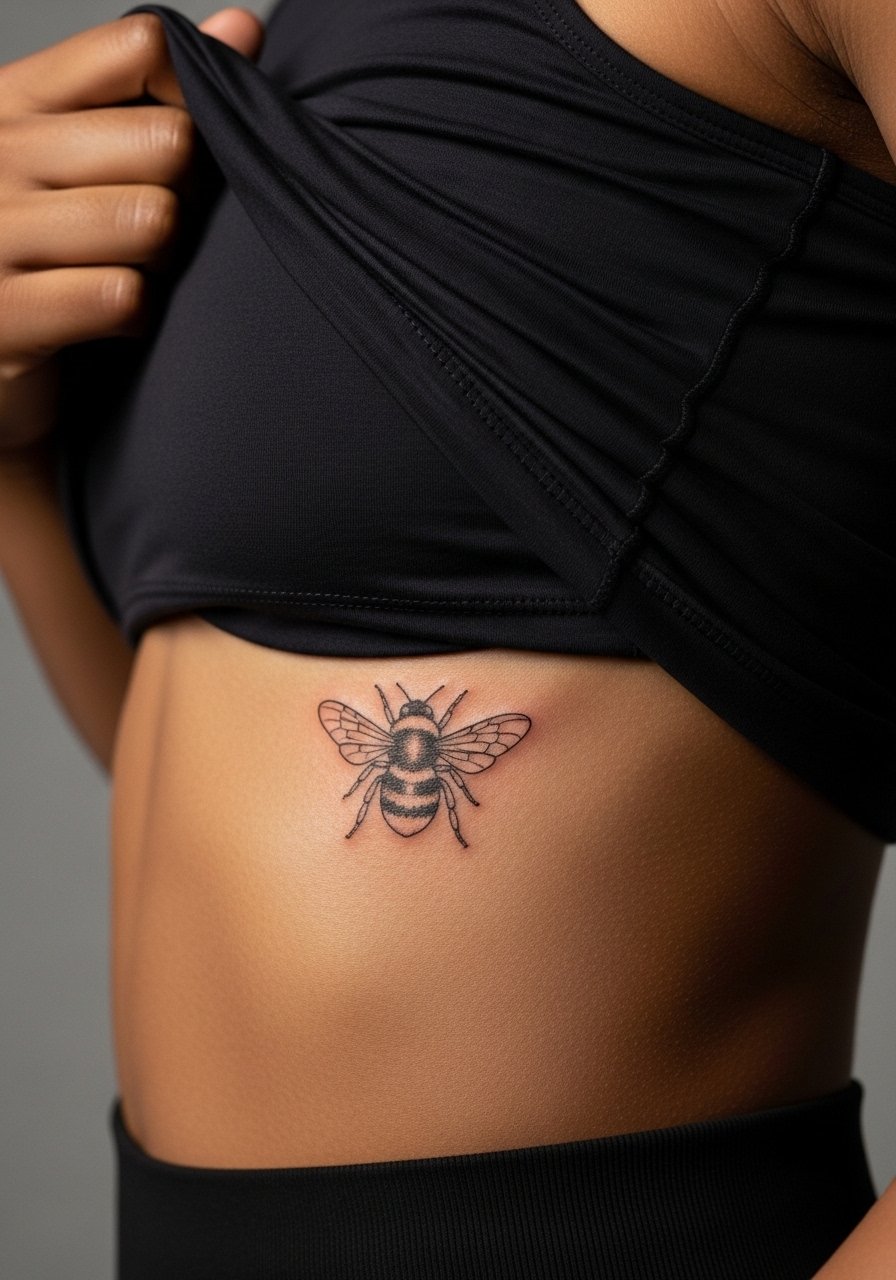
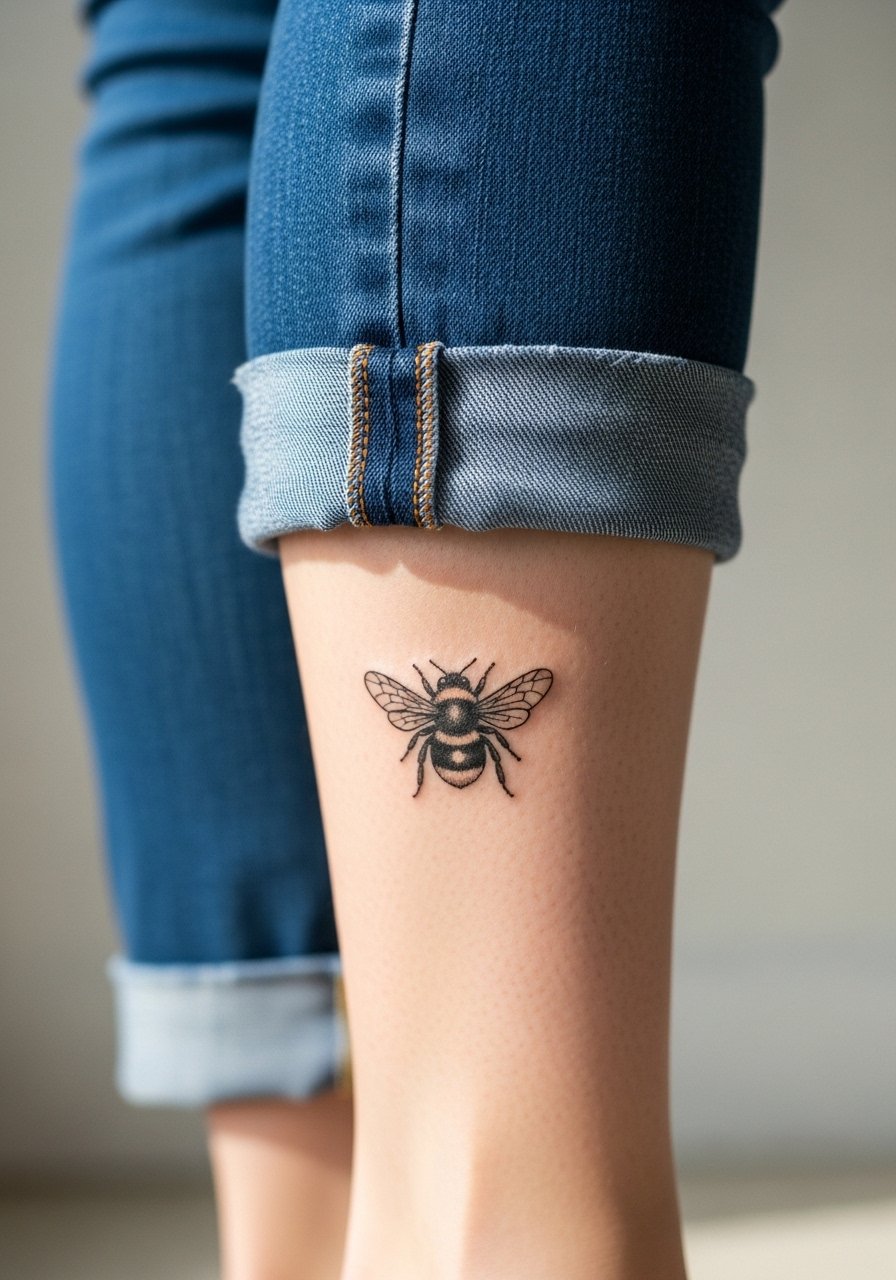
2. Minimalist Bumble Bee Outline on the Inner Forearm
This is a beginner-friendly choice that ages more predictably than ultra-fine detail. Ask your artist for slightly open negative space inside the wings so the lines do not merge as they settle. The inner forearm is forgiving and ranks about a 2 to 3 for pain, so you can schedule this on a weekday after work. The typical session is under an hour. A mistake I see often is asking for sub-millimeter lines with dense shading close by, which leads to blurring. At two years the outline will look softer but still legible. For session day, wear a cotton button-down shirt with the sleeve rolled up for easy access.
3. Traditional Bumble Bee with Bold Lines on the Shoulder

If you like something nostalgic that reads from across a room, traditional saturation is the way to go. Tell your artist you want bold outer linework with solid color blocks and minimal fine detail in the wings so the piece stays graphic. Shoulder sessions are moderate pain and usually one appointment. The common error is packing tiny details into a piece meant to be bold; those details disappear as color softens. Saturated traditional work generally ages well because the pigment holds, but expect color softening over years and occasional touch-ups for vibrancy. Show this off with an off-shoulder blouse that echoes the shoulder exposure.
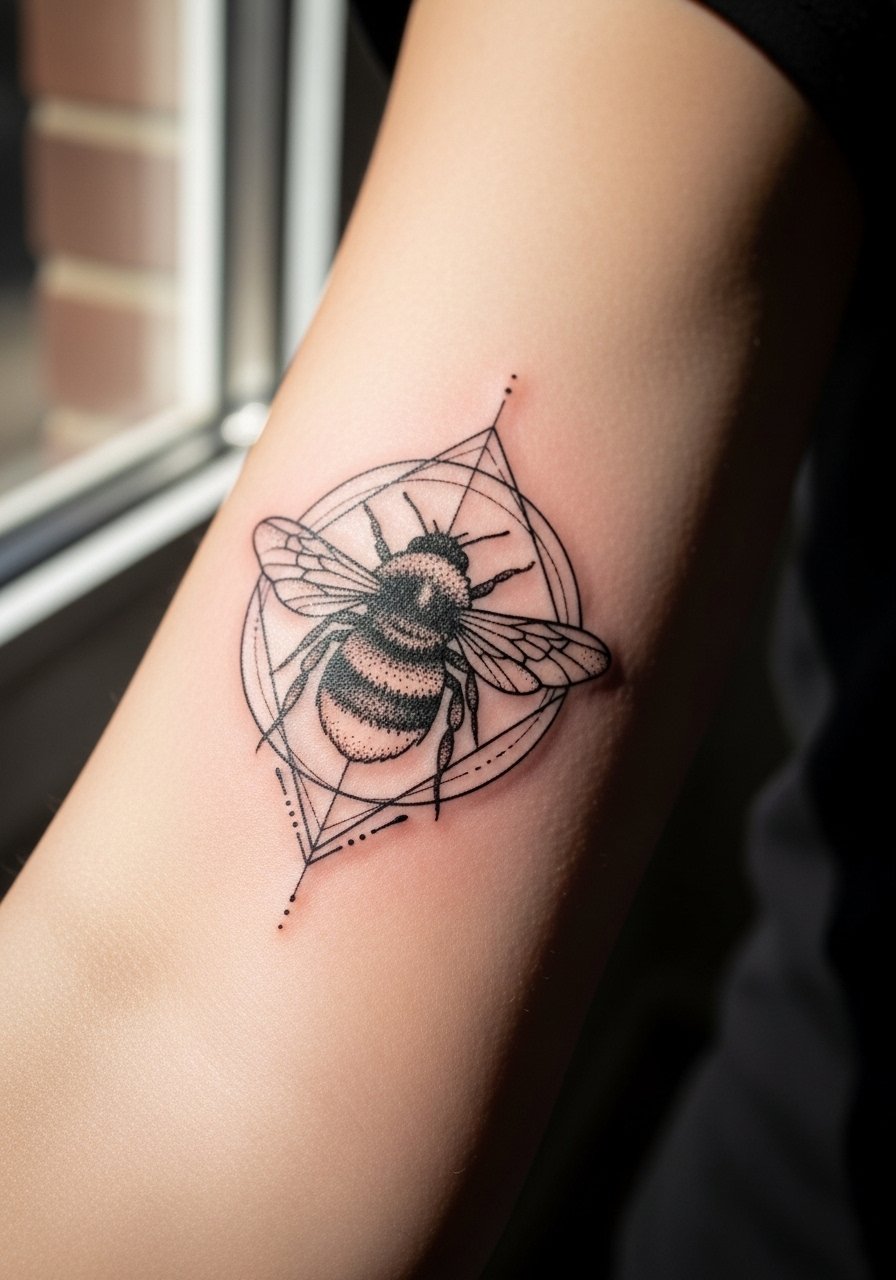
4. Geometric Bumble Bee with Symmetry on the Forearm

This design appeals if you like optical balance and want something a little abstract. The biggest mistake is going too small. Geometric lines need breathing room or the thin intersections merge as they heal. For consultation, mark exact measurements on your skin so symmetry is scaled to muscle flow. Expect a 1 to 2 hour session depending on complexity. Forearm placement is low on the pain scale and holds geometry well if lines are spaced. At five years densely packed geometry tends to soften in the tighter areas, so plan for a potential touch-up in the denser nodes.
5. Neo-Traditional Bumble Bee with Flowers on the Upper Arm
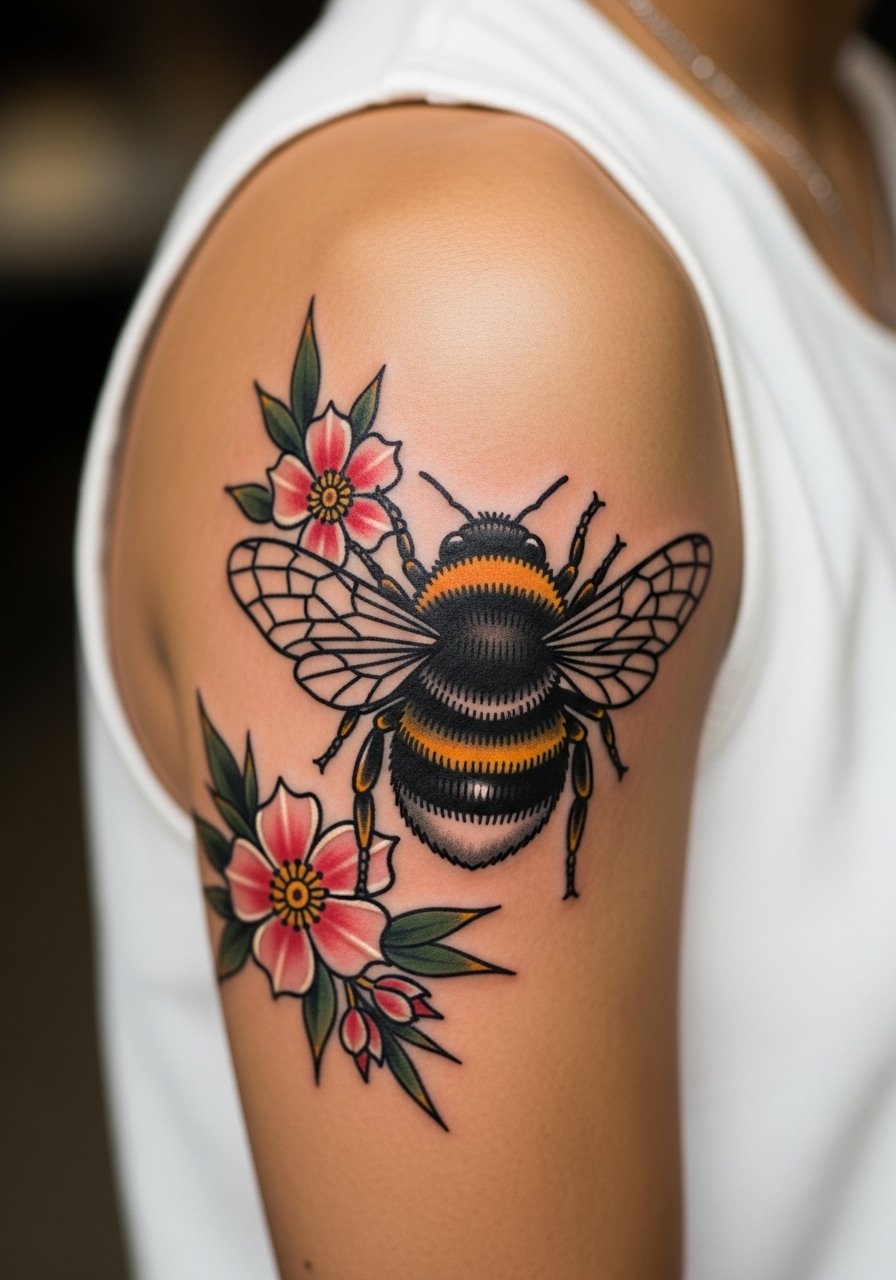
Neo-traditional lets you keep classic boldness while adding floral framing for a bit of narrative. Tell your artist you want the bee to remain the focal point by using muted color on surrounding blooms and stronger contrast on the insect. Upper arm sessions are comfortable and usually finish in a single sitting. Common mistakes include over-detailing the flowers so they compete with the bee. Over time color will mellow and the black outlines will keep the composition readable. Pair this with a sleeveless tank top on session day for easy access and to preview how the piece sits under clothing.
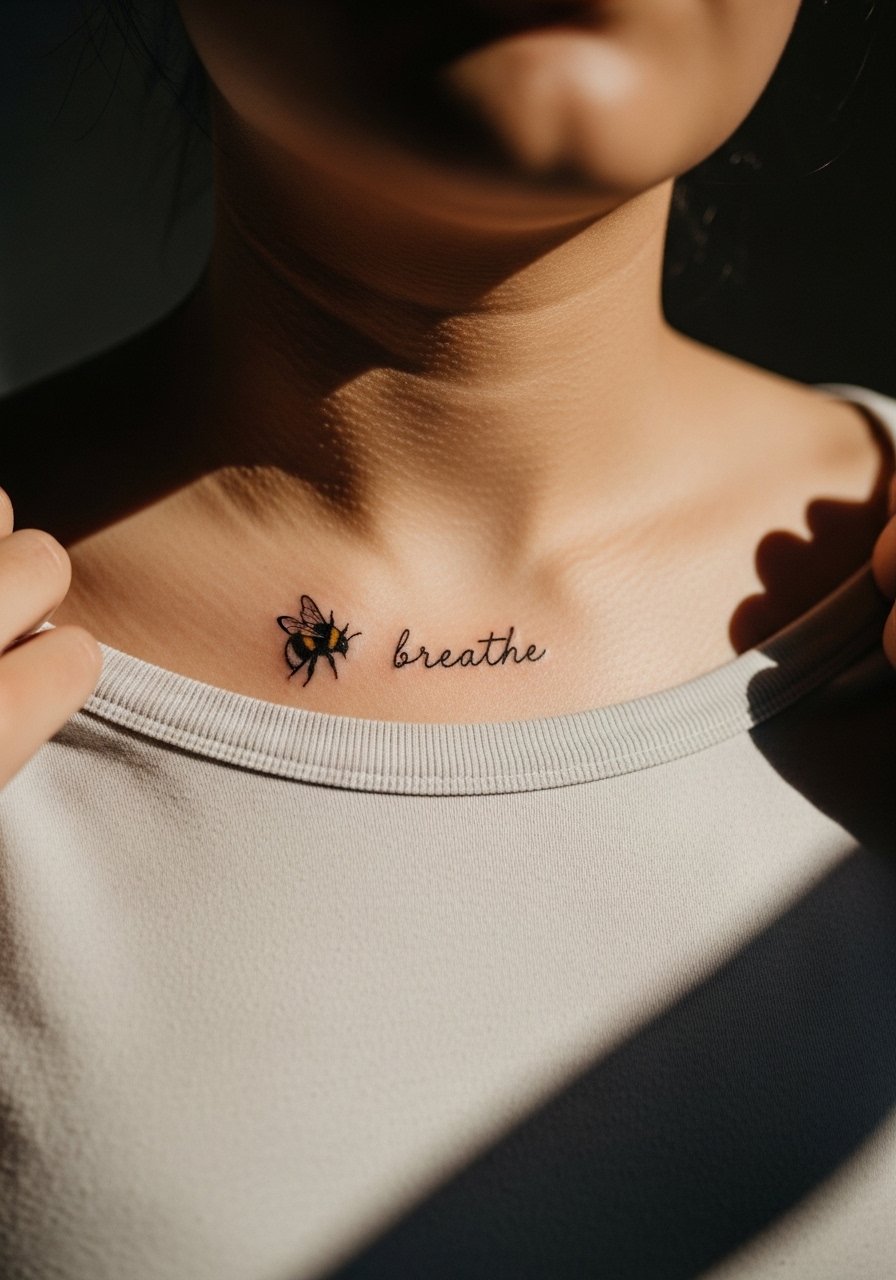
6. Micro-Realism Bumble Bee in Flight on the Collarbone
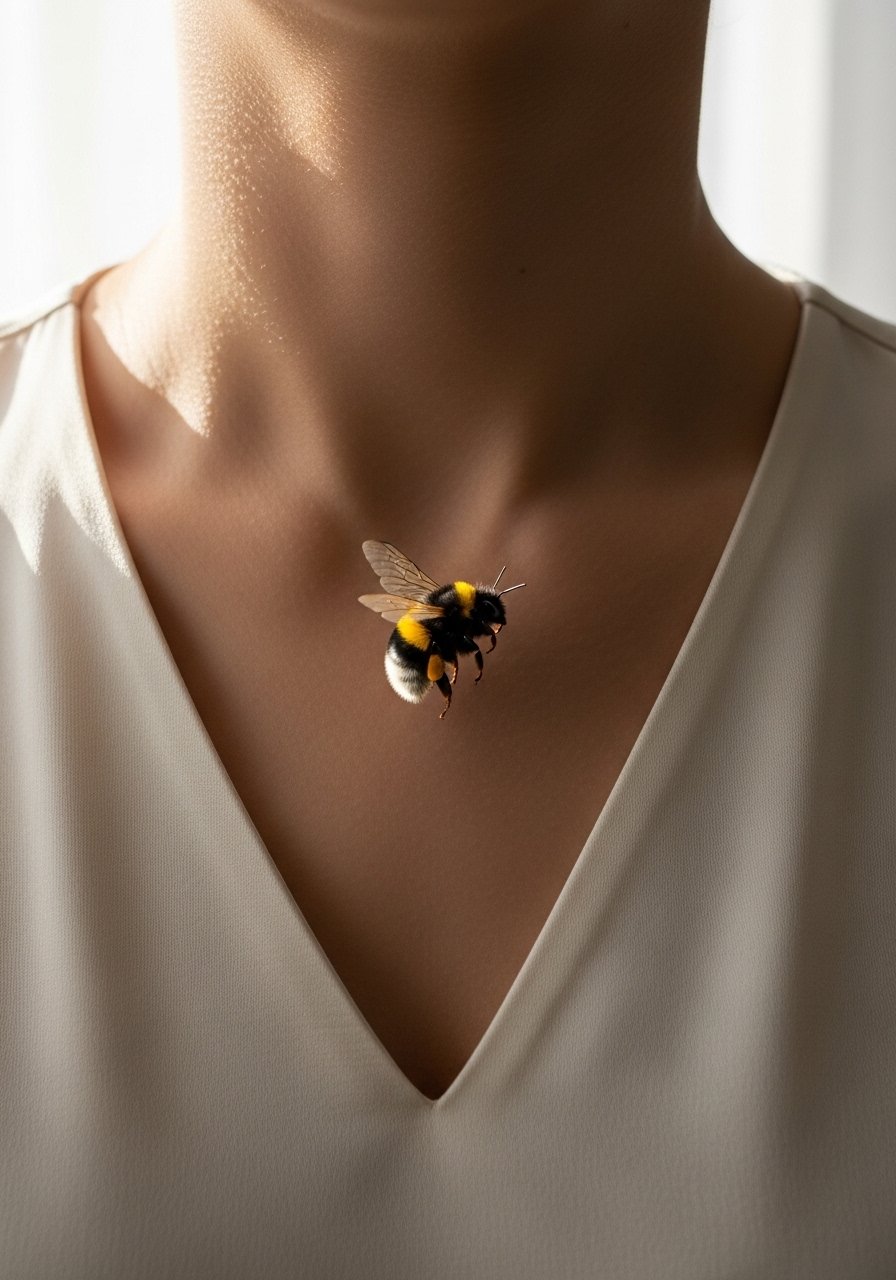
Micro-realism is for people ready to commit to tiny texture and value shifts. This one reads like a photograph when healed if the artist knows how to work in small scales. The collarbone can be bony and feels like a 5 to 6 on most pain scales, so schedule when you have time to rest. A common error is asking for full color micro-detail at a size that cannot hold the tiny highlights. Expect a two-session plan if you want crisp fuzz and wing veins. Healed at six months the tiny highlights will still pop. A touch-up at year two keeps the micro texture intact. For showing off, a v-neck silk blouse reveals the area elegantly.
Pre-Session Essentials
The forearm, collarbone, and shoulder pieces above ask for different prep, so a few targeted items smooth out the session and the first week.
- Stencil transfer paper kit. Lets you test placement and symmetry on skin before the needle, useful for wrist and forearm pieces.
- Topical numbing cream. Apply per directions before collarbone or inner arm sessions if you are sensitive and want a gentler first hour.
- Thin protective film roll. Helps finger and wrist tattoos survive early friction from washing and typing.
- Fragrance-free gentle body wash. Cleanses healing areas without irritating delicate linework on the forearm or shoulder.
- Aquaphor healing ointment. A thin layer in the first days protects fine line work and keeps small needle channels moist without clogging.
7. Watercolor Bumble Bee Splash on the Thigh
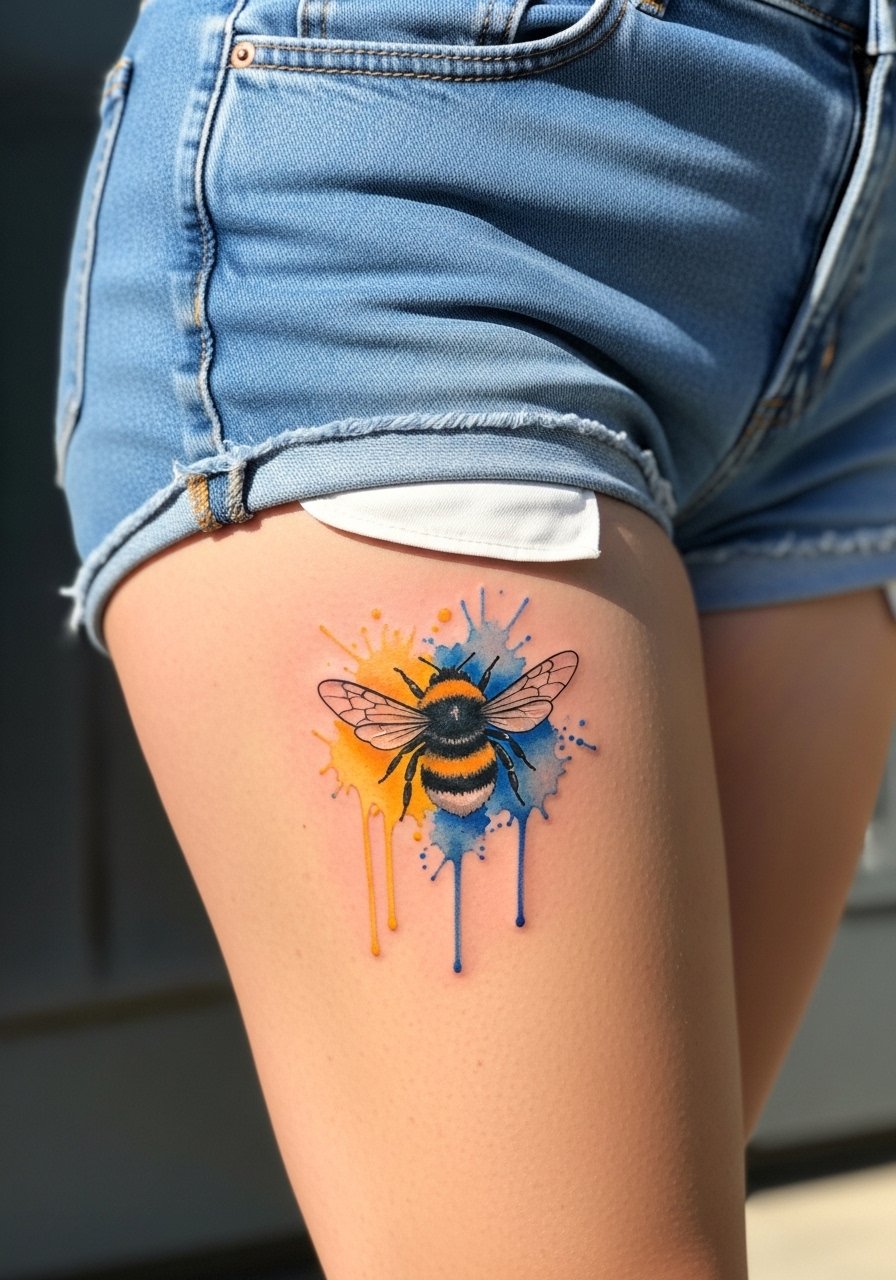
Watercolor gives you soft pigment washes that feel painterly rather than pictorial. For longevity, ask the artist to ground the piece with a thin black outline or slightly denser value near the bee so color has a contrast anchor. Thigh sessions are moderate and comfortable, usually a single appointment. The common issue is relying on pure wash without anchors, which fades into a bruise-like cast over time. At two years you will notice the softer pigments fade faster than black. If you plan to show this in summer, high-waisted shorts pair well with the placement for a flattering reveal.
8. Dotwork Bumble Bee Mandala on the Upper Back

Dotwork suits meditative, pattern-forward compositions that age gracefully when spaced correctly. For this one, ask for stipple shading that steps outwards instead of dense packing near the bee. Upper back sessions can be long and are best booked for a weekend slot. A mistake is compressing the mandala into too small a diameter, which causes dots to blur into tone. Over five years, dotwork holds better than tight linework on the back if the artist leaves micro-gaps between dots. Plan for two sessions if you want a perfectly even mandala.
9. Blackwork Bumble Bee Silhouette on the Calf
Blackwork offers high contrast and graphic presence that suits darker skin tones especially well. Ask for solid saturation with a crisp outline and minimal texture inside the silhouette so the shape stays bold. Calf placement is low pain and handles saturation well. The typical misstep is introducing fine interior detail that disappears as the black settles. Over time the silhouette usually keeps its shape with minimal touch-up. For footwear pairing, boots or midi skirts that hit mid-calf let the piece peek out without needing constant exposure.
10. Ignorant Style Bumble Bee Sketch on the Wrist
Ignorant style embraces a raw, sketch-like energy and feels playful on small canvases. When consulting, bring several quick-sketch references and say you want a loose hand, not refined realism. The wrist tolerates this, but avoid densely packed scribbles that blur into a single smudge. Expect a shorter session and a 2 to 3 pain rating. A common error is asking for the sketch to be as detailed as a realism piece. At two years this will read as an intentional mark if the artist keeps confident strokes and does not overwork the area.
11. Ornamental Bumble Bee with Honeycomb on the Ankle

Ornamental treatments turn the bee into a jewelry-like motif that suits ankle placement. Ask your artist for thin ornamental borders that do not meet the bee body so each element has room. The ankle is a bony zone and rates about a 4 to 5 for pain, so wear comfortable shoes and loose pants. People often over-ornament at the cost of negative space. Over time, ornament that is too fine can lose clarity. For summer, strappy sandals or bare ankles make the honeycomb feel intentional.
12. Fine Line Bumble Bee on the Ribcage, Controversy Noted
Fine line on the ribs divides artists into two camps. One group argues that skin stretch and movement blur the lines within a couple of years. The other group says proper needle depth and spacing allow fine lines to settle cleanly even on curved ribs. The truth is that placement, your skin elasticity, and the artist's approach determine the outcome. If you choose this, request spaced linework with slightly stronger anchor lines around the thorax. Rib sessions are painful for most people and often require breaks. Expect a possible touch-up in two years depending on how your skin recovers.
13. Realism Bumble Bee on a Flower on the Inner Bicep

Realism demands scale to show dew, fuzz, and wing texture. On the inner bicep a 3 to 4 centimeter piece gives an artist room for those details. During consultation, specify the amount of negative space and whether you want color highlights limited to the flower petals. Inner bicep skin can be soft and sometimes heals unpredictably, so plan for two sessions if you want crisp color layering. After six months the color will look fuller. The common mistake is forcing realism into too small a footprint, which compresses detail and speeds blurring.
14. Tiny Bumble Bee Flash Sheet Starter for Guest Spots

Tiny bees are perfect flash pieces when artists are doing guest spots. They are quick, sell well on a busy weekend, and let you get a clean piece without a long custom booking. If you want something like this, ask which flash the artist will be offering that day and confirm size before the walk-in time. Flash bees usually have simpler shading and are less touch-up intensive if the linework is bold enough. Wear a loose sleeve you can roll for easy access. Expect shorter sessions and minimal downtime.
15. Bumble Bee with Pollen Trail for Environmental Activism
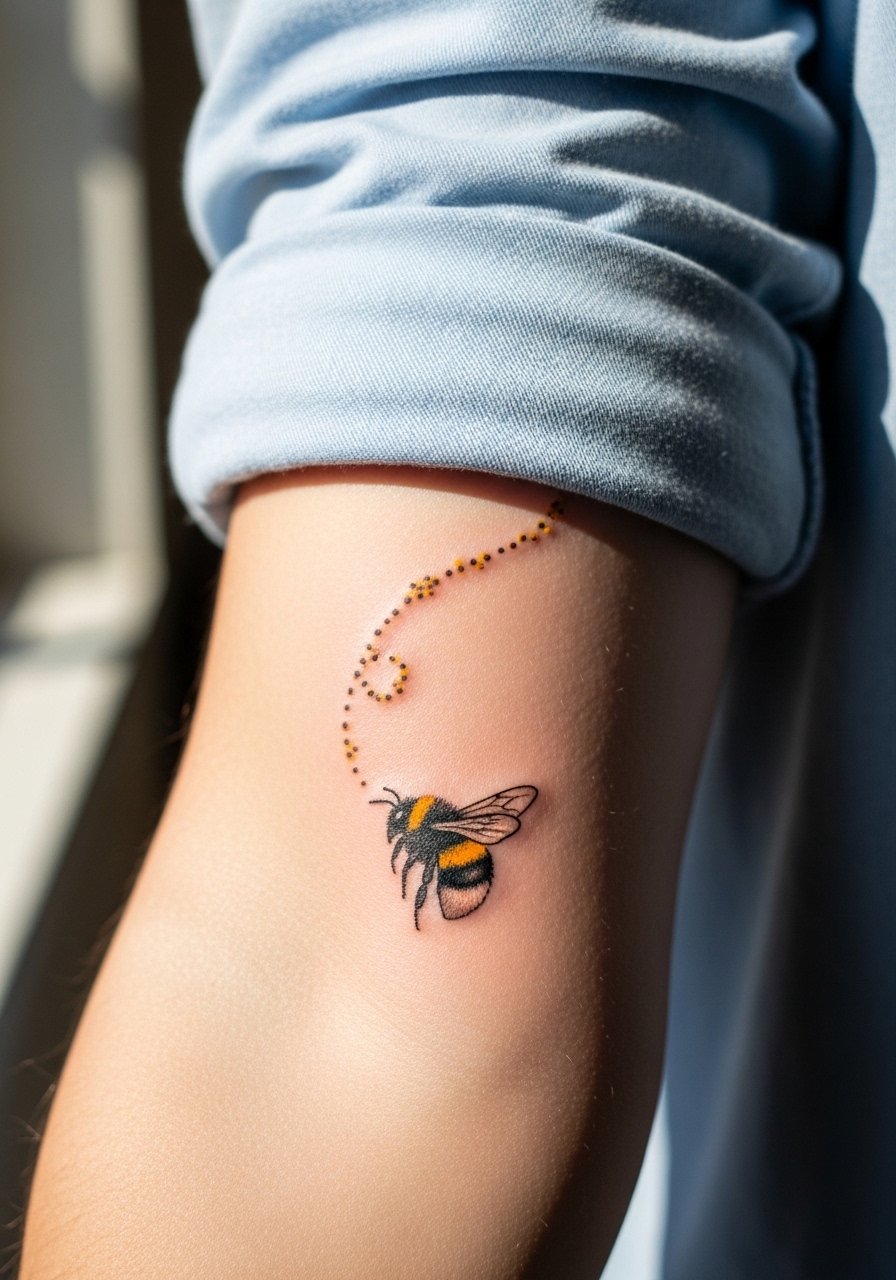
A pollen trail lets the bee connect to a broader ecosystem motif without leaning on clichés. Ask your artist to treat the trail as a graphic element instead of literal pollen dots, which keeps it readable as it ages. Forearm placement is visible and low pain, which makes this a great choice for activists who want a subtle reminder. The common error is over-texturing the trail so it becomes a blur. At two to three years the trail will soften but maintain its direction if the dots are spaced.
16. Micro Bee on Finger Joints for Movement Illusion

Finger joint tattoos move with your hands and can create a dynamic effect when flexing. The skin there is thin and prone to faster fading and touch-ups. Ask for slightly larger scale than you first imagine and expect to schedule touch-ups more often. The session is quick but the discomfort is sharp and short. A common mistake is insisting on ultra-fine detail on knuckles where friction eats pigment. If you want to protect this design, keep it simple and accept maintenance as part of the plan.
17. Honeycomb Background Accent Behind a Tiny Bumble Bee

A honeycomb accent adds geometric context without overwhelming a small bee. On the ankle, the pattern should be open with a few bold cells so the negative space breathes. Ankle work sees a lot of movement and rubbing from shoes, so expect touch-ups earlier than on the forearm. The session is straightforward. The frequent mistake is filling the honeycomb densely around a micro bee which reduces contrast over time. For footwear pairings, choose sandals or cropped pants to show the pattern.
18. Tiny Bumble Bee Behind the Ear with Discrete Framing

Behind-the-ear micro tattoos are intimate and peek-a-boo in nature. The prompt area is small so ask for confident, slightly bolder linework than your reference image. Placement behind the ear is a low-session time choice but can be tender. A common oversight is requesting hairline thin lines that vanish in a year. Keep expectations realistic and plan for a touch-up. Consider how hair growth and styling affect visibility before booking.
19. Collarbone Cluster: Tiny Bee with Small Script
Pairing a micro bee with a short script on the collarbone can create a subtle statement. For text, specify the exact word and font style during the consultation to avoid gibberish results. Collarbone skin shows small contrasts well but can be bony and feel sharp during inking. The mistake is cramming long phrases into this area. Choose one or two words maximum. Healed, the bee and word should sit together harmoniously. A thin chain pendant necklace sits above the piece nicely without taking attention.
20. Stipple Shaded Bumble Bee Over the Sternum

Sternum placements need careful shading choices to avoid heavy contrast that ages poorly. Stipple shading provides texture without heavy blocks of ink, which works well near the center chest. The sternum is a higher pain area and benefits from short sessions. One mistake is asking for dense black fill there, which can feel heavy and uncomfortable. If you go for this area, pick an artist experienced with central chest work and plan for possible touch-ups due to skin movement.
21. Tiny Bumble Bee Near the Ankle with Linen Styling

Ankle bees read delicate when paired with summer silhouettes. Ask the artist to space the legs and wings so friction from socks and shoes does not immediately affect edges. The ankle hurts a bit more and often needs a calm post-session routine. A common error is using hairline outlines that vanish with footwear rubbing. For showing it off, cropped linen pants or strappy sandals keep attention on the tattoo. Consider a wide leg linen pant you can roll to show the piece.
22. Tiny Bee with Geometric Halo on the Forearm
A halo gives the bee a subtle frame that reads modern when executed with careful spacing. During consultation, request that the halo be placed slightly away from the bee body so the negative space protects both elements as they soften. Forearm placement keeps the piece visible and low in pain. The common mistake is nesting the halo too close, which blurs into a single mass. Over time the ring will mellow but maintain shape if the lines are confident.
23. Tiny Bumble Bee on the Calf with Bootcut Pairing
Calf placement makes a small piece peek from under pant legs or skirts. Ask for slightly larger scale if you want detail to read from a distance. The calf handles saturation well and is low pain. A misstep is compressing detail in a tiny space that needs distance to be appreciated. For daily styling, bootcut jeans or midi skirts that hit mid-calf let the tattoo surface without constant exposure.
24. Blackwork Tiny Bee on Darker Skin Tones

For darker skin tones, high-contrast blackwork silhouettes read strongest and require less frequent touch-up than washed color. Communicate to your artist that you want a bold silhouette with clean edges, not fine gray gradients which can be less visible. The upper arm is forgiving and feels moderate for pain. The common error is relying on pale color fills to show contrast. Solid black gives clarity and longevity.
25. Tiny Bumble Bee Near the Clavicle with Strapless Styling

A clavicle micro bee sits elegantly when paired with evening wear. Ask for minimal shading and confident outer lines so the piece reads next to jewelry or open necklines. The area is bony and can be sensitive during the session. A mistake is asking for too much color or tiny script nearby which competes with the contour of the collarbone. For showing off, strapless dresses or low-neck blouses reveal the piece cleanly. Consider a strapless midi dress for special occasions.
26. Tiny Bumble Bee with Honey Drip Accent on the Thigh
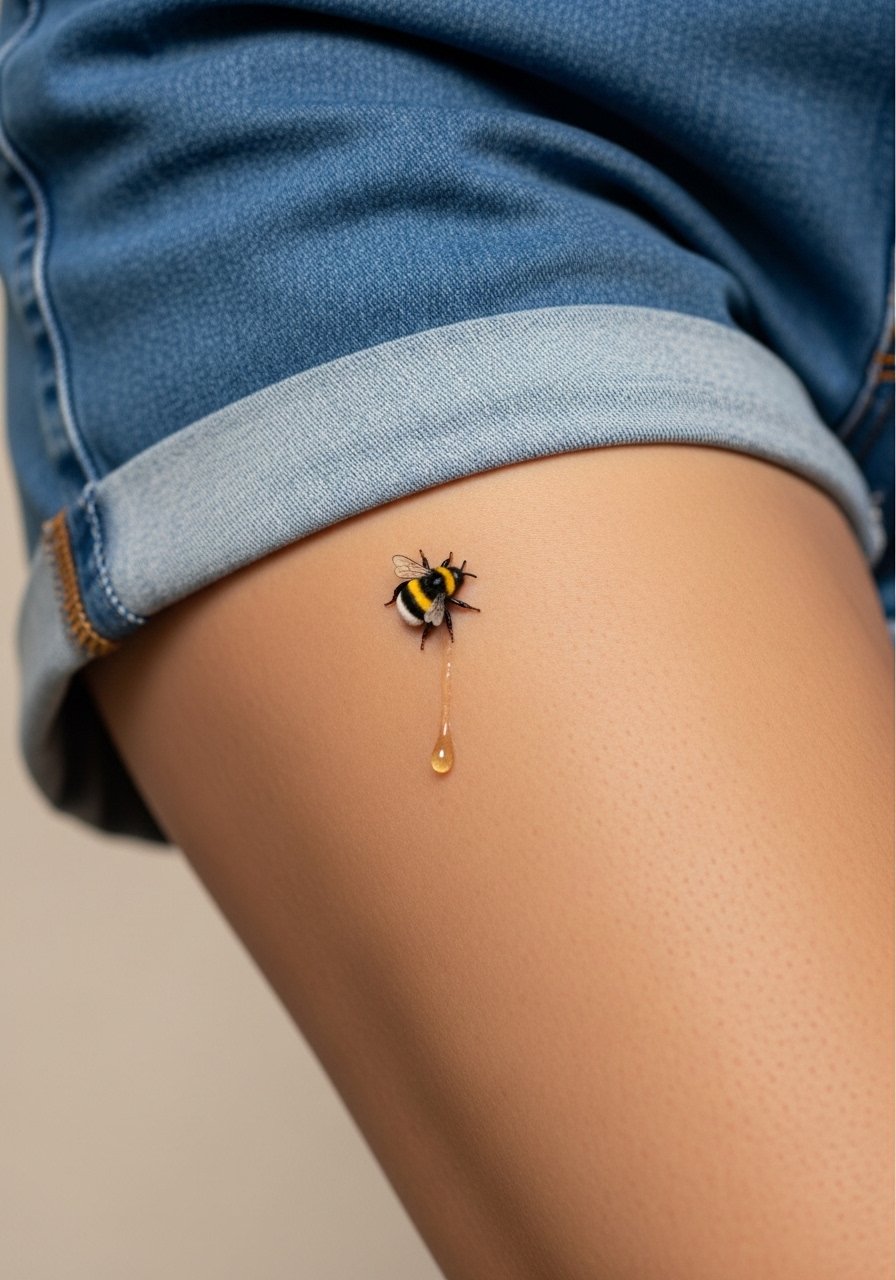
A honey drip adds a playful vertical element when placed on the thigh. For this area, the skin tolerates color well and sessions are comfortable. Request that the drip be slightly stylized rather than photorealistic so it reads at small scale. The mistake is making the drip too thin or detailed which ages into unclear marks. When planning session wear, loose shorts are best for access and comfort.
27. Tiny Bumble Bee as a Subtle Ear Lobe Accent

A micro bee near the ear is discreet and can act like a permanent earring accent. Ensure the design sits on the skin behind the ear and not on cartilage. During consult, ask for slightly bolder anchors and avoid ultra-fine detail which fades quickly in that zone. The area is sensitive and quick. A common error is underestimating how much hair and earrings affect visibility. This placement reads as an intentional tiny accent for people who like small surprises.
Frequently Asked Questions
Q: Will a fine line tiny bumble bee blur faster on my wrist than on my forearm?
A: It depends on line weight and placement specifics. Wrists see more friction and washing, which can soften ultra-fine lines faster. Ask your artist for slightly stronger outer linework for wrist pieces. For session wear, a loose short sleeve helps keep the area clean during healing.
Q: Do watercolor bumble bees need different aftercare than black line pieces?
A: The aftercare routine is similar, but colors can fade faster with sun exposure. Keep color pieces out of direct sun while healing and use physical cover later on. The product block above includes gentle wash and protective film suggestions that suit both types.
Q: How often should I expect touch-ups for finger joint or knuckle bumble bees?
A: Finger and joint tattoos typically need touch-ups more frequently because of constant movement and skin turnover. Plan on checking in around year one and again in years two to three. Keeping the design simple reduces the need for repeated work.
Q: If I want a micro-realism bee on the collarbone, what should I ask during the consultation?
A: Ask whether the artist has worked in micro-realism at that specific scale and request reference photos showing similar sizes. Discuss session length and whether a second pass will be necessary for highlights and texture. Expect a slightly longer appointment and plan to rest afterward.
Q: Are there discovery ways to find artists who specialize in tiny insect tattoos?
A: Yes. Search style-specific hashtags, use location tags for fine line studios in your city, and check tattoo directories for flash sheets. Booksy and forum threads can point you to guest spots and walk-in flash events without naming individuals.
