
Fine line peony pieces are everywhere on saved boards, and the ones that still read crisp at year five are not always the most detailed fresh photos. How a peony is sized, where it sits, and what you wear around it matters as much as the needle work. Below are 17 peony ideas that aim to look intentional now and still make sense after a touch-up or two.
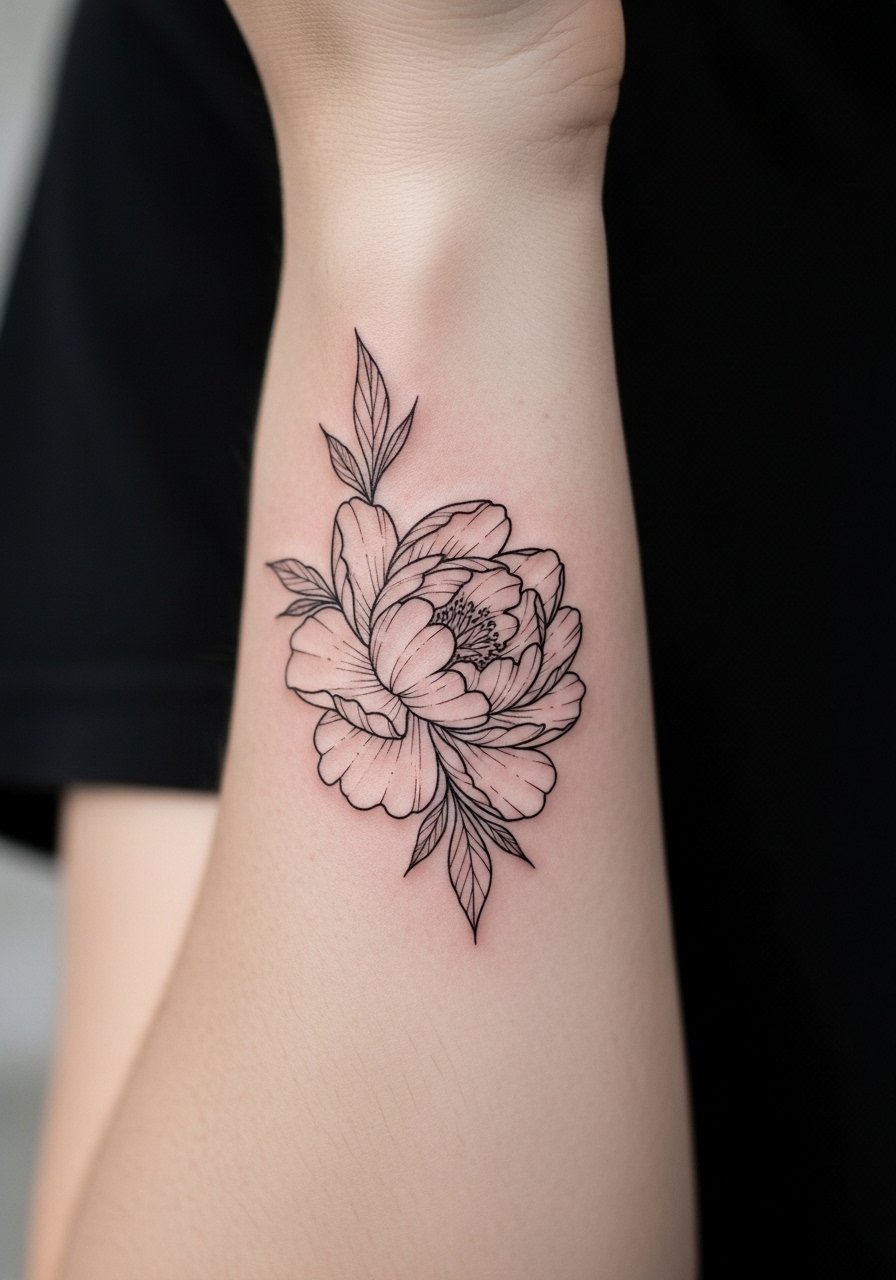
1. Fine Line Peony on Inner Forearm
I've seen this placement hold up better than most fine line options when spaced correctly. Ask your artist for slightly heavier contour lines and open petals, not a condensed petal cluster. The session feels steady, pain is moderate, and a typical 45 to 75 minute appointment covers a small sprig. At six months the lines look crisp, at two years the thinner interior lint may soften, and at five years expect some blurring that a precise touch-up will fix. A common mistake is asking for maximum detail at a micro size, which leads to merging lines. For show-off wear, roll up a linen shirt sleeve to frame the forearm without crowding the peony.
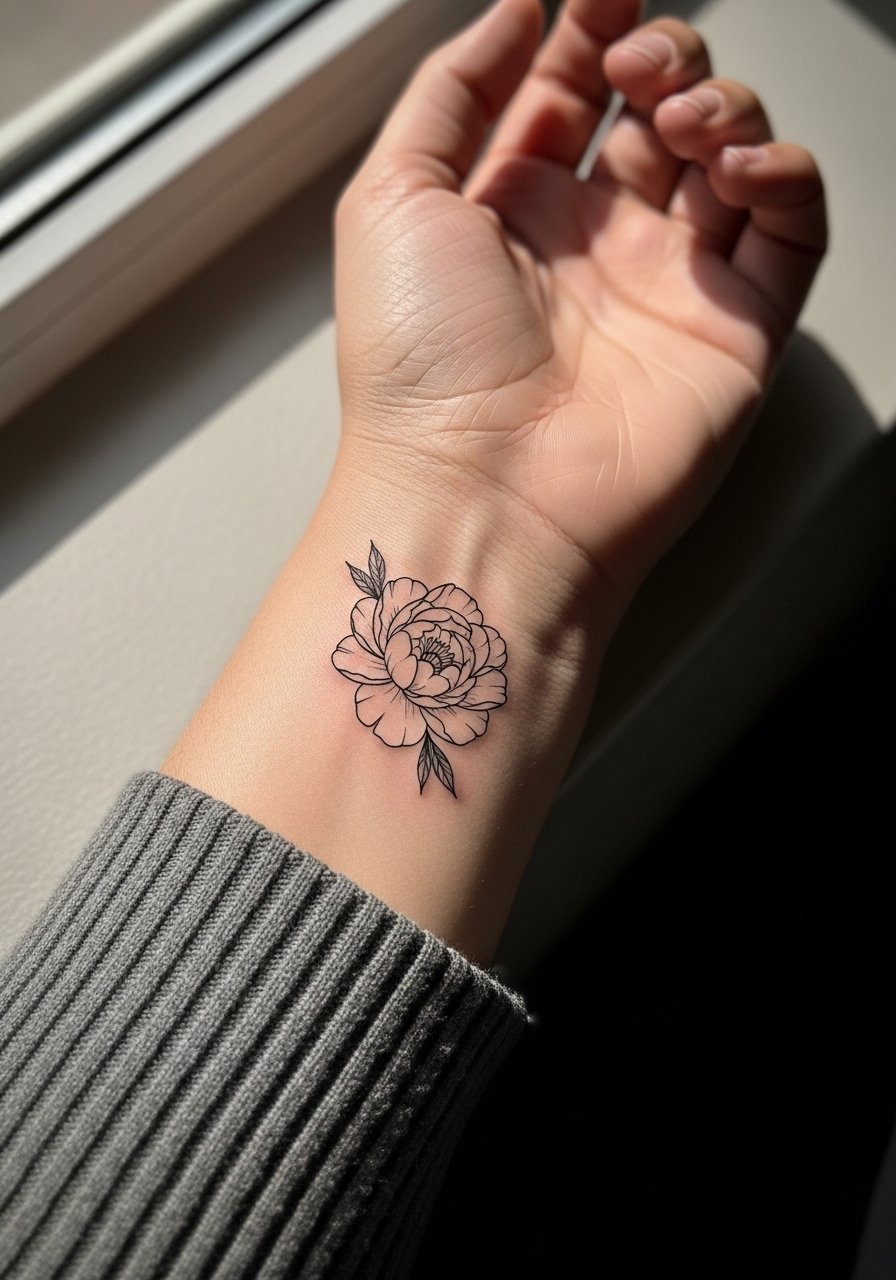
2. Micro Peony on the Wrist, Single Bloom
Fair warning, the wrist is a high-motion zone and tiny work can fade faster. I recommend a single bloom with clear negative space around it and slightly stronger outer linework so the silhouette lasts. Tell your artist you want defined outer petals and delicate inner shading, not packed stippling in the center. Sessions are brief, often under 30 minutes, but plan on a touch-up around year two for most skin types. Because wrists get wet a lot, thin linework there risks early softening and blowout if the needle depth is inconsistent. For showing it off, pair with a minimalist watch that does not crowd the tattoo.
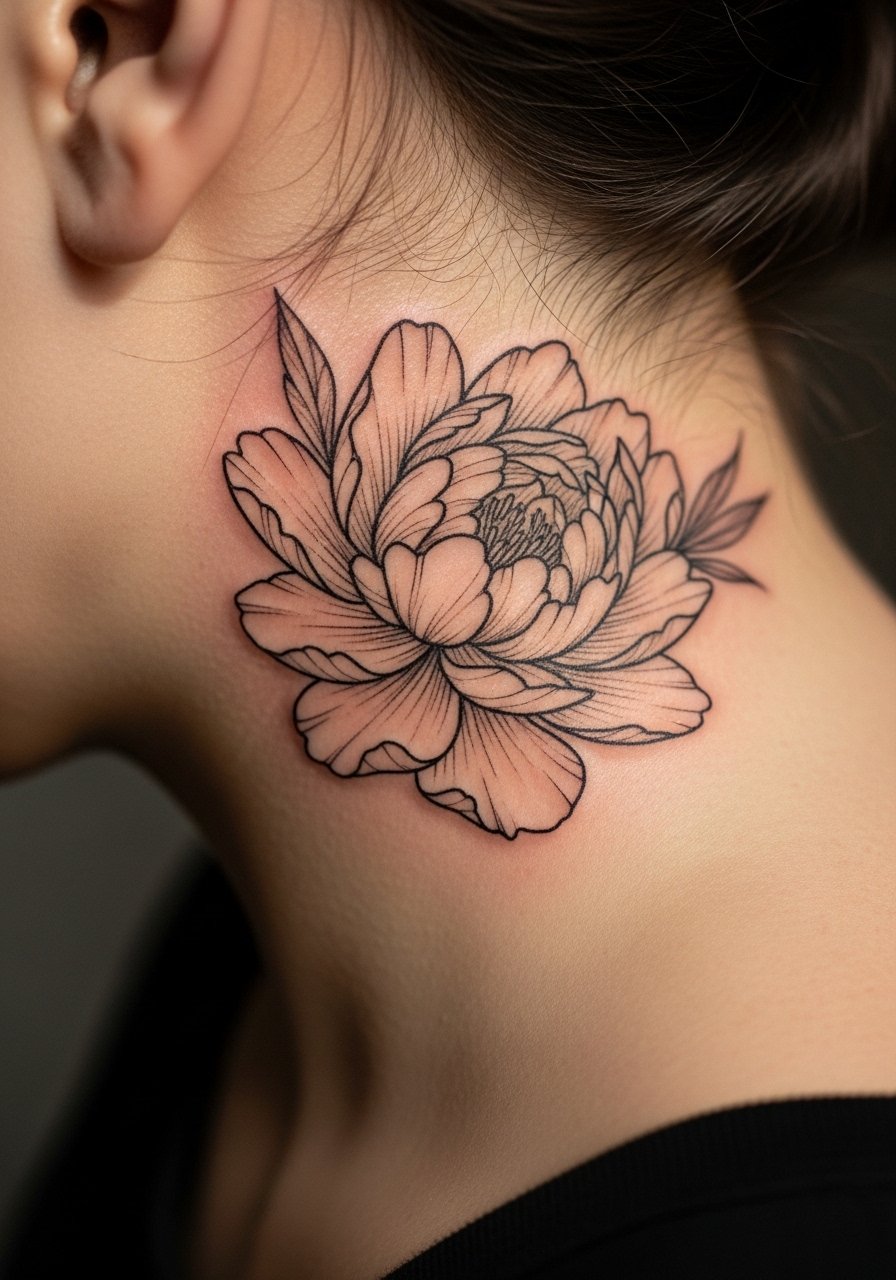
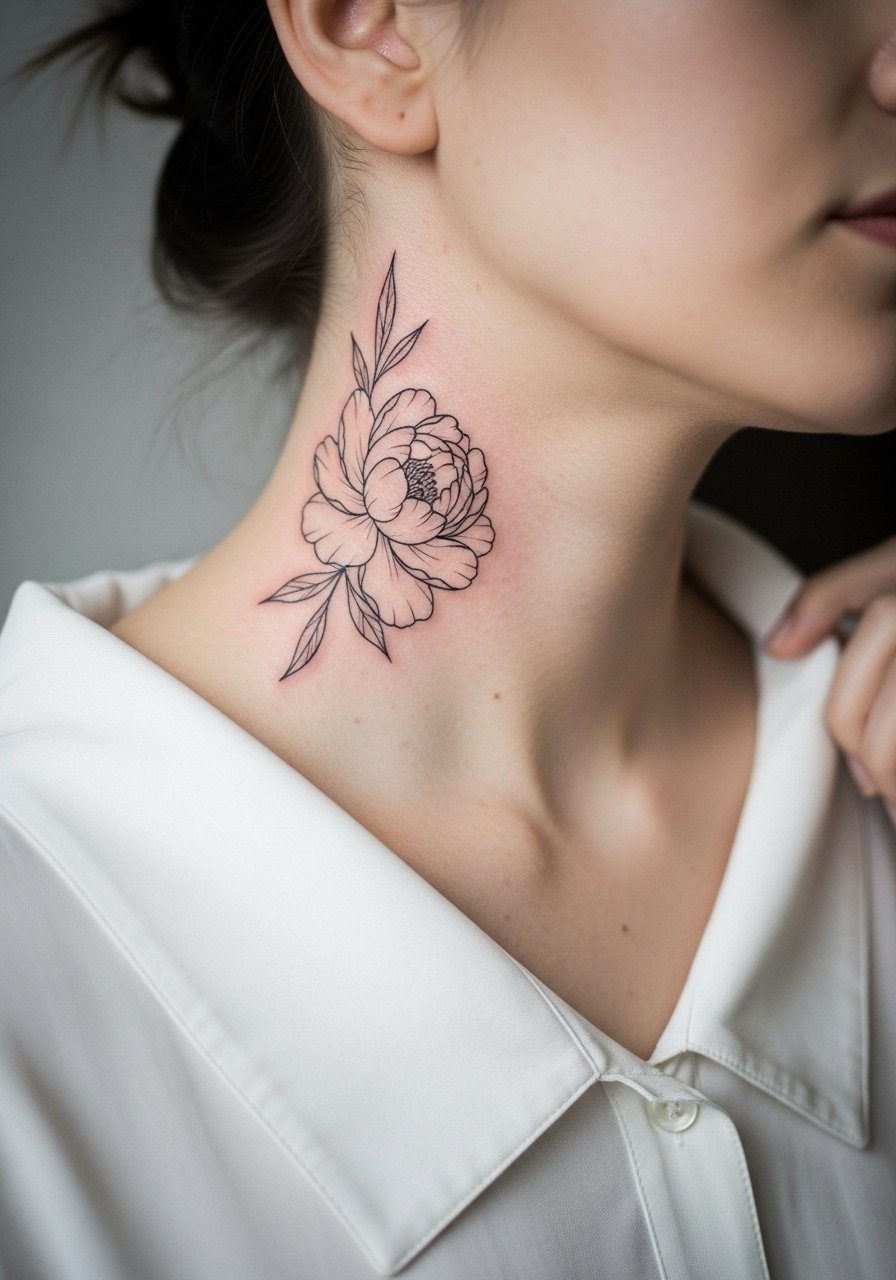
3. Tiny Peony Behind the Ear, Below the Hairline on Neck
Personal observation: behind-the-ear pieces read intimate and they age like any small linework does. The sensitive area needs a specialized hand because the skin under and around the hairline moves differently. Ask for a shallow but consistent depth and plan for a quick touch-up if hair products rub the area during healing. The session is short and low on pain, though finding a comfortable position can be awkward. This placement requires a careful artist because a common mistake is overcomplicating the composition. Consider an appointment-day tip and wear hair up in a loose clip so the artist has clear access to the area.
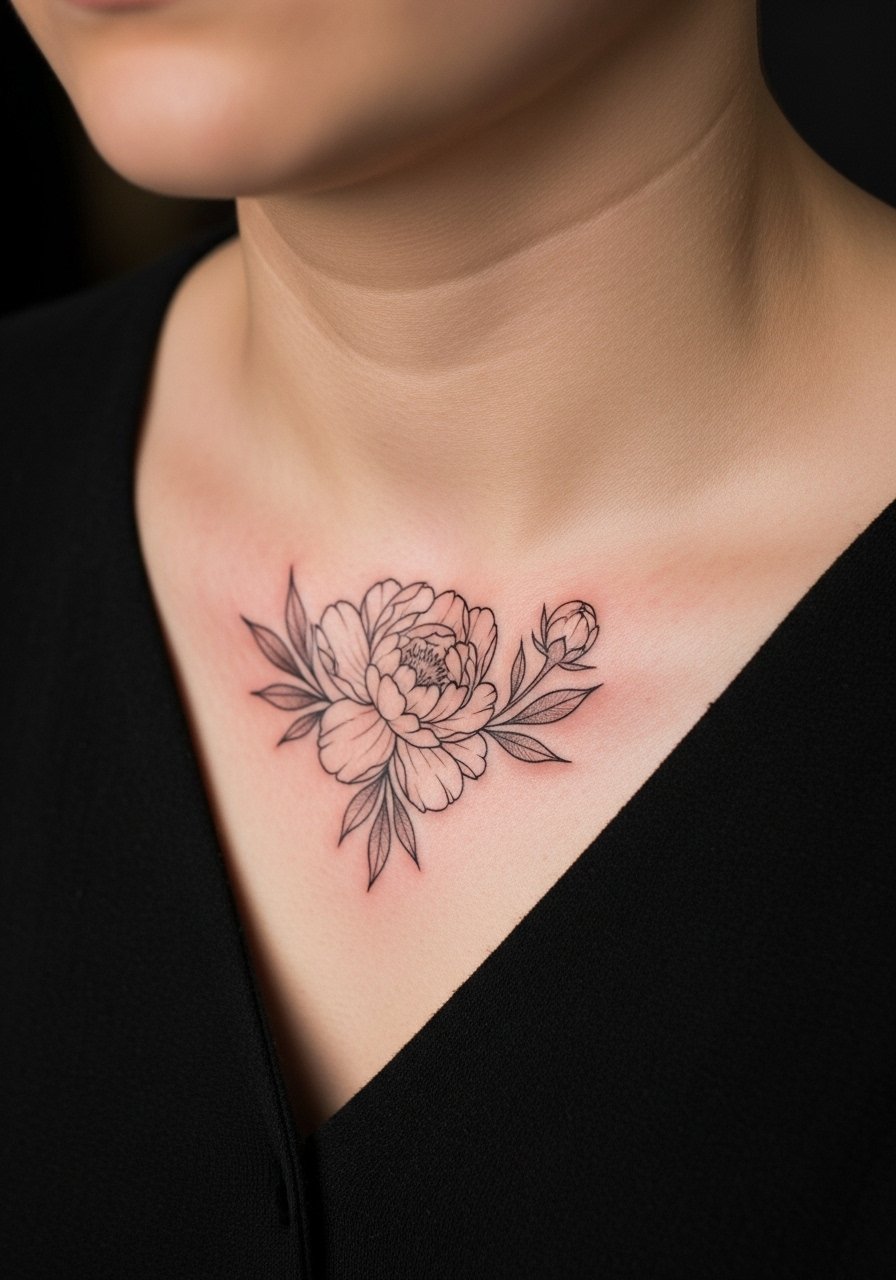
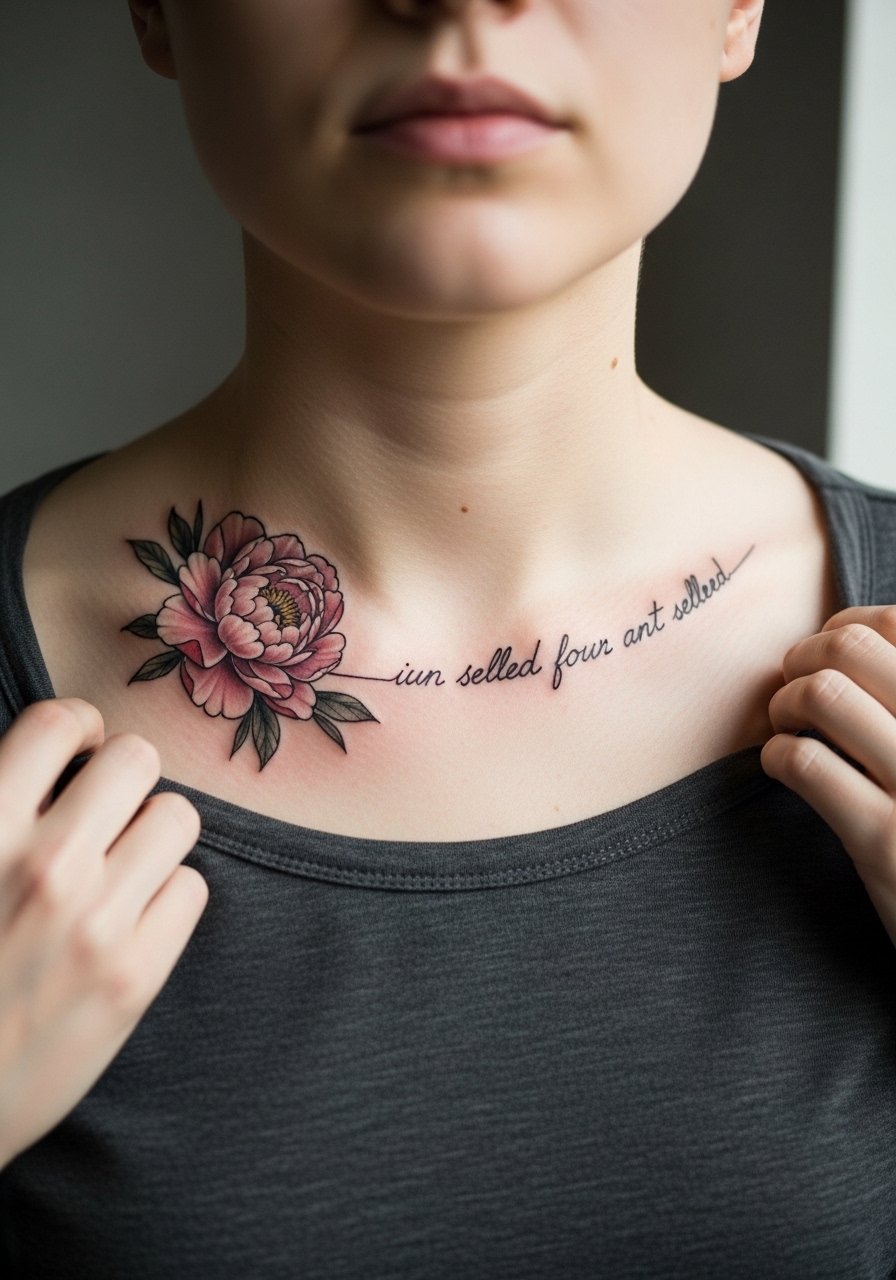
4. Collarbone Peony Sprig for Low Necklines
Most collarbone placements look elegant when the peony sits just above the clavicle and follows the bone line. During consultation ask for a gentle curve so the bloom reads correctly with a low V or scoop neckline. Pain is mild to moderate depending on proximity to bone, and sessions typically run 45 to 90 minutes. A common aging issue is placing too much dense shading against the bone, which can blur faster. For styling, a thin chain pendant necklace sits nicely above or beside the bloom and keeps attention on the collarbone without crowding.
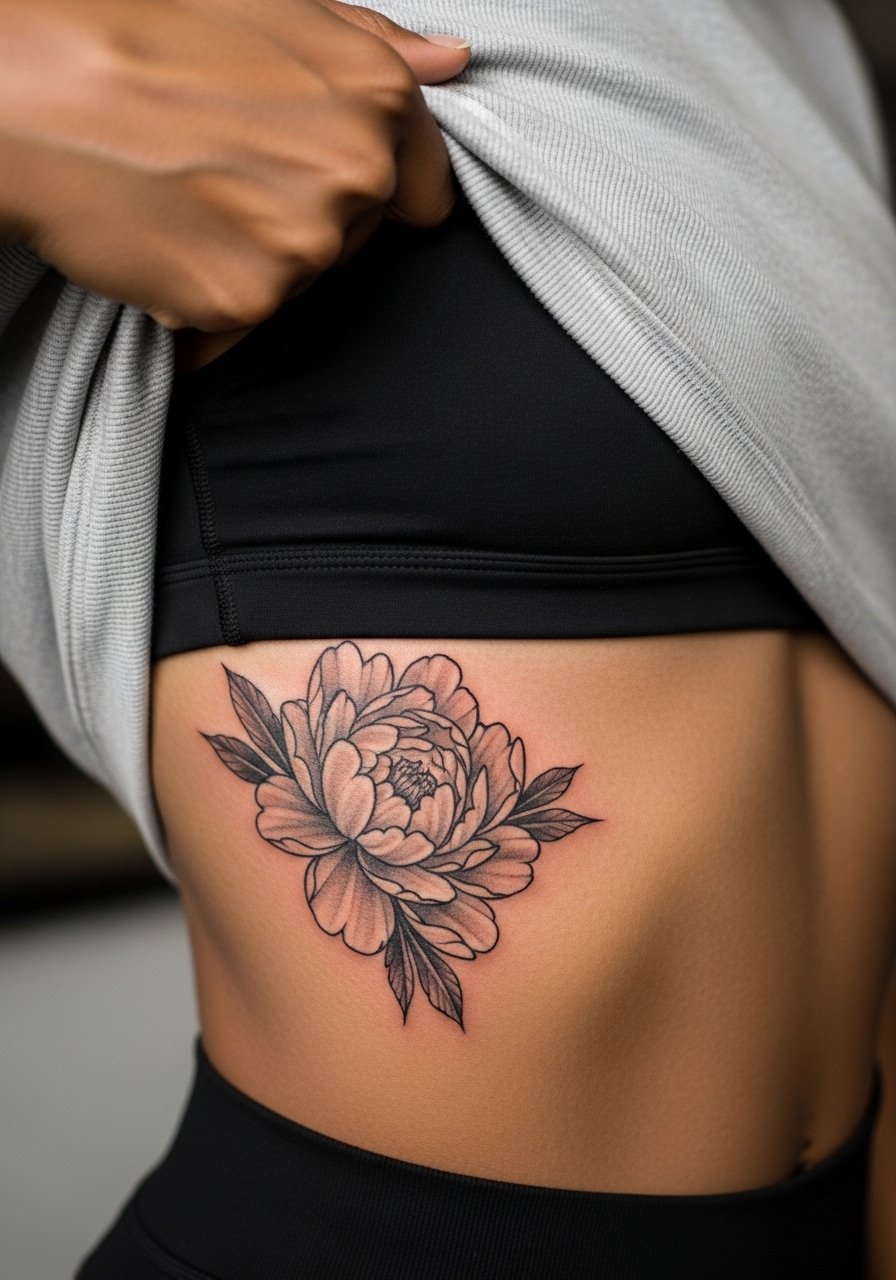
5. Ribcage Peony Wash with Soft Gray Shading
Controversy: fine line on the ribs splits artists into two camps. One camp says the skin stretch and variance cause lines to blur quickly. The other camp argues that with appropriate depth and spacing, fine line can settle well on ribs. When I advise someone I say pick an artist who explains their approach to spacing and depth. This idea works if you want a larger, airy bloom that breathes across the torso. Expect higher session pain and longer healing, and plan for a touch-up at year two or three. For the appointment, wear a cropped athletic top you can lift just enough so the artist only needs to reveal the tattoo zone.
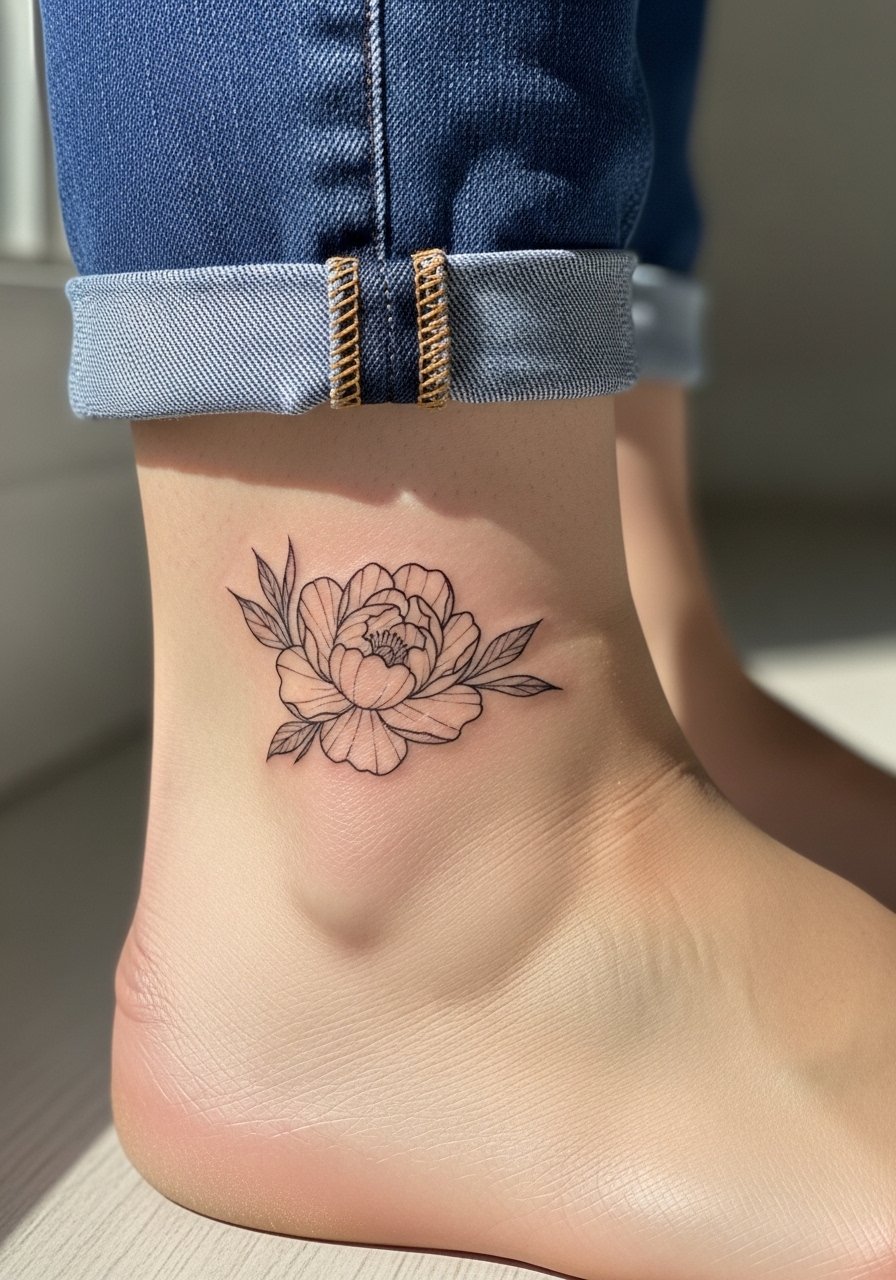
6. Tiny Ankle Peony Accent
Visual impact lead: an ankle peony looks unexpectedly stylish when centered above the bone with a narrow stem. The area endures friction from socks and shoes, so keep the design simple and slightly raised in contrast. Sessions are short and pain is low to moderate. A frequent error is over-detailing at a small scale, which fades unevenly. For the session wear rolled jeans or drawstring linen pants so the artist can access the ankle without pressure. Over the first two years the outline may soften, but the silhouette usually remains readable.
Studio Day Picks
The ribcage and ankle pieces above ask for different prep and the right supplies make the session and the first week easier.
-
Stencil transfer paper kit. Lets you preview the linework on skin before committing, especially useful for collarbone and wrist placements.
-
Topical numbing cream. Applied 45 minutes before can reduce discomfort for ribcage or inner thigh sessions without changing the artist's perception of pain.
-
Thin protective film roll. Keeps ankle and wrist pieces clean during the first week of friction from shoes and daily washing.
-
Fragrance-free body wash. Cleanses healing skin without stripping moisture, which matters for fine line work on forearms and collarbones.
-
Aquaphor healing ointment. A thin layer helps lock in moisture for the first few days without sealing the pores entirely.
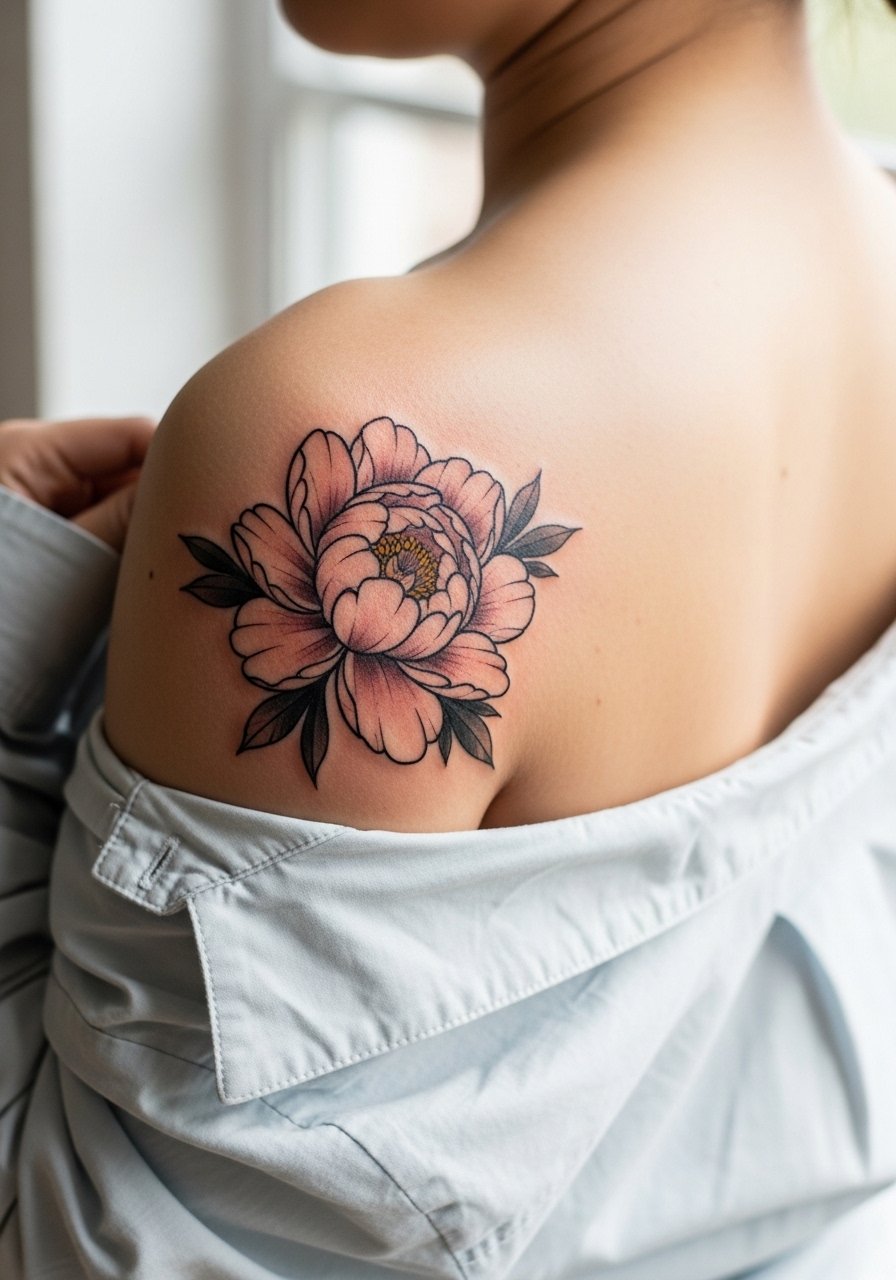
7. Single Bloom on the Back of the Shoulder Cap
Consultation lead: tell your artist you want the bloom to sit on the rounded part of the shoulder so it moves with the sleeve line. This placement tolerates slightly denser shading, and the curve gives the peony a sense of motion. Sessions are usually 60 to 90 minutes and pain is moderate. A common mistake is centering too close to the shoulder blade where shirts rub. For showing it off, wear a loose button-down shirt you can slide off one shoulder or roll back the sleeve to reveal the bloom elegantly.
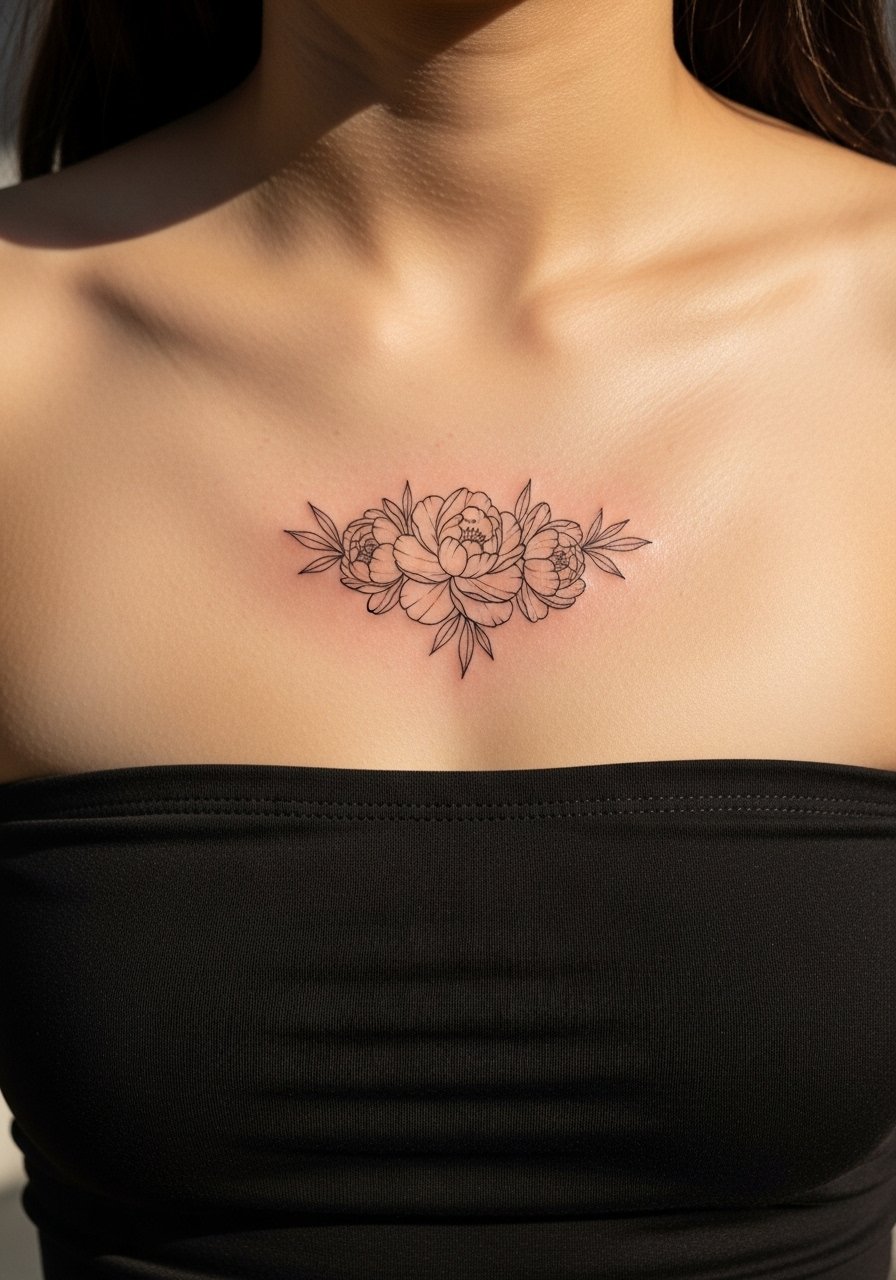
8. Sternum Micro Peony Cluster Under a Bandeau
Aging and reality lead: sternum peonies read delicate and intimate, but they demand an artist experienced with chest curvature. Artists are divided on ideal sizing because skin shifts with breath and body movements. The practical approach is a small cluster placed just above or below the bandeau line, so the design gets protection from clothing during healing. The session involves more tenderness and needs a longer aftercare window. If you plan to show it in swimwear, schedule sessions in dry seasons and pick an experienced chest specialist.
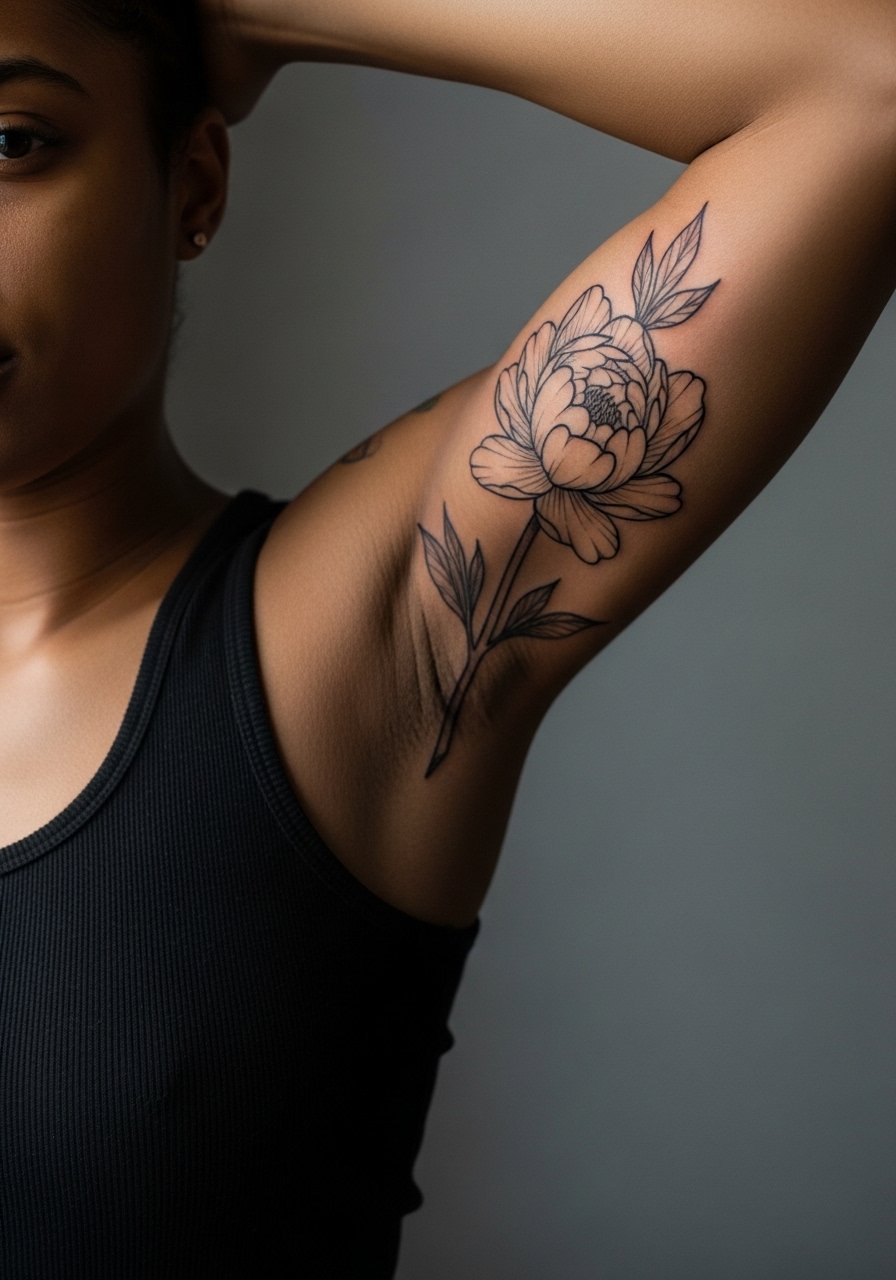
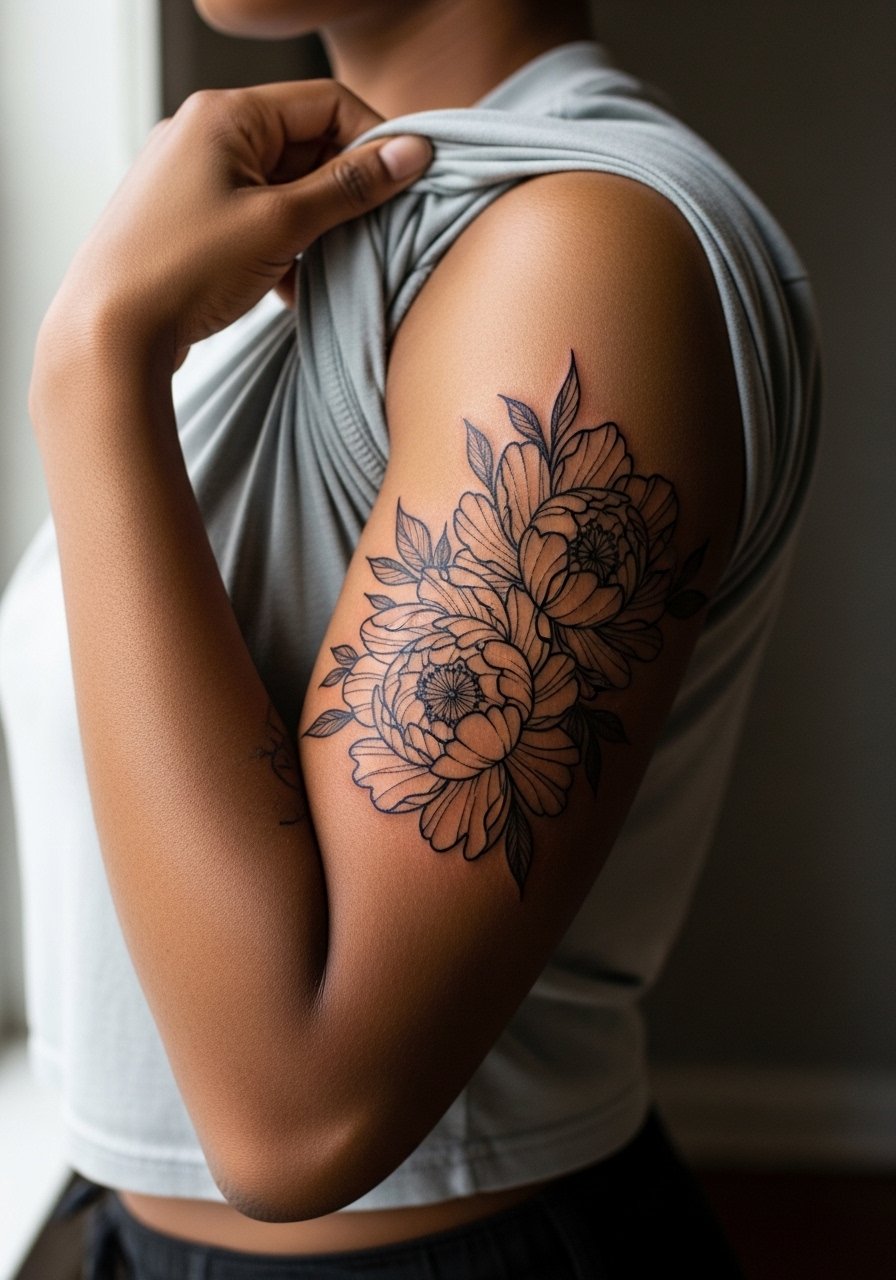
9. Inner Bicep Peony, Vertical Stem
Mistake lead: the inner bicep swells and moves a lot, so I see many small designs blur when artists compress the composition. Ask for a vertical stem that follows the muscle, slightly bolder outer lines, and minimal interior stippling. Sessions can be fidgety because you must hold the arm position, and the area rates about a 6 out of 10 on most pain scales. For the session wear a tank top so the artist can raise your arm naturally and access the inner arm cleanly.
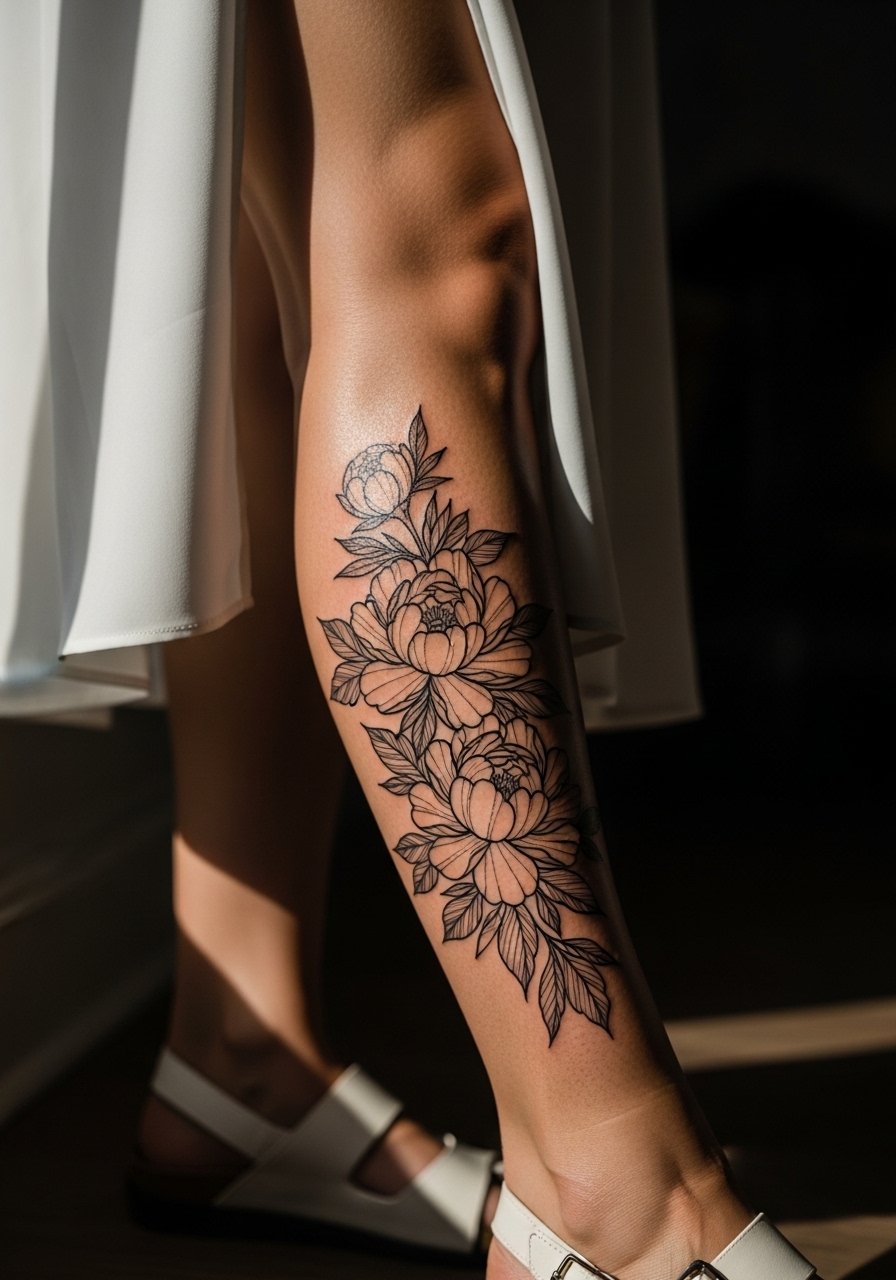
10. Calf-Side Peony for Vertical Flow
Visual impact lead: the outer calf is forgiving for size and allows the peony to read from a distance. This area takes saturation well so slightly deeper shading will age into a soft presence. Sessions range from 60 to 120 minutes depending on scale and feel moderate on pain. Avoid packing tiny dots into the petals at small scales, which is a common mistake. For show-off outfits, pair with mid-length skirts or open-back sandals that keep the lower leg visible without rubbing the tattoo.
11. Micro Peony on the Side of a Finger
Mistake lead: finger skin moves constantly and ink often fades unpredictably. If you want a finger peony, keep it single petal or a tiny bud with bold outer contour and very little interior detail. Expect touch-ups more frequently than with arm work. Sessions are brief but sensitive. Consider whether your job tolerates hand work because some employers still react to visible hand tattoos. For styling, stack with a thin midi ring set to keep the design feeling intentional rather than incidental.

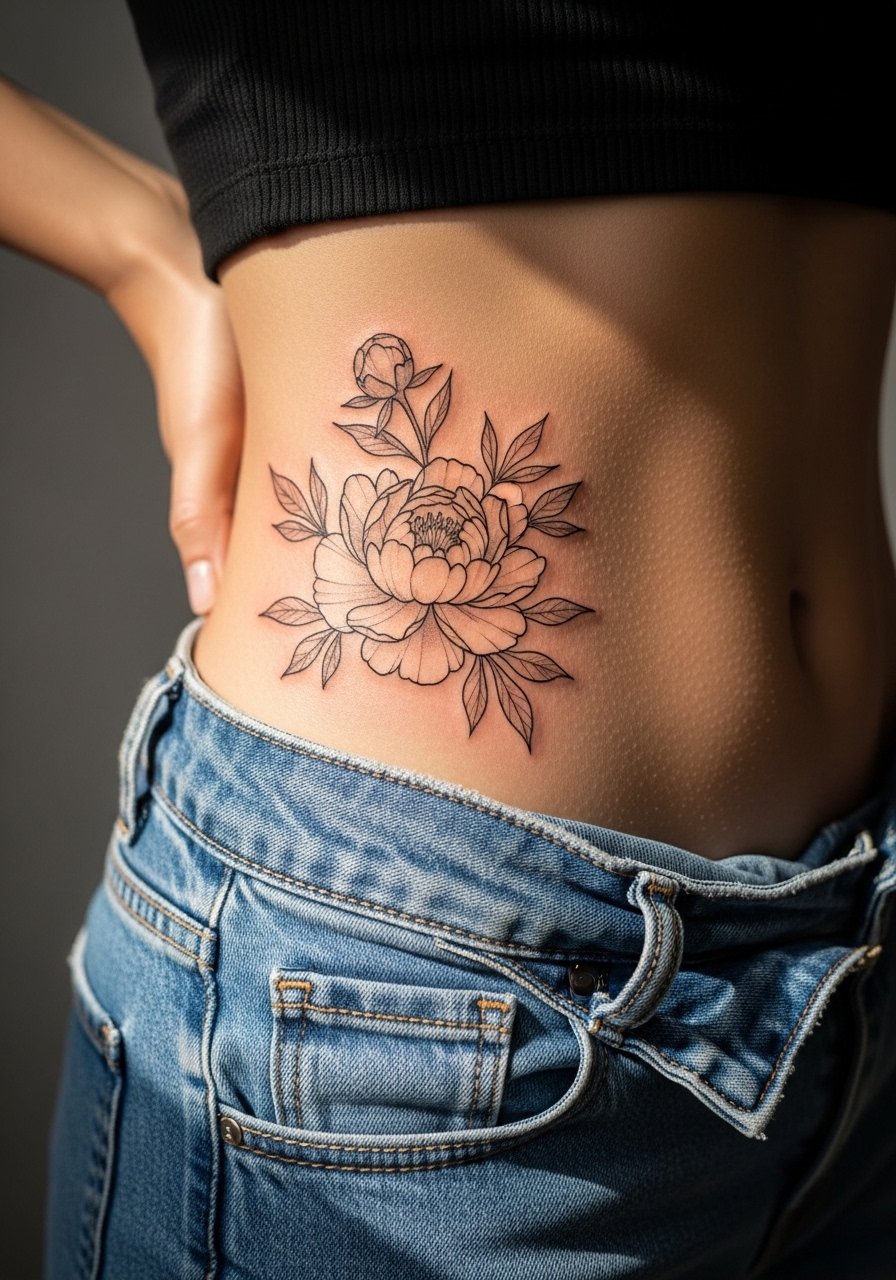
12. Hip Peony Peeking from High-Waist Jeans
Consultation lead: the hip gives a private reveal and works well with a slightly larger bloom that follows the hip bone. Ask for soft edges and a stem that tapers toward the waist. Sessions may be tender and you will want loose bottoms for the appointment. The common error is anchoring the design too low where jeans constantly rub it during healing. Plan clothing that keeps the area uncovered for brief intervals and protected otherwise.
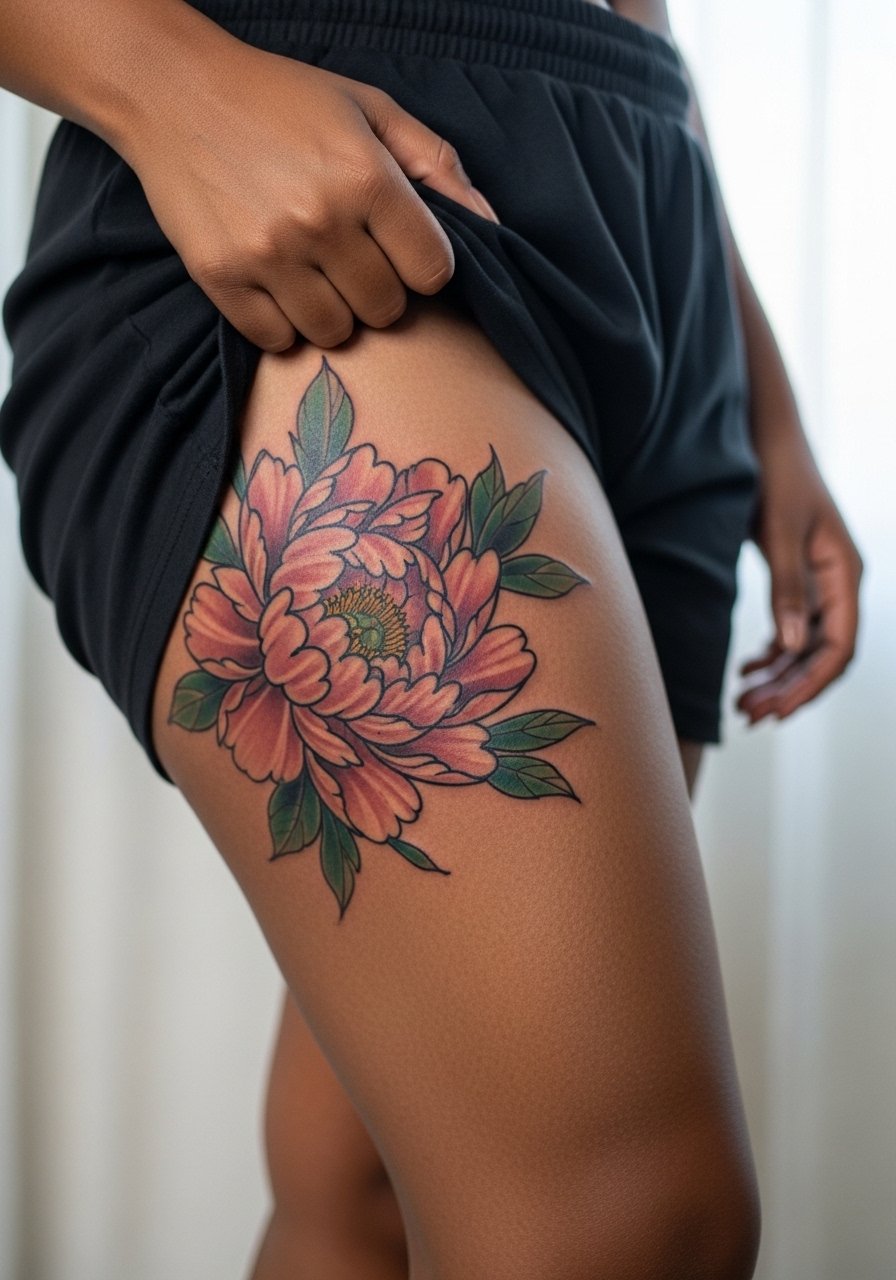
13. Thigh-Side Peony for a Bold Hidden Bloom
Personal observation lead: thigh placements let you go larger without aging issues from sun exposure, provided you avoid tight waistbands on top of the design. This placement tolerates more shading and texture, and the session can be longer depending on scale. A common mistake is choosing a piece that conflicts with jeans or sportswear seams. For the appointment wear loose shorts or a skirt so the artist can access the side without pressure.
14. Small Peony at the Base of the Neck, Side Neck Placement
Pain warning lead: the side of the neck is sensitive and visible. If you go here, keep the peony compact and ask your artist for rounded petals with enough breathing room. Sessions are short but tender and you will want to consider career implications. A common mistake is asking for dense black interiors in a tiny neck piece, which can make the design read heavy from a distance. Choose a placement that sits under a collar line if you want an easy cover option.
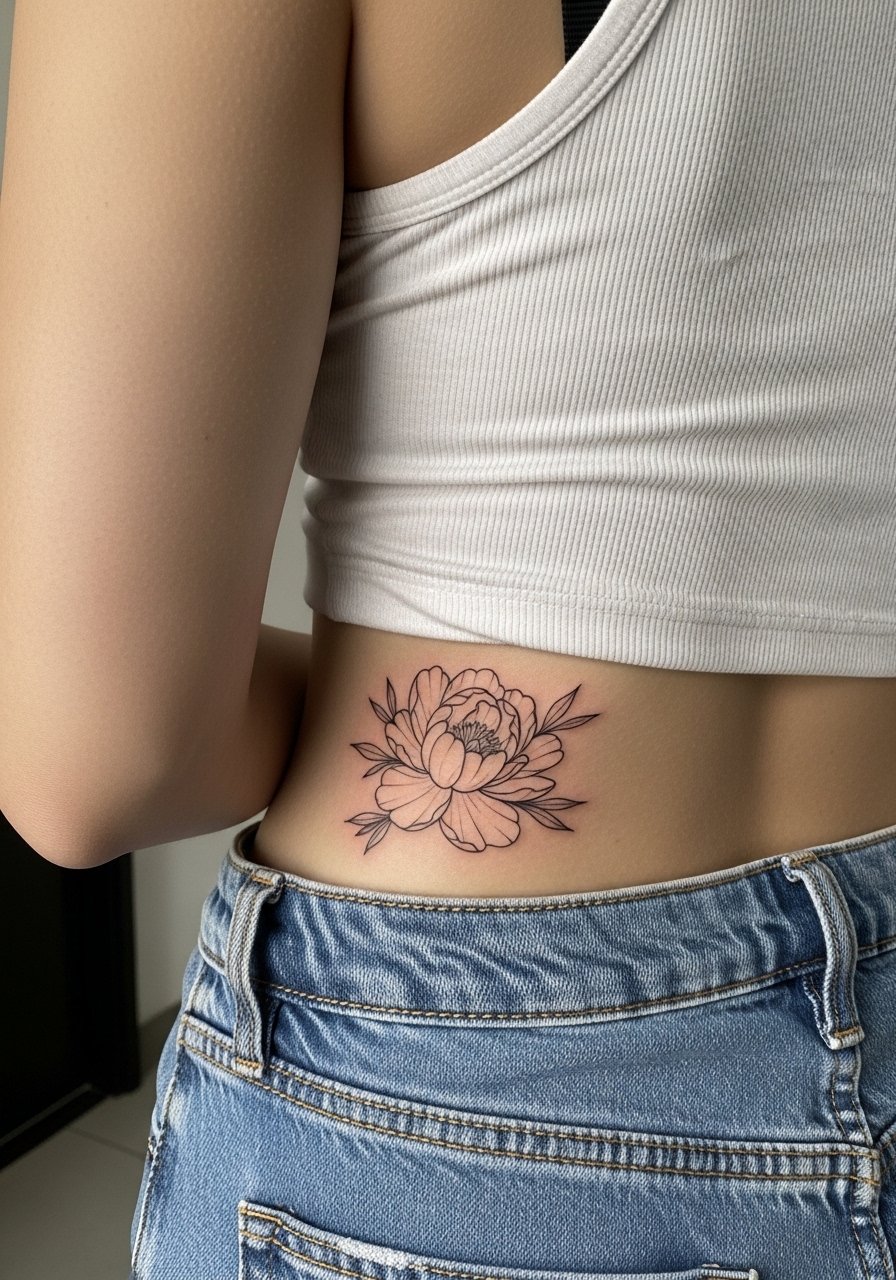
15. Lower Back Peony Accent, Off-Center
Consultation lead: lower back pieces age well when they follow natural curves and avoid the exact belt line. Pick an off-center placement so your clothing does not rub the tattoo every day. Sessions are moderate in time and low to moderate in pain. A mistake I see is placing too low where waistbands and belts can chafe during healing. For showing it off, choose high-waisted garments or dresses with low backs and consider a low-back dress for evening looks.
16. Peony Sleeve Accent, Negative Space Petals
Visual impact lead: using negative space inside petals can keep a sleeve element light while still readable. For a partial sleeve, ask your artist to stagger the peonies with open pockets of skin so the piece ages without becoming a solid block. Sessions span multiple appointments and touch-ups are expected at year three or four depending on your sun exposure. A common mistake is over-filling early in the sleeve, which leaves no room for natural settling. For session wear, a loose short-sleeve top helps the artist work on the upper arm and forearm zones.
17. Micro Realism Peony Near the Collarbone for Script Pairing
Consultation lead: when pairing a tiny realistic peony with a short script, have the artist stencil both and check spacing. Micro realism needs slightly more breathing room than simple linework. Sessions are short and the area around the collarbone rates low to moderate on pain. A common mistake is putting script too close to detailed petals, which makes both elements compete. For a jewelry pairing, try a thin chain pendant that sits just above the script so the floral and text balance.
Frequently Asked Questions
Q: Will a fine line peony on the ribs blur faster than one on the forearm?
A: It depends on placement and how tightly the petals are packed. Ribs shift with breathing and movement so tightly detailed small work can blur sooner. If your artist spaces the petals and uses slightly bolder contours, a ribcage peony can age similarly to an arm piece.
Q: How often should tiny wrist or finger peonies expect touch-ups?
A: Plan for earlier touch-ups than larger pieces, often around year two for fingers and wrists. The constant washing and friction these areas get speeds softening, so a maintenance session every couple of years is common.
Q: Are there career considerations for visible peony placements like hands, neck, or face?
A: Yes, hand and face work still affect hiring in some industries. Neck pieces are visible and can influence first impressions. If you have concerns, pick placements that can be covered by collars or jewelry during interviews.
Q: What should I wear to a ribcage or sternum session for comfort and access?
A: Wear a fitted sports bra or bandeau for sternum work and a cropped top for ribcage sessions so the artist sees only the area they need. Comfort in the chair matters more than fashion on the day.
Q: Can I pair a collarbone peony with a pendant without crowding the design?
A: Yes, a thin pendant that sits above or to the side can frame the peony. Try a slim chain or small pendant so the necklace does not overlap the petals visually.
