
Neo traditional keeps the drama of color and the discipline of linework in balance, and that makes it one of the few contemporary styles that both photographs well and can age gracefully when done right. The trick is choosing the right placement, spacing, and saturation for the piece you want. Below are 17 ideas that show how to make neo traditional read like art now and like a well-kept piece later.
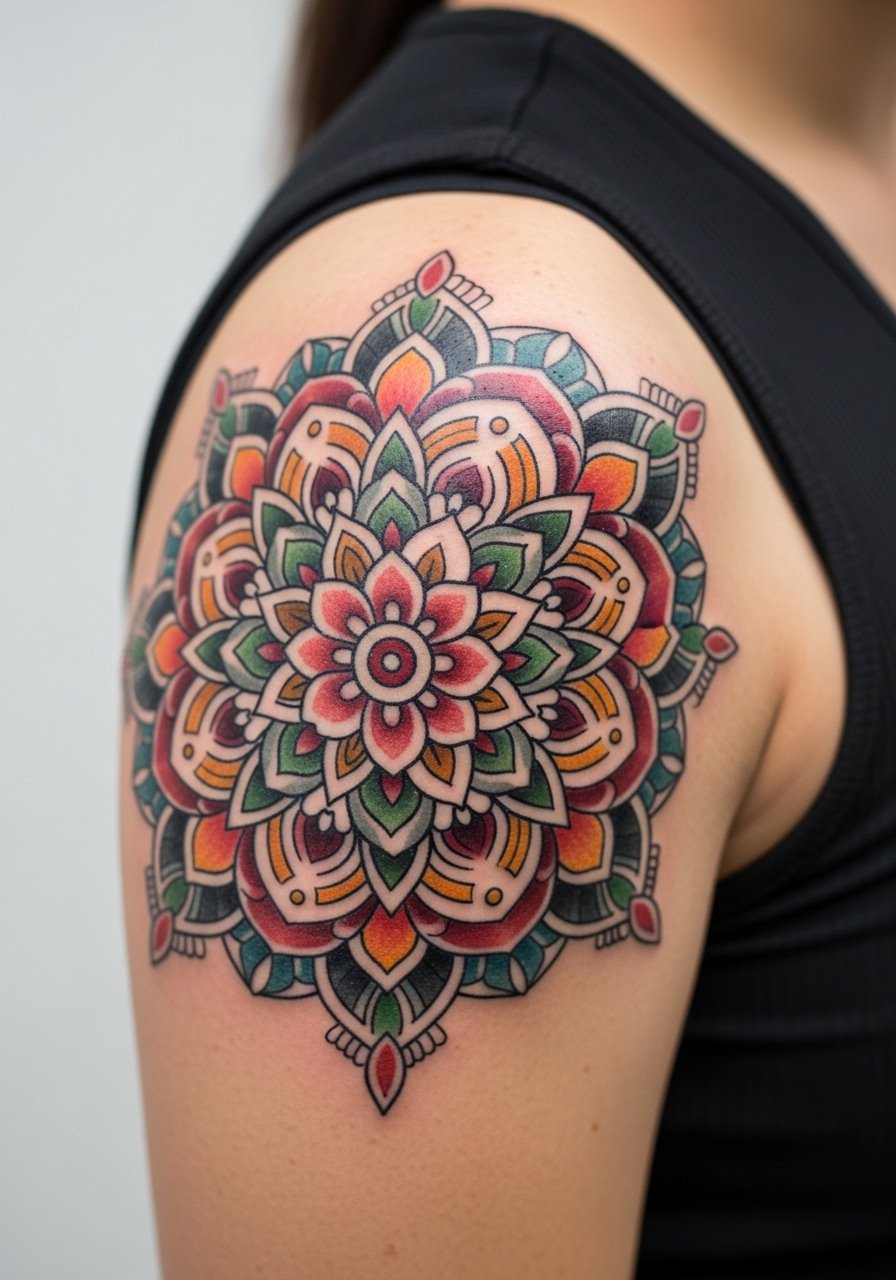
1. Bold Botanical Upper Arm
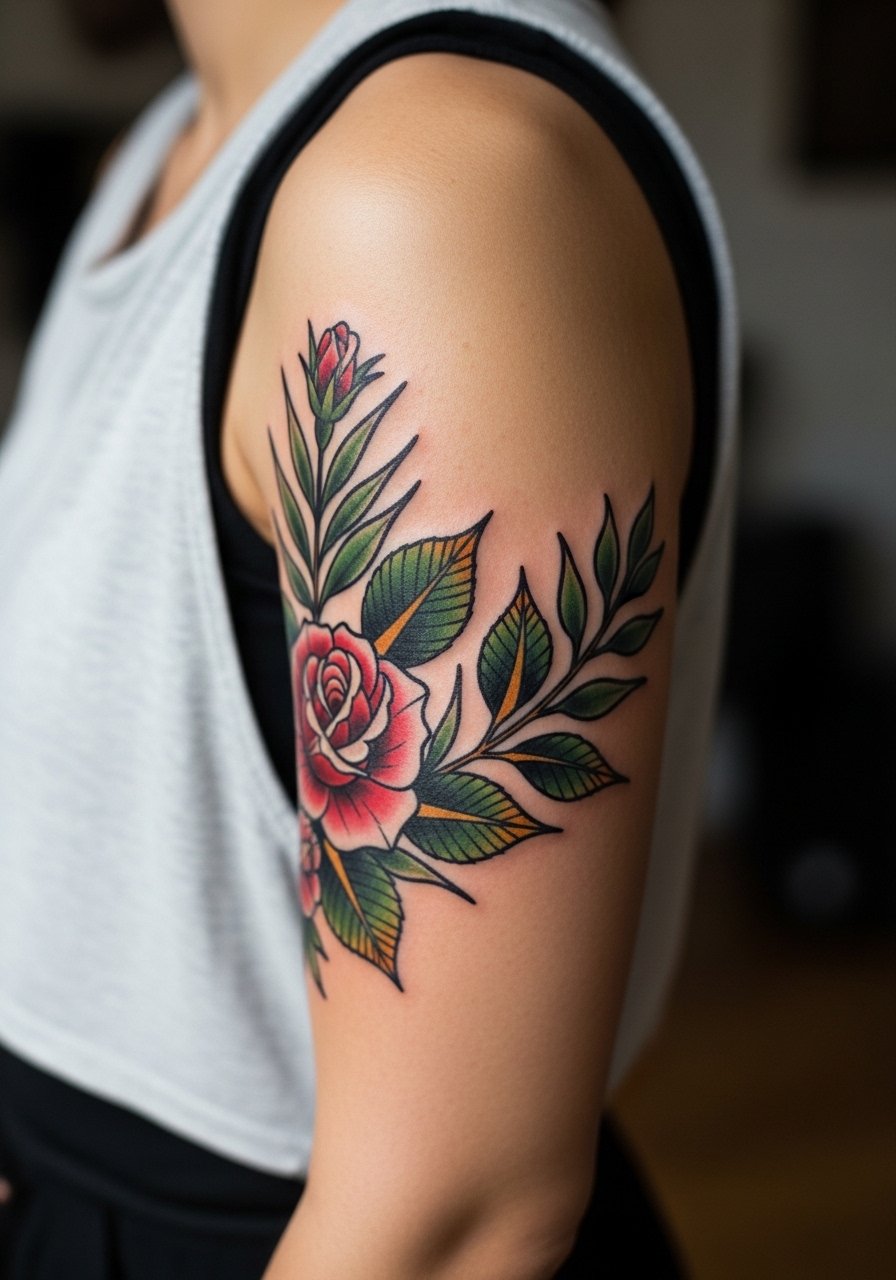
I recommend this when you want an instantly readable piece that still keeps room for a future sleeve. The upper outer arm tolerates heavier saturation without as much blowout risk as the inner arm. Tell your artist you want bold outlines with layered color fields and stipple shading in the shadow areas, not micro detail packed into one small spot. Pain is mild to moderate, and a typical first session runs two to four hours depending on coverage. Watch for common mistakes where artists try to render tiny petals inside a fist-sized layout. That version blurs faster. For showing this off, roll up short sleeves or wear a loose button-down shirt to frame the upper arm.
2. Pocket-Sized Rose on the Inner Wrist
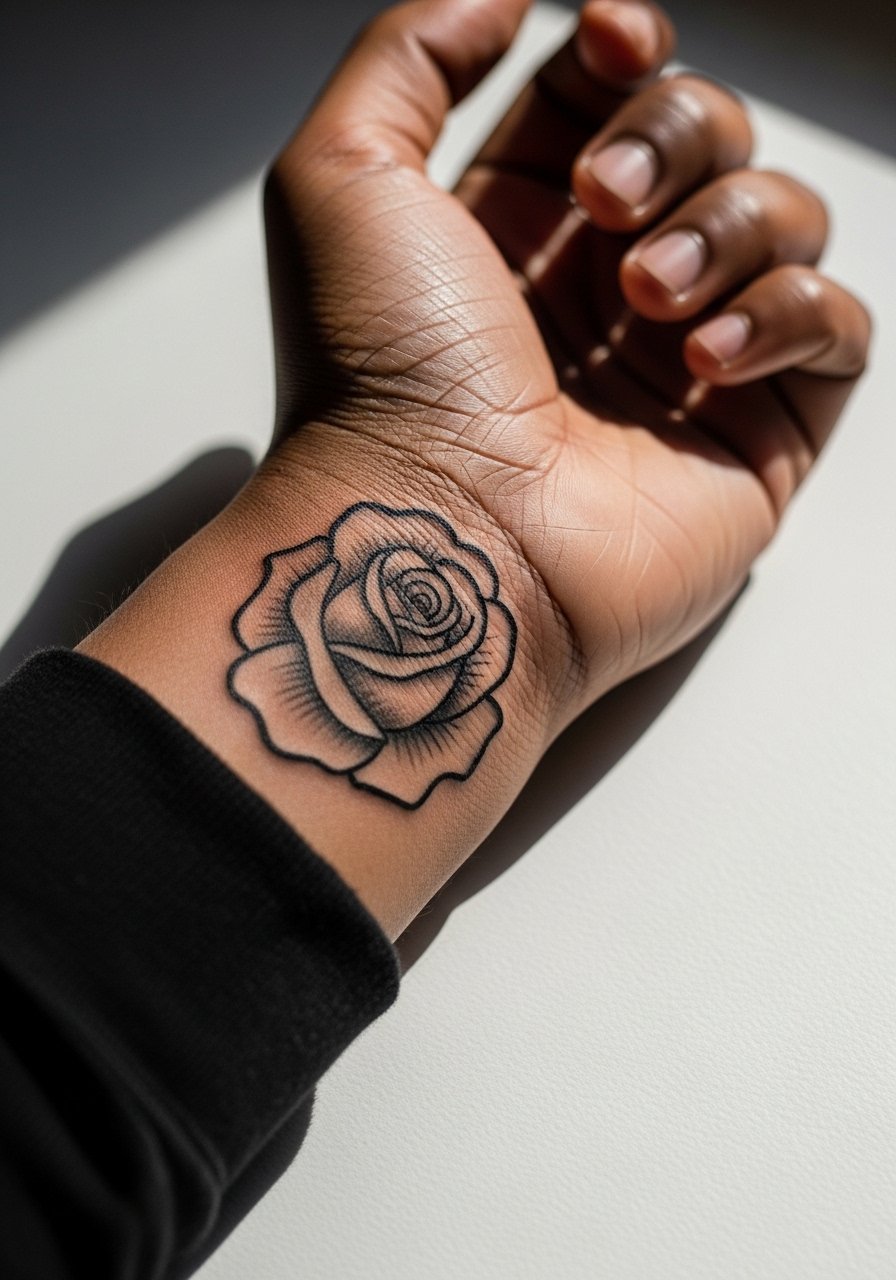
Fair warning, the wrist is unforgiving for ultra-fine details. I suggest a compact rose with a confident outline and saturated petal blocks. Ask for slightly heavier linework than you think you need so the shape reads at a distance and holds during healing. Expect a touch-up around year two for saturation and any areas exposed to frequent friction. The session is quick, often under an hour, but the area is sensitive. A common error is asking for micro-shading across the wrist band. That invites blowout and muddied color. Wear a thin chain bracelet rather than bulky cuffs to avoid rubbing the fresh work.
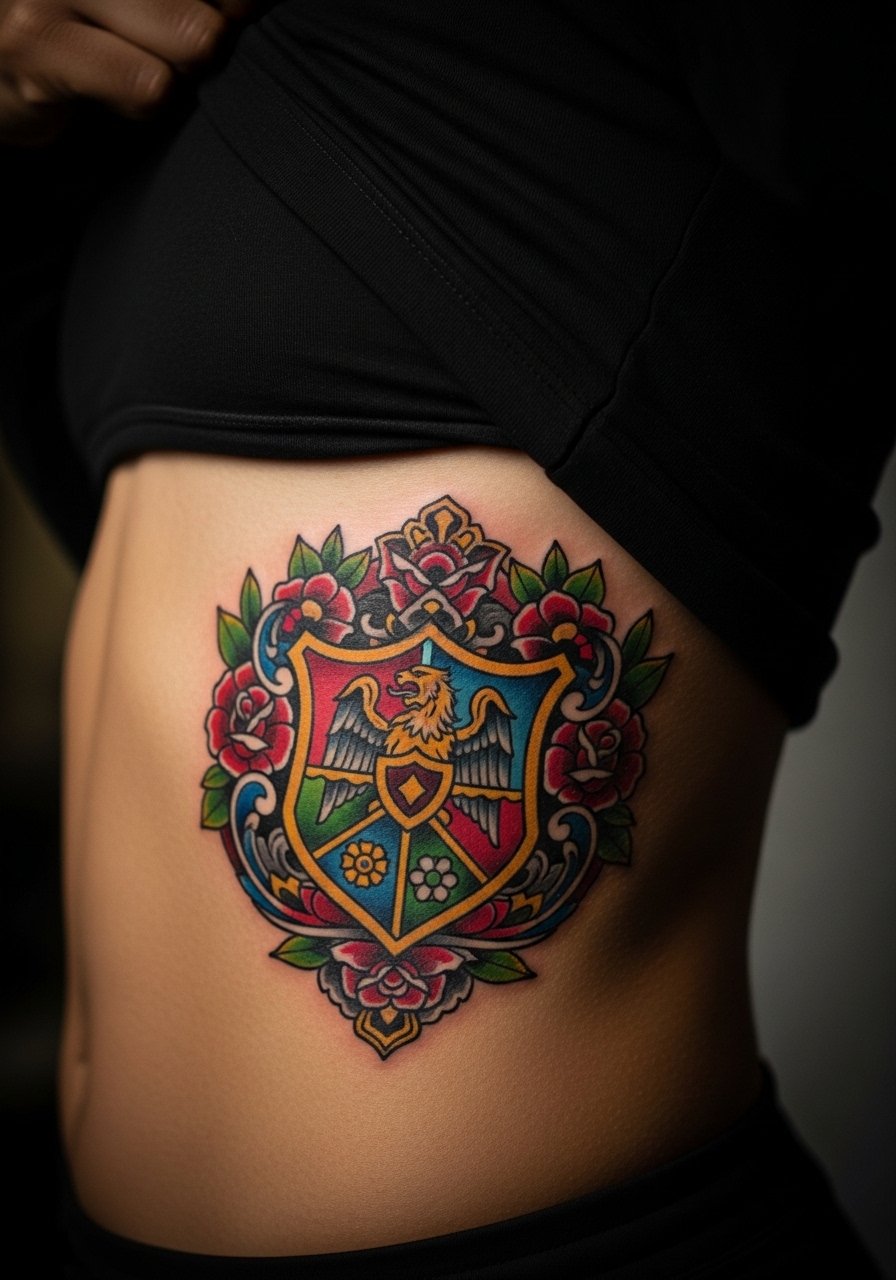
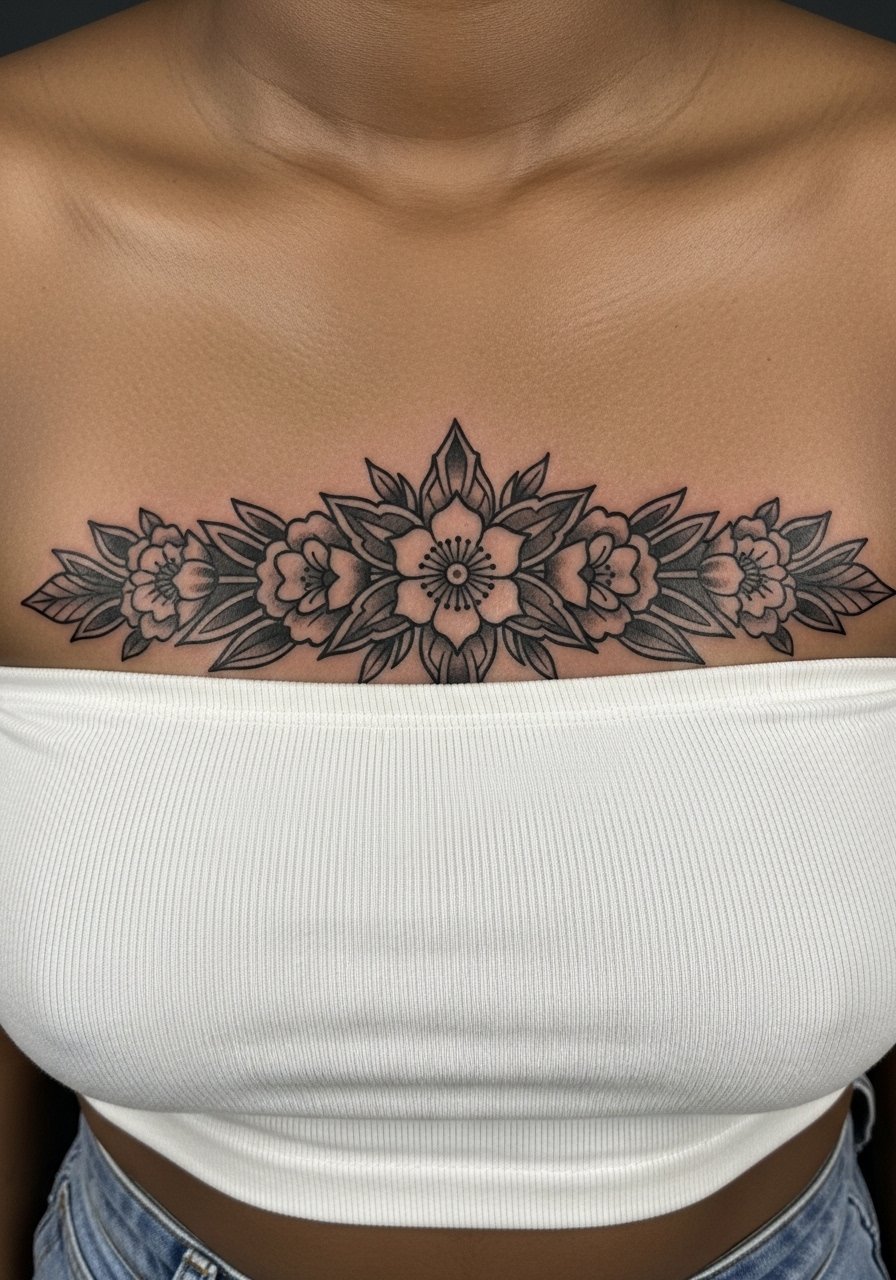
3. Collarbone Anchor with Decorative Frames
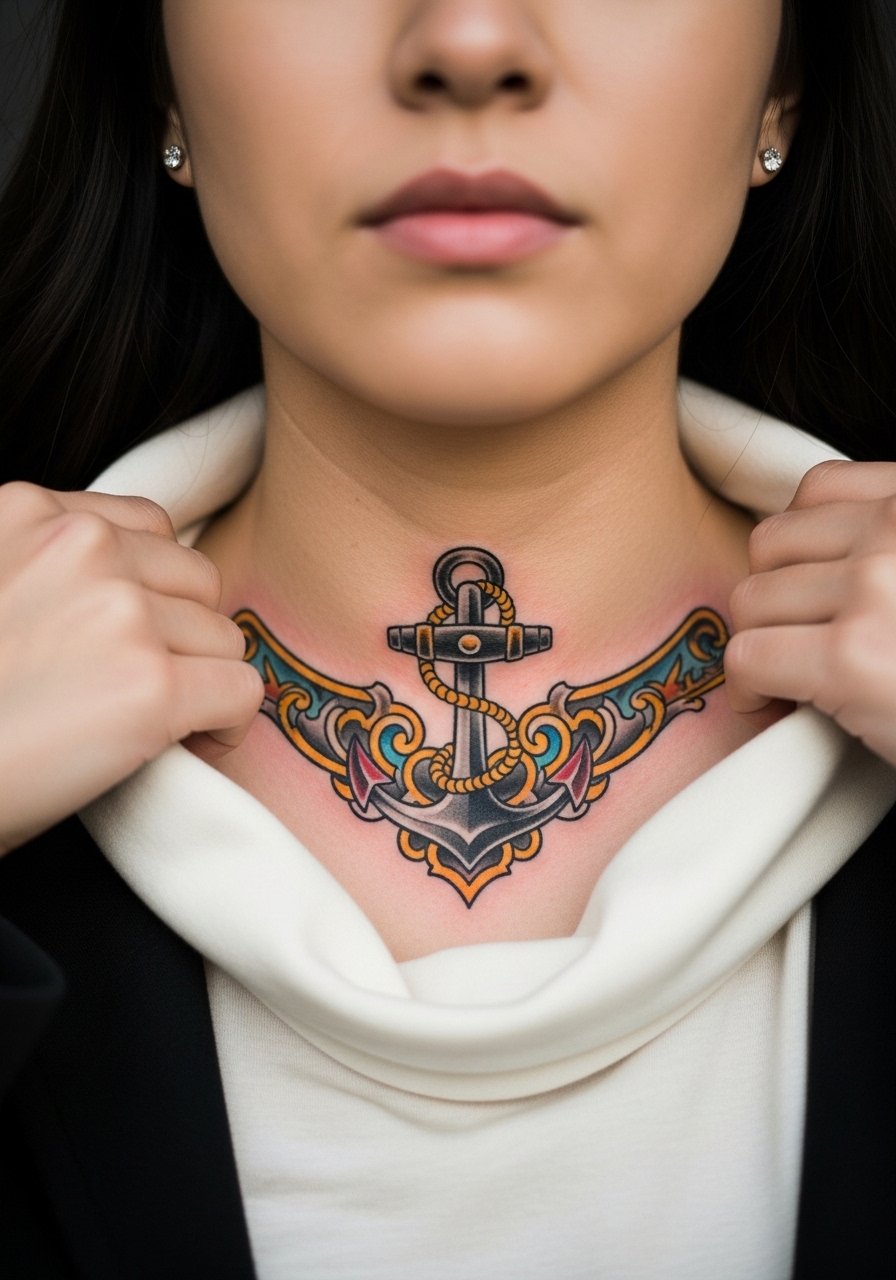
Most people choose the collarbone for pieces that read like jewelry. The real decision is scale. Too small and the ornamentation merges into blurred shading in a couple of years. In consultation, show photos that demonstrate negative space between decorative flourishes. Ask for whip shading around edges and dot work inside shadow areas to keep the piece breathable. Expect moderate pain because the bone is close to the skin. Touch-ups at year three are common to refresh saturation. For evenings out, pair it with an open-back midi dress if you want the tattoo to anchor your look.
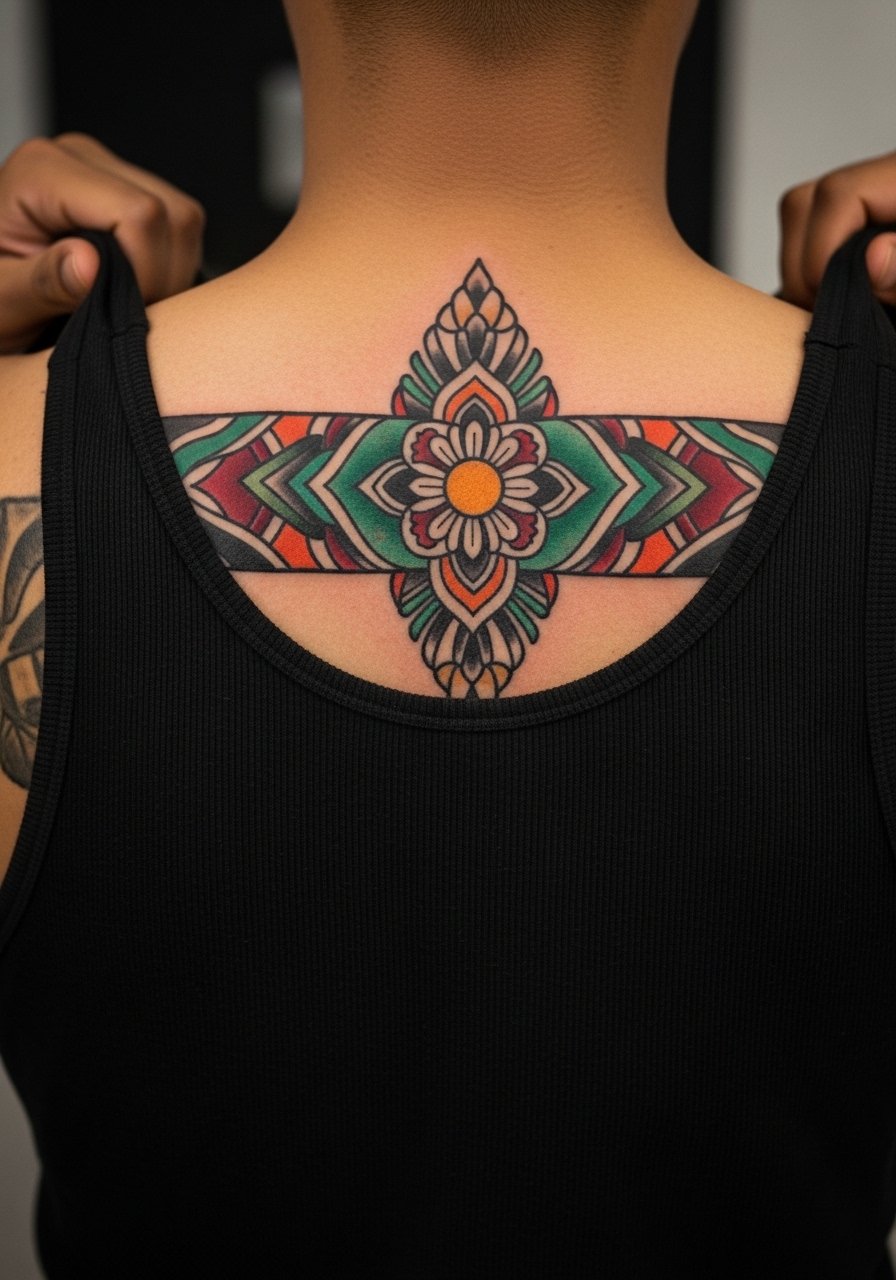
4. Shoulder Panel with Bold Outlines
There is something about a shoulder panel that ages predictably. This placement takes color well and hides minor touch-ups under clothing while still looking great when exposed. Ask your artist for a clear silhouette edge so the piece reads when you wear short sleeves. Sessions run two to five hours depending on size. The biggest mistake is packing too much micro detail into the curved surface of the shoulder. That detail flattens over time. For the session, wear a racerback tank so the artist can access the shoulder without you removing layers.
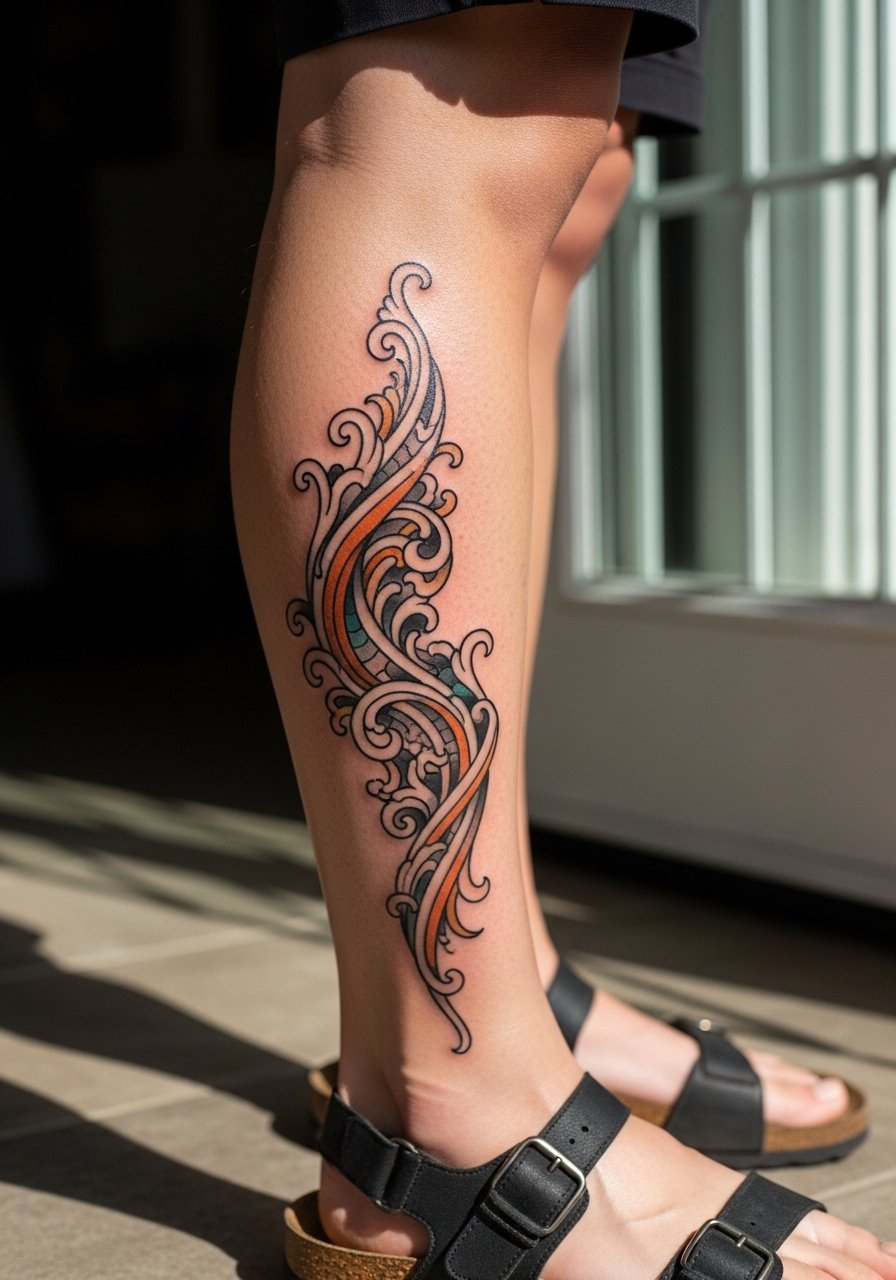
5. Neo Traditional Calf Motif
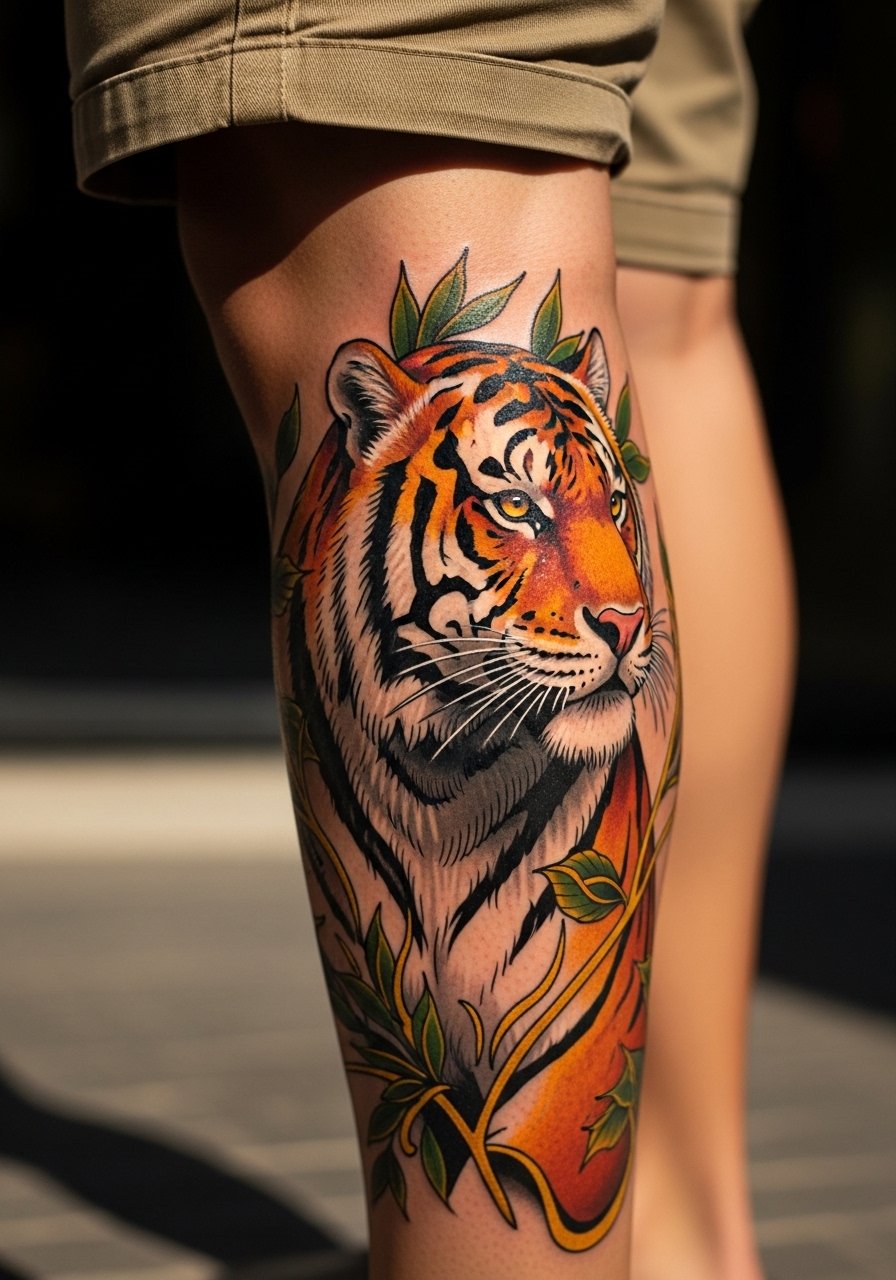
The calf handles saturation and larger shapes better than the ankle. I recommend this when you want a piece that can be stepped up into a lower-leg sleeve later. Tell your artist you want layered color fields with small areas of dot work for transition, not micro realism inside the motif. Pain is moderate. Sessions are comfortable because you can sit or lie down during long fills. A common mistake is starting with a heavy background wash that makes touch-ups harder. To show it off, wear loose drawstring linen pants rolled up at the hem.
6. Miniature Neo Traditional Hand Icon
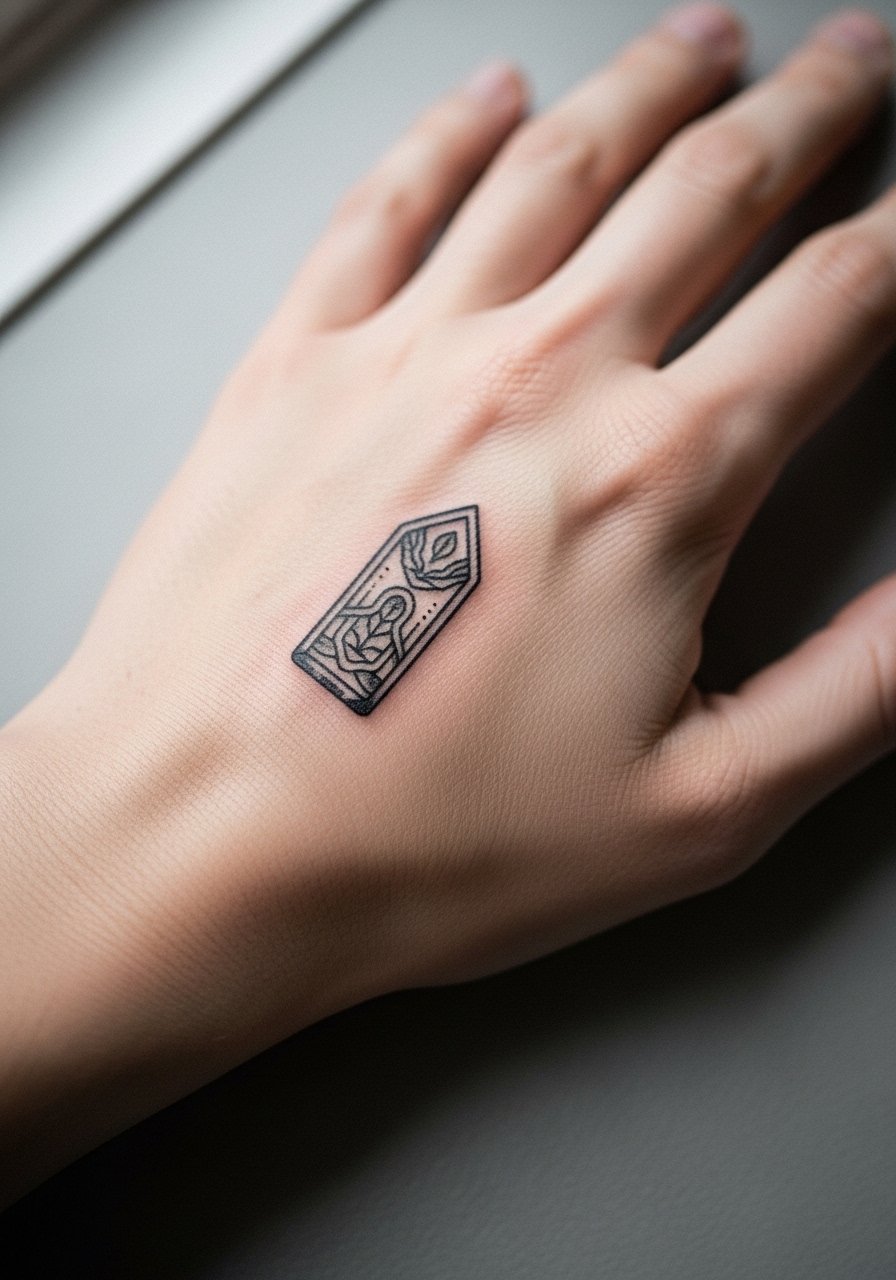
Hand tattoos still divide opinion. One camp accepts them as part of modern self-expression and prioritizes bold lines and heavy saturation. The other camp warns that hands face constant washing and sun and will need frequent touch-ups. Artists I know often advise heavier outlines and reserved color fields for hand pieces. Expect faster fading and touch-ups as early as year one. The session is sharp and painful. A common error is trying to include tiny stipple shading on knuckles. It usually becomes a gray smudge. Keep the motif simple and bold so the silhouette stays readable.
Studio Day Picks
The small and exposed pieces above, from wrist icons to hand motifs, need different prep than larger arm or leg work. These items smooth the session and make the first week easier.
-
Stencil transfer paper kit. Lets you preview the placement and linework on skin before the needle starts, which is critical for wrist and collarbone pieces.
-
Topical numbing cream. Applied as directed before the appointment it can reduce the edge of sensitivity on thin-skin areas without affecting the artist's work.
-
Thin protective film roll. Useful for fingers and wrists where friction is constant during the first few days of healing.
-
Fragrance-free gentle body wash. Cleanses fresh tattoos without irritating linework that fine neo traditional pieces rely on.
-
Aquaphor healing ointment. A thin layer during the initial days keeps the skin supple on smaller exposed work without suffocating the area.
7. Thigh Bouquet with Open Spacing

The outer thigh gives you space to breathe and is forgiving for saturated color. I like this when you want a piece that stays private unless you choose to show it. Ask your artist to leave open negative space between flower clusters to avoid the "blended blob" look after a few years. Sessions are moderate on pain and can be split into multiple sittings for larger work. A common mistake is packing fine micro-realism into a small thigh patch. That detail often blurs and makes touch-ups fiddly. For the appointment, wear high-waisted shorts or a wrap skirt so the artist can access the area easily.
8. Ribcage Curved Crest
Artists split on fine detail on the ribs. One camp says the skin stretch and breathing motion blur fine lines quickly. The other camp argues that with correct needle depth and spacing the lines settle fine. I advise choosing scale over tiny detail for rib work. If you prefer delicate elements ask for slightly thicker outlines and larger shadow shapes. Pain is high on the ribs and sessions are often limited by tolerance, so plan for short sittings. Expect touch-ups at year two depending on how much sun and friction the area sees. Bring a fitted sports bra you can shift during the session.
9. Neo Traditional Throat Accent
Neck tattoos are about risk and visibility. If your career allows visible ink this can be a powerful place for a small emblem. The skin there is thin so heavier outlines and reserved color blocks help longevity. Tell your artist you want clean linework and minimal fine gradients so the piece reads at distance. Pain is moderate to high because of the area. A common error is loading the neck with dense dot shading. That often softens into a patchy tone. For after sessions, keep sun exposure low and dress around the neckline to protect the work.
10. Neo Traditional Back Panel with Negative Space
Back panels are an invitation to plan long-term. The large canvas tolerates saturation and richer color transitions. I recommend designing with negative space lanes so future additions do not force overlapping touch-ups. During consultation, discuss how the piece will flow toward the shoulders and down the spine. Sessions can be long, often in the five to eight hour range if covering significant area. A common mistake is starting with an overly complex central motif that limits future expansion. For the session wear a button-down you can pull aside or a tank that allows access with minimal fabric removal.
11. Ankle Garland with Solid Outlines

Ankle tattoos face constant friction from shoes and socks. I suggest solid outlines and larger color fills rather than tiny micro detail. Ask your artist to keep shading compact and avoid long gradient washes that fade unevenly. Sessions are short but painful because of the bone proximity. Expect touch-ups sooner than for arm work, often around year two. A common mistake is expecting fine stipple shading to survive daily abrasion. Show-off pairing works well with sandals or cropped trousers that frame the area. For the appointment, wear pants you can roll up easily.
12. Throat-to-Sternum Vertical Motif
Sternum and upper chest pieces are sensitive and demand an artist who has worked that zone. The skin moves with breathing so the key is spacing and solid outlines. One common error is packing dense detail into the sternum center. That fills in and loses clarity with healing. Sessions are painful and often split. Expect touch-ups at two to three years depending on clothing friction. Because of exposure, some choose a design that plays with the neckline of dresses and tops. For the appointment wear a strapless or fitted sports bra that the artist can work around.
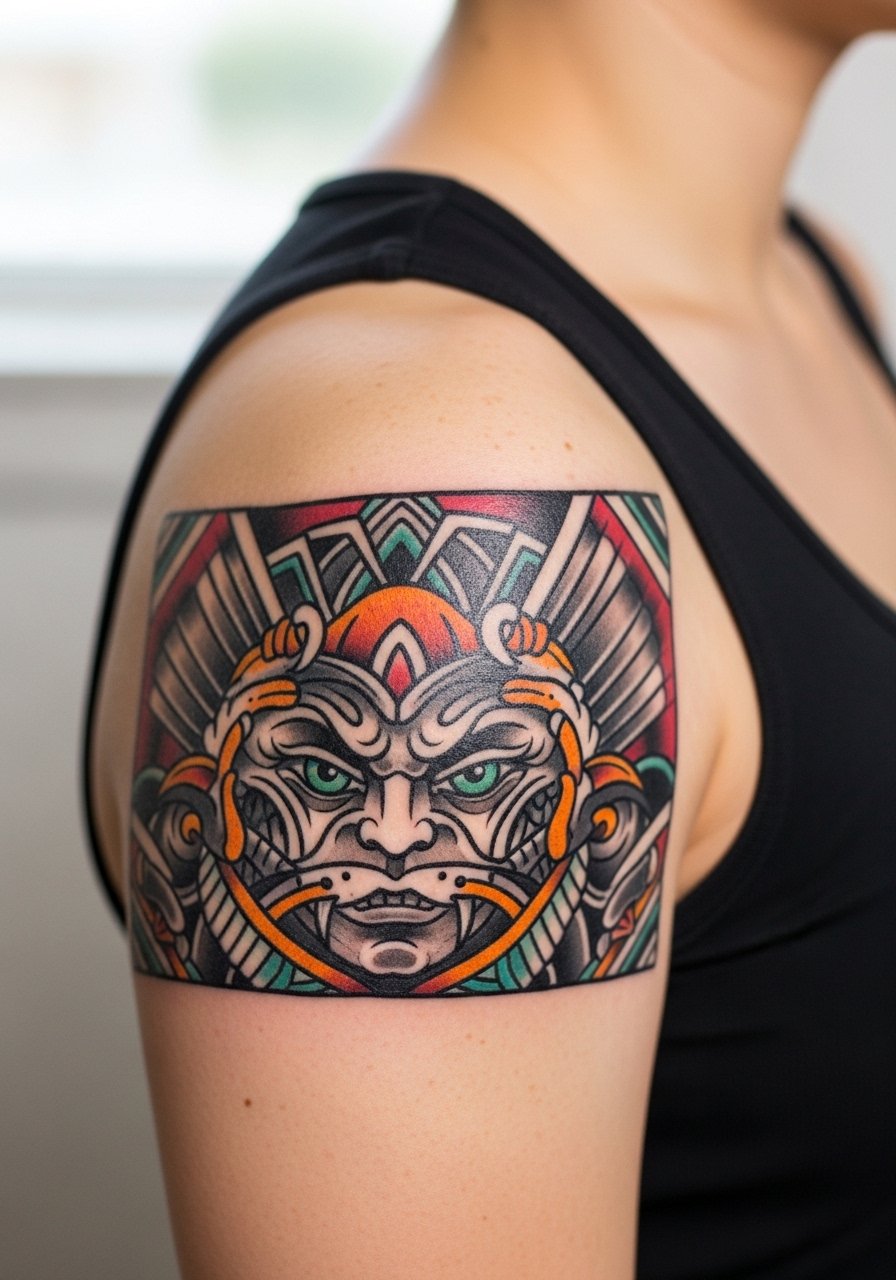
13. Neo Traditional Mandala Shoulder Cap
There is a temptation to go hyper-detailed with mandalas on curved surfaces. The safer route is to use bold outer rings and simplified inner patterns so the geometry survives regular movement. Tell your artist you want the central geometry to have breathing room and for shading to be stipple rather than dense gradients. Pain is moderate and sessions can be split. A common mistake is attempting micro-dot spokes too close together. They tend to merge over time. For showing this off, sleeveless tops highlight the shoulder cap without crowding the piece. Consider a loose button-down shirt left open.
14. Sternum-Focused Floral Band
Sternum bands are intimate and bold. The best versions use symmetric forms and solid outlines so the shape holds while you move. Some artists worry about fine line work here because of sweat and friction. Others use denser linework and report better longevity. Name both camps in the consultation and ask whether they prefer bold outline or delicate line for sternum placement. Pain is high and sessions may require breaks. A common mistake is coloring the entire area with a soft wash. That tends to fade unevenly. Opt for color blocks and reserved dot shading for longer life.
15. Neo Traditional Calf-to-Ankle Flow
A connected lower-leg piece benefits from planning how each element reads at both standing distance and up close. I like to map anchor shapes on the calf and use smaller motifs near the ankle to avoid visual noise. Tell your artist you want gradual saturation decreases toward the ankle to prevent the lower work from overpowering the calf. Sessions vary in length but are generally comfortable. A frequent mistake is trying to cram high-detail realism into the ankle zone. That part needs simpler silhouettes. Pair with cropped trousers or sandals to show the flow. For the session wear shorts with room to move.
16. Small Neo Traditional Finger Icon
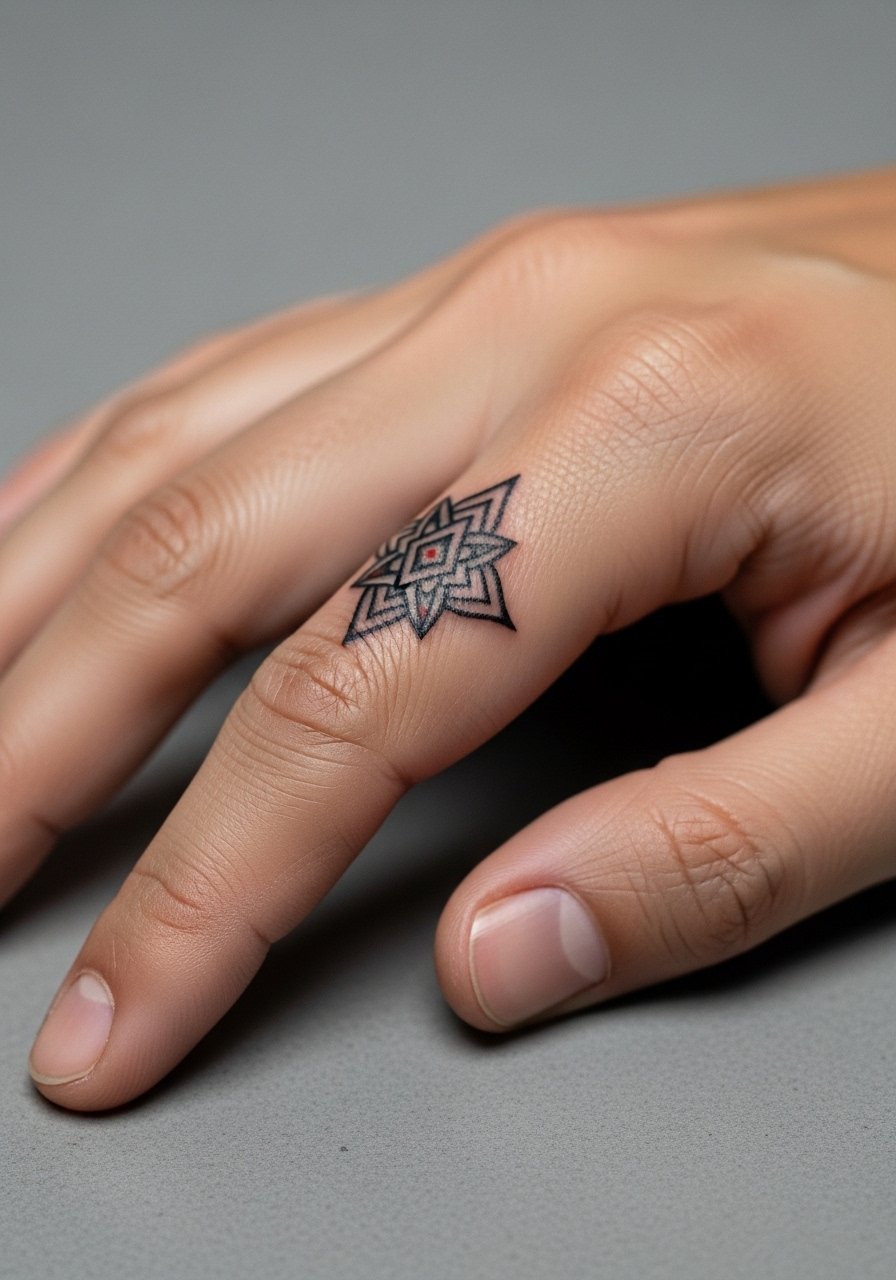
Finger work ages the fastest. The skin there sheds and the area sees constant washing and friction. One camp of artists avoids fine line on fingers and focuses on bold micro outlines. Another camp will do fine lines but warns of annual touch-ups. If you want a finger icon, ask for compact bold linework with minimal interior shading. Sessions are very short and intense on pain. Expect to book touch-ups at least every year or two. A common mistake is choosing tiny script on the finger. It usually becomes unreadable. Keep the glyph or icon simple so the silhouette survives.
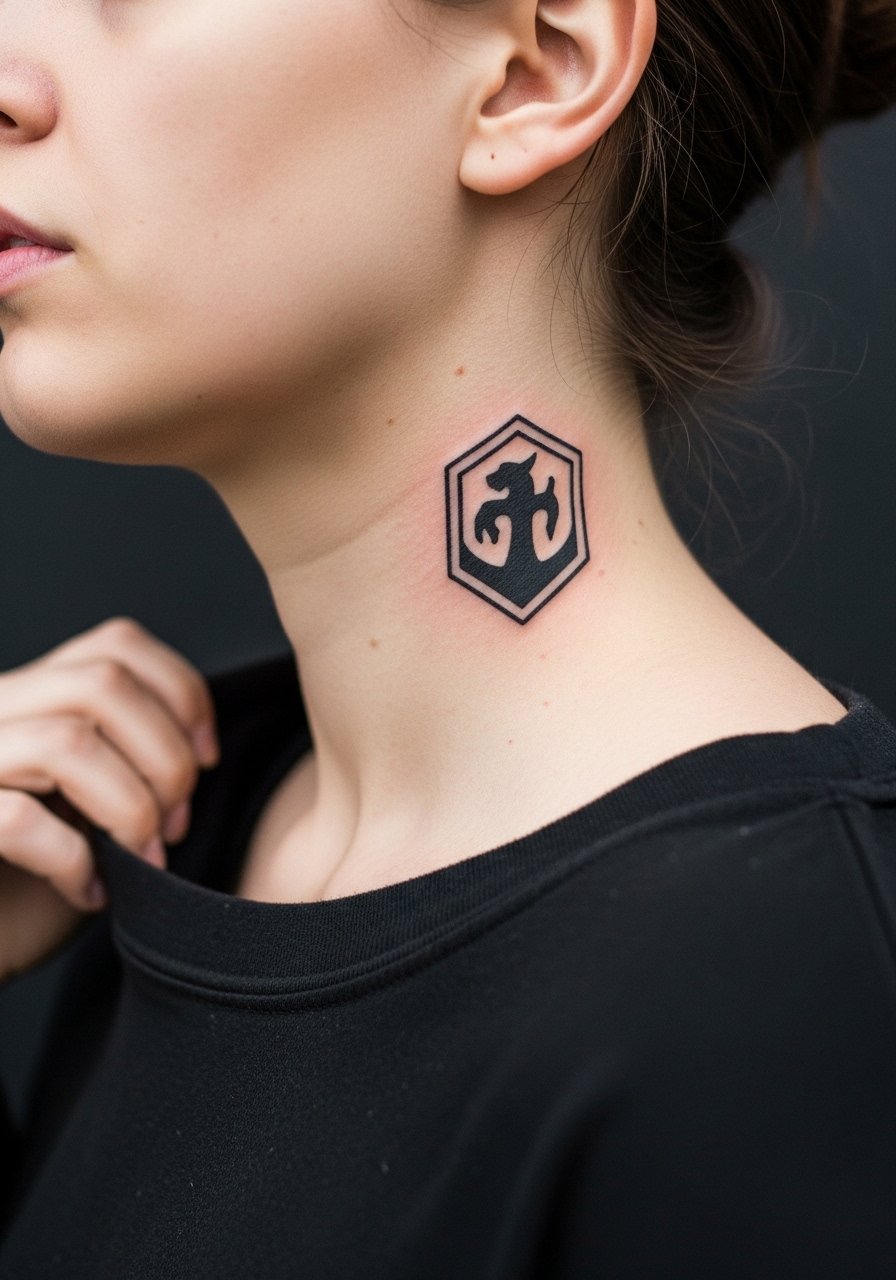
17. Neo Traditional Back of the Neck Emblem
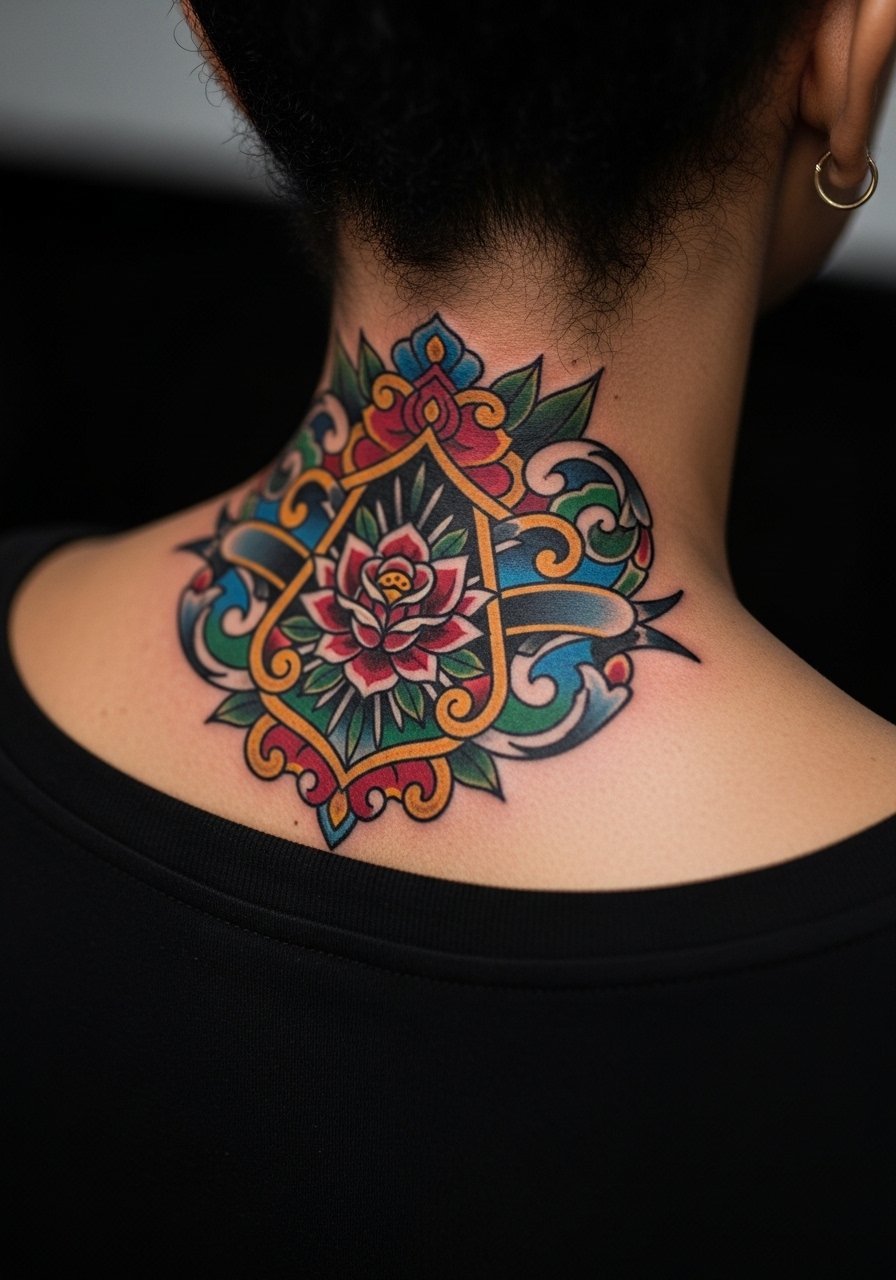
Neck emblems sit at the junction of visibility and subtlety. The back of the neck gets sun and collars rubbing the area so durable outlines and minimal micro shading are wise. Ask your artist for a compact emblem with good negative space so the piece keeps its shape. Pain is moderate and sessions are often short. A common error is placing too much minute texture near the hairline. That detail can blur and becomes tricky to touch up. For care during the first week, keep collars soft and avoid coarse fabrics.
Frequently Asked Questions
Q: Will neo traditional color hold up on ribs and sternum compared with the forearm?
A: It depends on scale and saturation. Forearms tolerate denser color blocks and lighter outlines better because the skin wears differently. Ribs and sternum are motion-heavy and may need slightly thicker outlines and reserved color fills to stay clear. In my experience, planning space and expecting a touch-up at year two to three is realistic.
Q: How soon can I wear a dress that shows my collarbone piece after a session?
A: Wait until the initial scabbing phase is done and the skin is no longer weeping, usually five to seven days, before putting on garments that will rub the area. For the session itself, I suggest a wide-neck or button-down you can shift easily. A loose button-down shirt is a practical option for both access and comfort.
Q: Are neo traditional hand or finger tattoos still risky for professional settings?
A: Some industries remain conservative, so visible hand or finger work can affect job options. The decision is personal. If you are unsure, choose placements that can be covered while you test workplace reactions.
Q: What should I ask during a consultation to avoid a design that blurs quickly?
A: Ask the artist how they space detail, what line weight they recommend for your skin type, and whether they expect touch-ups for the placement. Ask to see healed photos of similar placements within their portfolio or shop pages. Those images reveal more than freshly done photos.
Q: Can neo traditional be combined with stipple or whip shading without losing clarity?
A: Yes when used sparingly. Stipple and whip shading add texture without filling large areas. For longevity ask that stipple be used in shadowed zones and that large fills rely on solid saturation. That balance keeps the silhouette strong while preserving visual interest.
