
The red in trash polka reads like a scream on skin, and that shock is the point. Many people assume the saturated streaks will behave like normal color, but red needs different spacing, different saturation, and different expectations during healing. Read these curated modern trash polka tattoo ideas with placement notes and wardrobe tips so you know what to ask for at the consult and what to wear to the session.
1. Realistic Rose with Red Brush Stroke on Forearm
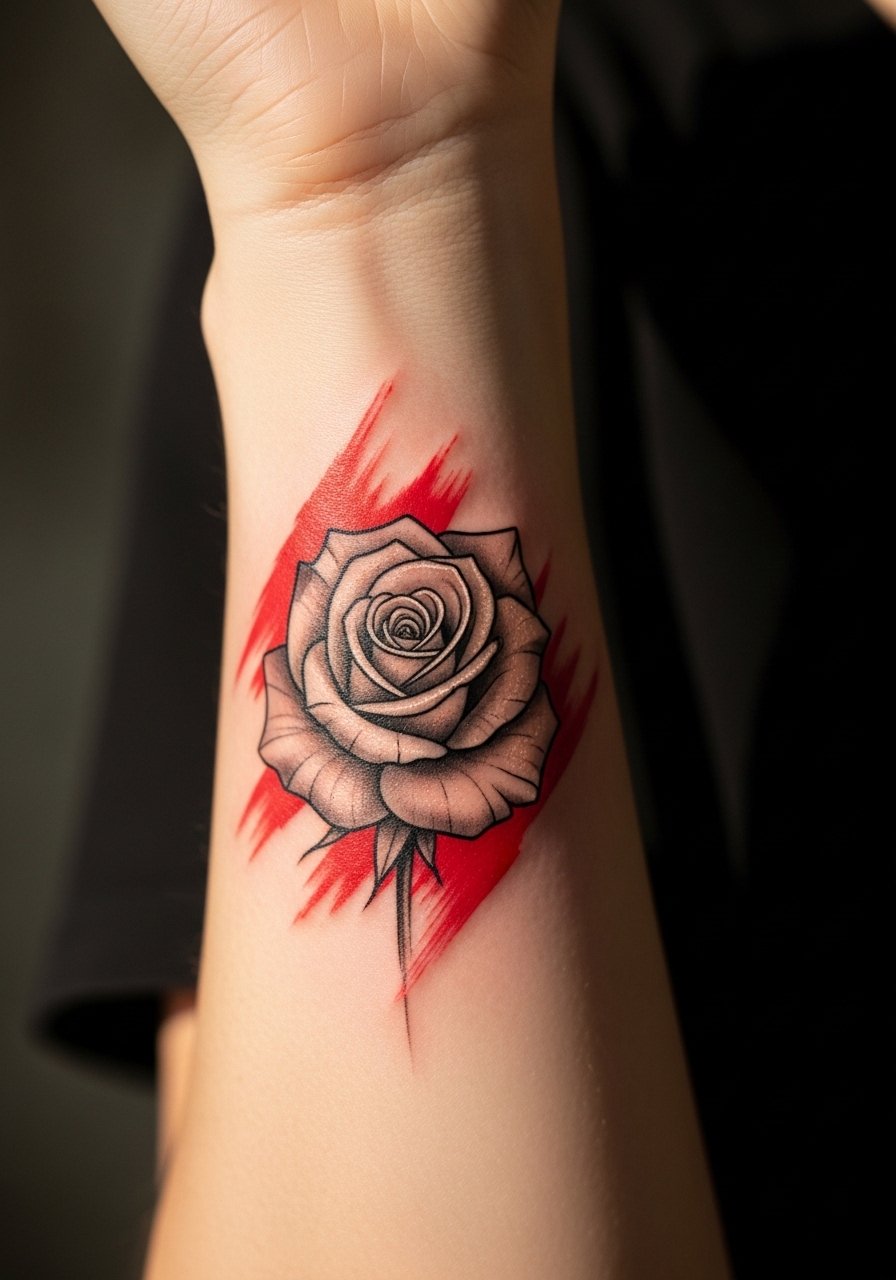
I see this forearm piece in consults more than any other single motif. Fair warning: the forearm shows detail well but also gets sun. Ask your artist for slightly heavier linework around the petals so the rose holds as the red brush strokes fade a little over the years. Session feel is moderate pain, usually one two-hour block for a medium piece. A common mistake is asking for the red strokes too dense right at the edge of fine lines. That causes bleeding into the petals as the red settles. For the appointment, wear a fitted black tee with rolled sleeves so the artist can work without tugging fabric. Expect a touch-up at year two to refresh saturation.
2. Photo-Realistic Wolf with Geometric Slashes on Shoulder
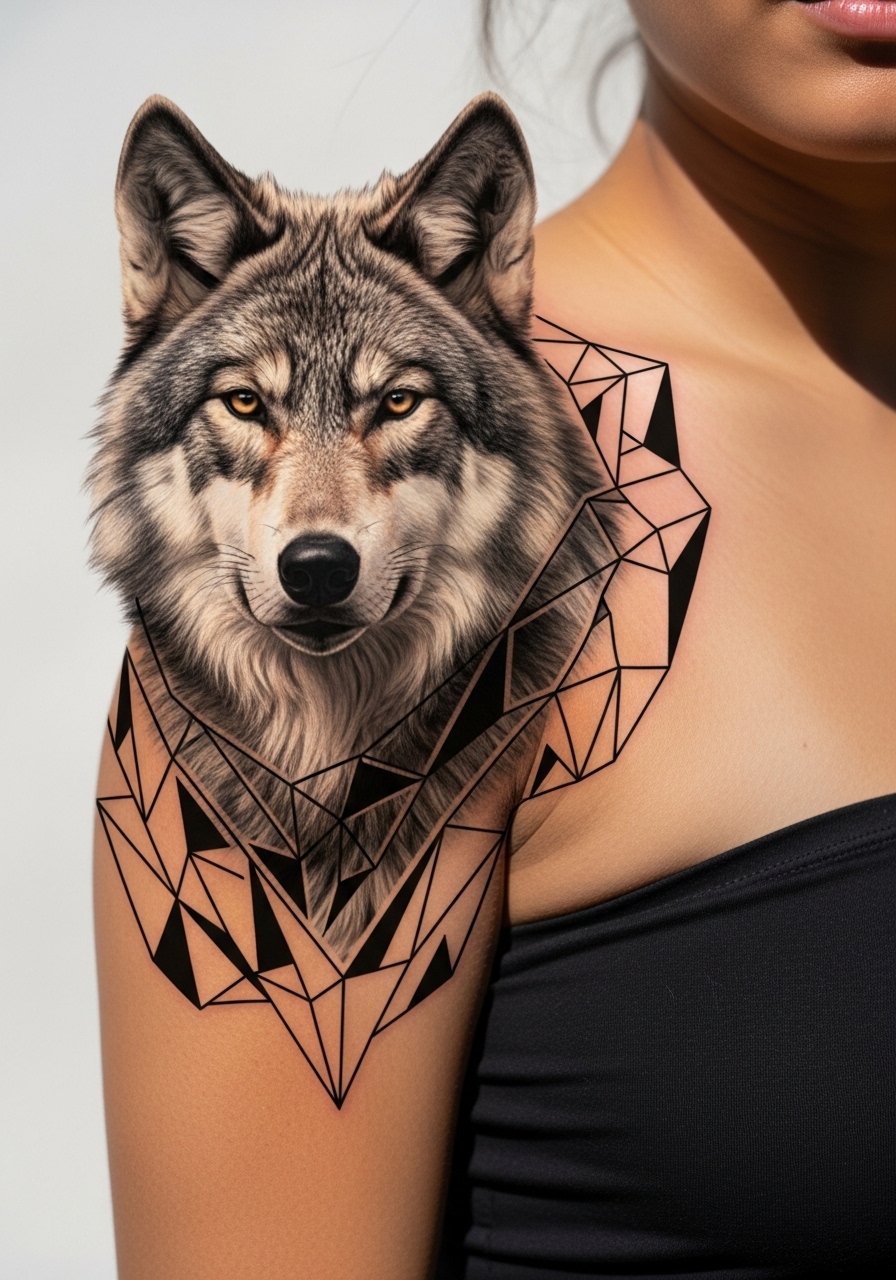
Shoulder trash polka pieces scale well and the canvas lets realism breathe. Pain is usually low to moderate, and most sessions run two shorter blocks so the artist can preserve saturation. Tell your artist you want contrast between soft fur stipple shading and hard geometric cuts. A mistake is requesting too many tiny details inside the wolf head, which can blur with shoulder movement. For showing it off, pair the piece with an off-shoulder crop top or a sleeveless band tee. Over time the geometric slashes maintain their impact better than micro detail, so plan touch-ups every three to five years depending on sun exposure.
3. Lion Head with Abstract Red Splatters and Script Overlays on Upper Arm
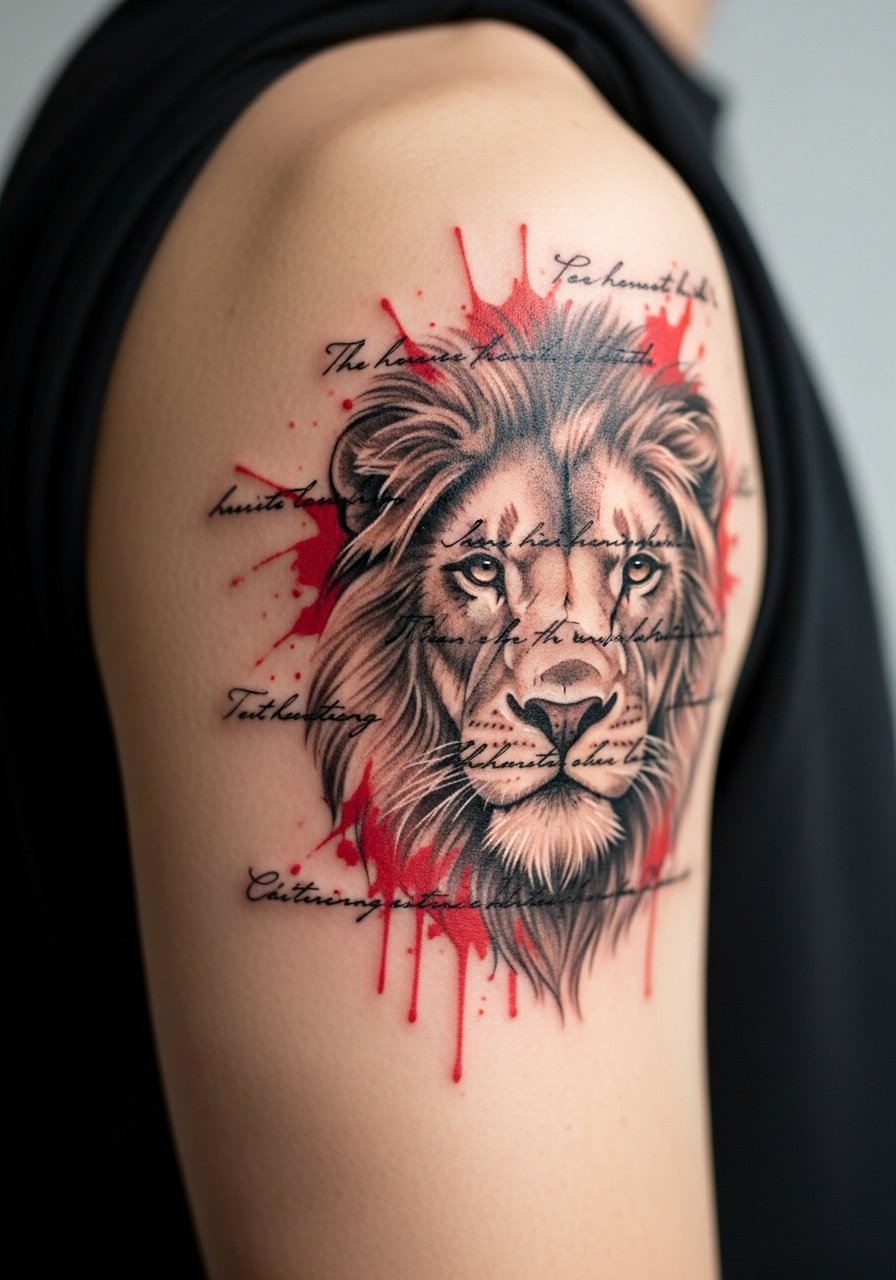
If you want a statement piece that reads from across a room, an upper arm lion with text overlays delivers. Expect moderate pain and three sessions for a 10-inch composition. Say exactly what font weight you want for the overlays so the script neither competes with the lion nor disappears. A frequent mistake is choosing tiny script that blurs into the splatters. For evenings out, this pairs with layered chain necklaces and sleeveless silhouettes. Try an off-shoulder crop top when you want the arm visible, and wear a strapless or open-button shirt to the session so the artist has full access. Plan on heavier saturation in the black areas to protect contrast where the red is aggressive.
4. Ship Silhouette with Red Geometric Blocks on Back
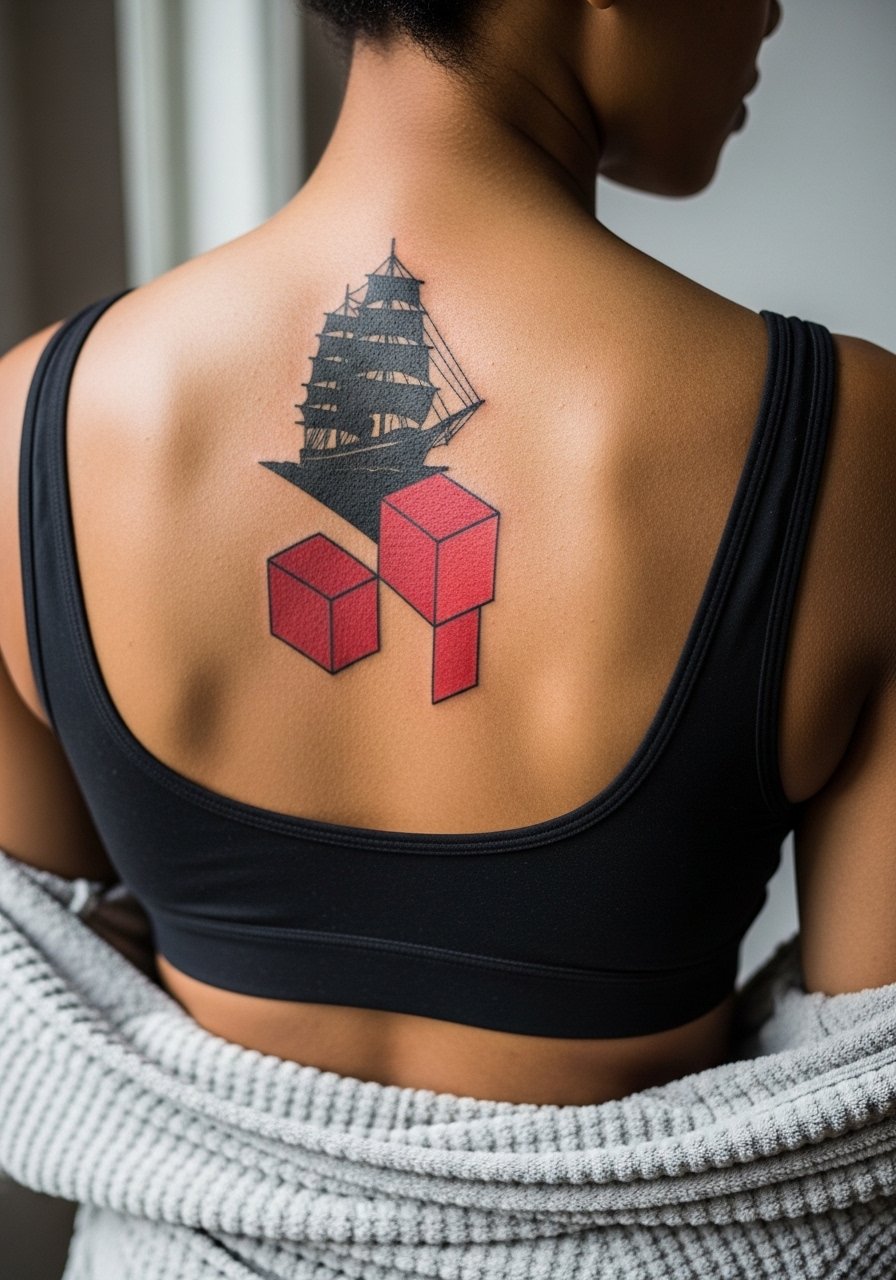
Back pieces let trash polka play big and narrative-driven. Large flat black fills retain their presence longer, while isolated red blocks may need refreshes. Sessions can run two to four blocks depending on width. A common error is compressing too many small motifs into one back panel. Ask for breathing space between the ship and the geometric blocks so each element retains clarity as the piece heals. For show-off moments, low-back or backless dresses highlight the composition. For the session, choose a front-open robe or sports bra so you can lie comfortably without fabric rubbing the fresh ink.
5. Fragmented Portrait with Black Brush Strokes on Chest or Thigh
Portraits in trash polka are dramatic but require planning. Expect multiple sessions, especially for chest pieces where movement and breathing can slow healing. The debate about fine detail on the chest exists. One camp argues heavy breathing and stretch cause early blur. The other camp says correct needle depth and proper spacing make portrait lines hold. When you book, ask specifically about their portrait touch-up policy. A typical mistake is giving only a single small reference image and expecting the artist to scale it without guidance. For a thigh placement, wear loose gym shorts or a skirt to the session so the artist can position you comfortably. Plan on touch-ups to keep the portrait crisp at year two to five.
6. Floral Collage with Typewriter-Style Quotes on Inner Bicep
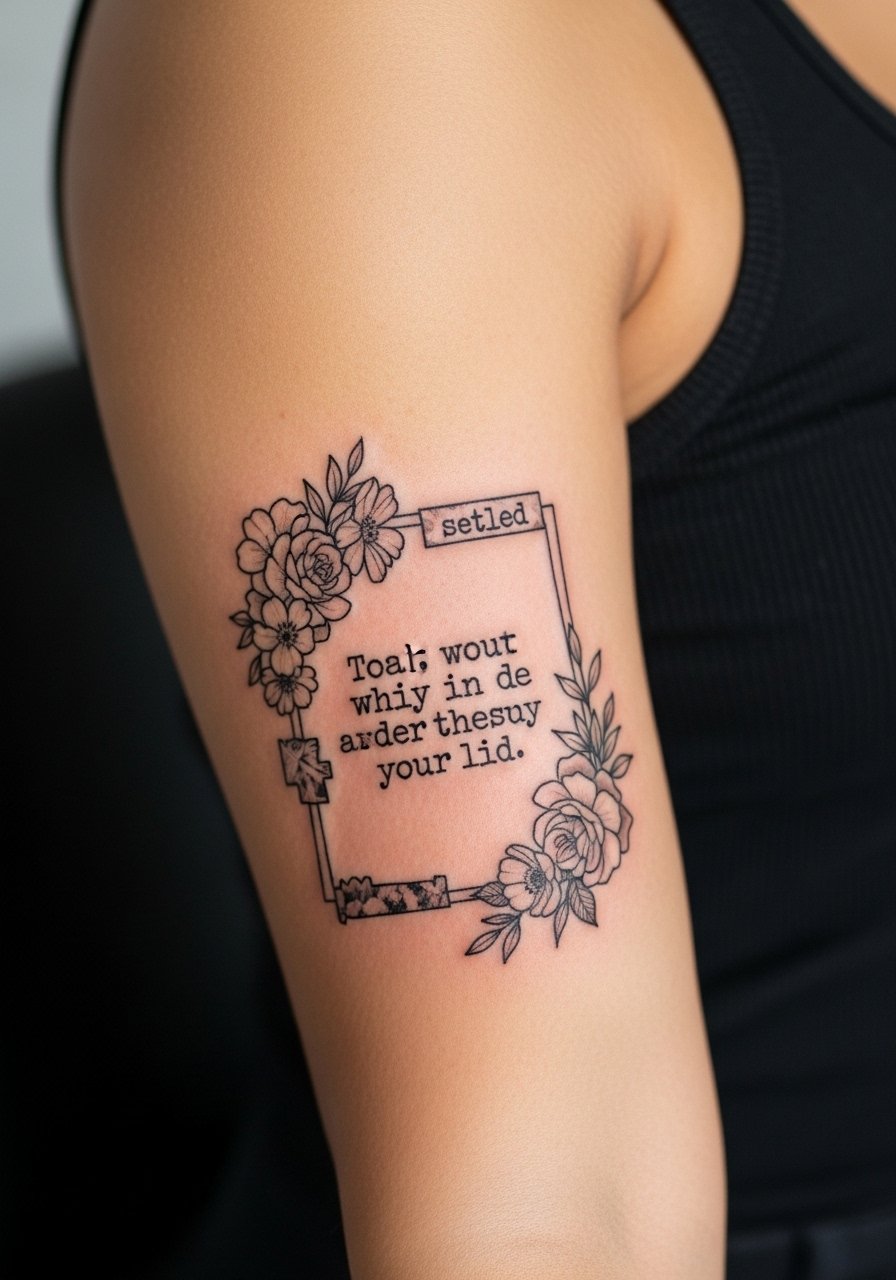
Inner bicep pieces look intimate and read well when quoted text is spaced correctly. This area can be sensitive, so pain is moderate to high for some people. Tell your artist you want typewriter spacing and letter weight that will still be legible in five years. A common mistake is cramming long sentences into narrow bands. For showing it off, pair with a sleeveless muscle tank and a leather cuff on the opposite arm. For the session, wear a loose short-sleeve shirt so the arm can flex without fabric dragging. Expect lighter red accents to fade faster than black linework, so factor in a small touch-up window.
Studio Day Picks
These first six placements ask for different prep. Wrist and inner arm work, and the larger chest piece above, each need slightly different supplies and session-day choices.
-
Stencil transfer paper kit. Lets you preview exact placement for text-heavy inner bicep pieces and forearm roses before the needle touches skin.
-
Topical numbing cream. Applied per instructions it eases the sting on sensitive rib and inner-arm spots without affecting linework.
-
Thin protective film roll. Keeps wrist and finger pieces clean during the first week of hand washing and daily friction.
-
Fragrance-free gentle body wash. Cleanses healing areas without stripping ink, especially useful for back and thigh pieces that see more sweat.
-
Aquaphor healing ointment. A thin layer for the first few days protects fine line and delicate red work without clogging needle channels.
7. Skull with Red Paint Drips on Calf
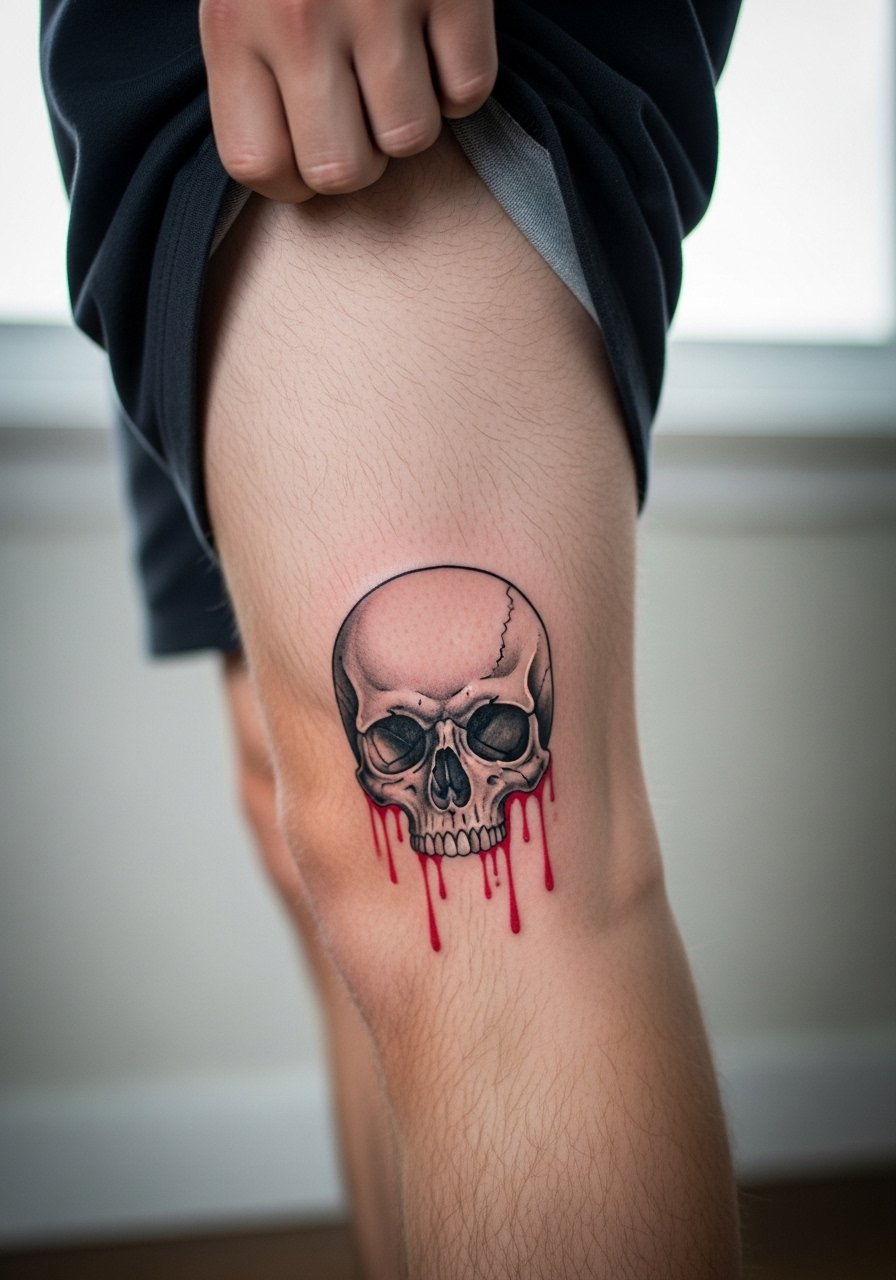
Calf pieces wear well and tolerate heavier black saturation. Pain is lower than ribs, and sessions are usually two blocks for medium pieces. Tell your artist you want a mix of solid black saturation and thin drip textures so the red looks intentional and not smeared. A frequent mistake is asking for too many tiny cracks in the skull that later blur when the calf rubs against clothing. For showing this off, cropped jeans or ankle-cropped pants work well and let the red pop against dark denim. Expect the red drips to need refreshes before the black areas do.
8. Abstract Geometric Chaos with Embedded Realism Eye at Collarbone
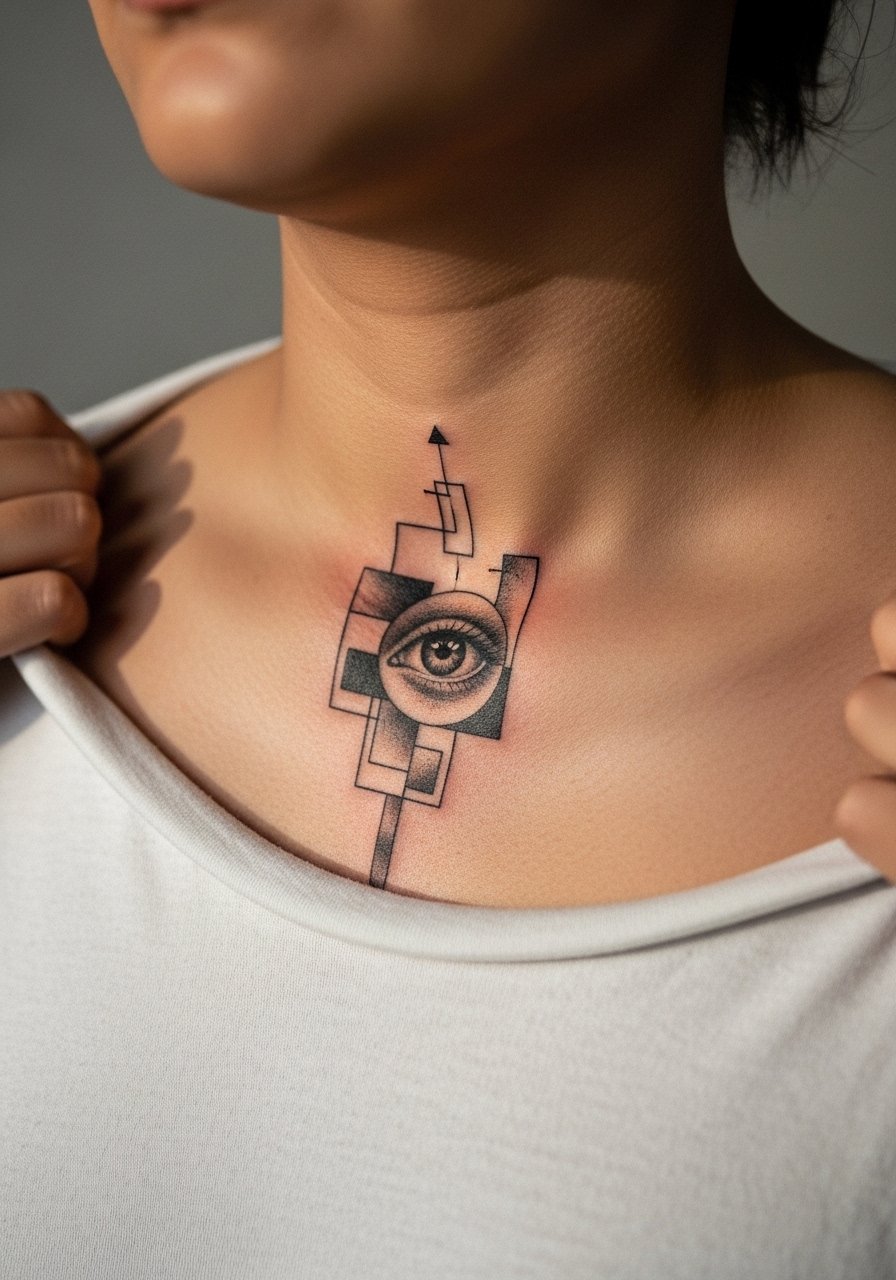
Collarbones are show-off placements but have a reputation for sensitivity. Placement pain is higher and touch-ups may be needed sooner because the area bends and sees sun. When consulting, ask for slightly thicker contour lines near the bone so the eye keeps definition. The mistake many make is insisting on hyper-fine eyelashes in that pressure zone. For outfits, a wide-neck shirt pulled just enough will highlight the piece without revealing chest skin. Watch for blowout risk along the bone. Plan for a small touch-up window to keep the realism crisp.
9. Bird in Flight Torn by Red Slashes, Starting a Sleeve
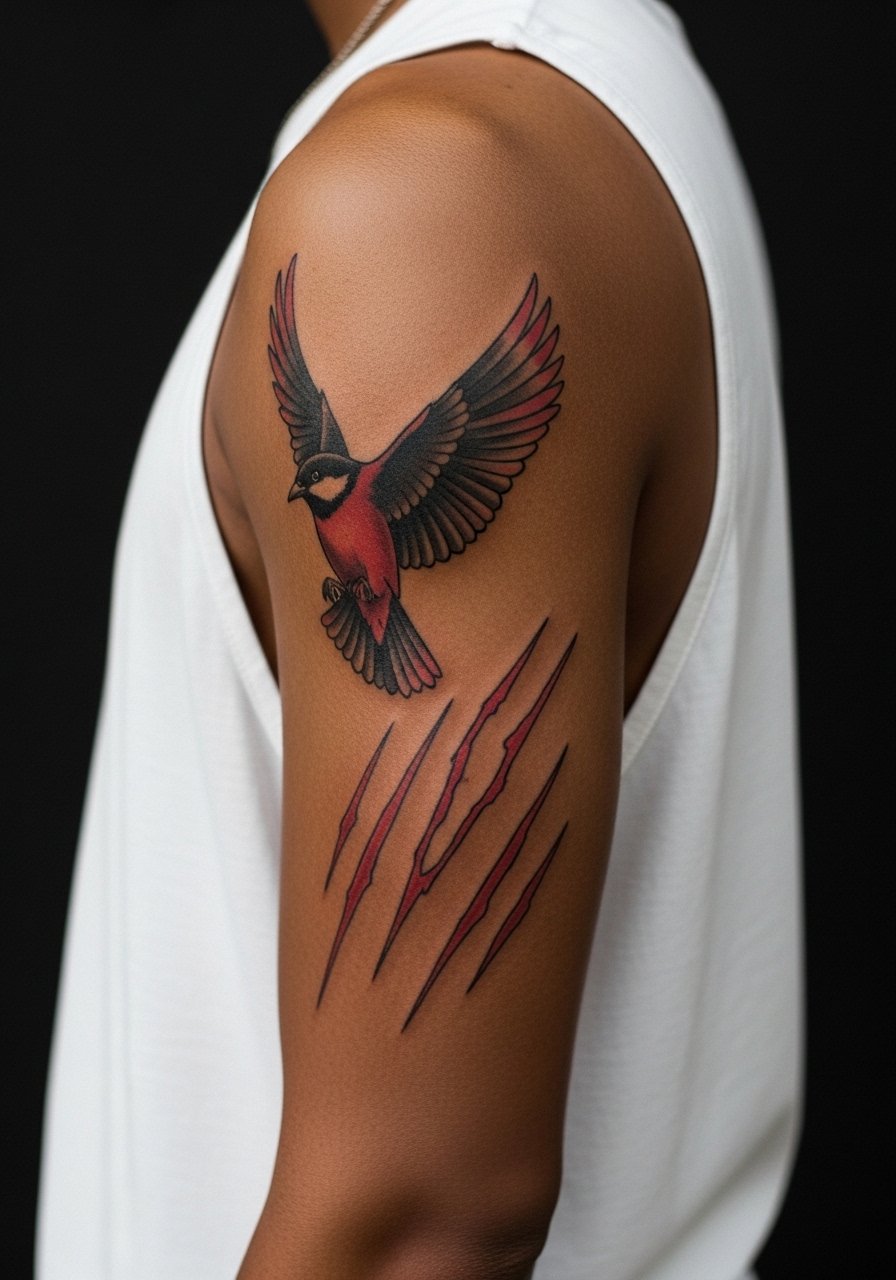
A sleeve-start bird benefits from flow. Expect multi-session work and moderate to high pain during long blocks. Tell your artist you want directional linework to wrap naturally toward the elbow. Common mistakes include forcing symmetry that fights the arm's natural curve. For the session wear, a loose tank top gives access without constraining position. For show-off looks, high-contrast punk layers and rolled sleeves frame the wing. Red slashes often need touch-ups to keep their vibrancy compared to black saturation.
10. Heart Motif Shattered with Graphic Text on Wrist
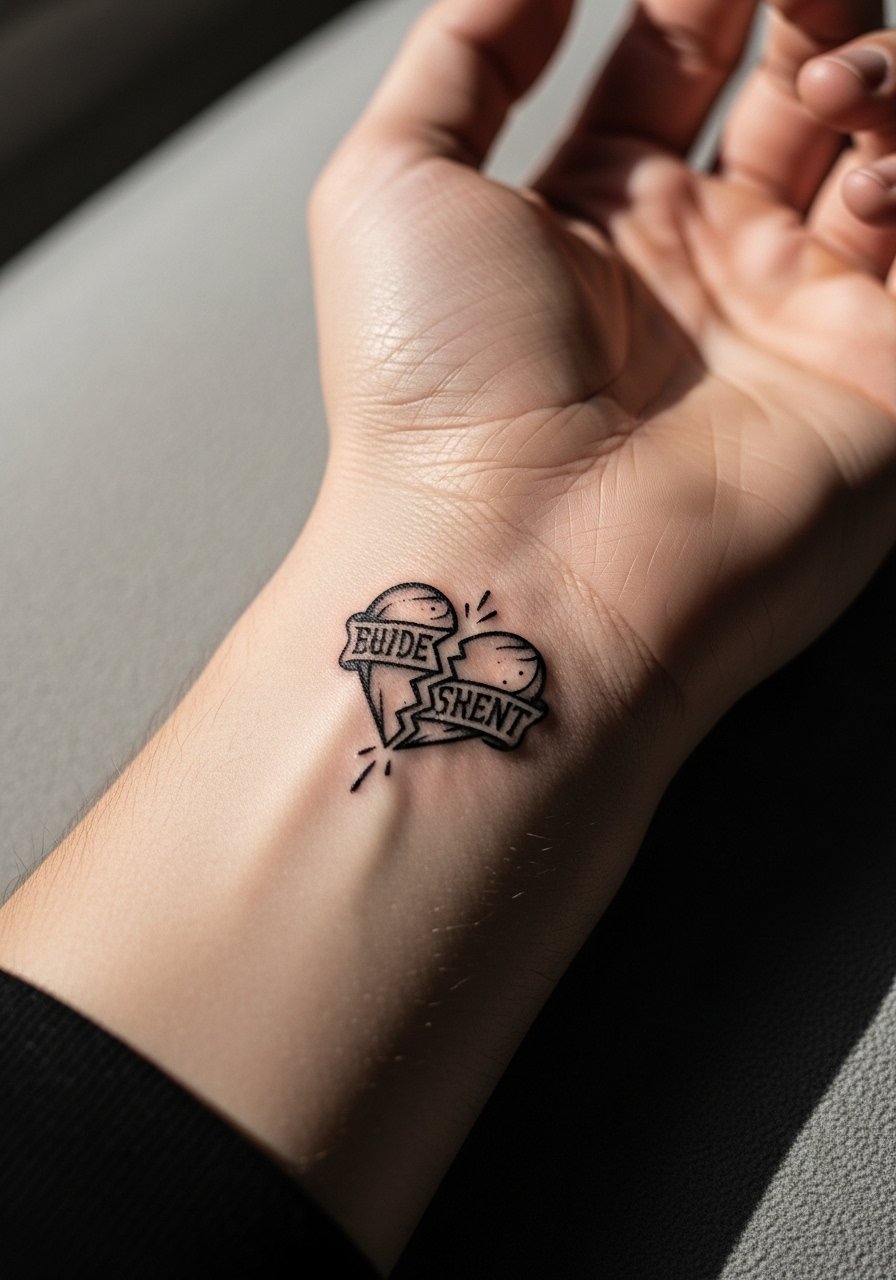
Wrist tattoos are small statements and heal under constant movement and washing. Pain is low to moderate. Specify letter spacing for the graphic text so it remains legible after the initial healing. A common error is putting long phrases on the wrist; keep it short. For showing it off, stacked dainty bracelets work well. Wear a minimalist watch or thin bracelets when you want the wrist visible. Thin red accents fade faster, so expect a touch-up window around year two for most wrist work.
11. Mechanical Gear Wolf Hybrid on Thigh

Thigh pieces are forgiving and great for larger mixed-technique concepts. Pain is moderate and sessions are often two blocks. Clarify the balance you want between mechanical and fur texture during the consult. A usual mistake is cramming too many tiny gears into narrow areas. For session comfort, choose high-waisted shorts you can shift easily. Combat boots and rolled shorts make for a gritty look if you want the piece to read punk. Thigh skin tends to hold saturation well, so touch-ups are less frequent than for extremities.
12. Ransom-Note Style Text with Rose Thorns on Ribcage

Ribcage work is notorious for pain and for challenging healing. Artists split into two camps here. One camp says the stretch of the skin on ribs blurs fine type within two years. The other camp argues that with proper depth and spacing type will hold. Name both and then ask where your artist stands. A mistake is expecting long text to remain crisp on this canvas. For the session, wear a cropped athletic top so the area can be accessed without full undressing. Plan for possible touch-ups in two to three years if you want type to stay readable.
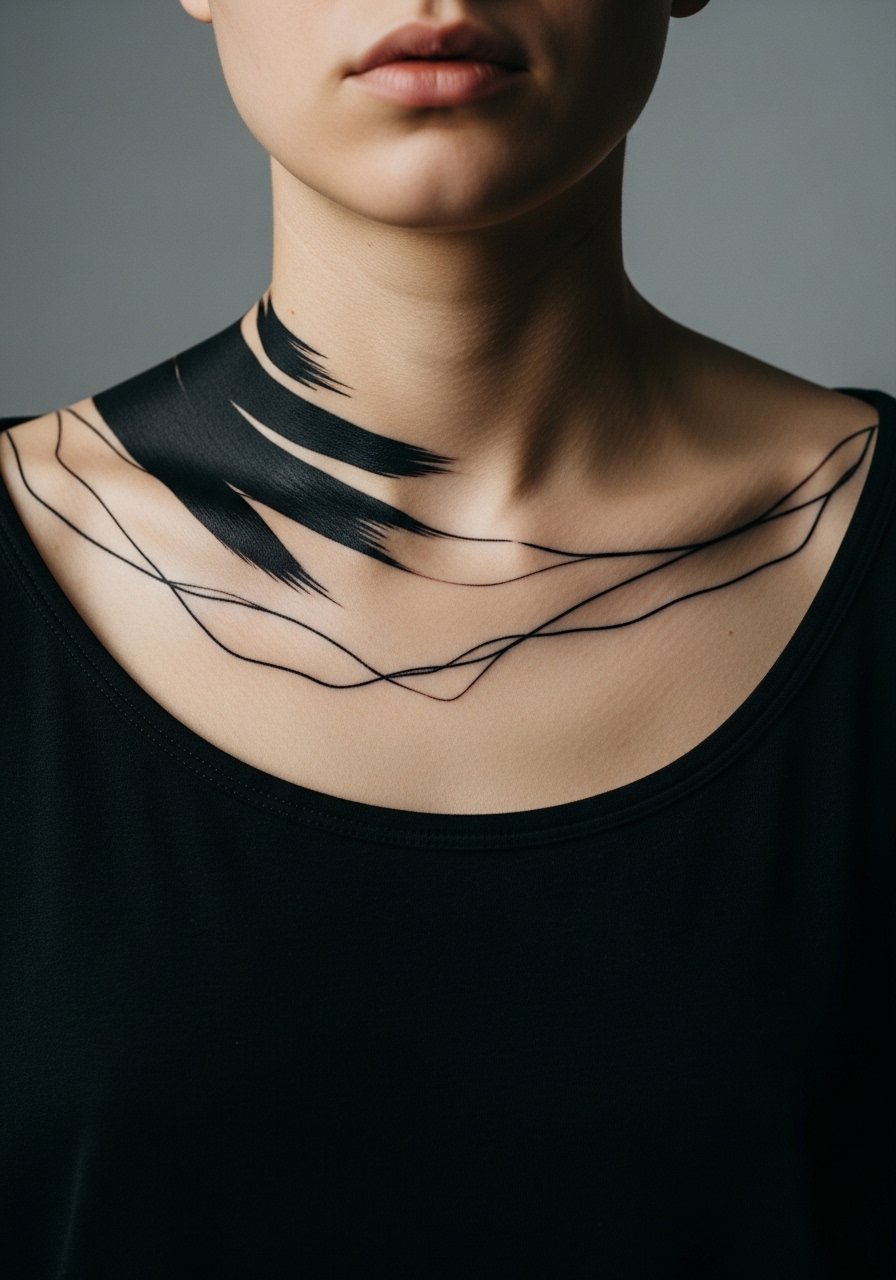
13. Minimalist Eye with Red Accent on the Neck Side

Neck tattoos are visible and career-impacting in some fields, so think through placement. Pain is moderate and healing requires careful sun avoidance. Ask your artist about line depth and direction to limit blowout risk. A mistake is asking for dense fills in tiny neck pieces that can spread. For wardrobe, wear a wide-neck shirt during healing so you do not irritate the area. If you need discretion for work, the collarbone or upper shoulder version reads similarly while staying easier to conceal.
14. Mechanical Sleeve Panel with Textured Red Blocks
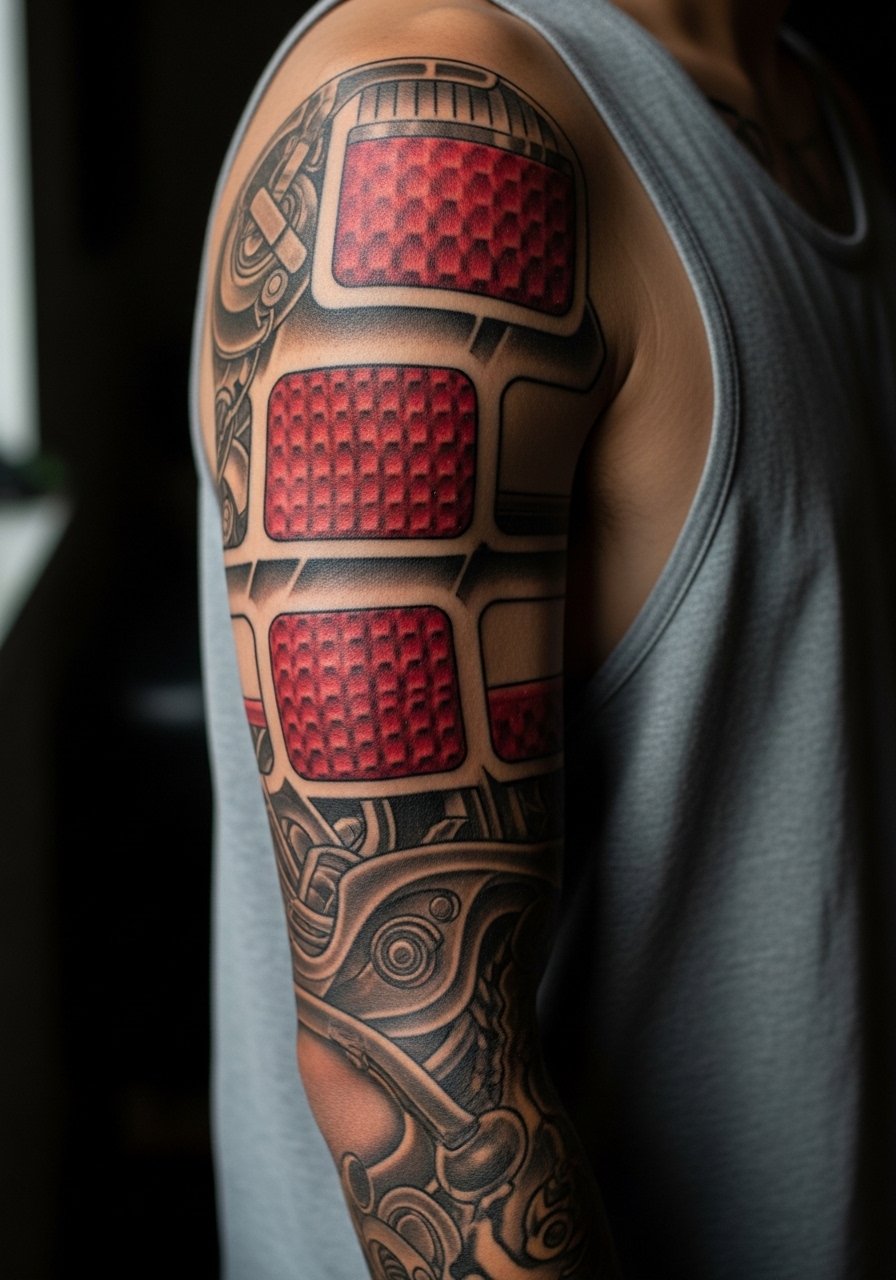
Full sleeve panels need planning for flow and negative space. Sessions are three or more and pain varies across the arm. Tell your artist you want modular segments so future pieces can be added without fighting composition. A common mistake is jamming too many focal points into a single panel. For the session, bring a loose tank top to keep the arm free. For outfits, rolled sleeves or short-sleeve button shirts help the sleeve read as a unified piece. Heavy black saturation in negative areas will help the red blocks keep their pop longer.
15. Small Trash Polka Ankle Motif for First-Timers
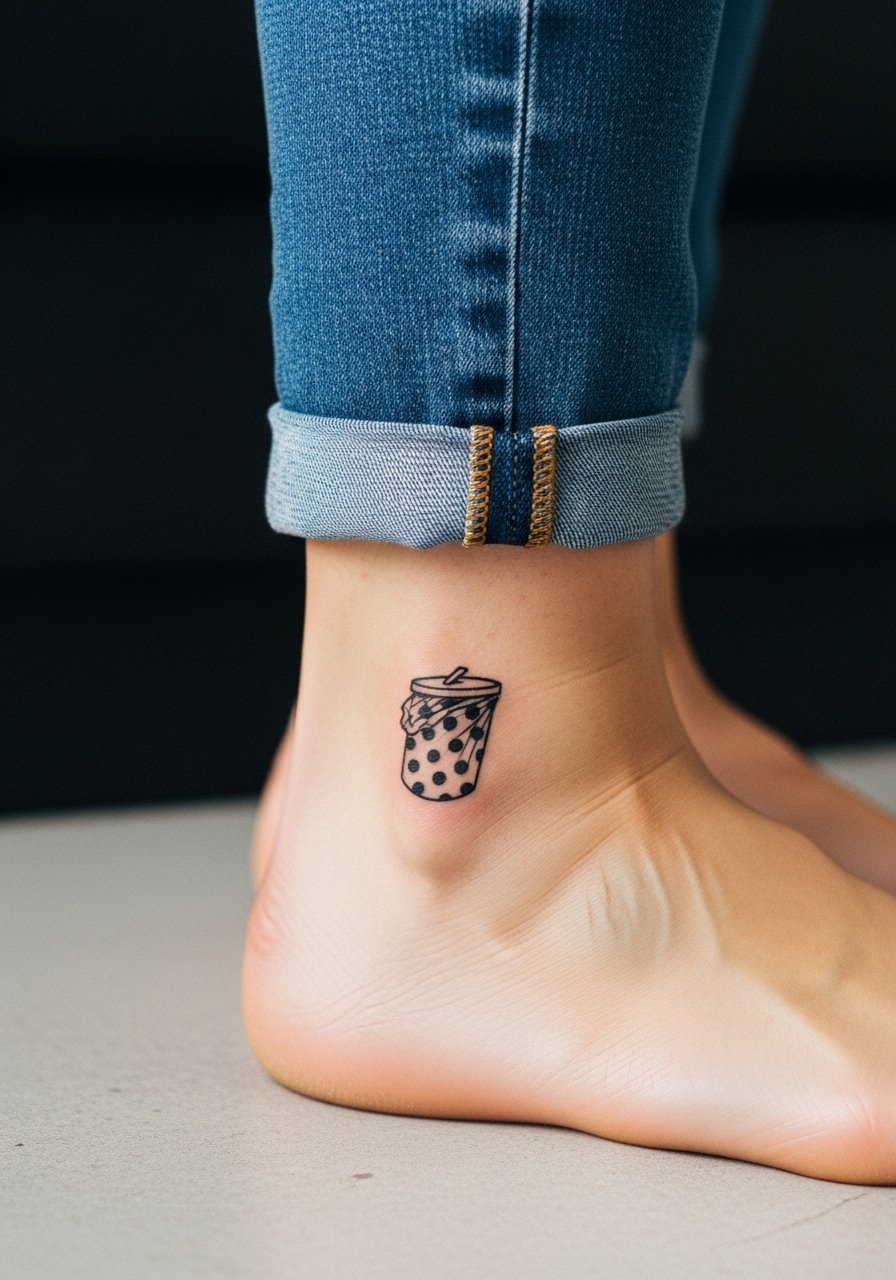
If this is your first trash polka piece, ankle motifs are an approachable start. Pain is moderate and healing is friction-prone. Ask for simplified brush strokes and limited red so the tiny design does not bleed into itself. A mistake is going too small with dense red. For the session, wear pants you can roll up easily and bring socks to wear afterward. Consider pairing it with ankle crop pants for days you want to show the piece. Expect faster fading from constant shoe contact and daily washing.
16. Collage Sleeve with Embedded Photo-Realistic Eye and Script

Collage sleeves let you mix photo realism with graphic trash polka elements and tell a story. Plan for three plus sessions and define which motifs get priority for saturation. A common mistake is letting script compete with detailed realism. For the session wear, a loose short sleeve shirt makes positioning easier. For showing off, rolled sleeves create a deliberate reveal. Keep in mind that the embedded eye will need heavier black to hold detail against the red collage accents.
17. Matching Couple Trash Polka Anklet or Wrist Bands
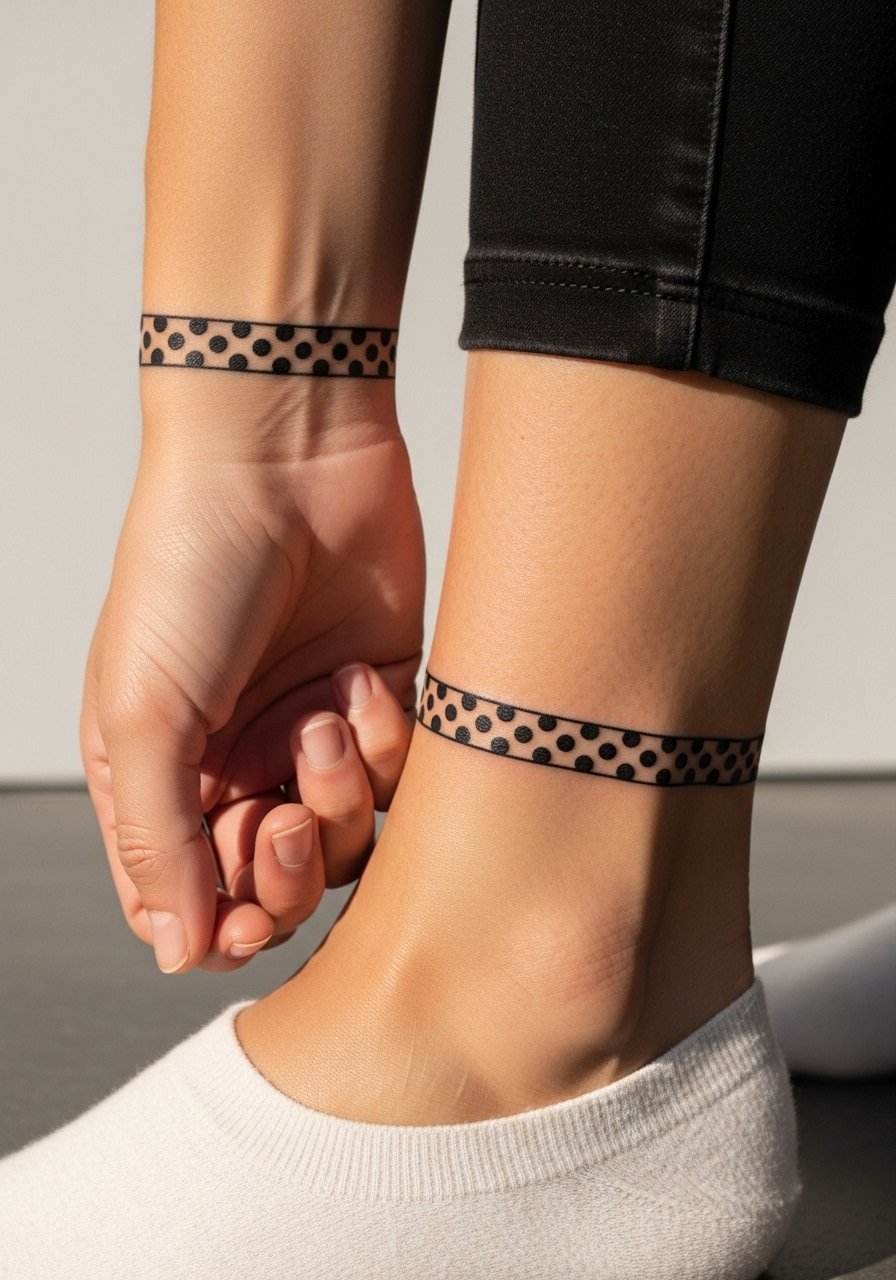
Matching pieces are popular and scale well to wrists or ankles. Pain is modest and sessions are short. Decide together on a consistent brush stroke weight so the pieces age similarly. A common error is letting partners pick different line weights that age at different rates. For showing off, the wrist version pairs with stacked dainty bracelets or a minimalist watch. For the session, bring clothing that exposes the specific spot without forcing you to fully undress. Plan minor touch-ups separately if one person wants a stronger red than the other.
18. Mechanical Heart Shards with Bold Red Splashes on Sternum
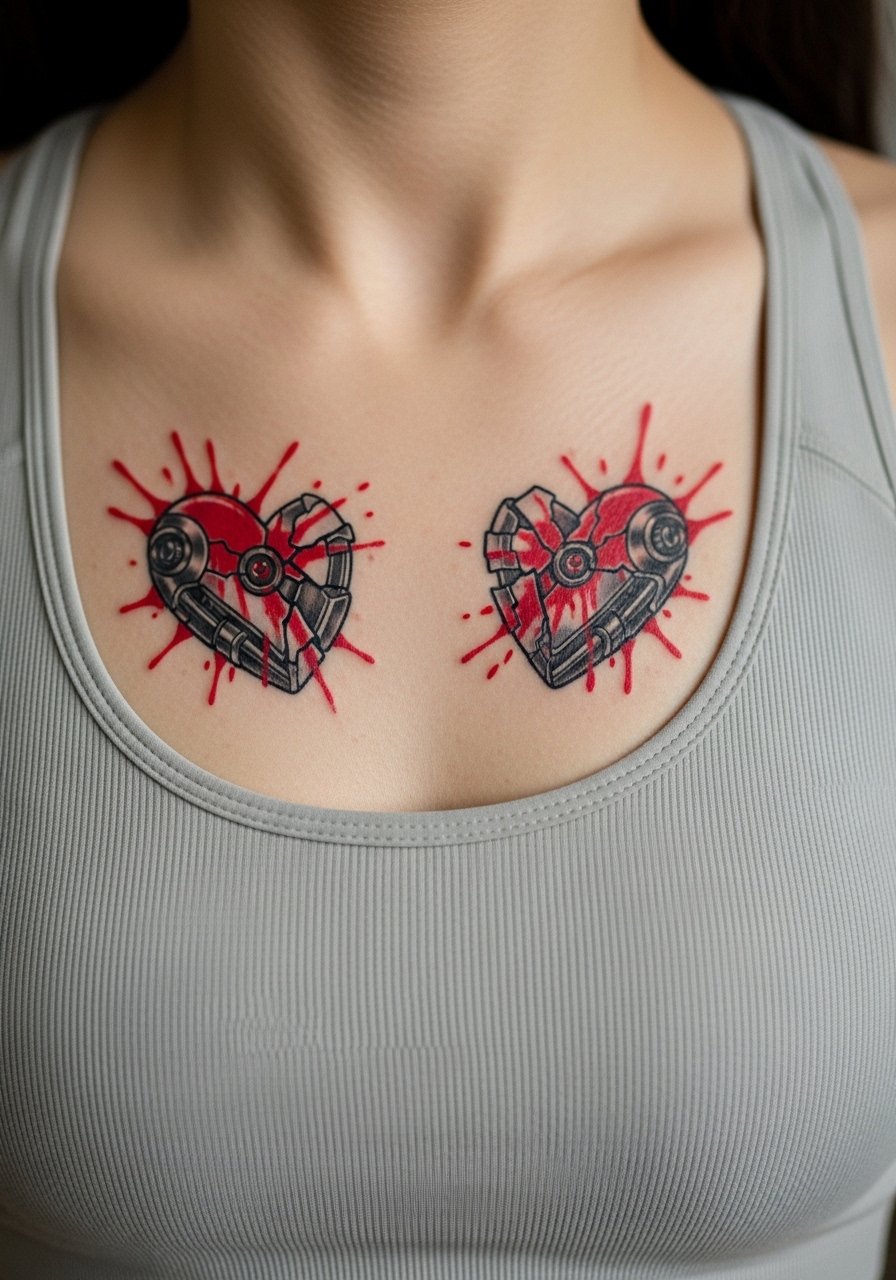
Sternum tattoos are high impact and high on the sensitivity scale. Sessions may be interrupted by discomfort. Discuss exact placement with a fitted sports bra so you can see how the design sits. A typical mistake is asking for heavy detail too close to the sternum center. For the session, wear a fitted sports bra or bandeau so the artist can access the area without fabric rubbing. Expect the red splashes to need maintenance earlier than surrounding black work if you regularly expose the chest to sun.
19. Micro-Realism Compass with Red Directional Streak on Wrist

Micro-realism on the wrist reads clean when the piece is slightly larger than truly tiny. Pain is low and the session is short. Ask your artist for slightly bolder compass points so they do not merge over time. A mistake is insisting on extreme micro detail that cannot survive daily movement. For showing this off, a thin chain pendant necklace or simple bracelet balances the wrist without crowding. Expect the red streak to fade before the black compass, so plan a small refresh at year two.
20. Fragmented Face Portrait with Bold Red Overlays on Thigh

Thigh portraits allow scale and dramatic negative space. Pain is moderate and sessions are comfortable position-wise. Tell your artist you want the red overlays to read like brush marks, not stains, and show examples. A frequent mistake is asking for too many dense black patches near delicate portrait tones. For session wear, put on high-waisted shorts or a skirt so the artist can shift fabric without pressure. Thigh pieces generally hold saturation well, so plan touch-ups less frequently unless you sun-expose the area often.
21. Eastern European Influence Collage with Typewriter Quotes on Rib and Side Torso
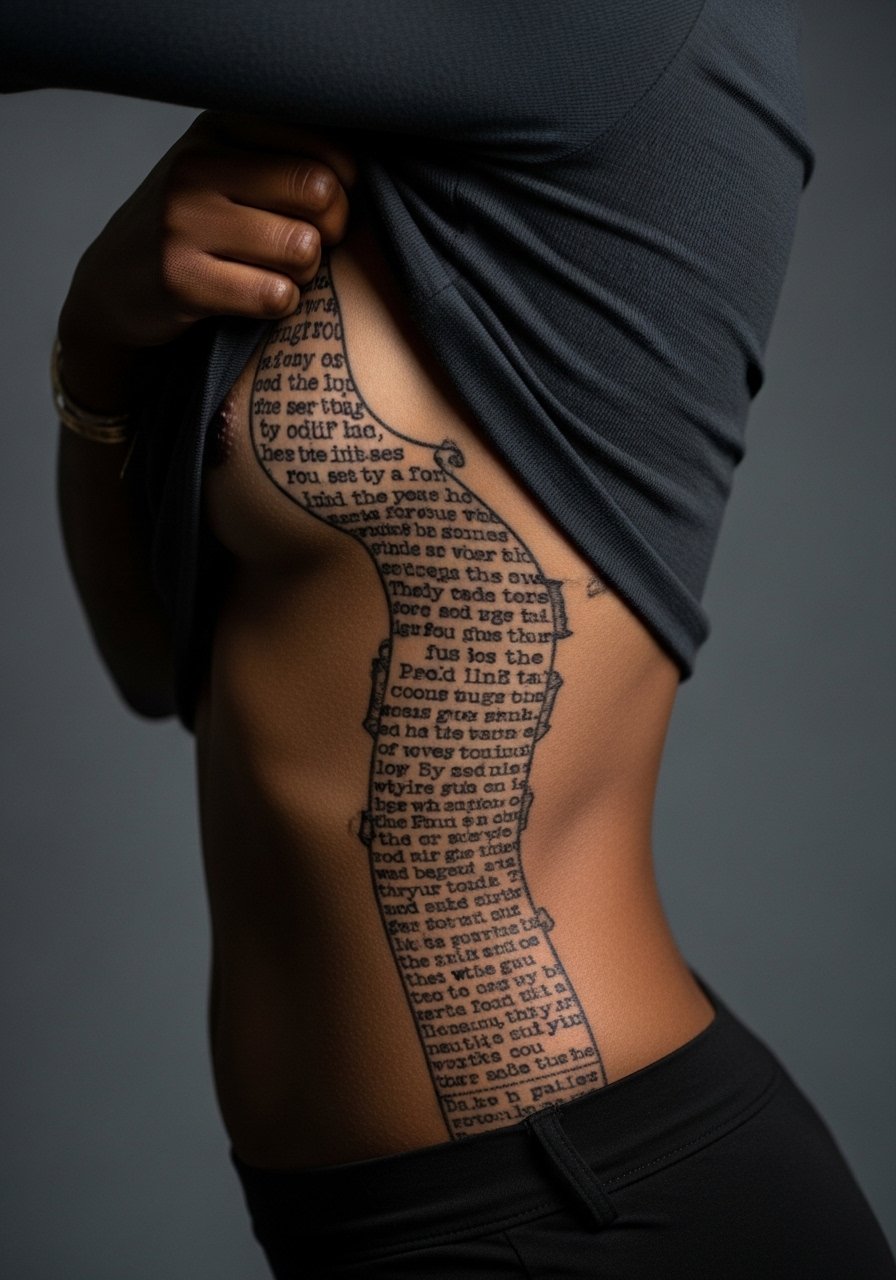
This design nods to trash polka origins and regional collage aesthetics. Cultural sensitivity matters. These patterns draw from Eastern European visual language, so consider slight adaptations rather than direct copies of cultural artifacts. Rib and side-torso placements carry high pain. Ask your artist how they plan to space text across curved ribs. A mistake is stretching long quotes across ribs without adjusting letter size for skin movement. For the session, wear a cropped top you can lift slightly so the area is exposed without full undressing. Expect type on ribs to need a touch-up option if you want long-term legibility.
Frequently Asked Questions
Q: How much does a modern trash polka tattoo usually cost?
A: Prices vary by size and complexity, but a medium trash polka piece typically ranges from 250 to 1,200 depending on session count and studio rates. Larger chest or full-back collages can be in higher ranges. Ask for a session estimate during consultation and confirm whether touch-ups are included.
Q: Will the red elements fade faster than the black areas, and how can I protect them?
A: From what I've seen, red pigments often show more noticeable fading than black. Keep the area sun-protected, avoid heavy exfoliation, and plan for a touch-up window at two to five years. Choice of placement matters too, since extremities and exposed chest tend to need refreshes sooner.
Q: Are small trash polka pieces a bad idea because of blowout risk?
A: It depends on placement and line weight. Tiny dense red accents and very fine black detail on the wrist or fingers increase blowout risk. Ask your artist to slightly up the line weight and leave breathing room around red strokes. That approach preserves clarity.
Q: How should I find an artist who does trash polka if the gallery pages are sparse?
A: Try #TrashPolka or #TrashPolkaTattoo on Instagram for current feeds, use Tattoodo searches filtered for style, and check r/tattoos for peer recommendations. Search "[city] trash polka studio" to find local shops that list style specialties. Look for portfolios showing healed work, not only fresh photos.
Q: Do placement and clothing choices affect healing for back, thigh, or inner bicep pieces?
A: Yes. Back and thigh pieces need loose wardrobe to avoid friction. For back sessions pick a front-open robe or sports bra. For thighs, loose shorts are best. Inner biceps heal better if you avoid tight sleeves and choose breathable fabrics during the first week.
