
Fine line lily of the valley tattoos are everywhere on saved boards, but the trick is knowing which tiny choices actually help them age. Placement, spacing, and whether you pick color or black-and-gray all matter more than the initial photo you like. Read the first idea and you will get a clear, practical starting point for a piece that still looks clean after a few years.
1. Fine line wrist wrap with trailing bells
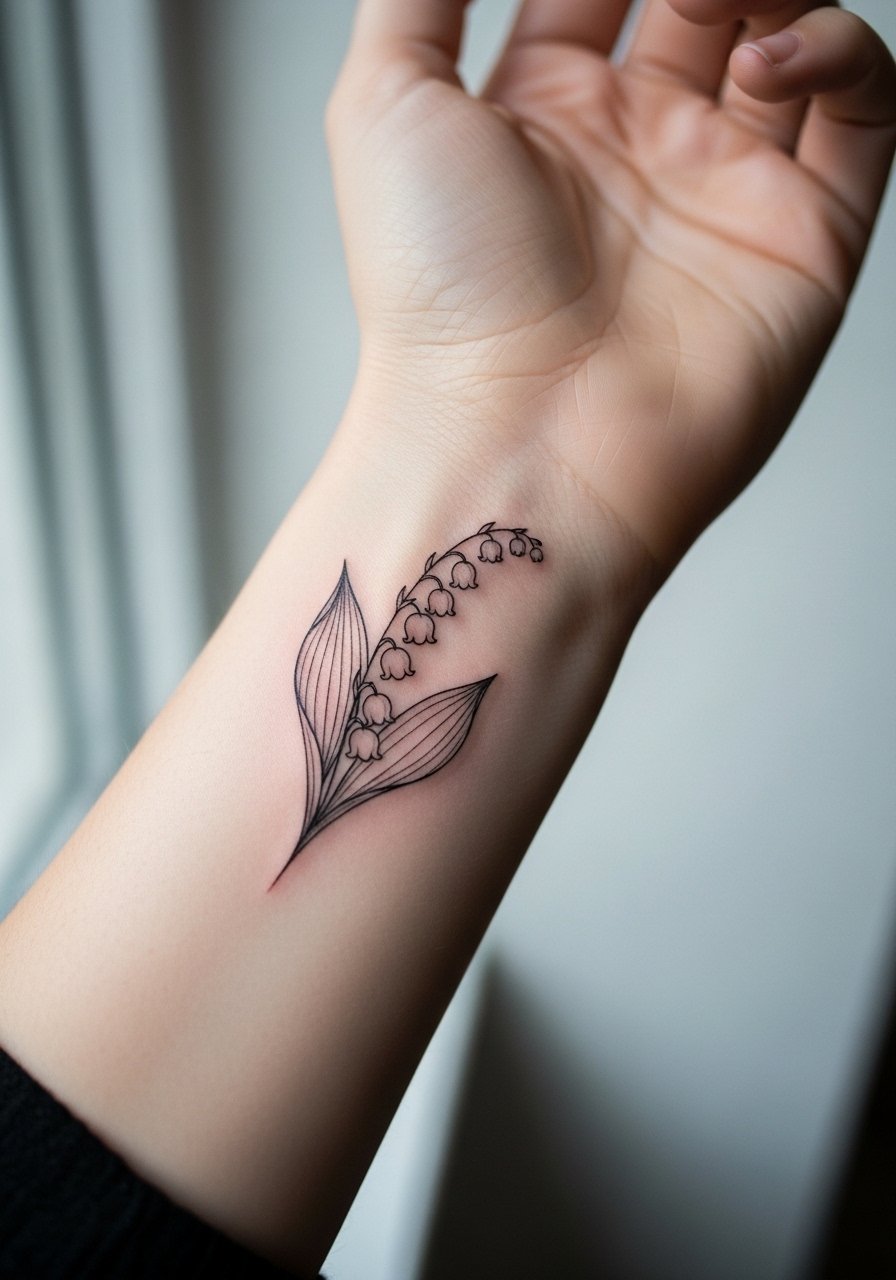
I have seen this wrist wrap survive everyday wear when the artist leaves a little breathing room between each bell. Tell your artist you want 1.5 to 2 mm spacing and slightly bolder anchor lines so the tiny loops do not fuse after a couple of years. Fair warning, the wrist rubs against clothing and watches, so expect a touch-up around year two to three for most people. Session time is often short, under an hour, and the pain is usually low to medium. For the session, wear a rolled cuff blouse you can push up easily, and plan to remove bangles for the appointment. Common mistake, asking for hairline single-pixel lines, creates a fragile result that fades into a ghost if placed too close to the joint.
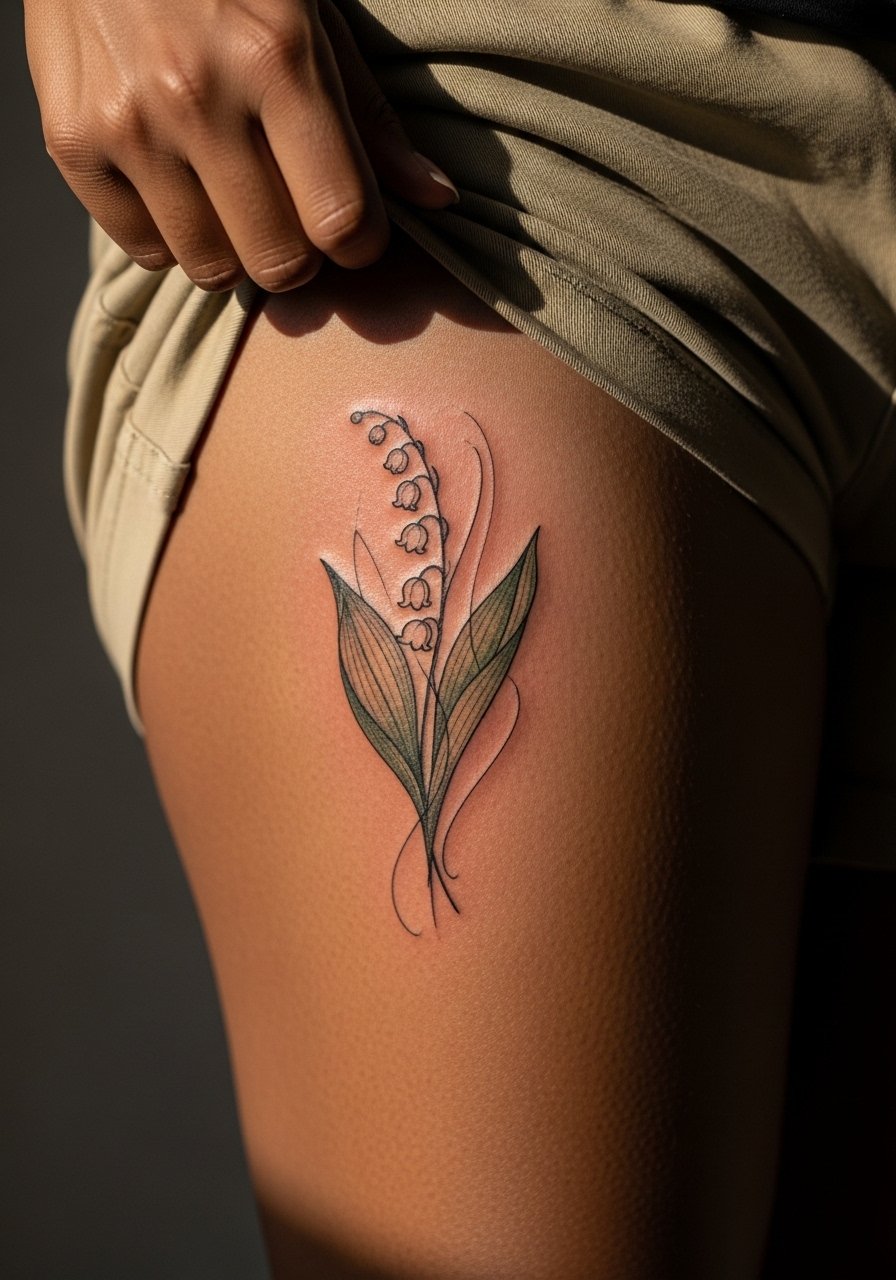
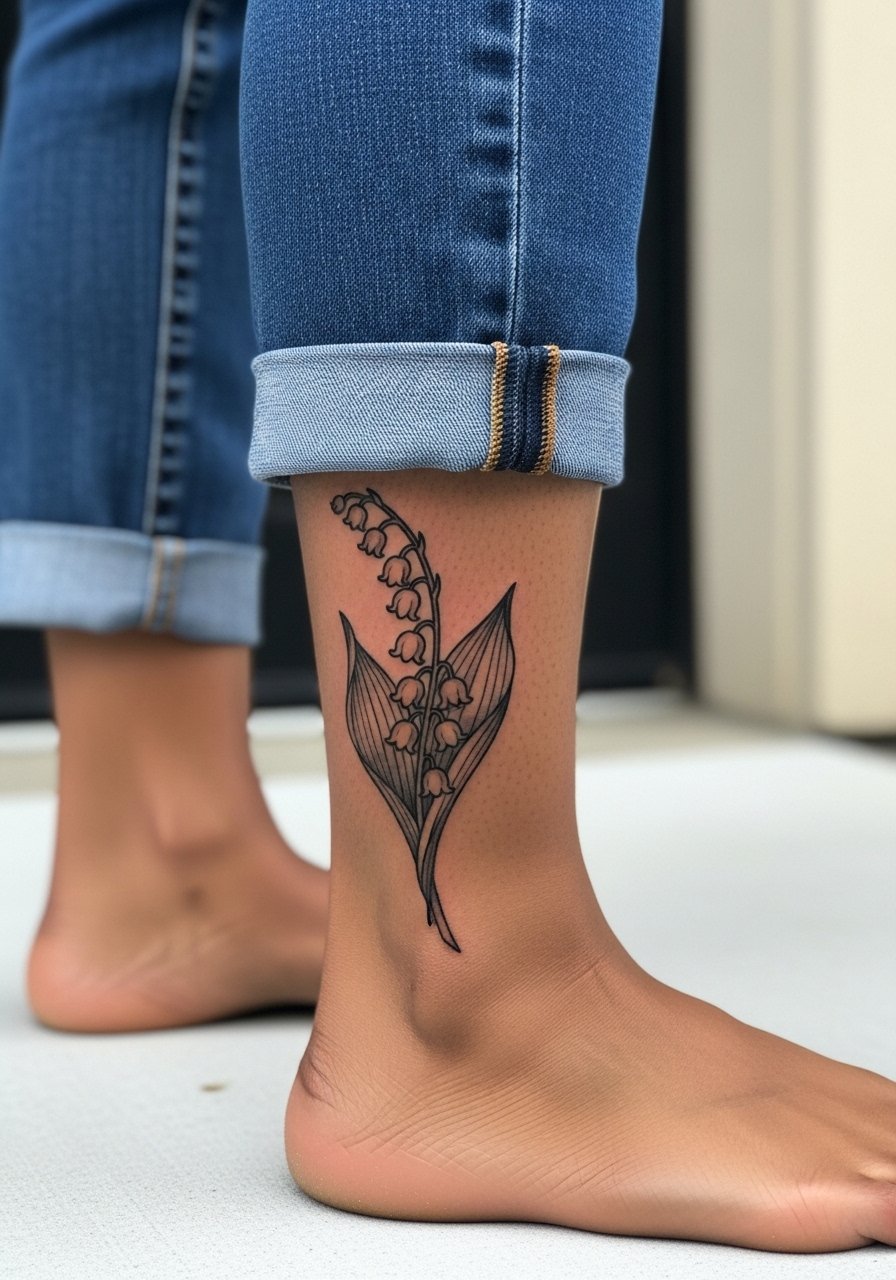
2. Minimalist single stem on the ankle
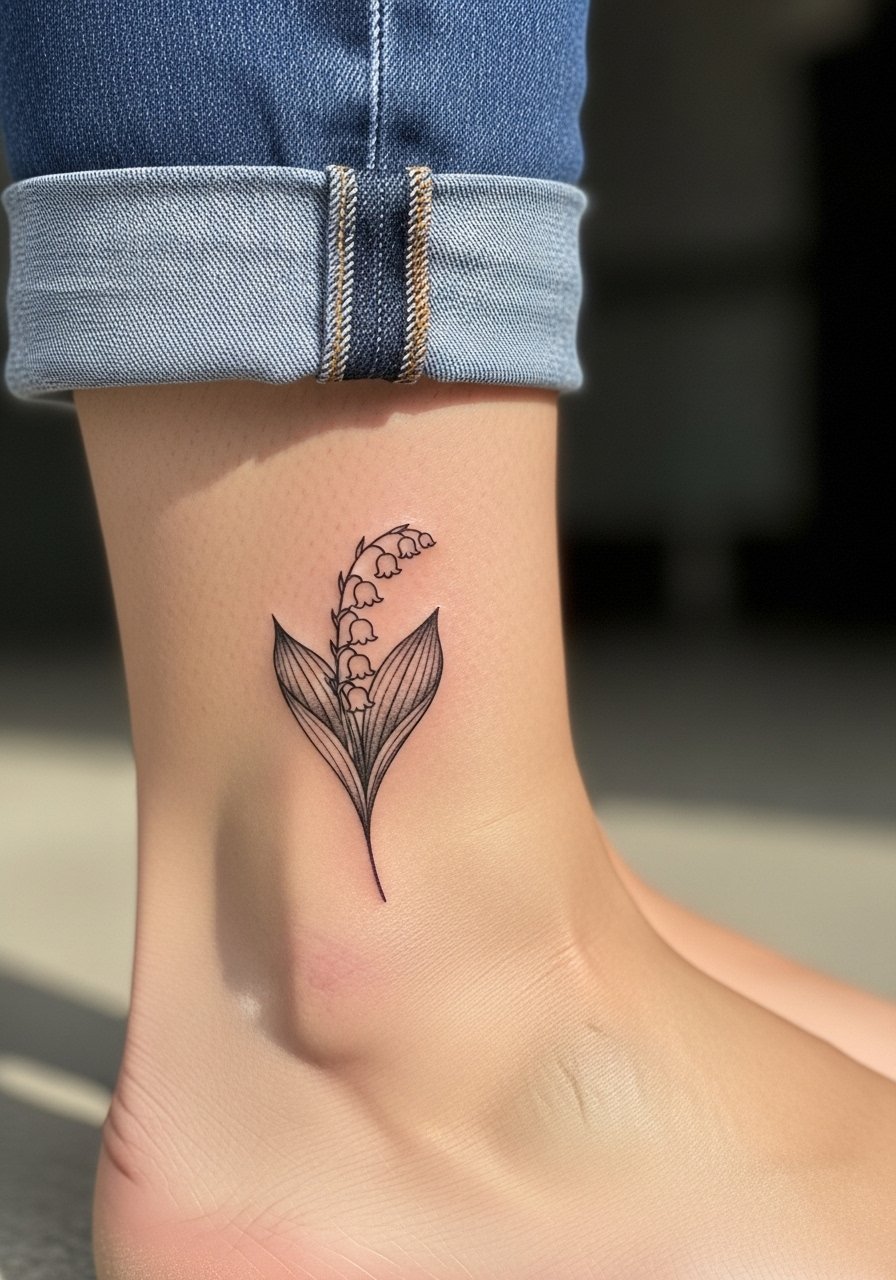
Fair warning, the ankle is a high-friction zone and heals differently from flatter skin. Ask for slightly thicker main stem lines and leave delicate inner details minimal so the piece does not blur from shoe straps and socks. One session, about 30 to 60 minutes, will usually do it. Pain ranges from medium to high depending on your anatomy, especially around the bone. For showing it off, pair the piece with strappy flat sandals or cropped jeans so the tattoo is visible without competing with heavy shoes. A common misstep is requesting ultra-dense dot shading on the ankle, which tends to cloud over time.
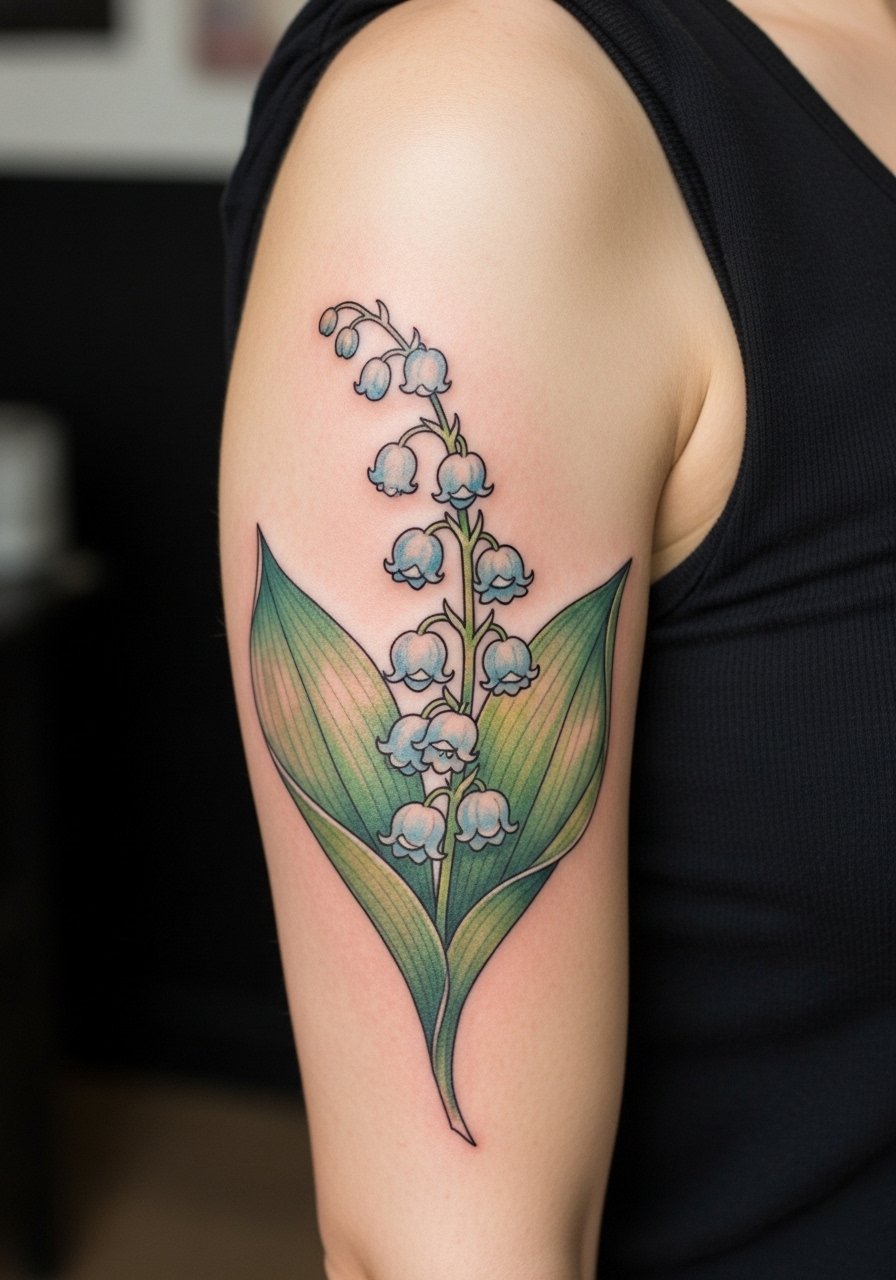
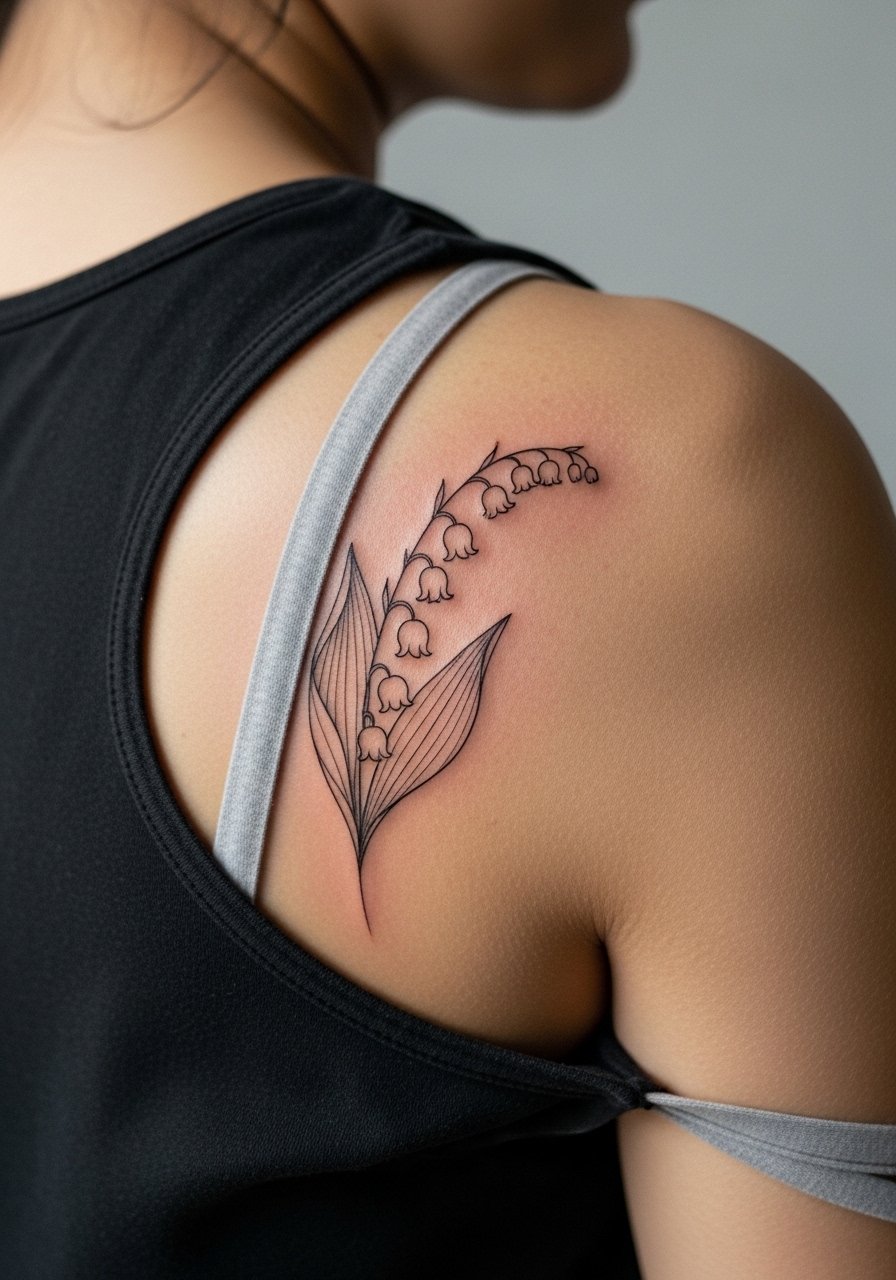
3. Micro-realism shoulder piece with soft shading
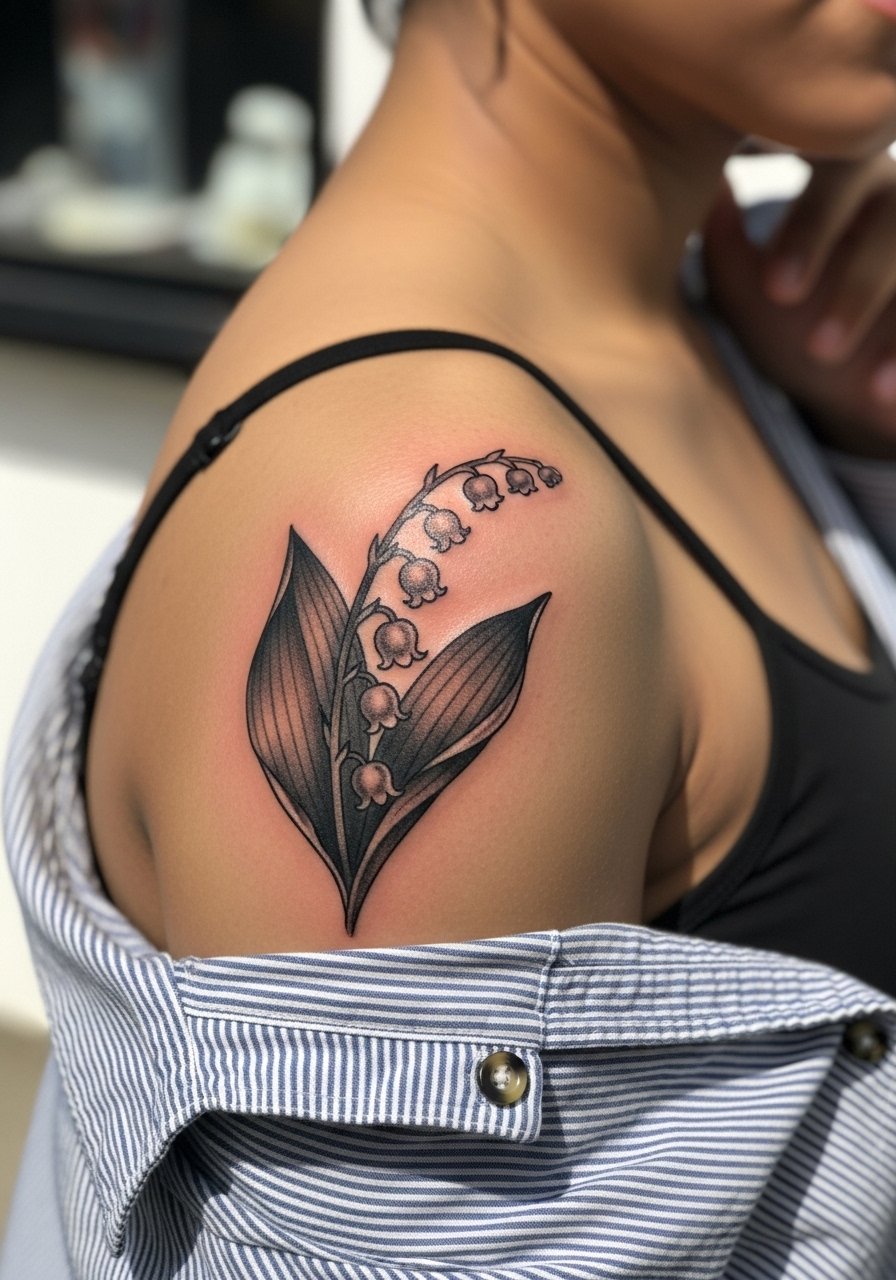
Most people overlook how shoulder skin accepts shading, so I tell clients to ask for subtle stipple transitions rather than blocky gradients. The shoulder gives room for 4 to 6 inch compositions and is forgiving in terms of aging. Expect two sessions for layered graywash and slightly longer chair time than a wrist piece. For the session, bring a button front shirt that you can slip off or pull aside so the artist has clear access. The biggest mistake is over-saturating color too early, which can flatten the lifelike depth that defines micro-realism.
4. Geometric lily of the valley on the forearm
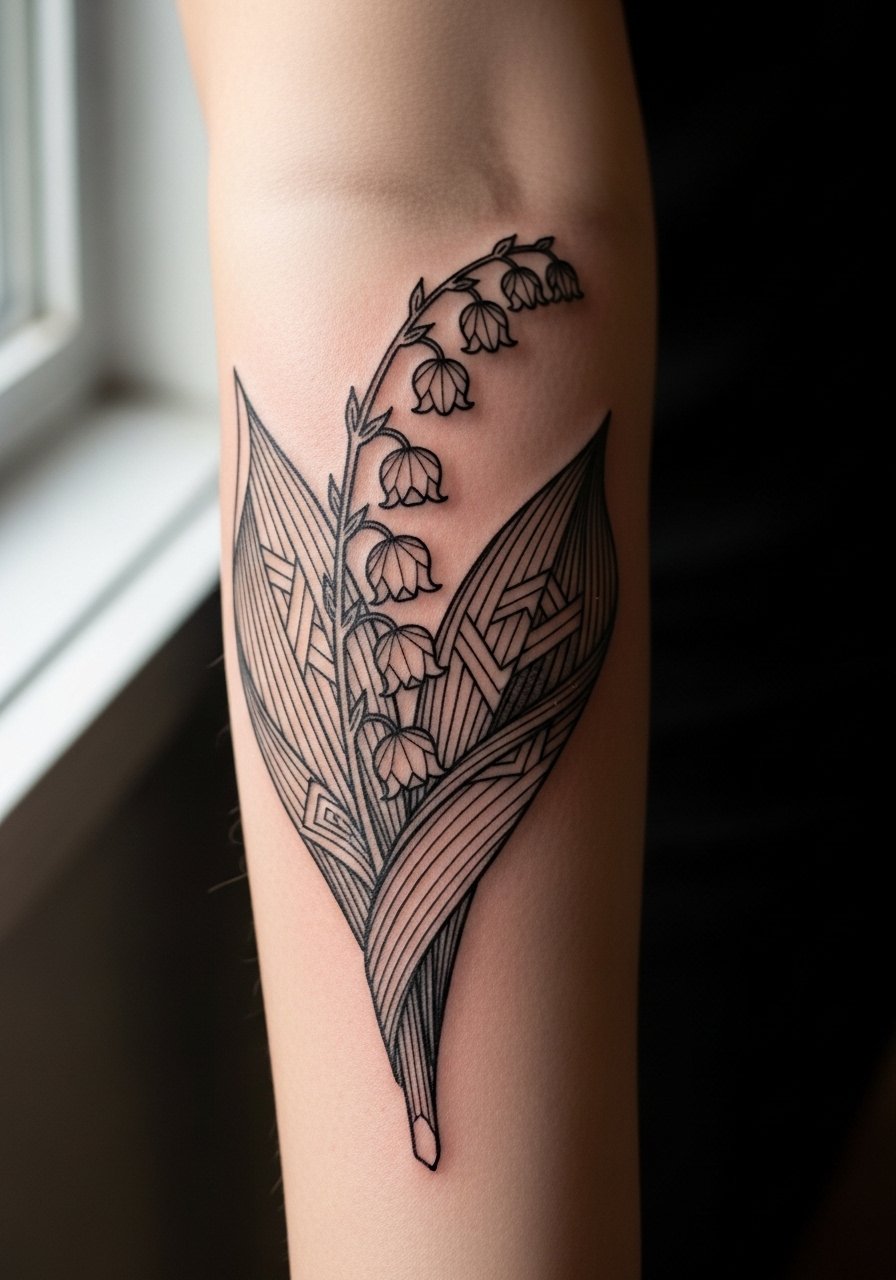
There is a visual clarity to pairing bells with geometric frames that reads modern from a distance. The forearm is a forgiving canvas for 3 to 5 inch work and holds crisp linework when the shapes have room. In consultation, show exactly how much negative space you want, and ask for slightly thicker geometry outlines than the floral linework so the plant does not disappear into the shapes as it heals. Pain and session time are moderate; most artists will finish this in one to two sessions. For daily wear, roll sleeves up with a linen rolled sleeve shirt so the piece sits visibly without being crowded by bracelets. A common mistake is compressing complex geometry into too small an area, which leads to merging lines later on.
5. Linework spine column that follows your curve
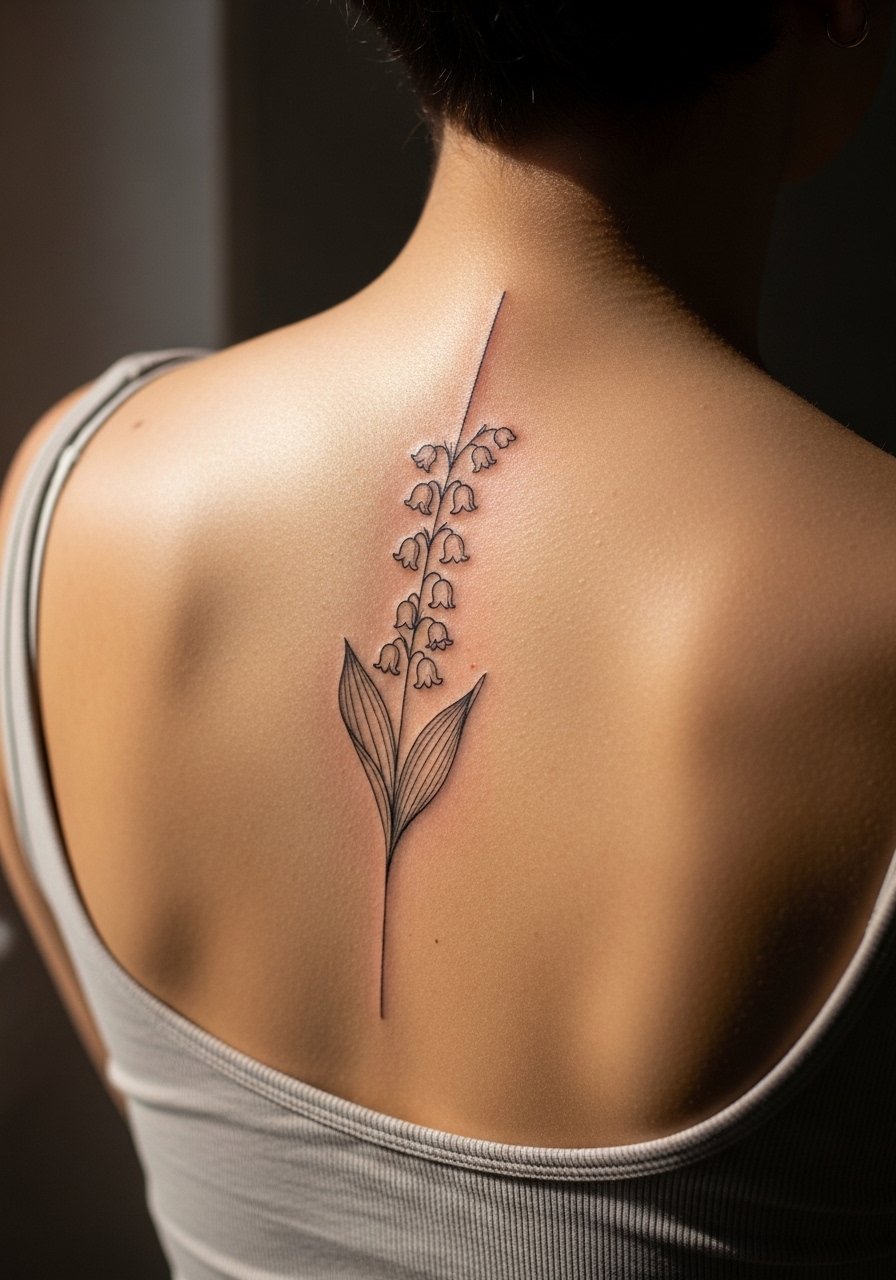
The spine column benefits from the body’s vertical flow but it demands careful spacing from the artist. When you consult, ask how the design will sit with your natural spine curve so leaves and bells do not end up skewed at movement points. Expect 2 to 3 sessions and medium pain, particularly over the vertebrae. For showing it off, a low back tank top or backless dress reveals the column without overstating it. The biggest mistake I see is compressing too many bells into a short drop, which makes the column look cluttered as it ages.
6. Black-and-gray ribcage bouquet with fern
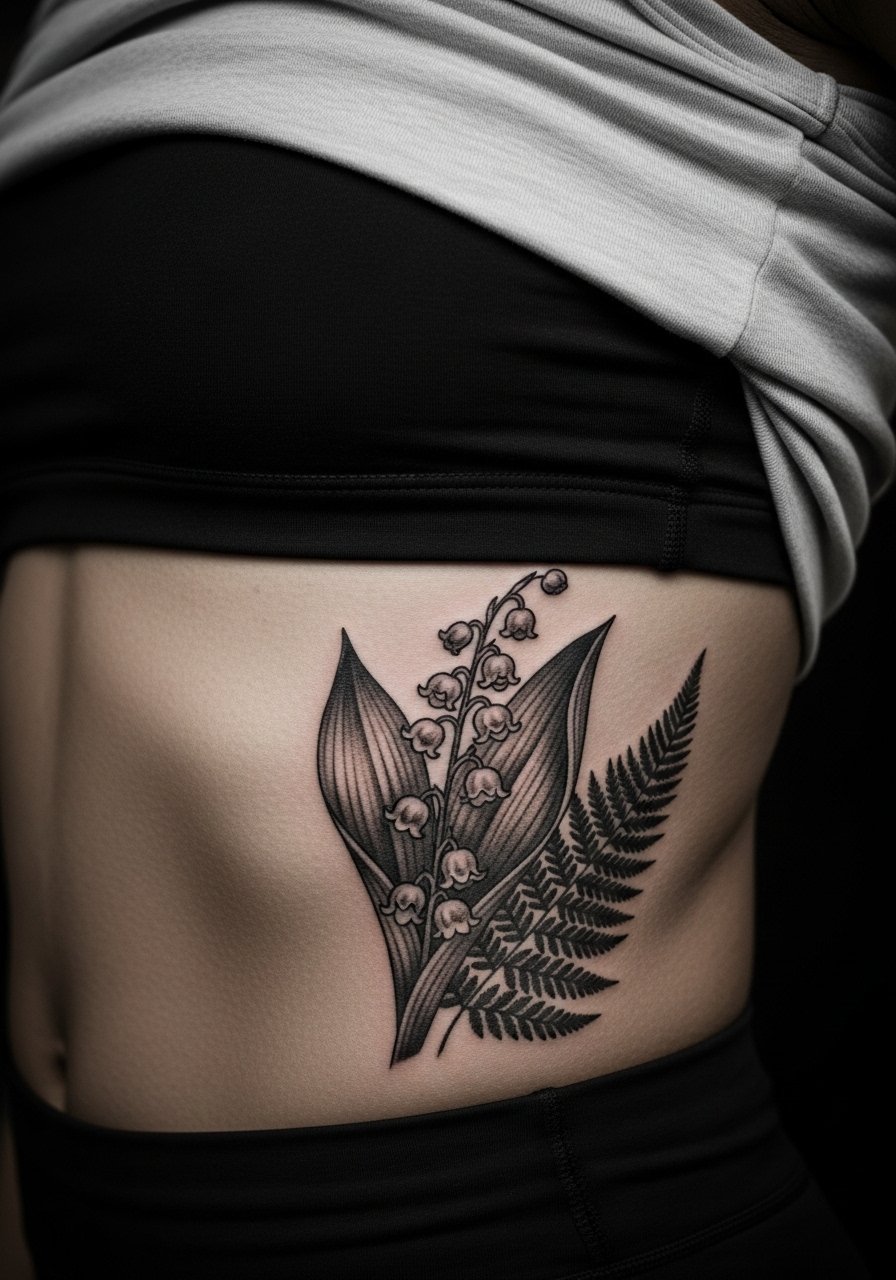
Artists split on whether delicate linework holds up on ribs. One camp says the stretch and frequent movement blur fine lines within a couple of years. The other camp says that with proper depth, spacing, and shading, black-and-gray stabilizes well. If you favor longevity, ask for slightly stronger anchor lines and layered graywash to protect tiny details. Rib pieces usually take multiple sessions, can be a 7 to 8 on common pain scales, and require careful session wear like a sports bra so the artist can access the area. A typical mistake is asking for hairline bells with extensive stipple in the same piece, which risks loss of contrast after healing.
Studio Day Picks
The wrist, ankle, ribcage, and shoulder ideas above ask for different prep and early protection, so a few targeted items smooth the session and the first week of healing.
-
Stencil transfer paper kit. Lets you preview the placement and line weight on skin before the needle, which is handy for wrist and forearm wraps.
-
Topical numbing cream. Applied before a ribcage or shoulder session it can reduce the edge of sensitivity without masking how the artist reads the skin.
-
Thin protective film roll. Useful for high-friction areas like the ankle and wrist during the first days of healing.
-
Fragrance-free gentle body wash. Cleans the area without stripping the delicate linework that fine line pieces depend on.
-
Aquaphor healing ointment. A thin layer in the first 48 hours keeps moisture balanced for small detailed work without clogging the needle channels.
7. Watercolor lily of the valley half-sleeve
Color lovers enjoy the painterly look but there is a real debate about it. One camp prefers soft pastels because they mimic fresh blooms. The other camp points out that pastels need more touch-ups and careful sun protection to avoid patchy fade. If you pick watercolor, ask the artist to layer pigments for subtle saturation and plan touch-ups at year two or three. These sleeves take multiple sessions and moderate pain depending on coverage. For showing it off choose an off shoulder linen top that reveals the sleeve without busy patterns. Avoid packing tiny watercolor washes into very small areas or they will vanish unevenly.
8. Tiny behind-the-ear sprig with hummingbird
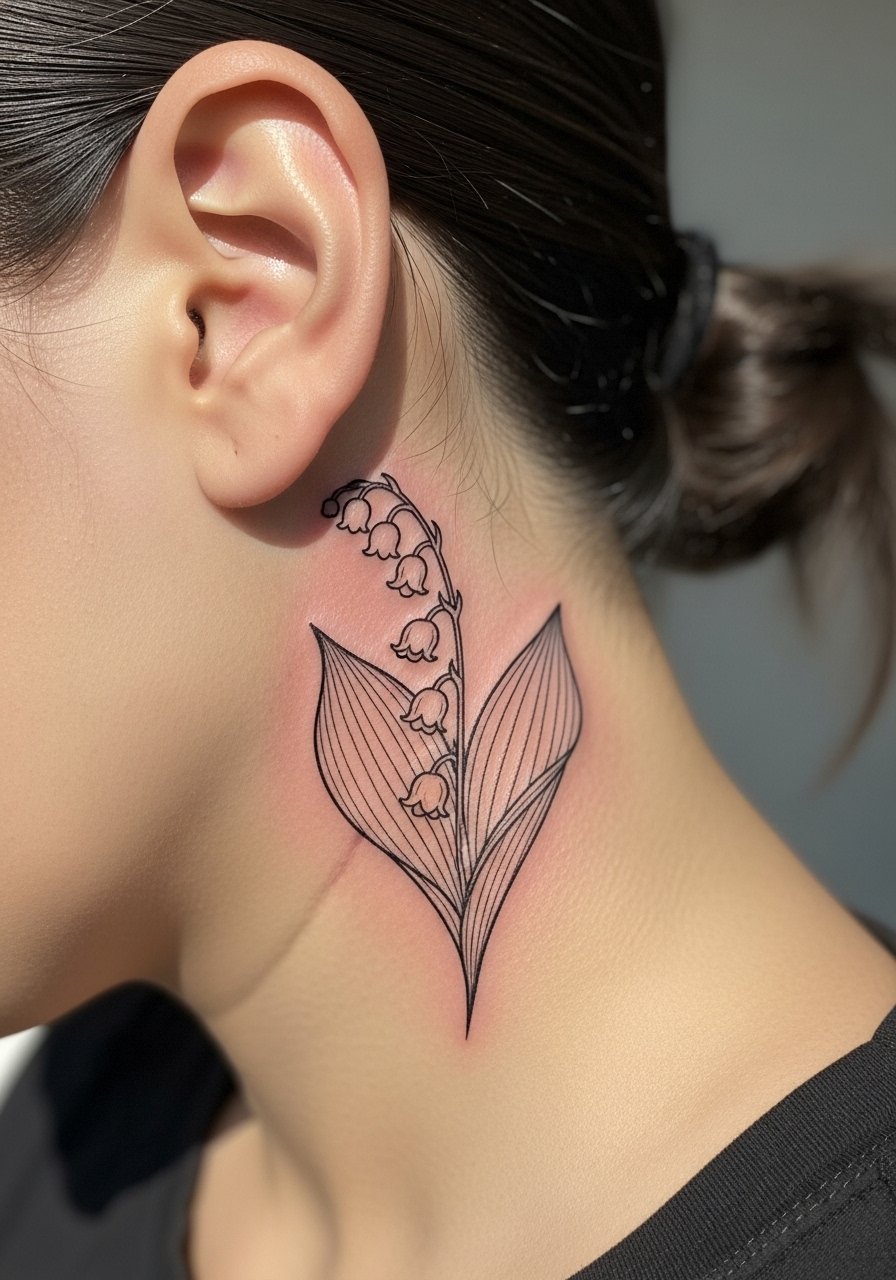
When you want discreet charm, the behind-the-ear placement is convincing. Tell your artist to keep the piece under two inches and to avoid dense shading so the small bells stay legible. Expect low session time and minimal pain, but note the area needs careful aftercare because hair, perfume, and scalp oils can irritate a fresh tattoo. For the appointment, wear your hair up so the artist can work cleanly. The common mistake is asking for a tiny hummingbird with heavy color filling, which eats the negative space that gives the design its delicacy.
9. Abstract lily bells on the inner thigh
Inner thigh pieces are intimate and they move with the body, so spacing and negative shapes matter. I tell clients to pick flowing, larger shapes for inner thigh work rather than dense micro detail that will compress when you sit. Sessions are medium in length and pain can be variable because of tissue sensitivity. For the session itself, wear loose shorts or a skirt so the artist can position your leg without tight hems. A frequent mistake is asking for very fine stippling in the narrowest part of the thigh, which can blur into a dull patch over time.
10. Neo-traditional calf piece with snake contrast
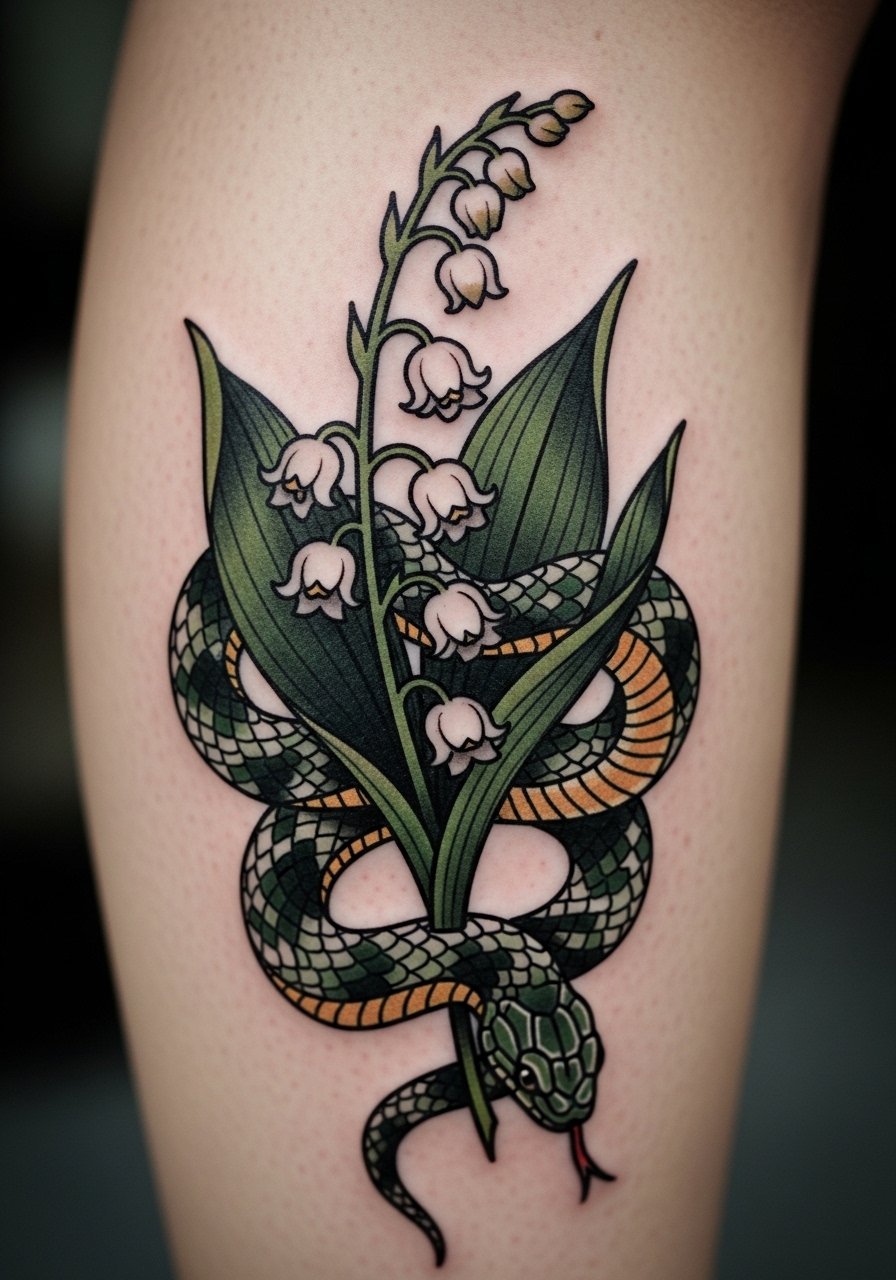
There is a strong visual payoff to pairing delicate bells with a bold snake because the contrast reads like a portrait of tension. The calf accepts saturated lines well and has a lower risk of blowout than the ankle. Sessions run medium to long depending on size and color. A common mistake is keeping the bells as hairline detail while making the snake massive and dense, which unbalances the composition. If you plan for boots or skirts in colder months know that fabric friction from high socks can dull color edges, so factor in a gentle touch-up timeline.
11. Large delicate back piece across the upper back
I've seen upper back pieces hold detail well because the skin is flat and the canvas is wide. Ask your artist to map the cluster across your shoulder blades so leaves follow muscle flow and the composition moves naturally with your posture. This work often takes multiple sessions and is medium on pain, concentrated along the scapula. For showing it off bring a backless black dress or low-back tank so the piece can breathe in outfits without being fully exposed. One mistake is packing too many tiny bells into the upper back where perspective flattens them at a distance.
12. Lily of the valley and dandelion arm band
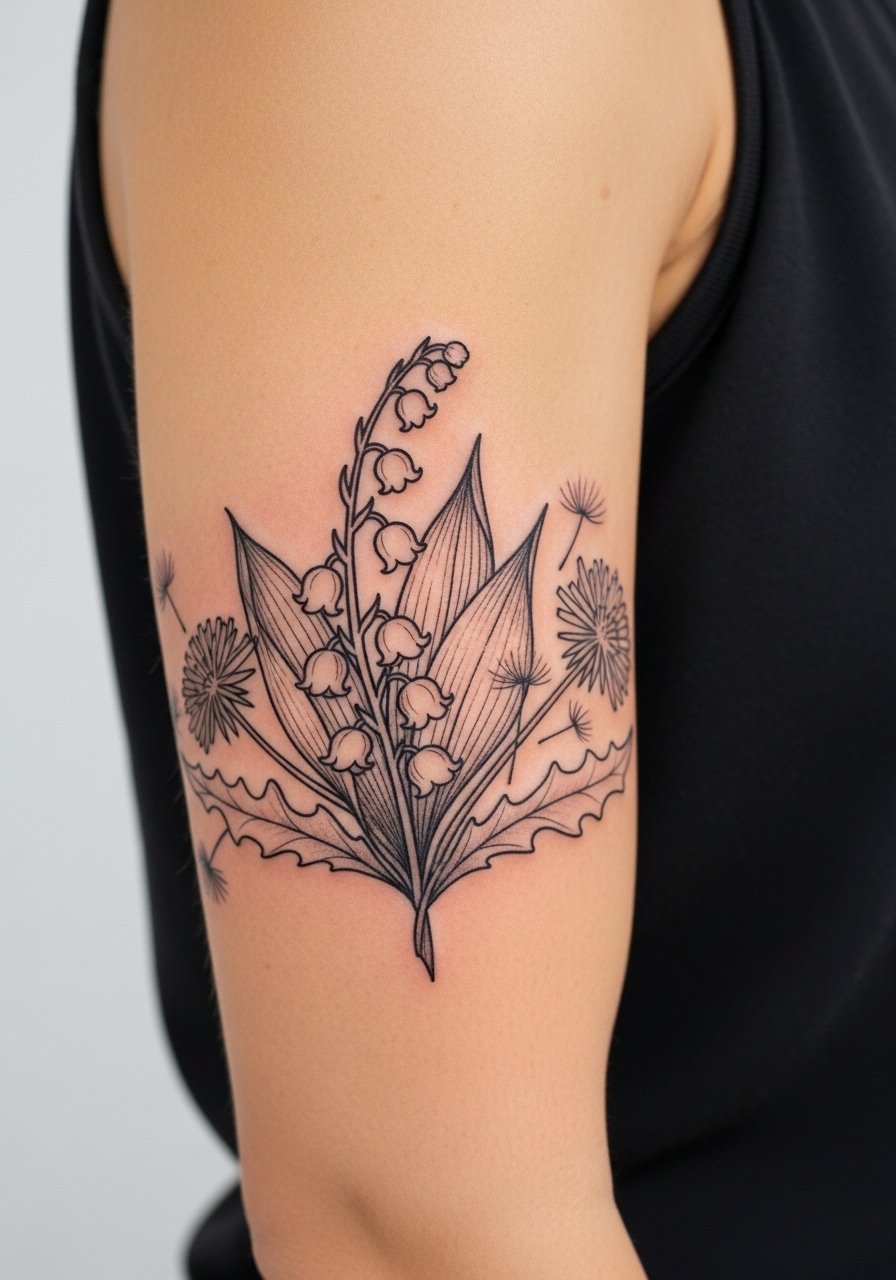
Arm bands wrap differently on every arm, so a template preview is important. Ask the artist to stencil and move it around your arm in the chair to check alignment and symmetry. Sessions are typically one to two sittings and pain is usually manageable. A common error is tightening the band too much with tiny repeating motifs which then look like a single bar as skin ages. For balance, consider spacing that allows a sliver of skin to show between repeats so the band reads crisp on the muscle when you flex.
13. Small collarbone sprig with single bell
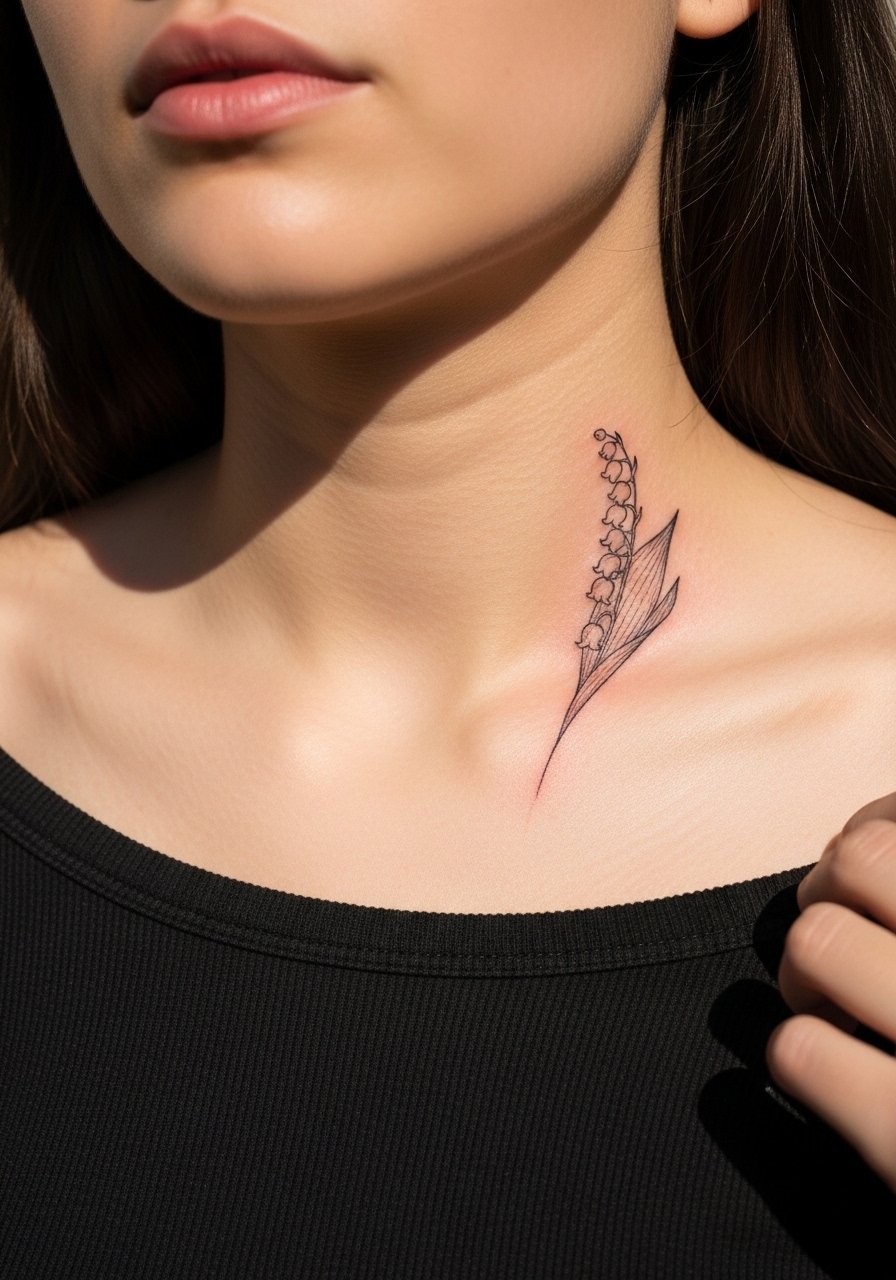
Collarbone placements are visible and fashionable but they move a lot with breathing and posture. I recommend a short stem and a single bell in that area so the piece does not stretch across the bone. Expect shorter sessions and moderate to high pain when needles cross the bone edge. During the appointment wear a wide-neck shirt you can shift easily. The usual mistake is asking for a long vine that crosses the bone diagonally, which often causes line irregularity and increased sensitivity during healing.
14. Single-bell finger tattoo for discreet charm
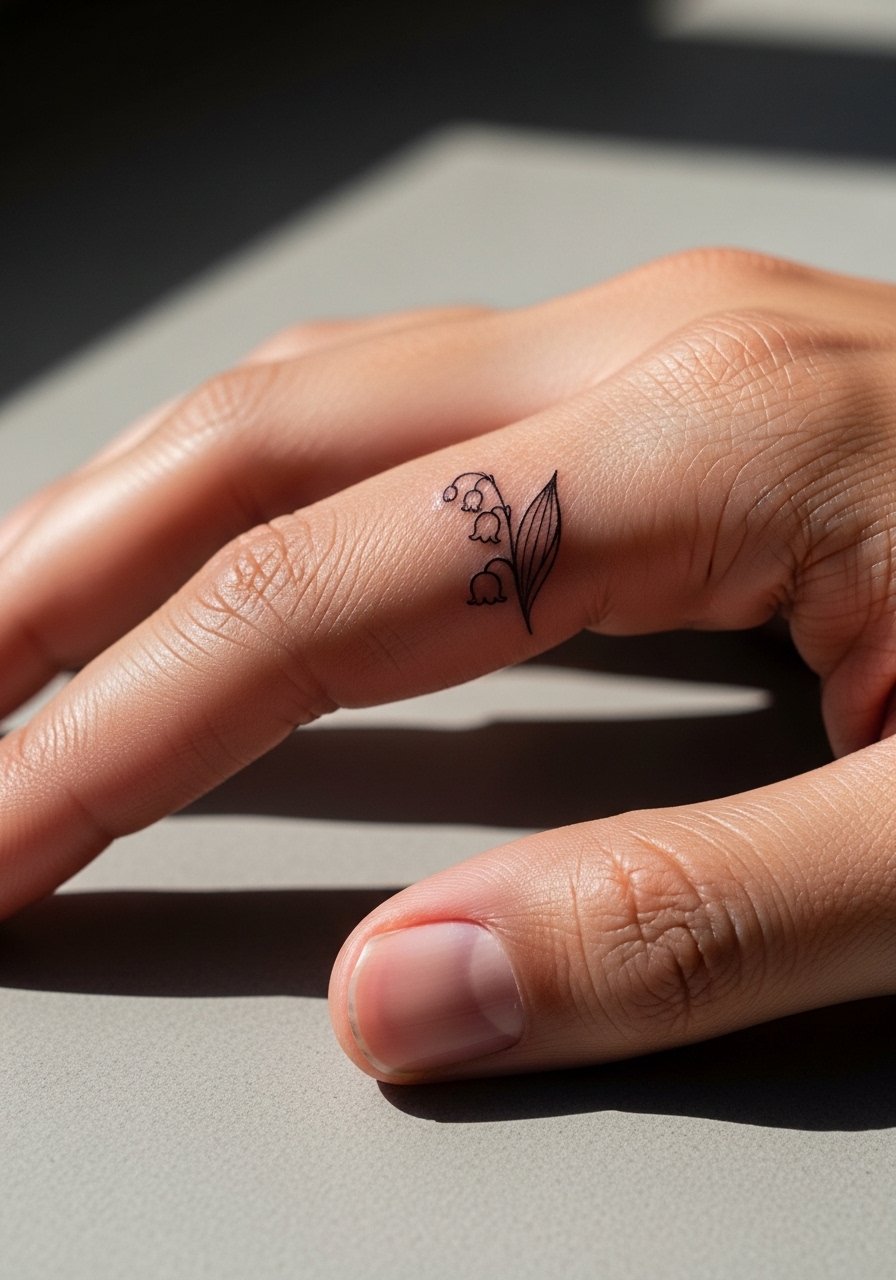
Finger tattoos are charming but they age differently because of constant washing and use. I advise asking for thicker anchor lines and minimal internal detail so the bell remains legible after surface wear. Expect quick sessions but plan for frequent touch-ups; fingers are among the most high-maintenance placements. A common misstep is requesting dense shading or multiple tiny blossoms on a single finger, which rarely holds a crisp edge beyond a year.
15. Thigh mural with fluid abstract bells
Thigh pieces allow experimental scale and fluid abstraction because the canvas is large and protected from constant sun. Tell your artist you want flowing negative space and to avoid tiny internal dots in dense areas that could compress when you walk. Sessions are often two sittings and pain is moderate, usually tolerable for most people. For showing it off, high-waisted shorts or a thigh slit skirt frames the design without crowding the composition. The mistake to skip is cramming intricate micro-detail into a spot of skin that curves sharply when you move.
16. Calf-to-ankle wrap with alternating bells
When a wrap moves from calf to ankle you need a rhythm in bell size so the pattern reads consistent while adapting to muscle and bone. Ask your artist to sketch the wrap directly on your leg to test flow before inking. This is a longer session and often done in two parts to manage swelling. A common error is keeping the bell scale identical across the calf and ankle, which distorts when the limb narrows.
17. Small bouquet above the rib line near the sternum
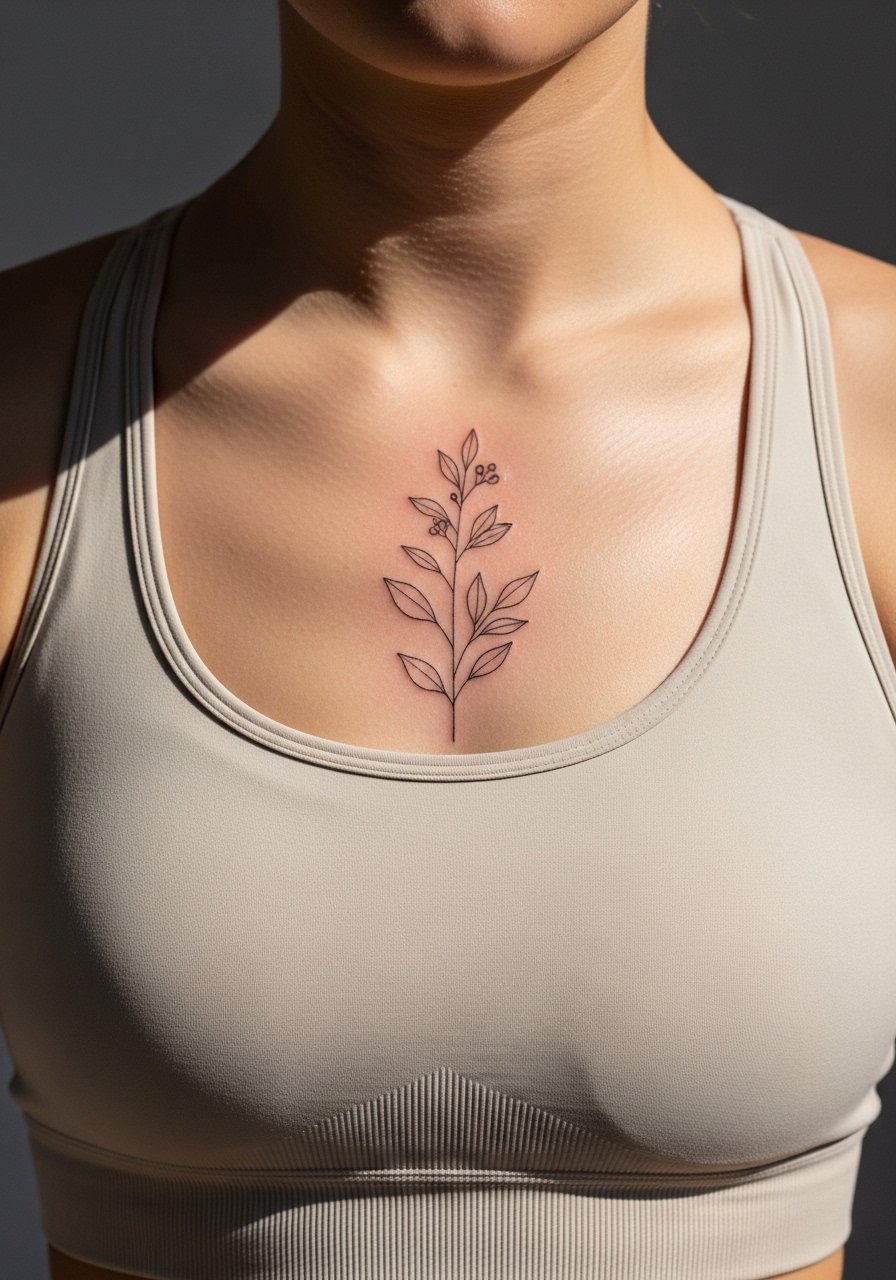
Sternum-adjacent work asks for thoughtful session wear and careful needle depth to avoid shifting lines. I tell clients to opt for slightly bolder central stems and delicate outer leaves so the composition keeps contrast as it heals. Pain tends to be higher in this zone and session times vary depending on how much shading you want. For the appointment, wear a fitted sports bra so the artist can access the area cleanly. The frequent mistake is requesting ultra-fine internal strokes across the sternum which do not hold up under repeated movement.
Frequently Asked Questions
Q: Will a fine line lily of the valley tattoo on my wrist need touch-ups sooner than a bolder version?
A: In my experience, yes. Fine line pieces on wrists face more friction and UV exposure, which can soften delicate strokes. Ask your artist about slightly stronger anchor lines and expect a touch-up around year two or three depending on lifestyle.
Q: Do watercolor lily of the valley sleeves require different aftercare than black-and-gray ones?
A: They both need the same gentle cleaning and sun avoidance, but watercolor pieces usually benefit from more diligent sunscreen down the line to prevent patchy fade. Plan touch-ups sooner for pastel washes than for solid gray shading.
Q: Are ribs a bad place for tiny fine line lilies given the skin movement?
A: Artists are split on this. Some say ribs blur fine lines quickly because of skin stretch. Others say proper depth and spacing make a difference. The honest route is to ask the artist where they stand and to request slightly bolder anchors if you want delicate detail in that zone.
Q: What should I wear to a shoulder or half-sleeve session for easy access?
A: Wear a button front shirt or a loose tank that you can slip off without tugging the arm area. Comfort and access let the artist work cleanly and reduce unnecessary fabric friction during the session.
Q: How do I find artists who do modern lily of the valley work without naming anyone?
A: Look through hashtag feeds like #LilyOfTheValleyTattoo and #FineLineFloral, browse Pinterest boards titled "lily of the valley fine line," and use local searches like "[city] fine line tattoo studio" on directories. Also read recent threads on r/tattoos for peer feedback before booking.
