
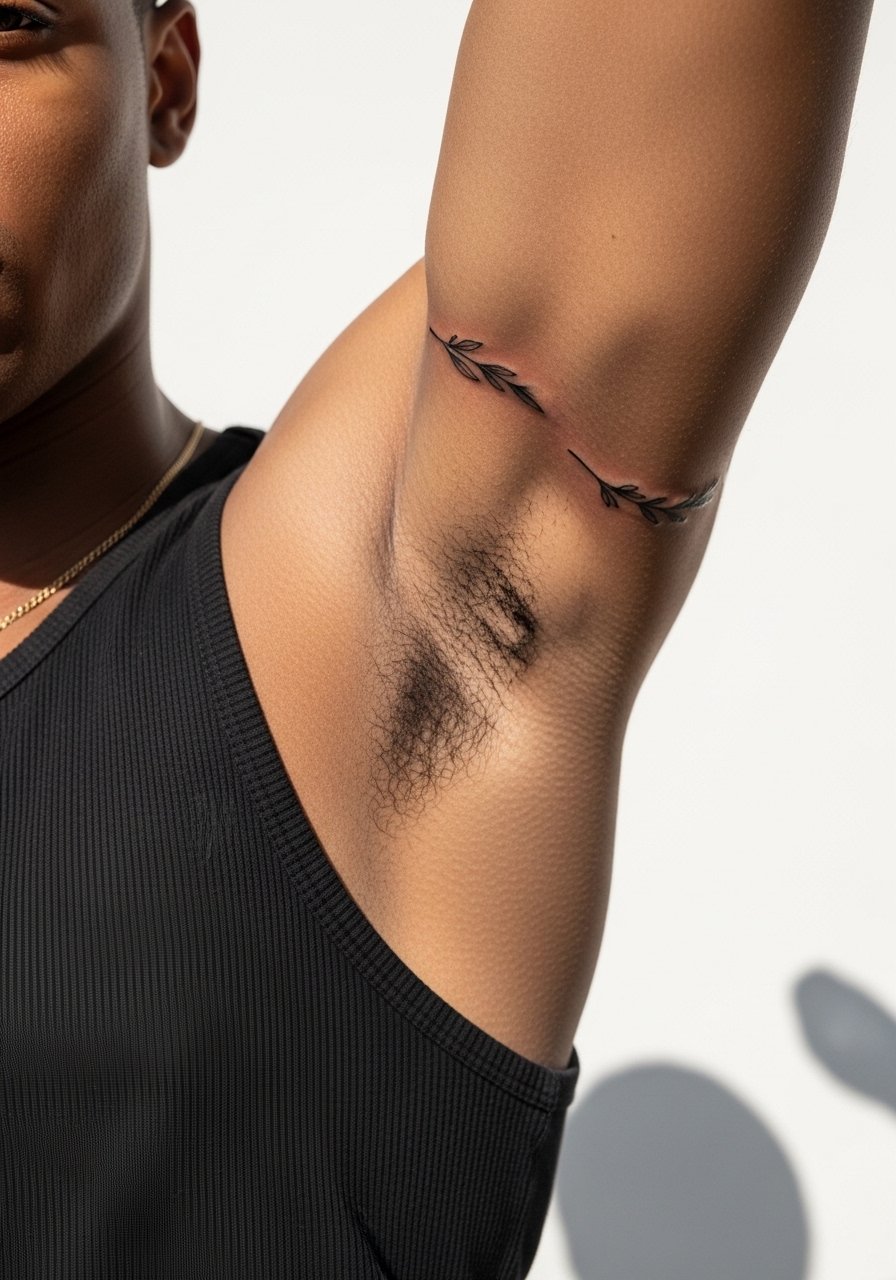
The stencil went on with the arm relaxed, the client laughed at a phone clip, then the artist asked for one small shift and the whole composition snapped into place. That short pause is where a minimalist inner bicep tattoo gets set up to age well or end up needing early touch-ups. These 27 ideas lean small, black, and considered so the placement reads like a quiet secret when you want it hidden and like intention when you raise your arm.
1. Fine-line Floral Stem that Follows the Curve
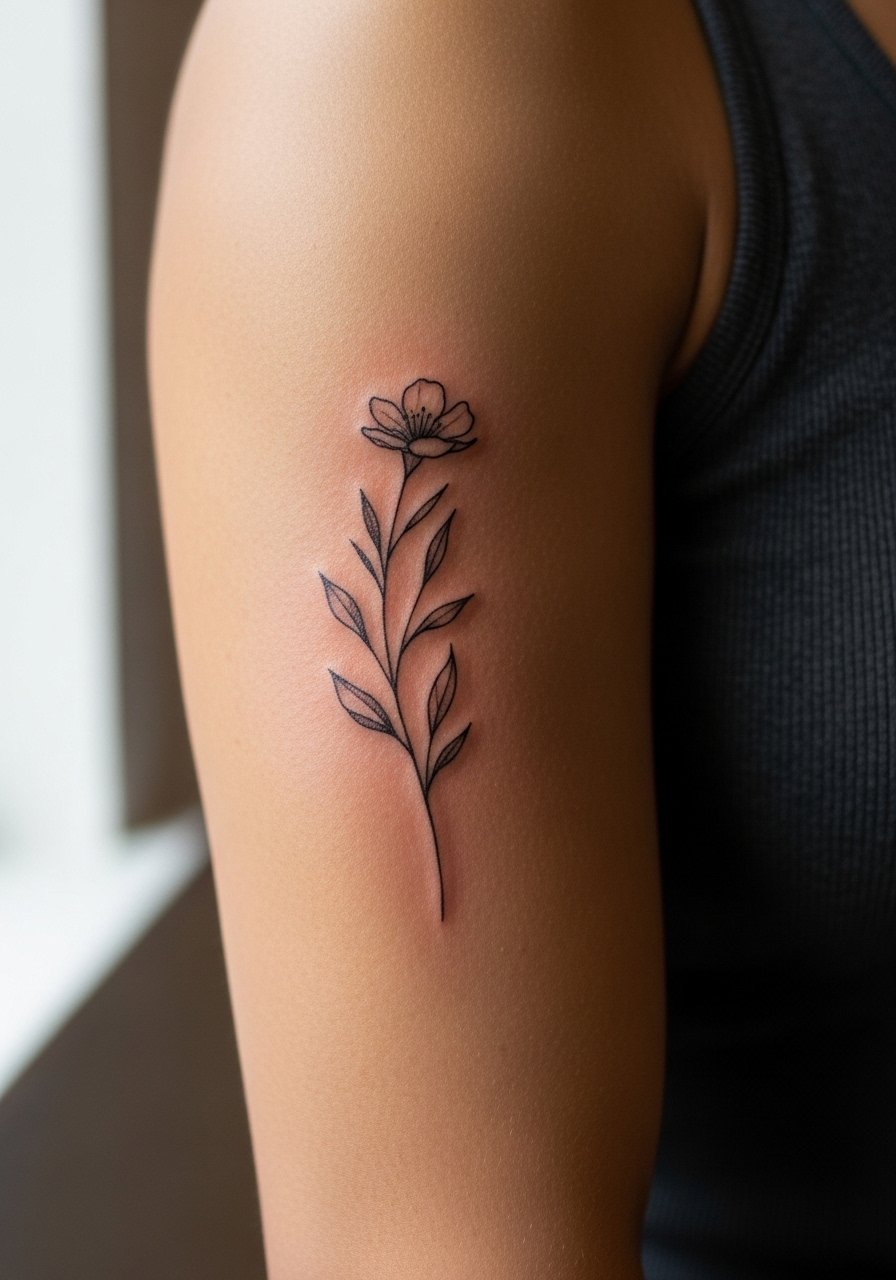
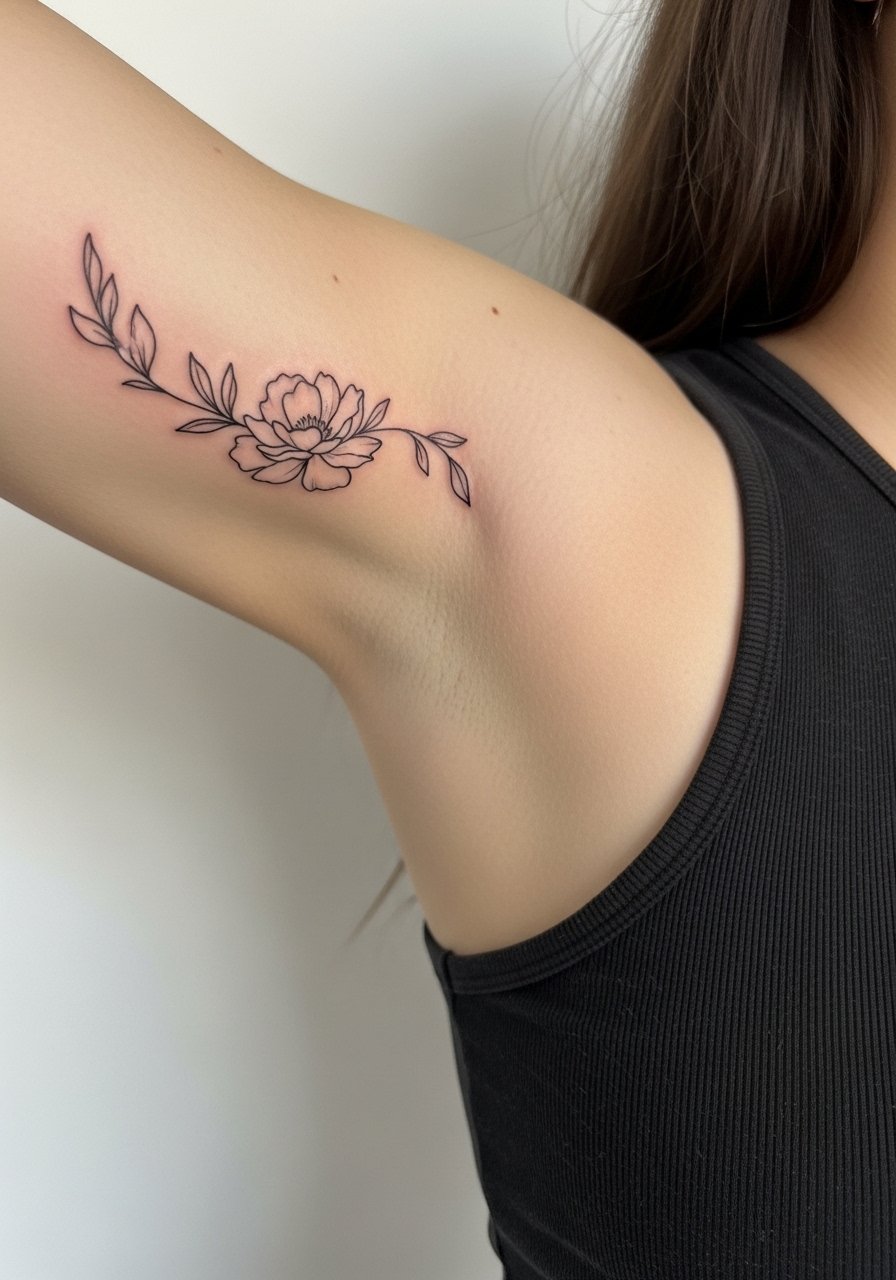
I’ve seen this one three summers running on friends who wanted something that lengthens the arm visually. Plan on a 2-3 inch vertical run, black only, and expect a one-to-two hour single session depending on detail. Tell your artist to match the stem to the bicep curve so petals sit on the high points of the muscle and not across the fold. Common mistake is cramming small petals into the curve, which creates blurring once healed. For showing it off, pair the piece with a sleeveless tank in neutral tones so the linework peeks cleanly from the sleeve edge.
2. Minimalist Geometric Triangle, Centered and Clean
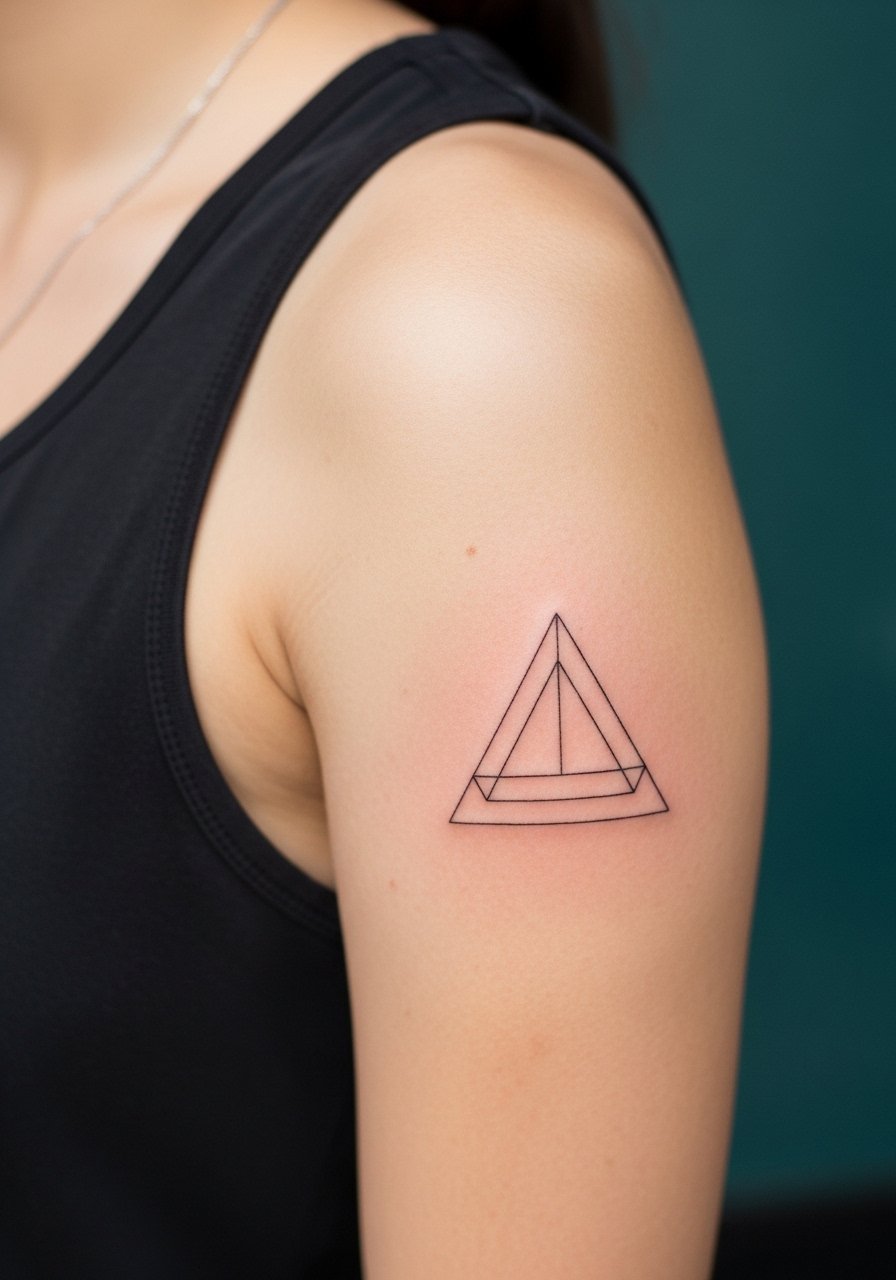
Fair warning: tiny geometry shows every shake in the hand. This 1-2 inch triangle works best when the artist uses a steady single-pass line and a slightly thicker lineweight than micro-dot work. It hurts less than ribs but more than the outer arm, so expect a quick sting and a 20-40 minute session. Ask for slightly more space between the corners than you think the design needs to avoid merging lines at year two. For a casual edit to outfits, try a rolled-cuff cotton tee so the bicep shows when you cuff the sleeves.
3. Delicate Script Quote, Curved with Motion
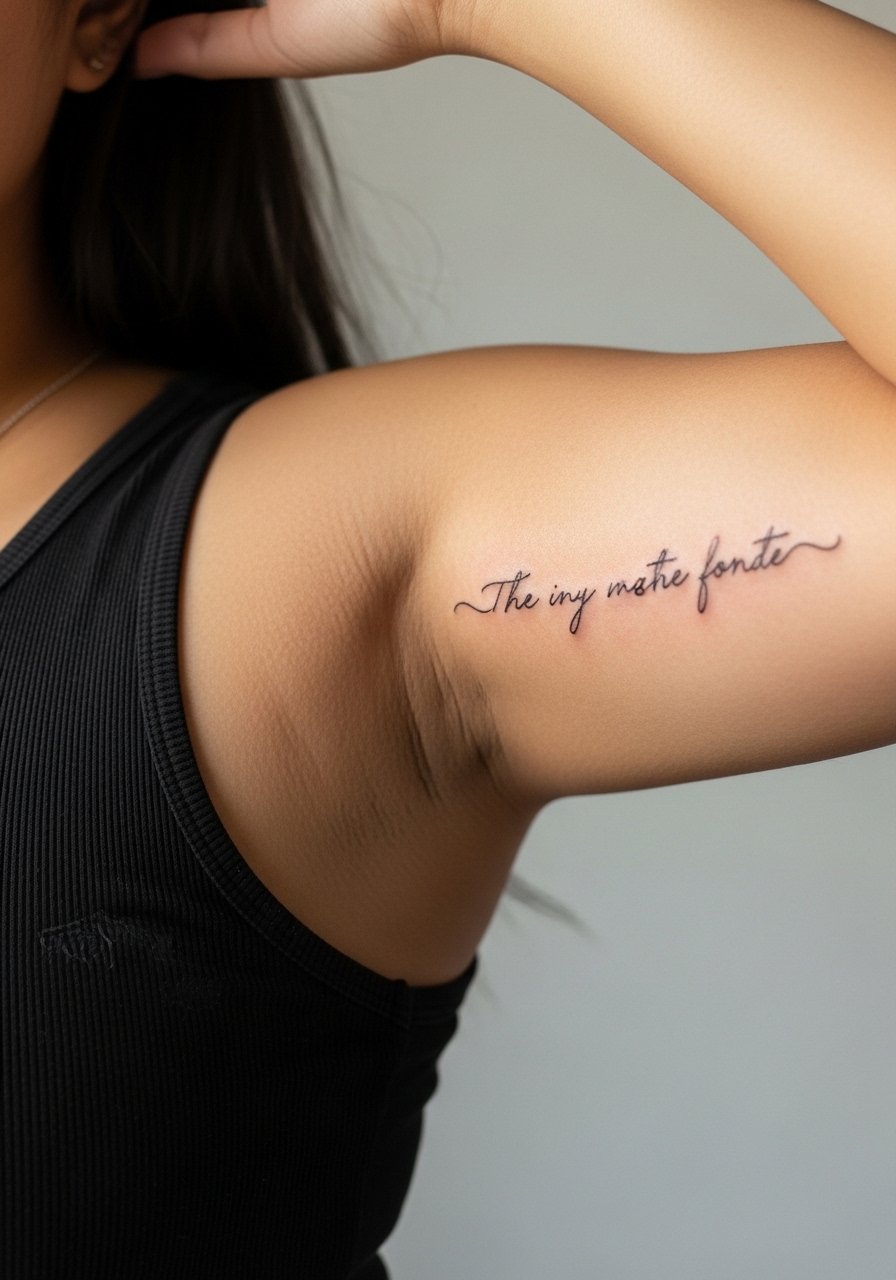
Most script fades faster when ink depth is inconsistent. For a vertical 3-4 inch phrase, sit with your artist to lay the stencil while the arm is both relaxed and slightly flexed. Tell them the exact curve you want so the letters read when the arm is at rest. Pain is moderate and session time is usually under an hour. A common error is asking for hairline cursive and then wondering why letters blur; request clear spacing and slightly firmer linework for longevity. Pair the quote with a thin chain pendant necklace that sits above the ink for subtle layering.
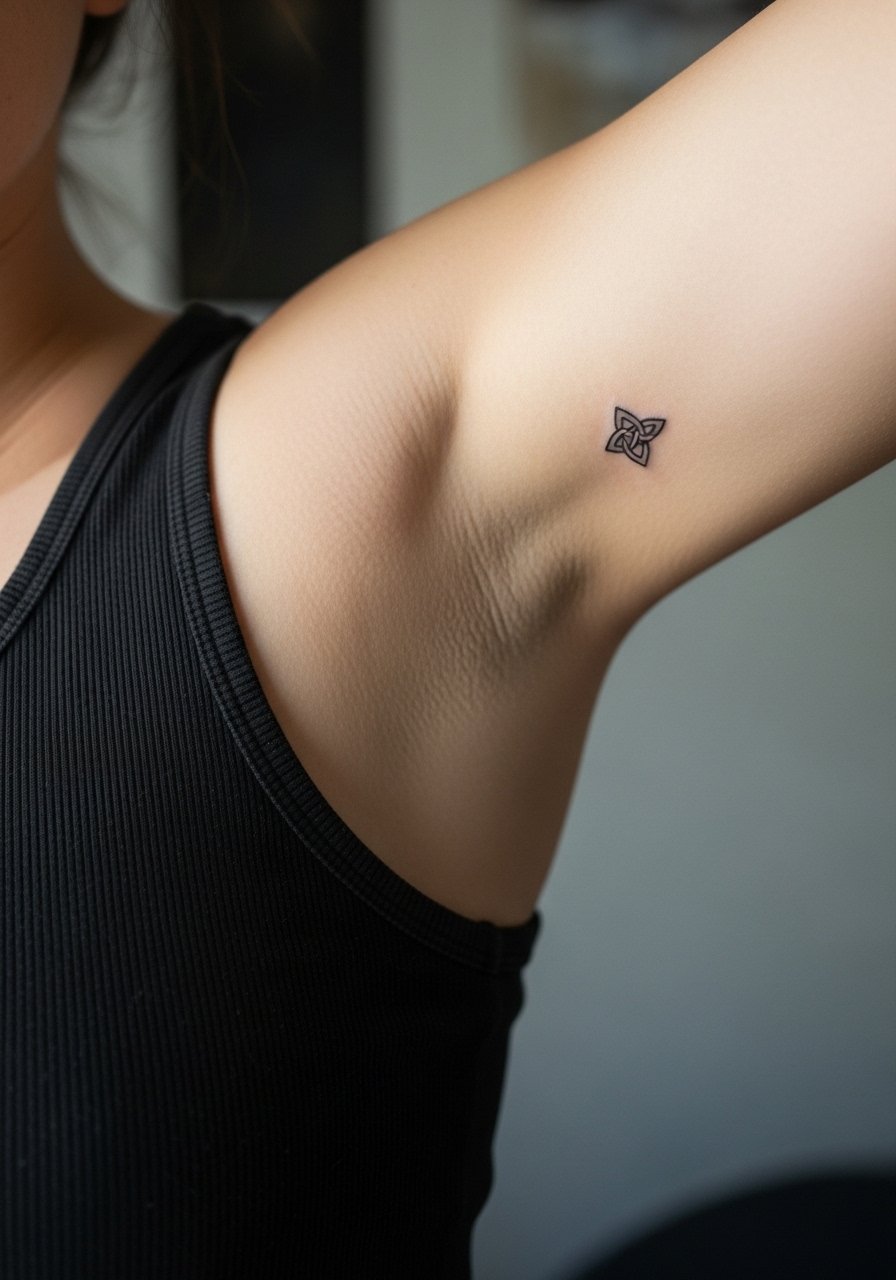
4. Tiny Moon Phase Cluster for Subtle Mystery
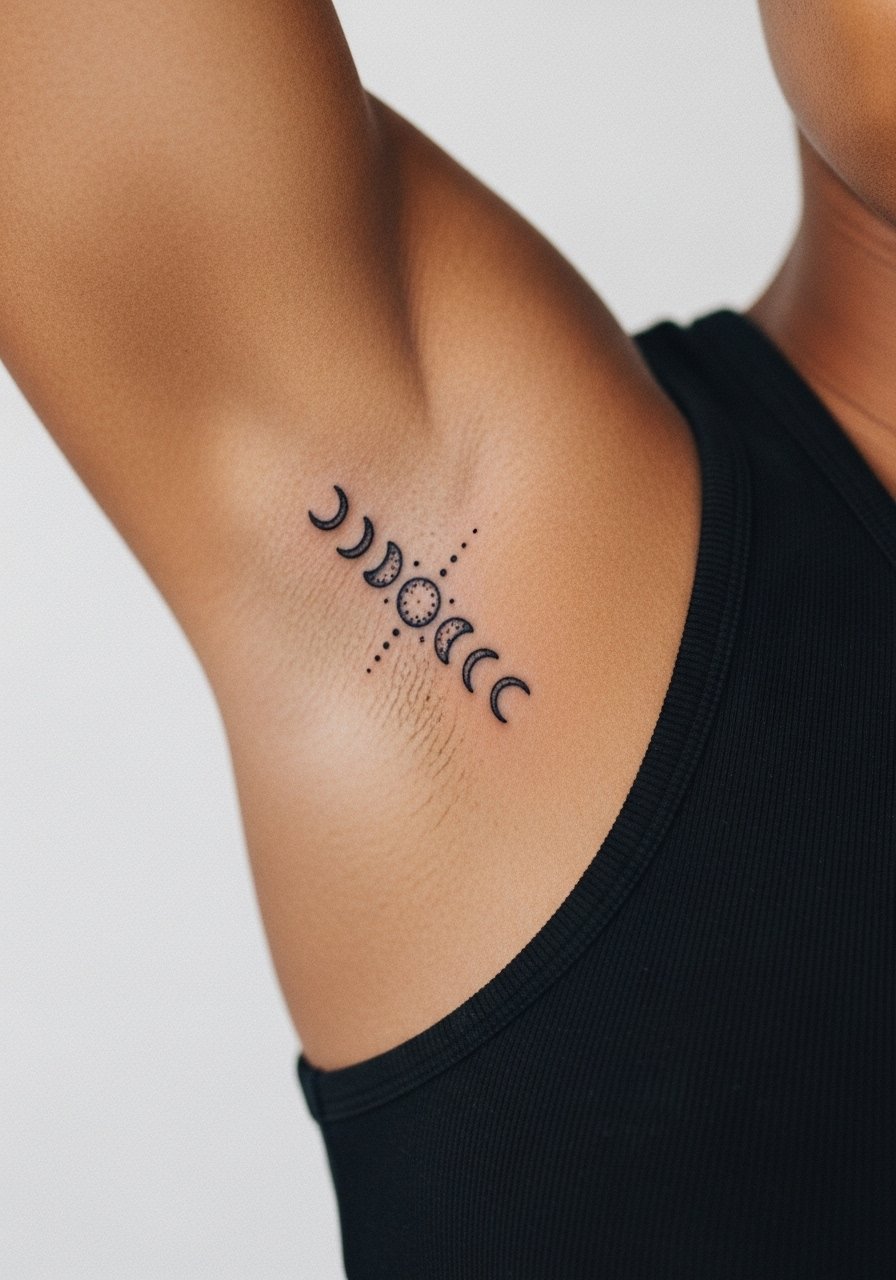
There is a trend-versus-reality split on micro symbols here. The style is quick, usually 20-30 minutes, and it photographs well in motion. The trick is to keep individual moons spaced so the dots do not migrate together as the skin settles. Commonly people ask for the full kit of phases at a very small scale and then need touch-ups at year two. For sessions, wear a loose tank to keep sweat away from the armpit fold. When you want to show it off, a racerback tank frames the inner bicep without crowding the design.
5. Single-Line Butterfly Outline, Light and Airy
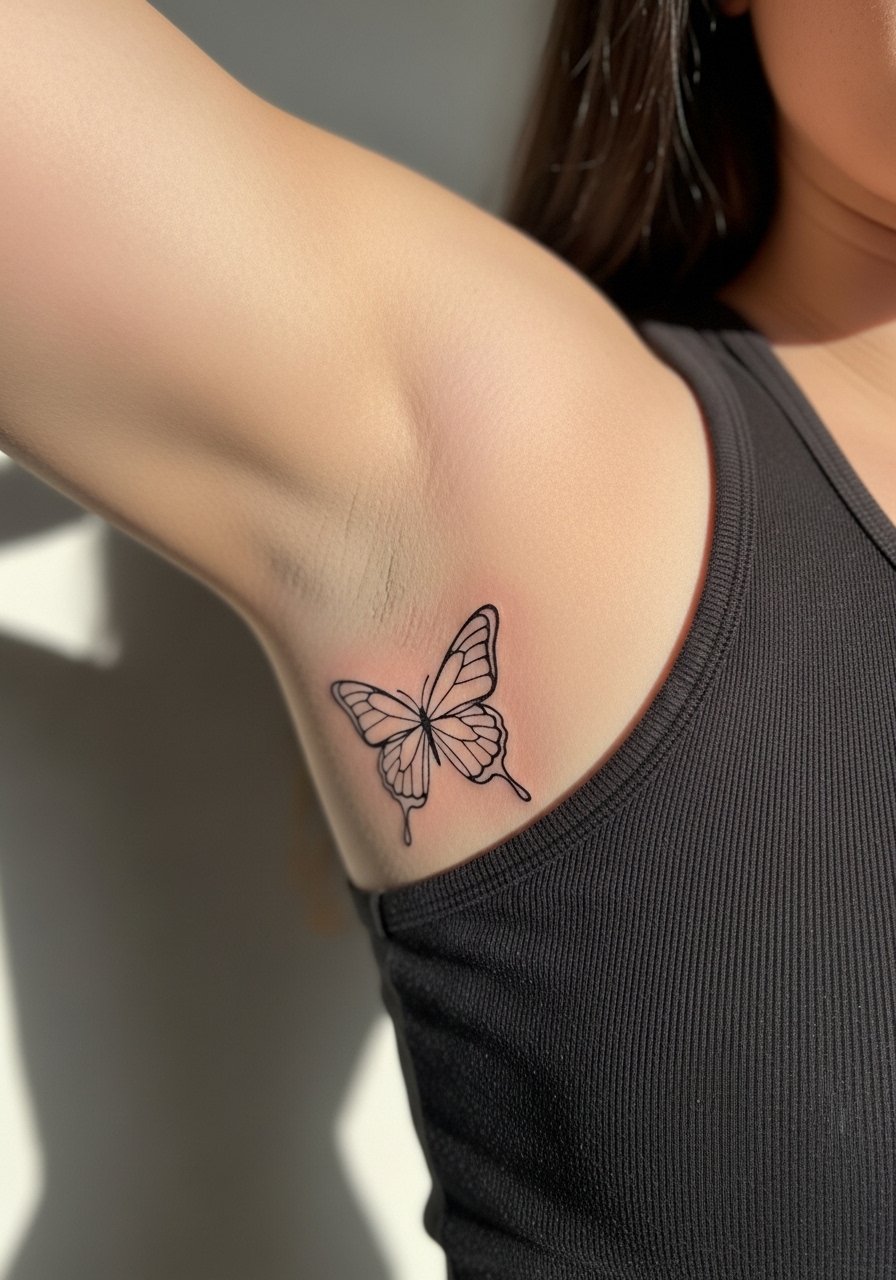
I’ve noticed butterfly outlines age best when the wings are given negative space. Ask your artist to keep the lines confident and avoid tiny inner details that fill in. Pain level is moderate and session time sits around 30-45 minutes. A frequent mistake is requesting tiny filigree inside the wings, which blurs; request an open outline instead. For wardrobe, this piece peers prettiest from a sleeveless fitted tank or a thin strap top so it can peek under the sleeve.
6. Ornamental Vine Pattern Running Vertically
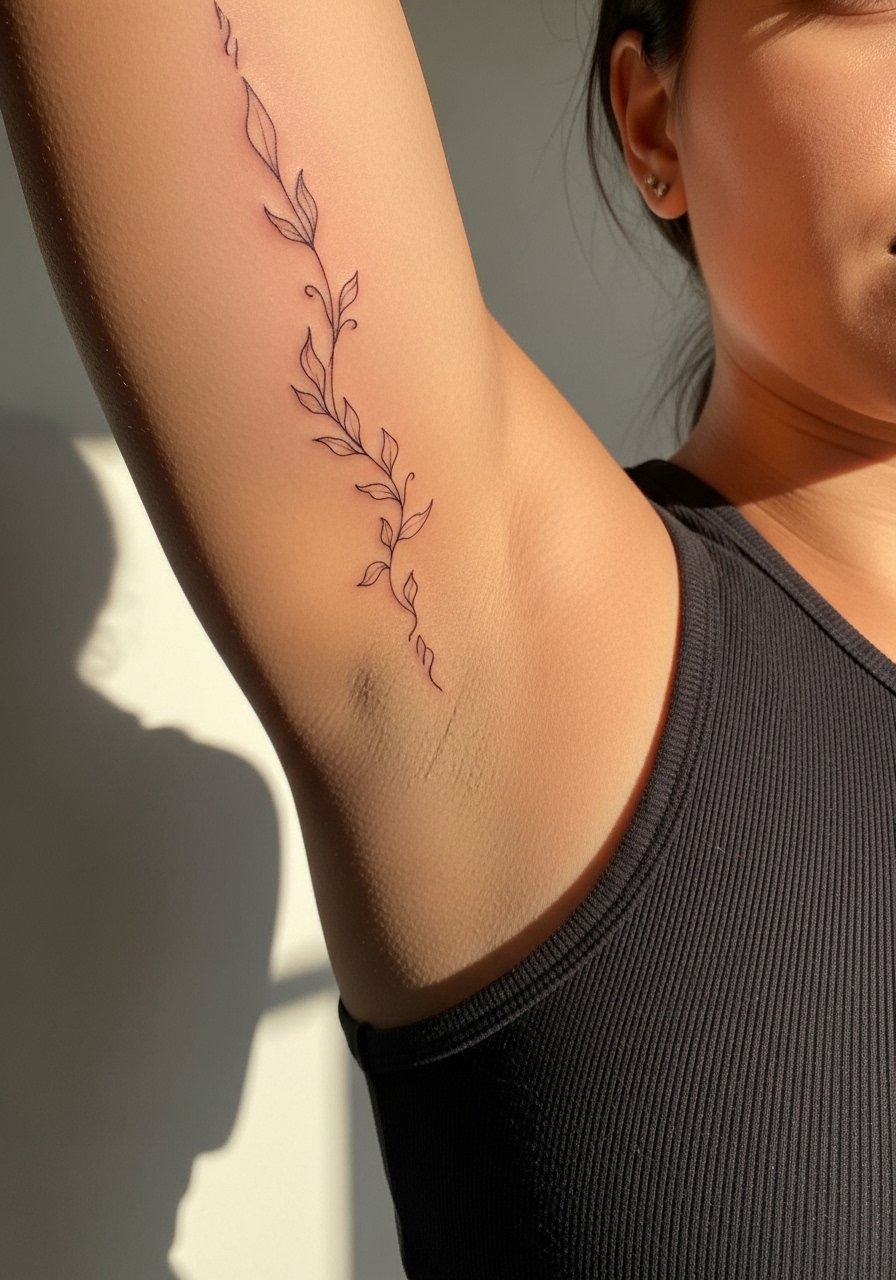
When you want repeat rhythm along the arm, vines work because they follow the bicep’s natural flow. This version should be 3-4 inches to avoid crowded leaves. Tell the artist to taper leaf sizes and keep linework slightly bolder at junctions so the pattern does not blur into a gray patch over time. Sessions can run longer if the vine is a continuous run, so plan for an hour plus. For appointment day, wear a loose button-down shirt you can pull aside for clear access.
Pre-Session Essentials
The designs above involve the inner arm and armpit friction, so a few items smooth the session and the first week of healing for those six ideas.
-
Stencil transfer paper kit. Lets you see the exact line placement on skin before the needle hits, which is especially helpful for script and botanical stems.
-
Topical numbing cream. Applied per directions before the appointment to ease inner bicep sensitivity without compromising linework.
-
Thin protective film roll. Keeps the armpit-adjacent area cleaner during showers and reduces rubbing from clothing in the first 3-5 days.
-
Fragrance-free gentle body wash. Cleanses the area while avoiding ingredients that sting healing skin and affect fine-line detail.
-
Aquaphor healing ointment. A thin layer in the very first days helps manage scabbing on delicate linework without suffocating the skin.
7. Micro Arrow Motif Pointing Upwards
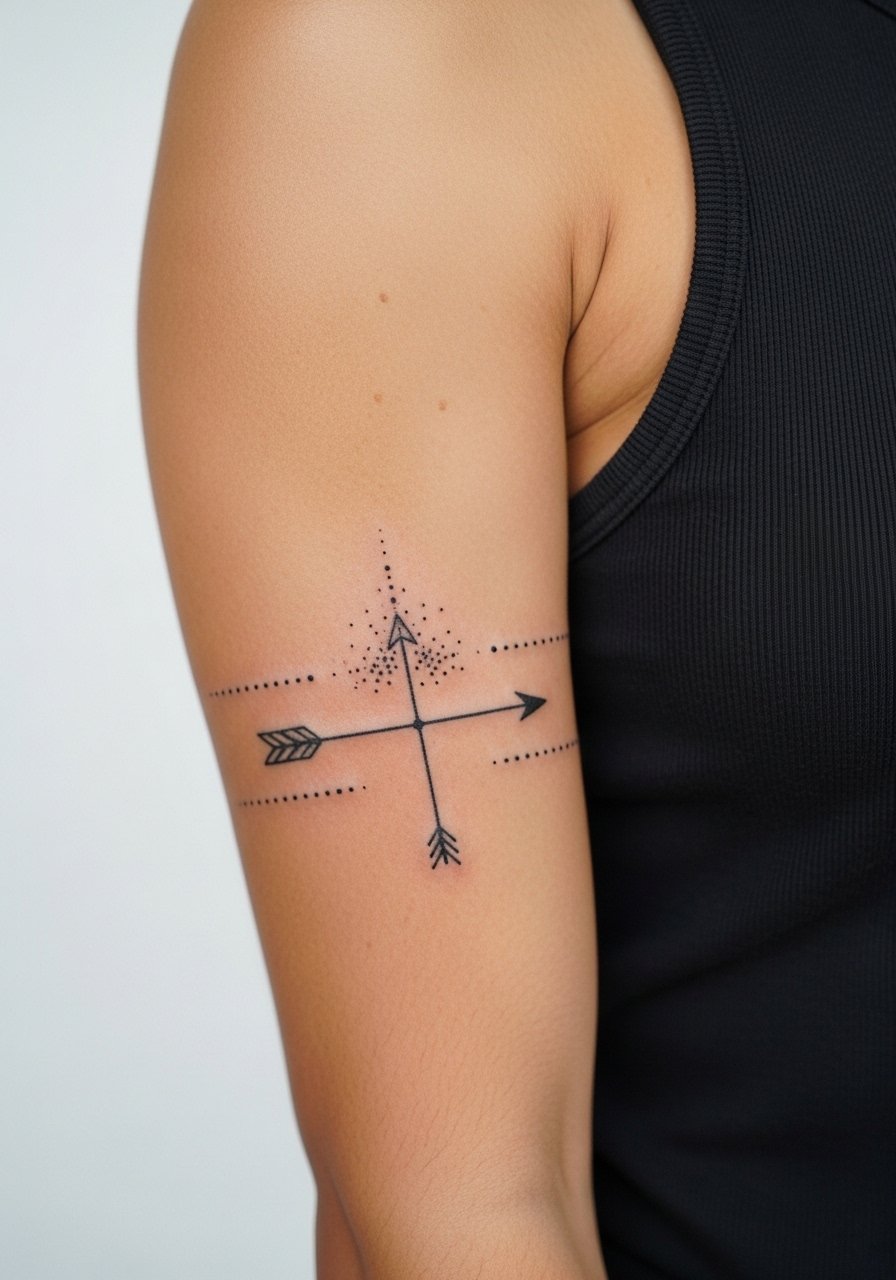
When someone wants a symbolic micro piece that stays private, arrows are fast and forgiving. Expect a 15-25 minute session and a tolerable pain level. A big rookie move is asking for too many tiny details inside the shaft. Keep it bold enough to avoid early loss of definition. If you exercise often, pick a position slightly away from the most active fold to reduce movement during healing. For post-session wear, a short sleeve button-down you can pull aside keeps the armpit from trapping sweat.
8. Fine-Line Heart with an Initial, Sentimental Minimalism
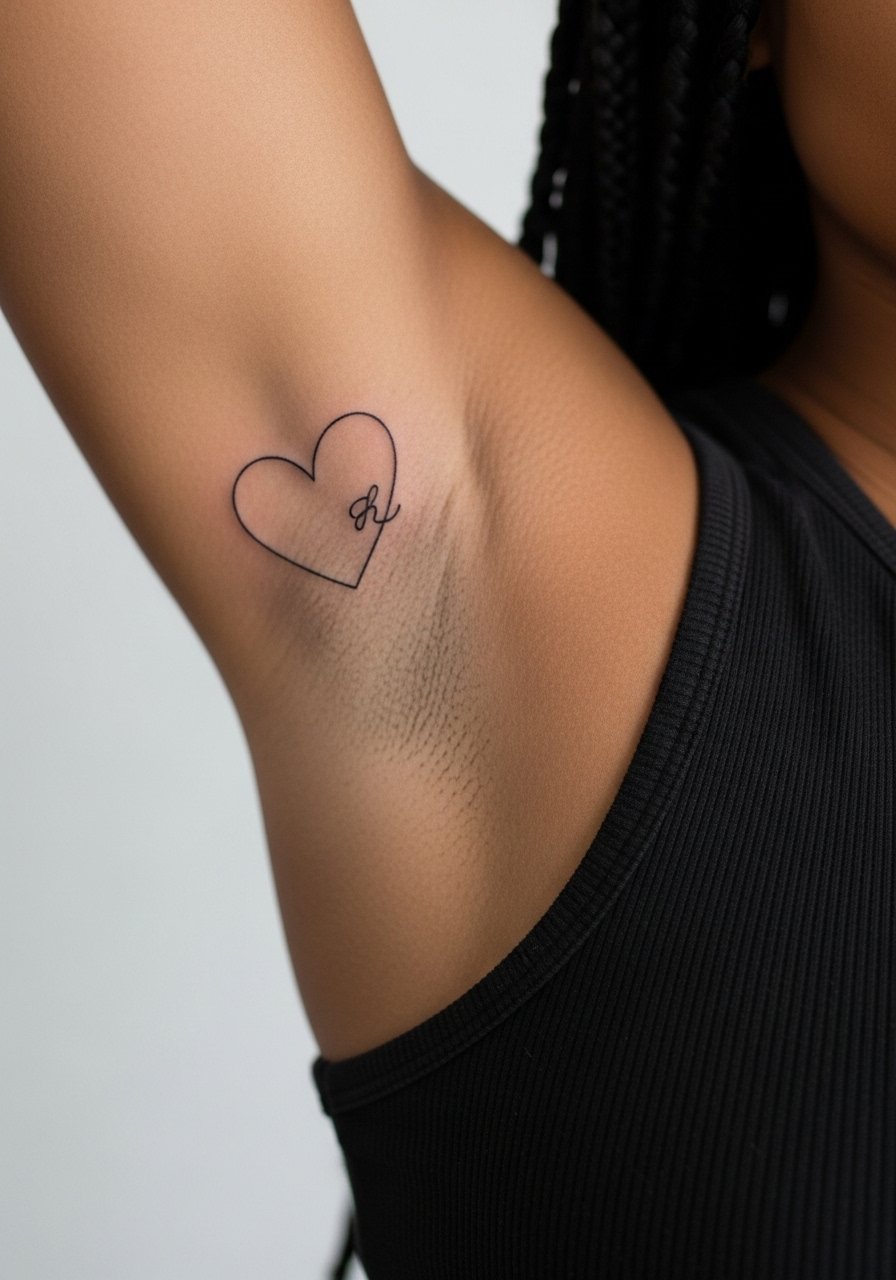
There is a clear split among artists about micro-lettering and skin tone. One camp says fine initials work fine if the artist spaces letters generously and uses blackwork depth. The other camp recommends slightly bolder scripts for darker skin tones to preserve legibility. Ask where the artist stands and request a mockup that shows how the initial will read at six months and at two years. Session time is short and pain is moderate. Pair this with a dainty cuff bracelet on the opposite arm to balance attention without crowding the bicep.
9. Roman Numeral Date Curved with the Arm
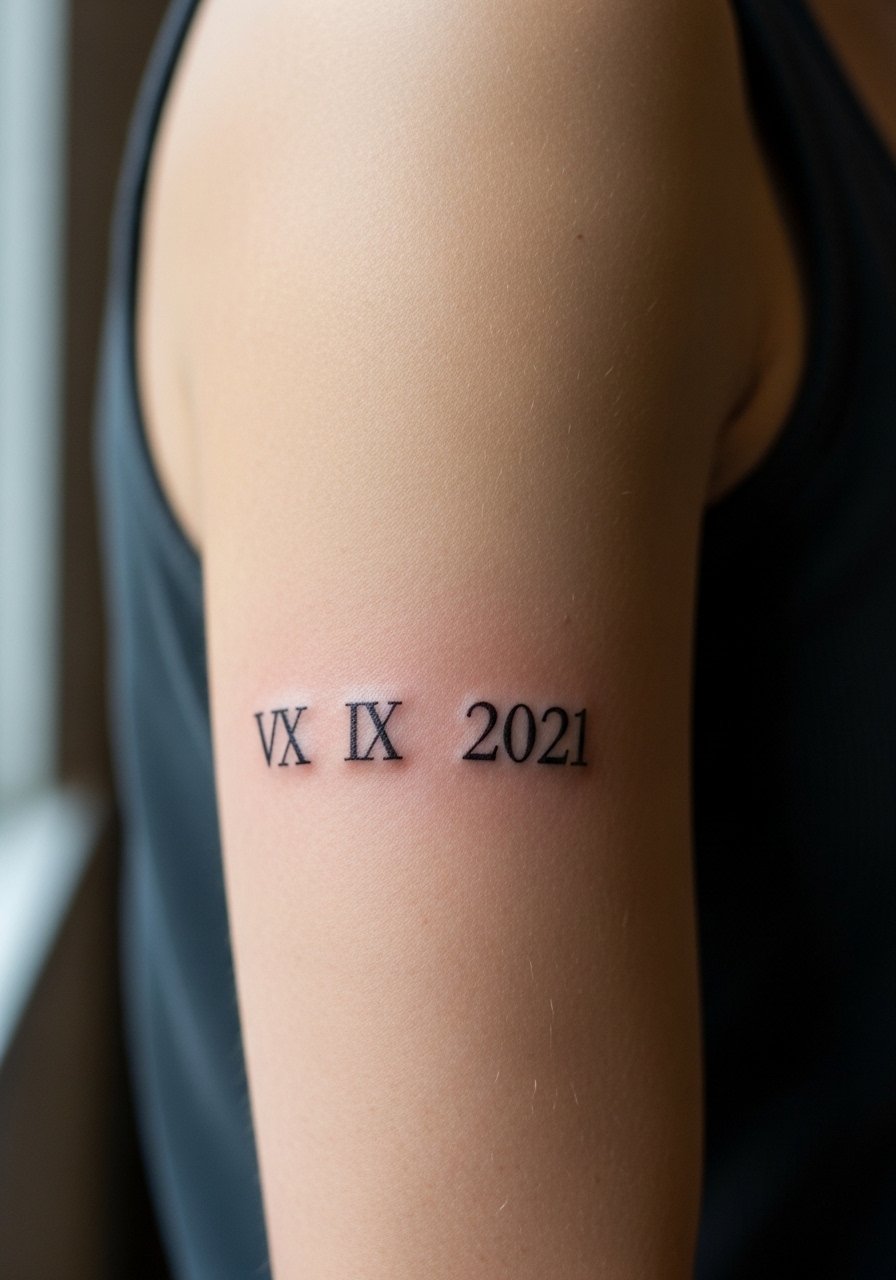
Most people underestimate how much the bicep curve alters straight text. For a clean 2-3 inch roman numeral, ask for a mild curve in the stencil so it reads horizontally when the arm is relaxed. Pain is moderate and it usually takes 30-45 minutes. A common mishap is using an ultra-thin serif that vanishes with time. Opt for slightly stronger linework and schedule a touch-up at 6-12 months if needed. Show-off tip: a thin gold chain necklace sits above the numerals without competing.
10. Delicate Wave Line, Horizontal Calm
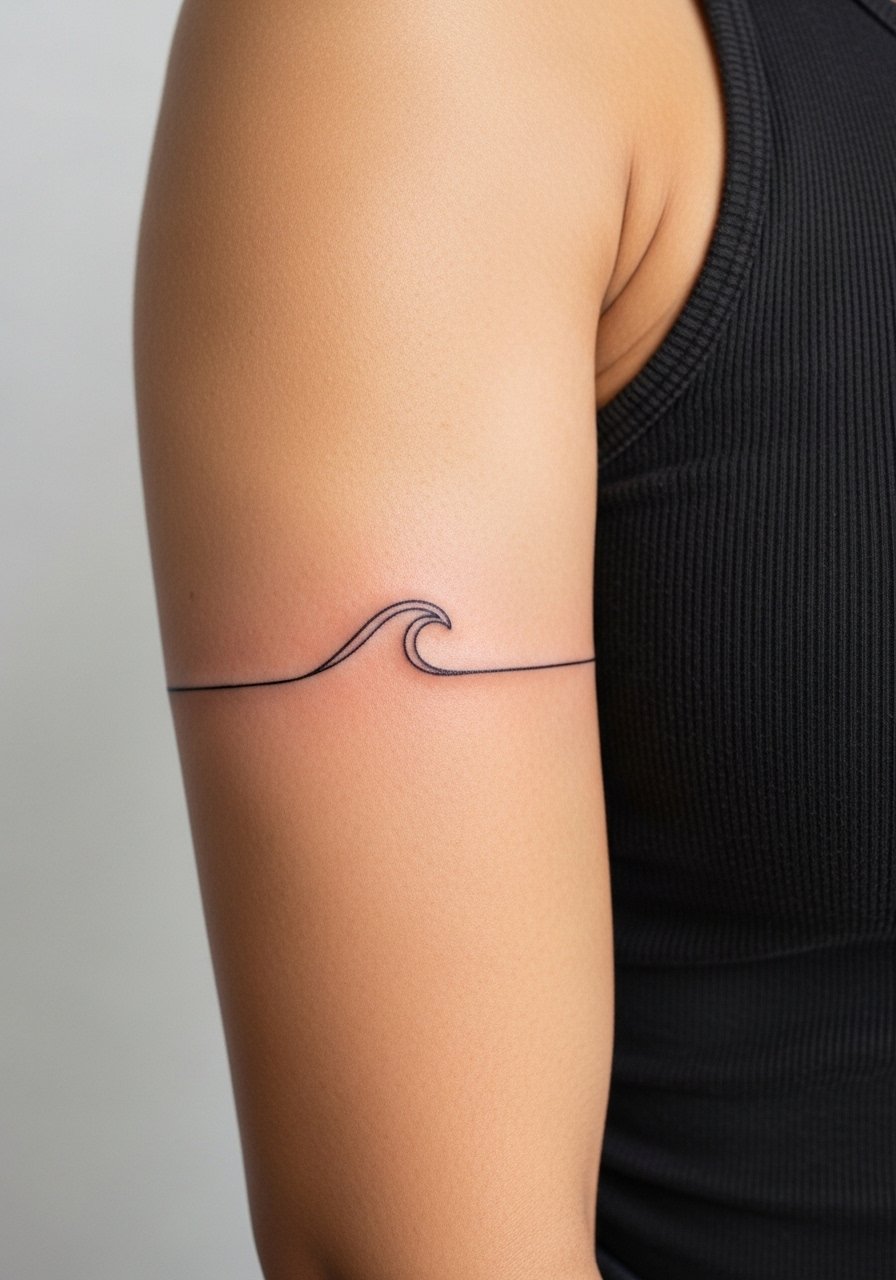
There is a practical charm to single-line abstracts. They heal predictably because they avoid dense saturation, and they handle flexing skin better when kept slightly larger than micro scale. Expect 20-30 minutes and low to moderate pain. The common mistake is making the wave too thin, which blurs. Ask for consistent linework and a little negative space around peaks so the rhythm holds at two and five years. For wardrobe, rolled sleeves or a rolled-cuff tee draws eyes to the wave without crowding the line.
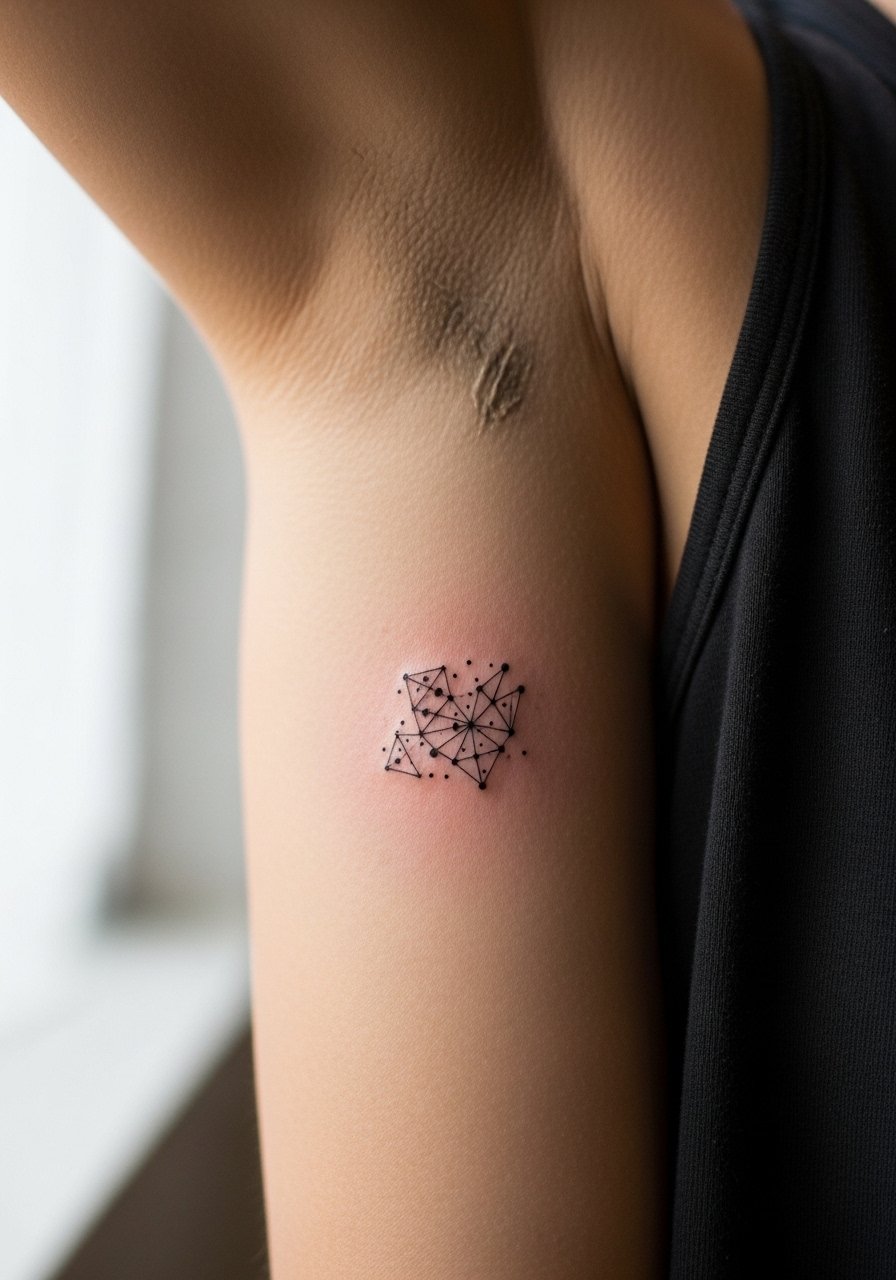
11. Small Constellation Dots arranged Like Your Sign
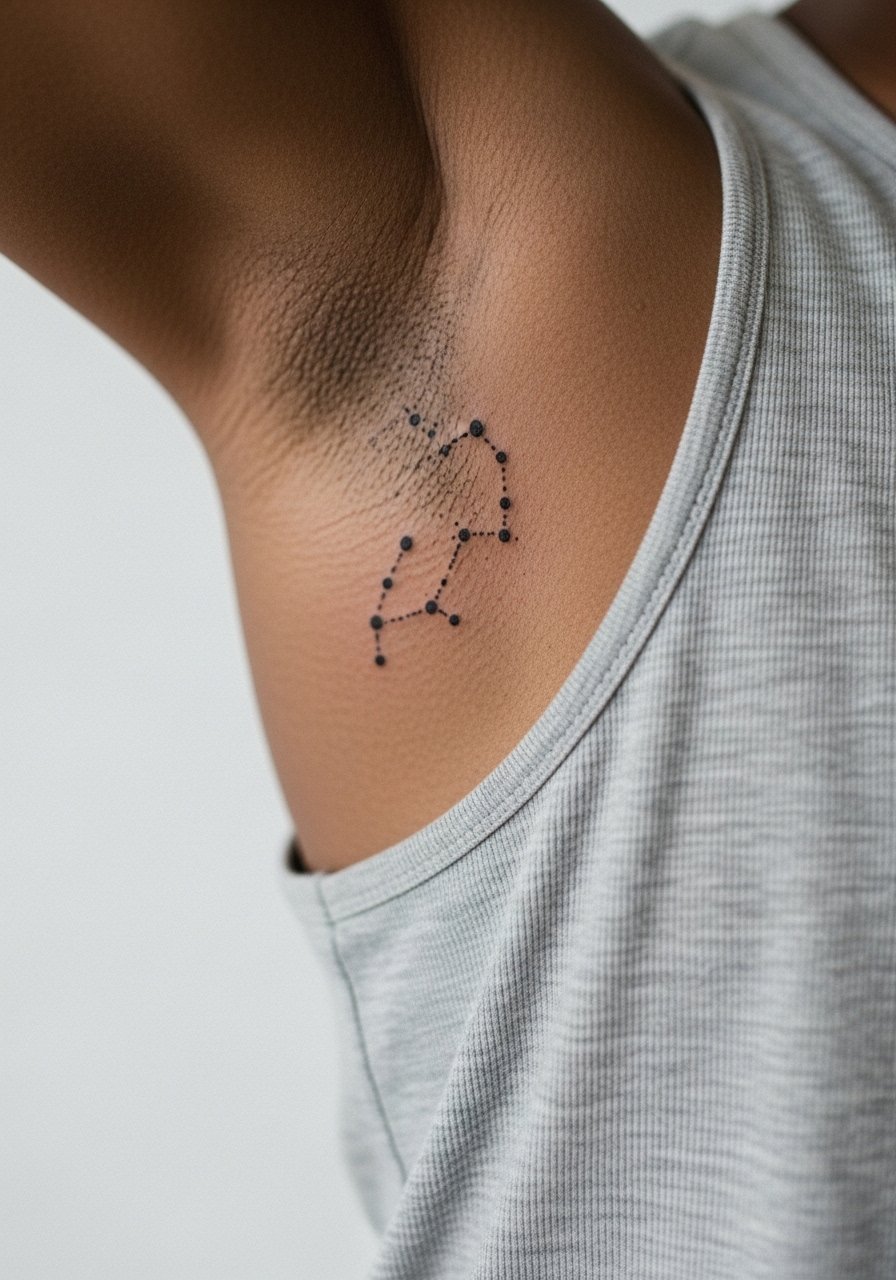
This style is forgiving if you let the dots be slightly larger than micro pinpricks. Most sessions are quick and healing is straightforward. A frequent error is requesting dense dot clusters with lines so thin they fade. Ask for dots sized to your skin tone so the constellation reads in photos and in person. If you sweat easily, place the cluster slightly away from the armpit crease to reduce friction during the first week. For showing it off, a thin chain pendant necklace keeps focus near the arm without pulling attention from the stars.
12. Thin Laurel Branch for Victory and Length
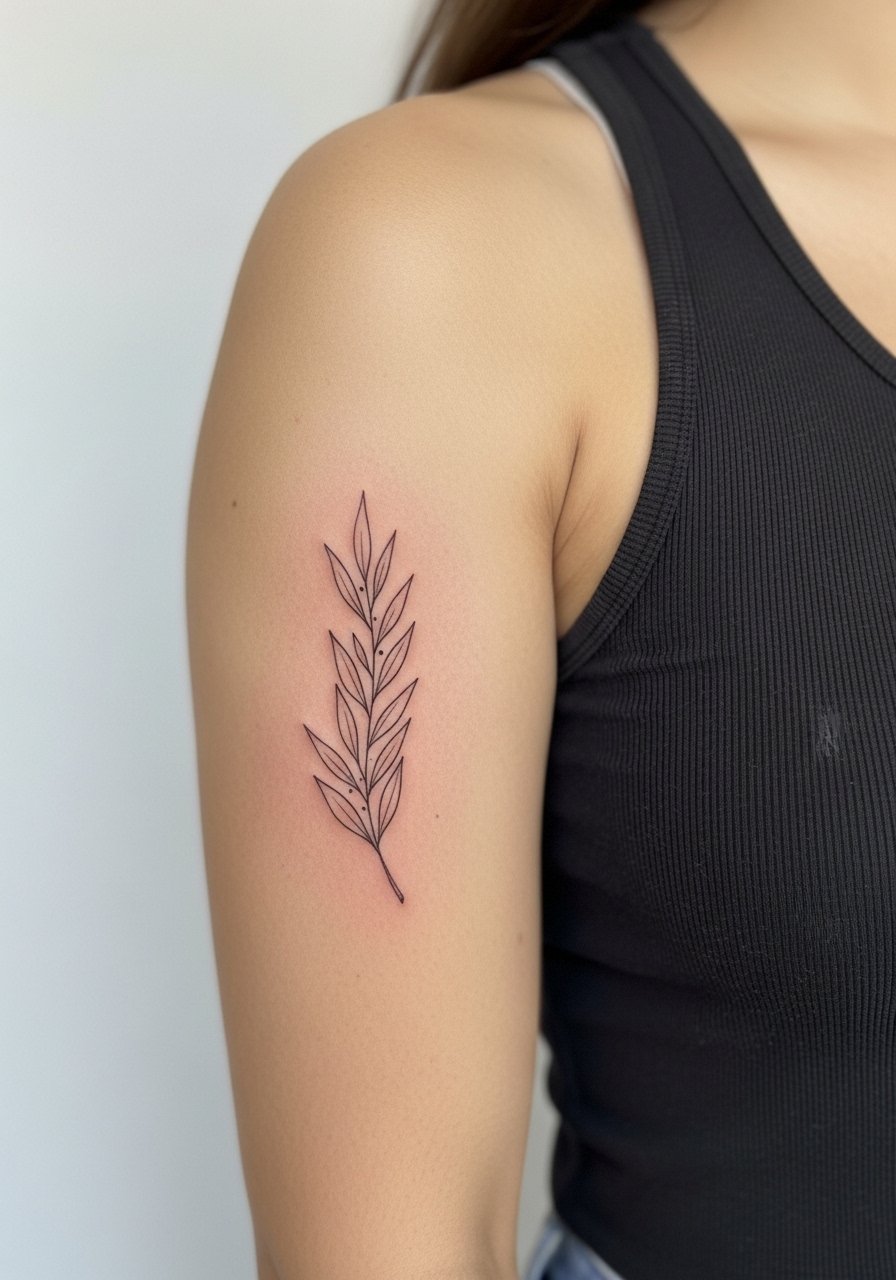
Most people pick laurel for its clean vertical motion. I tell clients to aim for a 3-inch height so leaves can breathe and the branch does not blur into a dark stripe. Sessions tend toward 45-60 minutes when leaves alternate in size. A common pitfall is too many tiny leaf veins which do not hold on moving skin. Wear a loose tank or button-up to your appointment so the artist has clear access without tight fabric rubbing the area.
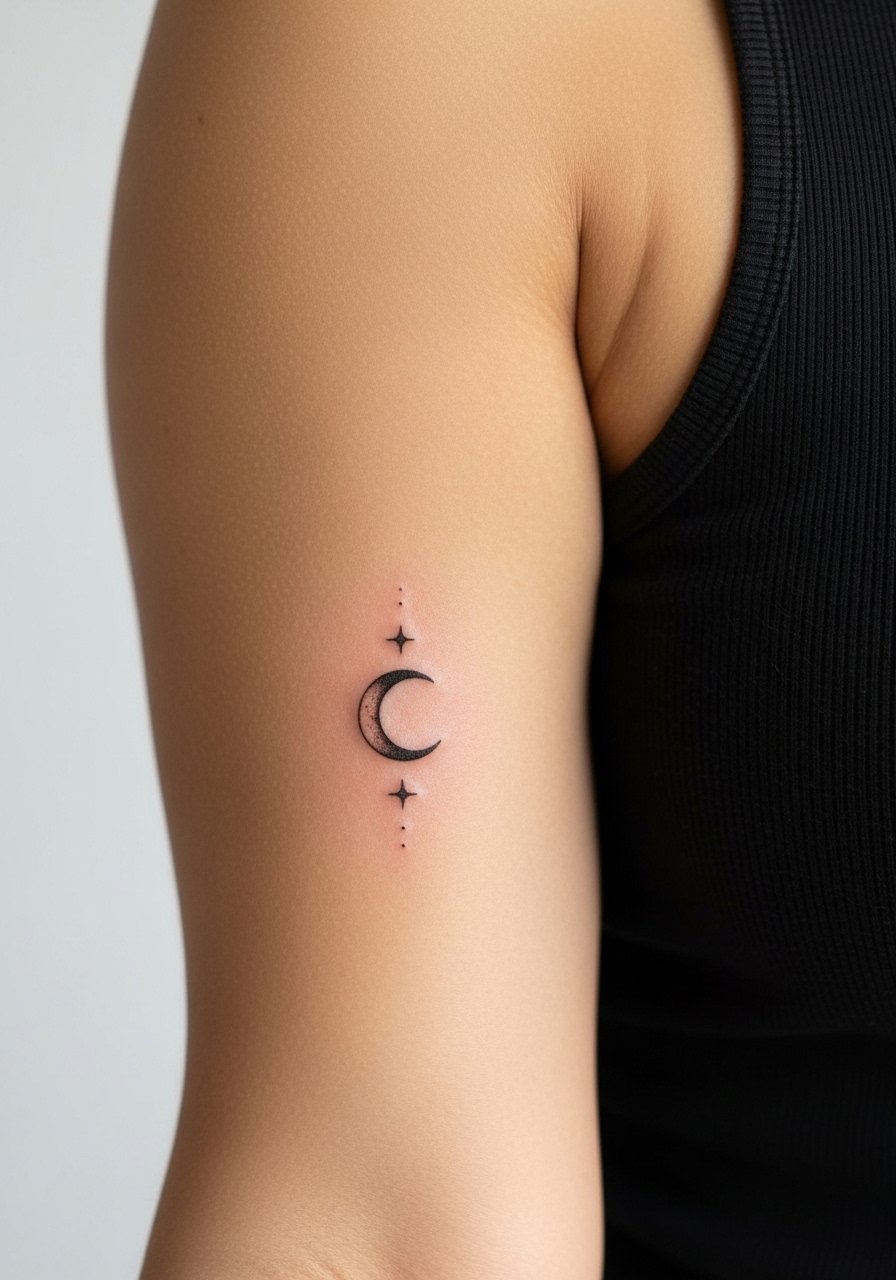
13. Single-Needle Crescent Moon with Dot Work
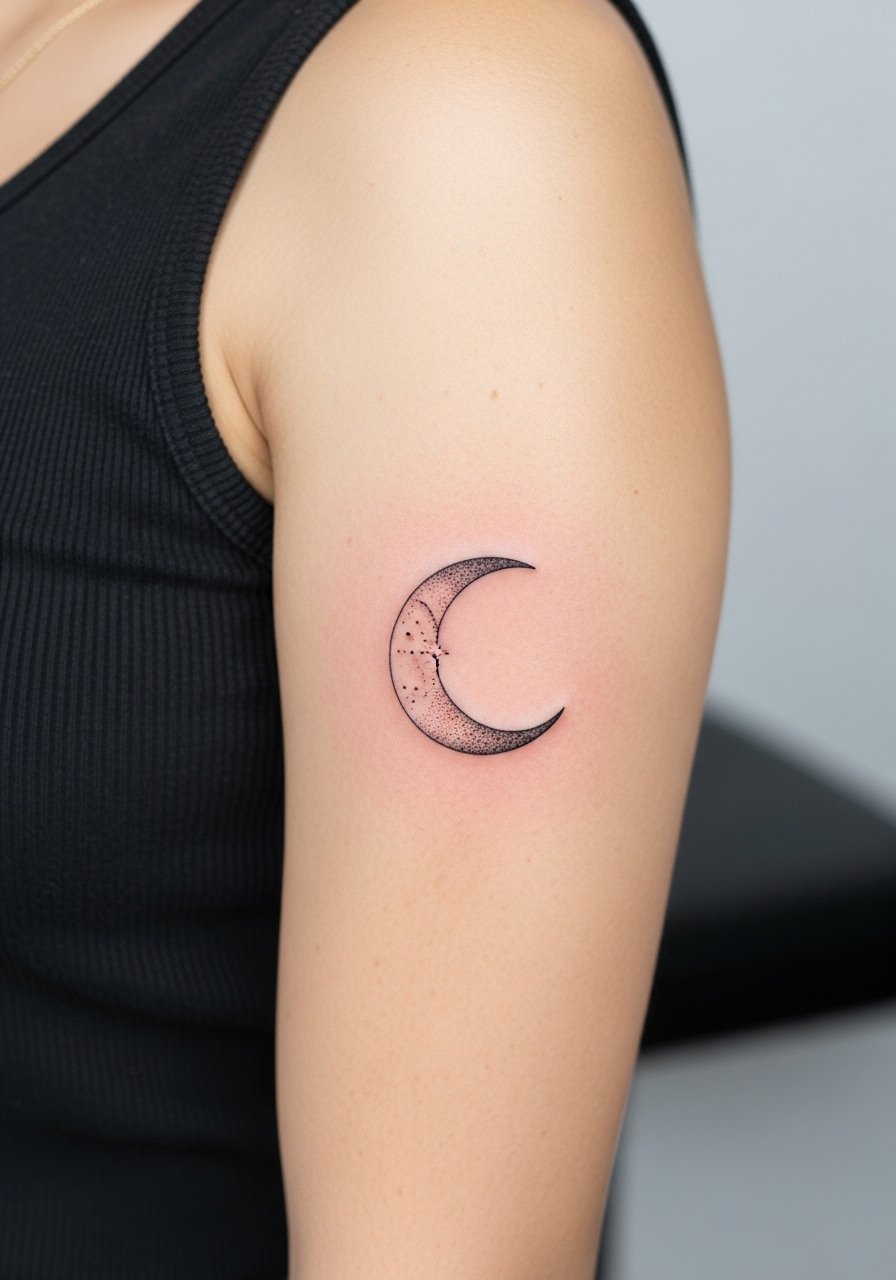
Most stipple shading looks lovely if it has room to breathe. Single-needle crescents need careful depth control to avoid blowout in the inner bicep. Sessions are often 30-50 minutes and pain is moderate. The mistake I see is asking for ultra-fine stippling in a very small area. Ask for slightly coarser dot work to keep contrast after healing. For evenings out, a sleeveless fitted tank shows the crescent without overwhelming it.
14. Micro-Realism Eye for a Watchful Detail
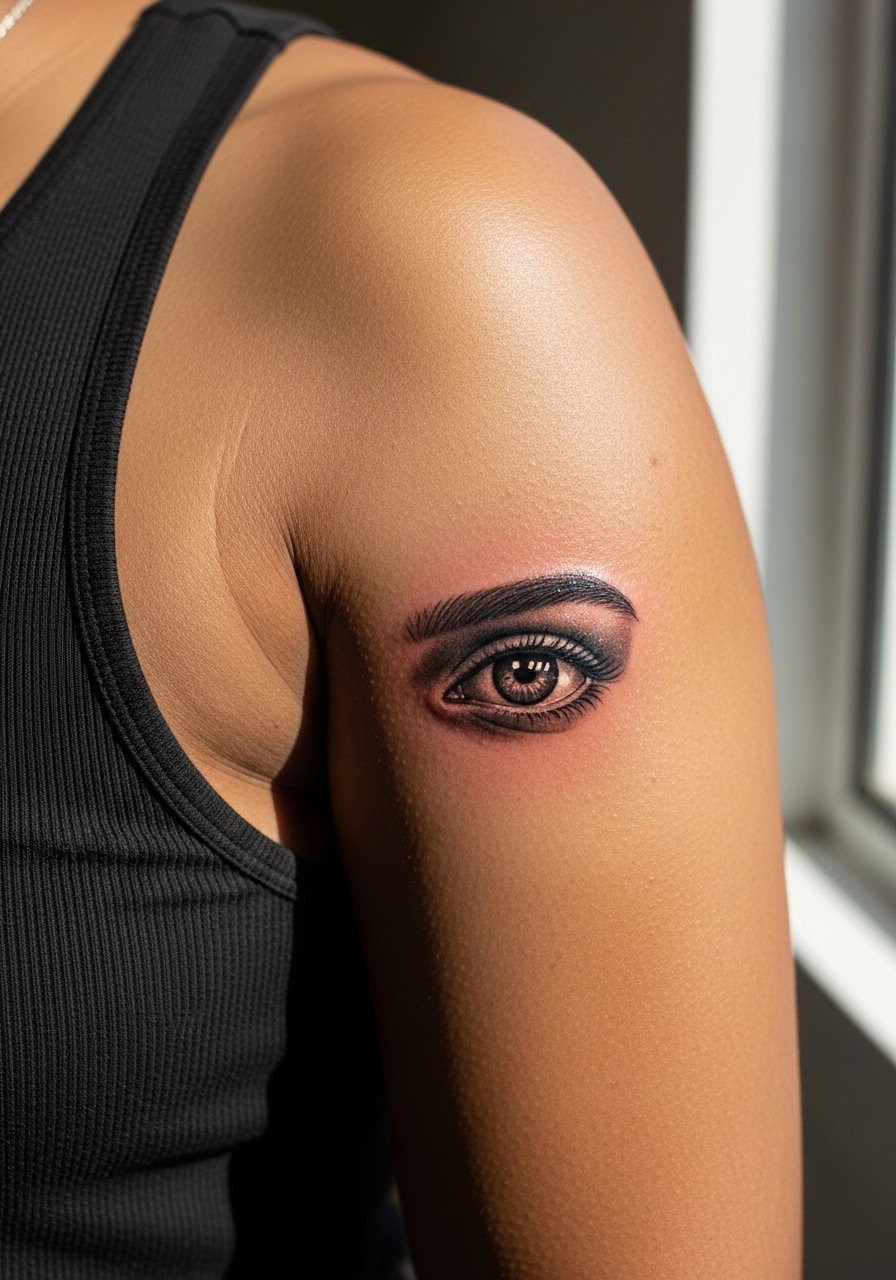
Micro-realism on the inner bicep is rare and needs a steady hand. This is one of the unique ideas often overlooked for women because it reads as subtle portraiture. Expect a longer session for shading and a higher touch-up likelihood at year two. The common error is asking for too small a pupil and losing detail during healing. During consultation bring clear close-up references and ask the artist how they handle tiny highlights and contrast. Wear a loose tank top so the artist can adjust your arm without friction.
15. Single-Line Floral Outline that Wraps Slightly
There is a visual pleasure to continuous single-line work when it follows muscle flow. Pain is moderate and sessions range from 30-60 minutes based on wrap. Avoid asking for tiny internal details inside the outline because single-line fills do not hold there. Ask for a mockup that shows how the line looks when you flex and when you relax. To wear it well, try a sleeveless tank in neutral beige or white so the wrap reads as motion rather than a print.
16. Tiny Geometric Cluster with Balanced Spacing
Most minimal geometrics fall apart if placed too close together. The fix is spacing and consistent lineweight. Expect a 20-40 minute session and a low to moderate pain level. A frequent misstep is asking for micro detailing inside each triangle. Keep the cluster open to retain contrast at two and five years. For casual wear, a rolled-cuff cotton tee frames the cluster without overshadowing it.
17. Stippled Dot Mandala Slice on the Inner Arm
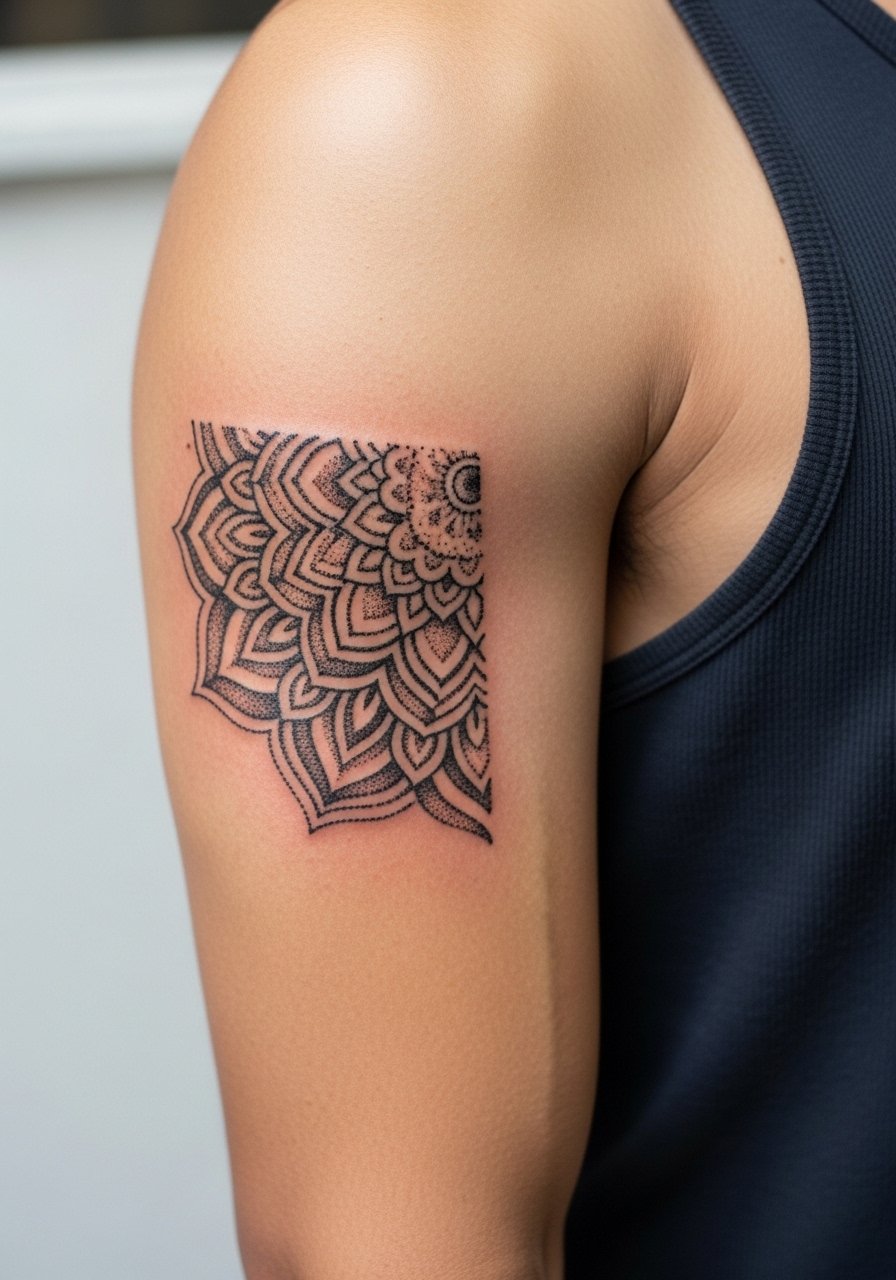
This variant borrows mandala geometry but in a sliced form to fit the inner bicep. Expect longer sessions for stipple shading and moderate pain with careful needle depth. Artists disagree on tiny mandala density here. One camp favors open spacing to avoid merging, the other thinks tight patterns can hold with expert depth control. Ask your artist which approach they use and request a healed mockup photo if they have one. For clothing, a short sleeve button-down you can roll frames the arm elegantly.
18. Minimalist Arrow and Date Combo for Directional Memory
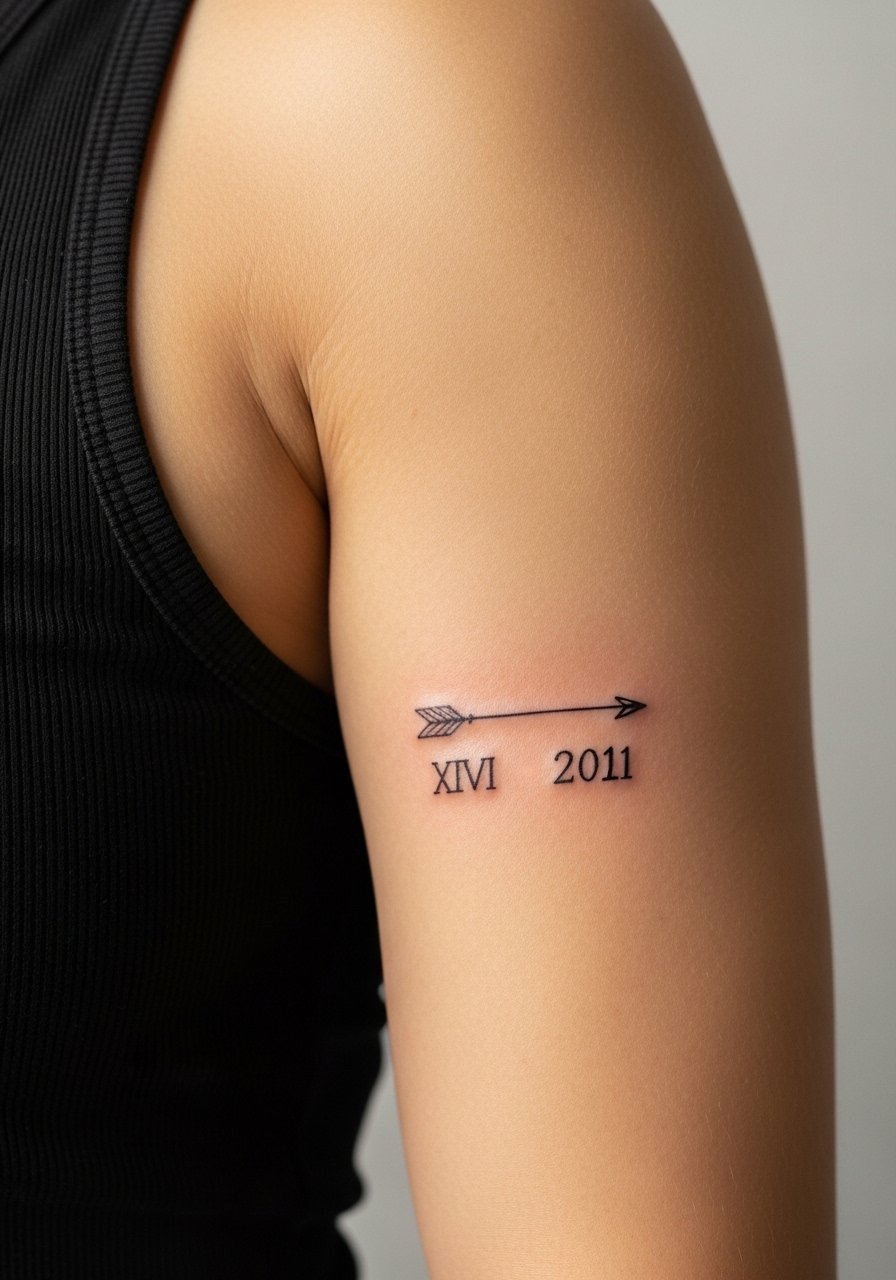
Combining a micro arrow with a small date gives meaning while staying compact. The session is quick, but alignment matters. Ask your artist to space the elements vertically so flexing does not pull numerals toward the arrow. A common mistake is stacking them too close which results in blurring between elements. For the appointment, wear a loose tank or button-down for access and minimal armpit sweat.
19. Vertical Script Single Word for a Strong Statement
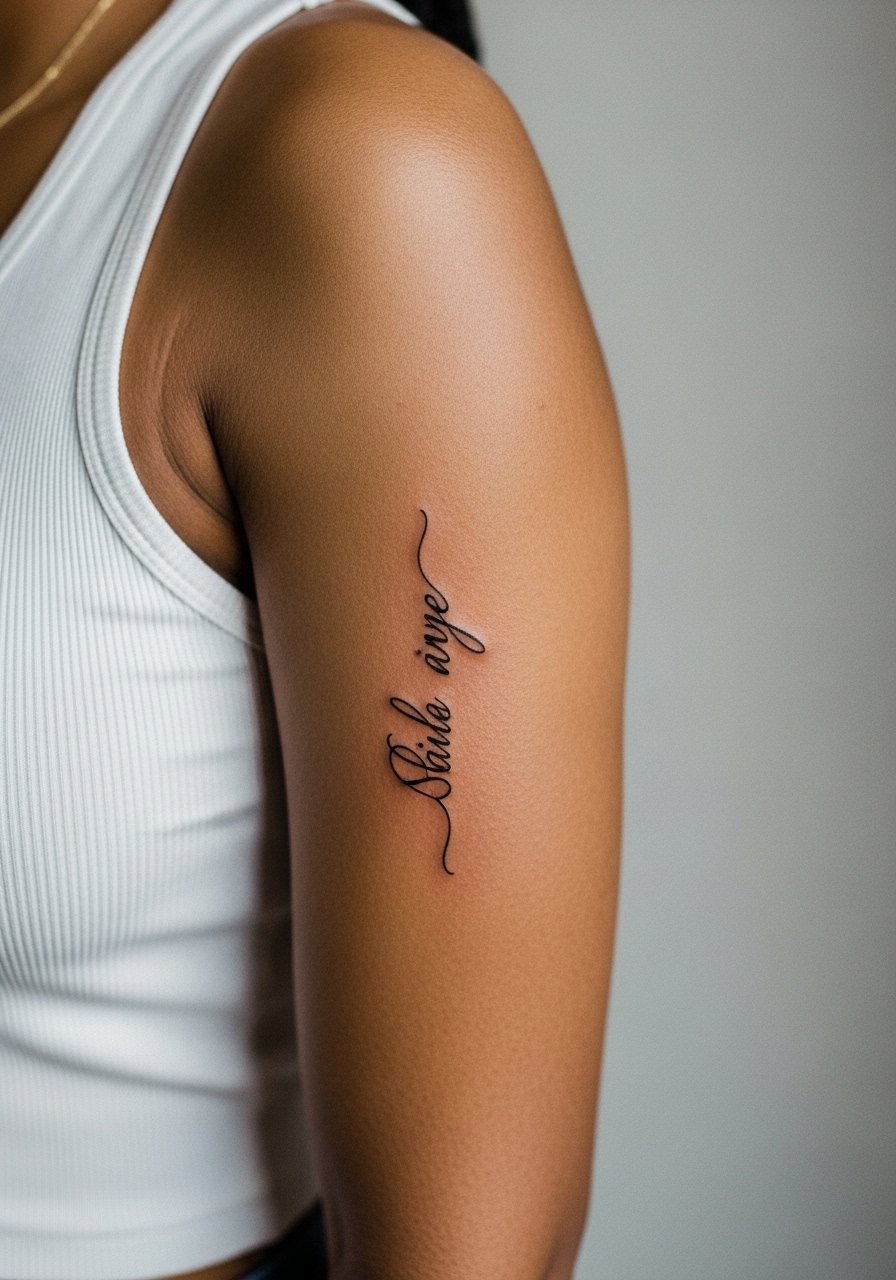
A single vertical word reads like a quiet banner when placed correctly. Pain is moderate and sessions often under an hour. The number one mistake is asking for ultra-thin cursive that becomes illegible on moving skin. Request slightly more spacing and a visible baseline so letters do not collapse together over time. To show it off consider a thin gold chain necklace that complements vertical lines without crowding.
20. Tiny Botanical Cluster with Negative Space

I've noticed clusters with intended negative space keep looking fresher. Aim for slightly larger leaves than you think and ask the artist to leave skin gaps between elements. Session time is usually short and pain is mild to moderate. Avoid asking for shaded veins in each leaf at small scale. For casual wear, rolled sleeves or a sleeveless fitted tank helps the cluster read as a motif rather than a smudge.
21. Crescent and Stars in a Vertical Stack
Visual impact lead works here since vertical stacks read like a column of intention. Expect a short session and moderate discomfort. The common error is making stars too small, which can vanish in a year. Ask for slightly larger stars and gentle spacing below the crescent. To wear it, a racerback tank frames the stack without distraction.
22. Minimal Botanical Ring that Wraps the Inner Arm
There is a procedural note here. Rings can migrate into folds if placed too close to the armpit. Ask your artist to position the wrap a little higher or lower than the crease. Sessions can be longer because of contouring and pain is moderate. The mistake is a full encirclement that sits over a high-flex area. For show-off styling, a dainty cuff bracelet on the opposite arm balances the look.
23. Minimal Key Outline, Tiny and Private
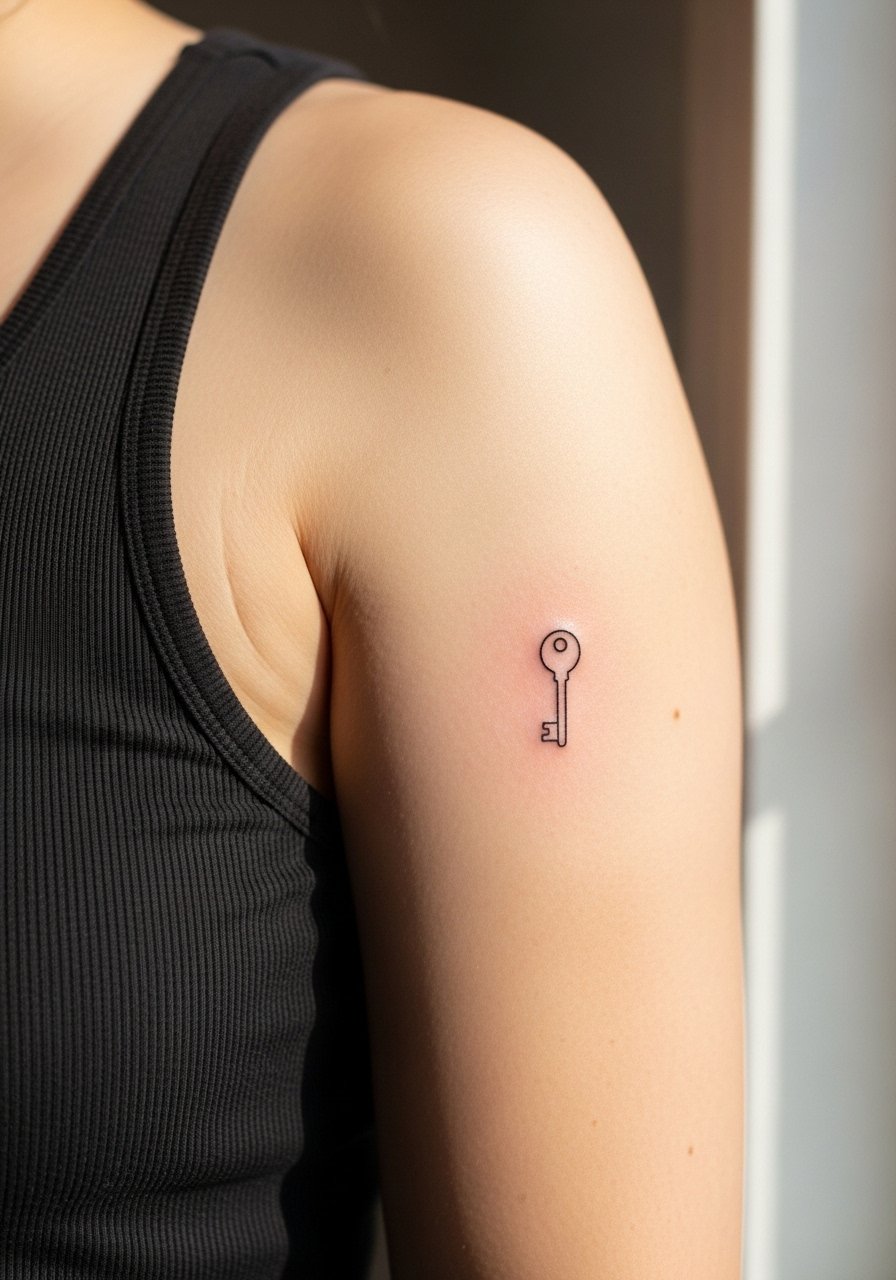
A tiny key is quick and discrete and usually heals well if not placed in the deepest fold. Consultation lead applies: bring references and ask the artist to scale the bow and shaft for longevity. Sessions are short and pain is moderate. People often ask for ornate key teeth that blur; keep it simple. For appointment day, a short sleeve button-down you can slide aside helps.
24. Tiny Botanical Sprig Behind a Small Script
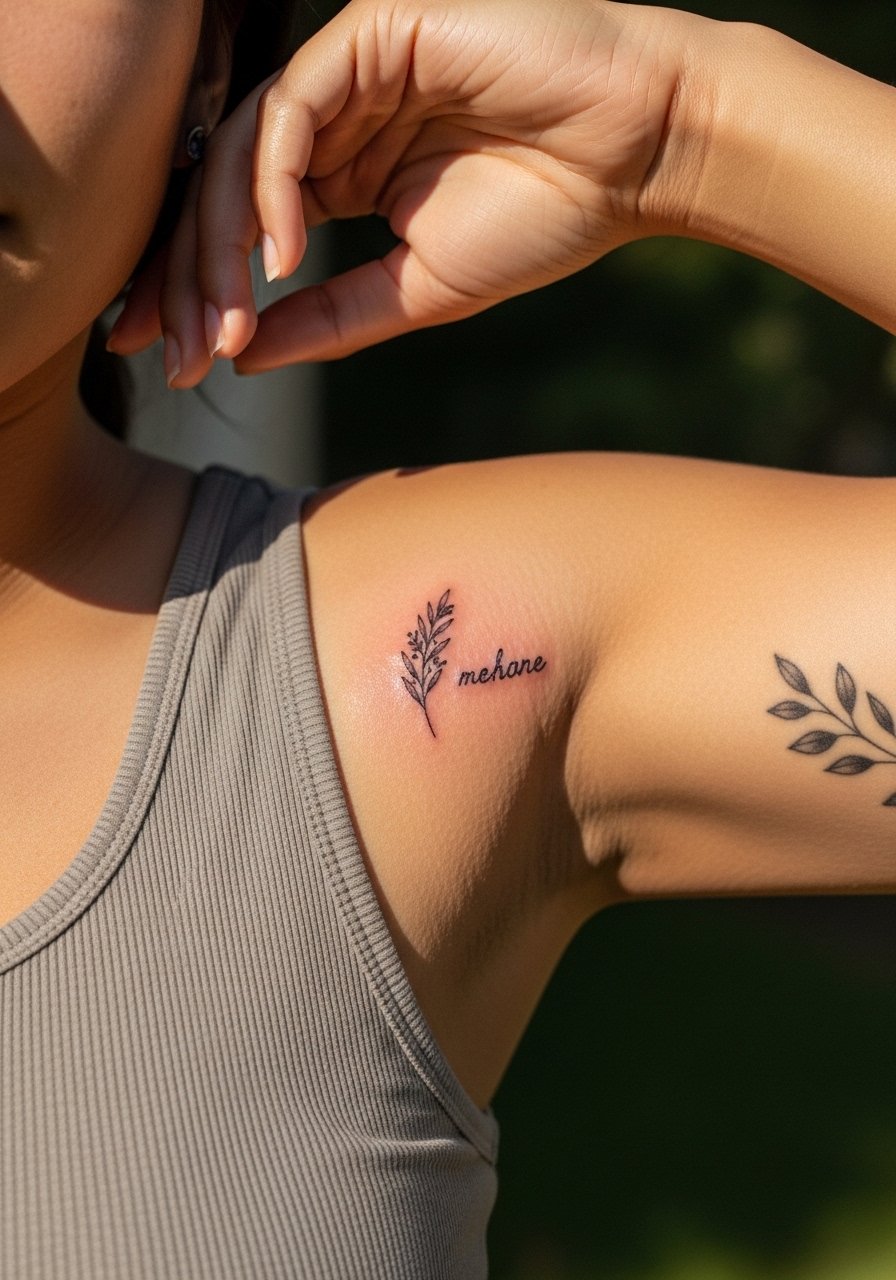
Mistake lead: the worst version stacks elements so tight the sprig and word merge as a gray mark. Leave at least a quarter inch between them and ask for defined negative space. Session time is moderate and pain manageable. For showing this pair, a thin chain pendant necklace can sit above the script while leaving the sprig visible.
25. Micro Compass Needle for Travel Memory
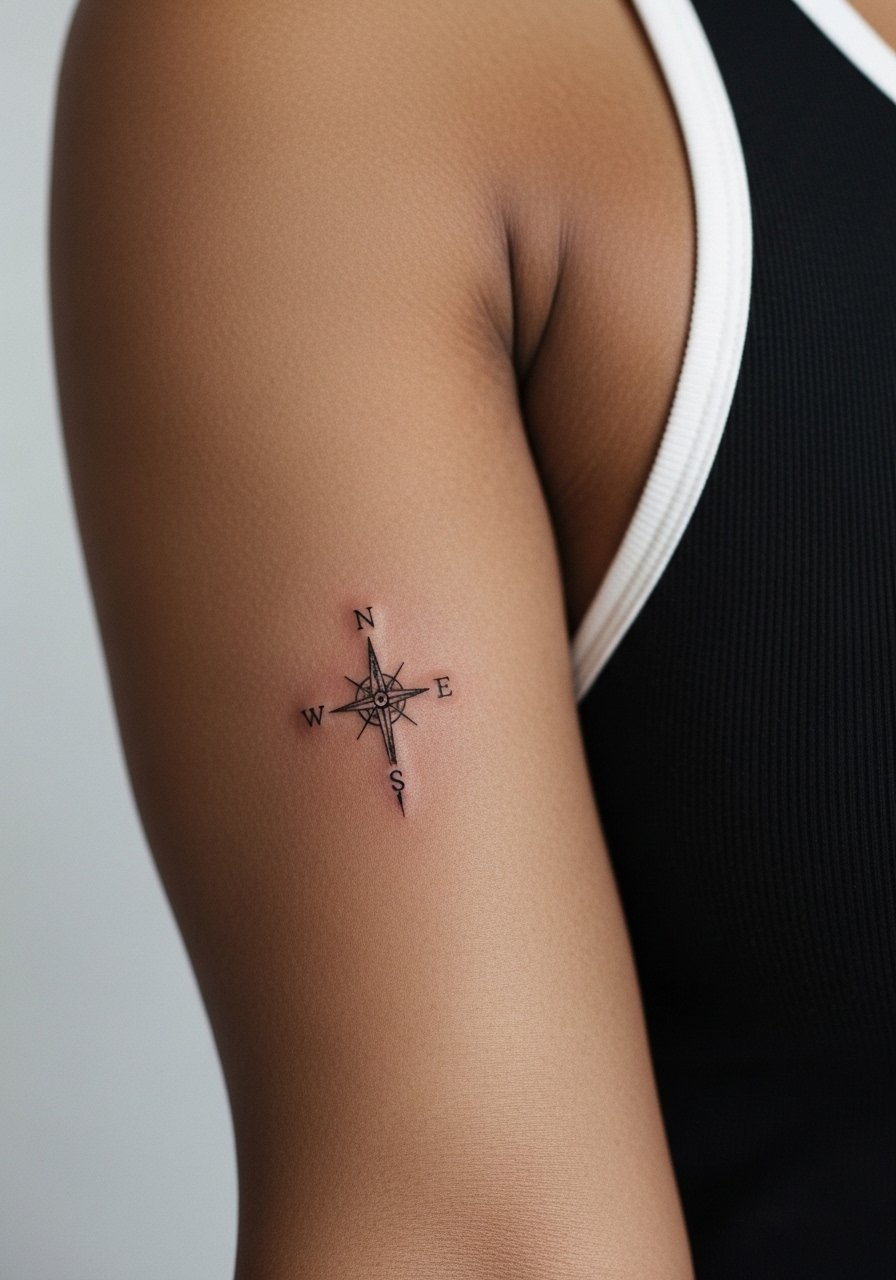
This is one of the under-covered ideas for women who travel and want a subtle symbol. The session is brief and accuracy matters more than shading. A common error is adding tiny decorative flourishes that disappear. Ask for clear direction points and a slightly bolder needle. For an effortless look pair with a dainty cuff bracelet instead of chunky jewelry so the compass remains the focal point.
26. Tiny Knot Symbol for Commitment or Memory
I've noticed knot symbols age well when lines have slight weight. If you want a symbol that reads at arm movement, keep the loops open and avoid micro twists. Session time is short and discomfort moderate. The mistake is overworking the center with tiny crosshatching. Wear a rolled-cuff cotton tee for casual days so the knot peeks when you cuff the sleeves.
27. Vertical Minimal Mountain Range, Small and Bold
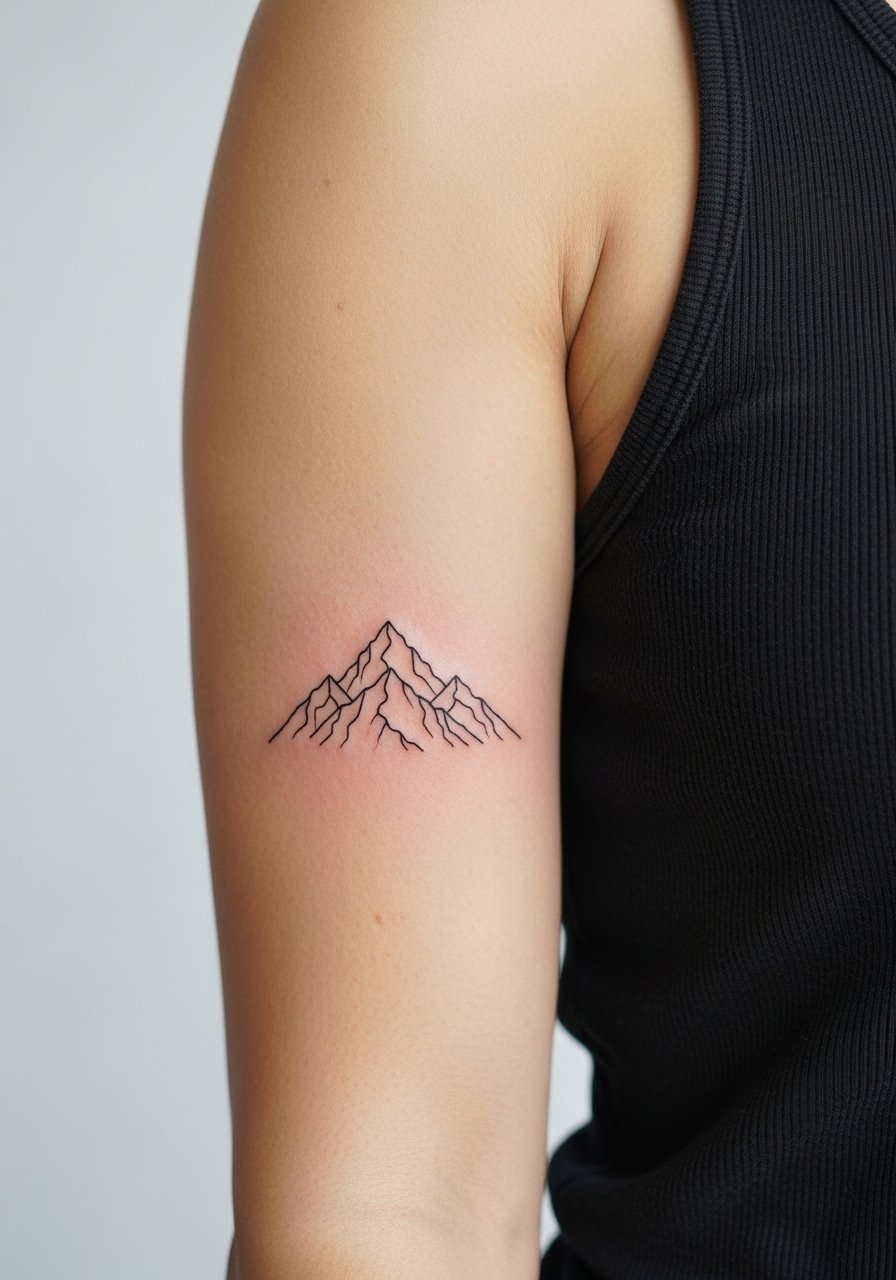
Consultation lead: show examples of spacing between peaks so they do not merge after healing. This 1.5-2.5 inch composition takes 30-45 minutes and tolerable pain. The common mistake is making peaks too tight and too thin, which creates a blurred skyline after two years. For display pair the range with a sleeveless fitted tank so the silhouette reads cleanly.
Frequently Asked Questions
Q: Will fine line inner bicep tattoos blur faster than bolder work and what are both camps saying?
A: Artists are split. One group says fine line is worth the look and accepts touch-ups at year two to keep details sharp. The other group recommends slightly bolder lineweight for inner arm work because skin flex can soften hairlines over time. My advice is to ask the artist which approach they use, view healed photos in their portfolio, and plan for a touch-up if you pick hairline script.
Q: How should I dress for an inner bicep session to limit sweat and rubbing?
A: Wear a loose tank or an open button-down you can pull aside so the artist has clear access while the rest of your armpit stays covered. A breathable fabric reduces sweat and chafing during the first few hours. I often recommend a loose button-down shirt you can easily adjust.
Q: Does dark skin affect fine line visibility on the inner bicep and what adjustments help?
A: Darker skin can make ultra-fine lines read lighter in photos, and fine lines may need slightly stronger lineweight or bolder blackwork elements to hold contrast. Ask for bold black outlines or small dot accents to increase longevity, and request healed photos from the artist on similar skin tones before booking.
Q: How bad does the inner bicep hurt compared with other arm placements and what to expect during a 30-minute session?
A: Pain is typically low to moderate. The inner bicep is softer than the outer arm but still has a thin skin feel that registers more than a forearm. In a 30-minute session expect concentrated stings on detailed passes but manageable discomfort with breaks. Numbing creams used properly can help if you have low pain tolerance.
Q: If I plan to gain or lose weight, which of these designs will distort the least?
A: Micro and vertical designs that avoid crossing major folds distort less. Tiny symbols like arrows, moons, and small geometrics shift less than long continuous vines. If you expect body changes, choose smaller motifs or vertical stacks placed away from the thickest part of the bicep.
