
Fine line trends flood feeds, but the micro patch work approach flips that script by treating tiny, resolved motifs as building blocks. Instead of one large image, you get a compact gallery that reads like a personal pinboard. Micro patch work can stay readable in small sizes if you plan spacing, line weight, and placement carefully. Below are 21 specific micro patch work ideas with what to ask your artist, how each design ages, and simple wardrobe notes to help you show the piece off.
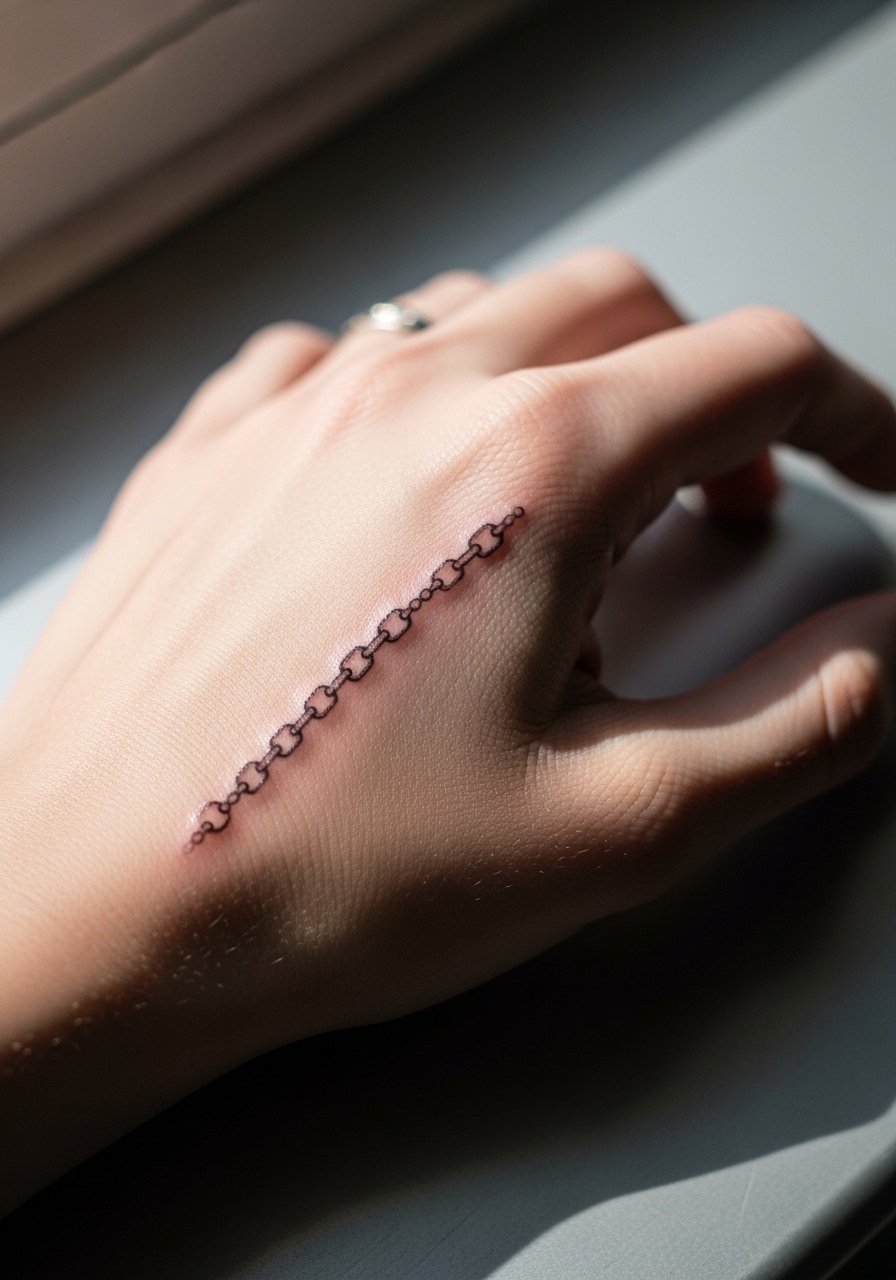
1. Constellation Wrist Cluster
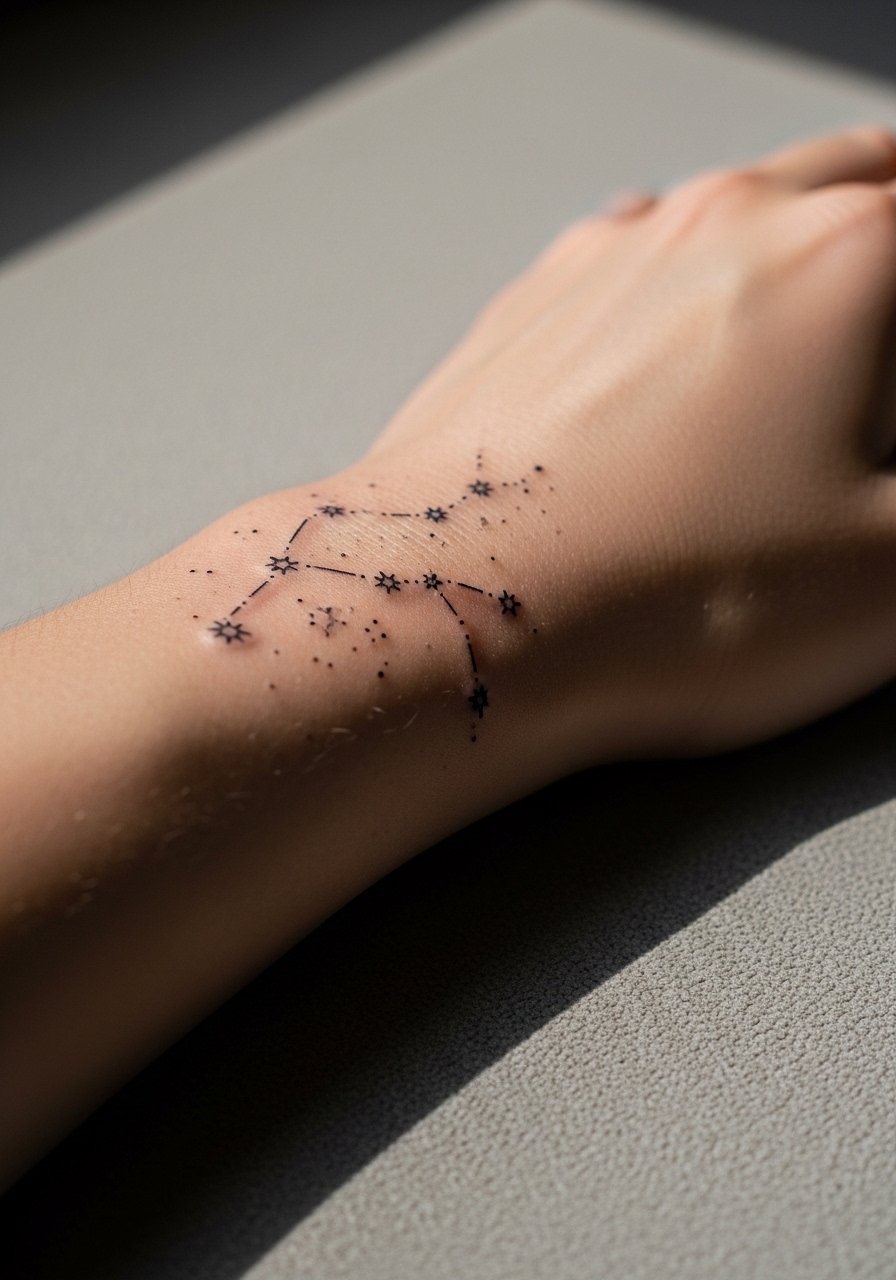
A compact band of tiny stars, mini constellations, and a single crescent makes a neat wrist patchwork. Tell your artist to space the dots so the stars do not merge over time and ask for slightly heavier connecting dots where permanence matters. Expect the wrist to show softening at year two in dense dot clusters, so plan negative space between patches. Session time is usually short, but the wrist is noise-prone from washing and friction. For showing it off try a thin chain bracelet that sits just above the cluster and avoids rubbing the ink.
2. Tiny Floral Collarbone Array
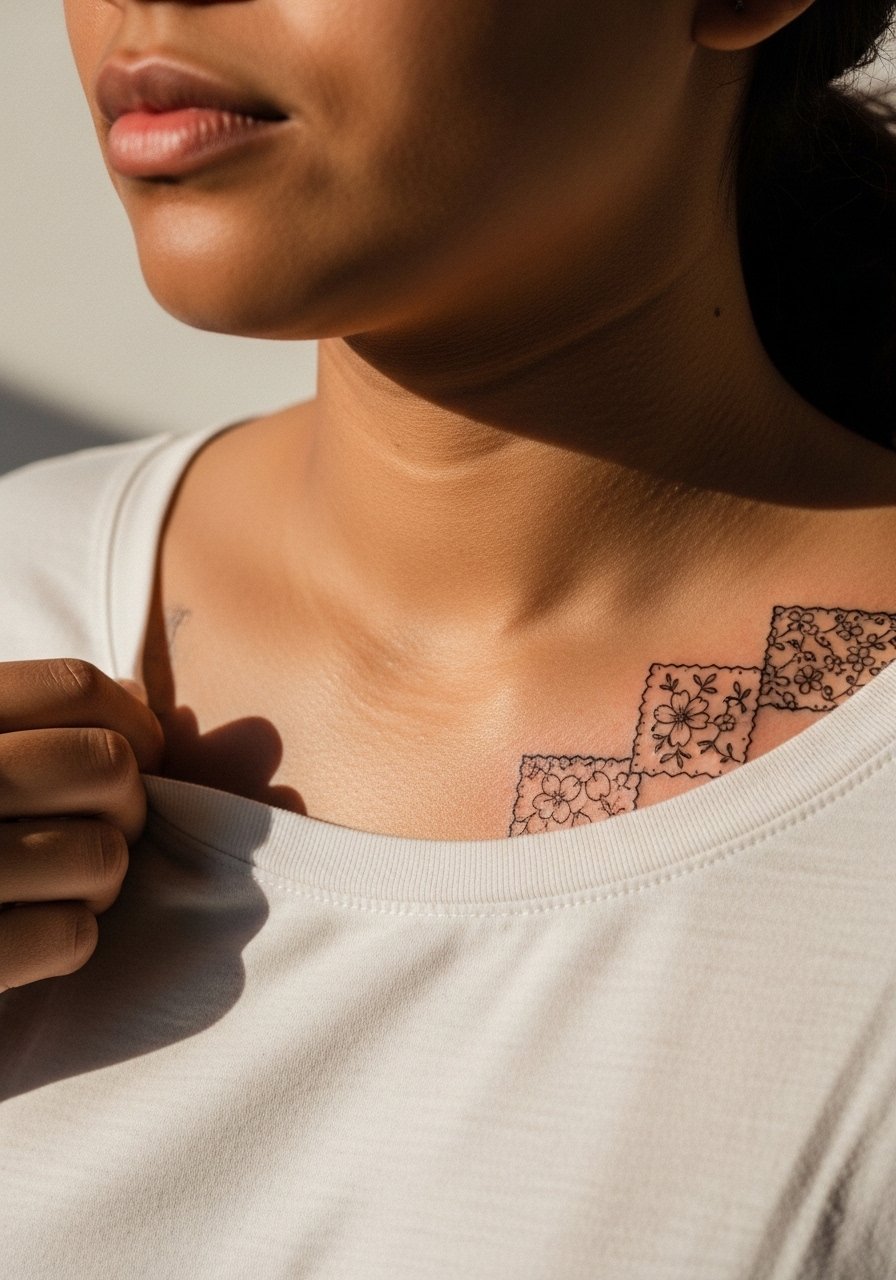
Small roses, sprigs, and buds arranged like embroidered patches across the collarbone read feminine and modern. During consultation request open spacing and slightly bolder stems so thin petals do not fill in as they age. The upper chest tolerates detail well but moves with breathing, so plan for a touch-up at year three if you want crisp petals. Session discomfort is low to moderate. Wear a wide-neck blouse on show days to frame the pieces without covering them.
3. Miniature Botanical Inner Forearm Strip
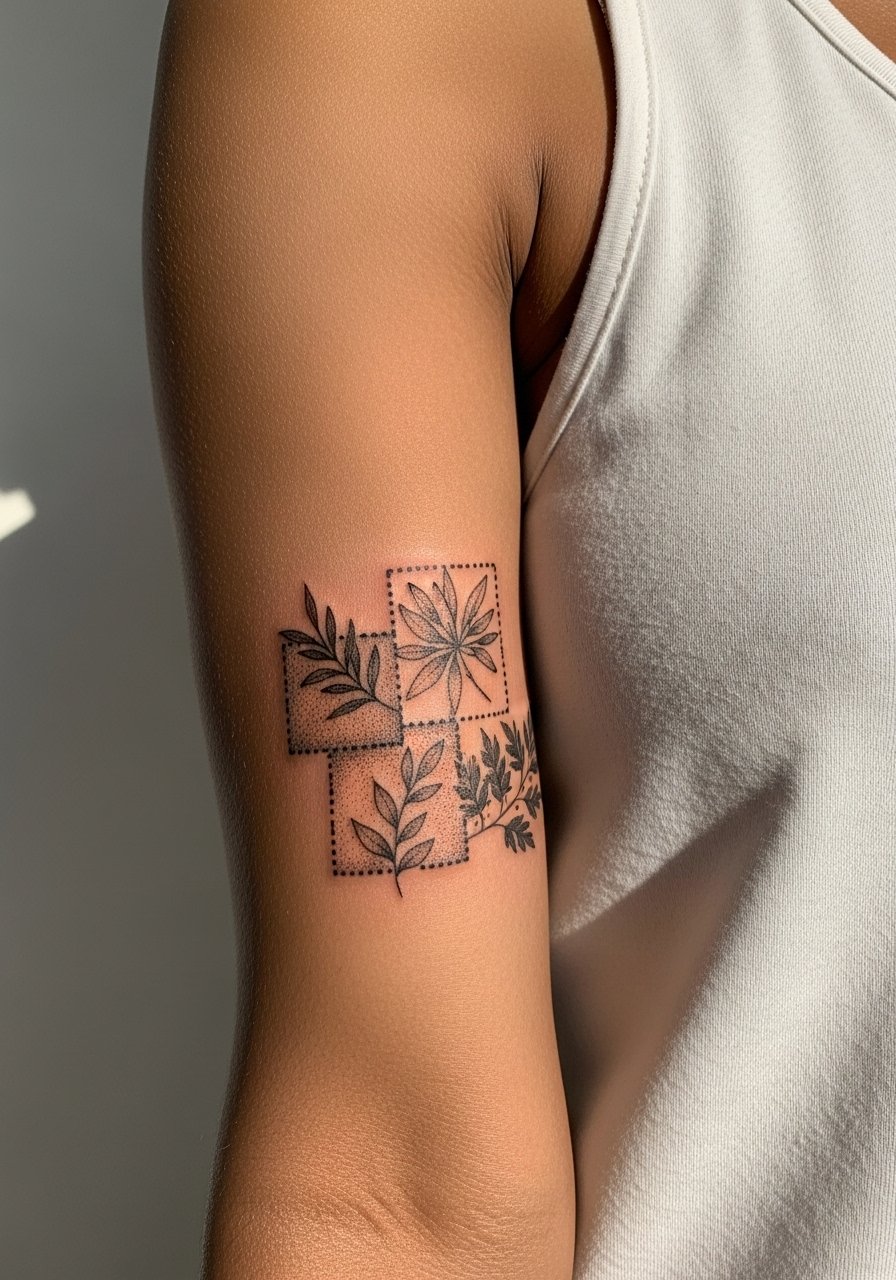
A row of tiny ferns, seed pods, and leaves arranged like tiles fits the inner forearm perfectly. Say during booking that you want stipple shading for texture rather than solid grey wash, and ask for slightly thicker main stems. The inner forearm usually keeps linework well, but dense dot work in small areas can look soft after a few years, so leave breathing room between motifs. Sessions are comfortable for most people. Pair this with a rolled sleeve linen shirt to keep the tattoo visible without exposing too much skin.
4. Micro Geometric Patch Grid on Upper Arm
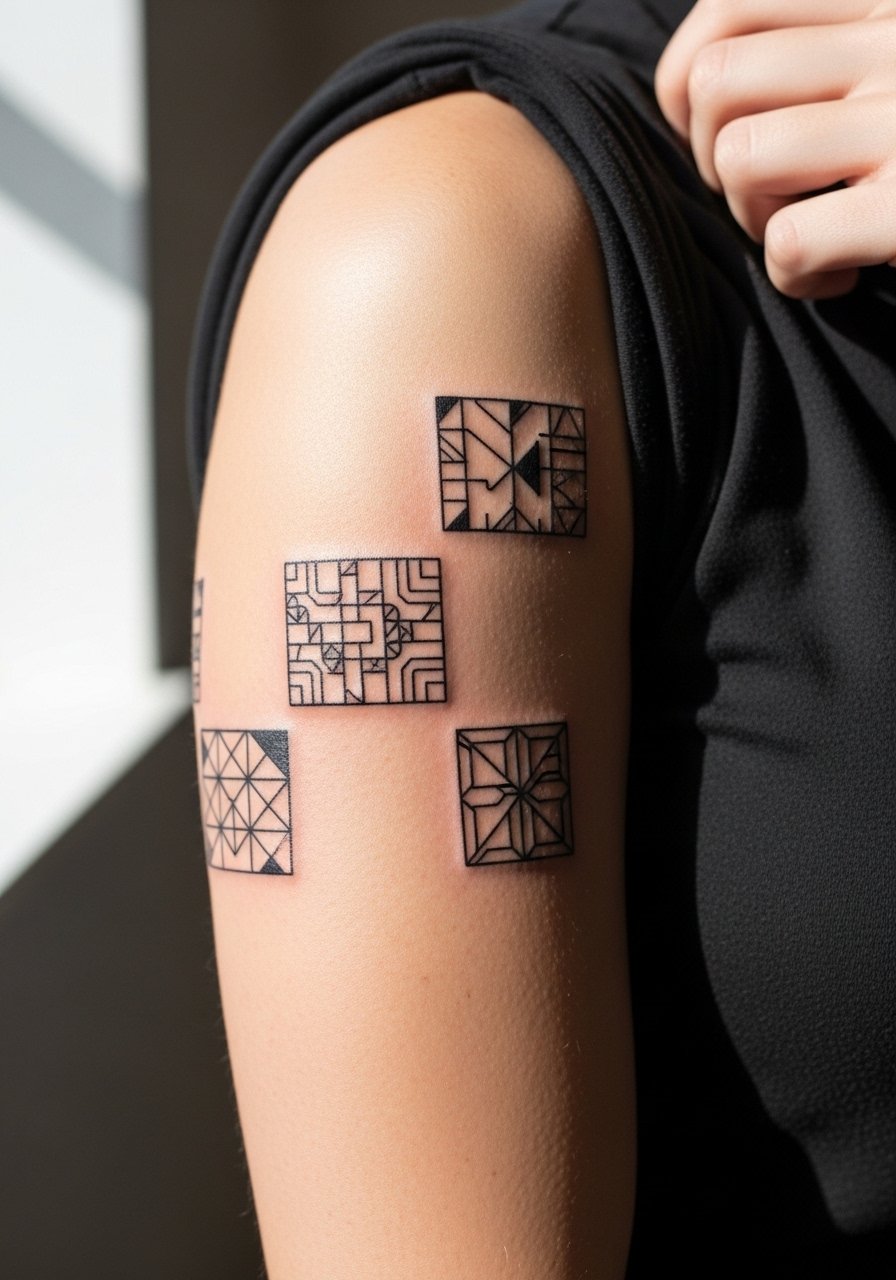
Small geometric patches, each with a different fill pattern, look like little badges across the upper arm. Ask for consistent line weight across the grid and request one slightly larger anchor patch so the composition does not read uniform from a distance. Upper arm skin holds saturation well, so these age nicely with minimal touch-ups. Session time depends on count of patches. For evenings out try a short-sleeve wrap top that frames the collection.
5. Petite Insect Cabinet on the Calf
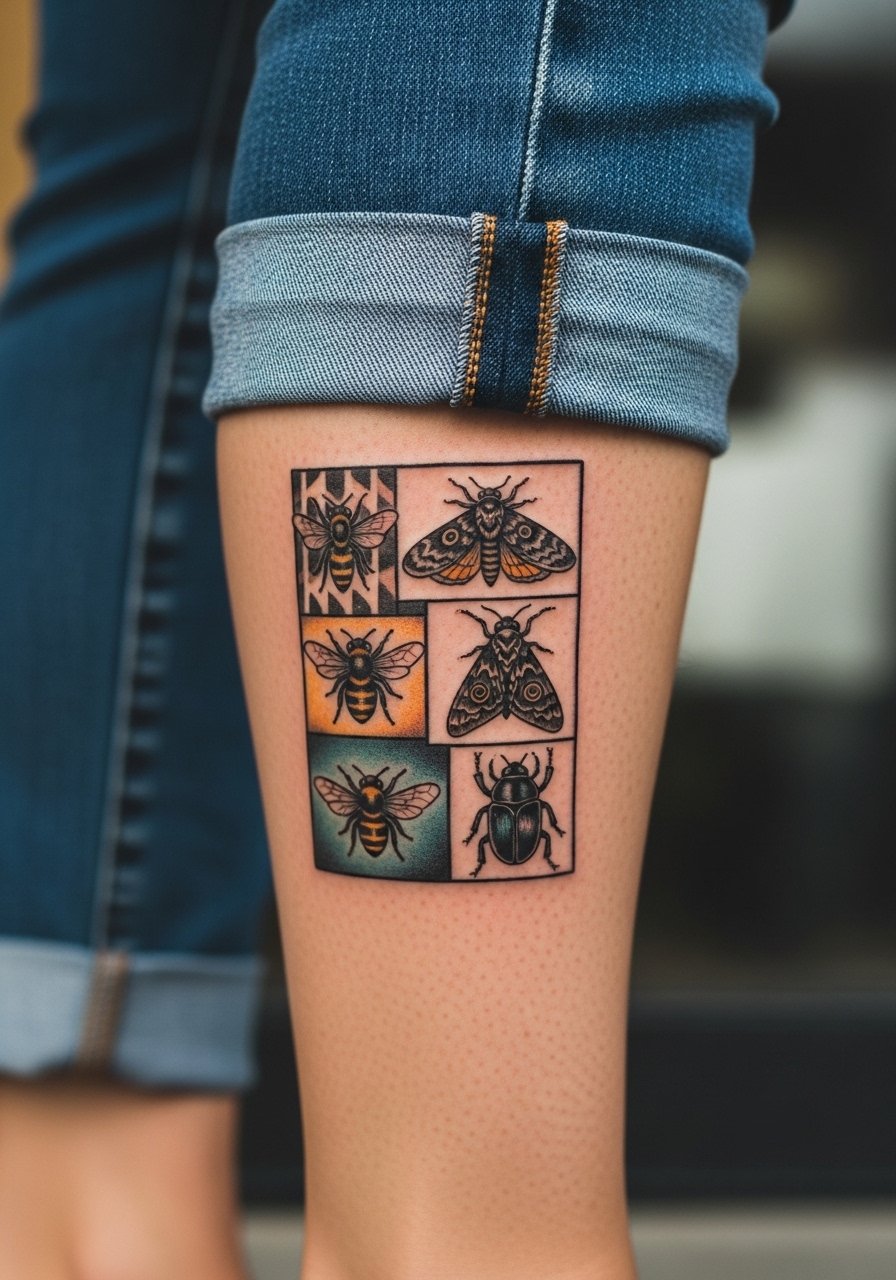
Life-sized tiny insects grouped like specimens make a timeless patchwork. Tell your artist whether you want anatomical detail or graphic silhouettes. Calf skin is forgiving for color and texture, but tiny antennae and legs are the parts that blur first. A common mistake is insisting on extreme micro detail for antennae that will not hold, so simplify those elements. Sessions are moderate in length. Wear rolled jeans during show-off moments to reveal the gallery without scuffing it.
6. Vintage Flash Micro Medallions Across the Shoulder
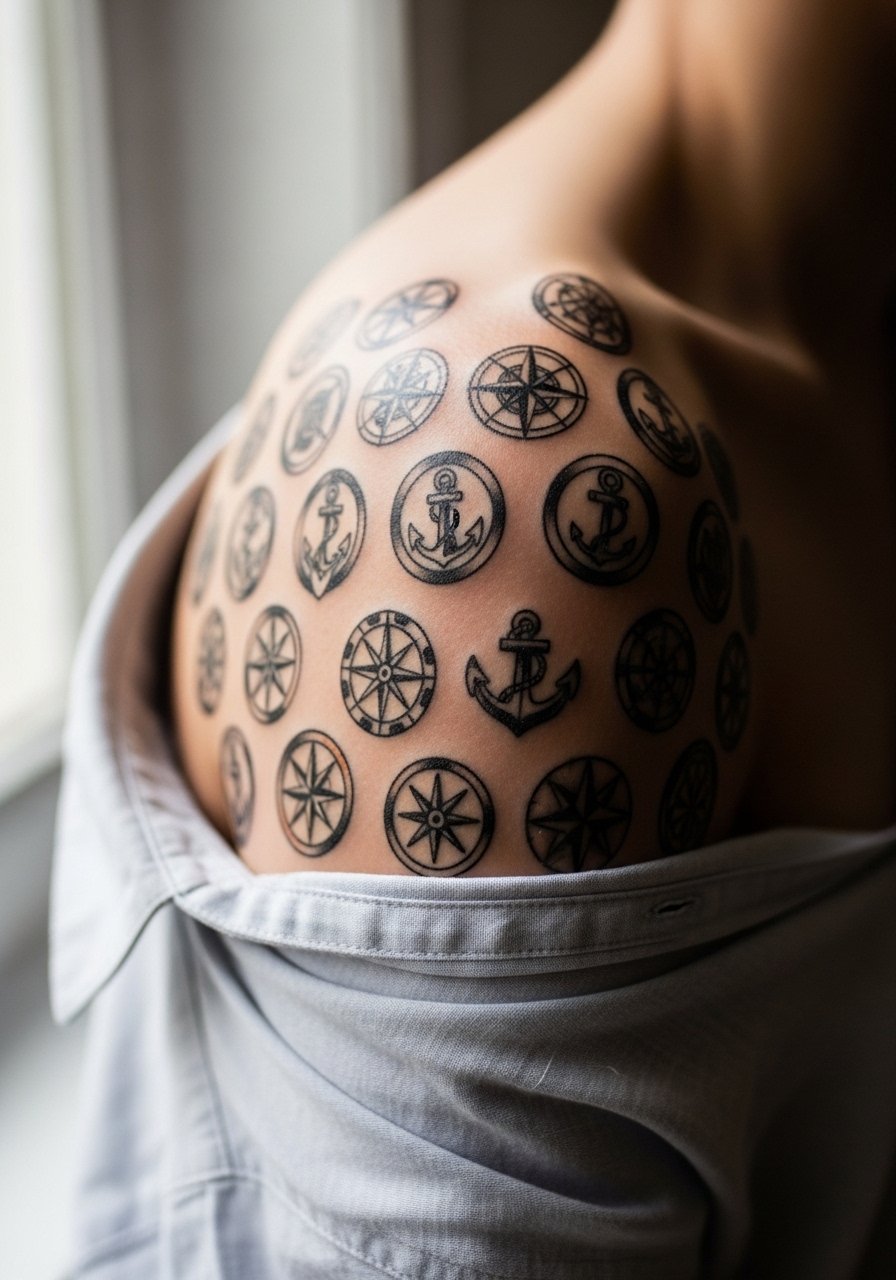
Small traditional flash medallions, each in its own square, give a throwback patchwork feel. Ask for bold outlines and solid, modest color blocks so saturation ages into a clear silhouette. Shoulders heal predictably, but areas near the shoulder blade move with clothing so mention where straps sit to the artist. Sessions are comfortable and often quick per medallion. For show-off wear a loose button-down shirt you can pull aside to reveal the shoulder cleanly.
Studio Day Picks
These first six pieces include wrists, collarbones, calves, and shoulders, so a couple of small prep items make the session smoother and the first week easier.
- Stencil transfer paper kit. Lets you preview placement on skin before the needle touches, which matters for the wrist and collarbone patches above.
- Topical numbing cream. Applied as directed it eases the sting on sensitive spots like the wrist and inner forearm without changing the artist's linework.
- Thin protective film roll. Useful for finger and wrist pieces that face frequent friction during the first week.
- Fragrance-free gentle body wash. Cleanses healing skin without stripping the tiny lines in your micro designs.
- Aquaphor healing ointment. Thin layers help lock in moisture for delicate linework without clogging small channels.
7. Micro Pop-Culture Patch Strip on the Upper Arm
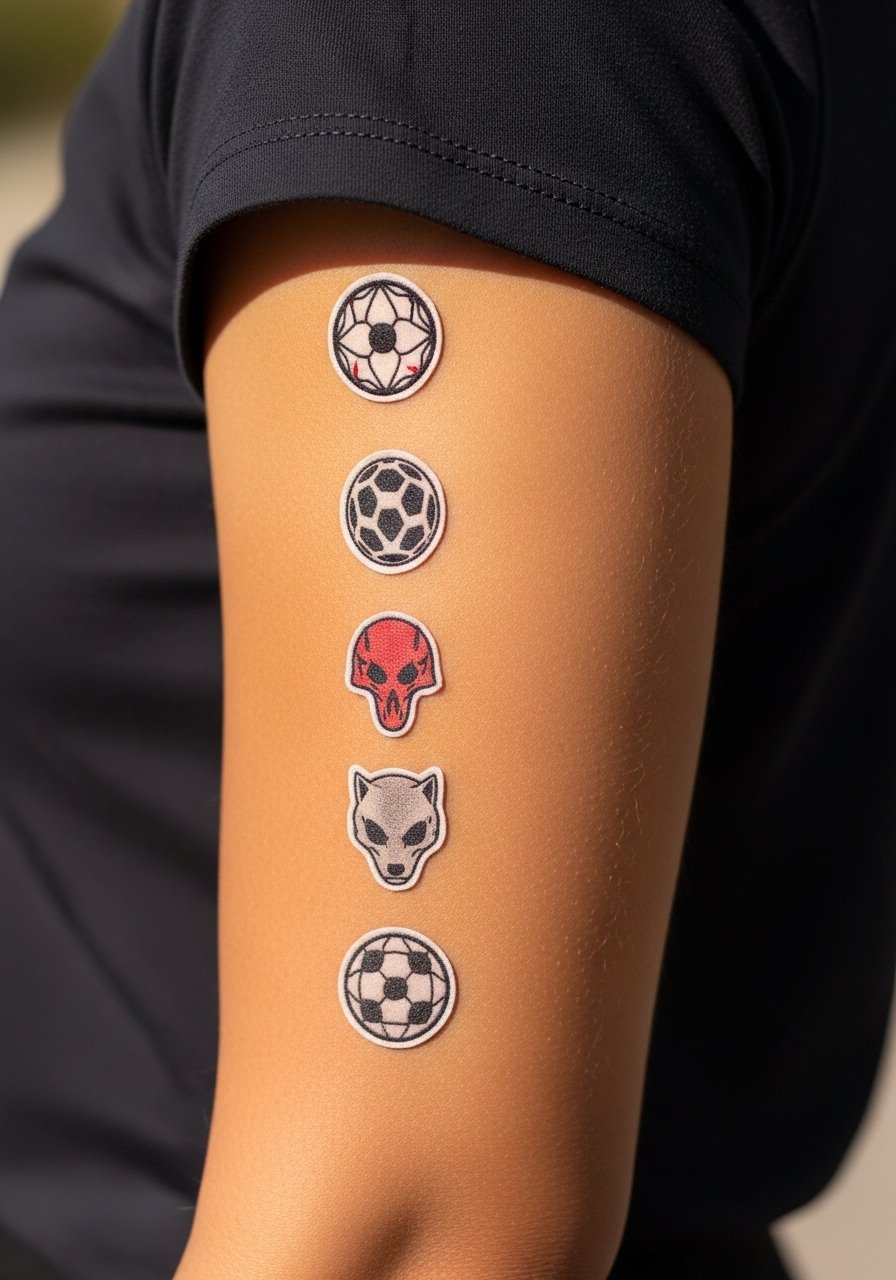
Tiny game icons, music symbols, and retro tech emblems can form a playful vertical patch strip. Decide whether you want literal reproduction or a stylized nod to keep detail readable. The upper arm tolerates micro color but very fine text inside patches will not stay crisp beyond a few years. A common mistake is cramming names into tiny banners. Sessions are short for each patch. For casual outfits, pair it with a vintage band tee with sleeves rolled to show the strip.
8. Micro Script and Coordinates on the Ribcage
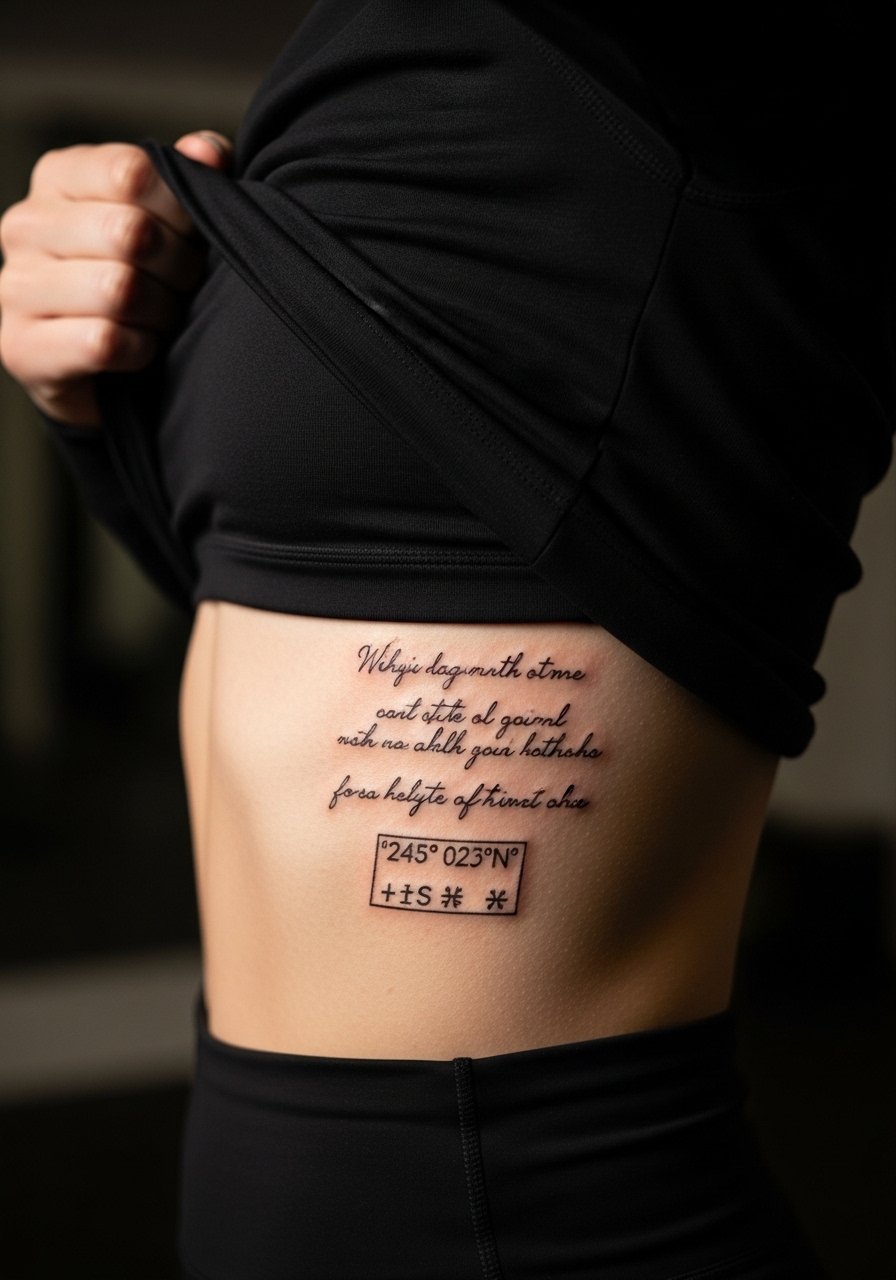
A tiny patch of script paired with coordinates makes a quiet, intimate patchwork. The ribcage is controversial for fine line. One camp argues that breathing and thin skin cause lines to blur within two years. The other camp says a skilled artist who spaces letters and places them at correct depth can make the script last. Ask where your artist stands and plan for a likely touch-up around year two. The session is more painful than an arm piece, so wear a loose cropped top you can adjust.
9. Micro Portrait Medals on the Upper Back
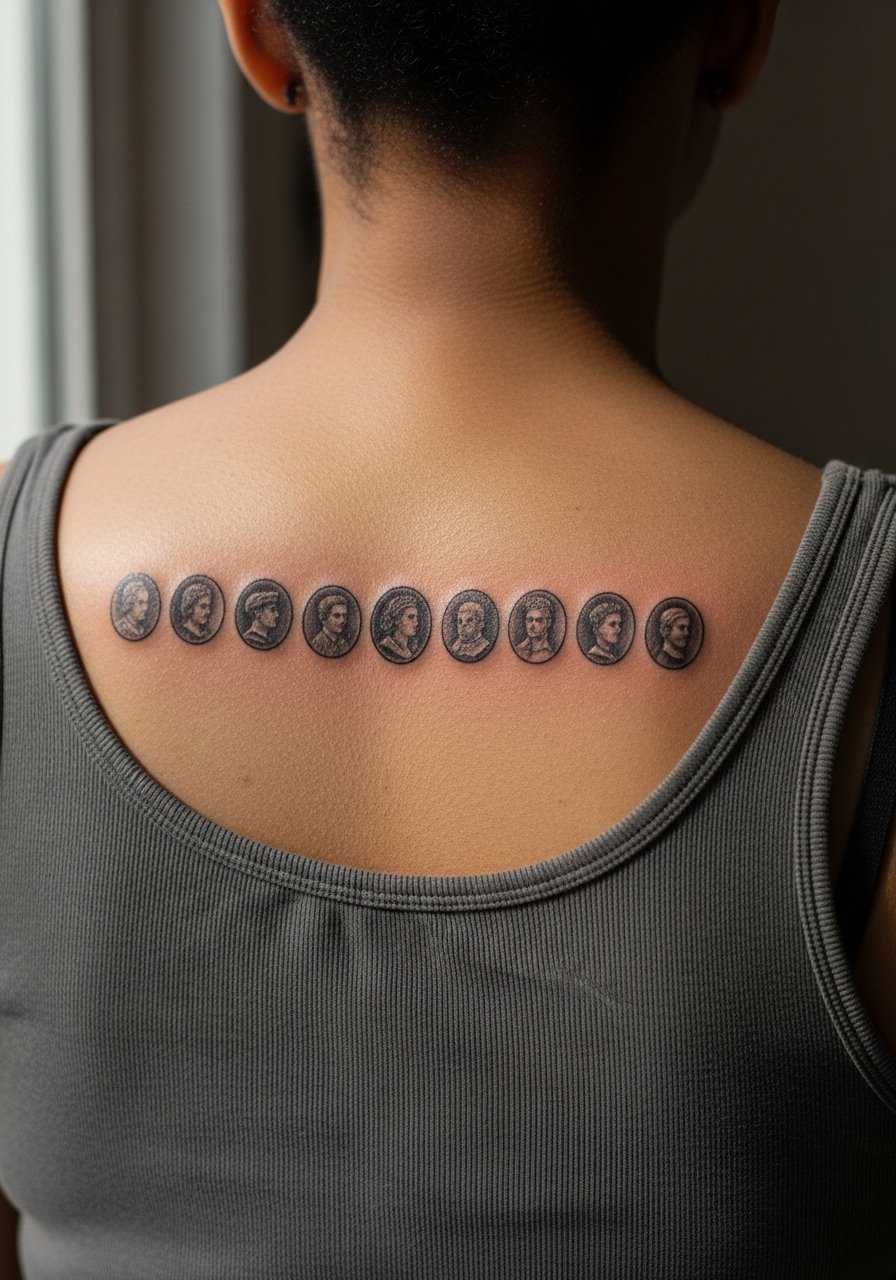
Micro portrait medals work as sentimental patches but demand careful sizing. Ask your artist for slight stylization so facial features read clearly at small scale and for contrast in highlights. Upper back skin can hold detail, but very small pupils and lashes are the first elements to soften. Sessions are moderate and may be split over short sittings. For showing these off, an open-back dress frames the rows while keeping straps off the work.
10. Miniature Animal Totems Along the Spine
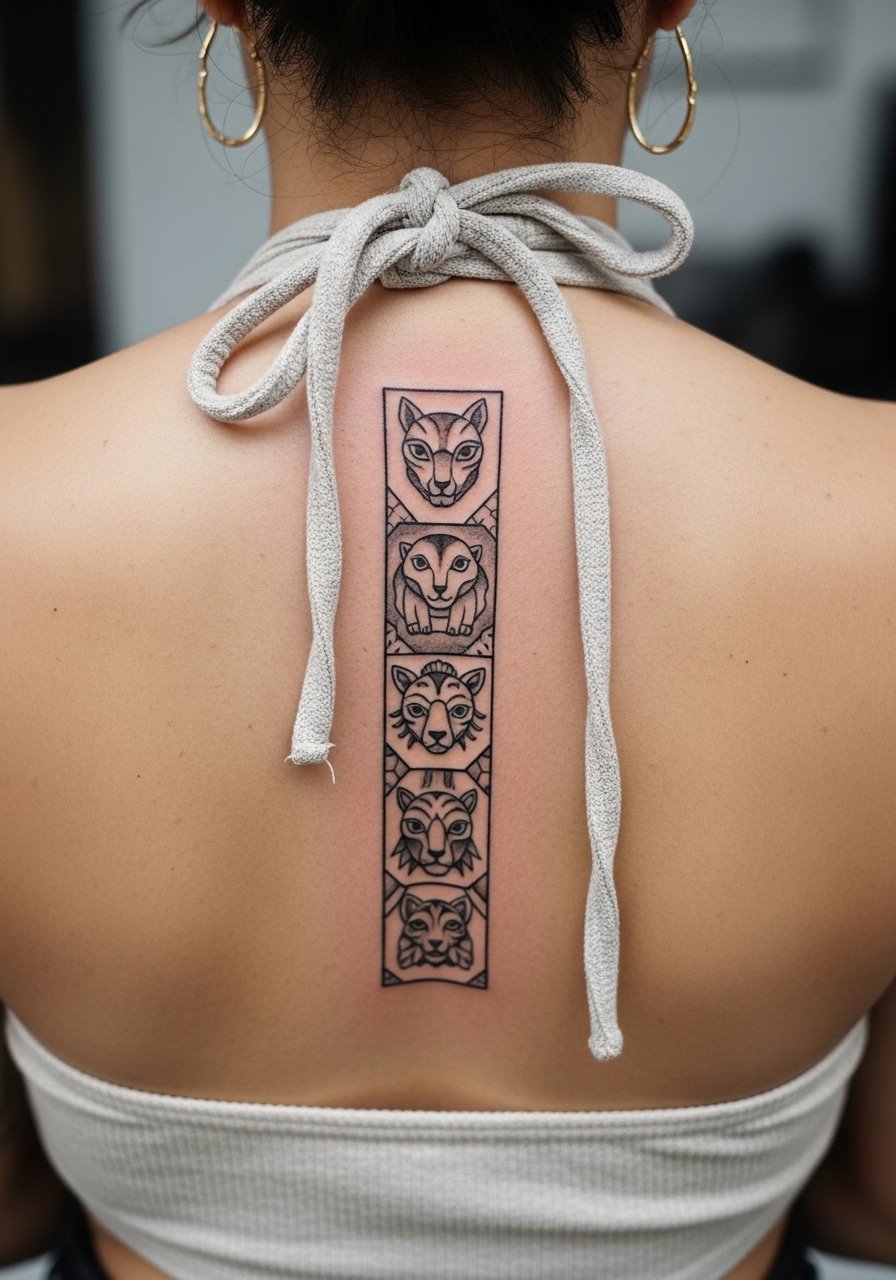
Tiny animal totems stacked along the spine give a vertical story. Tell your artist the scale you want and which element should be the focal point to avoid visual competition. Spine areas see different tension and might need touch-ups in years three to five if the pieces are very close. Sessions require careful positioning in the chair. Pair a spine column with an open-back halter for evenings when you want to show the sequence.
11. Mini Mandala Patches Behind the Ear
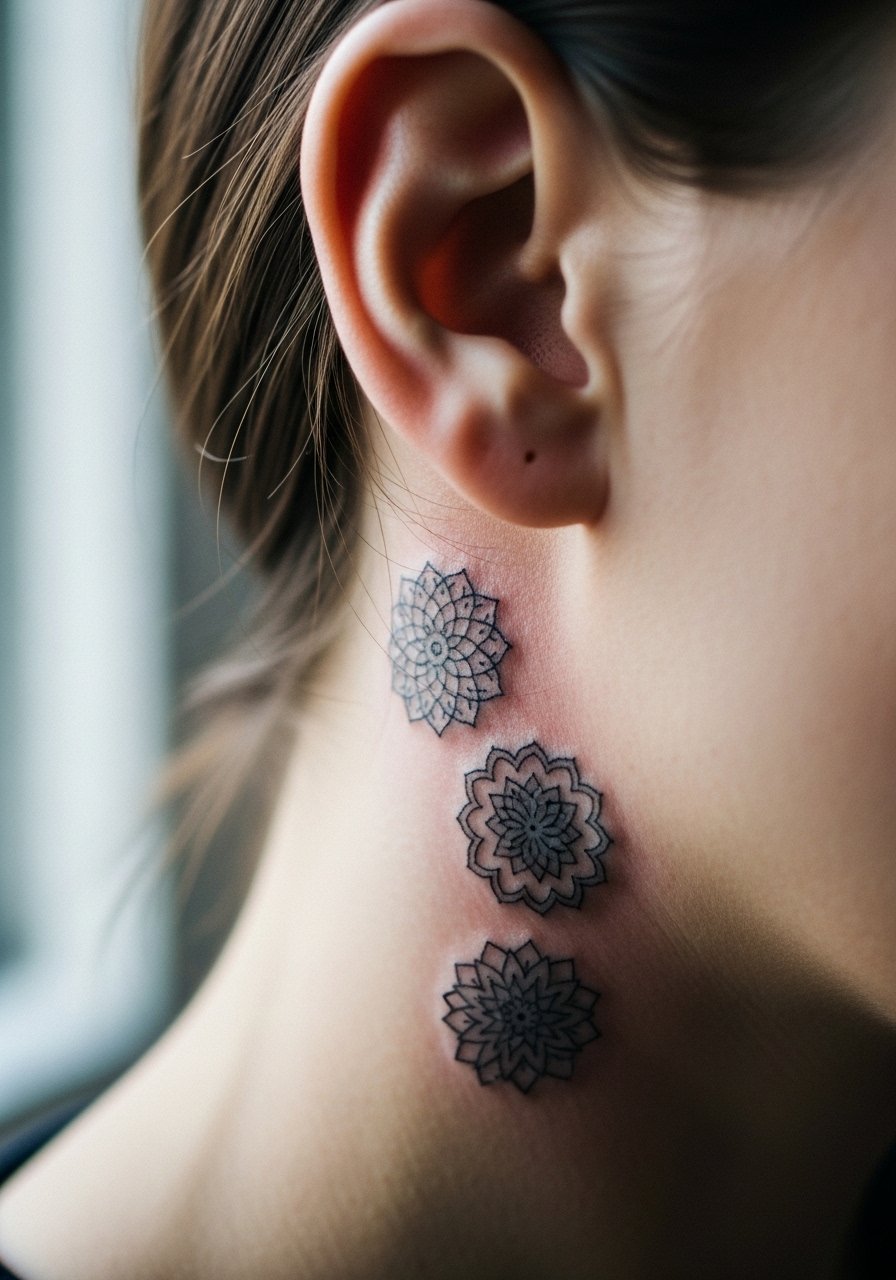
A row of tiny mandalas behind the ear is subtle and decorative. The artist should adapt traditional symmetry to the small scale by simplifying inner rings so the center does not fill. Behind the ear needs a specialized hand and steady stencil work because the skin is thin and placement is tricky. Expect minimal session time but be prepared for a touch-up if hair rubbing causes friction. Note on cultural origins, mandala designs trace to specific religious art, so many people choose slight personal variations rather than direct replicas.
12. Tiny Nautical Patchwork on the Ankle
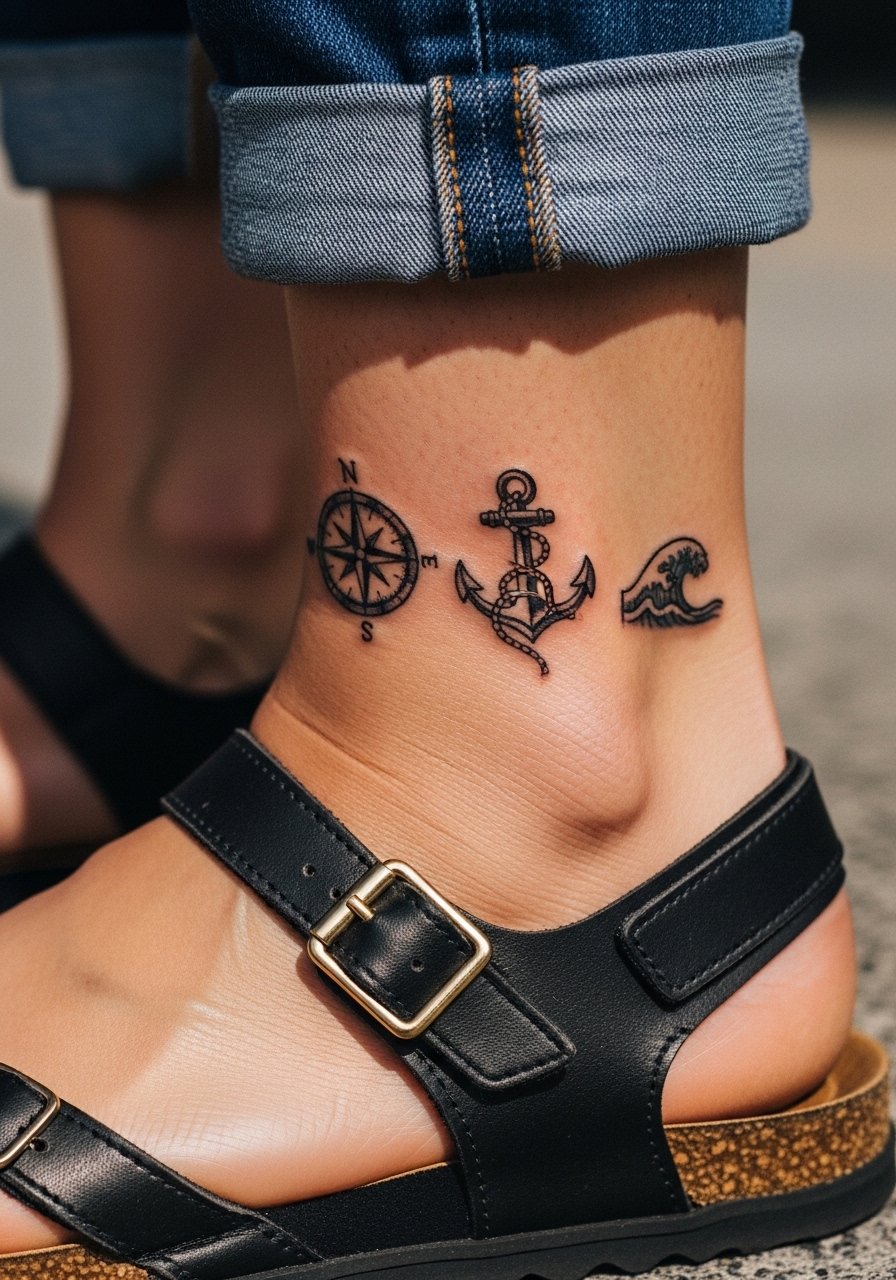
Small nautical icons grouped like sailor emblems work well on the ankle's narrow canvas. Ask for simple fills and slightly thicker outlines to protect against early blurring from footwear friction. The ankle is prone to rub from socks and shoes which can distort tiny details in the first weeks. Sessions are short but you should expect the need for touch-ups at year two for very small motifs. Style with strappy sandals when you want to show the pieces and avoid tight socks during healing.
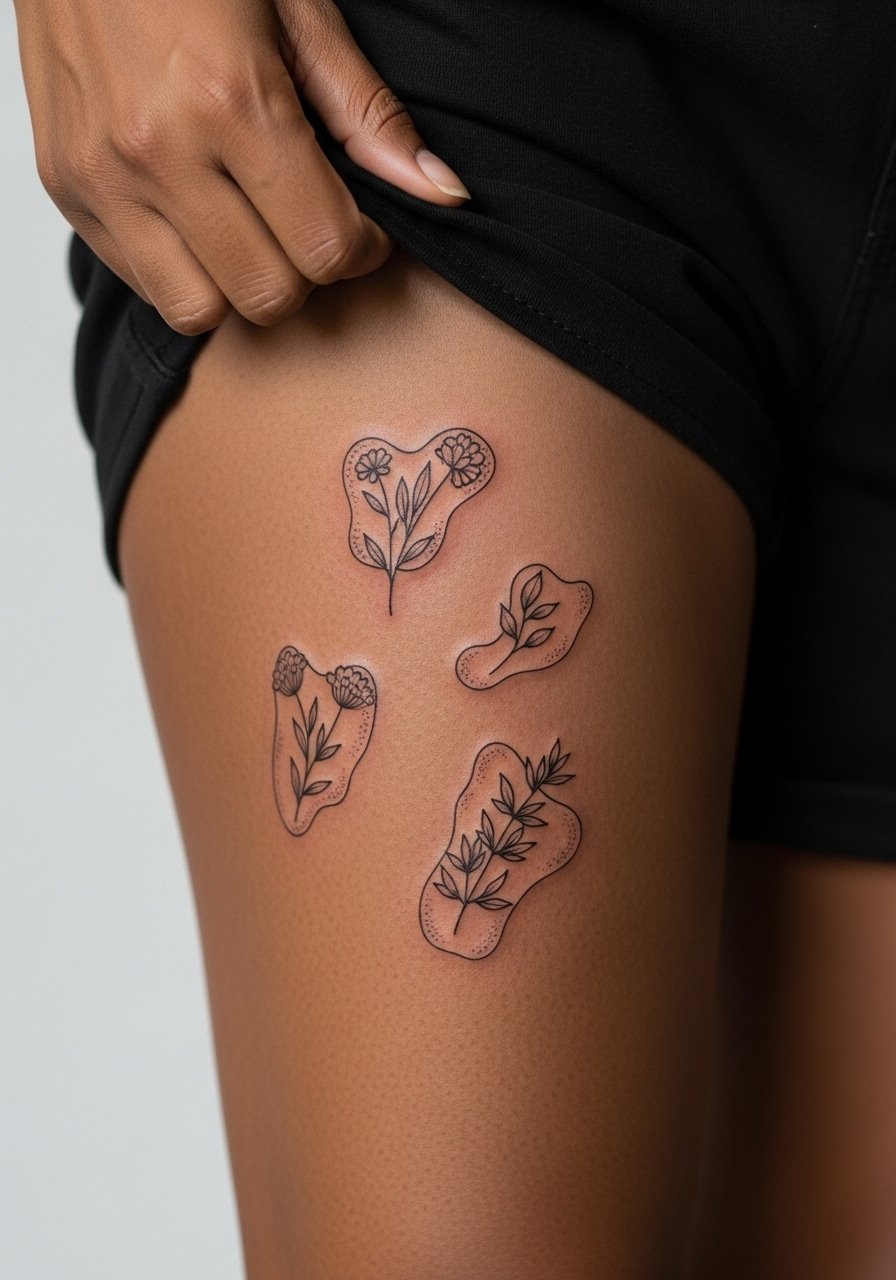
13. Micro Botanical Hip Sprigs
A trio of tiny botanical sprigs on the hip can feel private and decorative. Ask your artist for slightly bolder stem placement and airy leaf spacing to avoid blur where fabric hugs the area. The hip moves with clothes and sitting, so wear high-waisted bottoms that avoid direct pressure on the tattoo during the first week. Many people report the hip needs a touch-up at year three for ultra-fine lines. For session wear choose high-waisted jeans that you can shift without rubbing the fresh work.
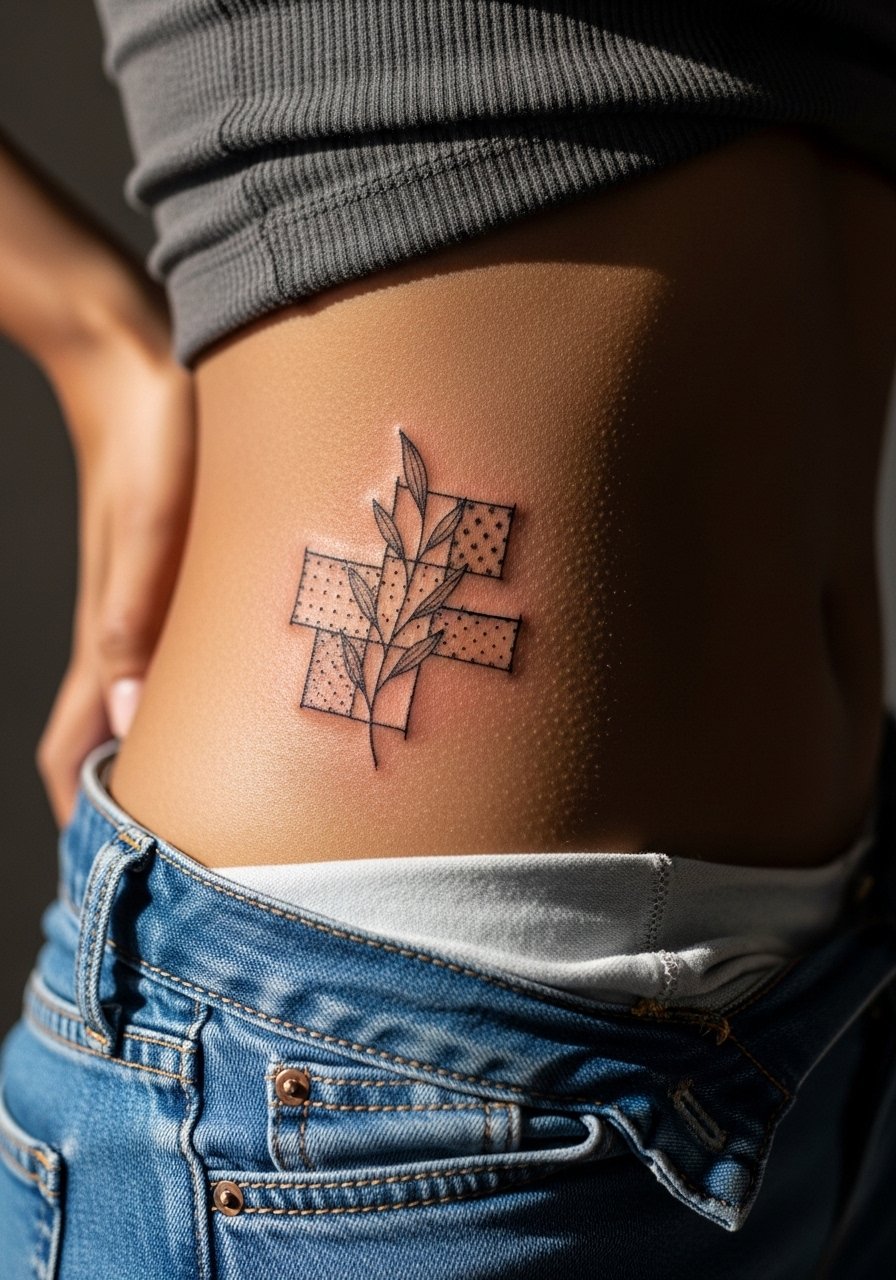
14. Micro Cosmic Chest Patches Near the Sternum

Small moons, tiny planets, and orbit symbols clustered near the sternum read intimate and centered. Sternum skin can be sensitive and moves with breathing which makes line stability a concern. Some artists say fine line on sternum holds if spaced and inked slightly deeper. Others warn that the area will often need touch-ups due to the delicate motion. Ask your artist which camp they are in so you can set expectations. For showing it off pair with a fitted sports bra or a low-cut top.
15. Tiny Script Band Around the Wrist
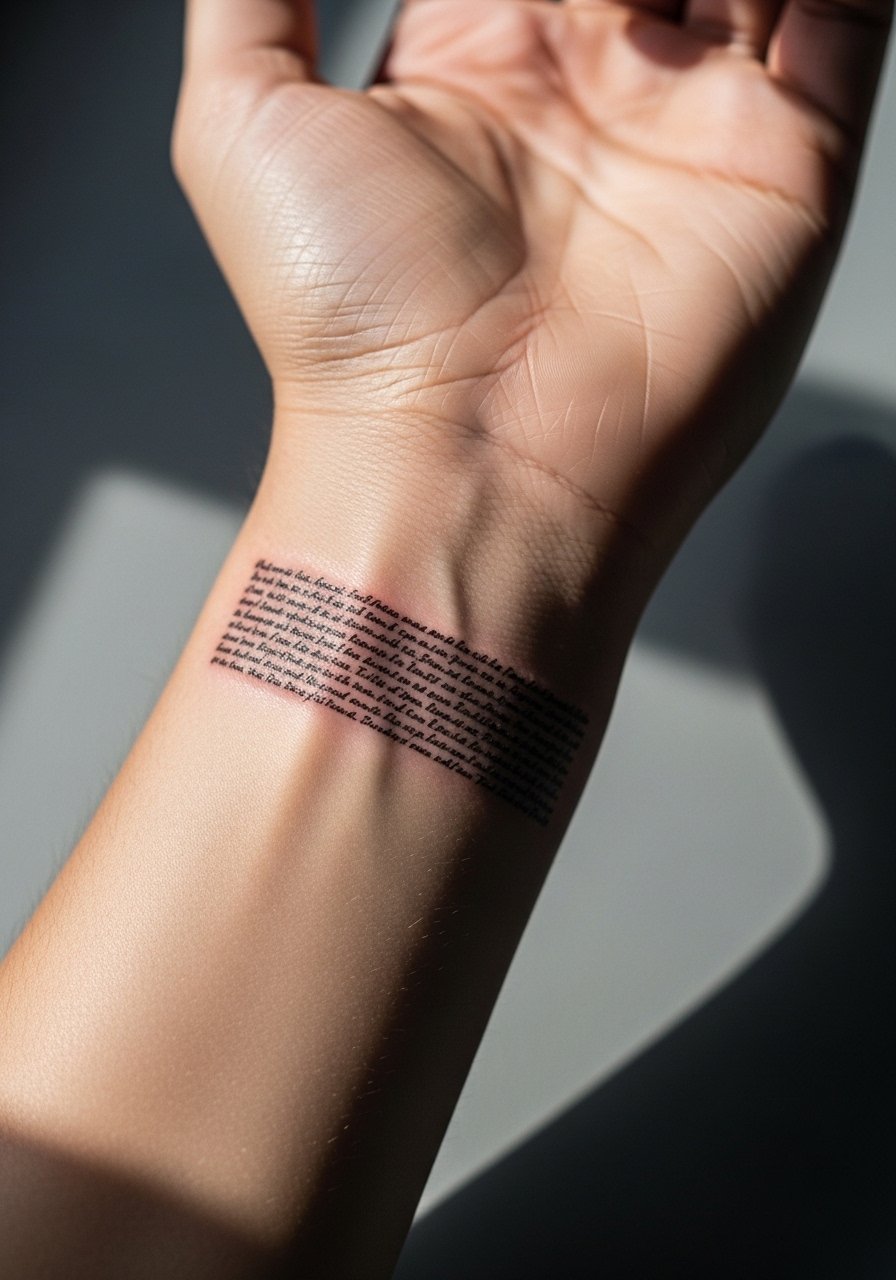
A narrow band made of very small words or single-word patches can read like a bracelet when spaced properly. Ask for letter spacing that accounts for skin movement and avoid ornate fonts that close up. The wrist is busy with washing and jewelry so thin scripts often need a touch-up after two to three years. A common mistake is asking for multiple tiny words with no space. For styling use a minimalist watch that sits above the script and avoids constant rubbing on the letters.
16. Micro Matchbox of Tiny Pop Icons on the Thigh
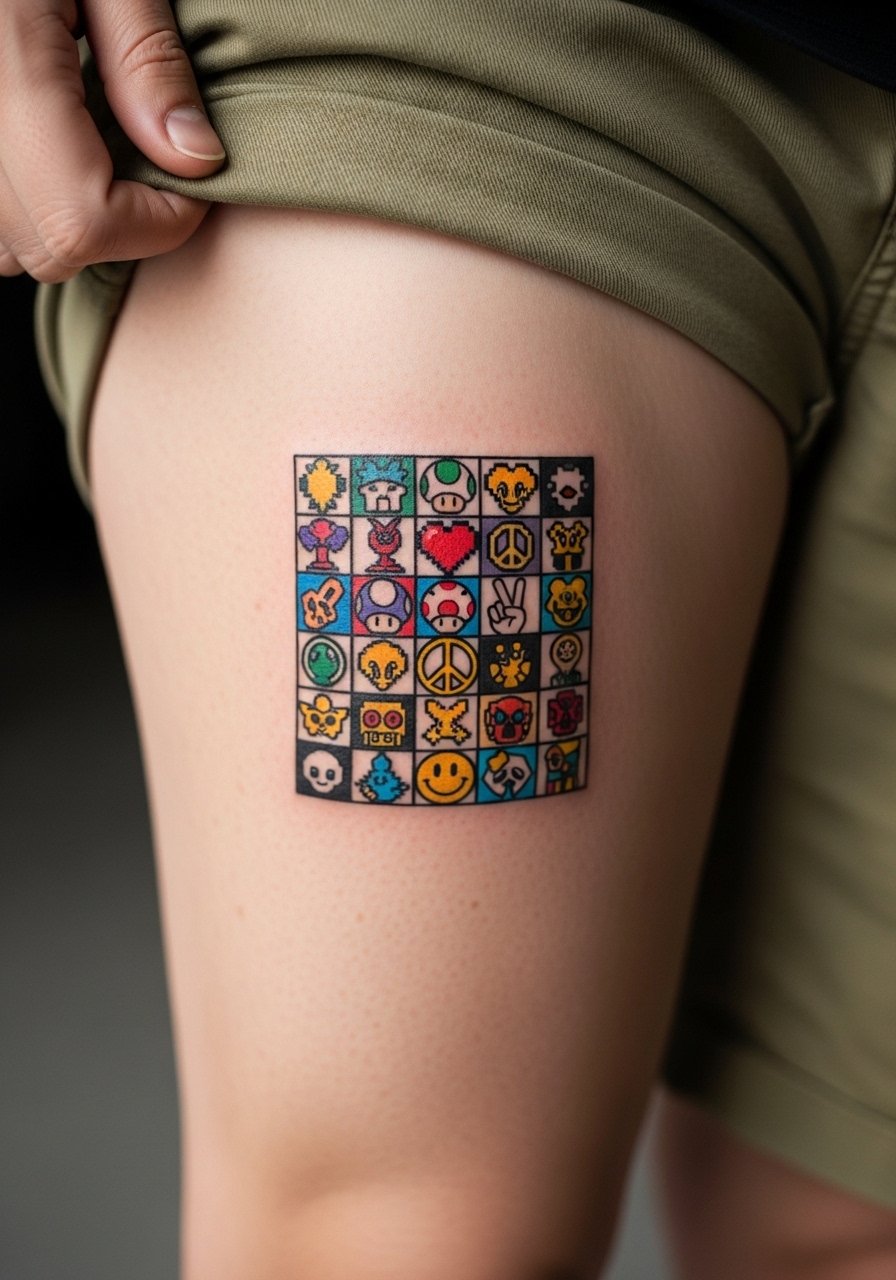
A small grid of pop icons on the thigh gives a cheeky, wearable patchbook. Thigh skin tolerates larger micro detail, but tight fabrics can press ink during healing so bring loose shorts for the session. Ask for slightly thicker outer lines for each patch so they separate visually when healed. Sessions are comfortable and often quick per patch. For show-off style pick a loose high-waisted short that keeps pressure off the area.
17. Micro Botanical Inner Thigh Sprigs
Inner thigh patchwork stays intimate and can be scaled to small decorative gestures. The inner thigh is sensitive and prone to friction so session discomfort can be moderate. For longevity avoid tiny clustered dots there and prefer slightly larger leaf shapes with airy spacing. Wear loose shorts to the appointment and avoid tight underwear in the first week. Consider that inner thigh pieces are rarely visible in day-to-day life which some people prefer.
18. Micro Chain-Link Pattern on the Hand Side
Hand and side-of-hand micro patches are high visibility and high maintenance. Artists split on this placement. One camp says hands almost always need frequent touch-ups because the skin regenerates faster there and exposure causes fading. The other camp says with bold spacing and heavier outlines small patches can hold for longer. If you choose hand work plan for regular maintenance and ask your artist for more saturation initially. Session pain is low to moderate. Keep in mind some workplaces still consider hand tattoos visible.
19. Micro Abstract Watercolor Patches on the Shoulder Blade
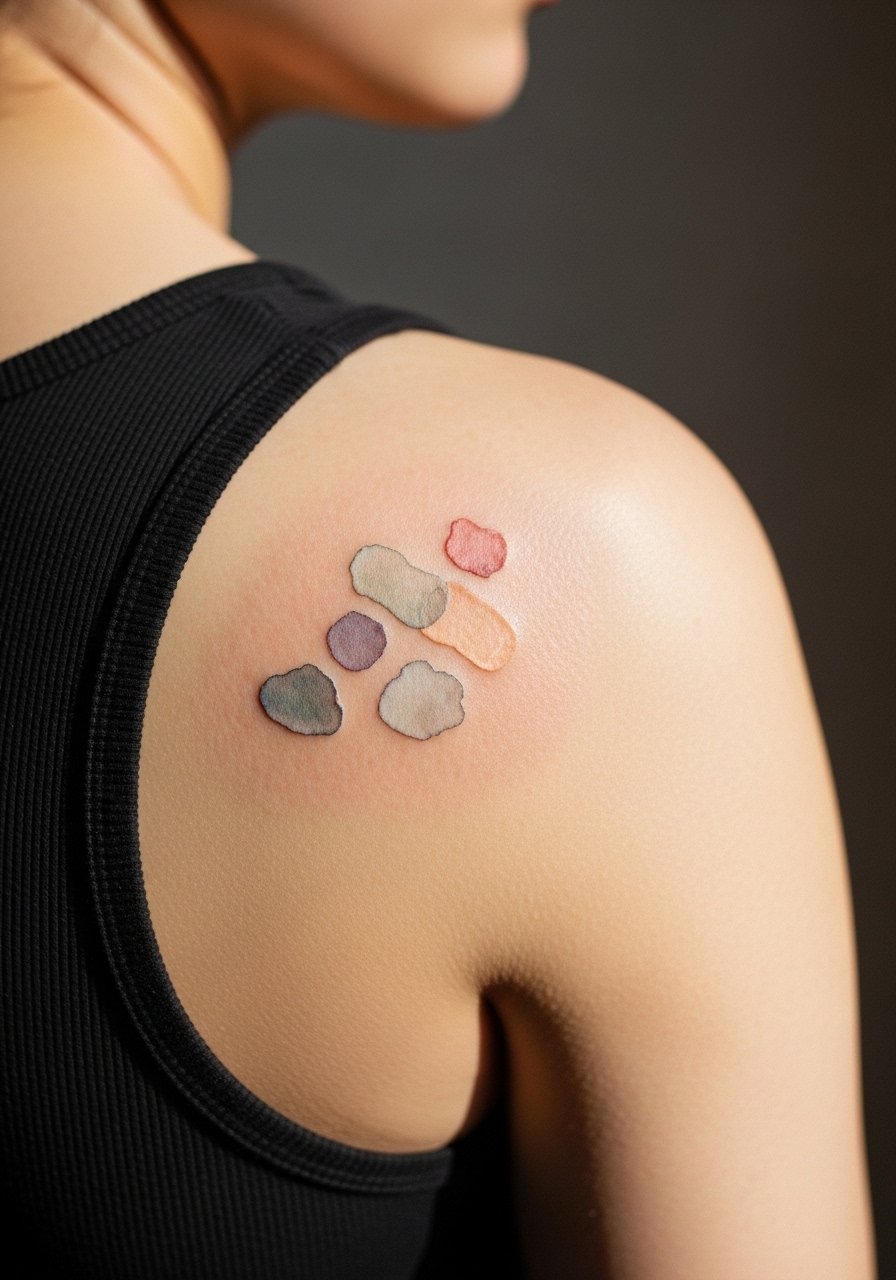
Tiny watercolor blobs paired with minimal linework can create a collage-like shoulder patch. Watercolor techniques need clear outlines or strategic negative space to avoid color bleeding into indistinct patches as they age. The shoulder blade tolerates color well but pigments that are too dilute will fade faster. Sessions are moderately long for multiple color patches. Show them with a tank top with a low back to keep straps out of the way.
20. Micro Zodiac Glyphs on the Finger Side
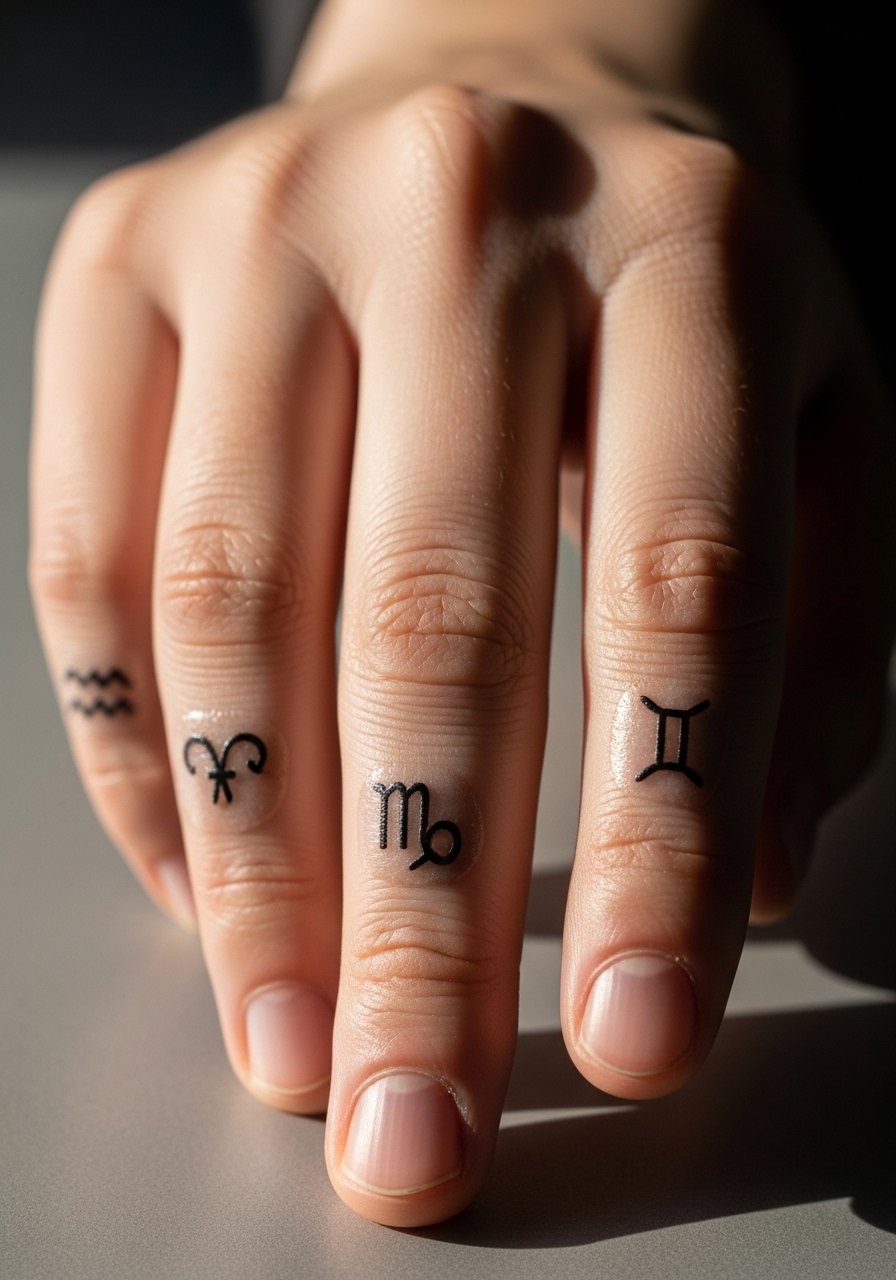
Fingers are tiny canvases and glyphs must be bold enough to survive constant washing. Ask your artist for thicker lines and reduced inner detail so the glyphs do not blur into a smudge. Fingers usually need touch-ups sooner than other spots, often within one to two years. Sessions are short but healing is fussy because of use. Style with thin stacking rings that do not contact the ink directly during the first month.
21. Micro Travel Patchwork on the Shoulder Cap
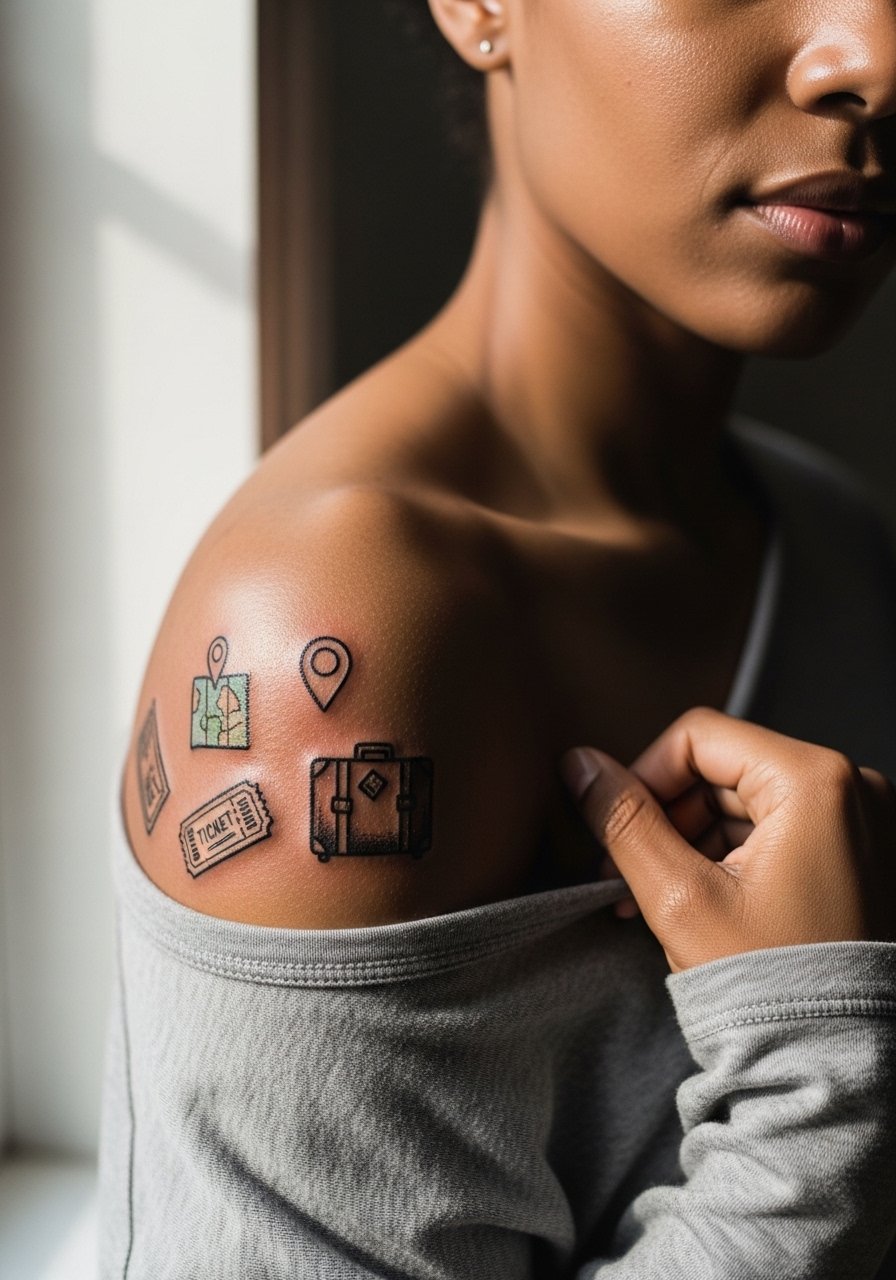
A cluster of tiny travel icons on the shoulder cap reads like a passport row. Ask the artist to prioritize simple silhouettes of each object so details do not vanish. The shoulder cap is forgiving for micro work and ages predictably well, but positions under straps can rub during healing so mention how you normally wear bags. Sessions are short per patch. For showing it off a wide-neck tee exposes the cluster without interaction from straps.
Frequently Asked Questions
Q: Will micro patch work tattoos on the ribs or sternum blur faster than on the arm?
A: They can. Ribs and sternum move with breathing and the skin is thinner which creates more risk for fine lines to lose clarity. Some artists say spacing and slightly bolder stems fix that, and others prefer larger scale there. Ask your artist which approach they use and expect a possible touch-up at year two to three for very fine work.
Q: How do I prepare clothing for a session that involves my inner thigh or hip?
A: Wear high-waisted shorts or bottoms you can shift without rubbing the area. A loose pair of high waisted shorts makes it easier to expose just the strip of skin the artist needs and protects the rest during travel.
Q: Are hand and finger micro patches worth it if they require frequent touch-ups?
A: They are worth it if you want visible, small-scale work and you accept maintenance. Hands and fingers are high-traffic zones that fade faster, so plan on refreshes and ask for slightly heavier initial linework.
Q: How does micro patch work change if I want color versus black ink only?
A: Color reads differently at small scale because diluted pigments can wash out faster. For micro color ask for saturated fills and bolder outlines to protect the edges. Black linework with small color accents often lasts longer and keeps the design readable.
Q: What should I bring to a consultation to get the micro patch look I want?
A: Bring a small collection of reference images that show scale on real limbs and clear notes about which motifs are anchors versus accents. Also describe any clothing habits that will touch the area, since friction matters for small pieces.
