
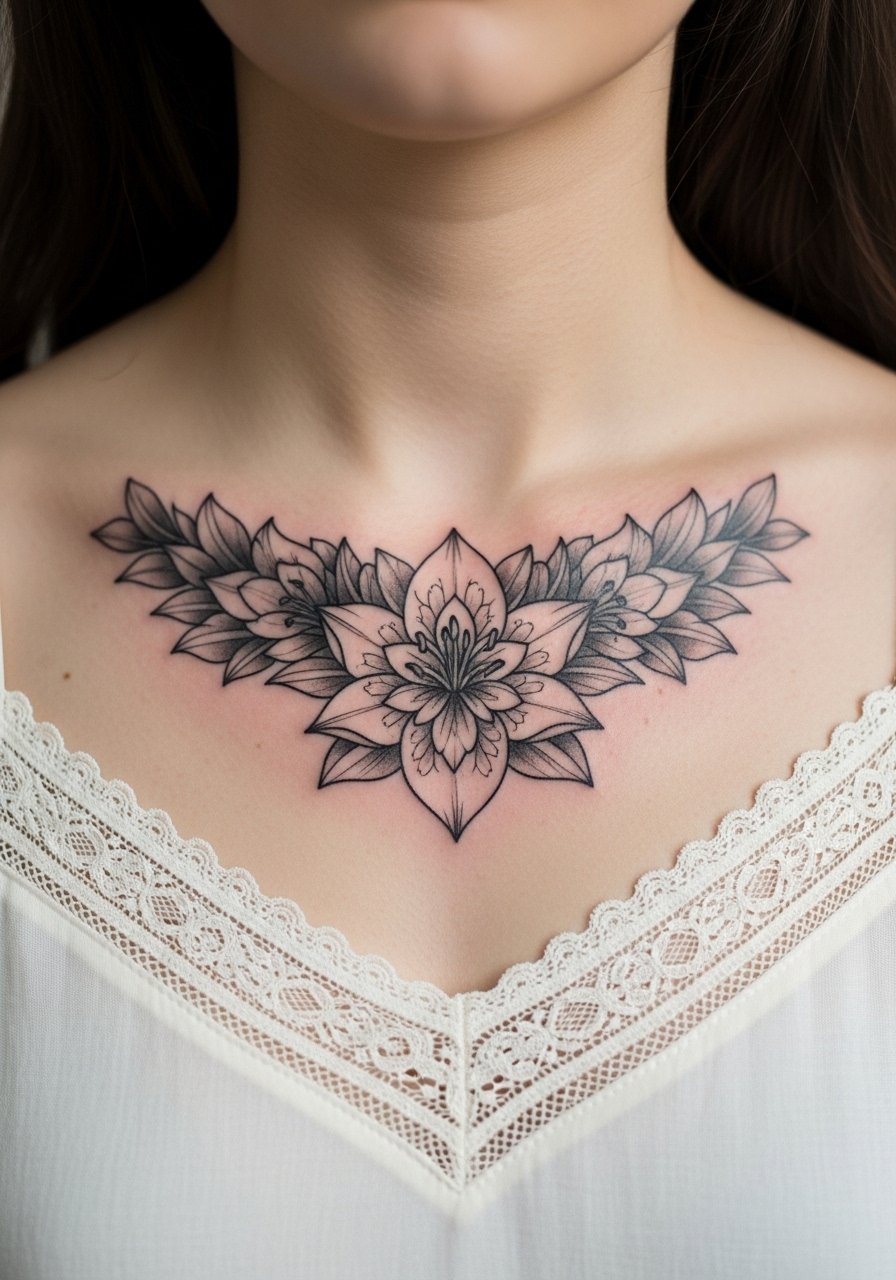
Fine line lilies dominate feeds, but on the collarbone trend and reality collide: ultra-thin linework can blur sooner than you expect, bone proximity makes sessions sharper, and straps or modest weight shifts can change how stems sit. Pick a lilly tattoo design on collarbone that looks like you now and still reads like you in five years. The first idea below shows a classic route that balances touch-up needs with daily wear.
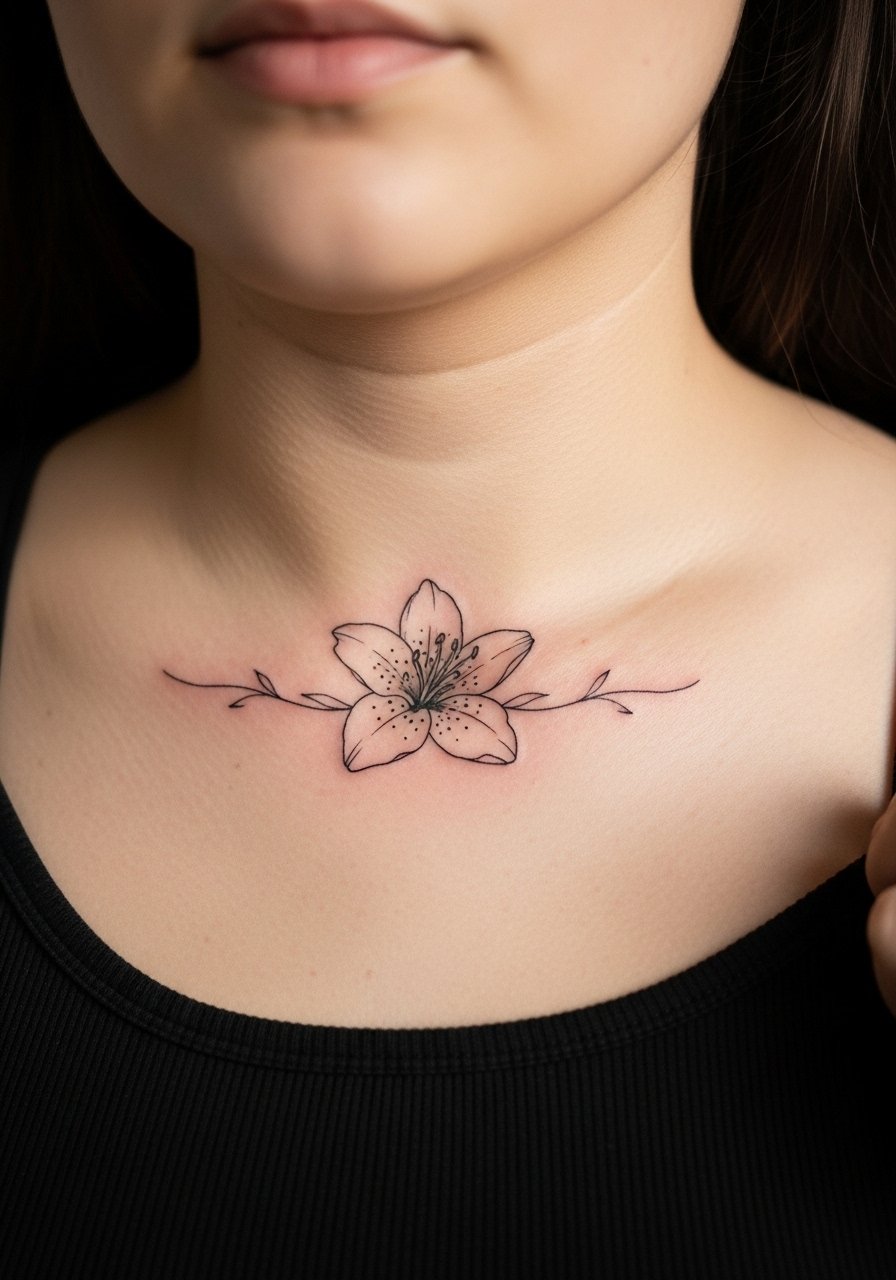
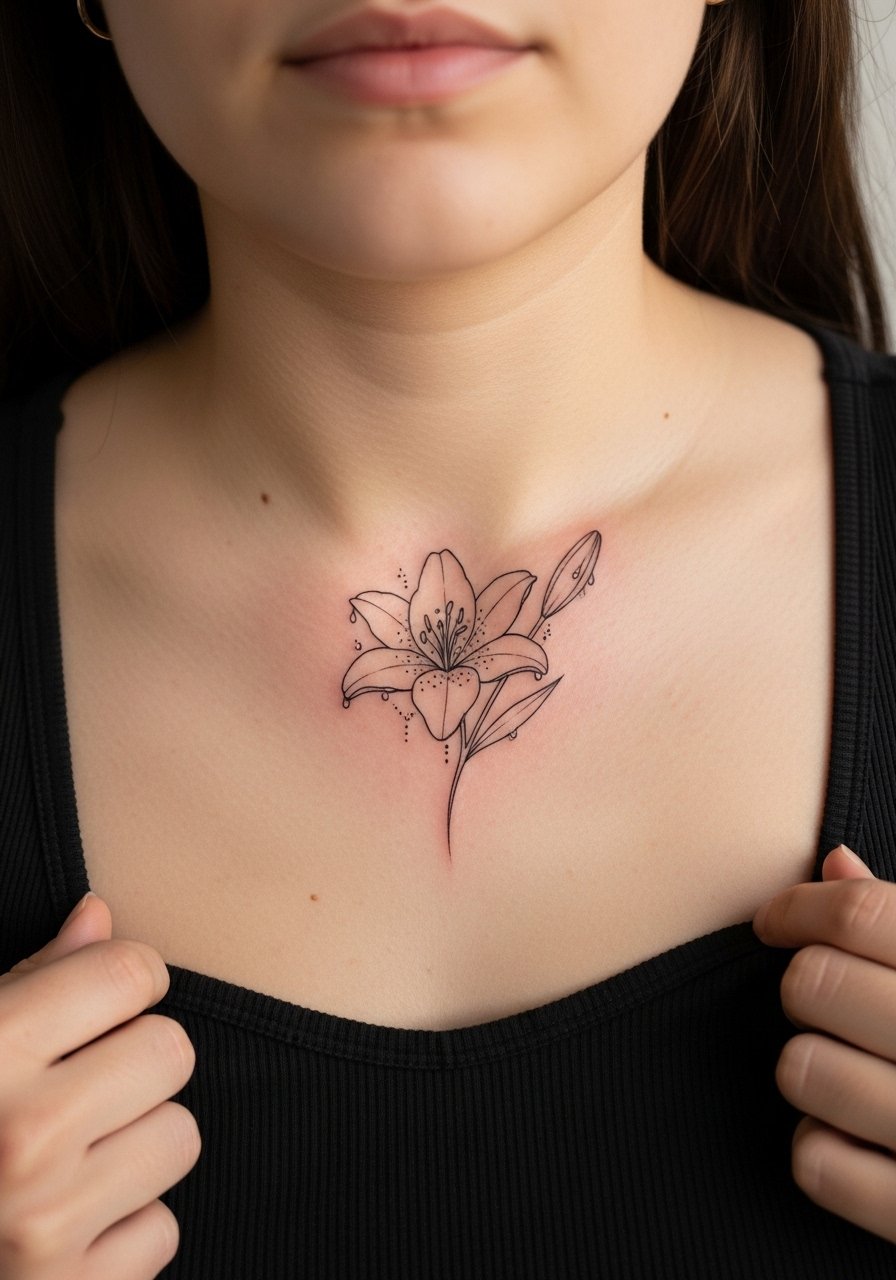
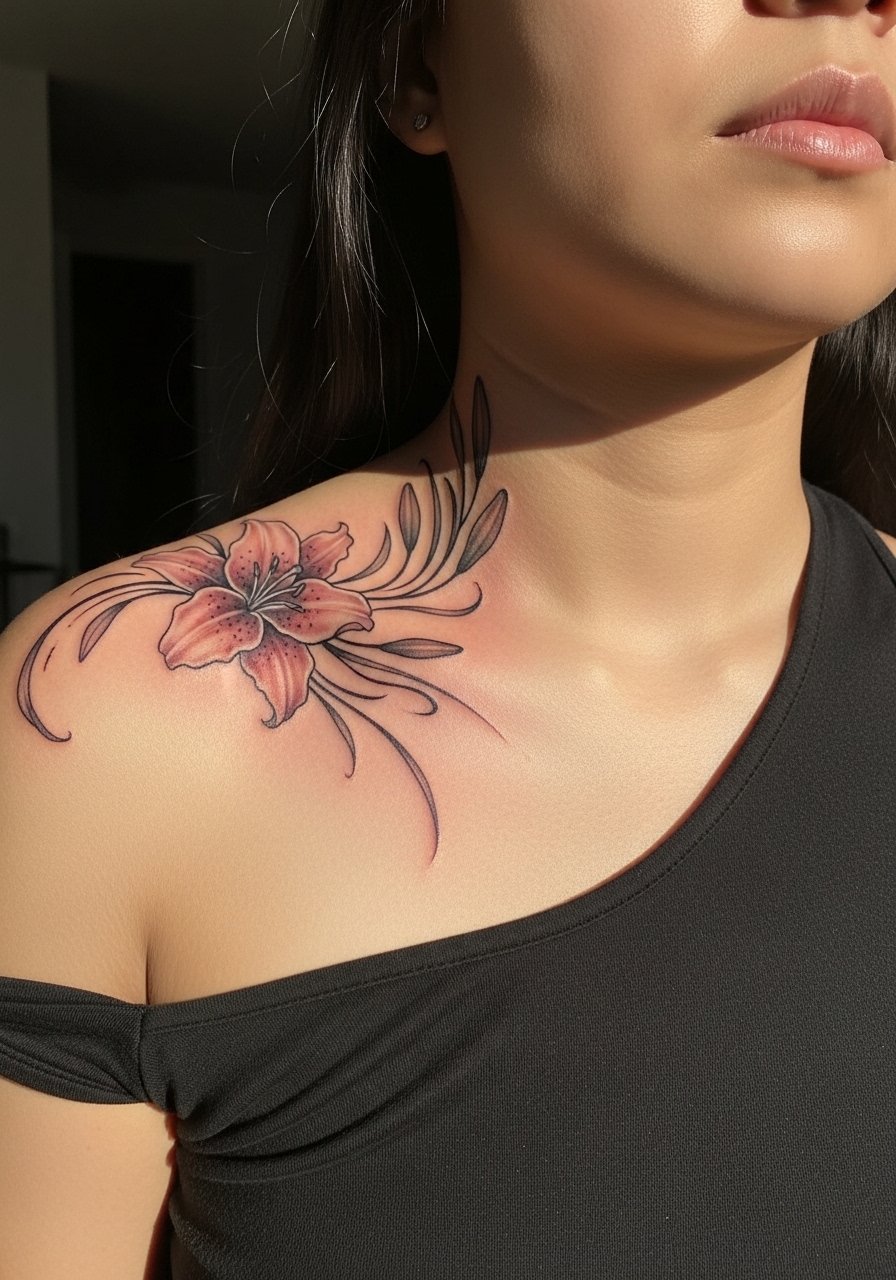
1. Fine line lily outline on the collarbone dip
I've seen this exact placement on tanks and blouses for years and it still reads delicate after touch-ups. Ask your artist to follow the collarbone curve so the petals nest in the natural hollow. Fine line on bone feels sharp during the hour to 90 minute session, so plan short breaks. Common mistake is going too small and packing lines too close, which leads to faster merging. Expect a light touch-up at six to twelve months for crispness. For showing it off, pair the piece with an off shoulder blouse or a delicate silver chain necklace that frames the hollow without covering the linework.
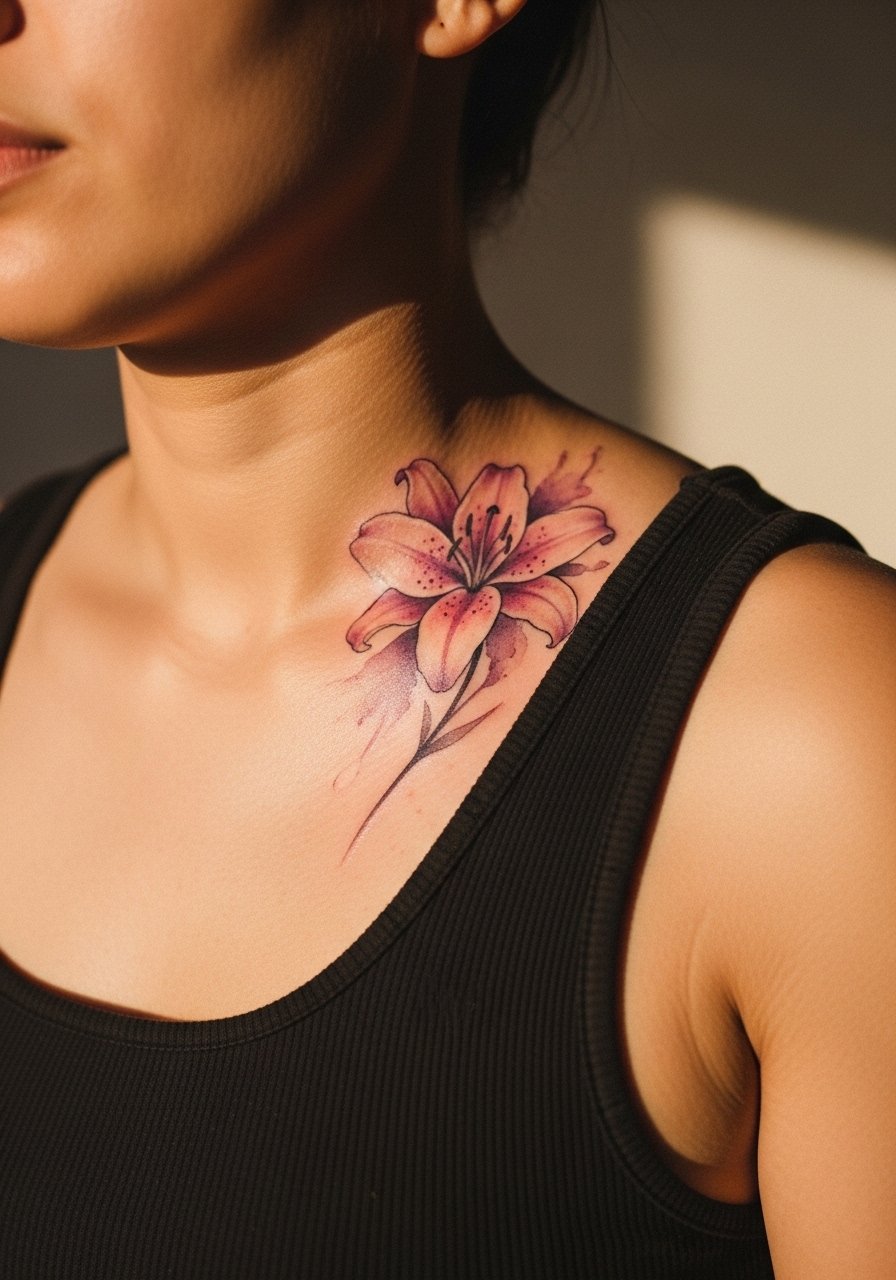
2. Watercolor lily splash fading toward the shoulder
Most watercolor collars look painterly at first and then soften with sun exposure. If you want color, ask the artist to anchor edges with very thin black linework so the patchy fade reads intentional. Expect a two-session workflow and a gentler healing window because color needs consistent saturation. Pain is moderate since the needle stays slightly longer in color fields. For session wear, bring a sleeveless tank or an open button shirt so the artist can reach the shoulder without straps tugging. A common error is picking pastels that wash out on darker skin tones, so test a mockup in natural light first.
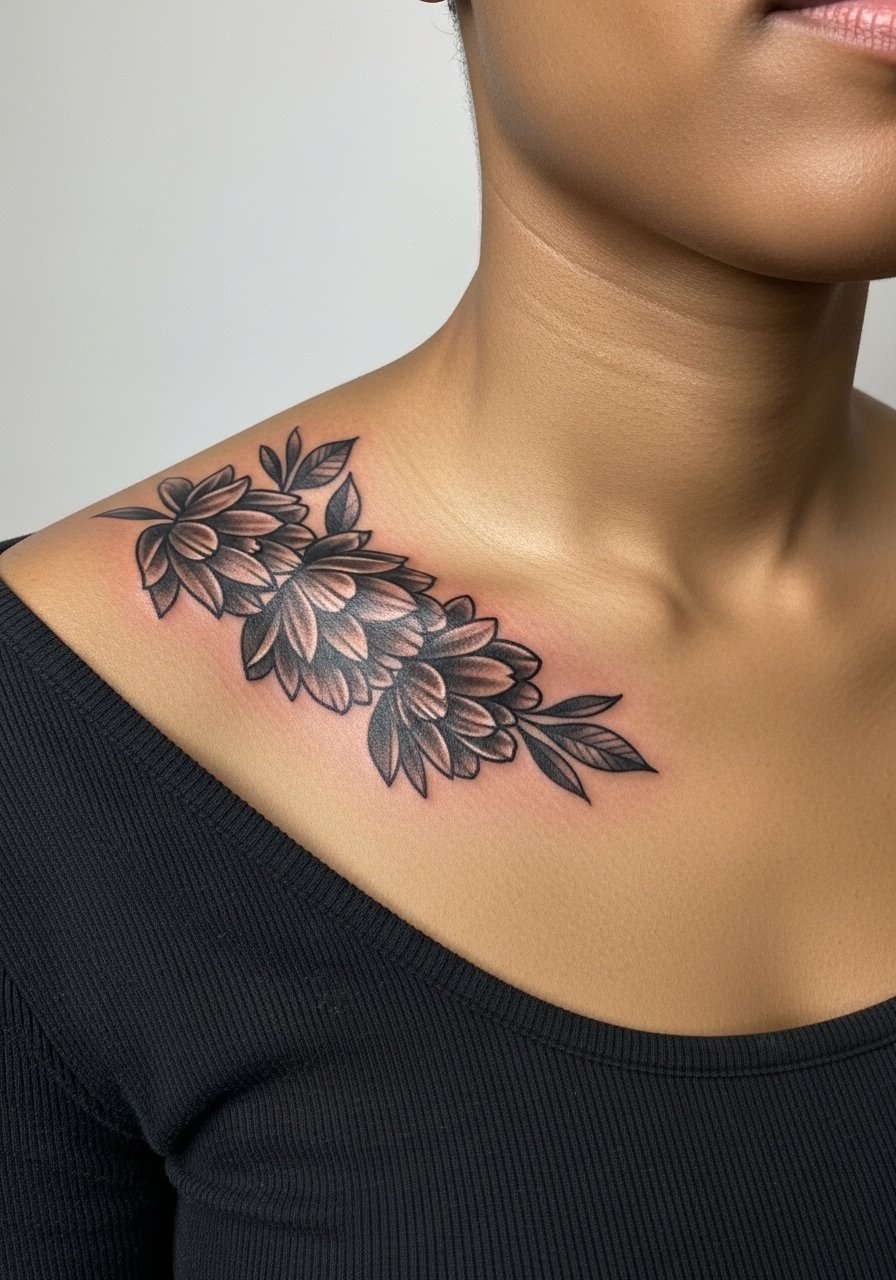
3. Neo-traditional lily with stems laid horizontally along the bone
There is something about bold outlines and controlled saturation that ages into readable form on the collarbone. Tell your artist you want strong linework with selective color pops, not full saturation across every petal. Sessions are usually one to two hours depending on size. The usual mistake is asking for maximal color in tight areas, which leads to patchy healing near straps. Blowout risk is low if lines are not too close to the bone and the stencil follows the collarbone anatomy. Over time the color will mellow, but the outline will keep structure so touch-ups are less frequent than with purely fine line pieces.

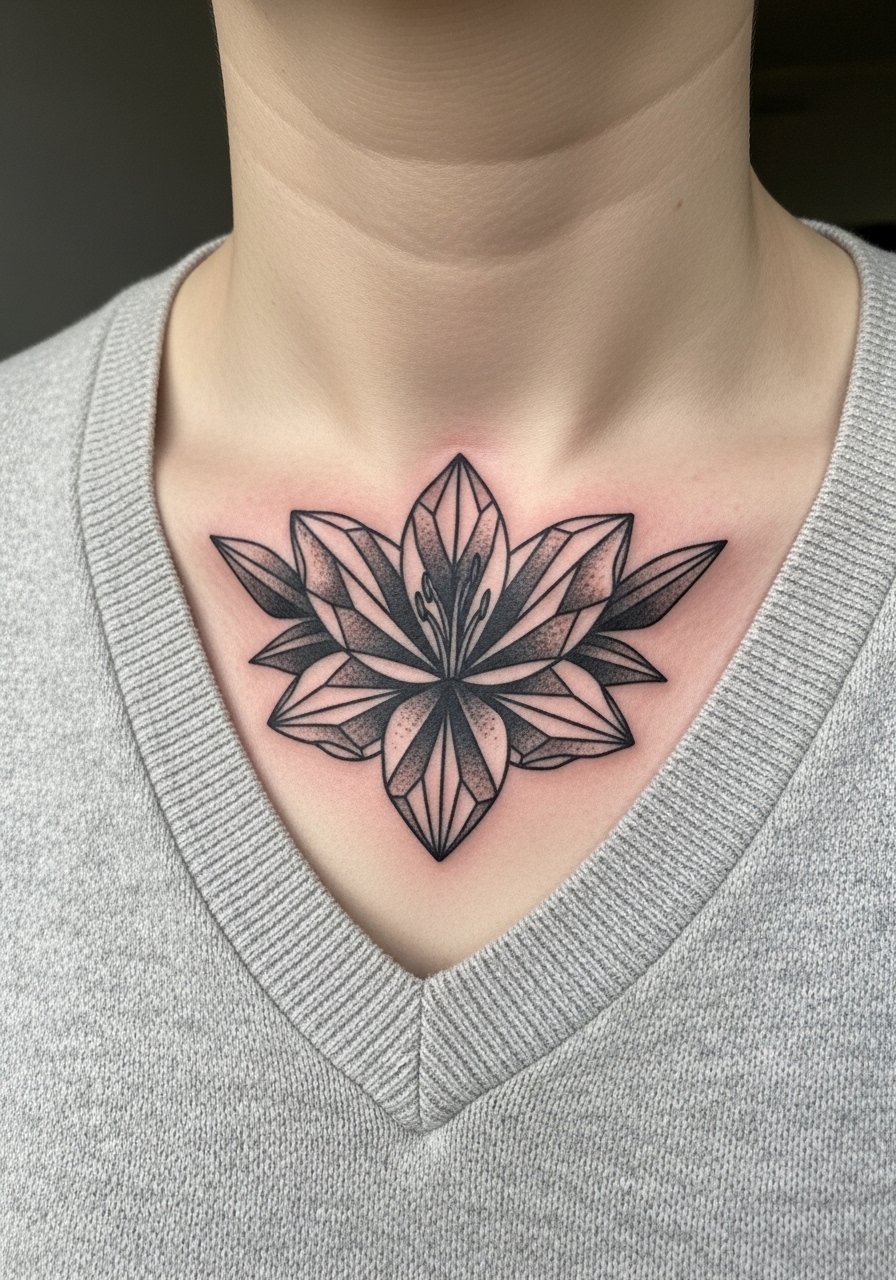
4. Blackwork geometric lily framed over the inner collarbone
Most people choose blackwork when they want an architectural look that lasts. The geometry sits best centered over the hollow and follows the bone so the negative spaces breathe. Expect a single session for a 3 inch piece but allow for a second pass if shading needs saturation. During consultation, ask to see healed blackwork close-ups so you can judge how saturated fills hold on similar skin tones. For wearing out, a v neck sweater or a minimal stud earrings keeps the frame simple and clean. A common error is making the pattern too intricate for the space; scale up so the dots and lines do not merge after a few years.
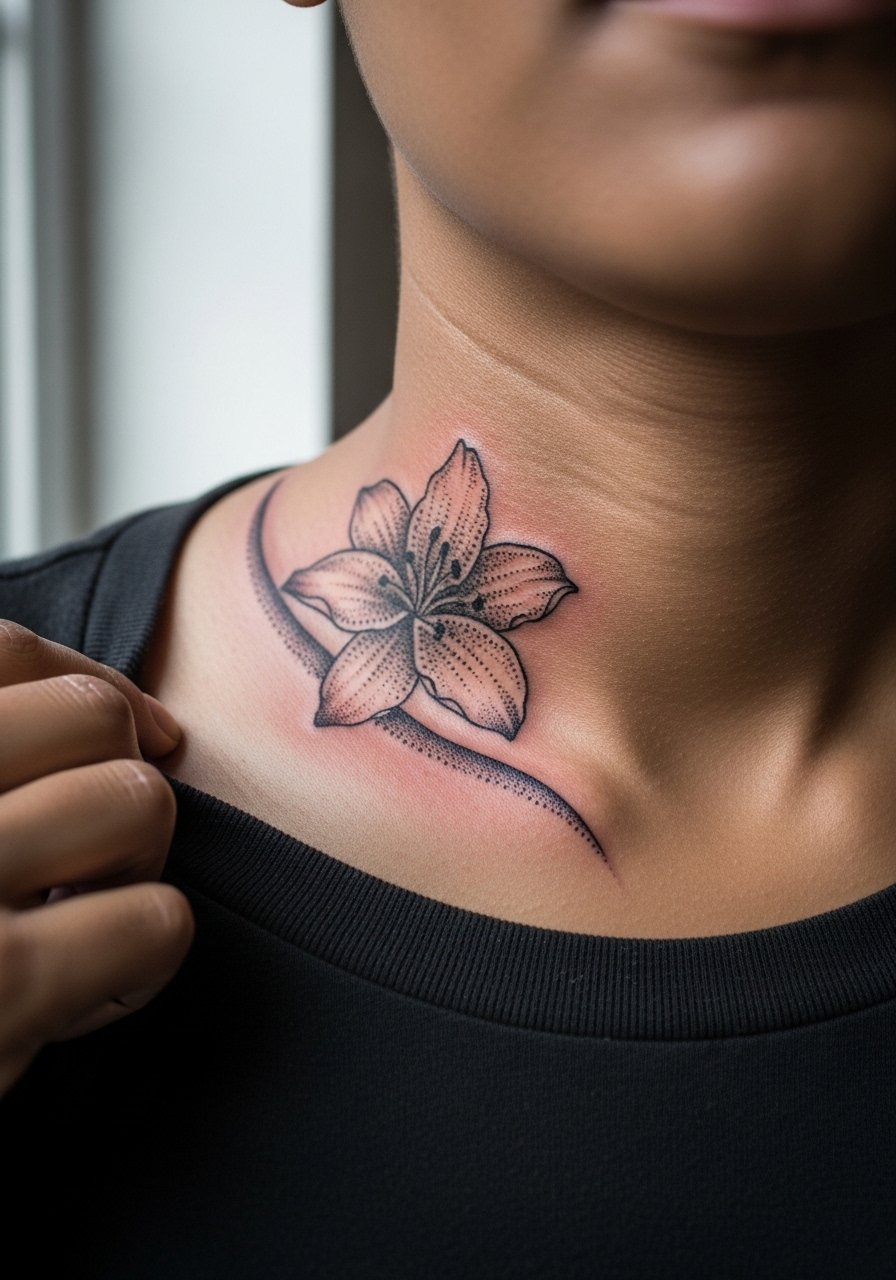
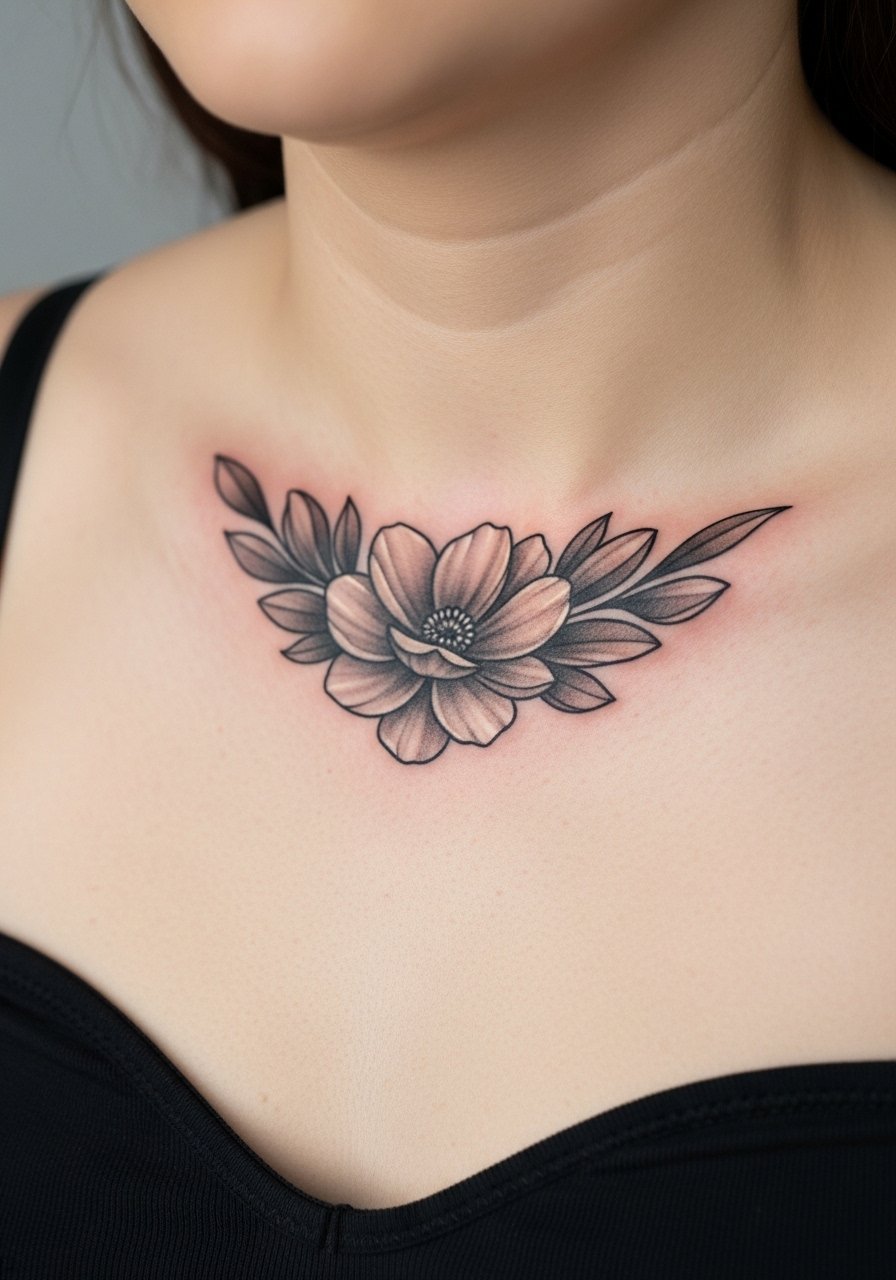
5. Micro-realism petal cluster near the collarbone peak
When someone wants the pressed-flower look, micro-realism is the route to convincing detail. Tell your artist you want fine stipple shading and subtle gray washes rather than flat grayscale blocks. Sessions run longer because of tiny tonal work and the collarbone is sensitive, so plan 90 to 150 minute windows with breaks. The aging story here depends on contrast; low-contrast pieces can fade into the skin and need touch-ups at two to three years. For show-off outfits, a sweetheart neckline top or dainty drop earrings let the realism read up close. Avoid asking for extreme micro detail at very small sizes because needles have limits.
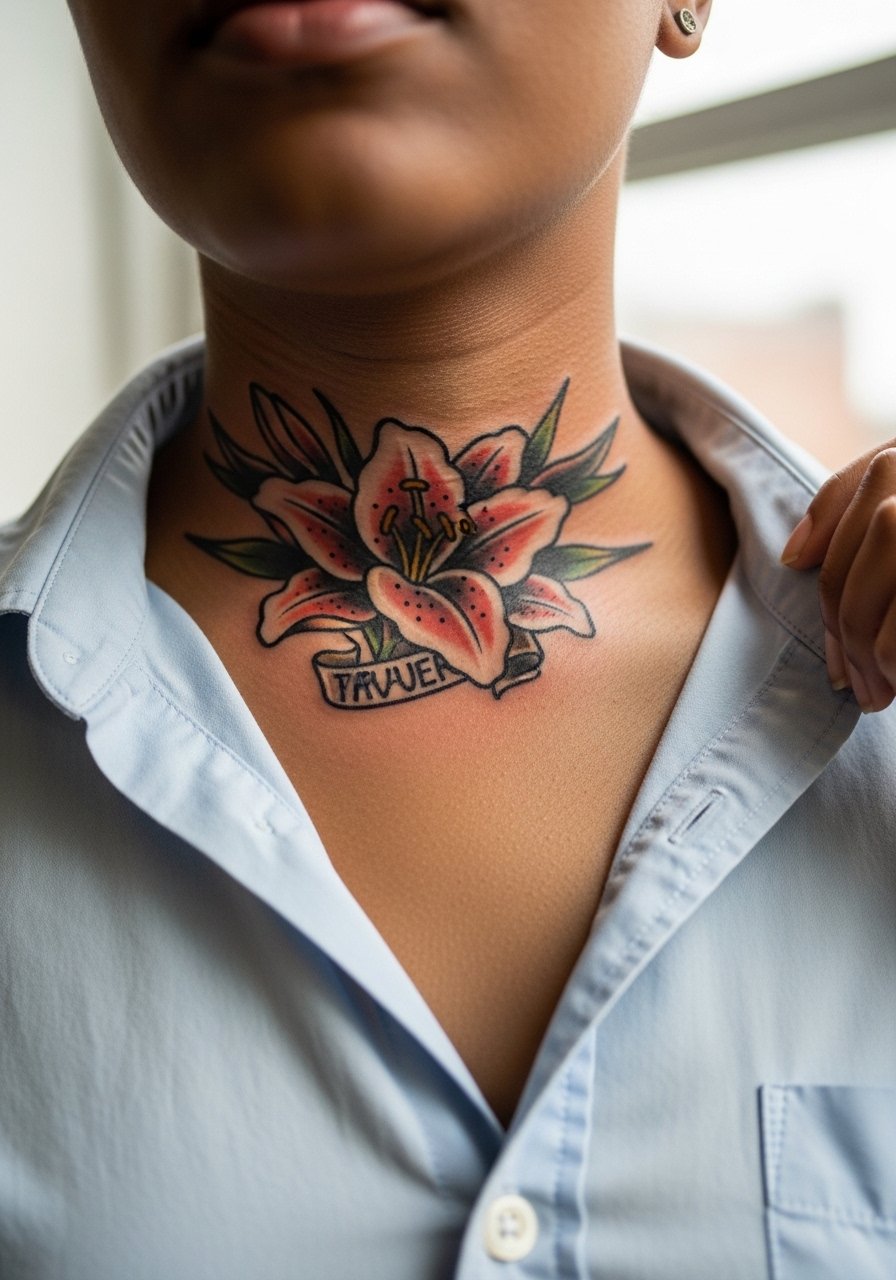
6. Traditional American lily with a small banner at the collarbone edge
This version leans into bold linework that keeps reading through years of sun and friction. Ask for a classic banner but keep text short so the letters do not become soup over time. The session is brisk because solid blacks and basic fills take fewer passes than realism. A frequent regret is making the banner too long or curving it wrong against the bone. If you plan to tuck blouses or scarves over the collarbone, remember saturated reds can stain fabrics while fresh. For session comfort, a strapless bra or a loose button-down is best so the artist has unimpeded access without fabric creasing the area.
Studio Day Picks
The ideas above mix fine line, watercolor, neo-trad and micro-realism on the collarbone, and each asks for slightly different prep. These picks smooth the session and the first week of healing for pieces on or near the bone.
-
Tattoo Goo Thin balm. Lightweight and less greasy than thicker ointments, it helps collarbone areas that sweat or rub against straps during the first days.
-
Inked Balm travel tin. Breathable formula that users praise for curved areas where thick butters pool, which is useful for the hollowed collarbone zone.
-
Heal Fast Serum. A thin serum option that avoids heavy occlusion on bone placements and can reduce scab thickness on delicate fine line work.
-
Bone Balm lightweight stick. Absorbs quickly and conforms to curved skin, which reduces transfer to clothing during the first week.
-
Aquaphor Healing Ointment. A thin layer early on can protect fresh fine work from friction, though some people prefer lighter balms once the initial redness subsides.
7. Ornamental lily mandala spanning the full collarbone
When symmetry is your goal, an ornamental mandala that traces the bone creates a meditative frame. Start the consultation with a printed mockup draped across your collarbone so the artist can match the symmetry to your anatomy. This one usually needs two sessions to nail the fine radial linework and to ensure even saturation across both sides. The common error is centering the design off the natural dip, which makes one side look heavier. For evenings out, a strappy cami and layered thin necklaces follow the mandala lines without clashing. Keep in mind some artists recommend larger scale to avoid the dense pattern blurring over years.
8. Ignorant style messy lily scribble in the collarbone dip
This messy sketch approach embraces imperfections and looks intentionally raw on curved bone. If you like motion over polish, tell the artist to prioritize energetic strokes and variable line weight rather than even outlines. Sessions are fast and often single-visit, which is one reason this style appeals to walk-ins. The trade-off is that spontaneous strokes can age unpredictably, so accept a lived-in look as part of the aesthetic. A real mistake is trying to over-refine scribbles into tight realism. If you are concerned about aftercare, discuss Saniderm versus dry healing options with the shop because opinions vary widely and both camps argue their approach is better for collarbone movement.

9. Dotwork lily with negative space along the collarbone curve
Dotwork thrives on texture and can create a hypnotic petal field that follows the bone. Ask for stippling density maps in the consult so you can see how shadows will read at arm's length. Dotwork takes patience during the session because stipple shading is slow and can be more uncomfortable near the bone. A common mistake is cramming too many dots into a narrow space, which creates a muddy look later. Pair this design with a crew neck tee for casual days or a single pearl pendant for more formal outfits. Touch-ups are usually needed at two to three years to restore contrast.
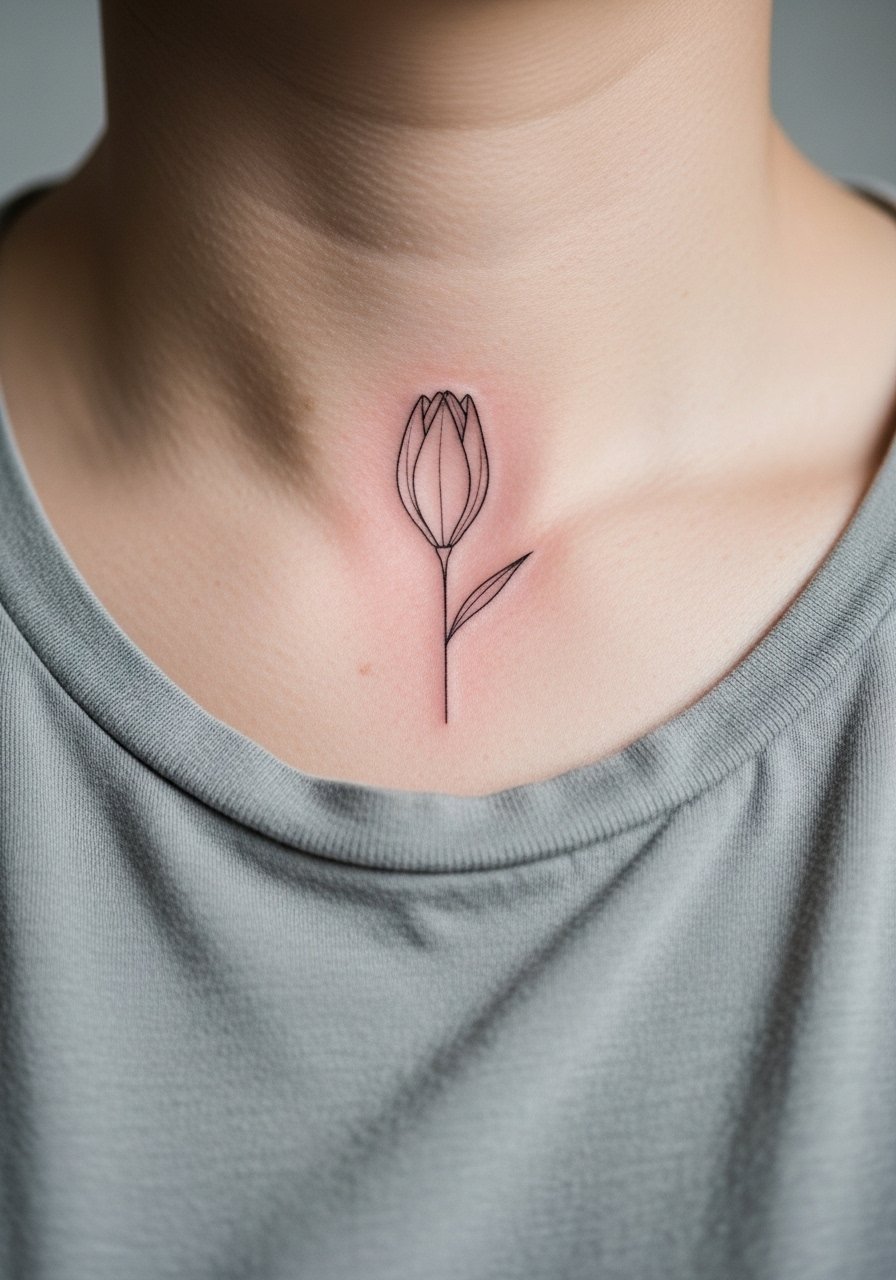
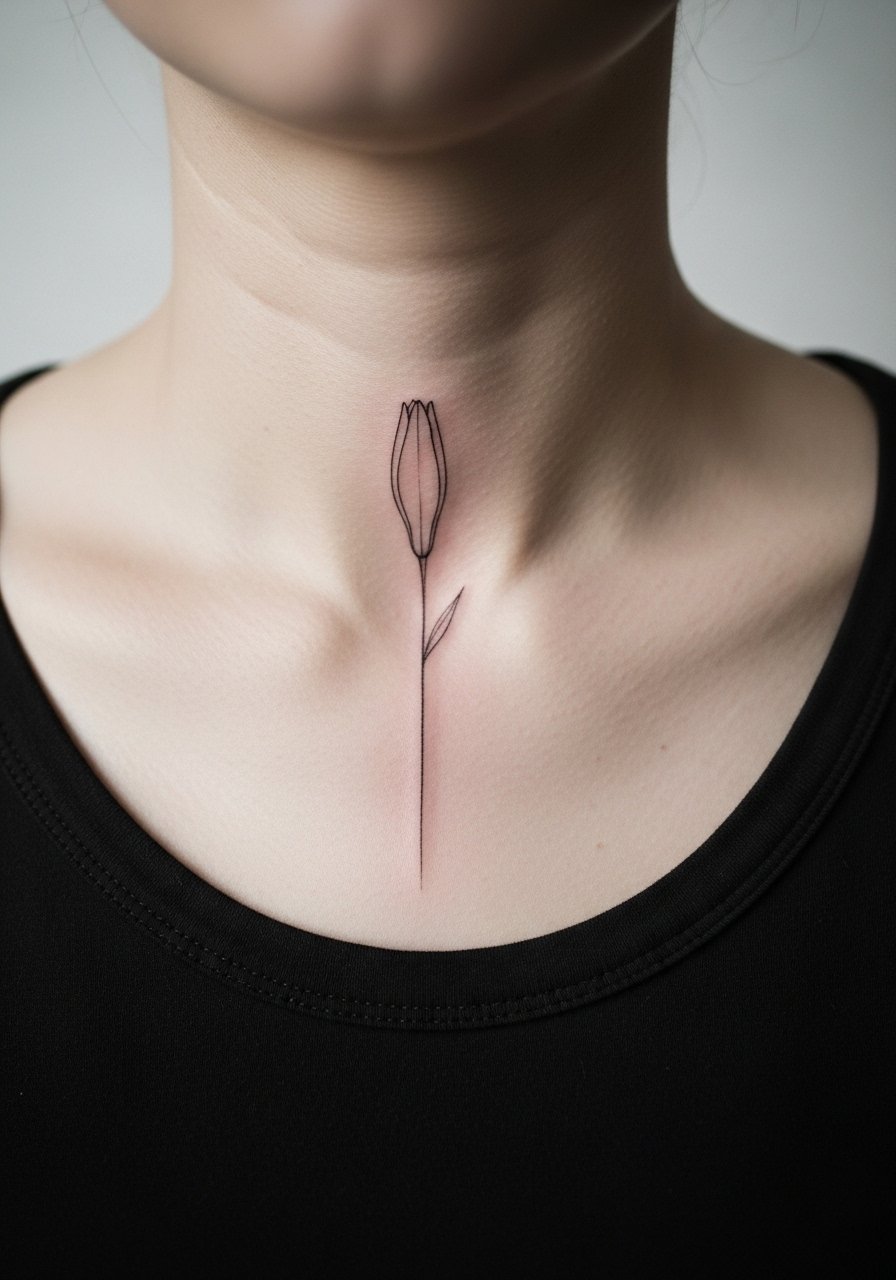
10. Minimalist lily bud silhouette on the collarbone peak
Most first-timers pick a small bud for a reason: it is quick, low-commitment, and easy to hide under collars. The biggest practical tip is to size it so proportions match your collarbone peak; too small and it disappears in photos. Sessions are brief and the pain is manageable but direct on bone. This style ages simply because there is less linework to blur. A frequent mistake is asking for extra tiny lettering next to a bud, which can turn unreadable. For shows and layering, a single pearl necklace or a soft crew tee keeps the peak visible without crowding it.
11. Botanical realism stem wrapping the collarbone
I have seen this style read as a natural vine that complements shoulder movement and swimwear. Tell the artist you want the stem to follow the bone precisely so curves remain balanced through weight shifts. Expect multiple sessions for the full 5 to 6 inch wrap because realism needs layered washes. A common regret is choosing too many tiny leaves in narrow spots, which can blur. For seasonal showing, a boat neck top or summer tank keeps the stem visible and flattering. Darker skin tones can benefit from stronger black outline anchors to keep the botanical readable in photos.

12. Fine line lily with dew drops nestled in the collarbone hollow
Most people pick dew drops for a little sparkle without color. Ask for dot highlights instead of tiny whites that can disappear on darker tones. The session is moderate length because the dew requires careful stippling and micro highlights. An aging trade-off is that very light highlights can fade and leave a flatter look, so plan a touch-up at one to two years. Avoid the mistake of cramming dew drops into every petal. For session wear, bring a low cut tank or a loose scoop top so the artist can access the hollow without fabric friction.
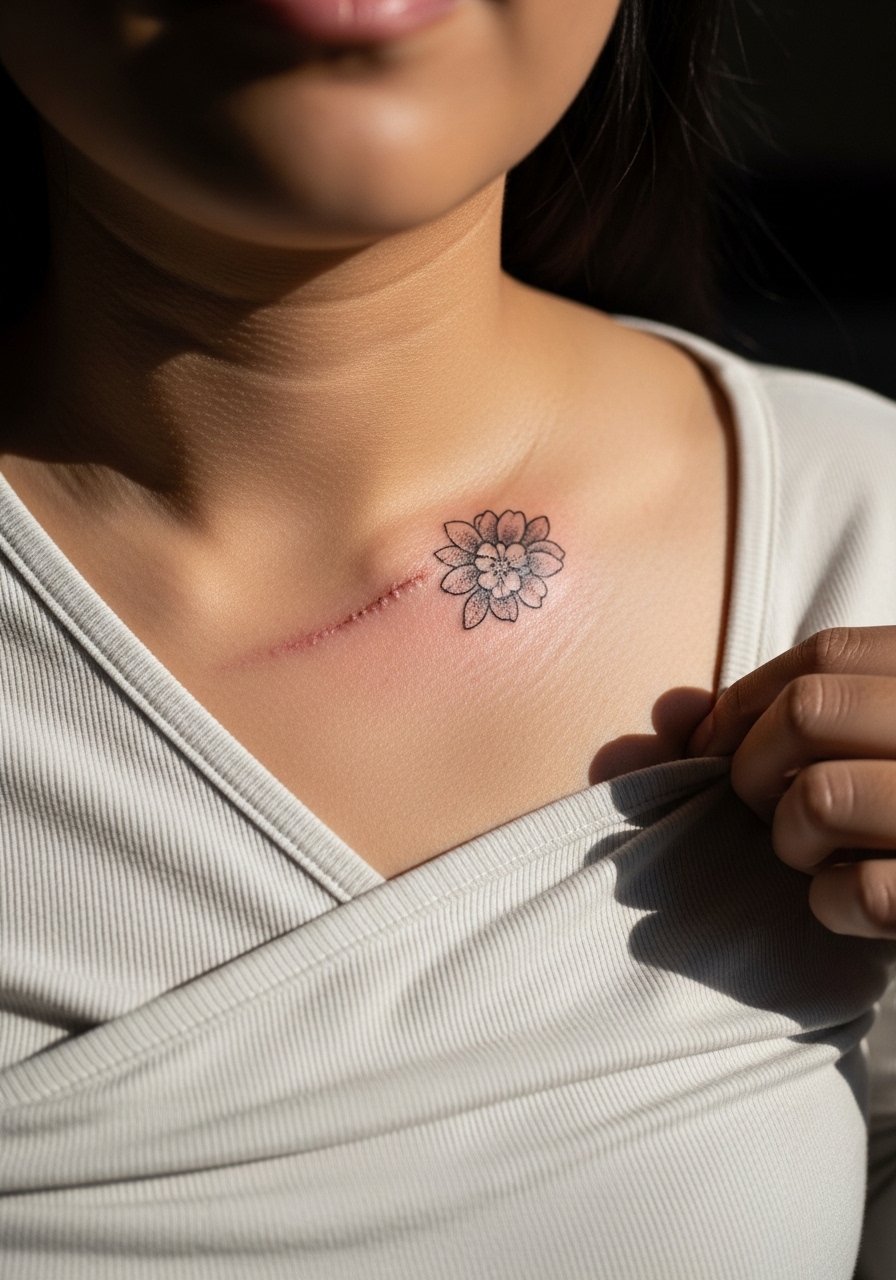
13. Micro petal cluster for scar camouflage on the collarbone
This is one of the underused approaches that combines design with healing history. If you have a small scar, ask the artist to integrate petals and leaves over and around the scar tissue. The consultation should include a healed-scar preview so you both agree on coverage density. Sessions vary depending on scar texture because tattooing scarred skin can be slower. A common misstep is trying to layer heavy saturation over fragile raised scars. For showing results, a wrap top or a vintage band tee keeps attention on the cover while remaining casual. Not every artist does scar work, so use discovery pathways like Instagram hashtags and booking apps to find specialists.
14. Black and gray single petal cluster hugging the collarbone curve
If you want minimal color but strong contrast, a black and gray petal cluster is a resilient choice. Tell the artist you want high contrast in the first pass so you can see how shading settles at six months. A mistake is requesting feathered gray across tiny petals, which can merge into an indistinct block later. Sessions are moderate and pain sits in the usual collarbone sensitivity range. For styling, a chunky chain necklace can contrast bold blackwork without covering the petals. Expect a touch-up at two to three years to refresh midtone shading if you get heavy sun exposure.
15. Minimalist vertical bud with stem tucked over the collarbone peak
This one reads almost like jewelry because of its vertical placement. When you consult, show how the stem will sit under necklace chains so nothing interferes visually. Sessions are short and often finish in one visit. The typical error is centering it too close to the neck where shirts rub the top edge. For session prep and later wear, throw on a round neck shirt that you can pull down slightly so the artist can work without catching fabric. Minimalist verticals age well because there is less detail to blur, though any thin line may need a light refresh at year three.
16. Neo-oriental lily with flowing stems toward the shoulder
The neo-oriental aesthetic uses sweeping stems and selective color to read like movement across the collarbone and shoulder. Tell your artist you want motion, not static petals, so stems curve with musculature. This is a multi-hour session and may need two visits for clean saturation across both bone and shoulder. A common slip is forcing rigid symmetry onto a design that should be organic. For showing it off, a boat neck top or halter style lets the flow read naturally. If you plan to expose the area often, ask about stronger black anchors to retain shape as color fades.
17. Micro-realism single petal cluster tucked along the inner collarbone
This final idea is for people who want hidden detail that shines up close. In consults, ask for high-resolution mockups on your skin so you can see scale. Work time is longer than a simple outline because micro realism needs layered tones and a steady hand near bone. The usual mistake is shrinking the piece down until it loses impact. For session comfort wear a strapless bra or a loose button-down you can move aside. Over the years the fine tonal work will mellow and a touch-up at two to three years keeps contrasts crisp.
Frequently Asked Questions
Q: Will a fine line lilly tattoo design on collarbone fade faster than a bold version?
A: From what I've seen, fine line work tends to lose crispness sooner than bold blackwork on exposed collars. The thin strokes have less material to hold up against sun and friction. Expect a touch-up at one to three years for fine line pieces, while a bold outline may go longer before a refresh is needed.
Q: How painful is a collarbone lily session and can numbing cream help?
A: Collarbone sessions are often described as a sharper sensation because the needle rides close to bone. Numbing cream reduces immediate discomfort for many people, though some artists prefer clients to feel normal tissue feedback. Ask your shop about their stance and plan 60 to 120 minute appointments with breaks if you pick a sensitive spot.
Q: Which healing route is better for collarbone tattoos, Saniderm or dry healing?
A: Artists and regular clients split into two camps. One camp prefers protective film like Saniderm for mobility and reduced rubbing. The other camp favors dry healing and thin breathable balms to avoid trapping scabs. The right choice depends on your clothing, activity level, and how much the area rubs during day-to-day life.
Q: I have darker skin. Which lily approach will show up best on my collarbone?
A: Blackwork and stronger outlines generally read better in photos and last longer on darker tones. If you want color, ask for deeper saturation and darker anchors so shades remain legible as they mellow. A consult with an artist experienced with your skin tone is the best next step; use hashtags and booking apps to find portfolios that match.
Q: Where can I find artists who specialize in collarbone lilies if local shops are sparse?
A: Search discovery pathways like Instagram hashtags for your city and #collarbonetattoo, check short-form videos on TikTok with location filters, and use booking platforms that list guest spots. Those channels surface artists who travel or do limited guest weeks and can help you book a specialist without naming individuals.
