
Sitting in the chair with the stencil just behind the ear is when choices feel very small and very permanent. The skin there is thin and close to bone, so line weight, spacing, and how the image interacts with hair growth matter more than most people expect. These behind-ear takes are small, intentional, and chosen to age with you when done with the right spacing. Start with options that read well at six months and still read at five years.
1. Mini Pagoda Silhouette in Fine Line
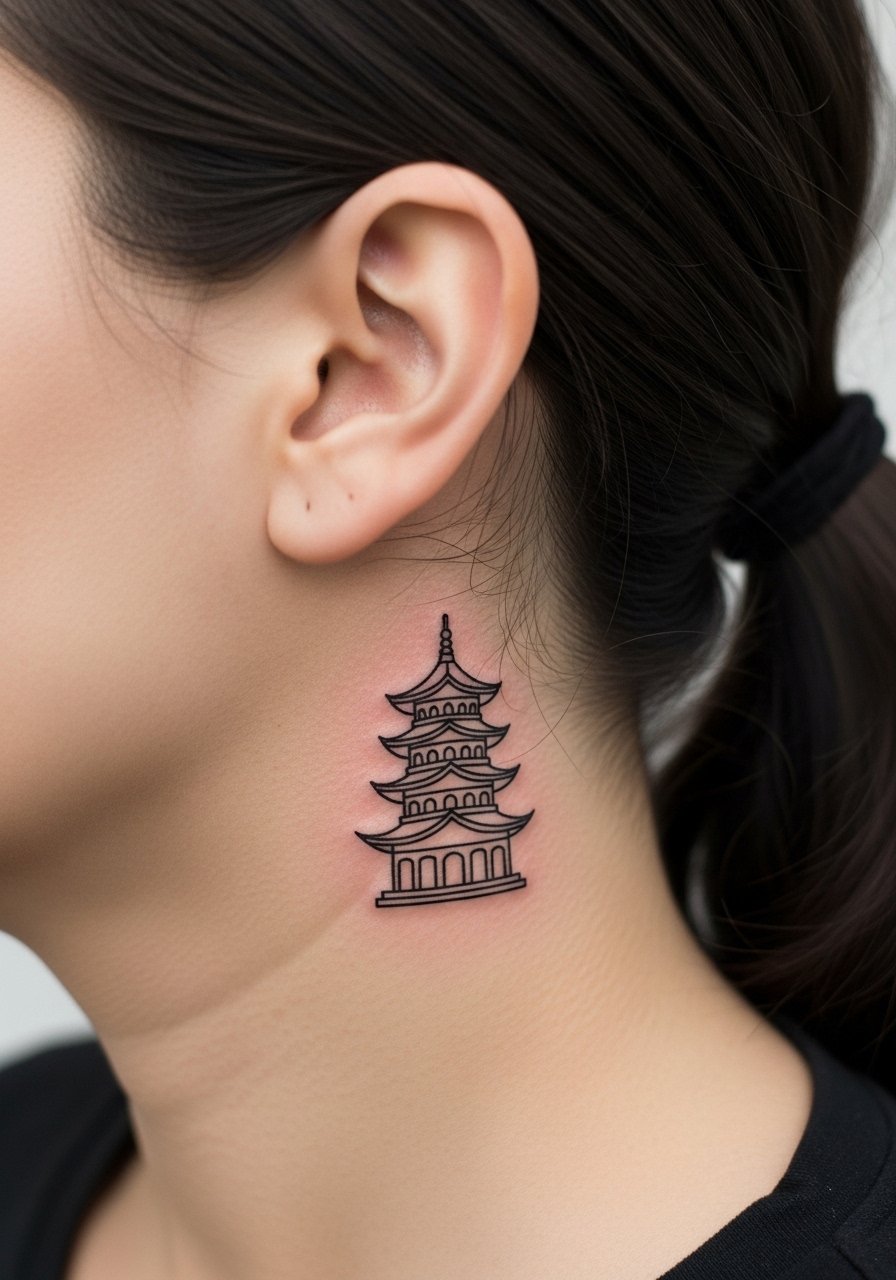
A shrunk pagoda reads best as a silhouette with clear negative space around each tier. Tell your artist you want slightly heavier outer lines and feathered interior strokes so the tiers do not merge as the ink settles. Pain is low to moderate because the area is small, but needle pressure near the mastoid bone can feel sharp for short bursts. Expect a one-session ten-to-thirty-minute appointment. Common mistake is packing too much detail into the tiers, which blurs by year three. For showing it off, pin your hair back with a silk hair scarf or a low clip to keep the area visible without daily fuss. This motif ties to temple architecture, so consider slight simplification rather than exact replicas.
2. Torii Gate Linework with Tiny Clouds
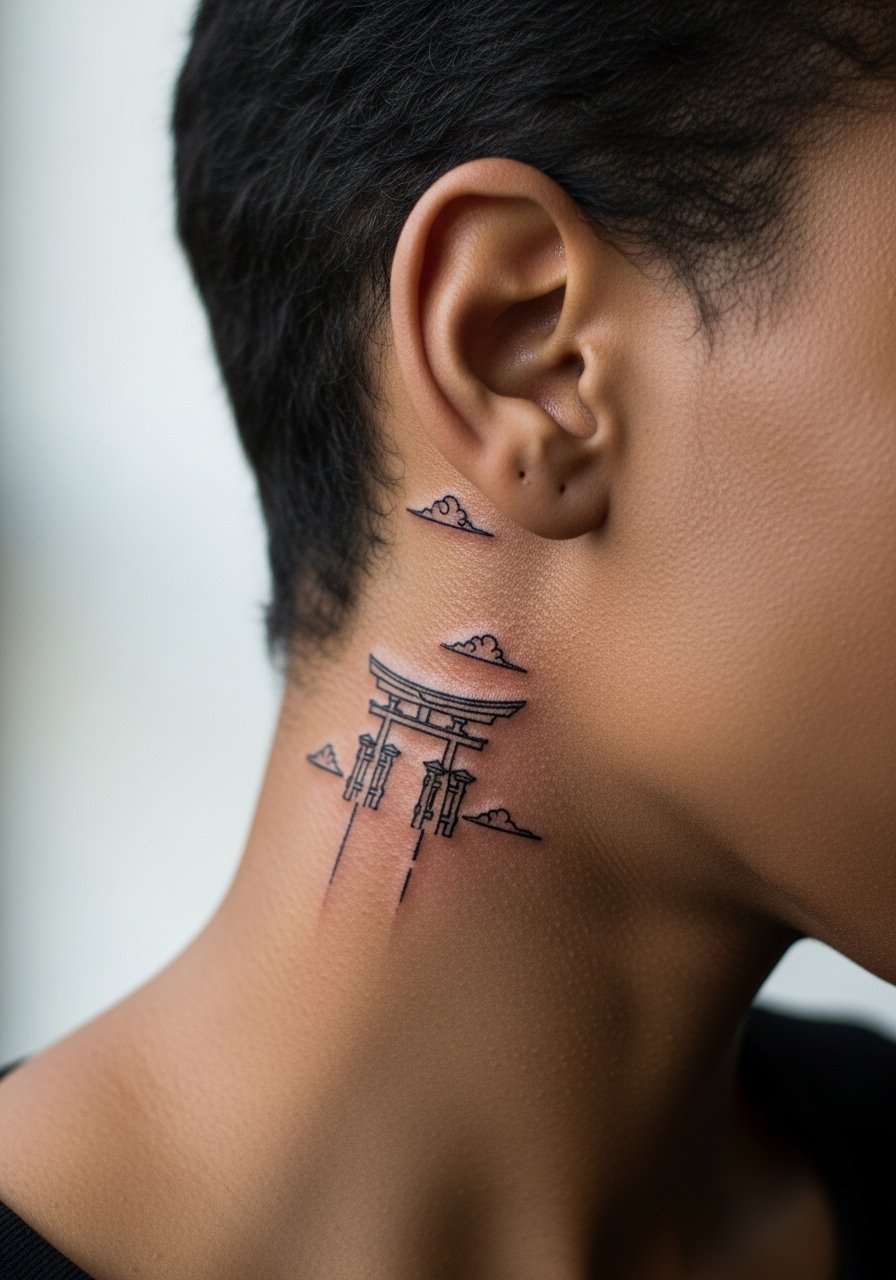
The torii gate works well as a compact vertical mark that follows the natural curve behind the ear. Ask for a touch of spacing above the crossbar so the clouds read separate as the lines soften. The session is quick and usually under thirty minutes. Expect the first six months to look crisp and at two years the clouds will blur more than the gate if the lines are too close. A common error is going ultra-thin across the entire piece. For an understated daily highlight, wear a thin chain pendant necklace that sits near the jawline to balance the motif visually.
3. Stone Lantern (Toro) with Moss Detail

A stone lantern gains depth from stipple shading rather than heavy color. When you consult, request stipple for texture and avoid full color fill. The piece feels like a short, slightly ticklish session because the artist will linger for texture. Blowout risk is moderate if the dots are placed too densely. At two years, stipple holds pleasantly if spaced; at five years dense dots can flatten into a gray wash. For the session, wear a wide-neck shirt you can pull slightly aside so the artist has clear access without exposing more than the immediate area. The lantern image comes from shrine grounds, so a simplified version avoids literal shrine reproduction.
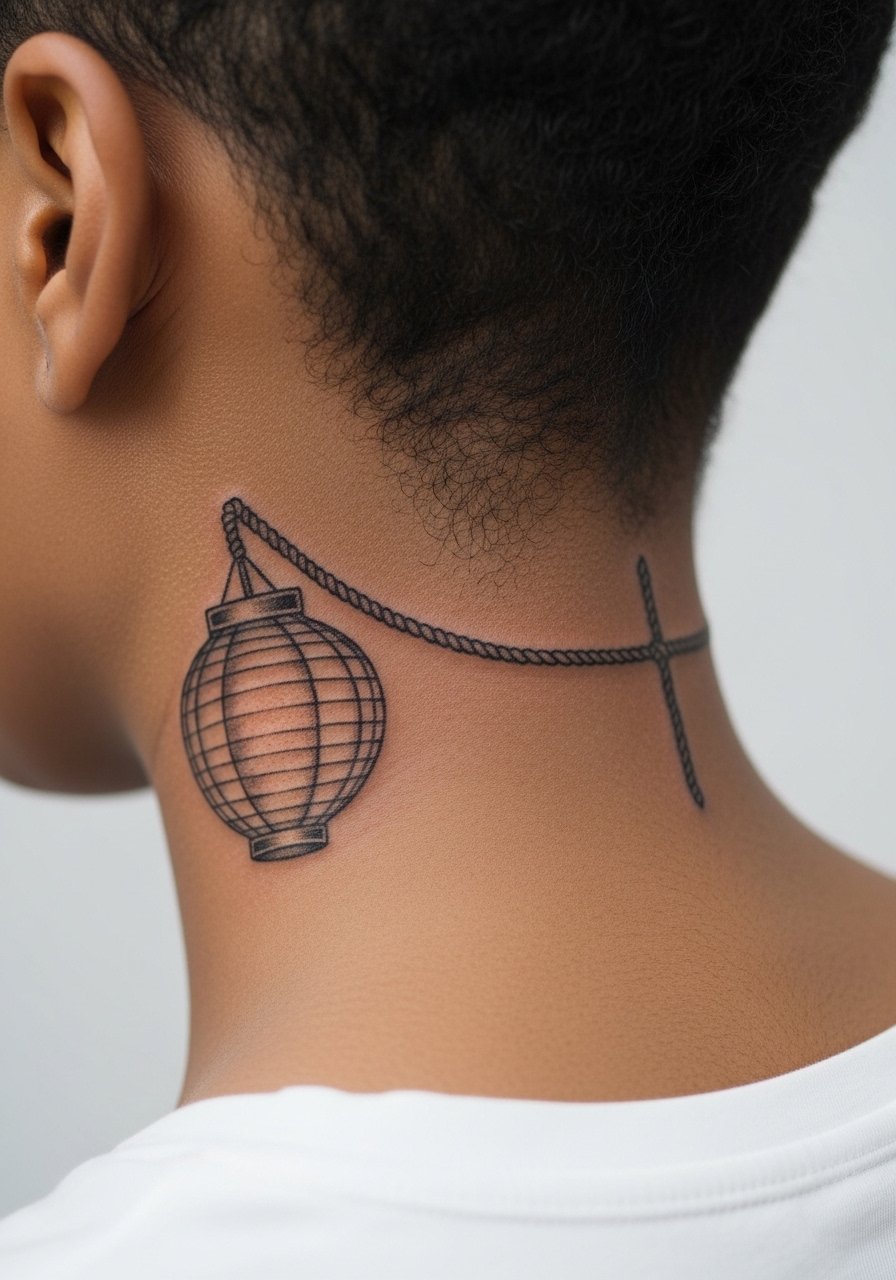
4. Small Chochin Temple Lantern in Blackwork
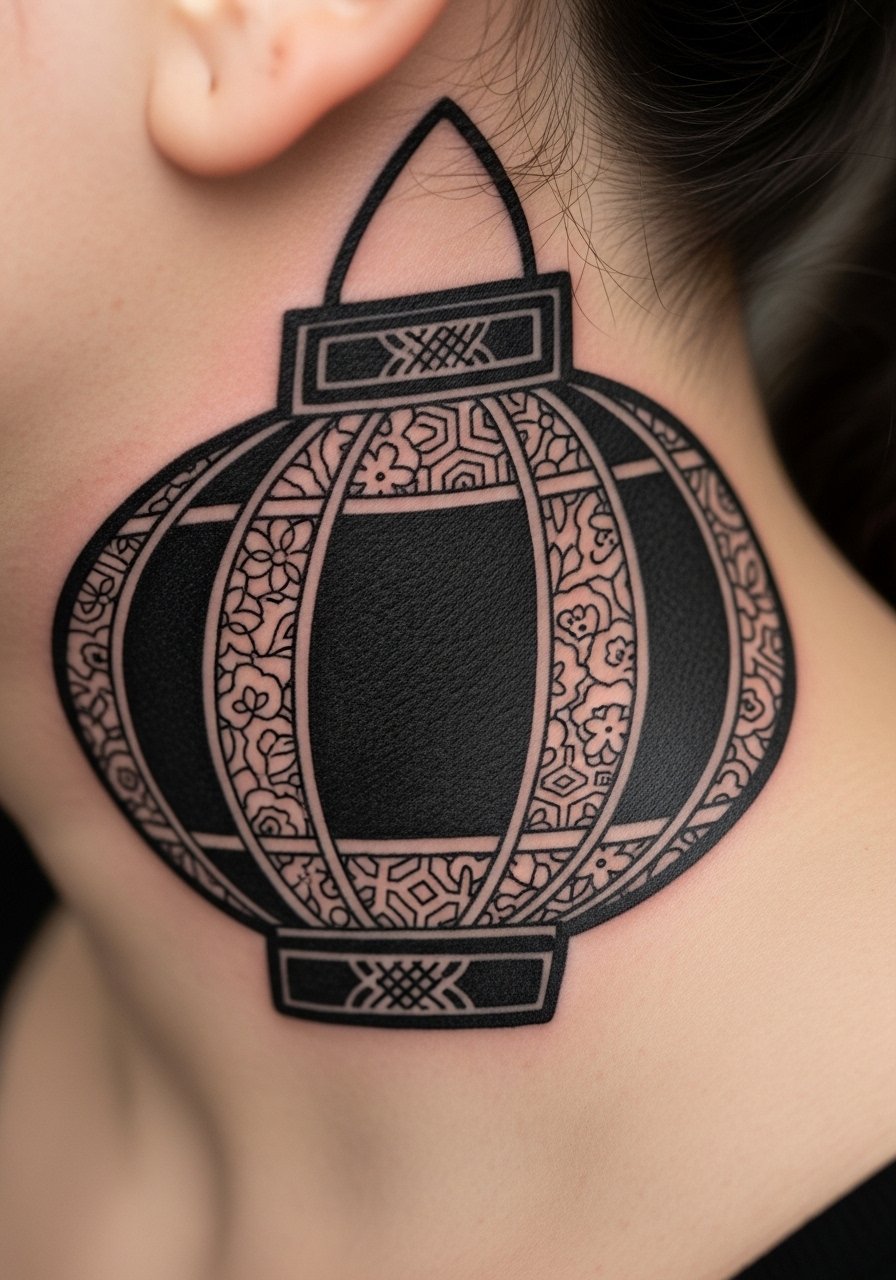
Blackwork lanterns age well because saturation holds longer than thin lines. Ask the artist for slightly reduced saturation near edges to prevent a crisp black halo that can look heavy as it settles. This placement is quick but sensitive, so the session feels like short focused bursts. Expect a touch-up at around year three for perfect edge definition. A common mistake is trying to add tiny script inside the lantern, which usually becomes illegible. Pair the lantern with small hoop earrings for balance and choose a subtle clip-back hair barrette during the first week so the area stays visible but protected.
5. Cherry Blossom Branch with Temple Roof Tip

Cherry blossoms read as movement when the branch follows the jaw curve. In consultation, say you want the blooms spaced so each blossom remains distinct at six months. Pain is low because the work is mostly line and small fills. The common aging issue is over-detailing the petals; they need breathing room or they merge. This design pairs well with a lightweight silk hair scarf for evenings when you want to show the piece without exposing scalp. Note on cultural sensitivity, cherry blossoms are significant in Japanese culture, so avoid combining them with sacred temple iconography in a way that feels like direct duplication.
6. Tiny Komainu Guardian Face

A komainu face behind the ear is compact and symbolic. Ask for simplified features and slightly bolder outer linework to prevent early softening. The session is brief and can feel sharp near the bone. Artists debate whether mythic or literal depictions are appropriate. One camp favors respectful stylized interpretations that reference the guardian spirit. The other camp says small replicas of sacred statues can feel insensitive. If you are unsure, choose a stylized version and ask your artist how they source reference material. For showing it off, small stud or cuff earrings frame the area well.
Pack Smart
The six designs above live in a high-movement zone, so small prep choices save headaches. These items help with session access and first-week protection for behind-ear placements.
-
Silicone stencil transfer pad. Helps confirm placement on the curved area behind the ear so the gate and roofs sit where you expect.
-
Topical numbing cream. Use cautiously and discuss with your artist; applied correctly it eases the quick needle bursts behind the ear.
-
Thin protective film roll. Ideal for protecting the tiny area from hair and shampoo friction during the first 24 to 48 hours.
-
Fragrance-free gentle body wash. Cleanses the area without irritating fine linework or delicate stipple texture.
-
Aquaphor healing ointment. A thin layer during the first few days helps with scabbing control on compact designs without suffocating the skin.

7. Micro Koi Curve That Follows the Jawline
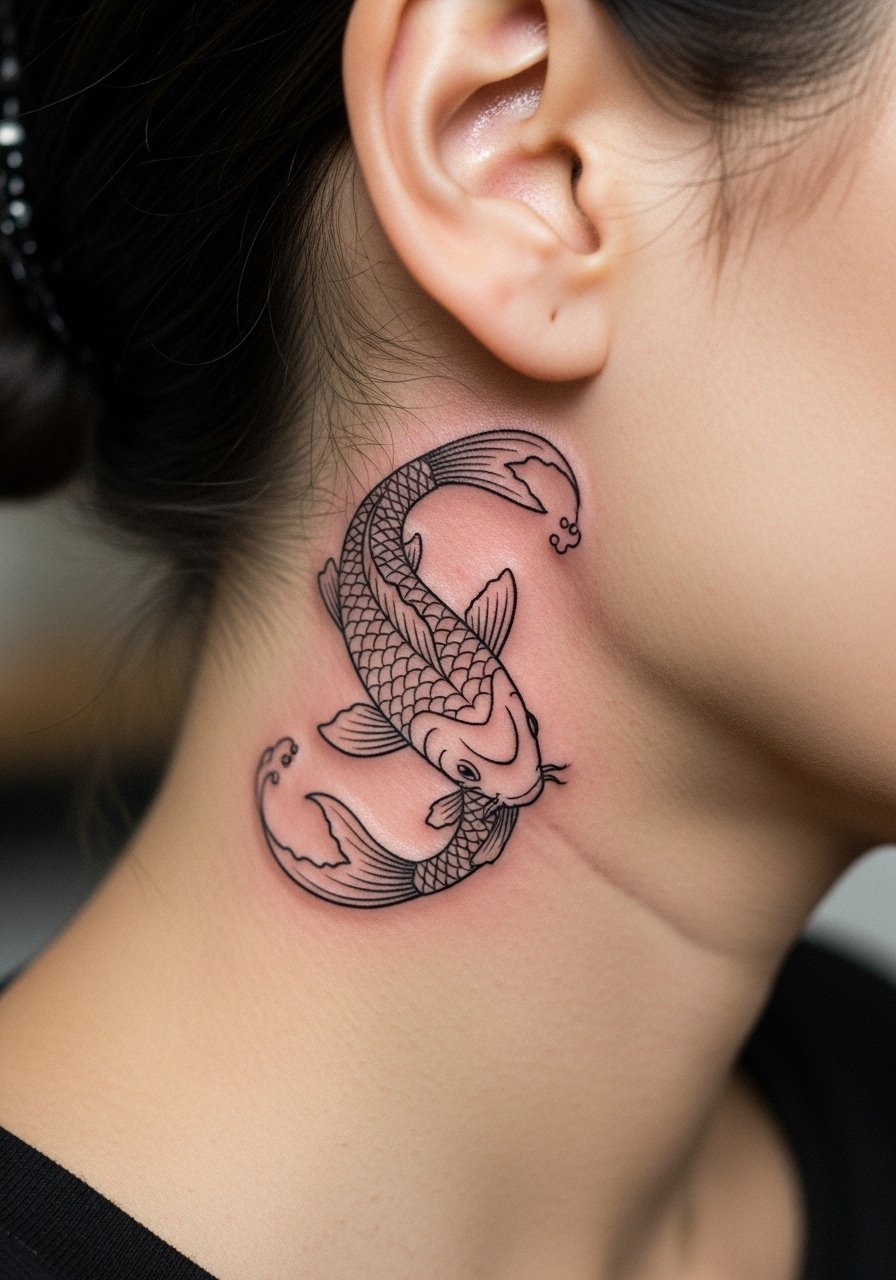
A micro koi behind the ear reads as a curve that compliments the jaw. Ask your artist to orient the fish so its flow sits with your natural hair part. Session time is short but the area is sensitive near the mastoid. Expect color to soften more quickly than black outlines, so keep color fills sparse. A real mistake is trying to squeeze scales into a three-quarter-inch fish. For dressing up, a pair of small hoop earrings helps the curve read as intentional styling rather than a random mark.
8. Incense Smoke Lines Rising Above a Tiny Shrine
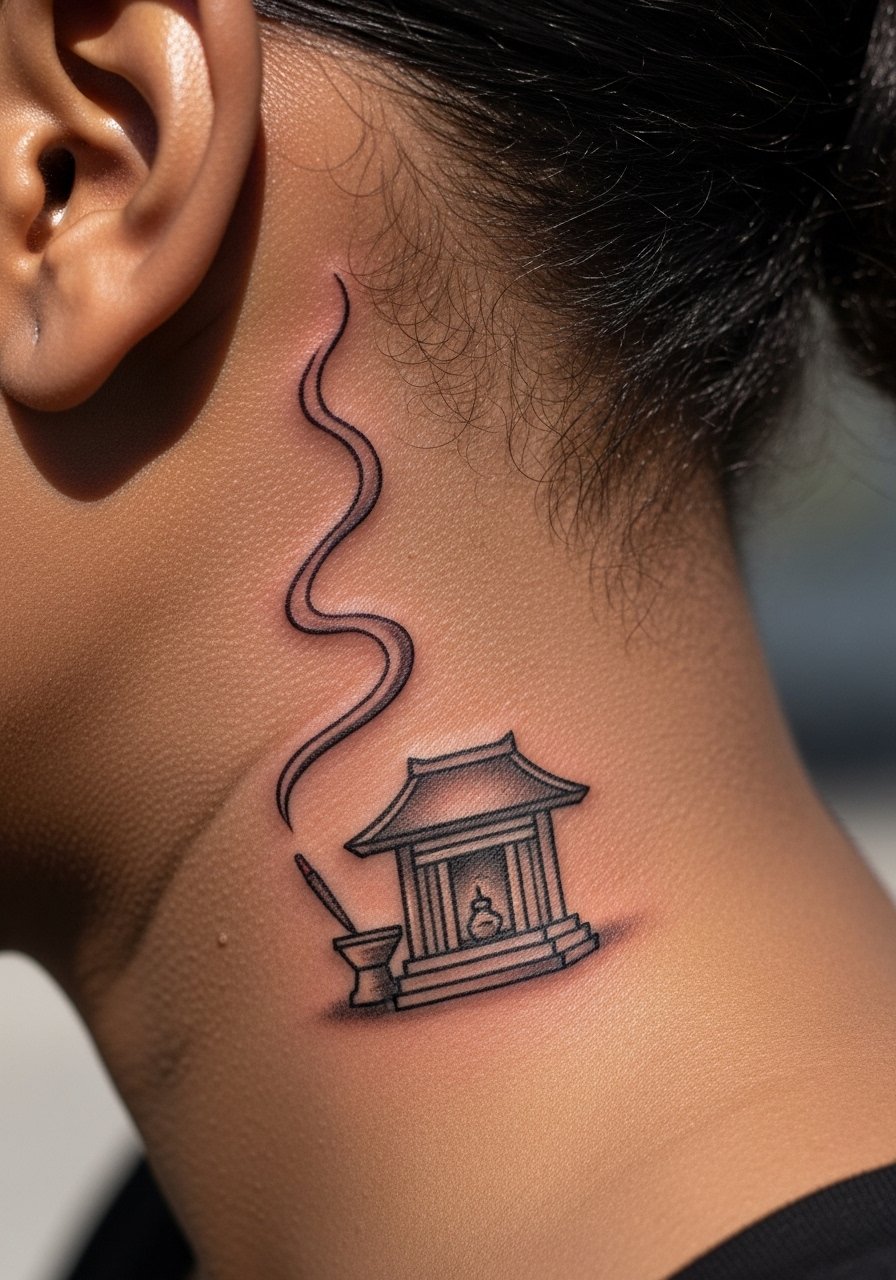
Whip shading creates the soft smoke lines that look good behind the ear because they can be narrow without crowding. Tell the artist you want the smoke to breathe and not touch the shrine silhouette so the smoke will still be visible after two years. The session feels quick and slightly more ticklish with the soft shading technique. The common error is compressing smoke curls into a tiny area. This is a good option for someone who wants symbolic motion with low visual weight.
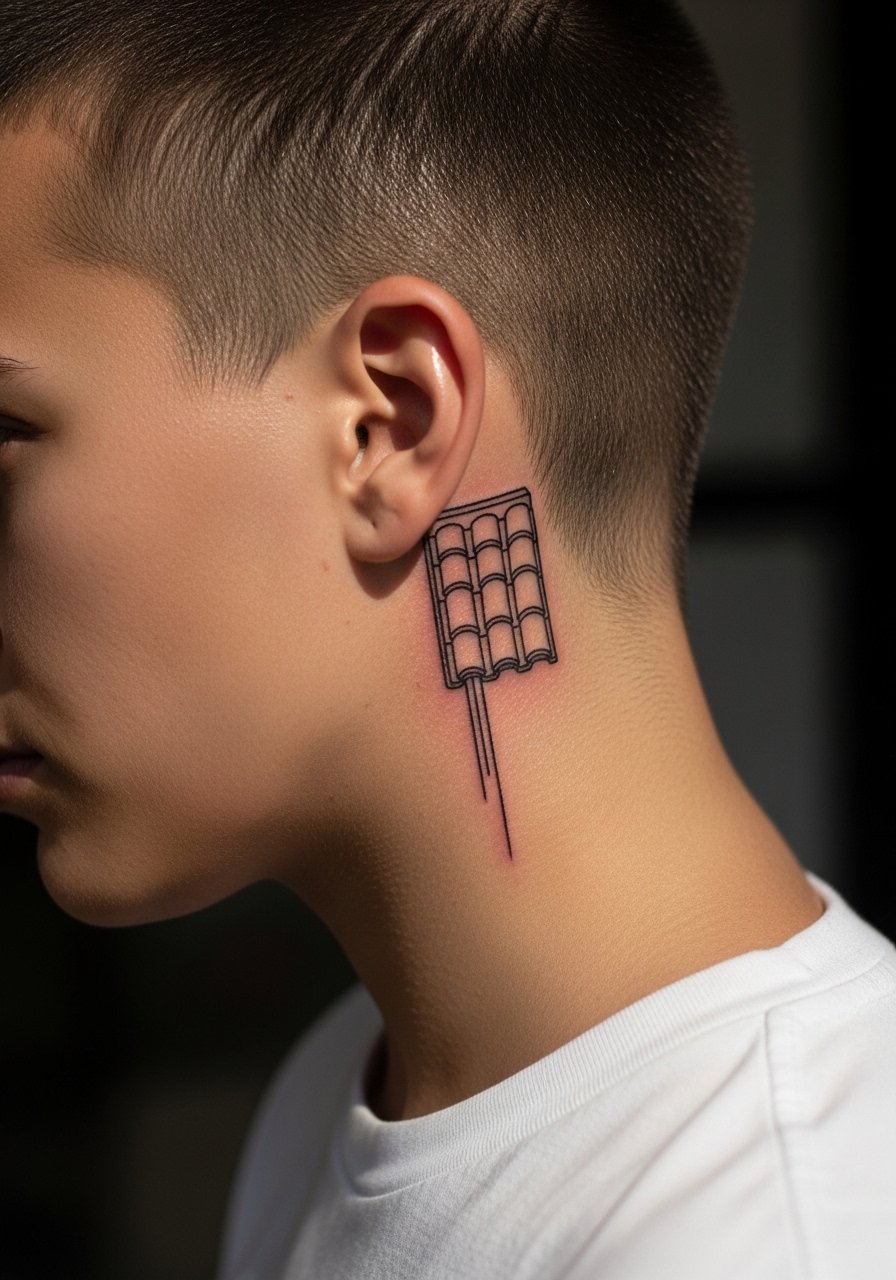
9. Small Temple Roof Tile Pattern as Ear-Trim Accent

Repeating tile motifs work well as a textured band that sits just behind the ear. You should ask for spacing between each tile so the negative space survives as lines migrate over time. These read like jewelry and pair nicely with a clip-back hair barrette or small ear cuff when you want to keep the area visible. A typical session is under thirty minutes. Avoid stacking too many tiles in a narrow band or the pattern will lose clarity by year three.
10. Tiny Ema Plaque with Single Kanji
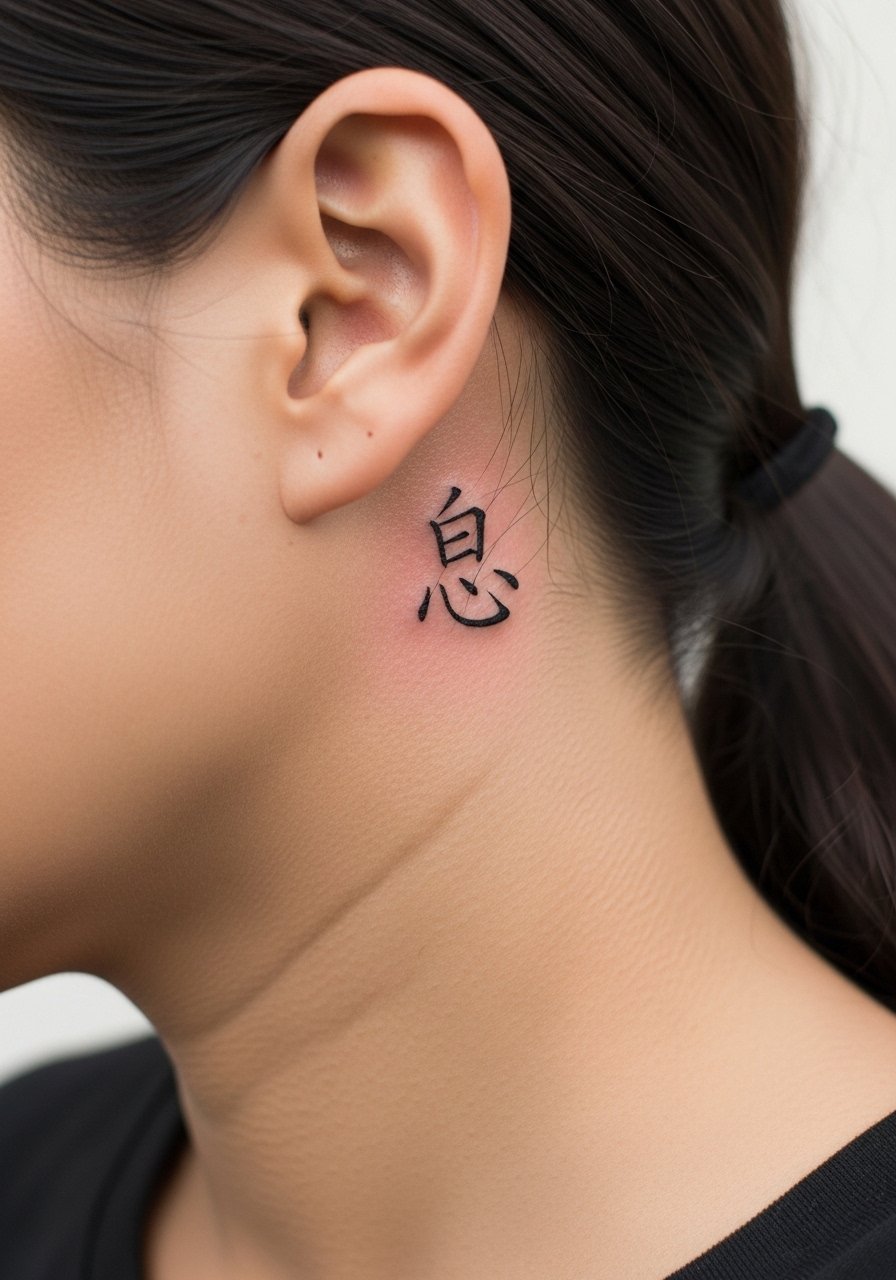
Text behind the ear must be chosen carefully. If you want a kanji, provide the exact character and its meaning and confirm spelling with the artist. Lettering looks best at a slightly larger scale here so it does not blur into a line. The session is fast but precise. Common mistakes include picking a character without fully understanding nuance. This placement is visible enough that some workplaces notice small script, so consider career context. A simple pendant that sits above the collarbone helps balance a script mark.
11. Kitsune Mask Outline with Minimal Detail

Kitsune masks are bold motifs shrunk for the behind-ear zone. Ask for the interior features to be suggested rather than carved in. That keeps the mask readable longer. The area is sensitive, but the session is short. Artists debate whether mythic creature imagery should be stylized or literal. One group favors symbolic, simplified forms that fit small placements. The other group supports intricate miniatures done by micro-specialists. If choosing this, verify the artist's portfolio of micro-mythic pieces via studio directories or convention listings. For showing it off, a low ponytail clip that lifts hair will keep the mask visible.
12. Mossy Stone Steps in Stipple Shading

Steps suggest movement and time within a small space. Stipple shading gives texture without heavy saturation. Tell your artist you want clear separation between each riser to avoid merging. The session feels like a short study in texture and can be ticklish. At two years, stippling that was too dense can start to look like a light gray patch. Wear a wide-neck shirt to the session so you can expose just the neck area without uncomfortable tugging.
13. Tiny Temple Bell Silhouette with Rustic Patina
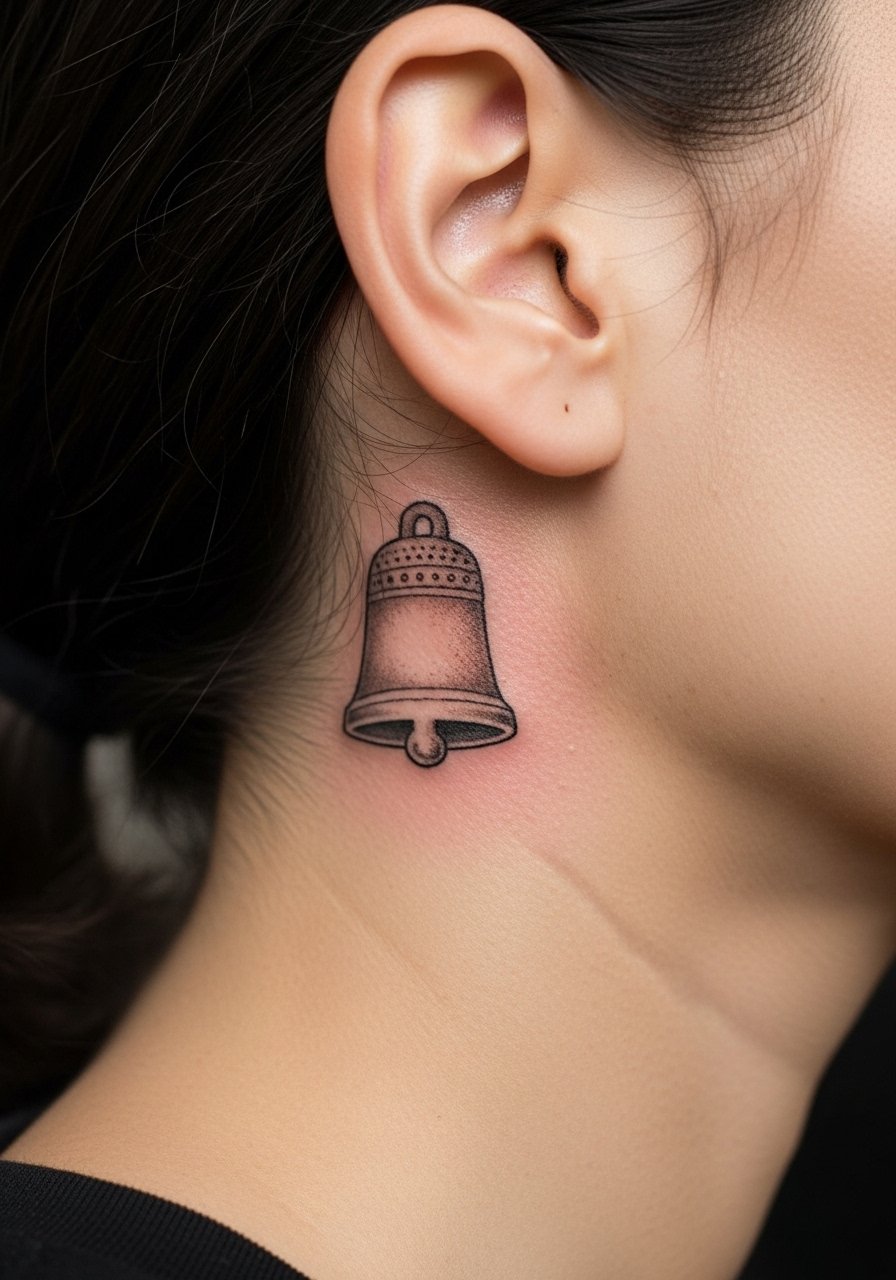
A bell silhouette works as a compact vertical mark. Request soft edge shading for a patina effect rather than heavy color. The session is brief. The main risk is trying to add too much aged detail, which gets lost. For a day-to-day highlight, a small stud earring positioned just above the tattoo lets it peek out. If you want the bell to feel aged rather than new, ask for gentle grain in the shading rather than crisp texture.
14. Zen Circle Ensō with Tiny Temple Line

A single brushstroke ensō translates well behind the ear when scaled up slightly over ultra-micro. Ask for natural variation in stroke width so it keeps personality as it heals. The session is under thirty minutes and feels quick. Common mistakes are going too small which eliminates the brush-like character. This design reads as personal ritual rather than direct shrine imagery, which sidesteps some appropriation concerns. Pair it with a thin chain pendant necklace to create a vertical visual line.
15. Tiny Stone Steps with Mini Torii at the Top

Combining steps with a miniature torii makes a small narrative piece. In consultation, emphasize negative space between step edges and the torii so each element reads on its own. The session takes slightly longer because of the two elements. Expect a low chance of blowout if the lines are kept bold enough. For showing it off, a silk hair scarf tied to lift hair at the back frames the scene without overexposing it.
16. Miniature Roof Tile Crest as Ear-Edge Accent
A crest at the ear edge acts like jewelry. Ask for slightly bolder outlines so the geometry doesn't blur. This placement is visible when hair is tucked, so think about daily hairstyles. Session time is short. A common error is trying to place too many geometric points in a tiny space. For balance, pair with delicate studs or an ear cuff.
17. Inked Paper Lantern Motif with Tiny Rope Detail
Paper lanterns are light and readable when kept airy. Tell the artist you want open areas inside the lantern rather than full fill. The session feels light but precise. If rope details are cramped, they will flatten by year three. For the session, a loose button-down shirt you can pull aside gives easy access without exposing anything beyond the hairline. Lantern imagery is common in cultural contexts, so a simplified study usually reads as homage rather than replication.
18. Mini Shrine Gate with Tiny Stone Path

Shrine gates with a hint of a path suggest pilgrimage in a very small symbol. Ask for clear spacing between path stones and the gate supports. The session is short and can feel sharp near the bone. A typical mistake is cramming too many path stones. This is a good pick for someone who wants a meaningful landmark motif without large-scale work. Wear hair up or a low ponytail clip to reveal the piece on special occasions.
19. Tiny Wave and Cloud Crest in Irezumi-Inspired Lines
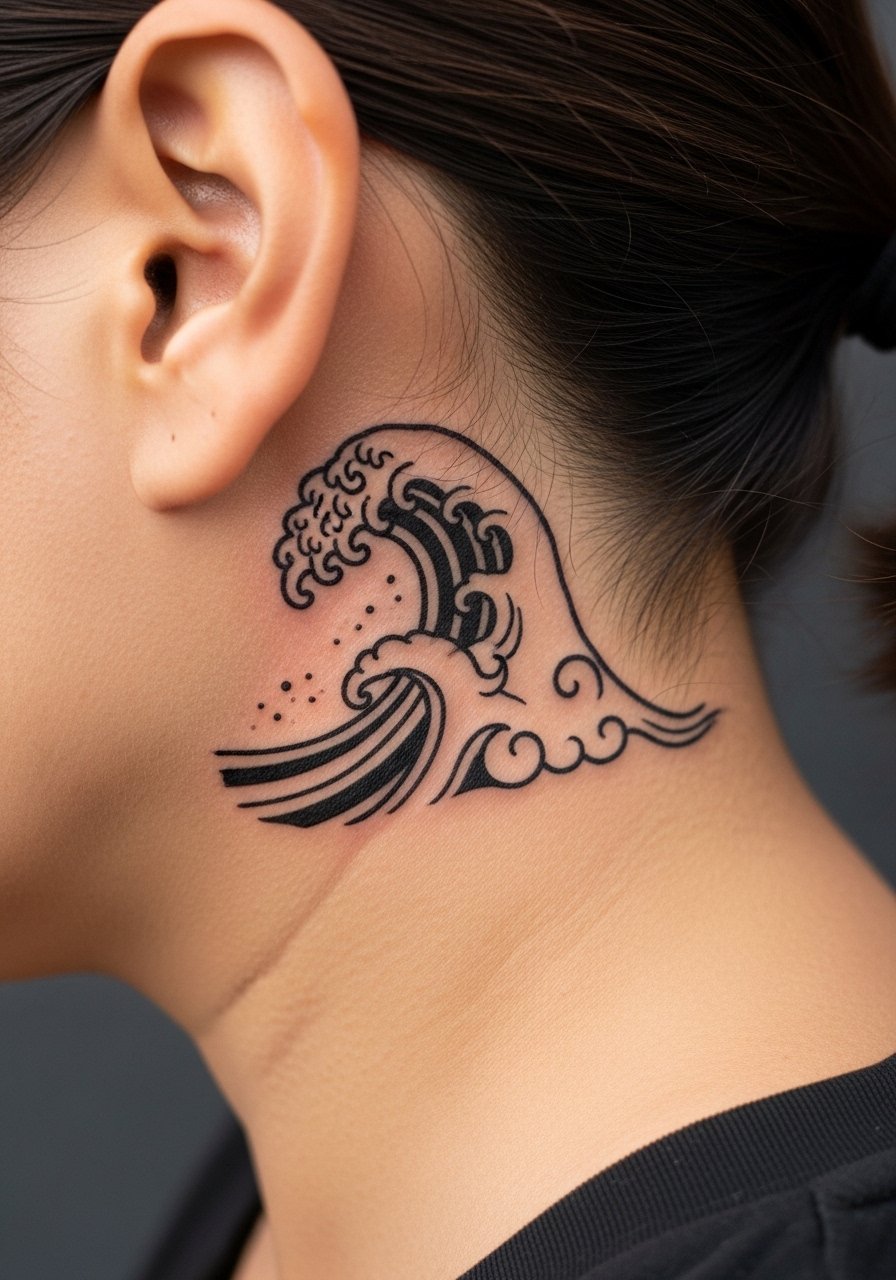
Irezumi elements adapted for micro work need simplified waves and clouds. Ask for bold outlines around the main shapes and suggest soft interior lines for motion. The session is brisk. Artists split on miniature traditional motifs. One camp says simplified traditional shapes respect the lineage. The other camp argues that traditional pieces require scale to honor technique. If you choose this route, pick a stylized approach rather than a direct replication of large-scale Irezumi. Small studs or a cuff help frame the crest.
20. Tiny Maple Leaf with Temple Ridge Suggestion
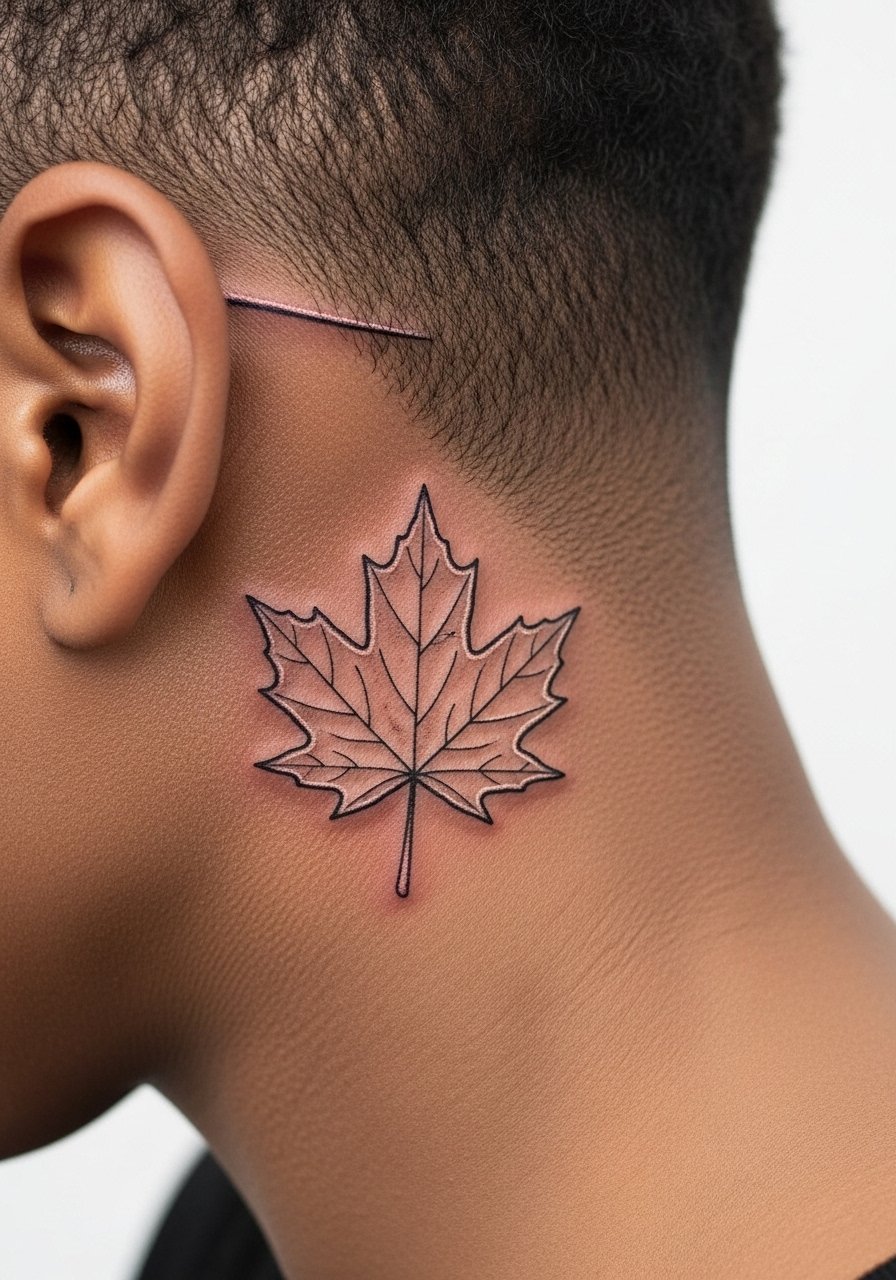
A maple leaf pairs seasonality with architecture in a tiny mark. Ask for a single wash of color only inside the leaf so it fades gracefully. The session is quick and mildly sensitive. The most common mistake is adding tiny veins that merge over time. For show-off moments, tuck hair behind the ear or use a silk hair scarf. This is a good option if you want small color with restrained detail.
21. Quiet Shrine Silhouette at Dusk with Soft Gray Wash

A dusk silhouette reads as an understated statement piece. Request a thin outer line with a soft gray wash behind the shrine to suggest dusk without heavy saturation. Session time is limited but the gray wash requires care in placement. The risk is the wash pooling if applied too heavily, which can flatten the silhouette. This design is excellent for someone who wants quiet symbolism rather than obvious iconography. For the session, a wide-neck shirt makes exposing the area simple and discreet.
Frequently Asked Questions
Q: How long will a behind-ear Japanese temple tattoo stay crisp before needing a touch-up?
A: Small linework behind the ear often needs a touch-up around year two to four depending on line weight and sun exposure. Bold blackwork holds longer than micro-detail. I have seen thin line pieces soften by year three, while slightly heavier outlines stay readable past five years. Plan on at least one possible touch-up in the first three years.
Q: Are there cultural concerns I should consider with temple imagery behind the ear?
A: Yes. One camp argues that small temple motifs can be respectful when stylized and sourced thoughtfully. The other camp says sacred imagery can feel appropriative if copied without context. A straightforward approach is to choose stylized, simplified elements rather than direct replicas and to be clear with your artist about respectful sourcing.
Q: Will hair or earrings interfere with healing for a behind-ear tattoo?
A: Hair can stick to the healing area and earrings that brush the skin increase irritation. During the first week keep hair pinned back and avoid heavy or dangling earrings. A simple stud or cuff is usually safe after the first few days. For the session, wear a wide-neck shirt so you can expose the area cleanly without tugging hair.
Q: Does the skin behind the ear hurt more than other small placements?
A: Pain varies by person but the area is thin and close to bone, so expect sharp, brief sensations. Sessions are typically short which helps. Topical numbing can help but discuss it with your artist first because it may affect the stencil.
Q: How should I find a tattooist who can do tiny temple motifs responsibly?
A: Use studio directories, local convention listings, and relevant hashtags to find artists who show micro work and culturally informed pieces. Look for healed photos of similar tiny motifs in portfolios and ask about their approach to cultural imagery during the consultation.
