
Fine line clovers have been all over saved boards, and the version people actually keep a decade later is rarely the smallest, faintest one they first pin. Placement and spacing matter more than the trend. If you want a clover that reads crisp after a few summers in the sun, pick the style with room to breathe and tell your artist where you plan to wear it. The list below starts with small, wearable favorites and works up to bolder, statement options.
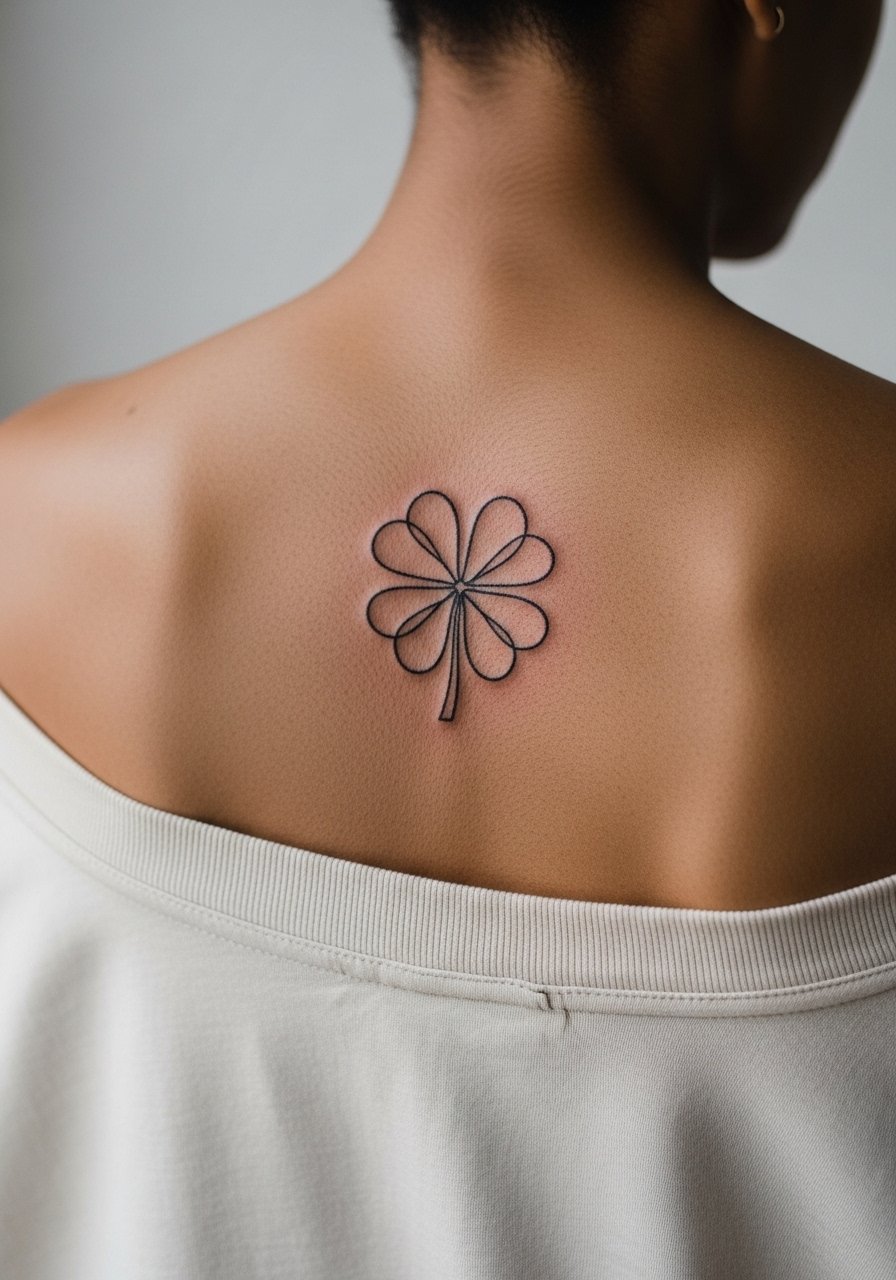
1. Minimalist Four Leaf Clover Outline on the Wrist
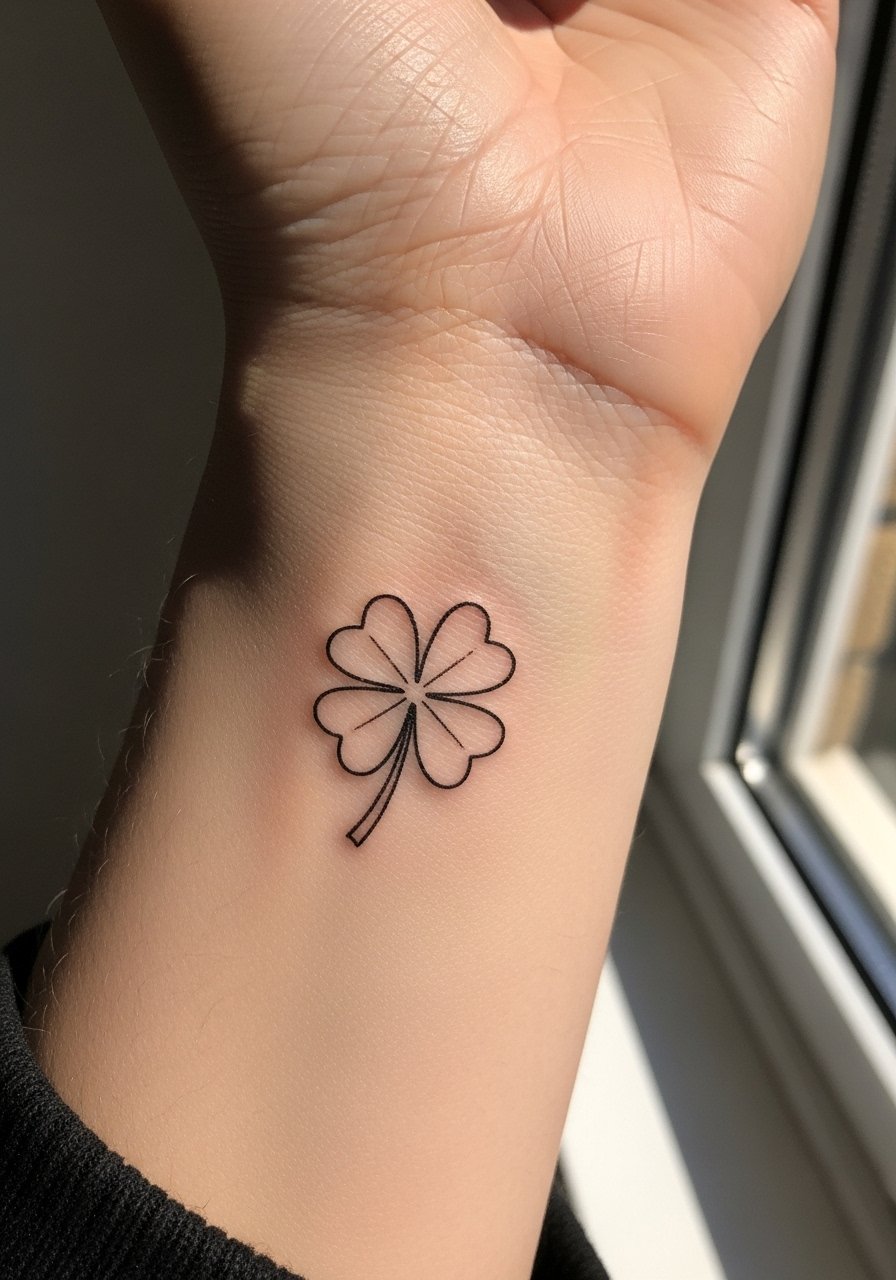
I've seen these minimalist outlines on first-timers who want a subtle marker for good moments. Fair warning, the wrist is a high-motion area so tiny linework needs a little breathing room to avoid early blur. Tell your artist you want slightly heavier linework than the thinnest flash so the leaves keep definition at year two. Pain is low to moderate and most sessions finish in under 30 minutes. For showing this off, pair it with a thin chain bracelet on the opposite wrist so the clover reads without clutter. For the appointment, wear a short-sleeve tee so the artist has easy access.
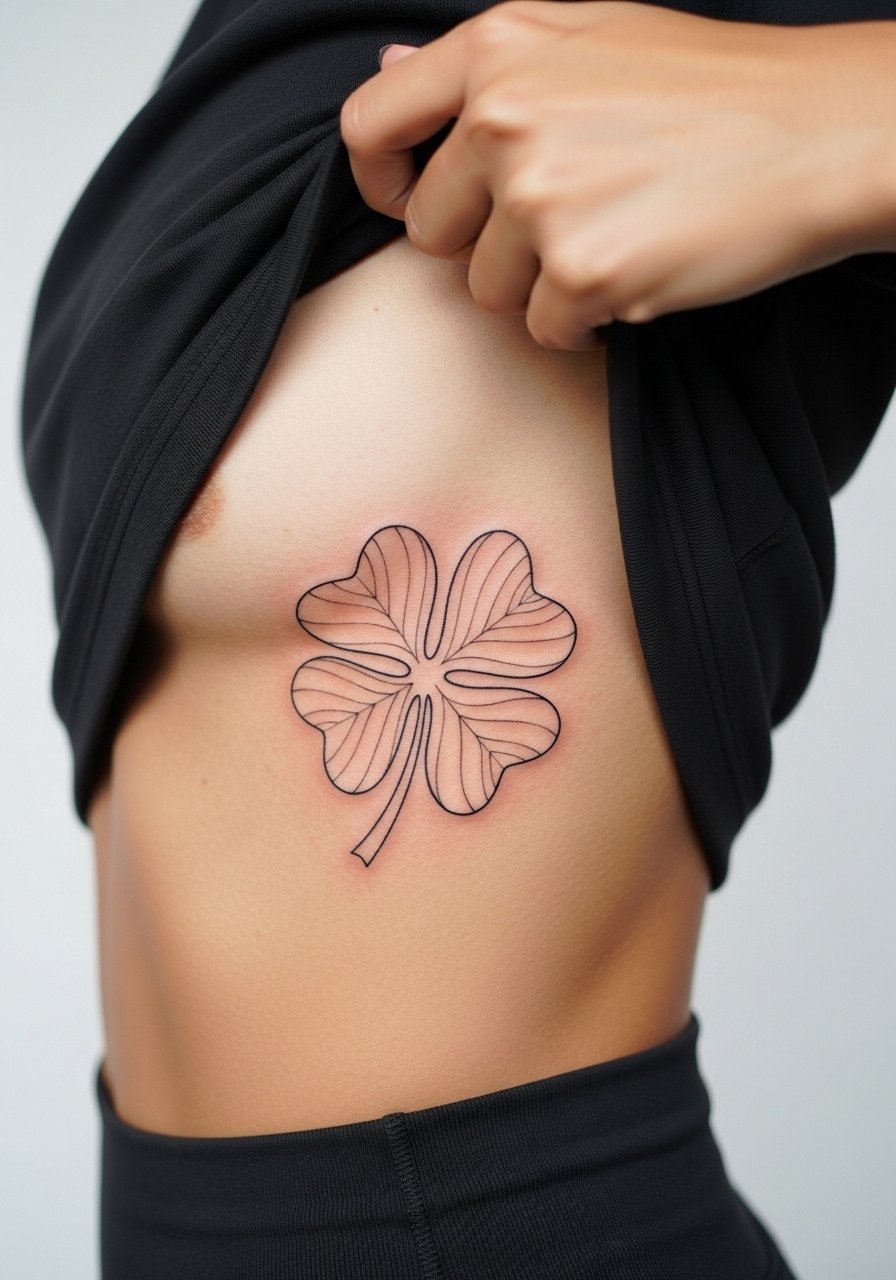
2. Fine Line Four Leaf Clover with Stem on Inner Forearm

When you want delicacy that lasts, the inner forearm is forgiving and shows fine line well. Artists split on tiny details near the vein here, so during consultation ask for consistent depth and slightly larger negative space inside each leaf. Expect a one-hour session and moderate pain. The common mistake is asking for ultra-thin single hair lines that disappear faster than people expect. This version ages better because the stem has just enough weight to avoid breaking up. Pair it with a rolled linen shirt when you want to frame the piece, and wear a loose button-down to the session so your arm is easy to expose.
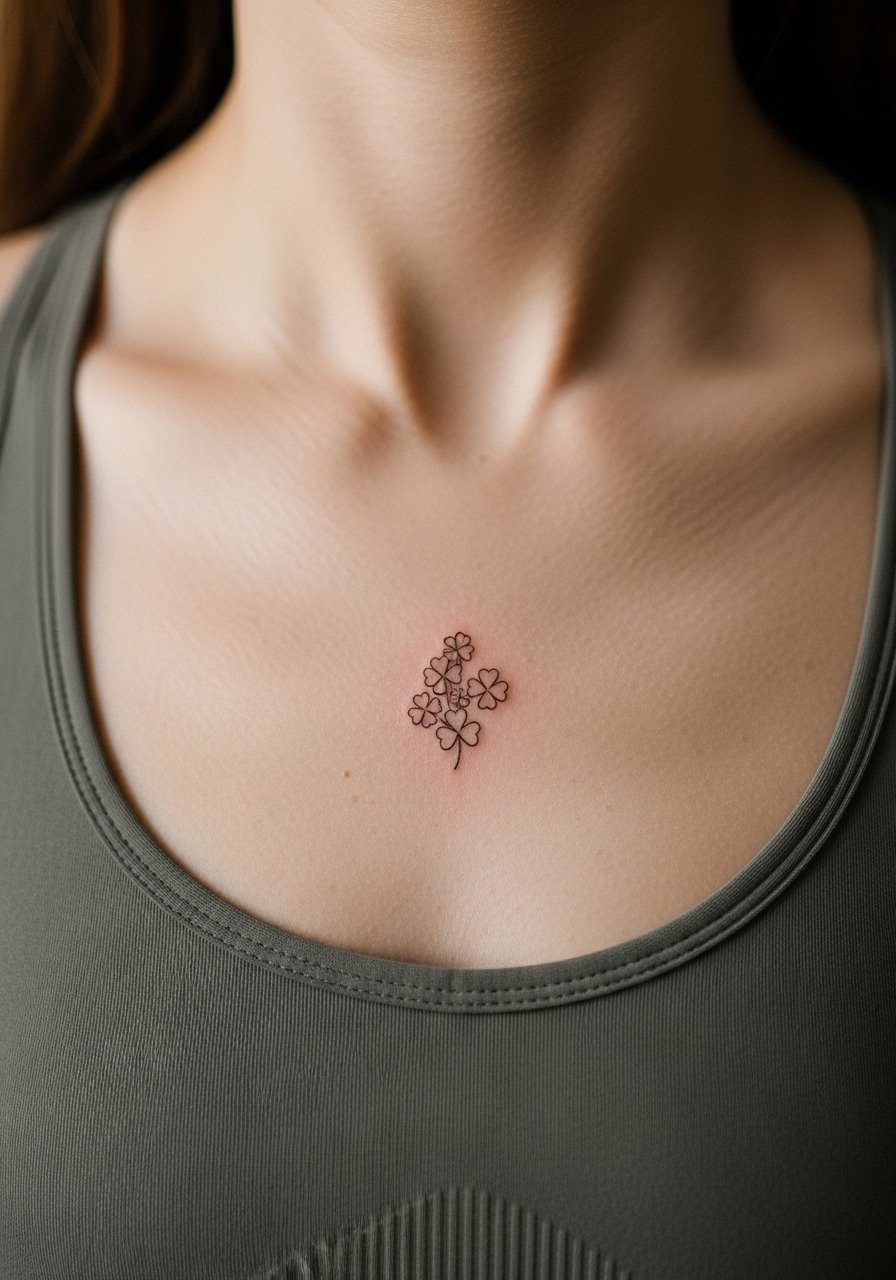
3. Watercolor Four Leaf Clover Splash on the Collarbone

Watercolor brings playful color but needs commitment to touch-ups. Most watercolor clovers look lush at six months and start showing thinner saturation at year two, especially on high-movement collarbone zones. The session runs longer because color layering matters, usually two sessions for saturation. A common error is asking for a tiny watercolor dot pack; color needs space or it mutes. For showing it off, an off shoulder blouse in a solid pastel keeps attention on the green wash. For the appointment, a strapless tank or button-up makes access simple.
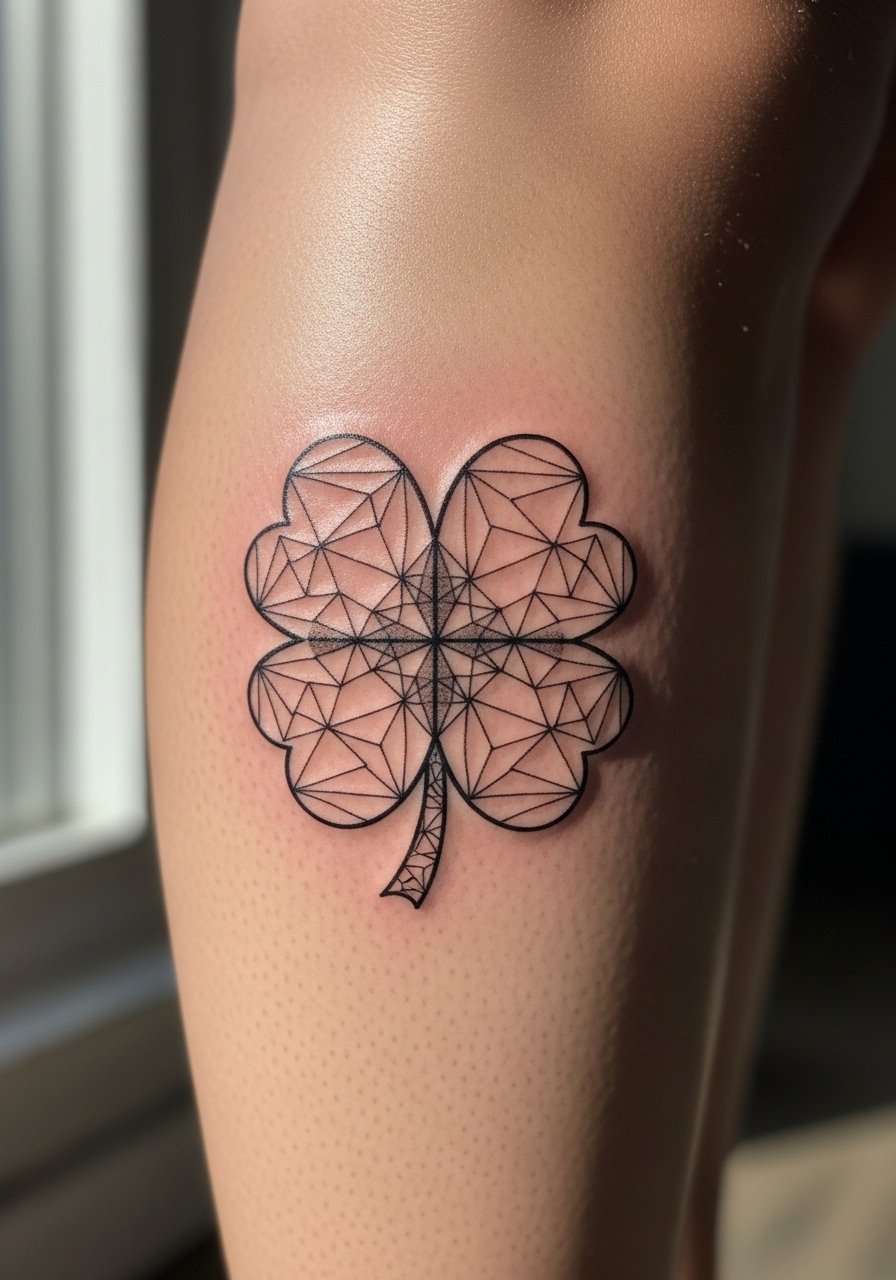
4. Realistic Green Four Leaf Clover on the Outer Calf
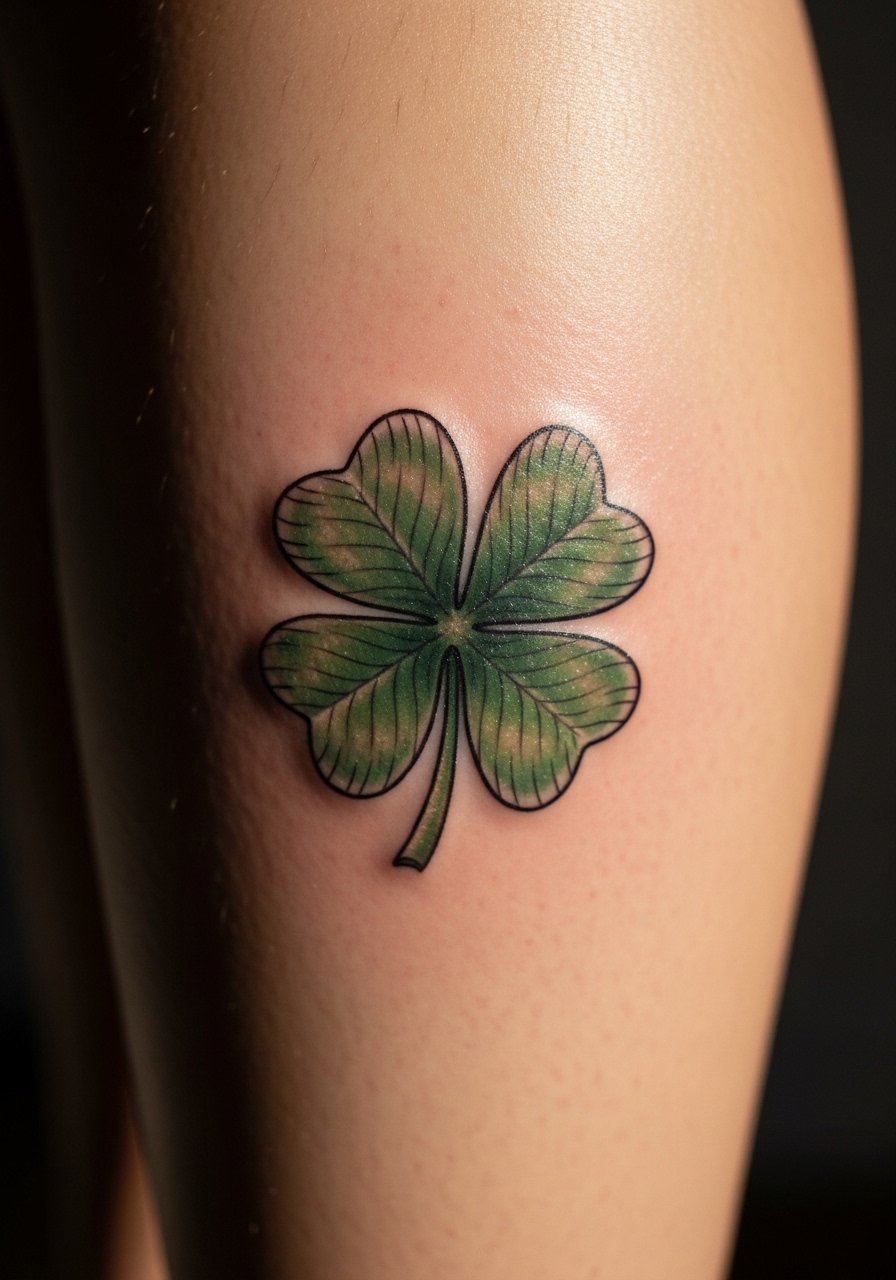
Realism needs saturation and gradual shading to read like a real leaf. The calf is ideal because it heals with less friction than ankles and takes shading well. Sessions run one to three hours depending on size and texture. People often request too-small realism, which ends up looking blotchy after healing. Ask your artist for visible veins and subtle color gradation rather than just flat green. For display, fitted athletic shorts or rolled joggers show the calf cleanly. During the session wear loose shorts you can pull up without pressure on the leg.
5. Celtic Knot Four Leaf Clover on the Upper Arm
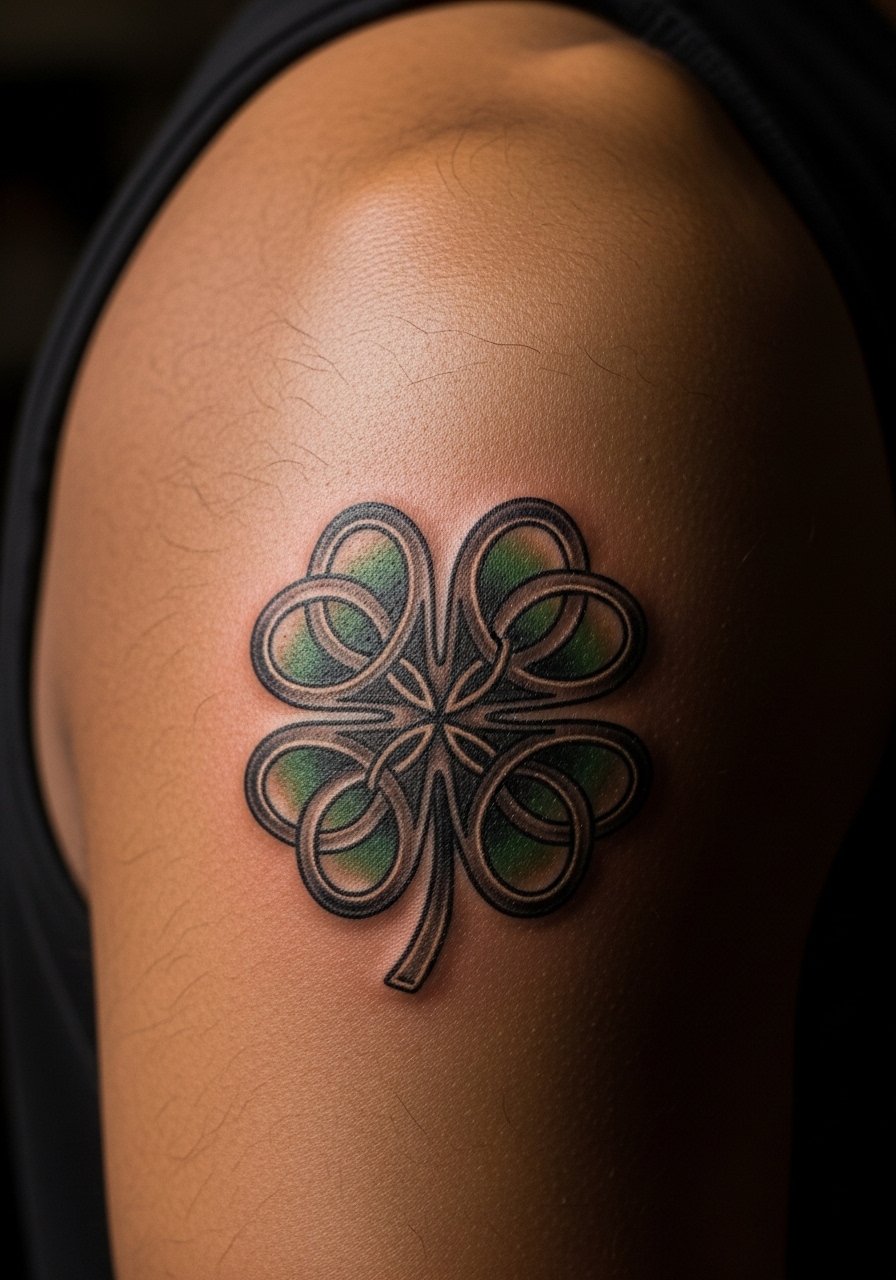
This neo-traditional approach leans on woven linework and a hint of green to emphasize heritage. Upper arm placement tolerates more detail and ages well with moderate touch-ups at year three to five. The big mistake is compressing knotwork into a too-small circle. Ask for extra spacing in the interlace so the knot keeps definition as the skin changes. For evenings out, a v neck blouse or open cardigan frames the upper arm when you want to reveal it casually. Note cultural sensitivity for knotwork that pulls from Irish motifs; many people choose personalized twists rather than direct replicas.
6. Tribal Four Leaf Clover Pattern on the Thigh
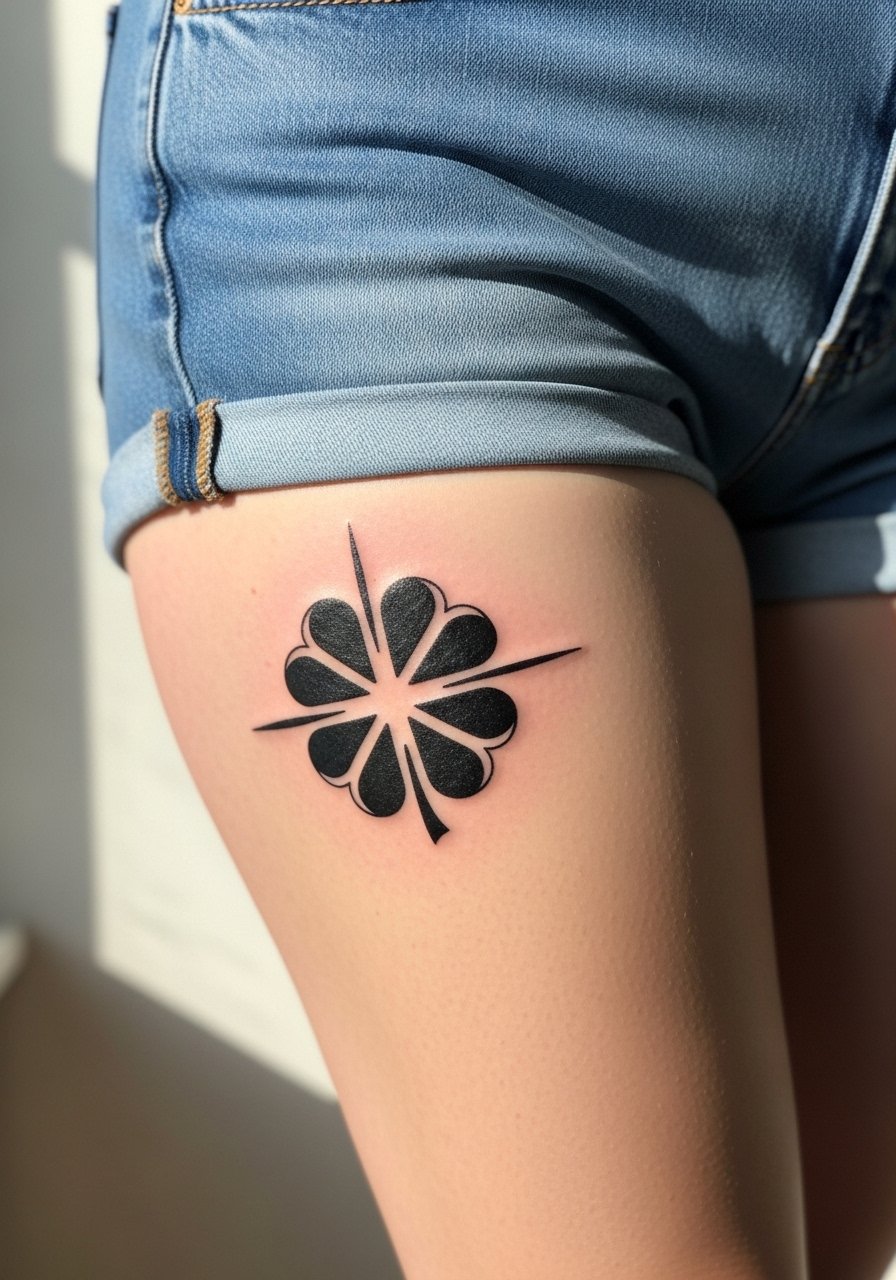
Thigh spots let tribal geometry breathe and read boldly from distance. Pain is moderate and sessions are typically single-run. The common version that ages poorly is overly intricate thin work placed too close to the hip crease. Keep lines bold and give each negative space room to avoid blowout. This placement pairs well with high-waisted shorts or skirts for summer visits. For the session wear loose shorts you can pull up easily so the artist has clean access.
Studio Day Picks
The first six ideas include a mix of delicate wrist and forearm work plus mid-sized upper arm and thigh pieces, so these items help with access, sensitivity, and first-week protection.
- Stencil transfer paper kit. Lets you preview placement on skin before ink goes down, useful for wrist and collarbone pieces that read differently on body contours.
- Topical numbing cream. Applied before short-session areas like the wrist and inner forearm to ease sharp needle work without prolonging chair time.
- Thin protective film roll. Keeps ankle and finger tattoos clean during the first days when friction from shoes or typing is highest.
- Fragrance free body wash. Gentle cleansing for larger areas like calf and thigh while the fresh color settles.
- Aquaphor healing ointment. Thin layer for the first days locks moisture in for fine line work without clogging delicate channels.
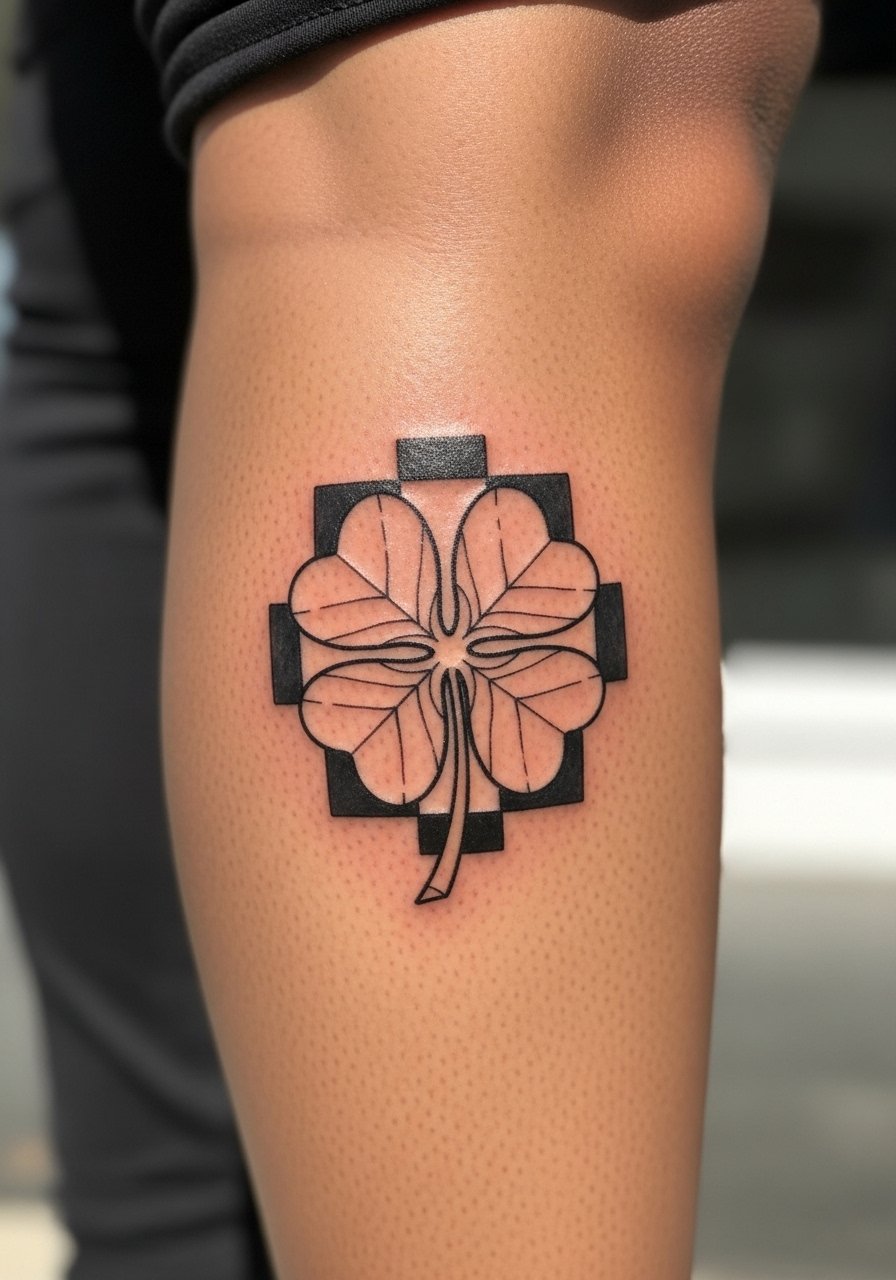
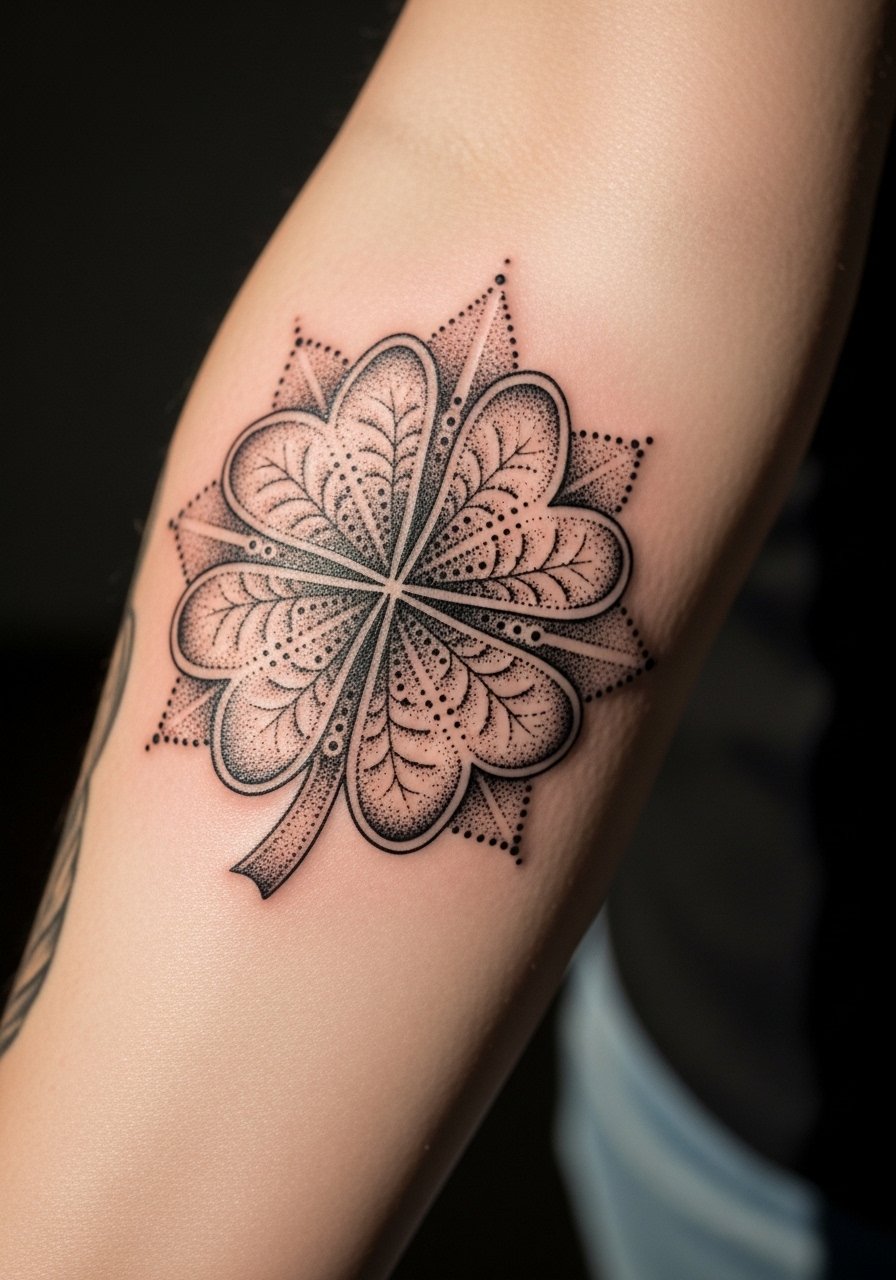
7. Blackwork Four Leaf Clover Mandala on the Back

There is a debate in some circles about blackwork mandalas and cultural borrowing. One camp focuses on meditative geometry and symmetry as personal expression. The other camp cautions about lifting sacred patterns without context. Either way, this placement handles heavy saturation and meditative symmetry well. Sessions are longer and pay attention to blocky saturation to avoid patchiness. Expect multiple sessions and moderate pain. This piece reads strong with open-back dresses or a tank for evenings when you want the mandala visible. During the appointment wear a button-down you can pull aside so the artist has good access to the back.
8. Ornamental Four Leaf Clover with Vines as an Ankle Wrap
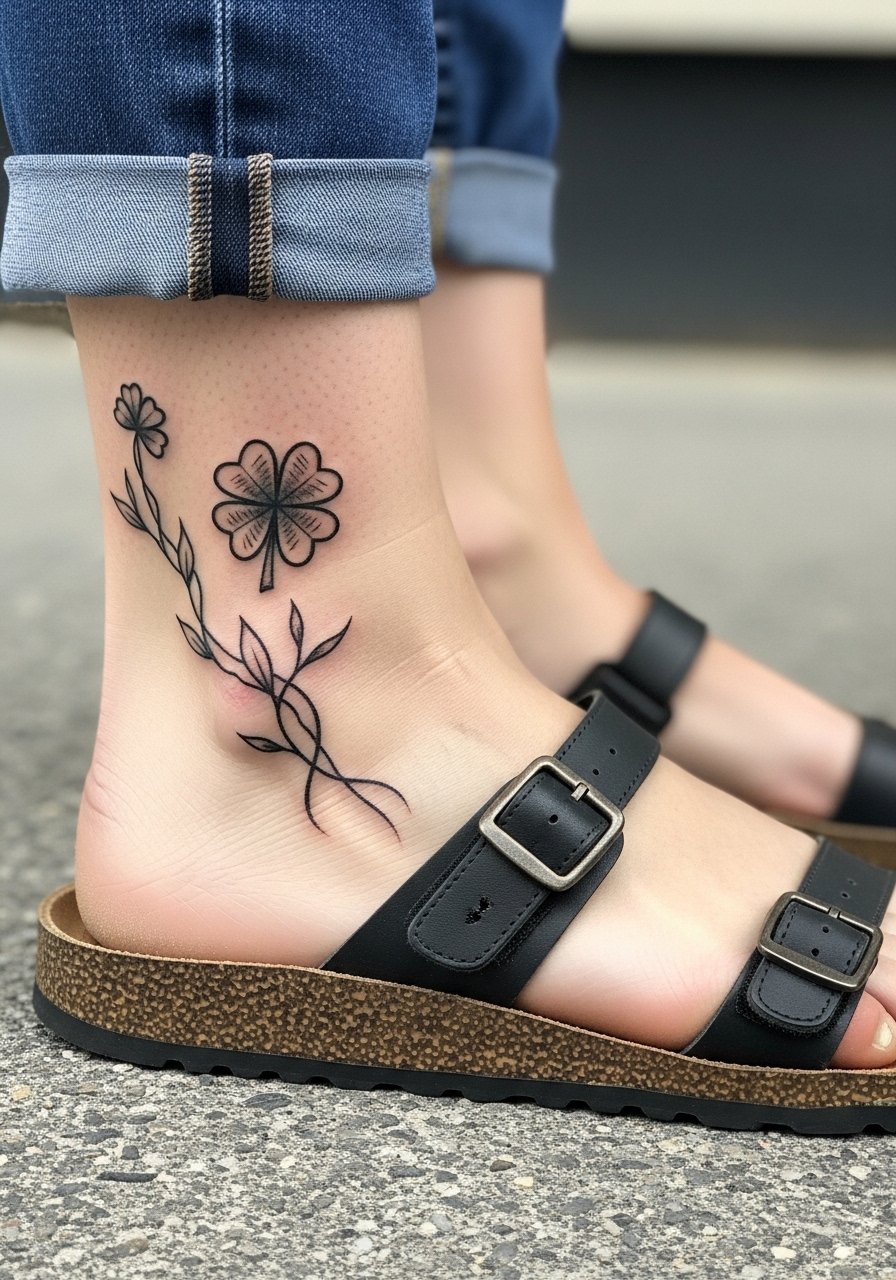
Ankle wraps look delicate but face a lot of friction from socks and shoes. The key is slightly denser linework and negative space inside the vine loops. Typical sessions are under two hours. A common oversight is placing too-close vine curls that merge after a few months. For showing it off, strappy sandals or cropped straight jeans frame the ankle cleanly. For the session wear loose pants or shorts so the artist can roll the leg up without pressure on the ankle.
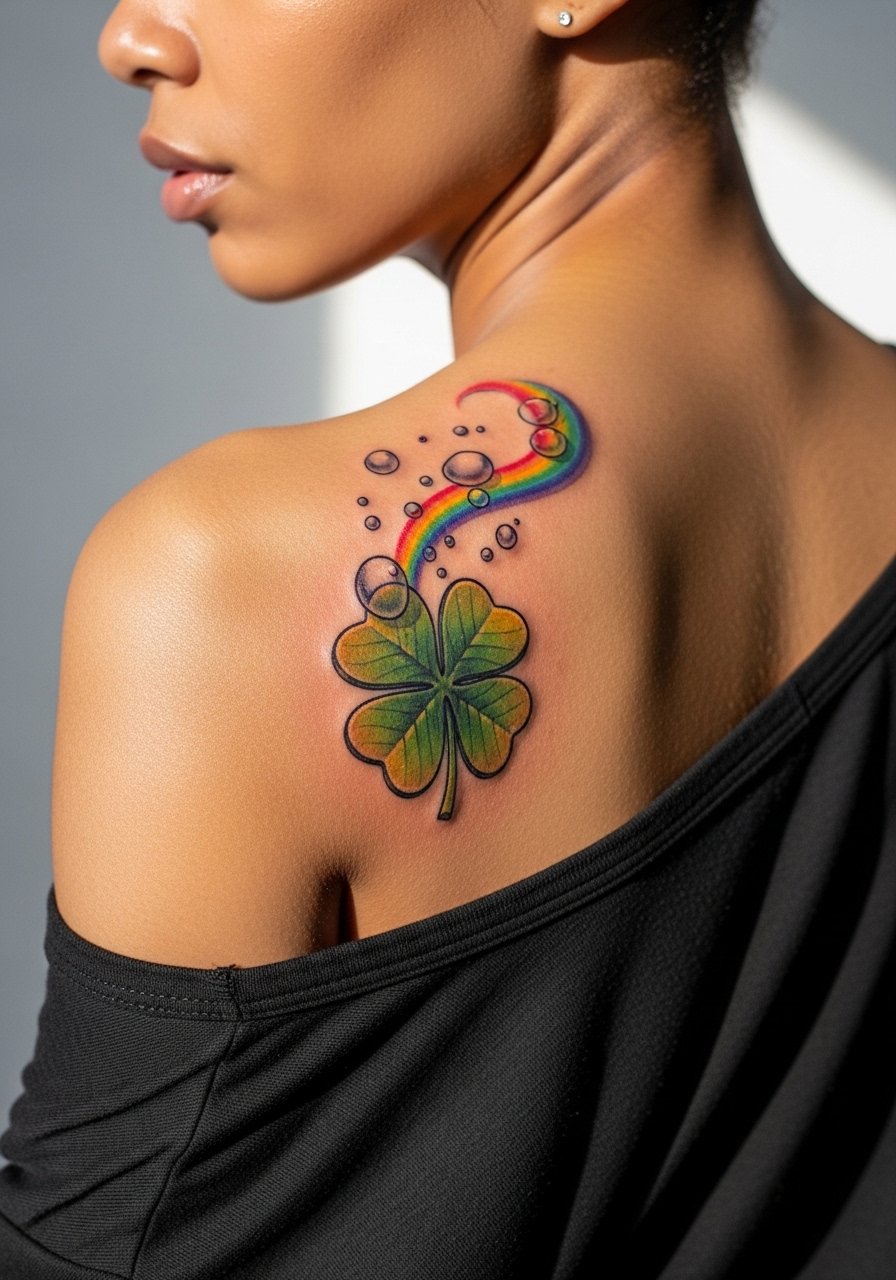
9. Rainbow Four Leaf Clover Burst on the Inner Bicep
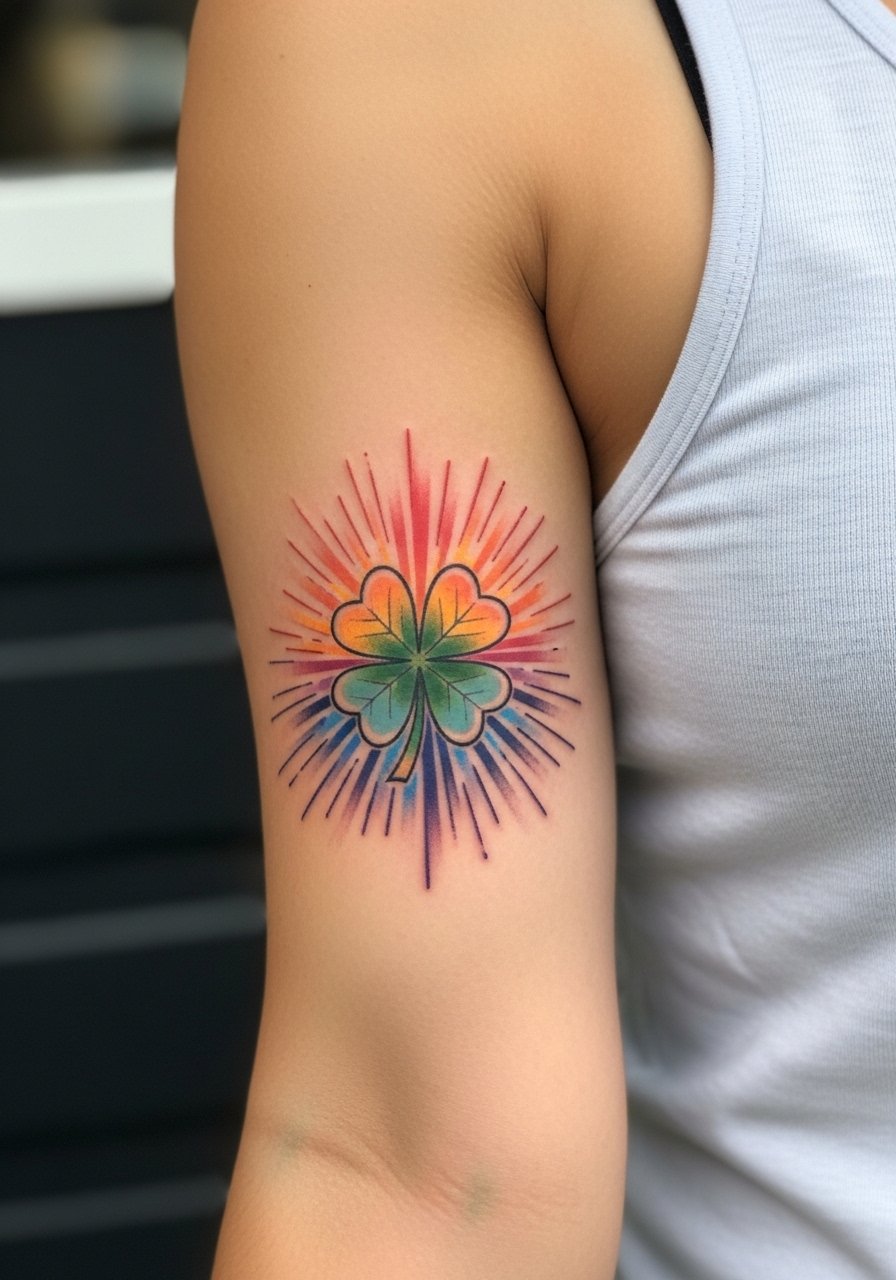
Inner biceps take watercolor and illustrative color well but can be sensitive during the session. Expect single-session work for a small burst but plan for touch-ups at year two if you want saturation to remain. The most common mistake is choosing a placement that hides the color from view most of the time. If you plan to show it, pair it with a racerback or sleeveless top. Put on a loose tank or button-down to the session so the artist can access the area easily.
10. Small Four Leaf Clover Cluster Behind the Ear
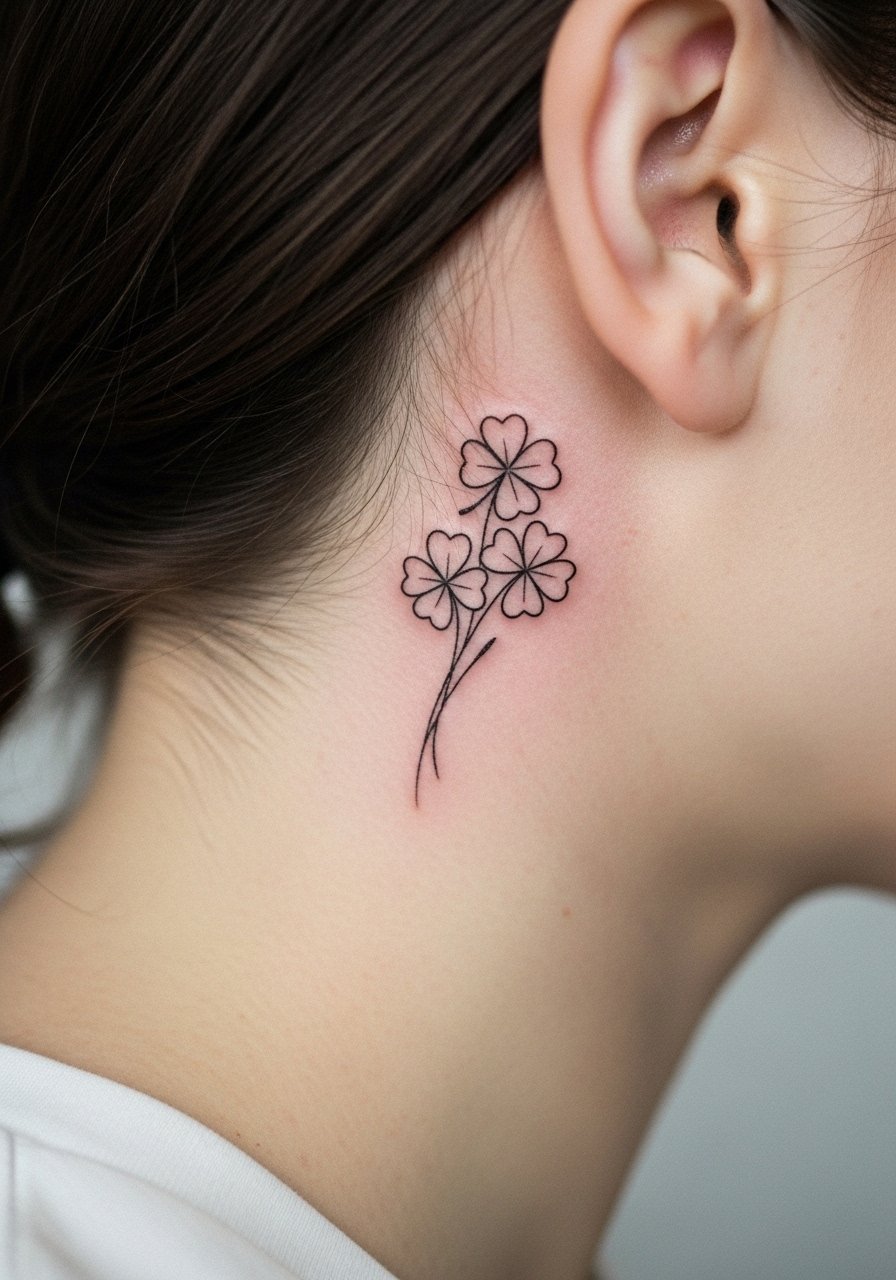
Behind-the-ear clovers are tiny and intimate, making them a popular add-on. Pain is low but the area can blur if the linework is too fine. The common mistake is compressing a cluster into a postage-stamp size. Ask for slightly bolder lines and space between leaves. For showing it off tuck hair behind the ear or use a pulled-back style. Session wear is simple, but tell your artist if you prefer the piece tucked under the hairline so they can plan placement accordingly.
11. Micro-Realism Single Leaf on the Sternum
Sternum placements need an artist comfortable with curved anatomy and longer sessions. Pain is higher here but the realism payoff is strong. The usual error is asking for too small a micro-realism piece on moving skin. Ask for an artist who has healed sternum examples. Expect one to two sessions and a realistic touch-up window at year two. Wear a fitted sports bra to the appointment so the artist can access the area cleanly.
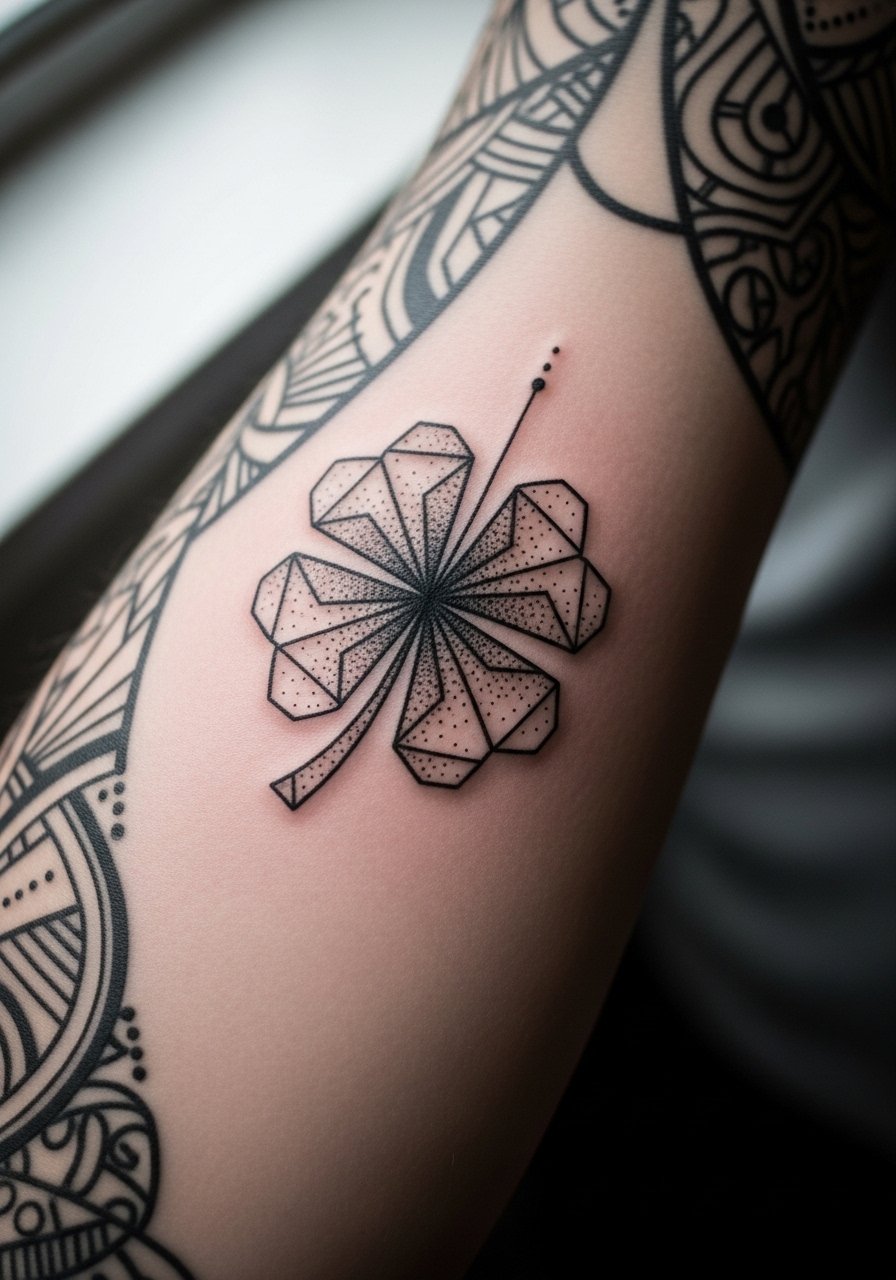
12. Geometric Negative Space Four Leaf Clover on the Calf
Negative space clovers use surrounding fill to let the shape pop without heavy green ink. The calf is forgiving for blocks and age-resistant. Sessions depend on fill size but usually finish in one visit. A frequent mistake is using too many tiny shapes around the negative space, which can blur. For the session wear shorts you can pull up easily. For showing it off, rolled joggers or fitted athletic shorts work best.
13. Four Leaf Clover with Vines and Beads on the Ankle
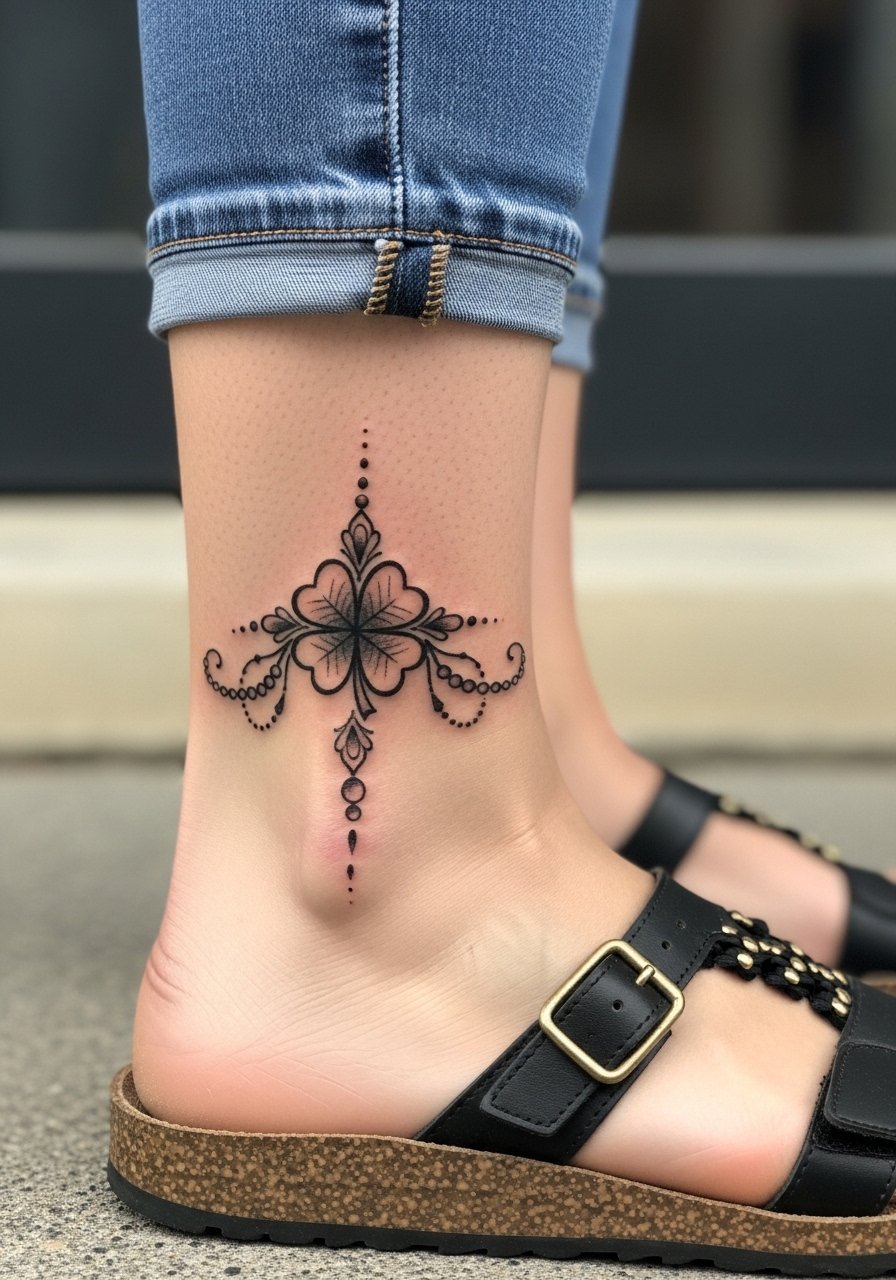
This ornamental take plays well as a wrap and frames the ankle elegantly. The ankle faces wear from shoes, so choose less fragile bead detail and slightly stronger linework. Common mistakes include tiny beads that disappear. Schedule a shorter touch-up at year one if beads start softening. Pair with strappy heeled sandals to show the work and wear loose shorts or a skirt to the session for easy access. Consider neutral palette footwear to let the black and green stand out.
14. Abstract Four Leaf Clover Interpretation on the Ribcage
Ribcage is notorious for aging in fine line work. Artists split into two camps here. One camp argues the skin stretch blurs lines within two years. The other camp says with proper depth and spacing, fine line settles fine. For abstract shapes, lean into slightly bigger leaf segments and avoid dense cross-hatching. Pain is higher and sessions may be split. Wear a cropped top to the appointment for easy exposure. Ask your artist where they stand on fine line ribs before you book.
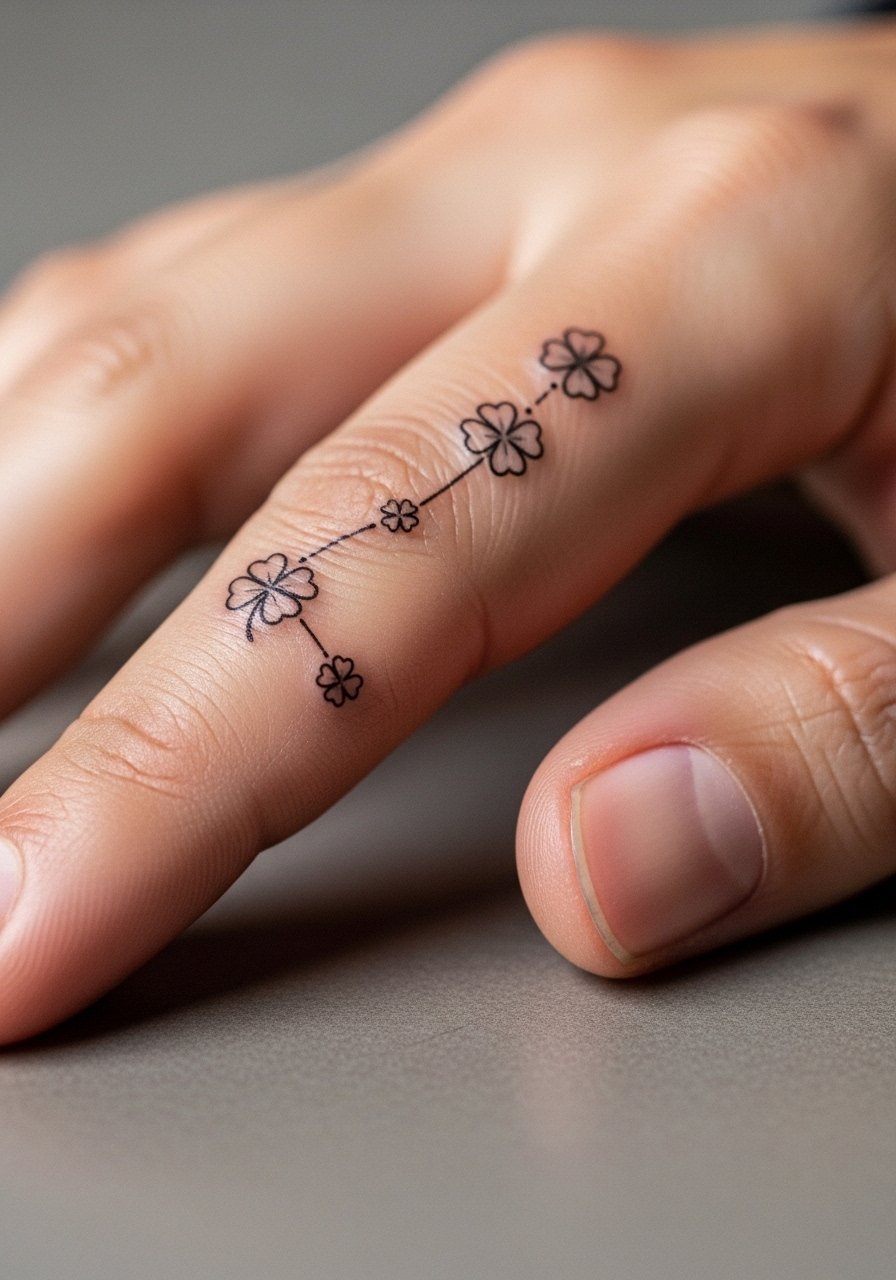
15. Clustered Mini-Clovers Along the Finger
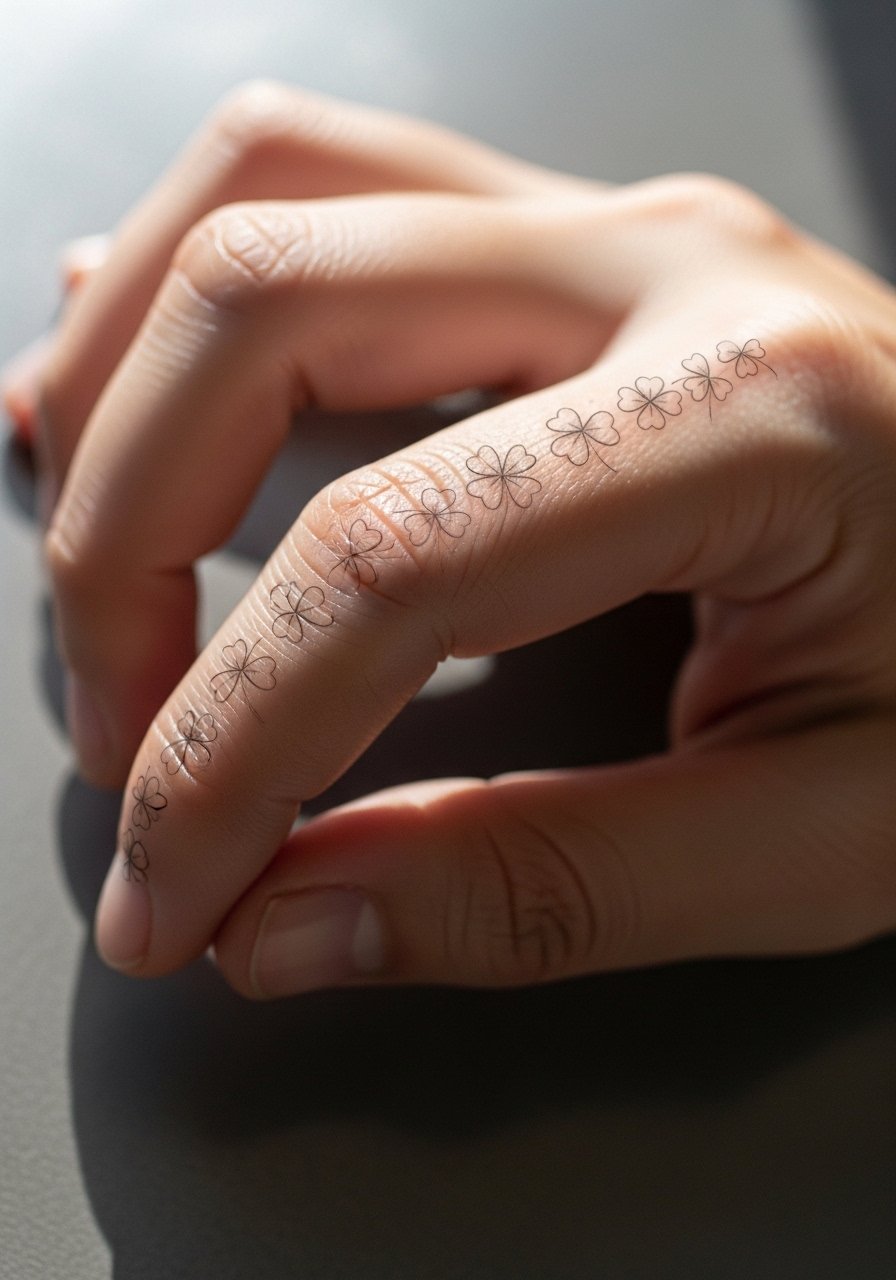
Finger tattoos age fast because of constant washing and friction. Clusters can look charming for a year and then need touch-ups. The most common mistake is expecting a lifetime of sharp dots without maintenance. If you want longevity, go slightly larger than your instinct and accept a touch-up at year two. Show them off with bare hands or simple rings. For the session, keep nails short and avoid lotions so the skin is clean for stencil placement.
16. Surreal Four Leaf Clover with Floating Rainbow Elements on the Shoulder Blade
Surreal clovers let you pair realistic leaf detail with abstract color bands. Shoulder blades handle color and larger composition well and are low-friction for healing. People sometimes pick tiny surreal accents that get lost on the shoulder blade. Ask for scale that reads from a slight distance. For evenings out, off-shoulder tops in solid pastels complement the piece. Attend the session in a loose button-down you can pull aside easily.
17. Four Leaf Clover Compass on the Inner Wrist
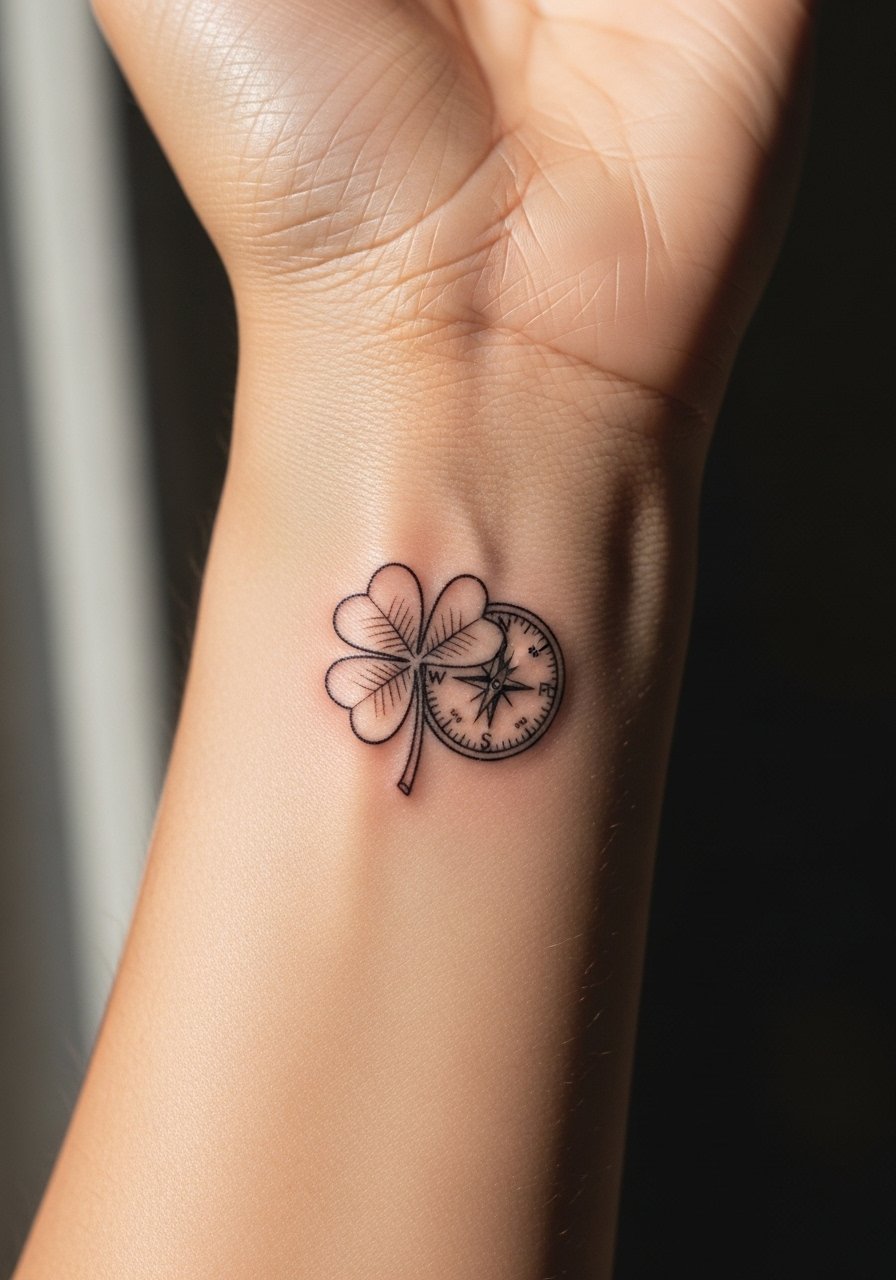
Combining a clover with a compass gives a directional motif without heavy detail. The inner wrist is visible and sensitive, so sessions are short but sharp. The usual mistake is crowding both elements too close. Ask for clear space between the compass points and the clover leaves. Pair this with a minimalist cuff shirt or a thin chain pendant necklace sitting above the piece to balance the neckline. Wear a short-sleeve shirt to the appointment for clear access.
18. Four Leaf Clover Mandala in Dot Work on the Forearm
Dot work mandalas pair meditative texture with the clover silhouette. Forearm placement showcases stipple shading and ages predictably when spacing is correct. Sessions take longer because dot density matters. A common oversight is asking for too-dense dot work in a small area which can merge. Tell your artist you want visible negative space between stippling clusters. For casual showing, rolled sleeves or linen shirts set the piece off nicely. Wear a loose button-down to the appointment to make it easy to expose the forearm.
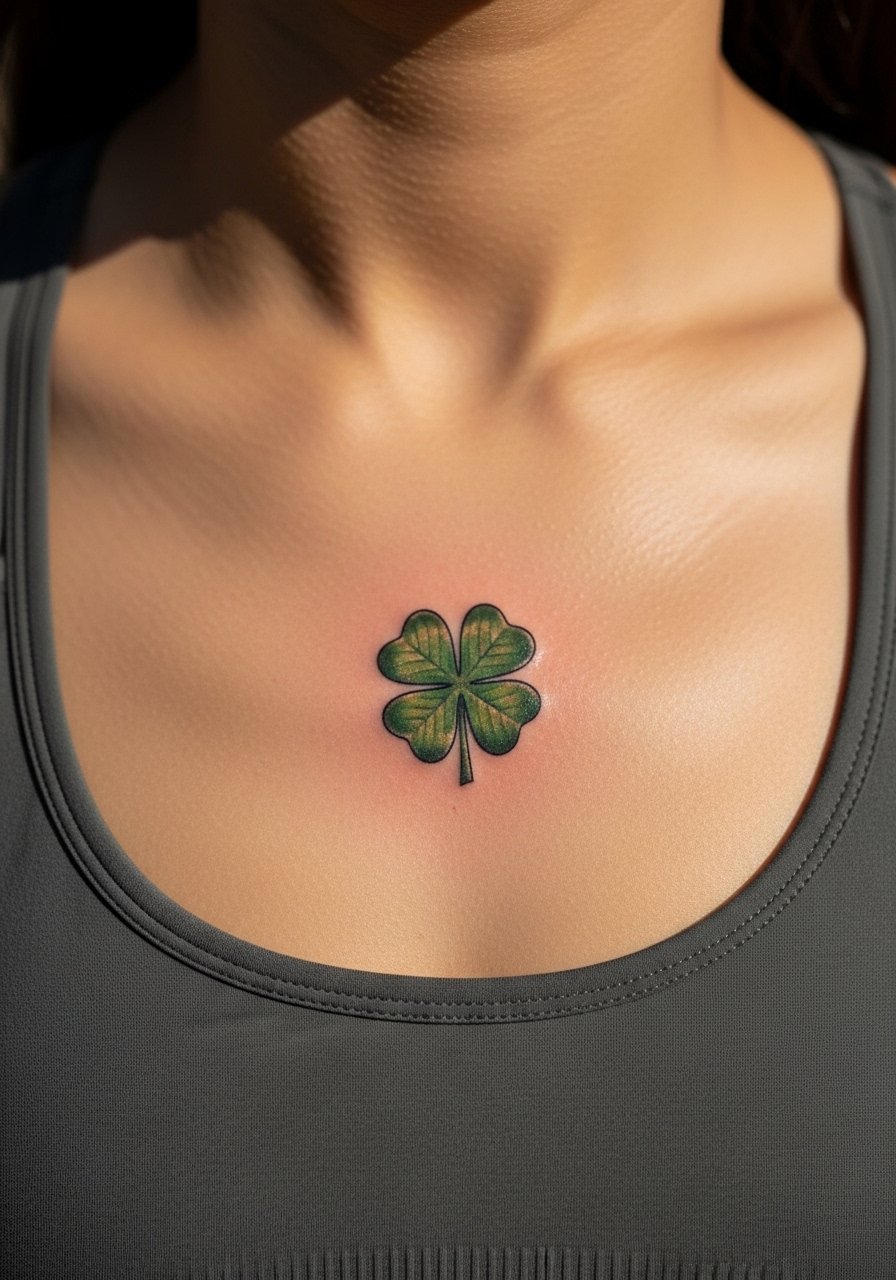
19. Four Leaf Clover with Scripted Initials on the Collarbone
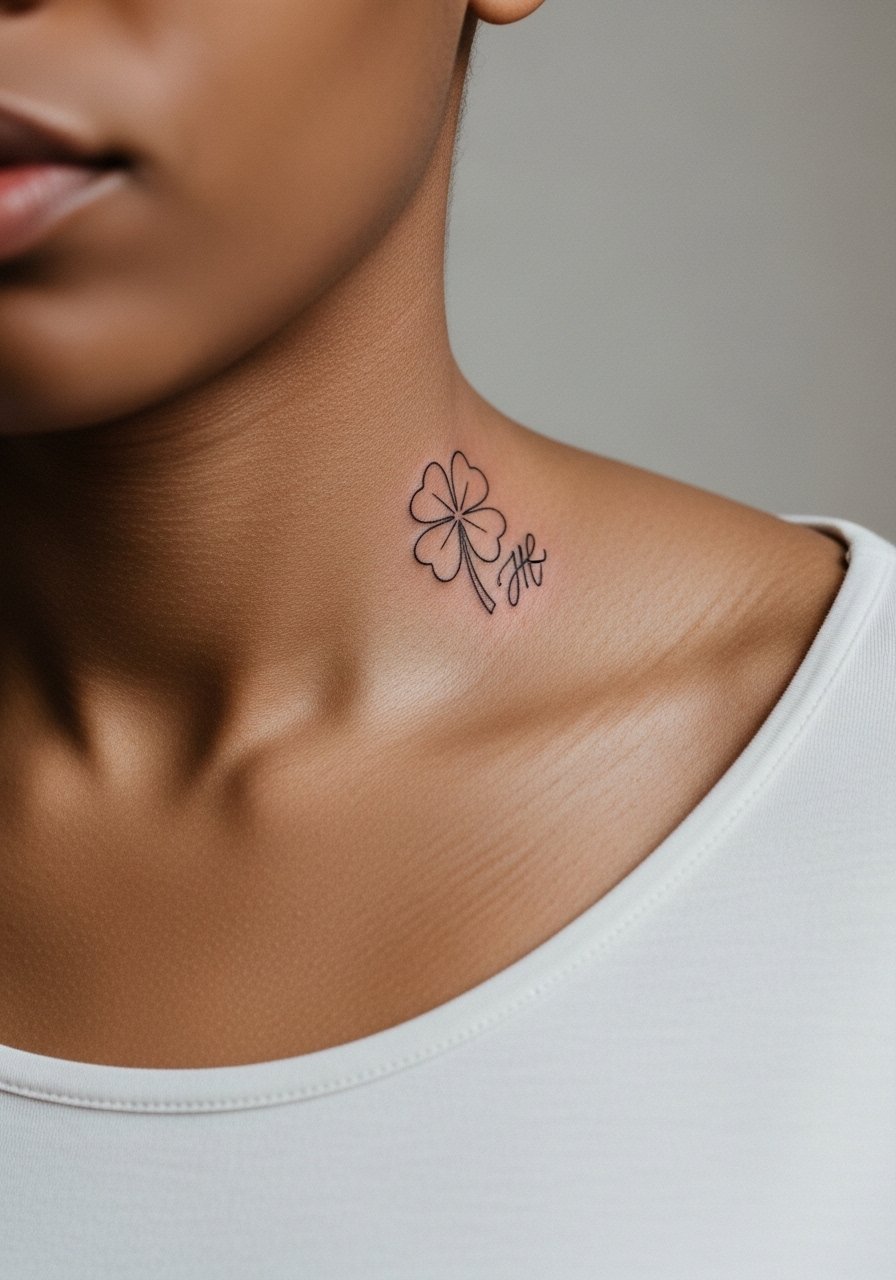
Adding initials personalizes a clover but places with text need scale planning. Collarbone script can look elegant but may blur if the lettering is too thin. Ask for a slightly thicker script and test the size on skin with a stencil. Pain is moderate and sessions are usually single-visit. For display, V-neck tops or open cardigans frame the area well. Wear a strapless bra or loose top to the appointment so the artist has clear access.
20. Geometric Clover with Fine Line Borders on the Calf
Geometric borders can protect the clover shape and help it age by giving linework defined anchors. The calf tolerates heavier lines and geometric fills. Sessions run one to two hours. The common mistake is making the internal geometry too tight to resolve after healing. Ask for slightly thicker border lines and clean negative spaces. For showing, fitted shorts or rolled joggers highlight the design. Put on loose shorts to the appointment so the artist can move the fabric without rubbing the area.
21. Four Leaf Clover Wrist Wrap with Tiny Dots
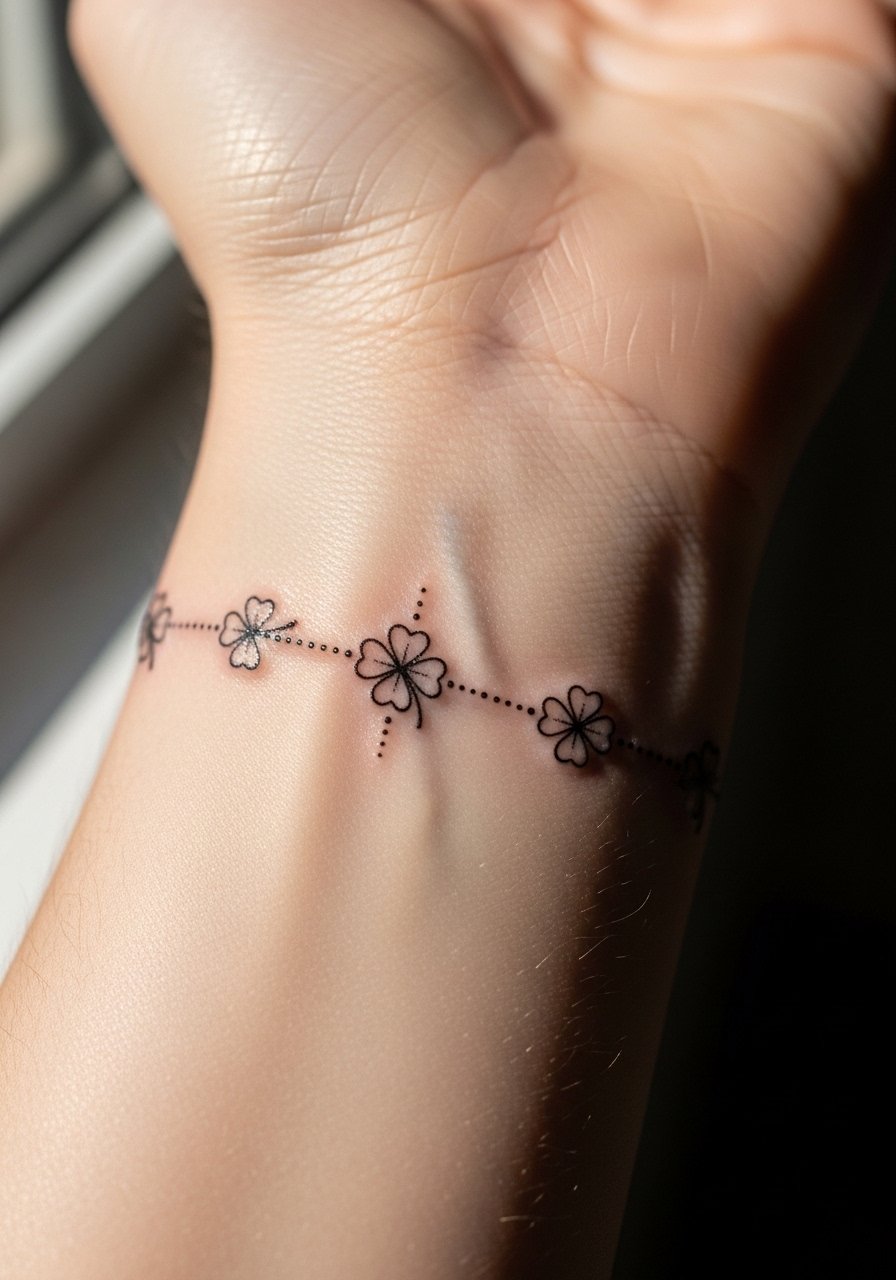
Wraps look like jewelry and are great for people who want a repeatable motif. Wrists are exposed to sun and soap, so expect a touch-up window earlier than on less-washed areas. A common mistake is insisting on ultra-fine dots that disappear. Ask for dots with visible weight so the pattern keeps reading. Pair this with stackable thin bracelets to enhance the jewelry effect. Wear a short-sleeve tee to the session for easy access.
22. Four Leaf Clover and Ladybug Tiny Scene on the Ankle
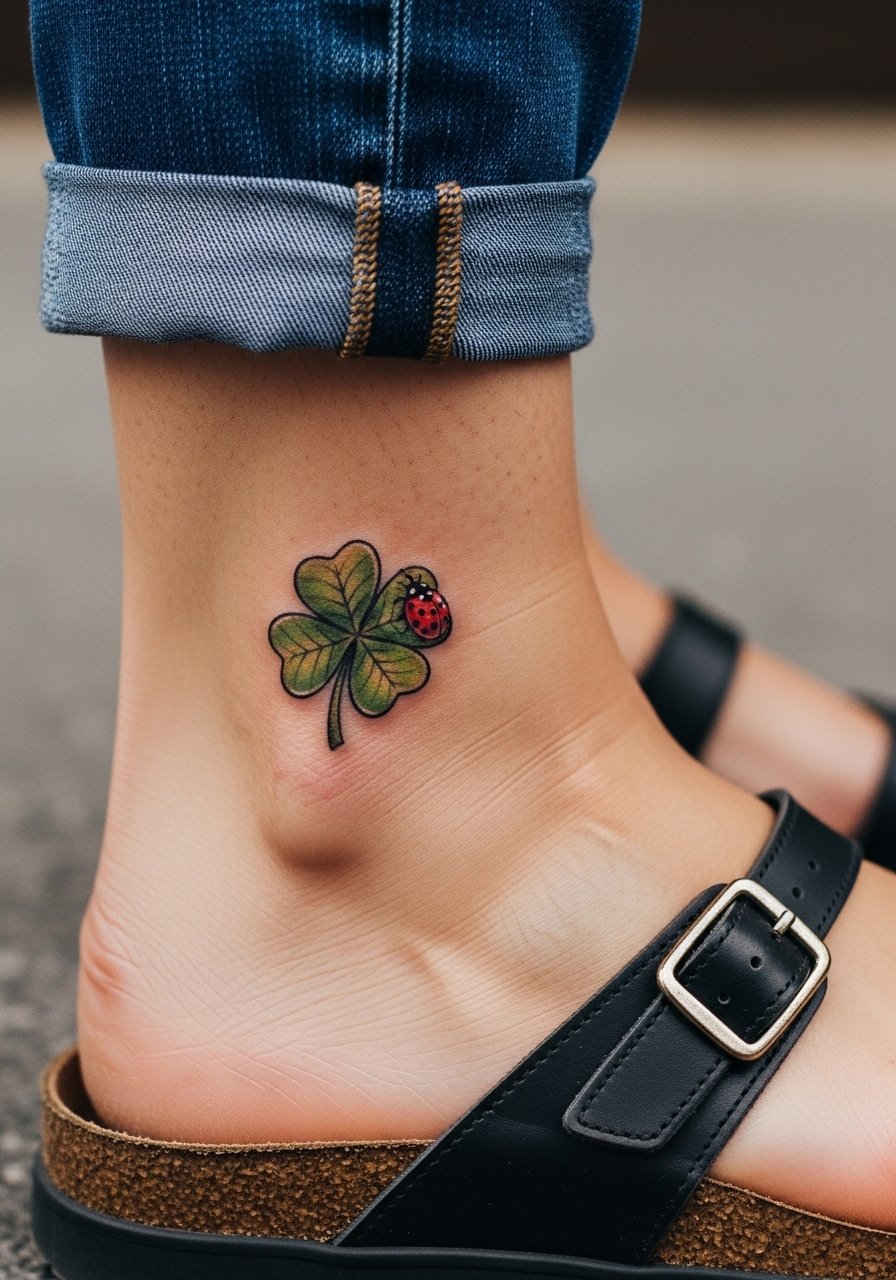
Adding a tiny ladybug brings character and scale contrast. Ankle tattoos are susceptible to shoe friction so avoid ultra-fine dots near the edge. Sessions are short but plan a small touch-up if the outer lines soften. Dress the piece with strappy sandals to show the detail. Wear loose bottoms to the appointment so the artist can access the ankle without tight fabric pressing on the area.
23. Abstract Linework Clover Across the Upper Back
Upper back canvas allows sweeping abstract designs that breathe. Pain is low to moderate and sessions can be single or split depending on scale. The main mistake is compressing sweeping elements into a small patch which loses impact. Ask for a mockup that shows how the lines flow with shoulder movement. For summer wear, open-back tops or halter dresses highlight the sweep. Bring a button-down you can pull slightly aside for the appointment.
24. Clustered Tiny Clovers as a Sternum Accent
Sternum clusters are intimate and need an artist experienced with the chest anatomy. Pain is higher and sessions are shorter but intense. A common oversight is demanding too many tiny elements in a tight space. Request a scale test on skin so the cluster keeps its shape as it heals. For the session wear a fitted sports bra that the artist can work around. Consider the piece's visibility with your usual wardrobe before committing.
25. Four Leaf Clover Constellation Finger Band
Finger bands are trend-forward but have higher fade rates because skin regenerates faster there. Expect touch-ups and possible rework. The classic mistake is assuming a tight, continuous band will last unchanged. For longer life, go for breaks in the band and slightly bolder points where the leaves meet. Rings and simple bands complement this look best. Keep your hands free of lotions before the appointment so the stencil adheres cleanly.
26. Abstract Surreal Clover with Moon Phase on the Thigh
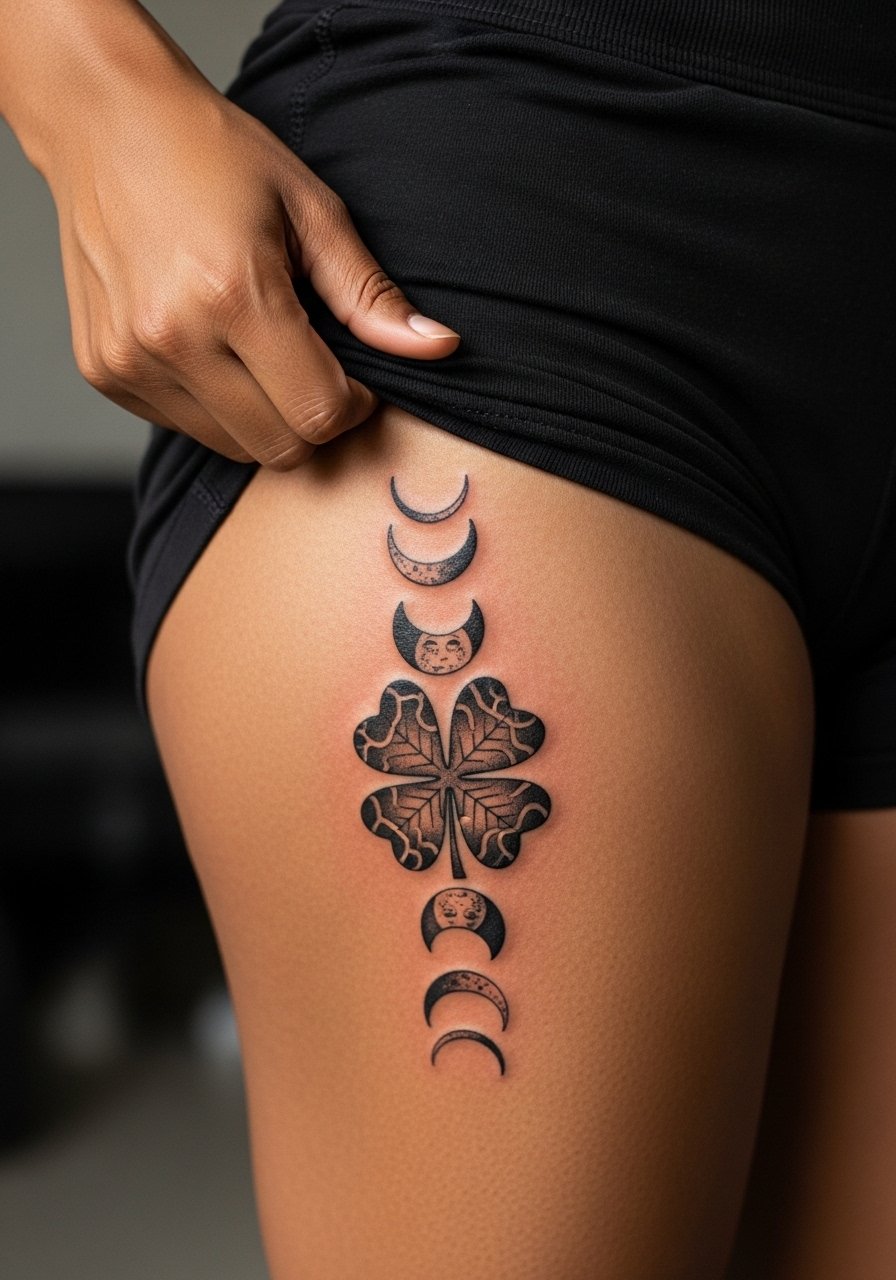
Upper thigh is forgiving and allows larger surreal mixes like moon phases with a clover silhouette. Pain is moderate and sessions can be longer for composition work. A common error is cramming too many small celestial details into a small area. Ask for balanced spacing and clear focal points. Pair with high-waisted shorts or skirts that reveal the work in summer. For the appointment wear loose shorts you can shift without pressure.
27. Geometric Four Leaf Clover Sleeve Accent on the Forearm
Using a clover as a sleeve accent lets you build around it with geometry and dot work. Forearm sleeves age predictably when each element has space. Sessions are multiple and you should expect touch-ups over time. The common mistake is crowding the clover with too many fillers early on. Discuss a phased plan with your artist so the piece grows intentionally. For showing, rolled sleeves and linen shirts highlight the contrast. Wear a loose button-down that you can roll for the session.
Frequently Asked Questions
Q: Will a fine line four leaf clover on the wrist blur faster than one on the forearm?
A: Generally, wrist tattoos face more friction and washing, so ultra-fine lines often soften sooner. Forearms get less constant abrasion and show fine line longer. Ask your artist for slightly heavier line weight on the wrist and expect a touch-up sooner than on the forearm.
Q: Do watercolor clover tattoos need different aftercare than black ink clovers?
A: The basic aftercare steps are the same, but watercolor relies on saturation and gentle touch during healing. Keep sun exposure low and follow the artist's guidance on moisturizing. Plan for a possible touch-up in the first two years to keep color pops vivid.
Q: Are there placements I should avoid if I want my clover to age well?
A: High-motion and high-friction zones like fingers, palms, and the top of the foot tend to fade faster. If longevity matters most, choose forearm, calf, or upper arm where the skin is more stable.
Q: How do I talk to an artist about adding Celtic knotwork without copying sacred patterns?
A: Be upfront that you want inspiration rather than a direct cultural replica. Ask the artist to incorporate personal motifs or modify the knotwork so it references the aesthetic without duplicating a specific traditional symbol.
Q: What should I wear to a collarbone or shoulder session to make access easy?
A: Bring a strapless tank or a button-down you can pull aside so the artist can work without you getting uncomfortable. Comfortable clothing makes longer sessions far easier.
Q: How long before a touch-up is typical for fine line clover designs?
A: It depends on placement and sun exposure, but many fine line clovers see the first touch-up between year one and year three. Plan for a check-in with your artist around year two to assess saturation and line clarity.
