
Fine line trends dominate feeds right now, but when it comes to dotwork tattoo stencil outlines the real test is what survives everyday life. Small dots can vanish on wrists and hands unless you choose spacing and density that account for healing and friction. Below are 21 dotwork stencil ideas that solve common fade and transfer problems, show what to ask your artist, and include wardrobe tips to help you wear each piece well.
1. Dotwork Mandala Forearm Piece
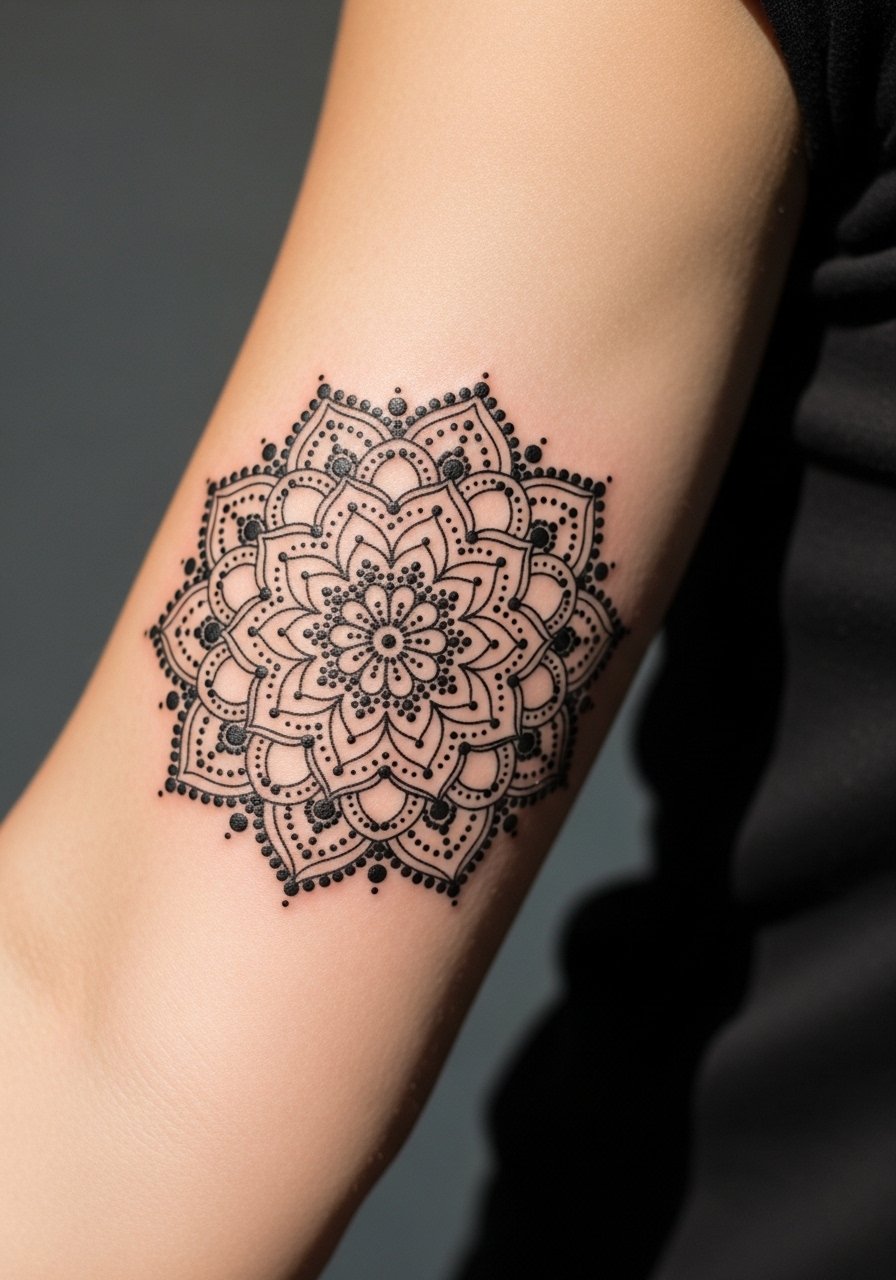
I see mandalas on forearms all the time and they work well when you size them for the skin. For a 2–4 inch piece ask for slightly wider spacing between concentric rings so the dense center does not merge over time. Tell your artist you want high-density stippling toward the center but room in the outer rings to avoid blowout. Expect a two-session build for crisp gradients and a touch-up at six to twelve months if you work out or sunbathe often. For the appointment wear a rolled sleeve black tee so the artist can roll sleeves without tugging.
2. Geometric Sleeve Outline That Scales

Most sleeves start with an outline stencil that maps negative space. When you want sacred-geometry motifs across a sleeve, prioritize a layout session rather than a single flash. Ask for variable dot density in sketches so the artist can darken focal areas later. A common mistake is asking for everything tiny and detailed at once; give the stencil room and plan multiple sessions. Expect six or more sessions for a full sleeve outline, and know that heavy gym forearms can subtly shift tight dot clusters, so scale the elements outward near flex zones. Pair the early sessions with a loose button down shirt you can slide aside.
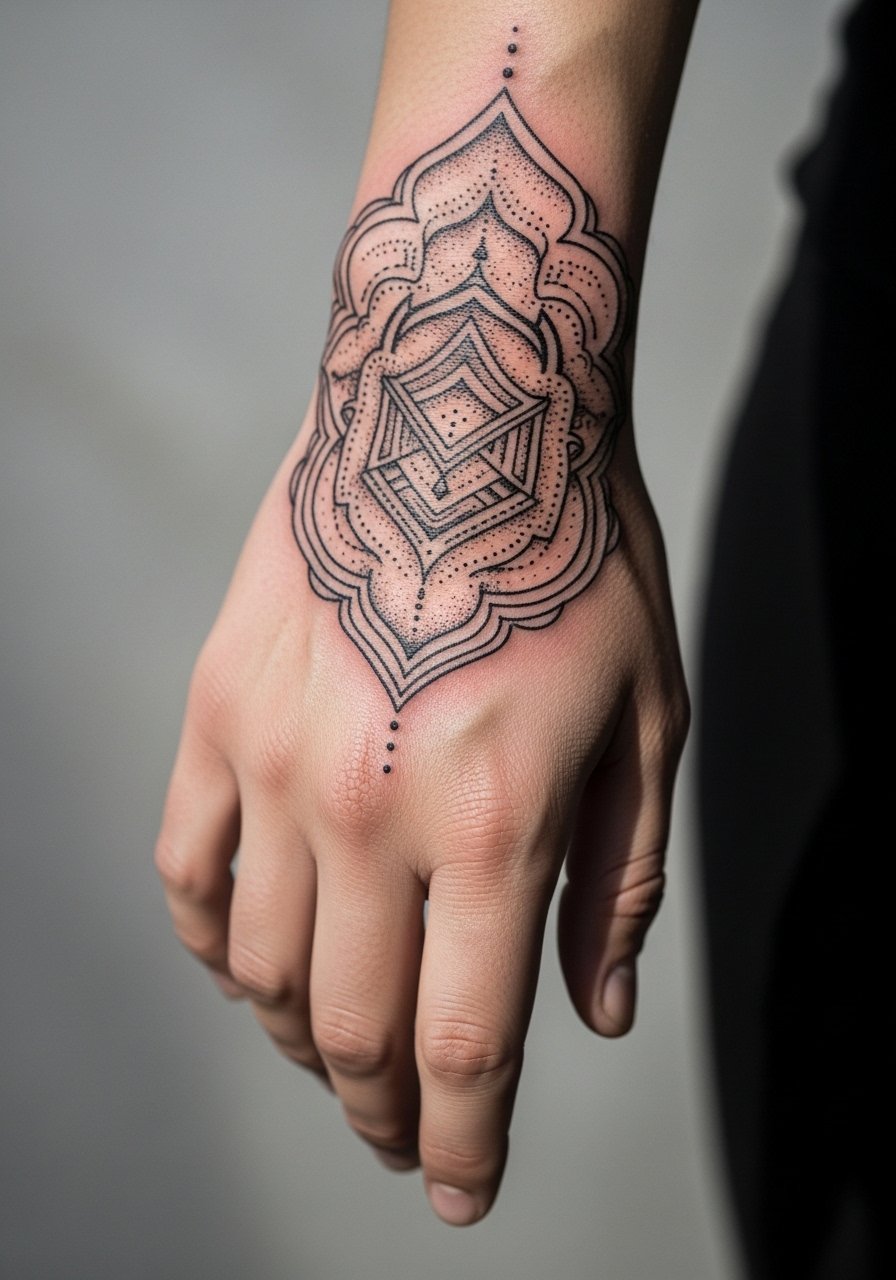
3. Small Dotwork Wolf Mandala on the Wrist
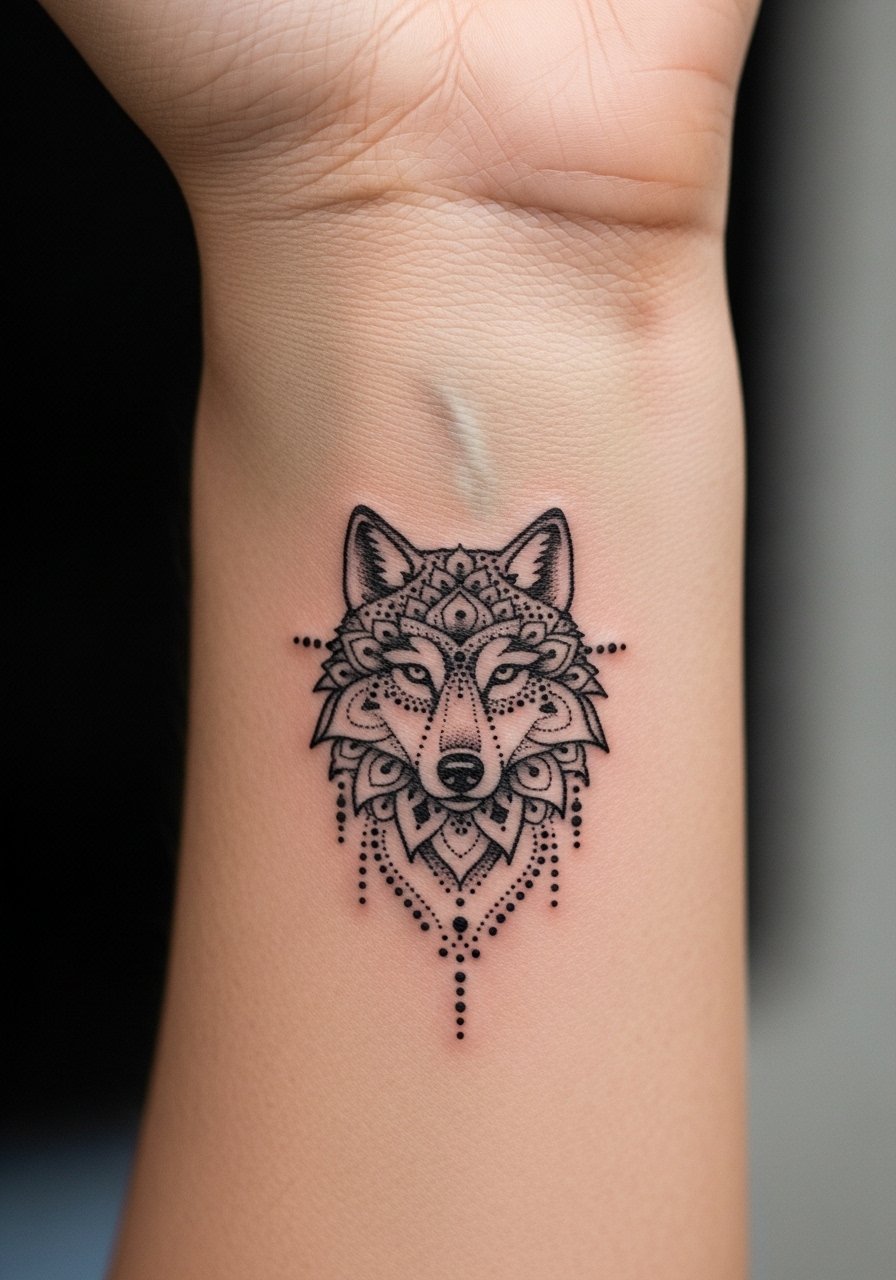
The inner wrist heals differently than the forearm. For a 1–2 inch wolf mandala request the stencil to avoid the exact wrist crease so dots do not migrate with movement. Pain is usually mild but expect the wrist to feel raw for the first few days because of constant washing. The common misstep is asking for too much micro detail in a tiny area; pick the essence of the motif instead. A single session often does the job, with a touch-up at year one if contrast softens. Show it off with a thin leather cuff bracelet on the opposite wrist to frame the piece.
4. Flower of Life Upper Chest Piece
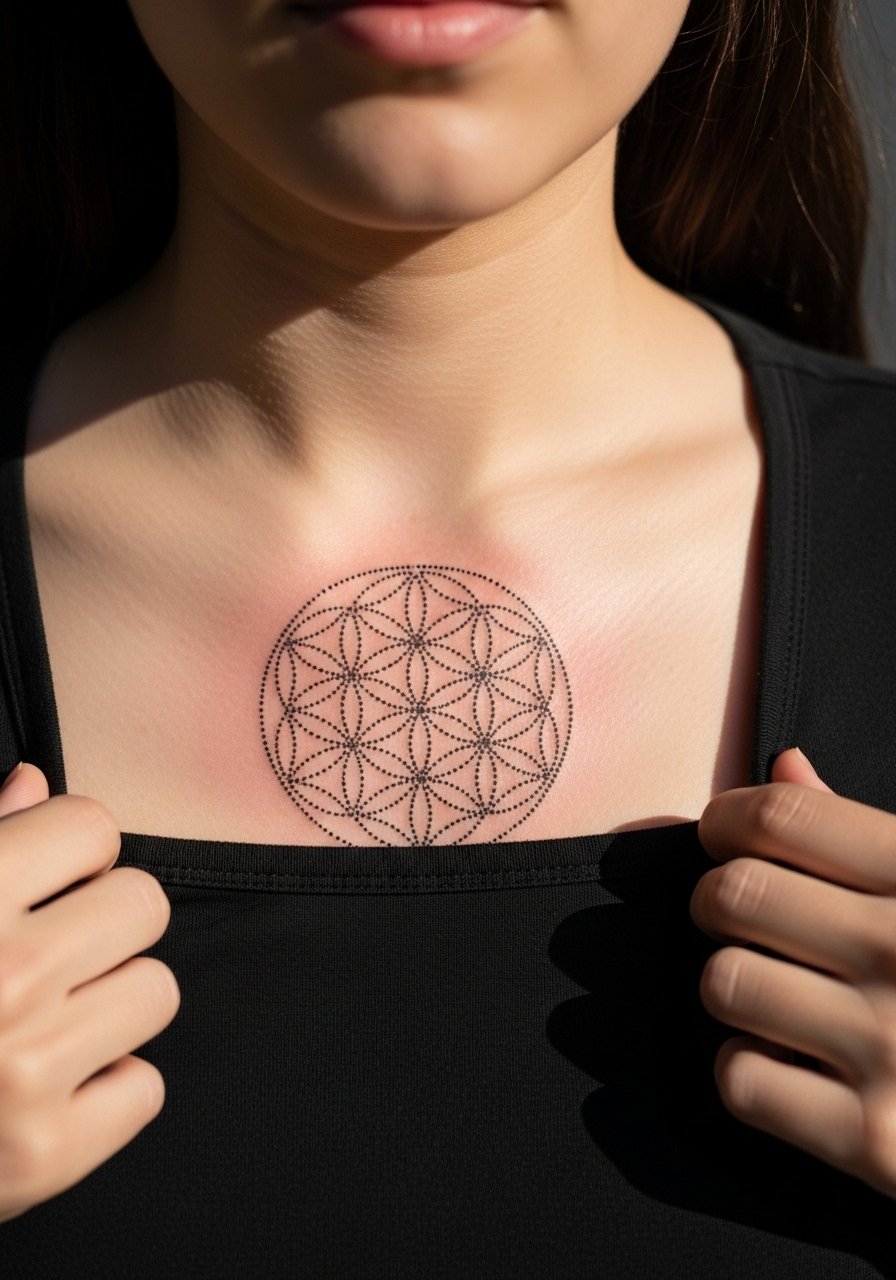
The chest gives a generous flat plane for repeating geometry, which helps dotwork hold its shape. During consultation, show the exact scale you want with a printed stencil so you can confirm how the pattern sits on either collarbone. One controversy here is aftercare film versus open-air drying. One camp says protective film keeps dense dots clean and sealed. The other camp worries it traps moisture. Decide with your artist and plan a touch-up at six months if any dots soften. For the session wear a v neck linen tee so the collar can be adjusted without fully removing clothing.
5. Owl Silhouette on the Outer Thigh
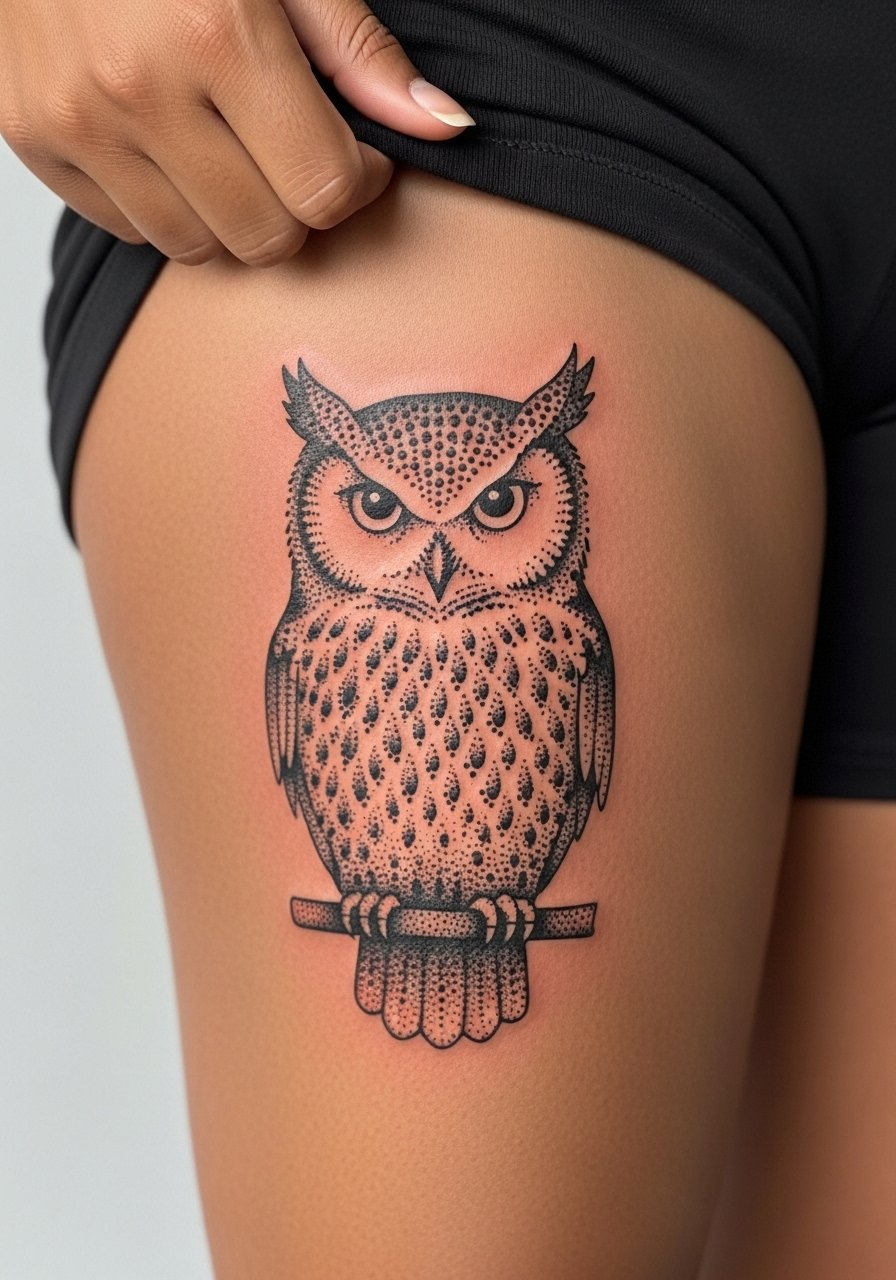
Thigh pieces scale well and let you use dense dotwork without risking blowout. I recommend a 4–6 inch outline for an owl to maintain feather detail. The biggest mistake is asking for tiny feather dots at a small size; they blur on the curved thigh over time. Plan for three sessions if you want layered shading. Thigh stencils are easier to position if you print trial stencils and test placement at home. For showing this off, reach for high waisted denim shorts that stop above the piece.
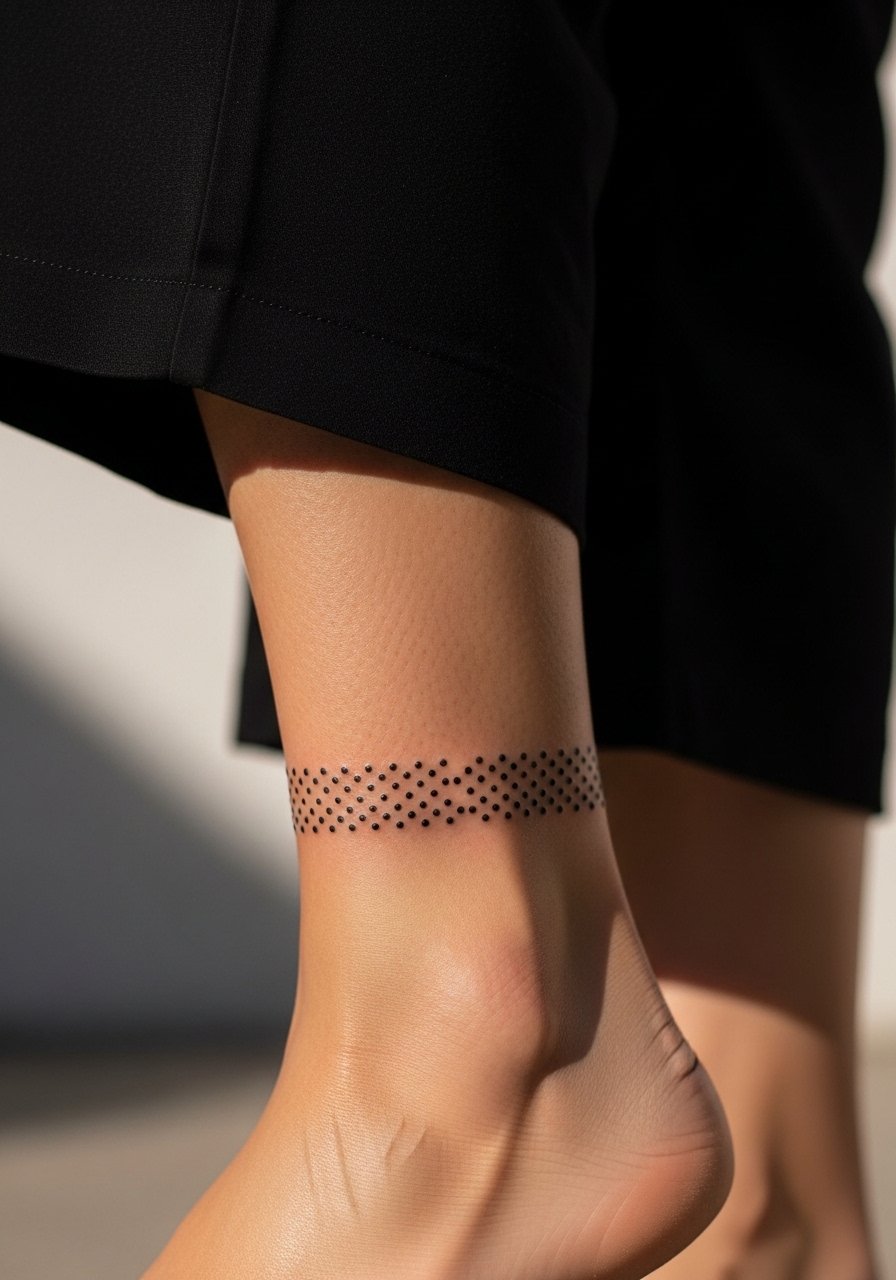
6. Micro Dotwork Mandala Ankle Bracelet
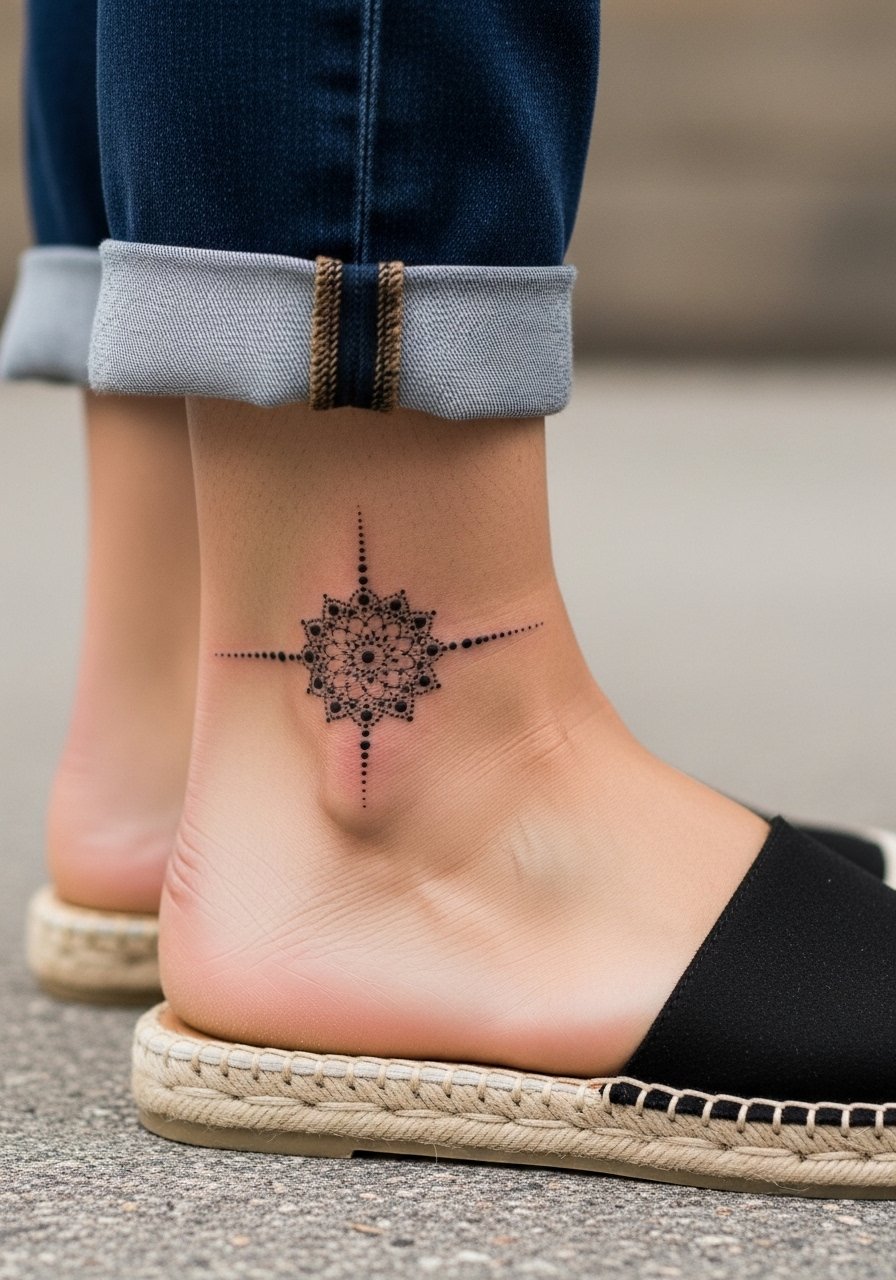
Ankle wraps are favorite first tattoos since they are low commitment and tidy. Keep the width around two inches and insist on single-layer dot spacing so the bracelet breathes with movement. Stencil smearing on curved spots is common here. Ask for vegetable-based stencil ink and a flexible transfer technique to prevent slipping during application. One session usually completes a micro mandala, but expect touch-ups sooner if you wear tight socks or boots regularly. For the appointment wear cropped wide leg pants or pull up joggers so the ankle is easy to access. Pair the finished piece with espadrille wedge sandals.
Pack Smart
The forearm, wrist, thigh and ankle pieces above all benefit from small prep items that save time at the studio.
-
Stencil Stuff Transfer Solution. Helps prevent smearing on curved zones like ankles and forearms so the stencil uploads cleanly to skin.
-
H2Ocean Piercing Aftercare Spray. A spray option for the first few days can be gentler than heavy ointments on micro dotwork around the ankle and wrist.
-
Framydoma Custom Stencil Paper. Flexible stencil paper that contours to thighs and shoulders keeps transfers from folding during placement.
-
Dotwork vegetable stencil ink set. Artists report these hold better during long blackwork sessions without smudging.
-
Aquaphor healing ointment. A thin layer during the very first nights keeps fine dot channels from drying hard, especially useful for delicate wrist work.
7. Dotwork Dreamcatcher Shoulder Cap
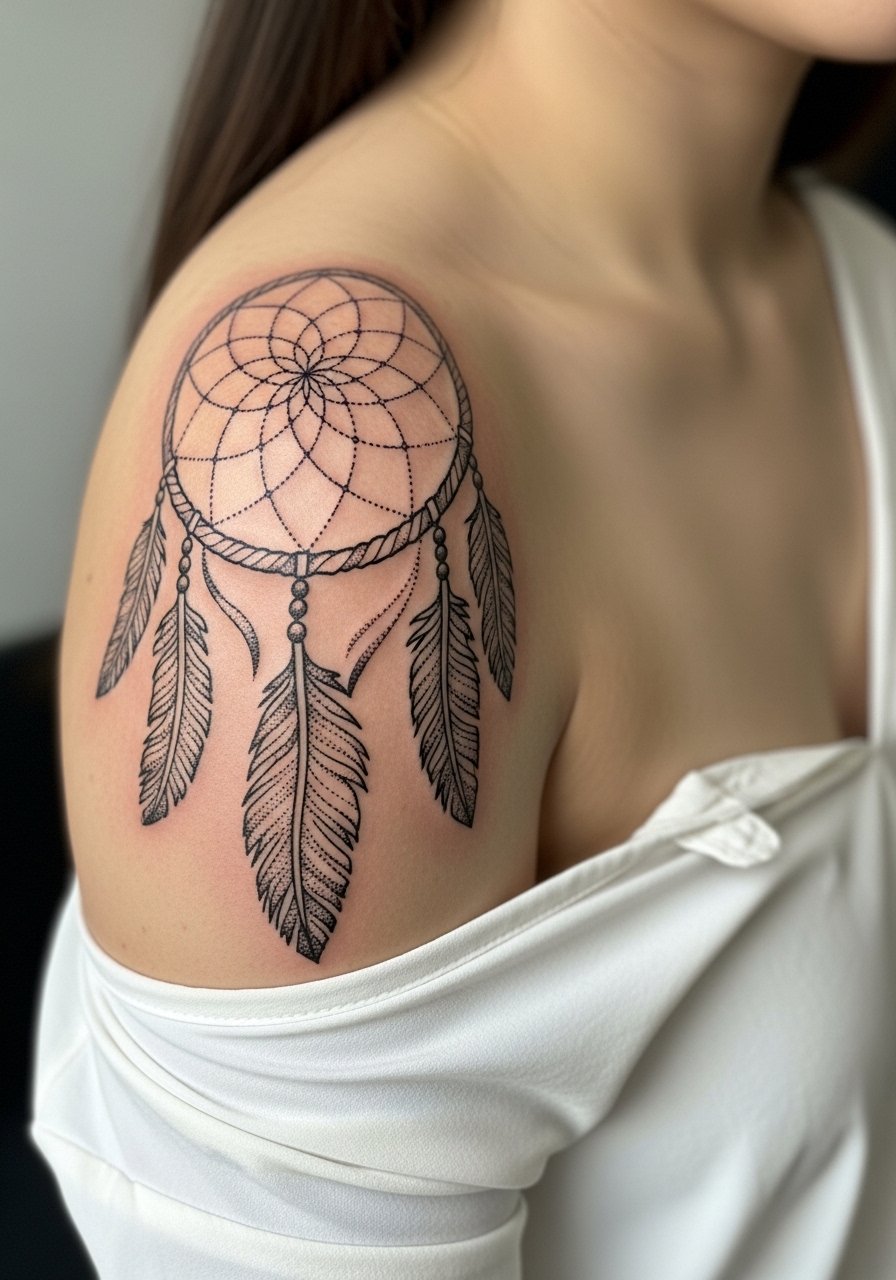
Shoulder caps take circular motifs well and let feathers flow into the upper arm. For a dreamcatcher, ask for layered density in the web and lighter, airy stippling in the feathers. The common error is packing too many tiny feathers in a small area. If you want the piece to sit well beneath clothing, tell the artist which sleeve styles you wear most so the stencil avoids seam lines. Session time is usually two to three hours. Wear a strappy tank top you can slide down slightly for access, and expect a six to twelve month touch-up window if the outer feather tips soften.
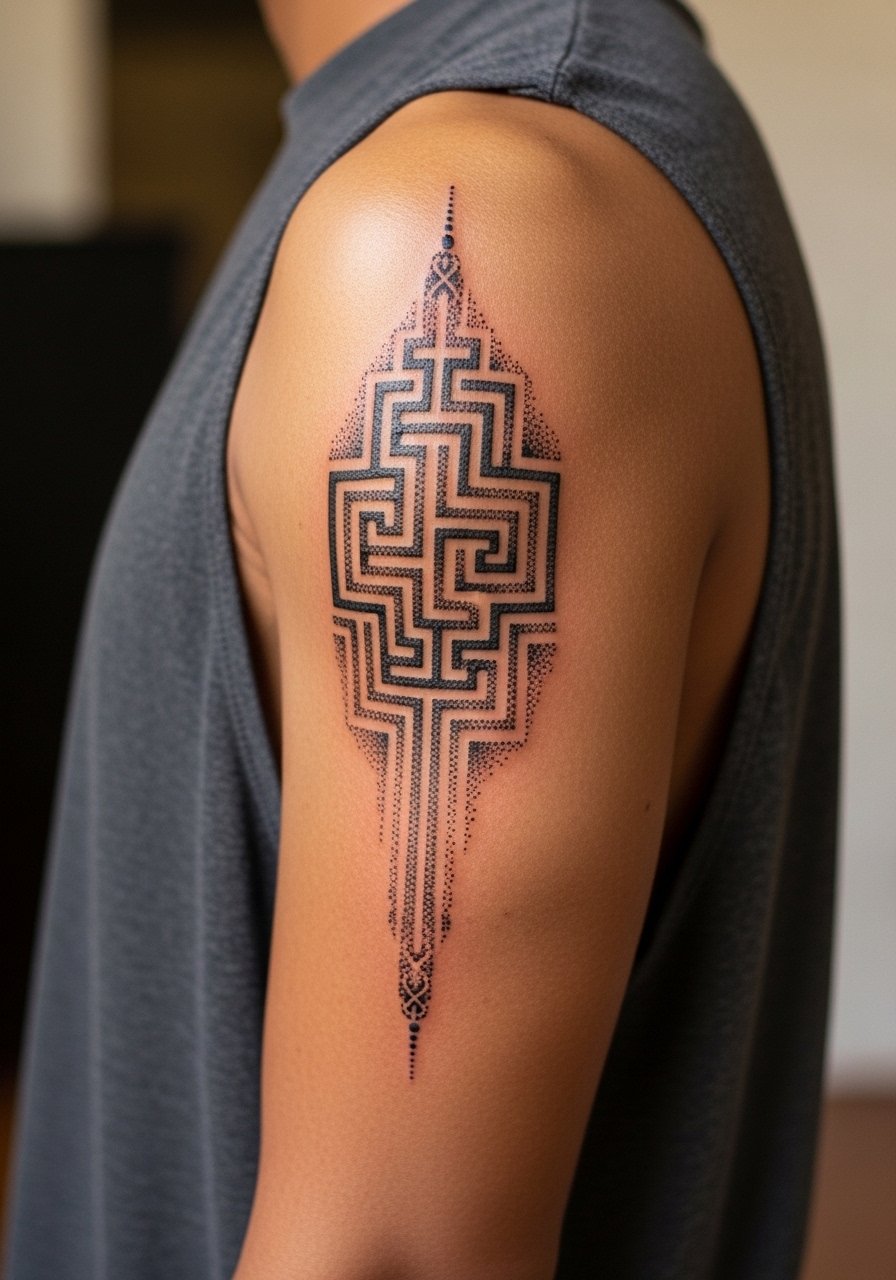
8. Labyrinth Spine Column That Elongates
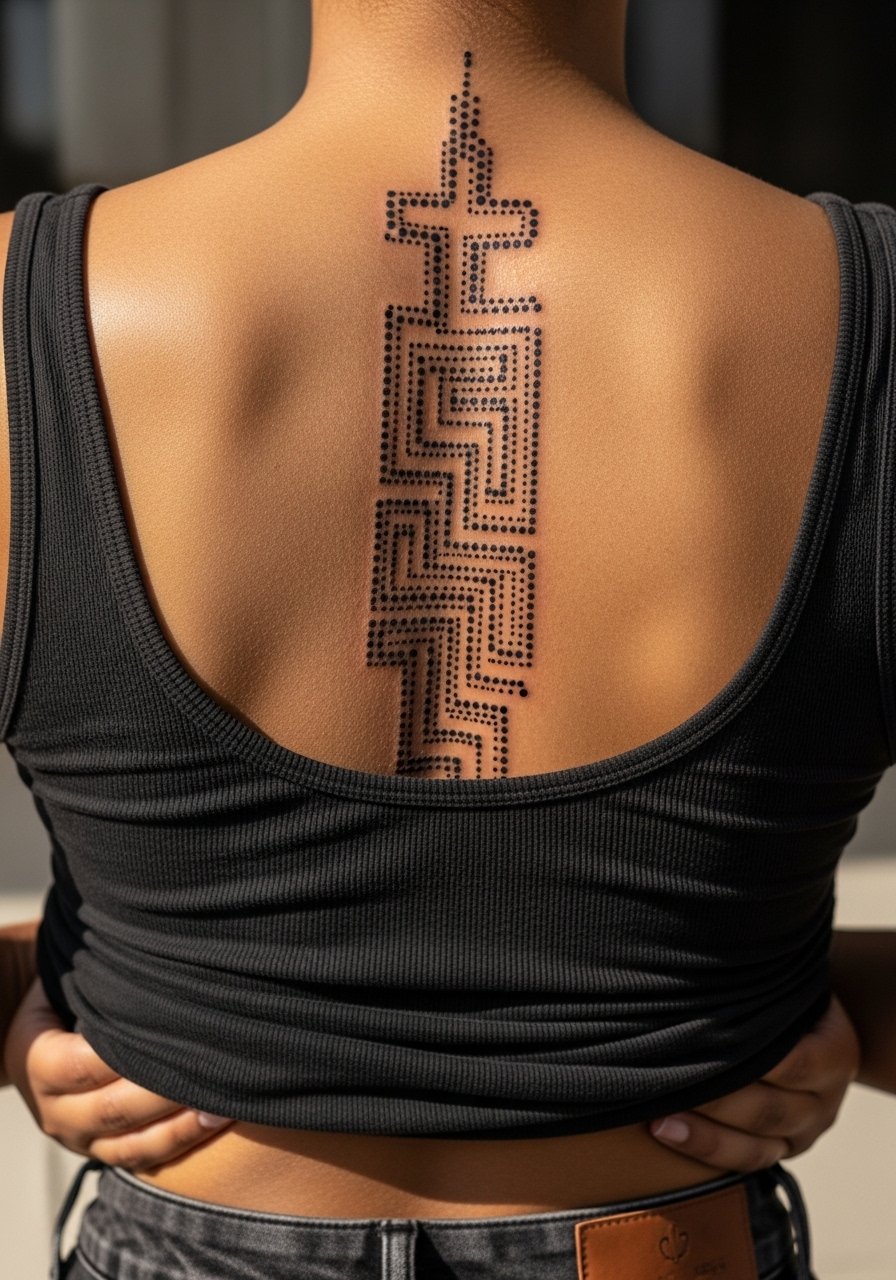
Spine work reads dramatically but the skin there moves with posture. For vertical labyrinths keep the path broad enough so dots do not merge when you bend. When you consult, have the artist mock the stencil while you stand and while you bend forward to check distortion points. Expect four sessions for deep gradient control, and plan on touch-ups at year one if the central column shows softening. Hand position changes during long sessions matter, so wear a low back tank top that you can remove or shift without rubbing the fresh ink.
9. Small Dotwork Hourglass on the Ribcage

Fair warning: the ribcage is a high-pain zone but it gives dramatic contours for small symbolic pieces. Artists are split on technique here. One group says fine line and single-needle dotwork blur quickly because the skin stretches with breath. The other group says you can get clean results if the dots are placed with controlled depth and spacing. Ask the artist which camp they sit in and request a practice stencil on the same side of the chest. Sessions run two hours or more because breathing disrupts steady handwork. For the session wear a sports bra or bandeau so only the rib area is revealed.
10. Sun and Moon Calf Wrap
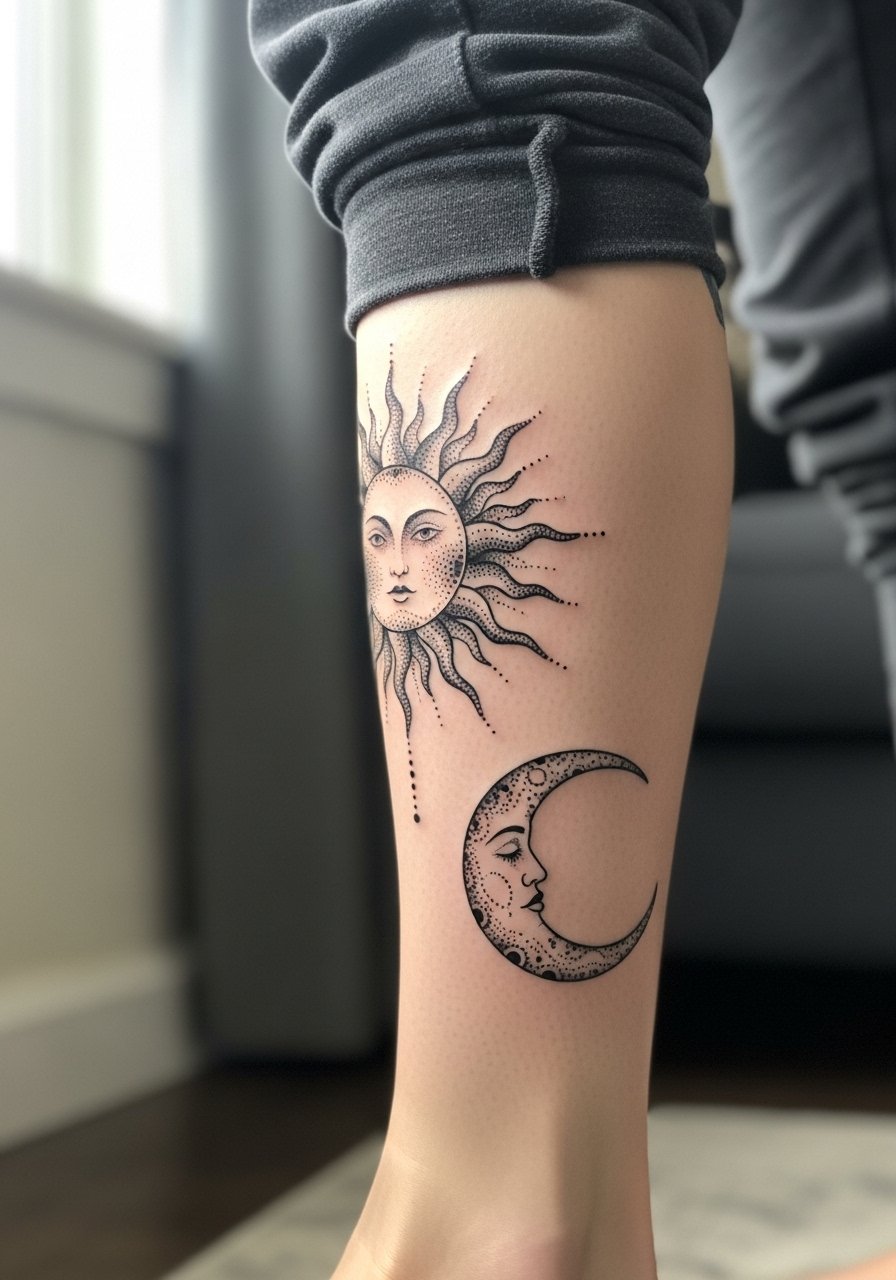
Calf wraps hit their stride when the motif flows with the muscle. For sun and moon designs, request dot bursts with clear negative space between rays so the contrast stays readable from a distance. The leg tolerates medium session lengths well and usually needs two sessions for a five-inch wrap. A mistake is pushing density too high near the tendon area, which can cause long-healing scabs and uneven dots. During the session wear cuffed joggers to make rolling the leg easier and give the artist a steady surface to work on. Boots or sandals in your wardrobe will show the wrap off seasonally.
11. Tree of Life Along the Collarbone

Collarbones are flattering for horizontal ornamentals that frame the neckline. For a four-inch tree of life, ask that main branches sit over the bone and finer root dots fall into the chest shadow so the piece reads from arm movement. The common mistake is compressing roots too tightly against the bone, which speeds up fading. Session time is typically two hours and the piece holds well if you avoid sun exposure for the first month. Wear a wrap style blouse for the appointment so you can reveal the area without stretching fabric over fresh ink.
12. Infinity Knot on the Top of the Hand
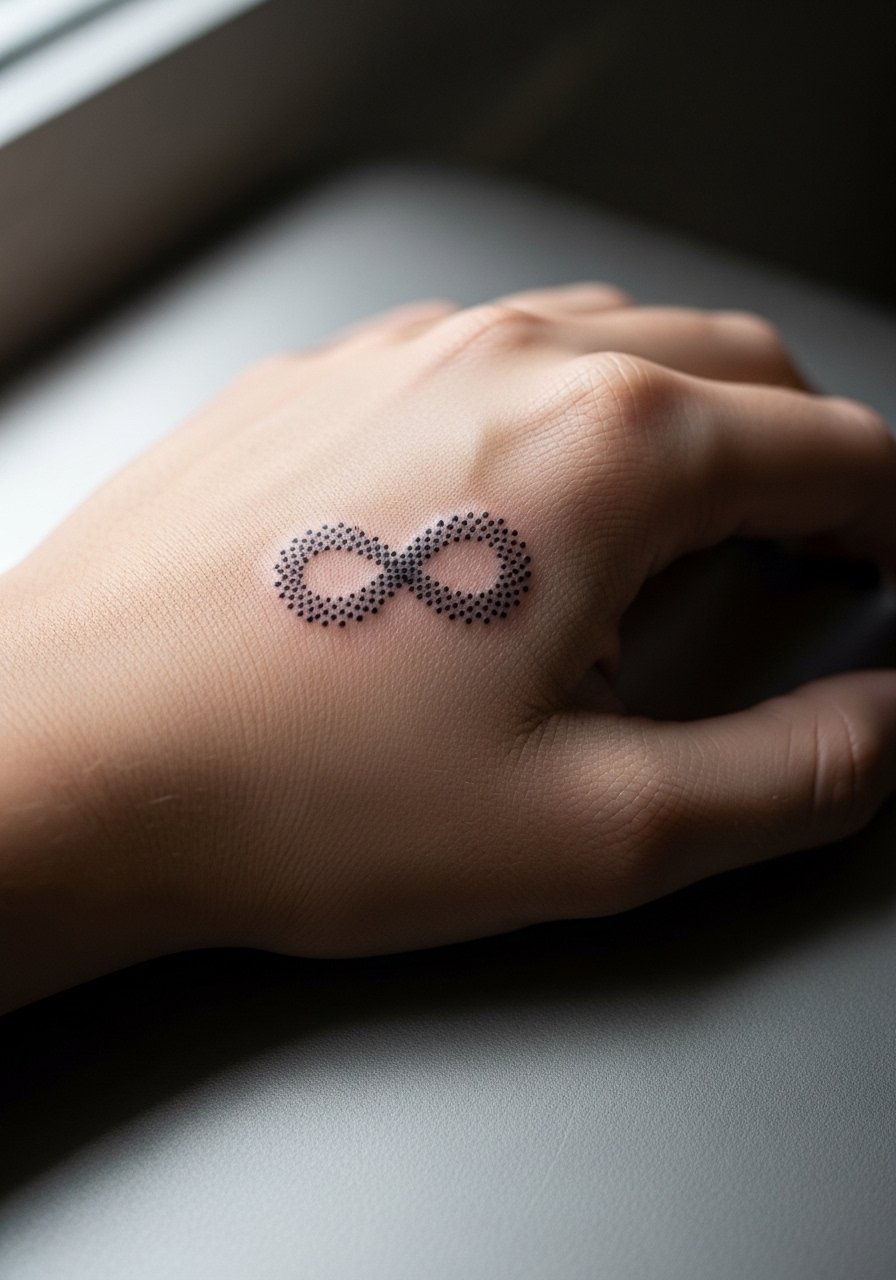
Hand tattoos face heavy wear and higher fade risk, but hybrid dotwork knots with slightly larger dots and purposeful negative space can last longer. If you want a visible knot, ask for spaced stippling rather than micro stippling. The biggest mistake is tiny text or filigree on the hand, which will soften rapidly. Expect touch-ups at six to twelve months. Be aware that some workplaces restrict visible hand ink. Pair the finished knot with a dainty stackable ring on the opposite hand to balance visibility.
13. Dotwork Compass on the Sternum
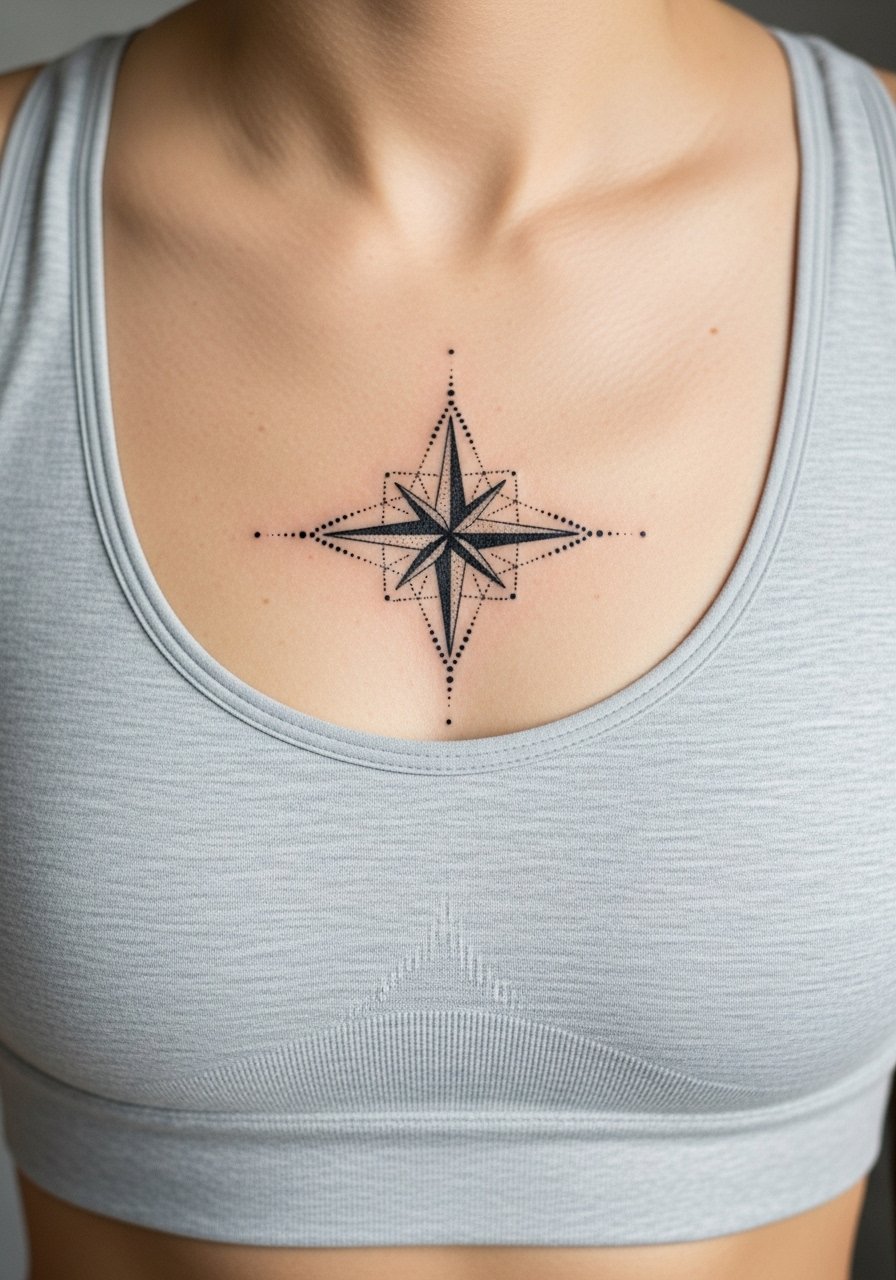
Sternum work reads bold and central but it is a sensitive area. When booking a compass here request a stencil placement check in a fitted top so you can see how the points align with your ribcage and cleavage lines. Artists debate numbing creams for these sessions. One camp says numbing interferes with movement cues. The other camp supports it for longer sessions to keep the client comfortable. Ask about both approaches and decide with your artist. Sessions can be long because of the steady hand needed, so bring a cushion and wear a strapless bralette or sports bra for clean access.
14. Scar-Integrative Dotwork on Upper Arm

Using dotwork to incorporate scars can be transformative when done with respect for texture. The trick is to offset the stencil slightly so dots sit around raised tissue and use heavier shading to unify the surface. A common error is trying to cover a scar with dense dots that actually highlight texture. During consultation bring photos of the scar in different lighting and ask for healed photos of similar work on the artist's portfolio. A single session may suffice for small designs, but plan a touch-up if the scar tissue rejects ink spots. For the appointment wear a sleeveless muscle tank you can slide down.
15. Hybrid Dotwork and Linework for Back of Hand Aging Prevention
Hands age differently so combining dotwork and supportive linework can maintain shape as skin changes. Ask for slightly bolder anchor lines with stipple filling to carry contrast longer. The real mistake is relying on micro-only dots in this placement. Expect touch-ups earlier than arm pieces. This approach is recommended if you want visible work that softens gracefully instead of disappearing. Session length is usually under two hours for a small hand motif. For showing this off, consider a minimalist leather wristband on the opposite wrist.
16. Printable Mandala Thigh Stencil Test
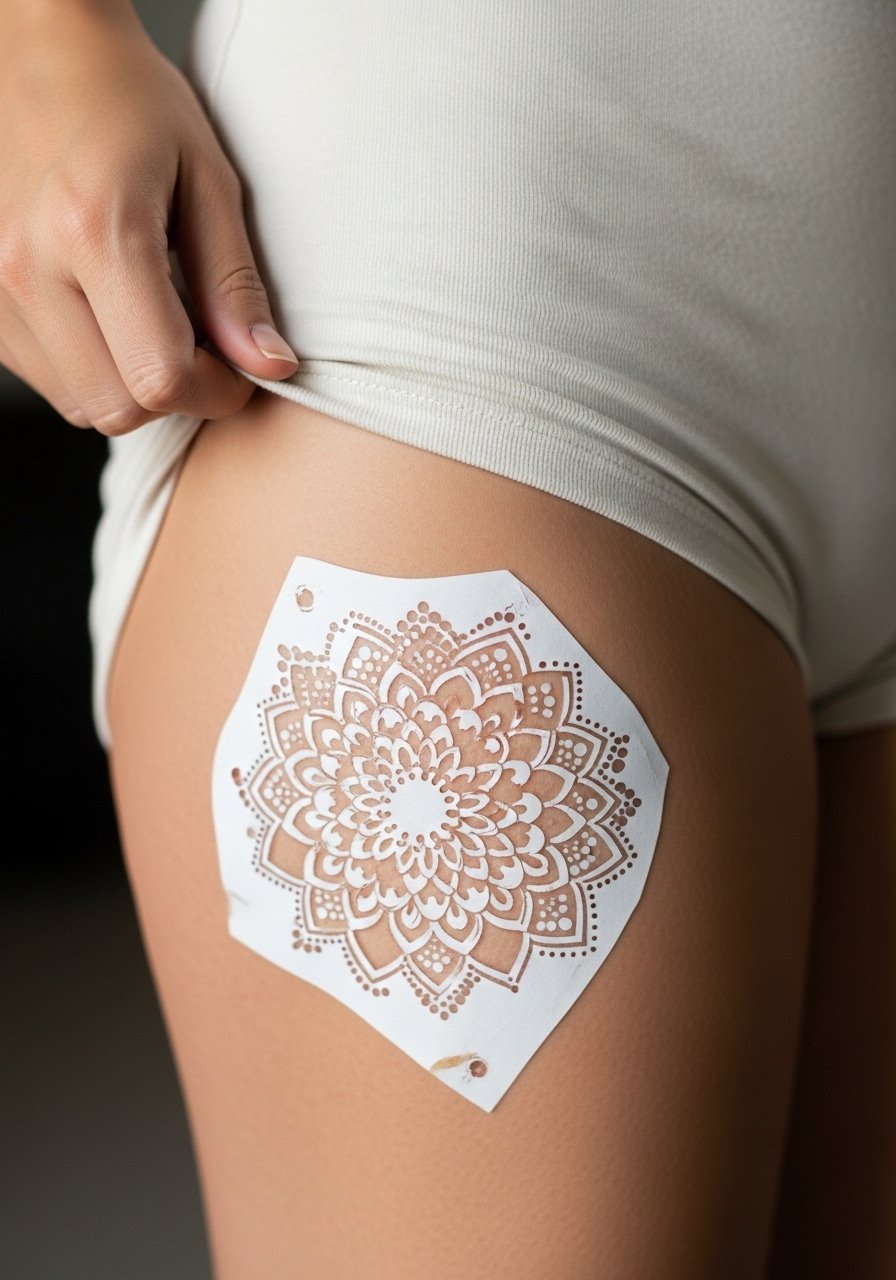
One under-covered idea is printing mandala stencils at home to test placement on the thigh before booking. Try several sizes, tape them on and move in different poses to see how the pattern reads when you sit or walk. Bring your favorite print to the consultation so the artist can trace and adapt it to muscle curves. This avoids guest-spot cancellations and saves design time. If the stencil needs to wrap, ask about custom flexible transfer paper. For the appointment wear high waisted shorts that you can shift without rubbing the area.
17. Micro Dotwork Accent Behind the Ear
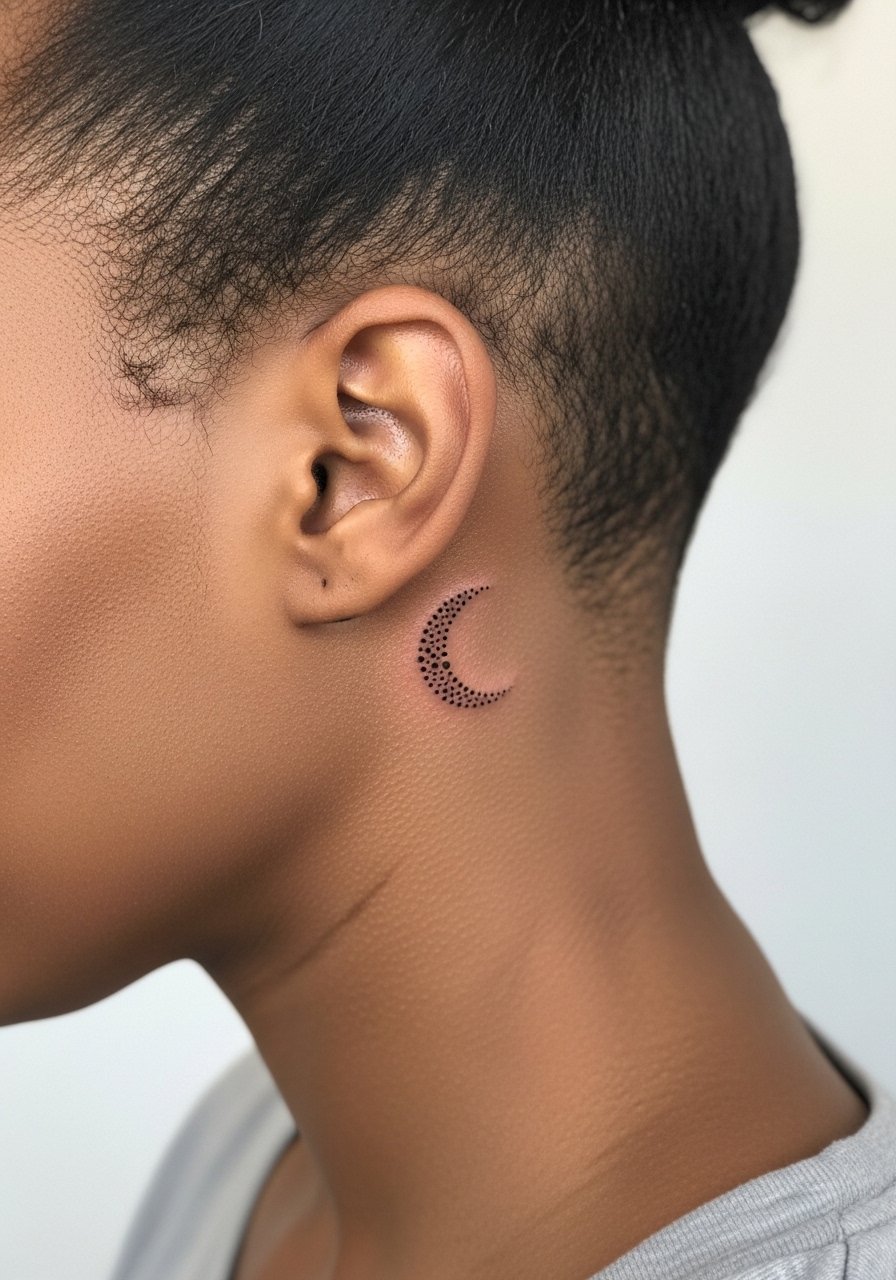
Behind-the-ear accents are subtle and easy to hide, ideal for tiny dot clusters. Because the area is close to hair and clothing, the stencil must be precise. Ask the artist to place the stencil below the hairline and to show a final preview in your hair tucked position. Pain is usually mild but the skin is thin, so expect extra sensitivity. One session handles most micro dots. For cleanliness and access, wear hair pulled back into a low bun or clip. Consider a small stud earring to frame the piece after it heals.
18. Owl Half-Sleeve Transition with Negative Space
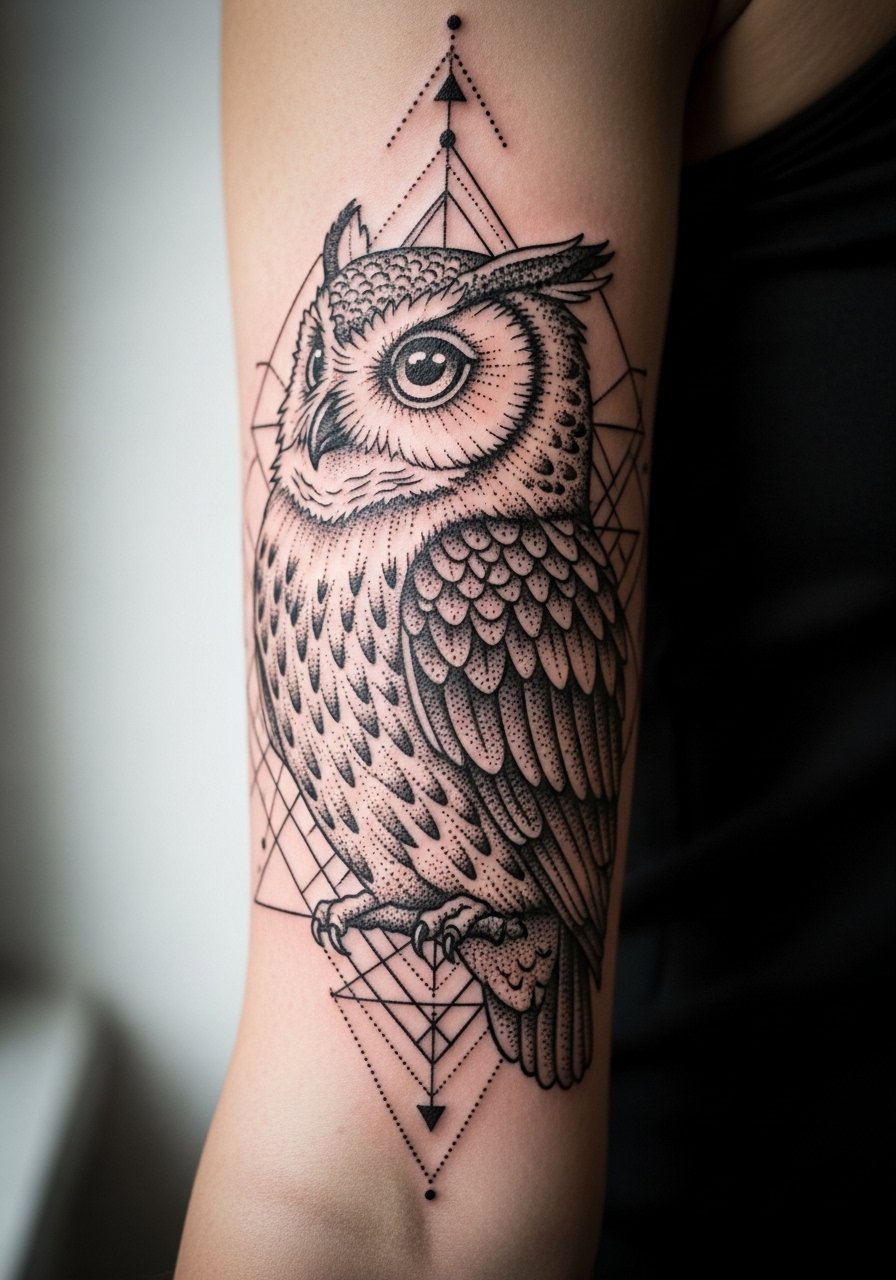
Half-sleeves work best when elements breathe. For an owl that transitions into geometric fields, ask for planned negative space corridors so the eye has room and the dots do not collapse into a single tone. A common mistake is crowding the elbow junction which ages fast due to frequent bending. Expect three to four sessions and map pads of solid black away from joint lines. For session comfort wear a loose button down shirt that you can slide off one arm.
19. Curved Ankle Band with Flexible Transfer Technique
Curved surface stencils are tricky on ankles. Request flexible transfer paper and ask the artist to test the stencil while your foot is flexed and relaxed. A frequent error is applying the stencil on a relaxed foot then tattooing with a flexed ankle which shifts line placement. One session usually covers a simple band. Tell your artist you printed a test and would like to compare placement while standing. For showing it off, wear cropped wide leg pants or strap sandals.
20. Constellation Dotwork on the Foot
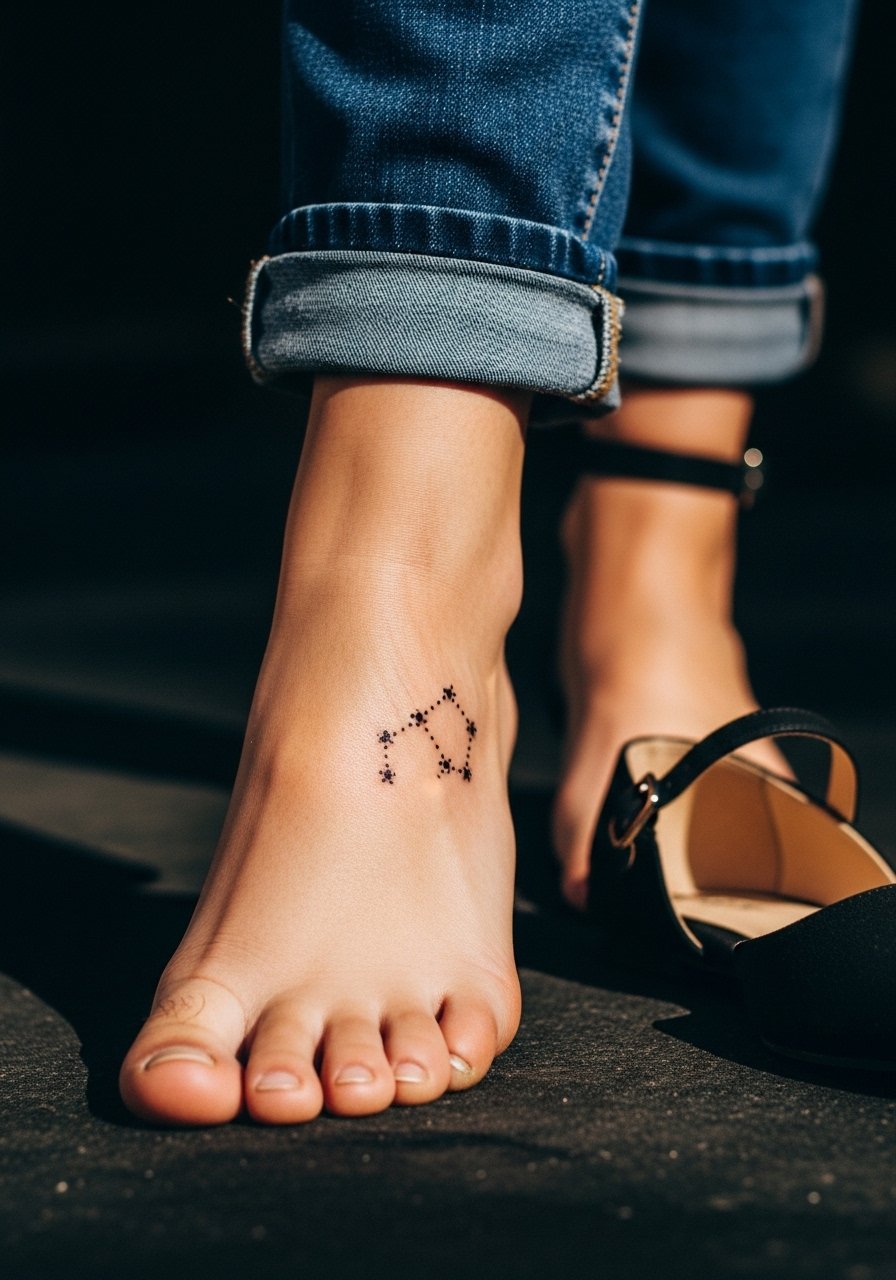
Foot pieces must deal with friction from shoes and the tendency to swell. For constellation dots keep them slightly spaced and avoid placing tiny dots under straps. The most common mistake is making the arrangement too dense near the instep where shoes rub. Session time is short but healing is picky so avoid long walks and wear open shoes for the first week. Plan a touch-up at six months if any stars lose crispness. For the session wear ankle strap flats you can slip off without pulling socks.
21. Labyrinth Elbow to Tricep Connector
Elbow junctions are movement hotspots so designs that span elbow to tricep need deliberate spacing. Best practice is to insist on larger dot modules over the joint and denser work above and below. The mistake is asking for tight stipple across the joint, which breaks up as you bend. Expect two to three sessions and a touch-up window at nine to twelve months. For the appointment wear a sleeveless muscle tank with the arm raised to let the artist reach the tricep without fabric shifting.
Frequently Asked Questions
Q: Will dotwork on darker skin tones fade unevenly faster than on lighter skin?
A: From what I have seen, fading patterns differ with skin tone because contrast behaves differently. Artists who work with diverse healed photos and use higher dot density in key areas tend to get more even results on dark skin. Ask to see healed examples on a similar tone and plan for a touch-up at six to twelve months.
Q: How do printable stencils change the booking and guest spot process?
A: Bringing a printed stencil can save design time and sometimes lowers the session cost since the artist can trace instead of redrawing. It also helps you test size and placement at home. Make sure the printed size is realistic on your body before you go in.
Q: Are ankle and foot dotwork designs more likely to need touch-ups because of friction?
A: Yes, constant shoe rubbing and swelling make ankle and foot pieces prone to early softening. Spacing dots slightly and avoiding placement under straps reduces that risk. Expect a touch-up sooner than you would for an inner forearm piece.
Q: What should I tell my artist about stencil smudging on curved spots like the ankle?
A: Ask for vegetable-based stencil ink and flexible transfer paper and request a quick standing-and-sitting check. Those steps help the stencil hold on curved skin and reduce the chance of a second placement during the session.
Q: How does the Saniderm versus dry healing debate affect dotwork aftercare choices?
A: Both camps present valid points. Some artists say a short protective film use keeps dense dots clean during the first 24 to 48 hours. Others prefer open-air healing to avoid trapped moisture in stippled areas. Discuss your skin type and lifestyle with your artist and choose the approach you can follow precisely.
