
Fine line looks gorgeous in photos, but it does not always win the longevity race. I've noticed tiny ghosts and micro bats fade faster when placed where skin stretches or rubs, artists vanish mid-booking, and price jumps can surprise people last minute. If you want small seasonal ink that still reads crisp after a few years, start with designs and placements built to age well. The list below starts with easy-to-wear ideas and moves into the more playful options that suit different wardrobes and touch-up budgets.
1. Fine line ghost nibbling candy corn on the wrist
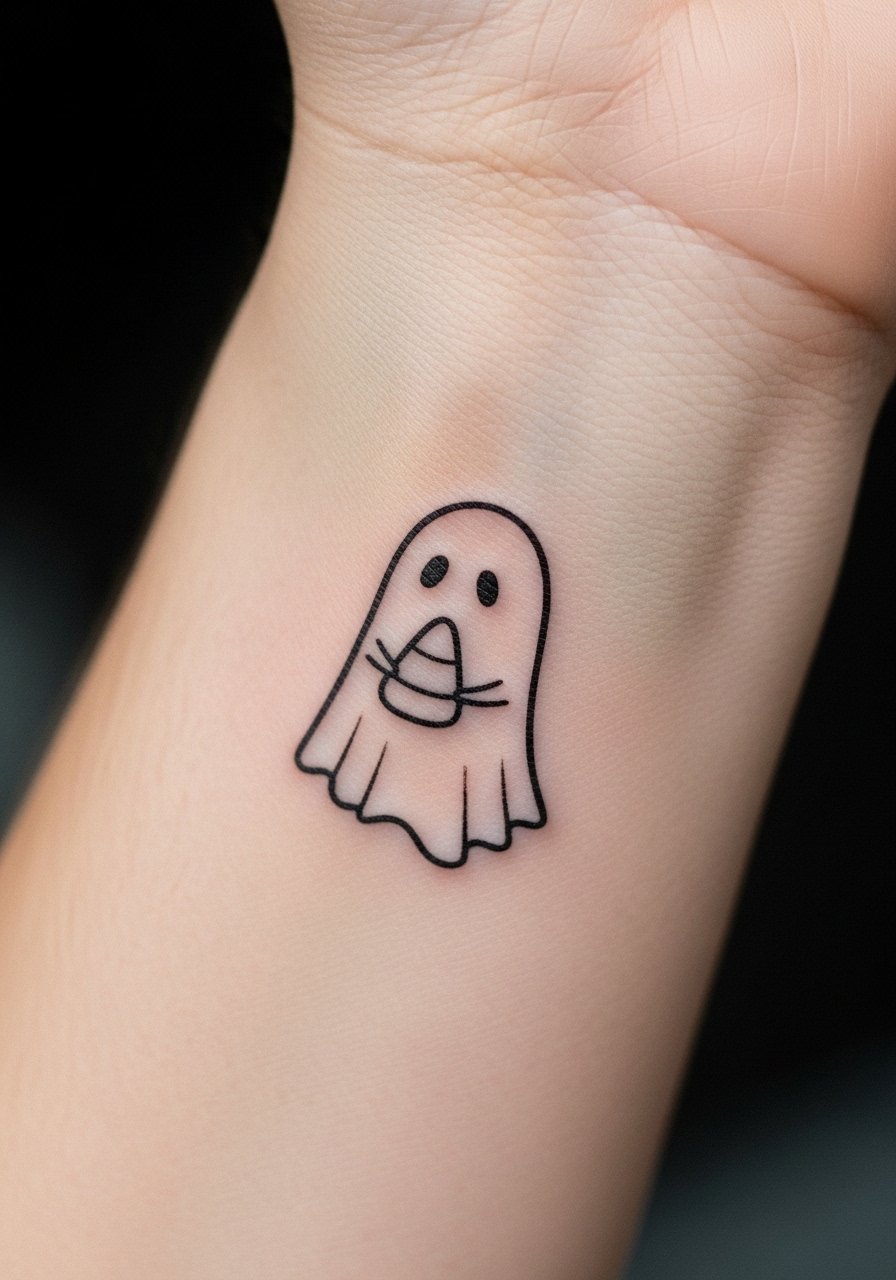
I've seen this style on forearms for years and it still reads playful at six months. Fair warning, the wrist is a high-friction zone so the fine line needs a little extra spacing to avoid merging. Tell your artist you want slightly bolder linework than the reference so the ghost keeps its contours after a summer of sleeves and bracelets. Session time is short, usually under an hour, and pain is mild to moderate. Common mistake is asking for micro detail inside a tiny outline. For showing it off, layer a thin chain bracelet on the opposite wrist so the tattoo feels intentional rather than accidental.
2. Kawaii-style pop culture vampire on the forearm
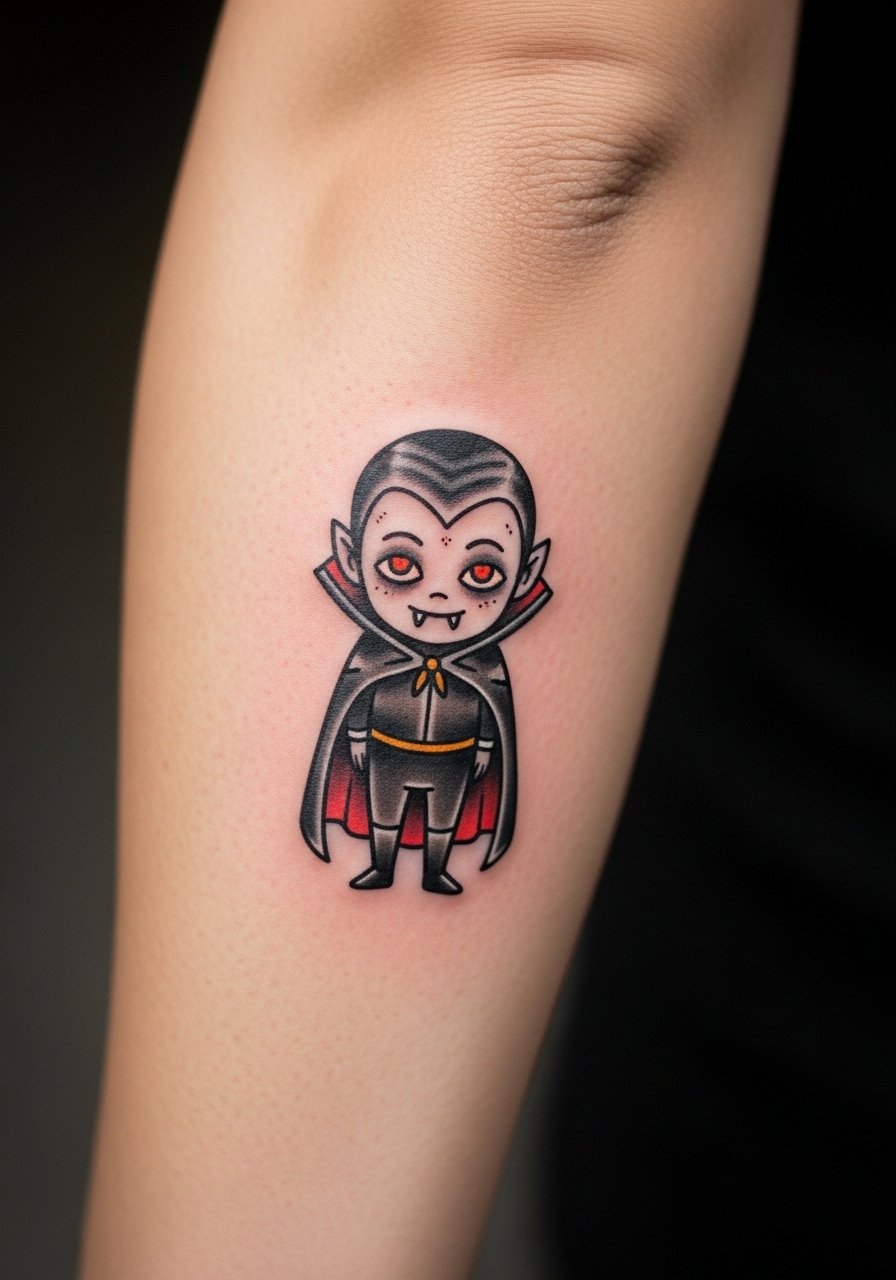
When you want pop crossover energy without heavy commitment, a small neo-traditional vampire on the forearm balances bold outlines with playful color. In consultation, ask the artist for saturated accents only in the cape and fangs so the piece does not compete with other tattoos. The inner-forearm placement stays visible for months and is easier to photograph than ankle work. Expect a one-session appointment around an hour. The main mistake is asking for tiny gradients inside a small character, which fades faster than flat color. Pair daytime outfits with a rolled cuff shirt and a stack of thin stackable rings for a cozy, curated look.
3. Mini Pusheen cat with pumpkin on the inner arm
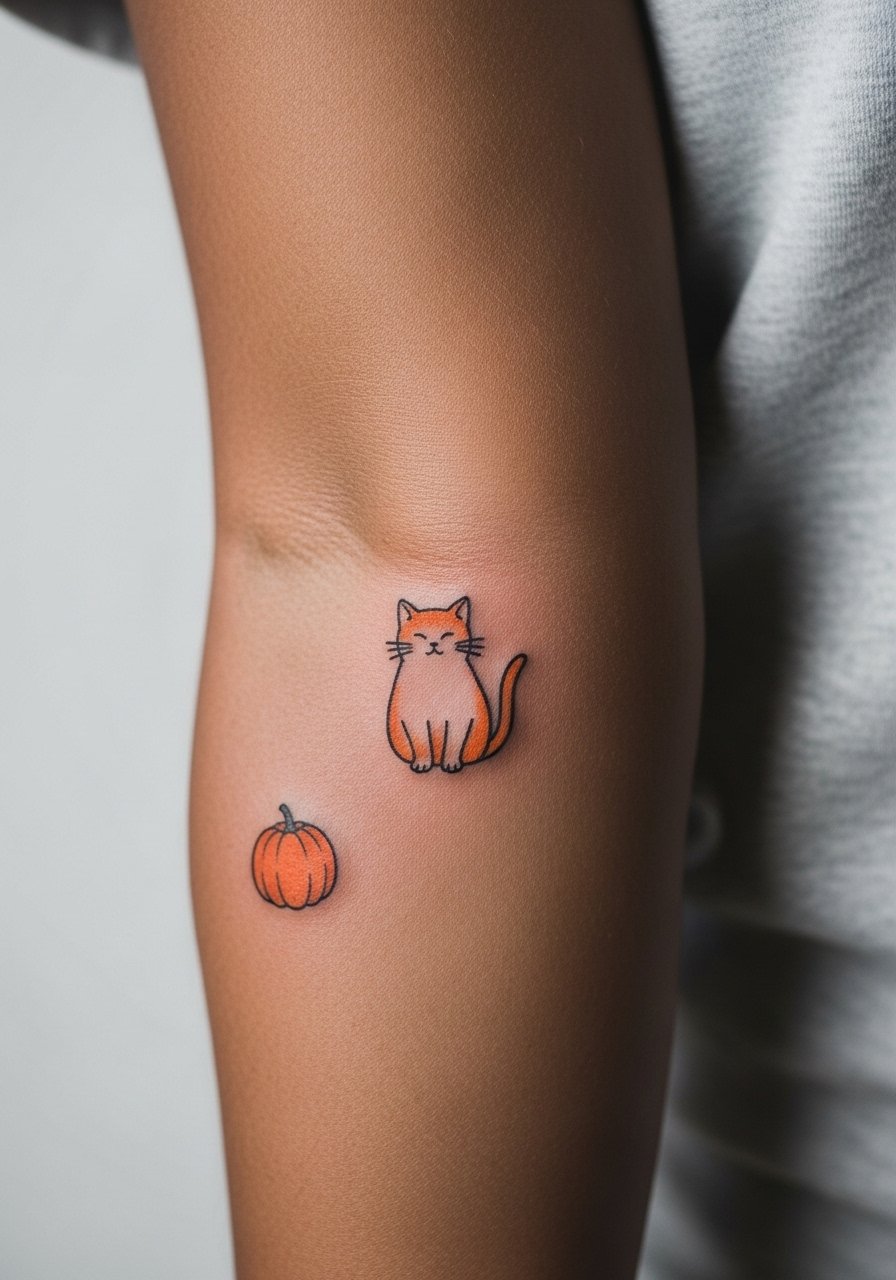
I've seen meme-inspired micro pieces heal beautifully when the artist keeps shapes simple and contrast high. The inner arm is forgiving for small illustrative work and the Pusheen aesthetic benefits from solid black outlines with a single orange pop. Tell the studio you want the pumpkin in flat color rather than watercolor to avoid early migration of orange inks. Sessions are short and pain is low. A common error is cramming too many tiny elements into a 1.5-inch space. For showing it off, roll a cuff and wear a rolled cuff sweater in cream or pumpkin to frame the art without overpowering it.
4. Fluffy ghost sipping a pumpkin spice latte on the collarbone
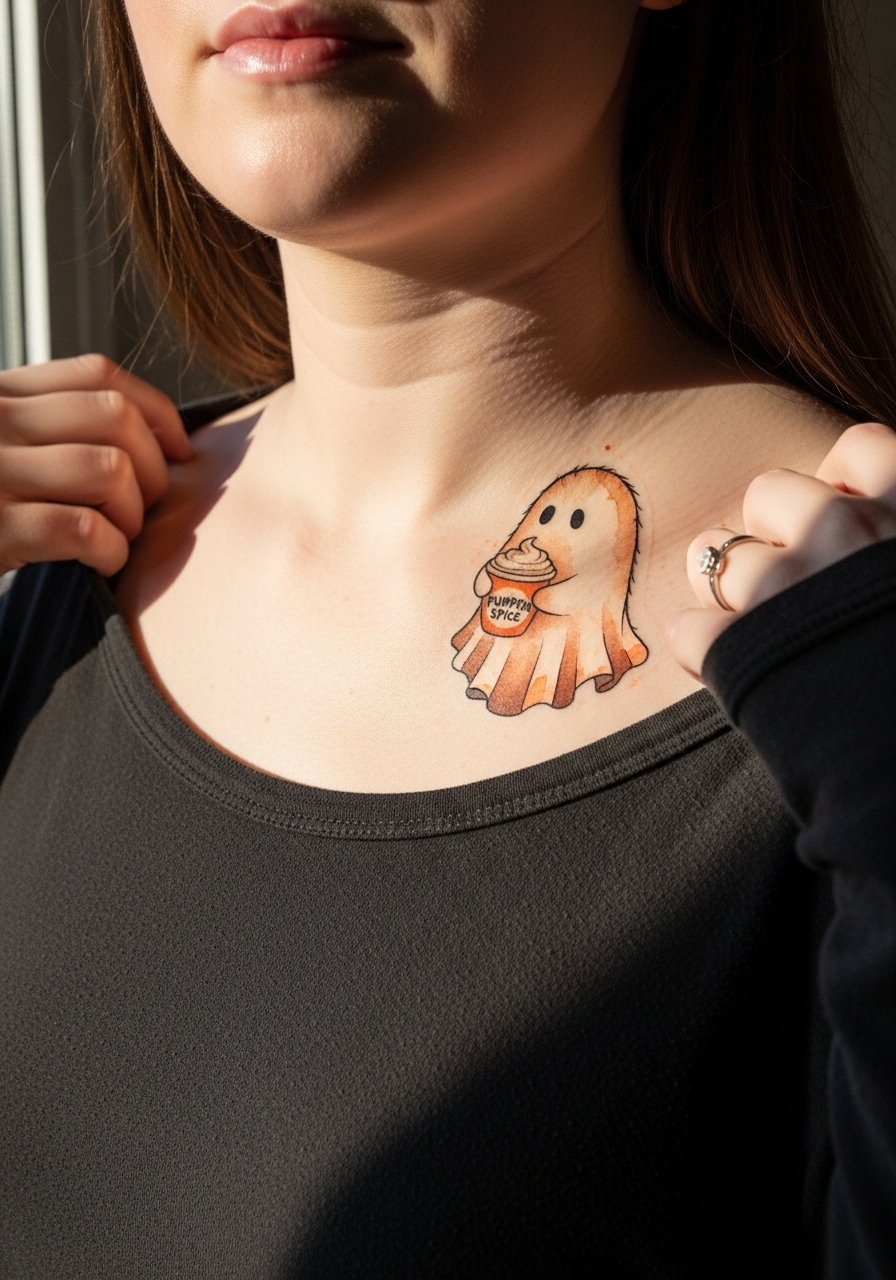
Most watercolor pieces on delicate collarbone skin need careful saturation to avoid looking patchy years later. The collarbone sits well with a 3-4 inch fluffy ghost rendered in soft orange and brown tones. When you consult, ask for gradual color builds and an option for a light touch-up at six months. Session time is typically 1 to 2 hours and pain is moderate because the area is thin. A frequent mistake is requesting ultra-diffuse watercolor without any line anchor. For outfit pairing, an off shoulder top or a V-neck sweater keeps the tattoo visible and flattering.
5. Cheeky black cat on a broom at the ankle
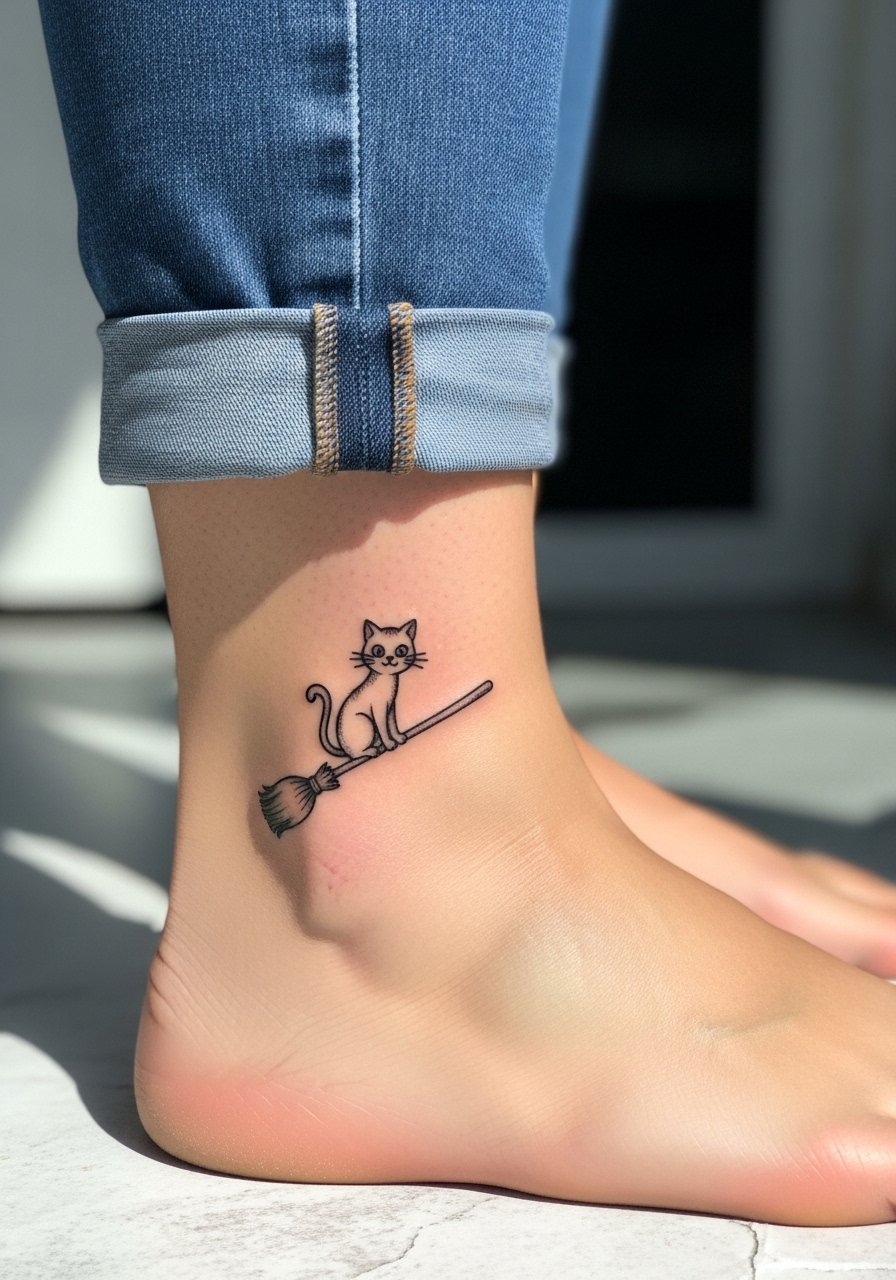
The ankle is great for tiny witchy motifs that peek out of sandals. For this cheeky cat, ask for bold linework rather than ultra-fine hairlines, because ankles rub against shoes and socks. Expect one session under an hour and a moderate pain level from the thin skin near the bone. Commonly people go too tiny and lose silhouette, so specify that the tail and broom remain readable from a short distance. Style it with strappy ankle sandals or cropped pants that let the design do the talking.
6. Wide-eyed bat cluster on the shoulder

Artists split on where stipple dot work reads best, and the shoulder is usually a safe middle ground. One camp says heavy blackwork and dot shading age into stable contrast. The other camp warns that dense dot clusters can look muddy if too close together. Ask your artist to space the stippling so shapes keep breathing over time. This design usually requires two sessions for saturation and touch-ups. For sessions, wear a loose button-down shirt that you can pull aside so access is clear. The shoulder shows well with sleeveless tees or a black kimono cardigan when you want to display the cluster.
Pre-Session Essentials
The wrist and ankle pieces above heal under lots of friction, so a few targeted items smooth the appointment and the first week.
-
Indie thin recovery balm. A lighter balm texture prevents orange inks from running while still locking in moisture for fine line designs on wrists.
-
Breathable dry-heal wraps. These are helpful for ankle and shoulder work when humidity or rubbing from clothing is a concern.
-
Portable aftercare stick. Small non-greasy sticks are handy for micro-arm or finger tattoos while you are out and about.
-
Fragrance free gentle body wash. Use this during the healing window to cleanse without irritating the delicate lines or vivid orange hues in collarbone and forearm pieces.
-
Aquaphor healing ointment. A thin layer in the first few days helps retain moisture for fine line work without clogging the channels.
7. Spiderweb with candy corn tucked on the wrist

When a design mixes web texture and small color pops, spacing is everything. Most people want the candy corn very small but that invites color bleed. Ask the artist to place the orange as a single flat fill and to keep web lines slightly thicker than a hairline. The wrist is a common touch-up zone, so expect light maintenance after a year. Sessions run under an hour and pain is tolerable. A real mistake is requesting ultra-thin webs crossing into orange fills. For showing it off, try a dainty bracelet stack on the opposite wrist so both hands balance visually.
8. Mini zombie hand reaching out from a finger
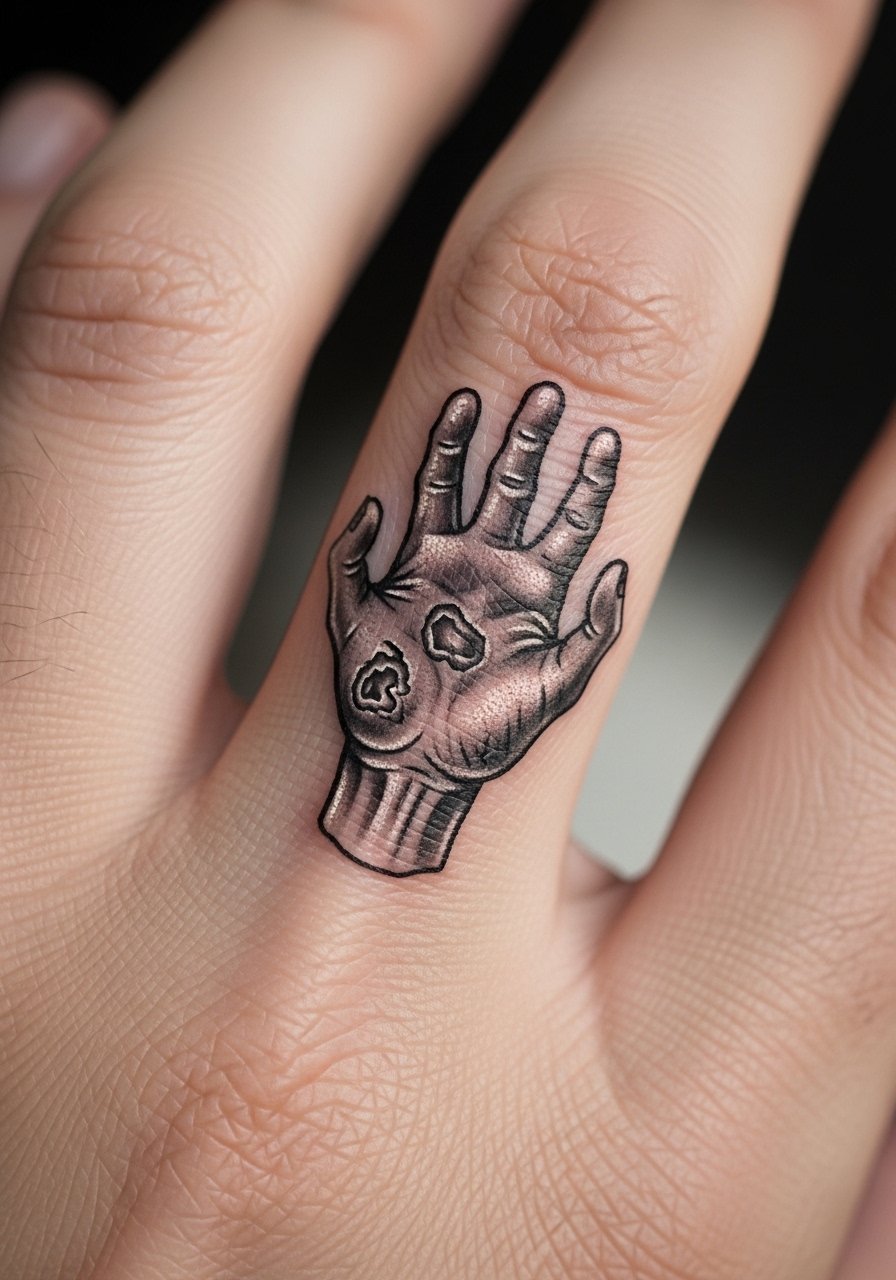
Finger tattoos age differently than arm work. The skin there regenerates fast and friction from washing speeds fading. When booking this micro-realism piece, tell the artist you accept a touch-up at six months as a plan, not a failure. Sessions are short but the touch is more intense because the area is bony. A common error is asking for extreme tiny shading that will not hold on the finger. For the session, keep the area dry and minimalistic and avoid heavy jewelry the first two weeks. Finger tattoos have a higher blowout risk when lines are too delicate, so ask for slightly more saturation.
9. Skeleton sipping pumpkin spice on the calf
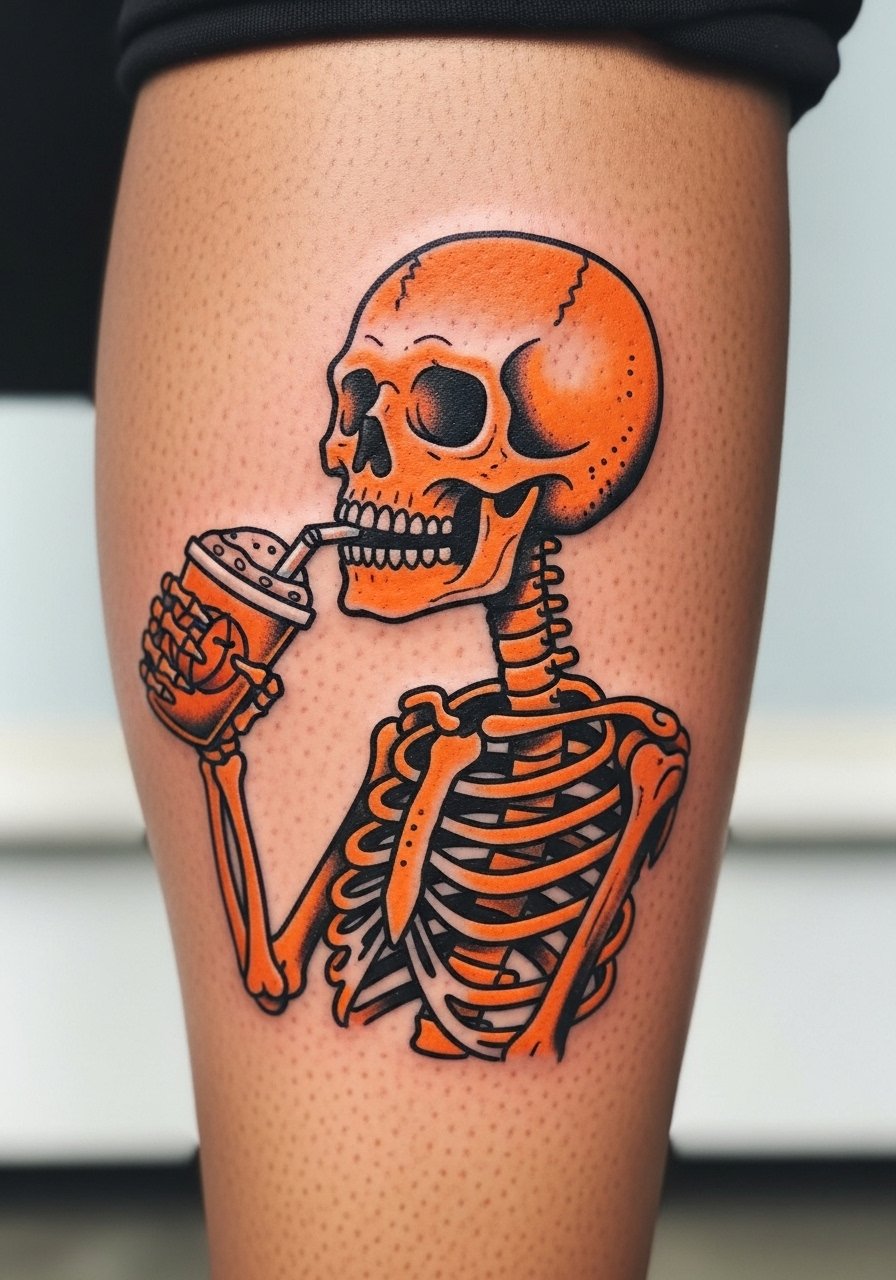
There's a particular charm to bold traditional linework on limbs. The calf offers room for medium-size pieces that read from a distance and heal into stable saturation. When you show references, ask for strong outlines and flat orange fills for the drink element so the colors stay visible on darker skin tones. Sessions can take up to two hours depending on size and comfort. The common mistake is trying to cram micro detailing into a medium panel that benefits from broader shapes. Wear rolled straight jeans or a high-low skirt to flash the calf when you want attention.
10. Frankenstein bolt with hearts on the upper arm
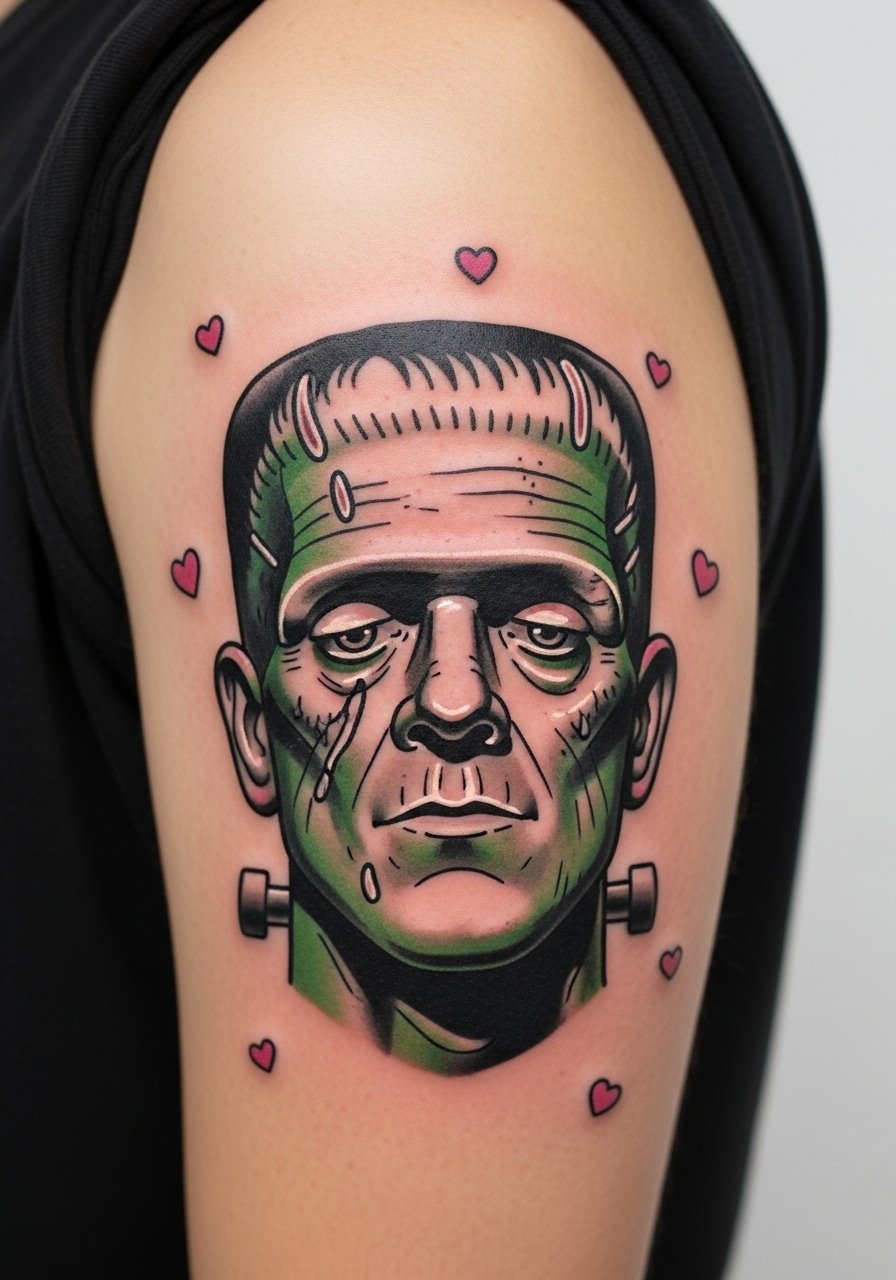
This neo-traditional bolt turns monster imagery into a softer motif that works well on the upper arm. The area tolerates color well and is forgiving for touch-ups if you plan a freshen at the one-year mark. When consulting, ask for flat green shades with small pink accents to keep the look graphic. Session time is usually under an hour and pain is low. People sometimes request too many small gradients in the hair or skin which muddy over time. For daily wear, a short sleeve button-up rolled at the cuff frames the upper arm without covering the piece.
11. Tiny coffin charm behind the ear on the neck line
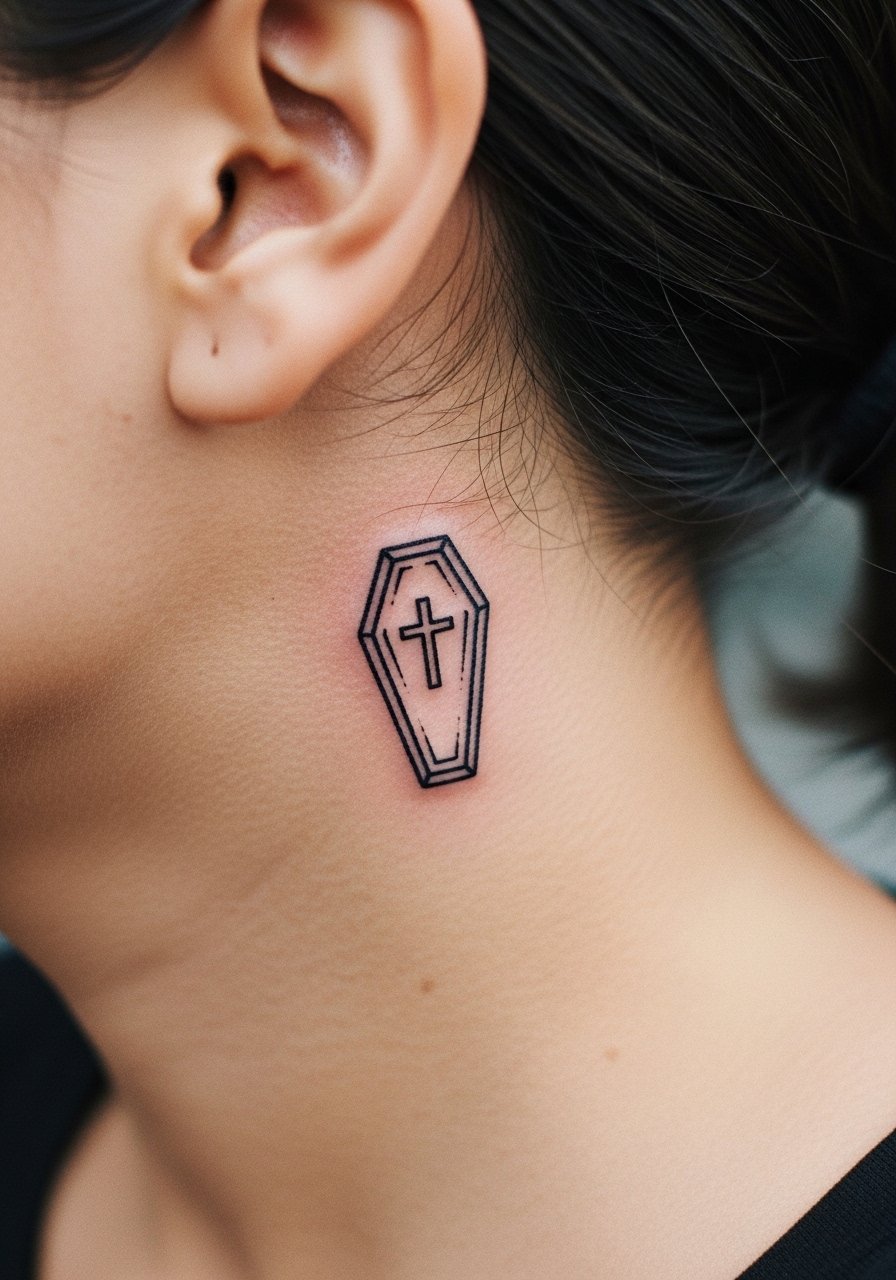
Placement behind the ear reads intimate and discreet. The spot requires delicate linework scaled to the small canvas. A common mistake is requesting heavy detail that will blur into a dark spot with hair rubbing. Keep the charm simple and bold enough to retain shape. Session time is under an hour and pain is low to moderate. For professional considerations, this placement is subtle but visible when hair is up, so think about your usual hairstyles. If you plan to hide it for interviews, a low bun or leaving hair down does the job without extra effort.
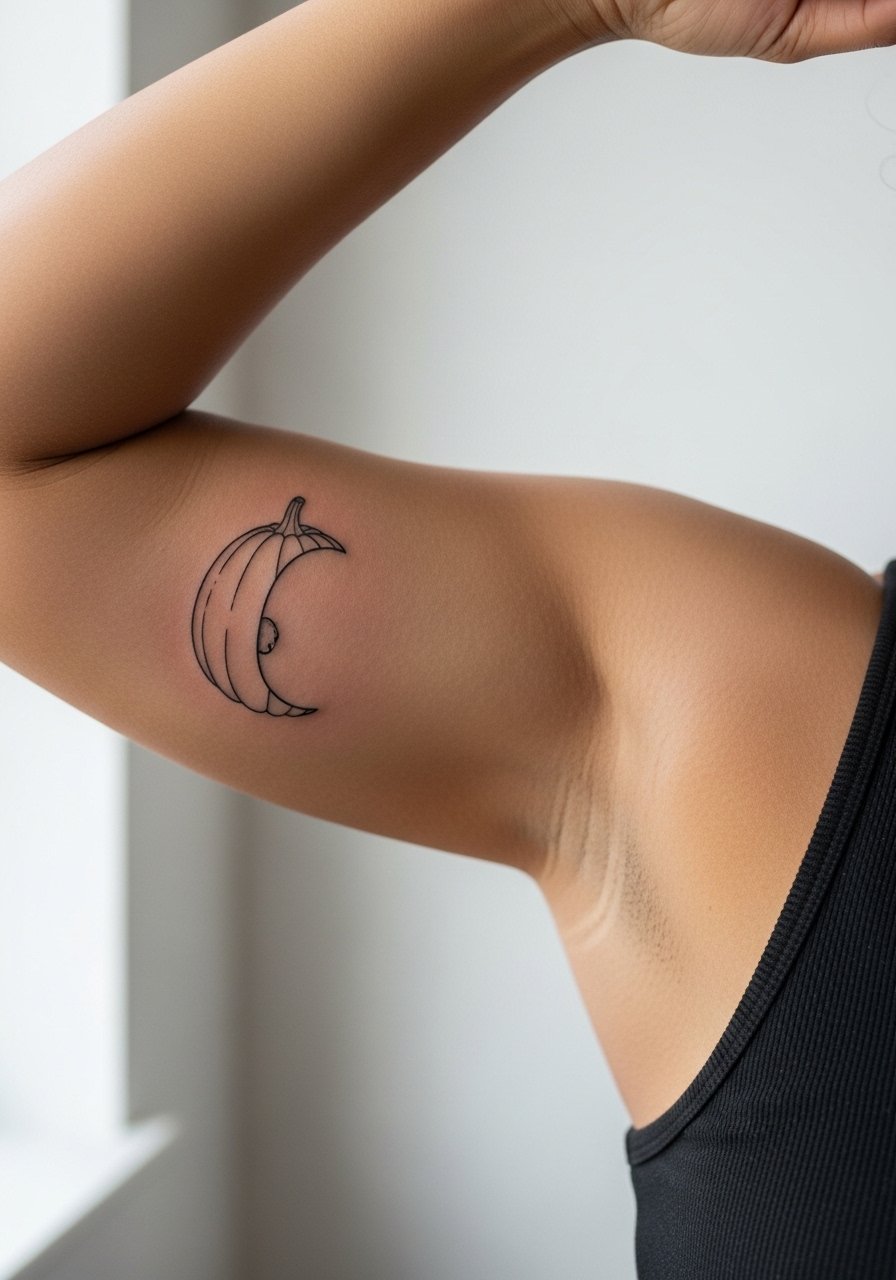
12. Crescent moon wearing a tiny witch hat on the forearm
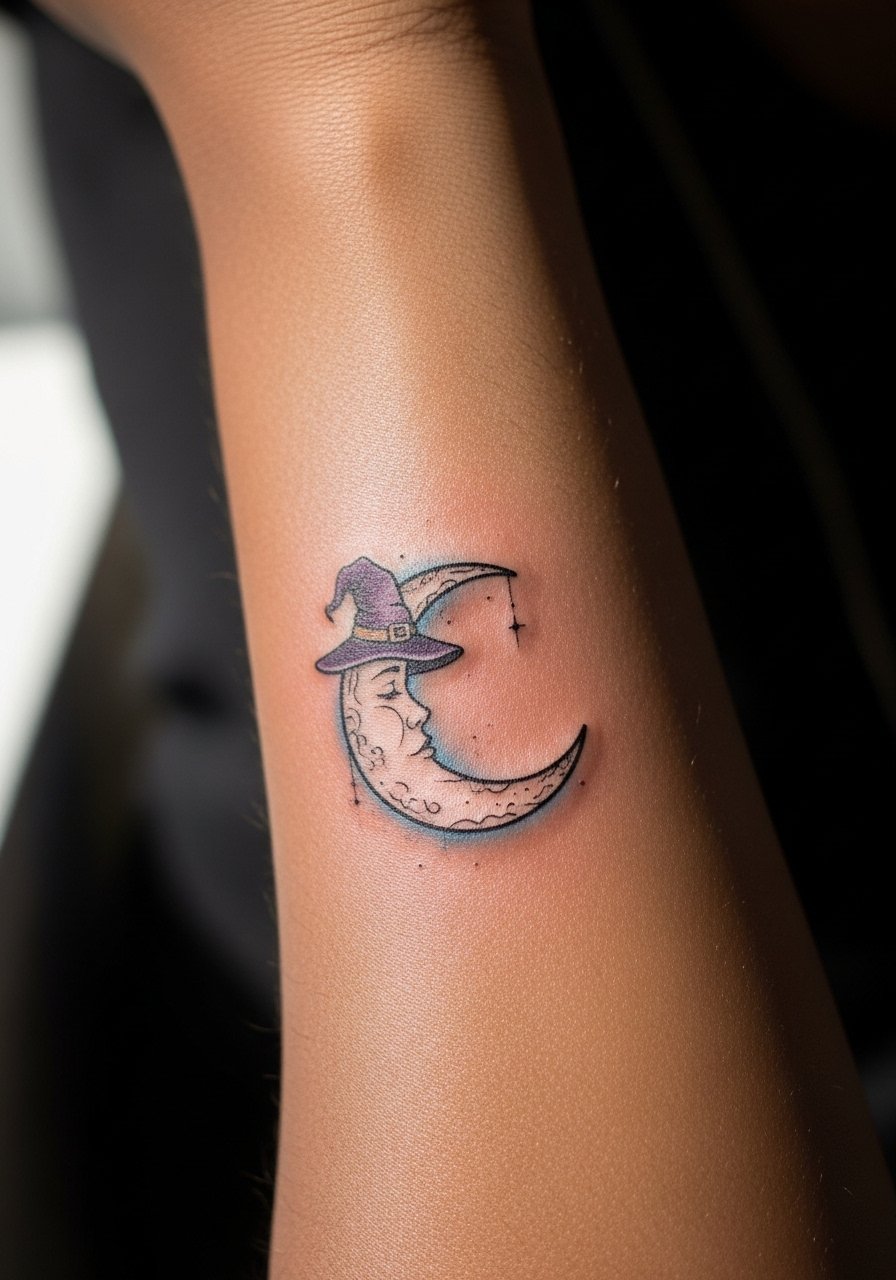
Personal observation: moons with small accessories read best when the main shape is thick enough to survive years of sunlight and lotion. Ask your artist to anchor the moon with a medium line weight and to keep hat accents as flat color rather than soft shading. The forearm is forgiving and photographs well at every stage of healing. Expect a one-session appointment with mild to moderate discomfort. A misstep is pushing micro shading inside the crescent. For styling, pair this with a linen short sleeve shirt rolled at the cuff so the artwork sits center stage.
13. Candy corn enamel pin style on the ankle bone
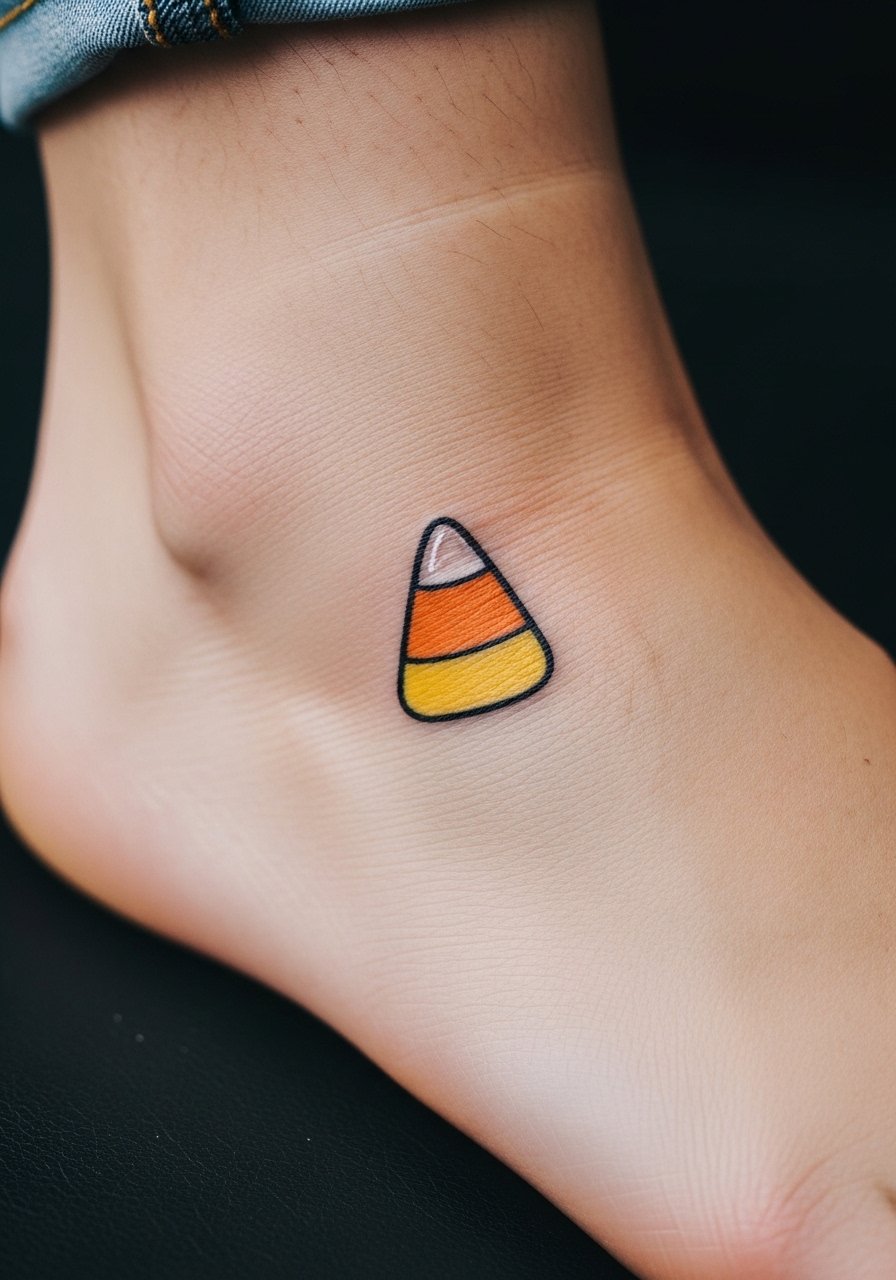
A single enamel-style candy corn is deceptively simple, and its longevity depends on color choice and placement. The ankle bone experiences constant rubbing, so go for flat fills and strong borders to prevent color washing. Sessions are quick and pain varies if placed directly over bone. The usual error is asking for translucent watercolor orange, which disappears faster than solid fills. For footwear, wear strappy sandals or cropped pants that reveal the design without rubbing it.
14. Micro bat line across the collar of the shoulder blade
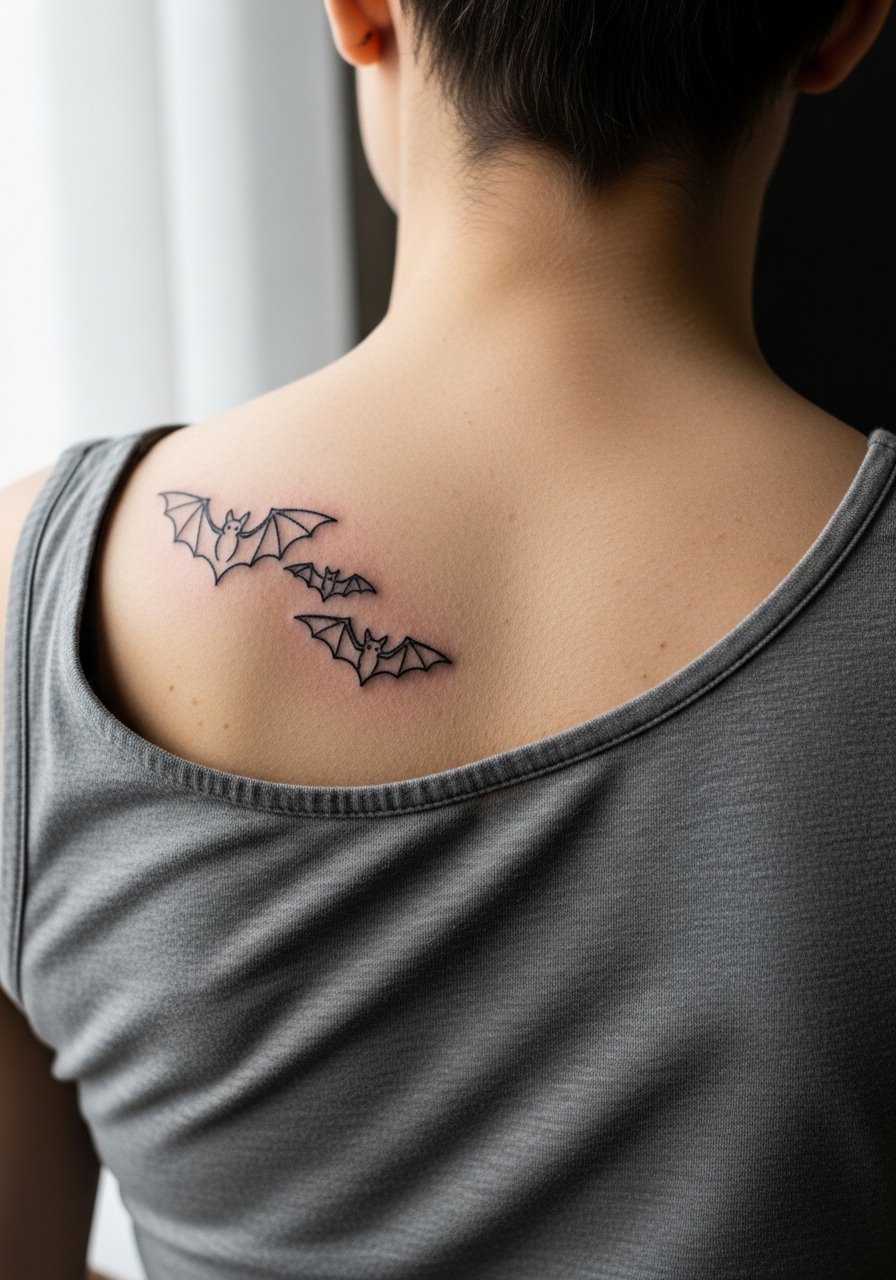
Artists debate whether micro fine line holds on back and shoulder areas over time, and opinions split into two camps. One group says bold blackwork beats ultra-fine lines for longevity. The other group argues that with deliberate needle depth and spacing, fine line settles crisp on shoulders. When booking, ask what they recommend for spacing and touch-up timing. The shoulder blade is a low-friction zone which helps micro work last. For the session wear a loose tank top so the artist can access the area without you being uncomfortable.
15. Jack-o-lantern smile tucked behind the ear of the neck
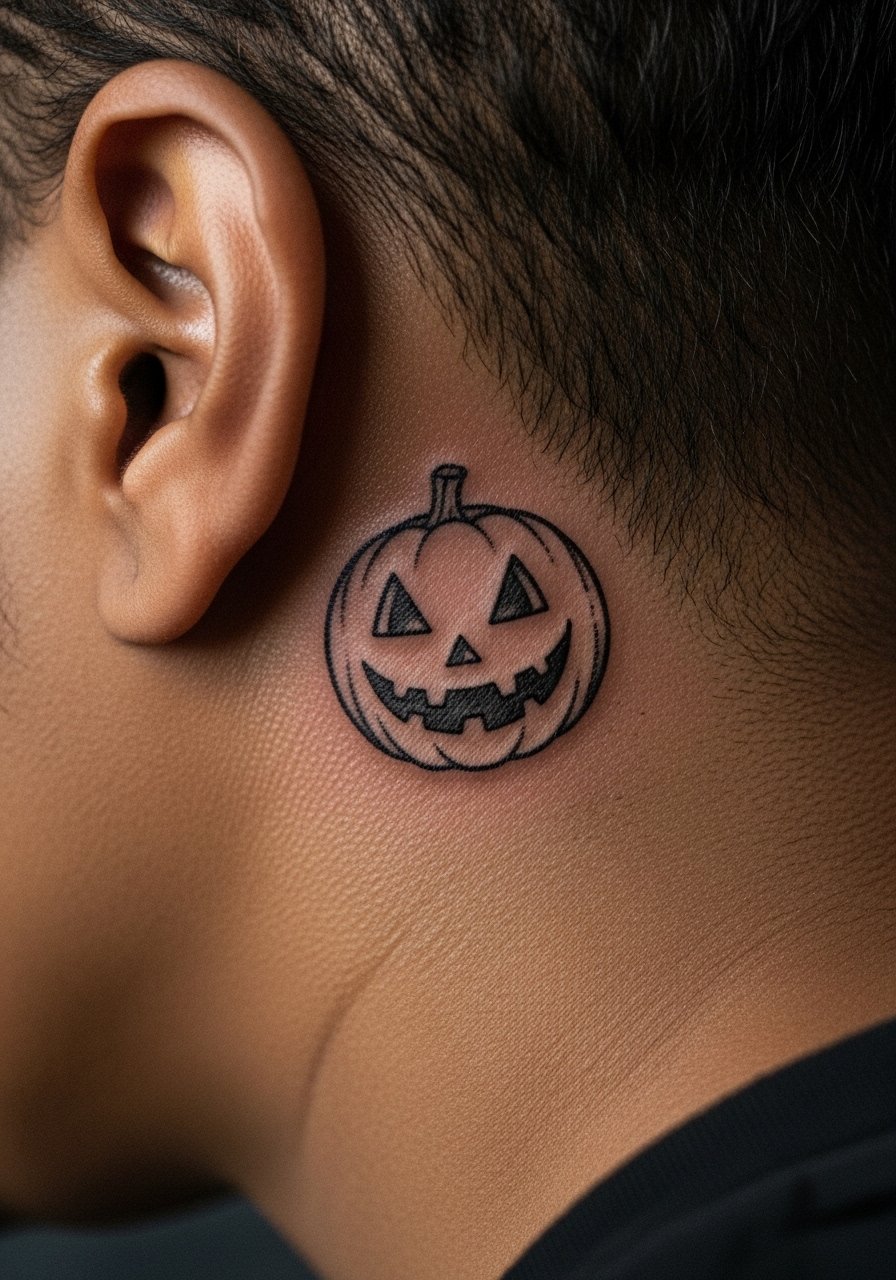
This placement looks like a playful secret when hair is up. Keep the pumpkin compact and high contrast so the carved smile stays readable. The area heals quickly and sessions are short. A common mistake is layering tiny dot shading into the pumpkin, which can fade unevenly. For showing the piece, a pulled-up hairstyle or a high ponytail puts it on display without much effort. Consider how often you wear your hair up before committing to this spot.
16. Cute ghost family on the ribcage with tiny scarves
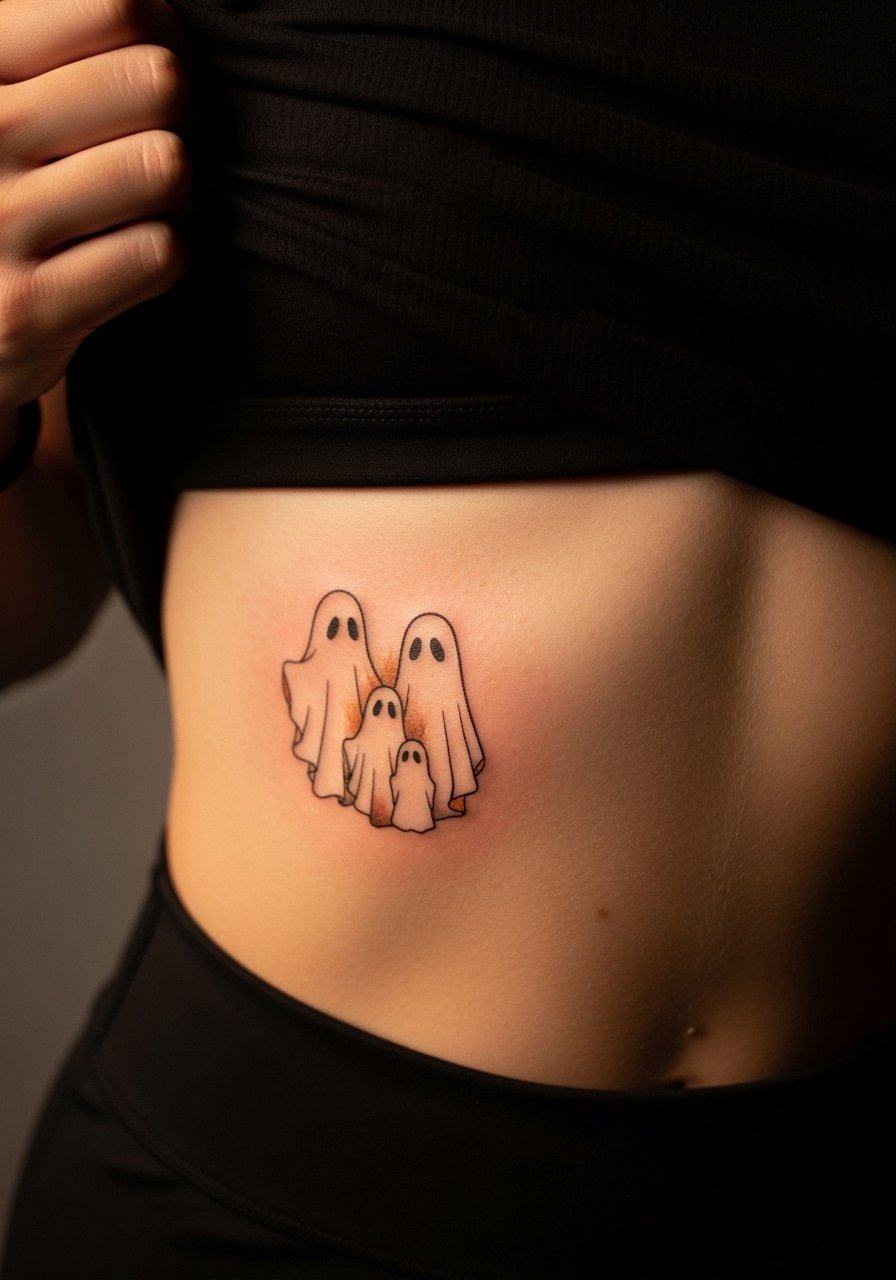
Aging reality lead: ribs can be unpredictable for fine line because the skin stretches with breathing and weight changes. One camp recommends avoiding extreme micro detail there. The other camp will say careful spacing and experienced technique succeed. If you want this design on the ribcage, ask for slightly thicker outlines and plan for a touch-up at the one-year mark. Sessions are more intense because of location and may require breaks. For the appointment, wear a strapless bra or a cropped top you can lift so access is clean.
17. Crescent pumpkin hybrid on the inner bicep
Consultation lead: the inner bicep is soft and takes ink differently than an outer arm. Tell your artist you want a clean silhouette and minimal color. The inner arm is less exposed to sun, which helps orange tones last longer than on the wrist. Expect a single session and mild to moderate pain. Mistakes include asking for too many tiny shading strokes that blur with movement. For the session wear a tank top so the artist has full arm access and you stay comfortable.
18. Playful broom-riding kitten mid-calf

Visual impact lead: calf placements give room for characters that read well at a distance. This design benefits from confident outlines and flat color patches in the cape or hat. Plan for a one to two hour session depending on color. A frequent error is cramming intricate facial detail into a cartoon kitten which loses personality when scaled down. When you want to show it off, a high low skirt or rolled jeans helps the artwork stand out on warm days.
19. Tiny witch hat on the finger joint

Finger joint tattoos are charming but volatile. The skin there sheds faster and regular use speeds fading. If you choose a joint placement, accept that touch-ups may be part of the plan and ask the artist for bold, simple shapes. Sessions are very quick but the sting is more concentrated. The common mistake is asking for thin line detail on the joint. Keep it graphic, then style with no rings the first two weeks. If you need to hide it in a professional setting, a thin dainty ring can mask the area temporarily.
20. Pumpkin spice latte cup with tiny skull latte art on the forearm
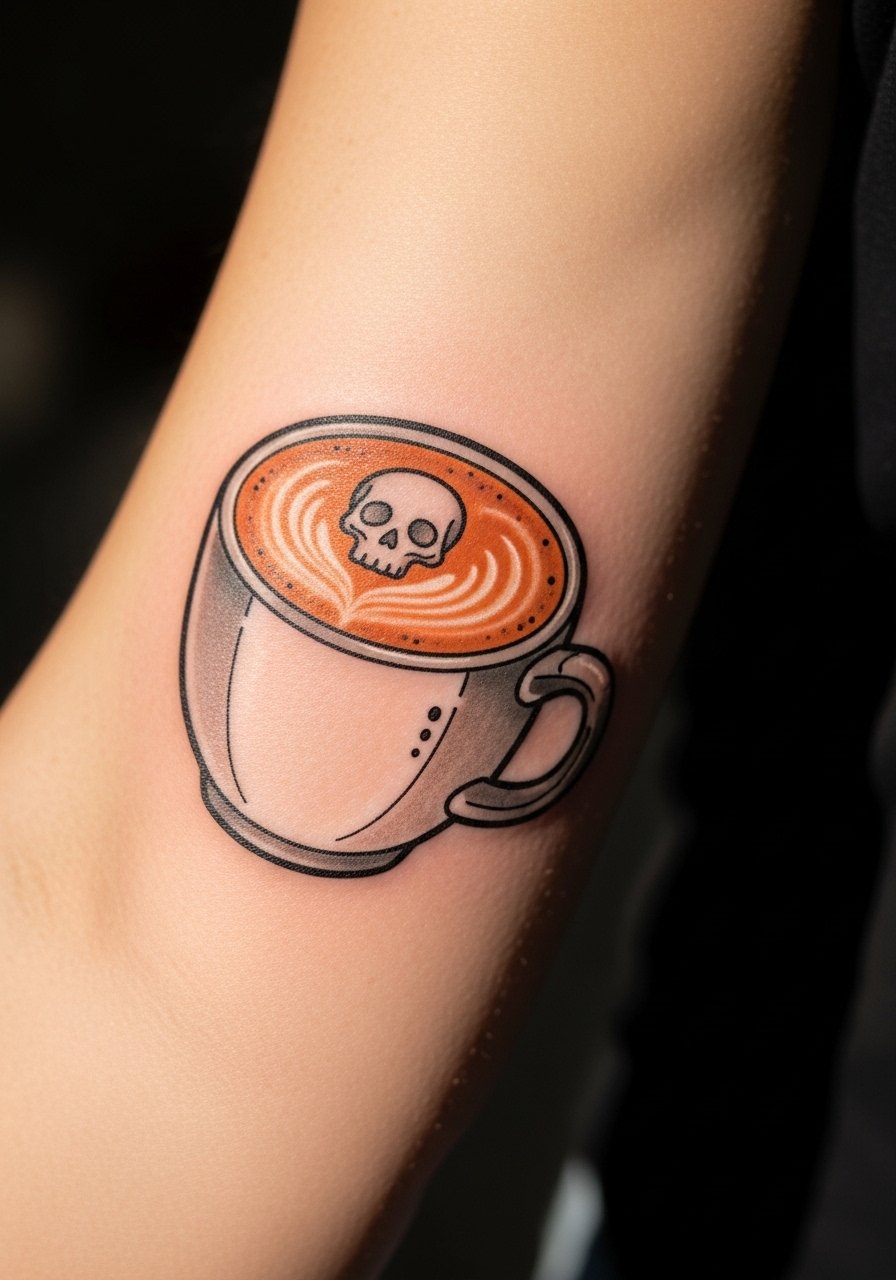
Aging/healing lead: caffeine-themed pieces with warm palettes photograph beautifully but orange and brown inks can drift if not saturated properly. Ask for flat color blocks and avoid thin stippling inside the cup. The forearm is generally low-risk for blowout and is easy to retouch. Sessions are under an hour and pain is low. People sometimes try to over-detail the latte foam which loses definition; keep the skull art bold and small. For outfit pairing, a rolled cuff sweater in cream or pumpkin orange frames the motif nicely and keeps attention on the linework.
21. Tiny tombstone with a heart on the upper chest

Controversy lead: chest and sternum heal differently and opinions vary on aftercare. One group recommends occlusive products for faster healing. The other group prefers dry healing to avoid scab over-moisturizing. If you want a tiny chest piece, decide which camp you follow before the appointment and tell the studio. The sternum is moderately painful, and sessions are short for small motifs. Keep designs simple because heavy detail can scar more noticeably on thin chest skin.
22. Moon and stars chain across the collarbone
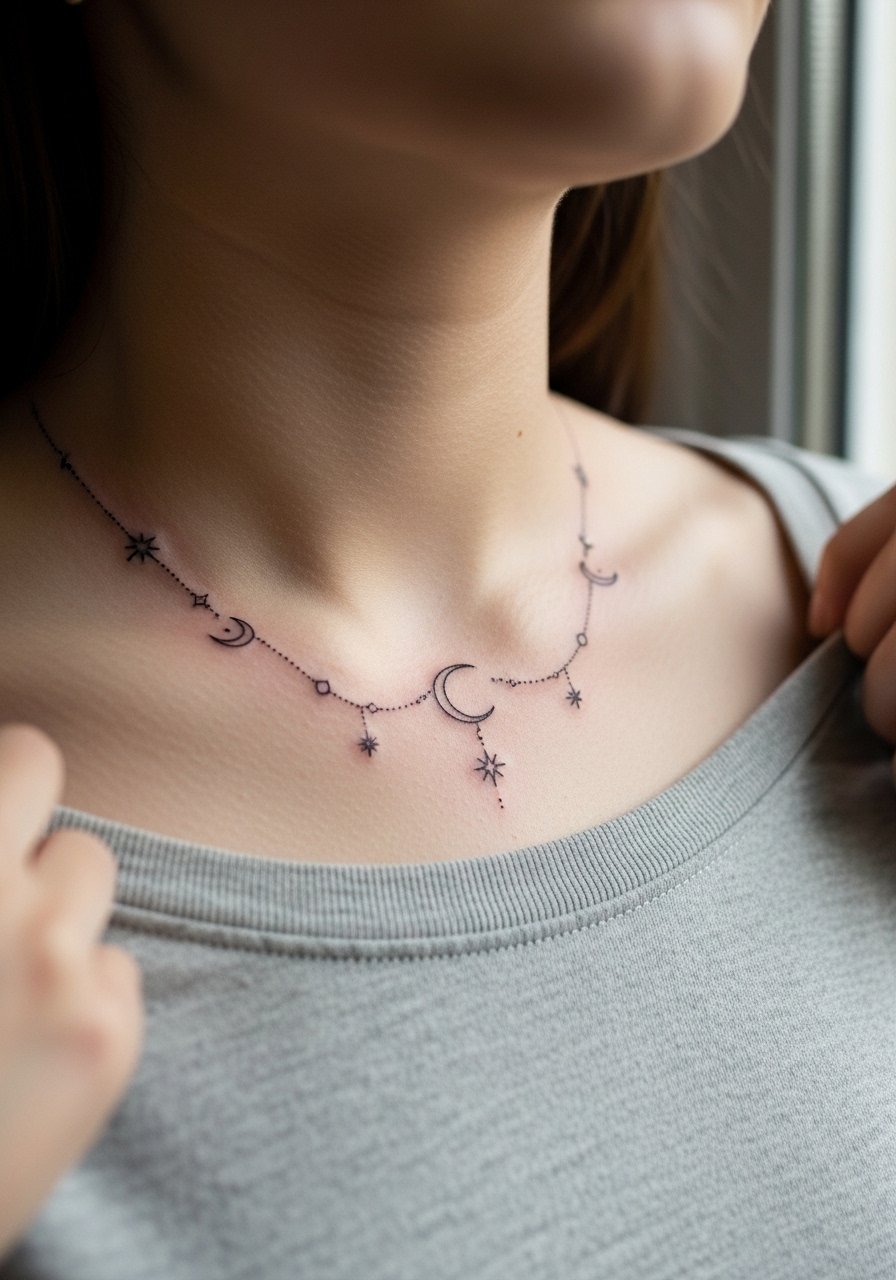
Personal observation: collarbone chains look delicate when executed with even spacing and a few anchor stars. The mistake is trying to chain too many tiny stars which merge into a faint band over time. Ask for slightly larger node points at intervals so the chain reads at a glance. Sessions are short and discomfort is moderate. For showing it off, a thin chain pendant necklace sits above the line without competing.
23. Wide-eyed kitty perched on a broom across the shin

Visual impact lead: shin tattoos sit squarely in view when you wear skirts or shorts. This design benefits from confident black outlines and a flat spot of color in the broom or eyes. Sessions can be more intense because the shin is bony. A common error is letting the artist compress too much tiny fur detail into a medium panel. For showing it off, pair with rolled jeans or skirts for maximum effect. Wear loose shorts to the session for easy access.
24. Micro constellation with a tiny ghost at the wrist crease
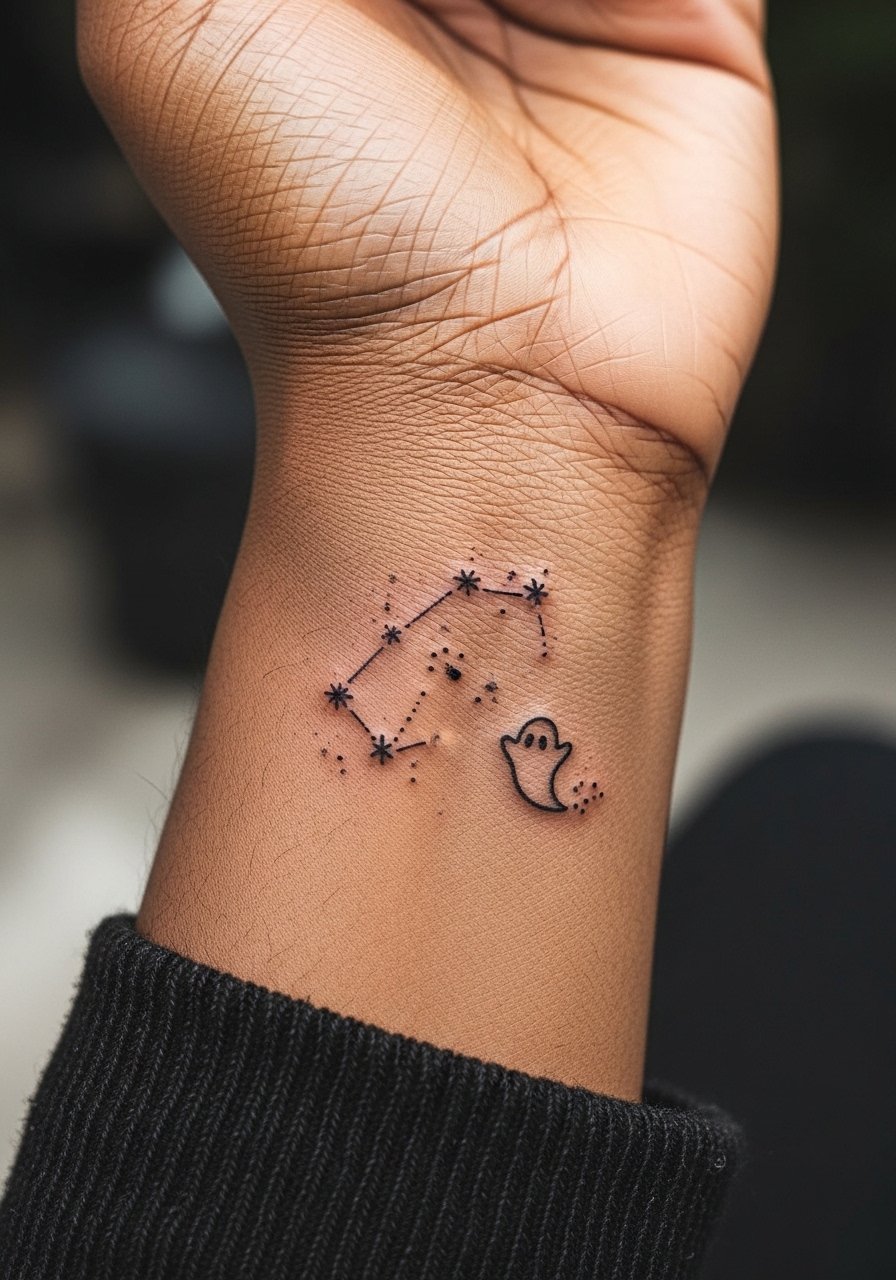
Mistake lead: constellations need negative space to remain readable. When you add a tiny ghost as a charm at the wrist crease, balance the dots with a clear gap so they do not blur into one another. The wrist crease sees repeated bending and washing, so expect lightweight touch-ups at year two. Sessions are brief and pain ranges from low to moderate. For showing it off, layer a dainty bracelet stack on the opposite wrist to complement without crowding.
25. Tiny potion bottle with a heart label on the inner wrist
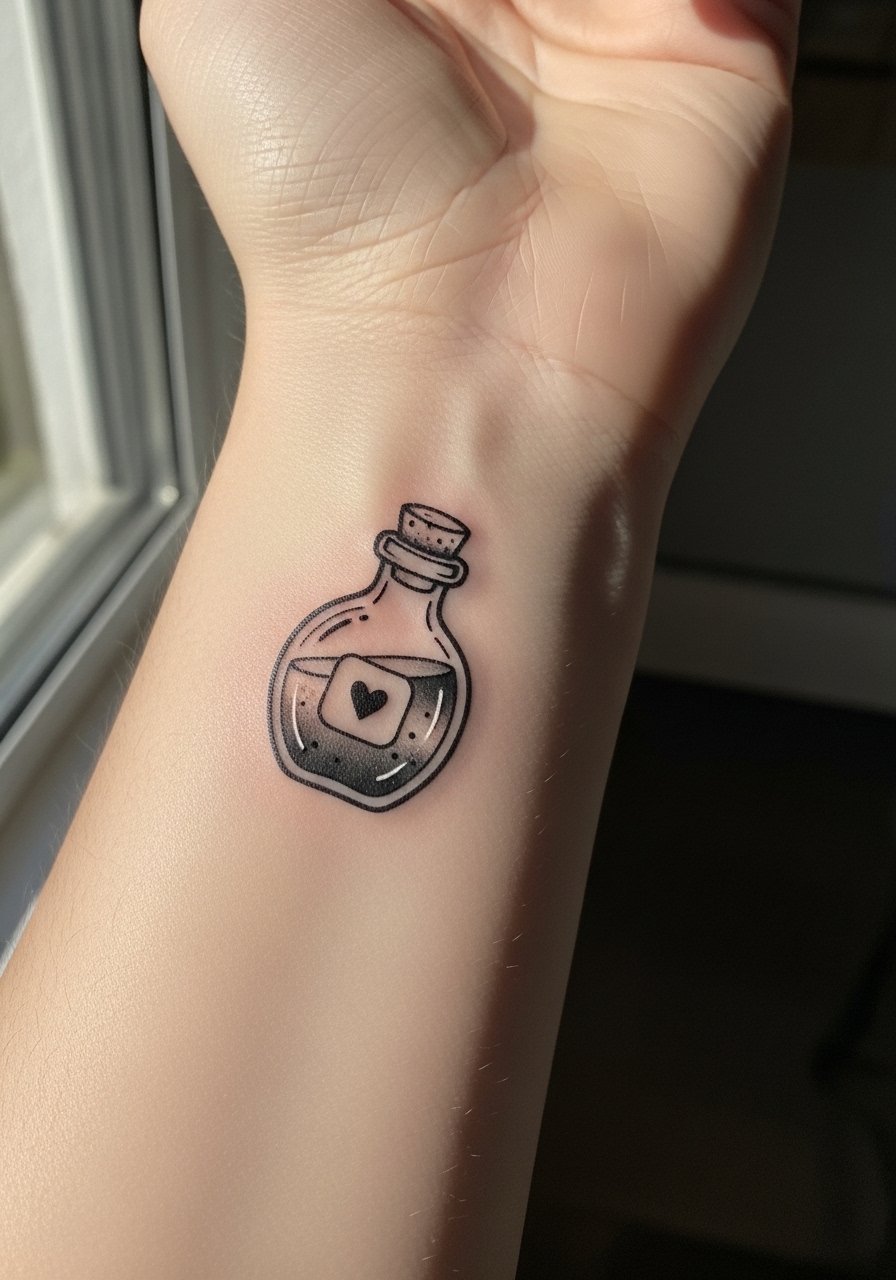
Consultation lead: the inner wrist is a classic spot for charms and small bottles. The key is not to overcomplicate the interior. Tell your artist you prefer a silhouette with one color accent in the label so the shape survives frequent movement. Sessions are short and stinging is tolerable. A common error is asking for micro lettering on the bottle which becomes illegible. For showing it off, add a thin chain bracelet on the opposite wrist to balance the look.
26. Little ghost peeking from a pocket on the forearm

Mistake lead: pocket pieces look best when the pocket outline is bold enough to separate from the body. Tiny ghost details inside a faint pocket can get lost after a year. Ask for a clear pocket border and minimal interior shading. The forearm is low-maintenance for touch-ups and the session is quick. Pair with rolled sleeves and a linen short sleeve shirt to let the artwork breathe during daily wear.
27. Tiny broomstick charm behind the knee

Decision-pressure lead: behind-knee placements are subtle but need careful planning because the area bends and stretches. Ask your artist to scale lines for movement and to expect a touch-up at year one. Sessions are quick and the sensation ranges from mild to moderate. The common mistake is asking for tightly packed detail which blurs as the skin flexes. For the appointment wear loose shorts so the artist can access the area without you feeling exposed.
Frequently Asked Questions
Q: Will fine line ghost tattoos on the wrist fade faster than the same design on the forearm?
A: Yes, from what I have seen wrist placements face more friction and frequent washing which accelerates fading. Forearms get more sun but are easier to keep dry and protected. If you want the ghost to hold longer on the wrist, ask for slightly bolder linework and plan a touch-up around year two.
Q: Should I use protective film wraps or dry healing for a new ankle tattoo?
A: Artists and healers split into two camps. One camp prefers breathable protective film for less mess and consistent moisture control. The other camp favors dry healing to encourage natural scabbing. Both approaches can work. Ask your artist what they recommend for ankle work and follow a single method consistently so the healing environment is stable.
Q: For colored pumpkin tattoos on medium to dark skin, what keeps orange visible in photos?
A: High-contrast black outlines and flat color blocks help orange pop on medium and dark tones. Ask for solid color saturation instead of soft washes and consider photos taken in natural window light for the best representation.
Q: How often should I expect touch-ups for micro finger or joint tattoos?
A: Finger and joint tattoos usually need touch-ups more often than arm pieces because of skin turnover and friction. Expect a planned touch-up around six months to a year rather than treating it as a failure. Budgeting for this upfront saves stress later.
Q: Can I wear regular jewelry to show off my new collarbone tattoo during the healing window?
A: Keep jewelry light and avoid anything that rubs directly over fresh ink. A thin chain pendant that sits above the tattoo is fine, but avoid chokers or heavy pendants until the area is fully healed. A simple thin chain pendant necklace can frame the collarbone without disturbing the site.
