
Fine line trends look gorgeous on feeds, and blackout sleeves dominate before-and-after reels, but there is a real gap between what photographs well and what holds up on living skin. I have seen people scramble when an inexpensive walk-in morphs into months of touch-ups, when an artist is booked out for three months, and when their skin tone changes how a color palette reads. This list skips empty promises and gives cover-up options that hide old ink and age the way you want, starting with a mandala that actually works on a forearm.
1. Floral Mandala on the Outer Forearm
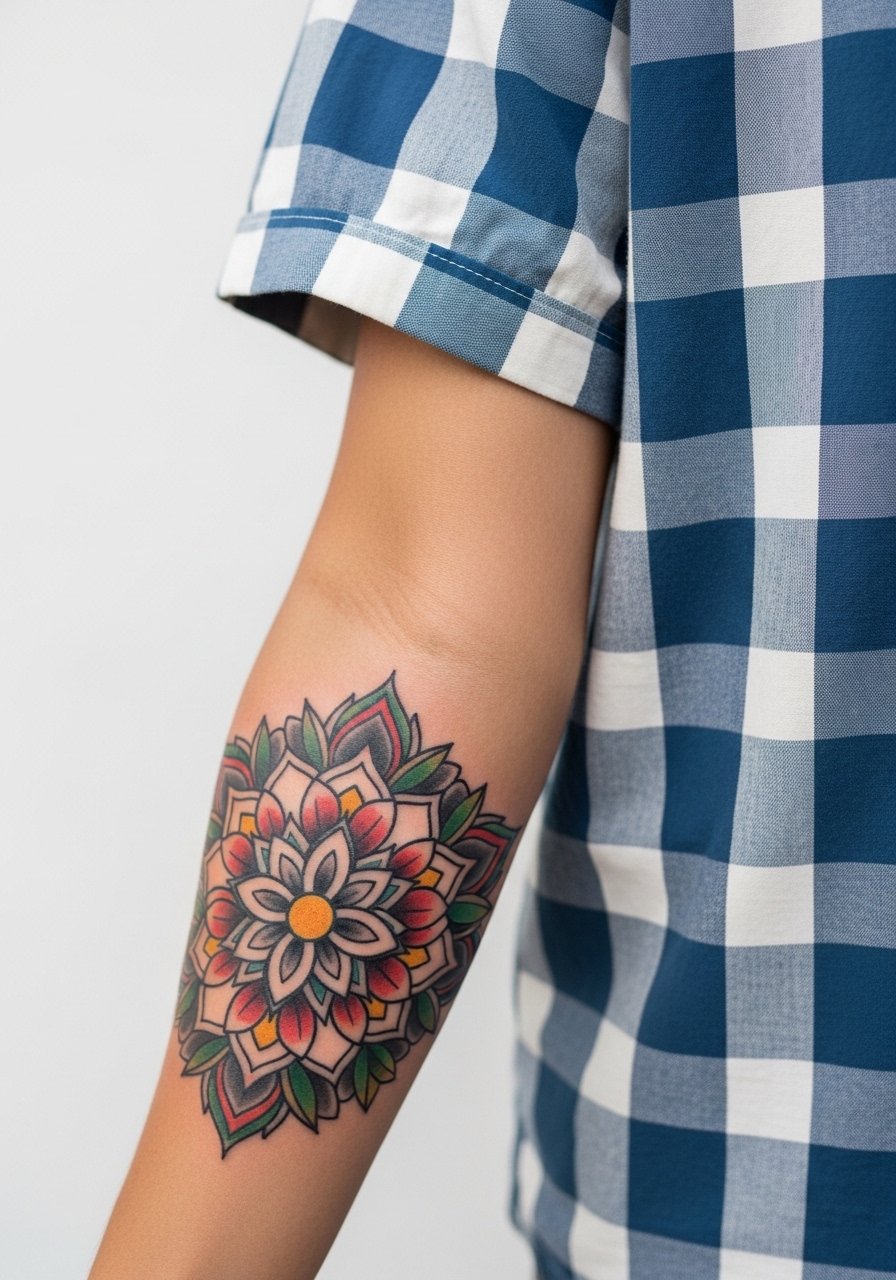
A layered mandala uses concentric petals and heavier black fill to mask old lines while still looking intentional. I recommend asking your artist to scale the central petals larger than your original ink so dark shading sits directly over the problematic strokes. A common mistake is shrinking the mandala to fit a gap that needs expansion. Expect a one to two hour session for a 3-inch cover and a touch-up at year two if you live outdoors a lot. For the session, wear a loose short-sleeve button-up you can pull aside without tugging the stencil. Artists split on color for heavy cover-ups. One camp favors full color with deep saturation, and the other sticks to black and gray. Name which side you prefer during consultation and ask how they plan to target the old ink.
2. Sunflower with Dark Center at the Ankle
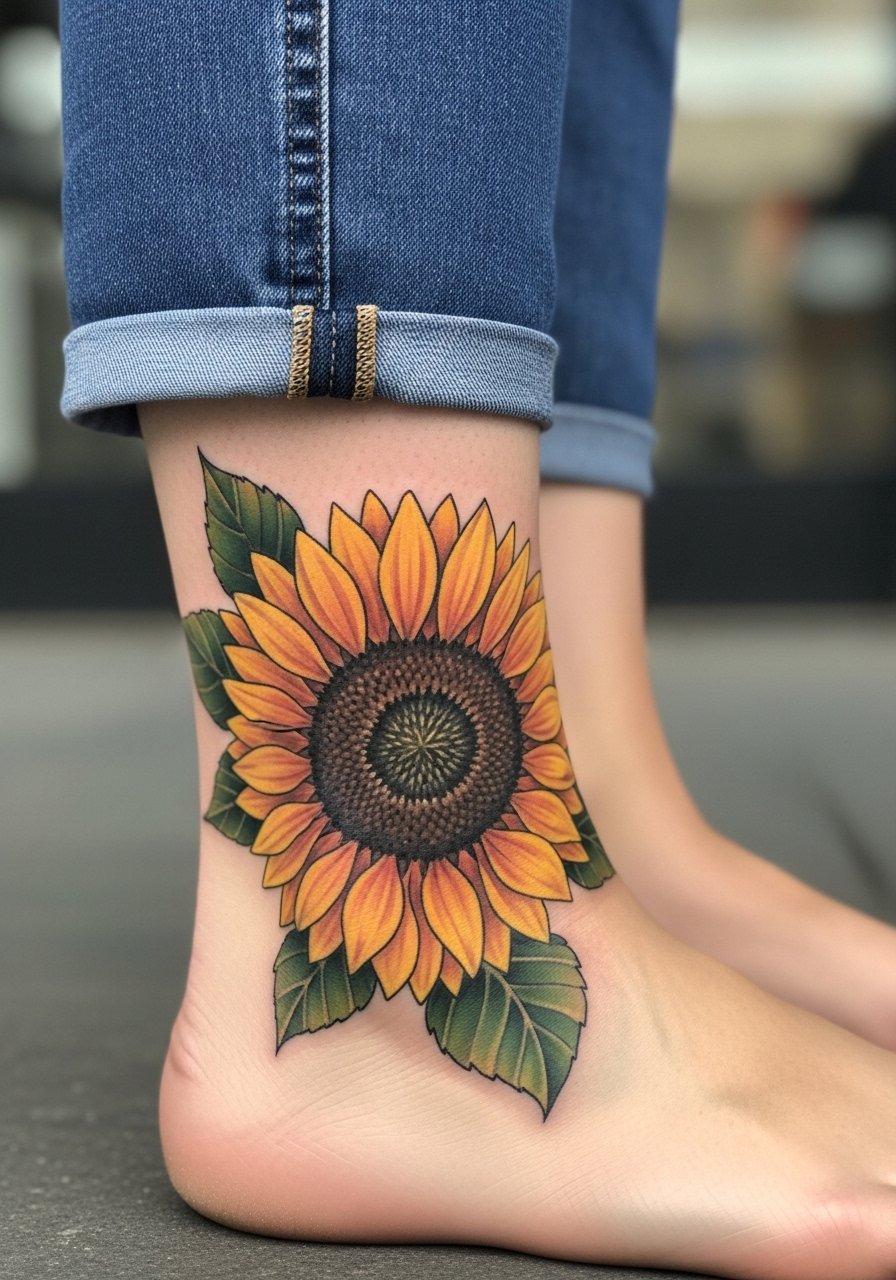
A sunflower uses a dense, dark seed core to swallow small scripts or faded stamps. Tell your artist to concentrate saturation in the center and to push contrast between petals and core; that contrast is what hides lettering. For ankle placements expect brief, single-session work that can sting more than forearm work because the bone sits close to the skin. A frequent slip-up is making the petals too thin, which allows the old ink to peek through after healing. For summer outfits pair this with cropped straight-leg jeans or a flowy midi skirt when you want the design to peek out. If your old ink is very dark, plan for the petals to overlap the original lines rather than trying to sit beside them.
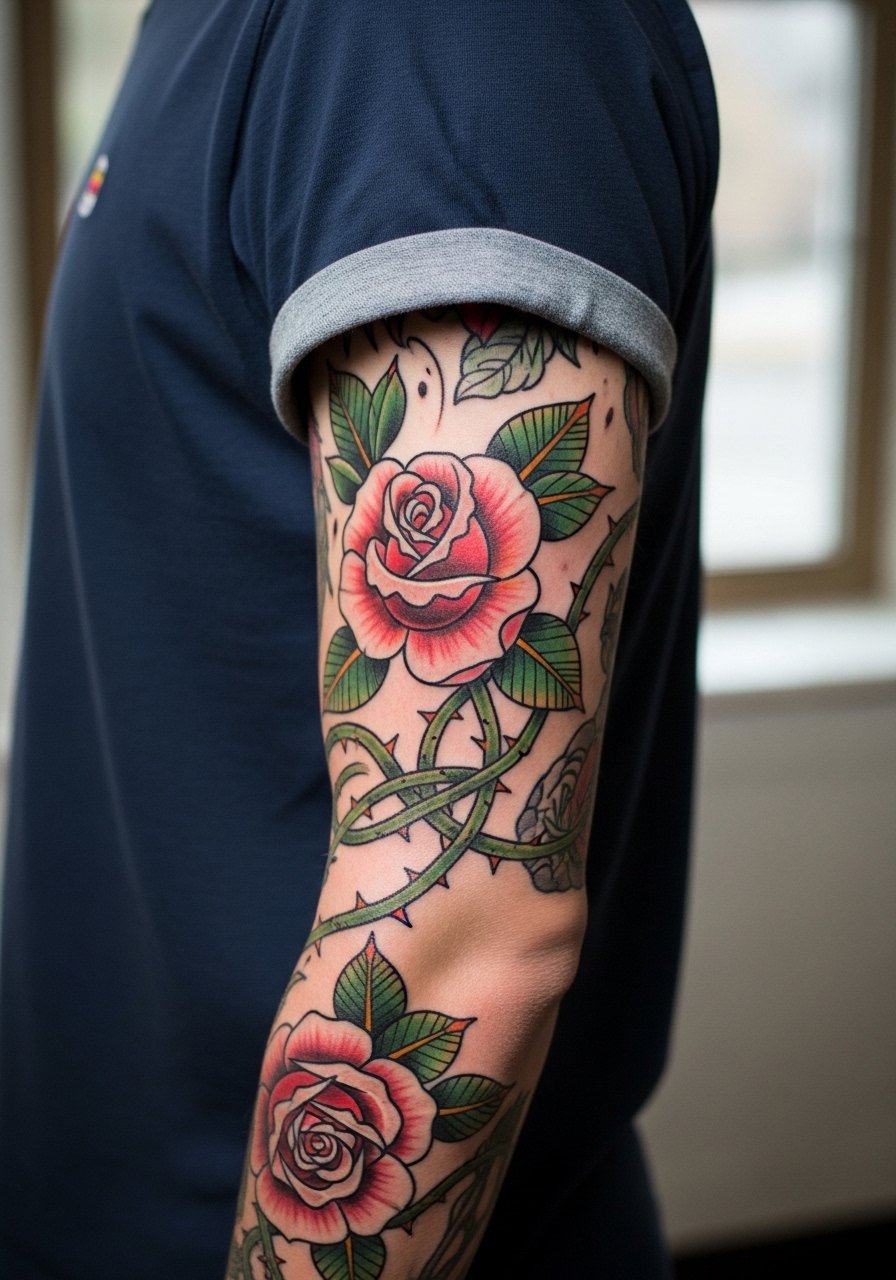
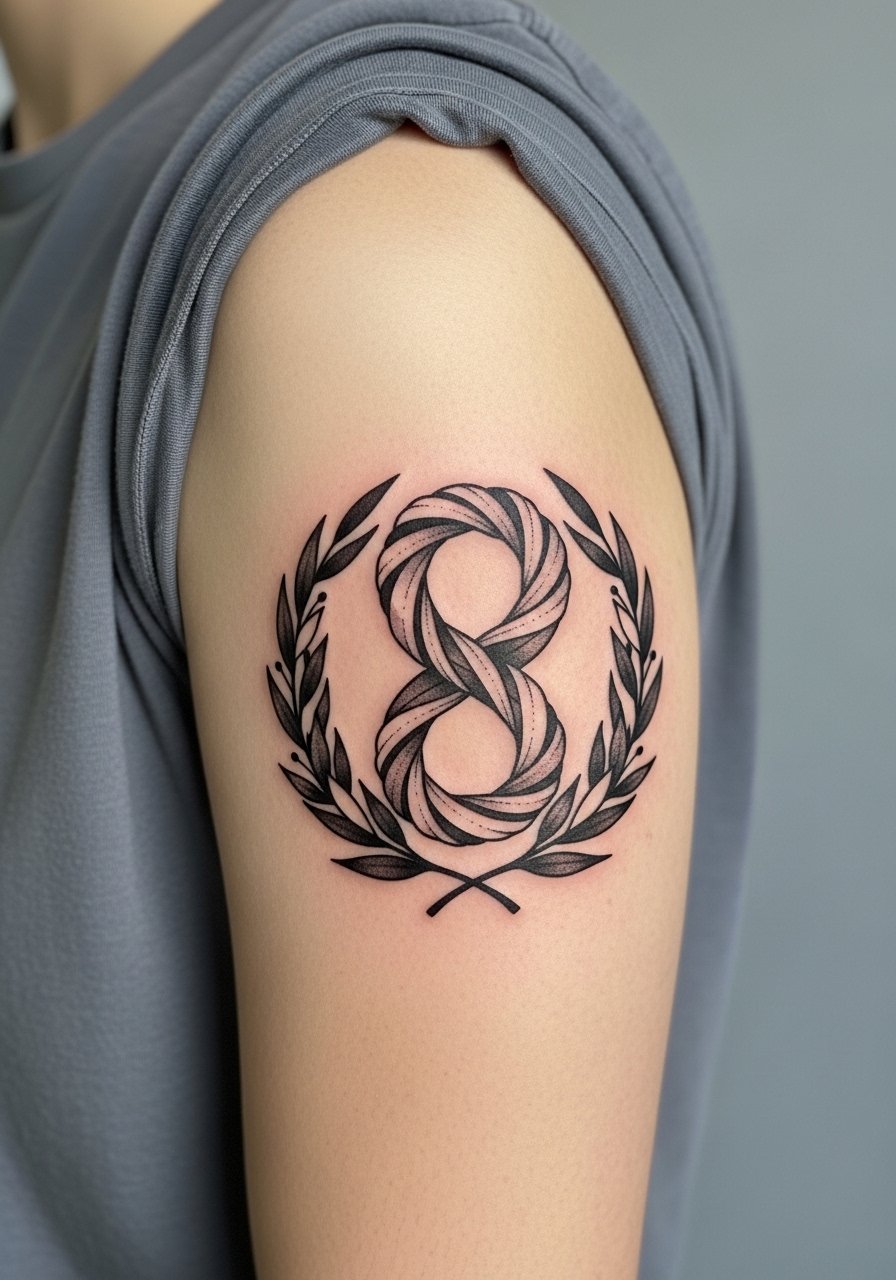
3. Rose with Layered Shading on the Shoulder
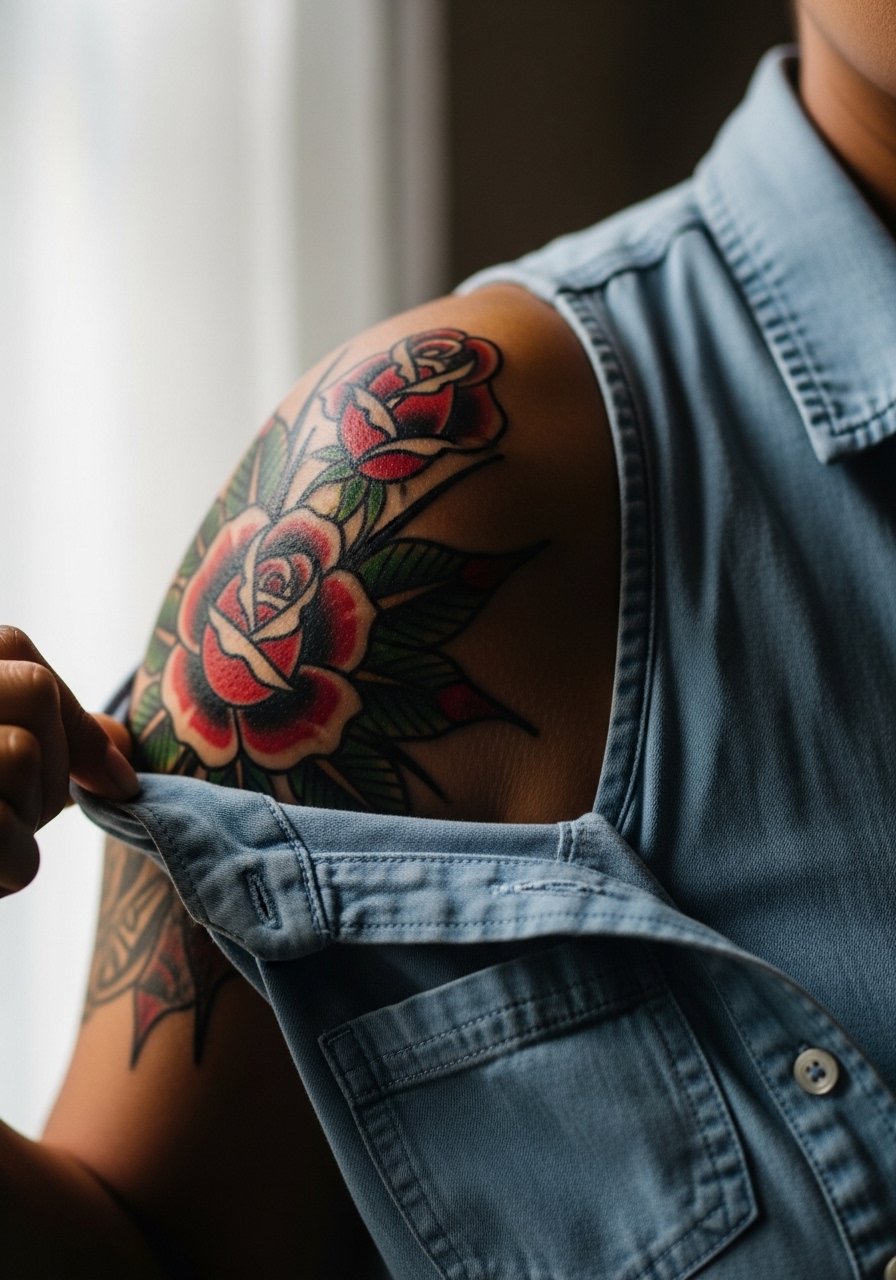
Roses build depth with overlapping petals and graduated shading, which makes them ideal for burying old lettering or small symbols on the shoulder. In consultation ask for deeper shading at the petal bases and saturated midtones toward the edge. A common aging problem is too many thin lines in tiny petals, which blur over time. Shoulder flesh moves less than inner arm flesh, so touch-ups often stay years apart. Pain is milder here than at the wrist, and session time is usually one to two hours for a medium rose. For show-off outfits an off shoulder blouse frames the work without competing with texture. If the original ink is dense, plan to scale the rose slightly larger than you think you need.
4. Micro Floral Cluster for Small Wrist Regrets
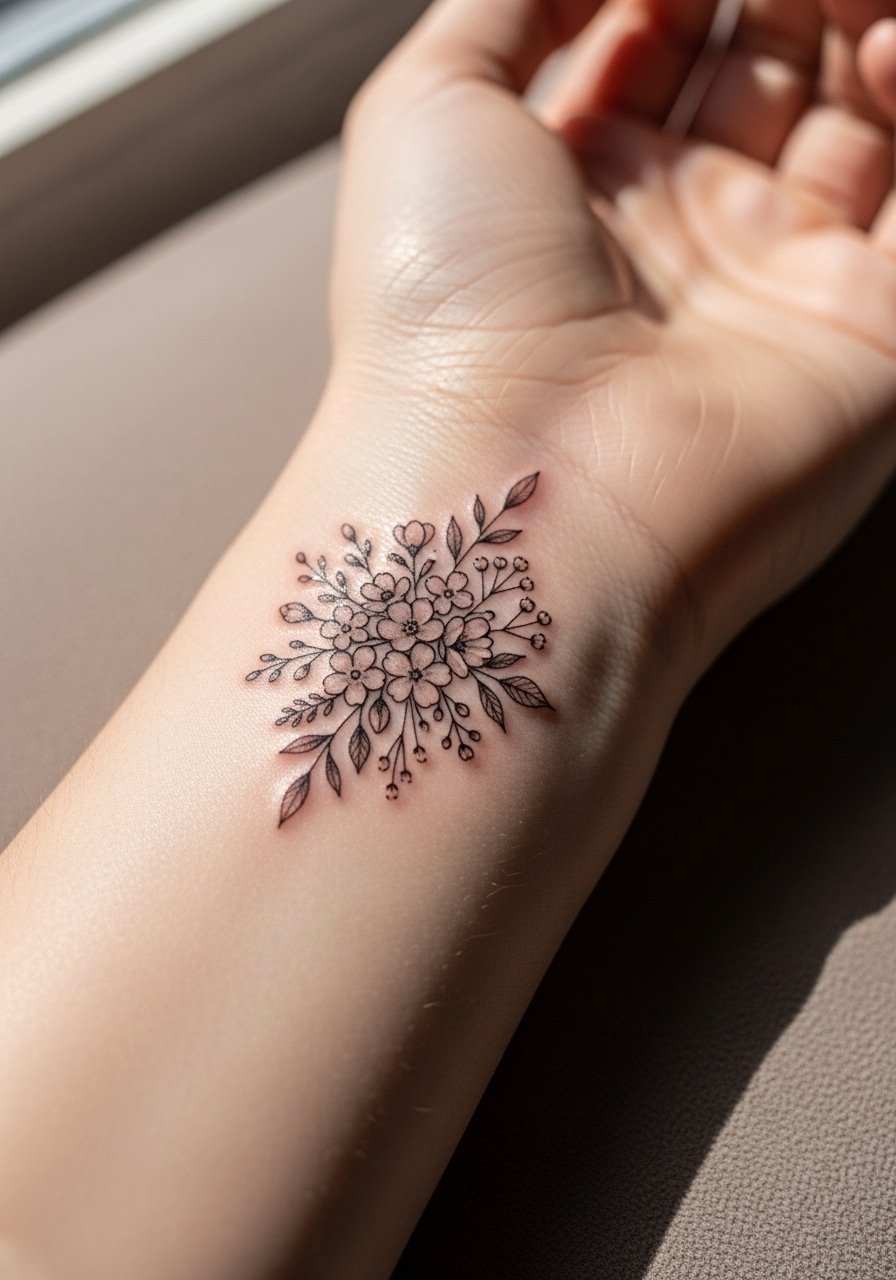
Micro florals are a sweet way to mask small marks while keeping scale minimal. Tell your artist you want slightly bolder stems and tiny leaf fills so the old ink gets covered rather than outlined. The wrist is sensitive and may require a short break during the session. People often ask for the smallest possible motif and then come back a year later because the detail blurred. To avoid that, give the design room to breathe and expect a touch-up around year two. While wearing jewelry, keep it simple so metal does not rub the fresh lines. Try a thin leather cuff bracelet on the opposite wrist for balance. This spot works well when the regret is just a few lines or a name.
5. Feather Texture Overlay at the Collarbone
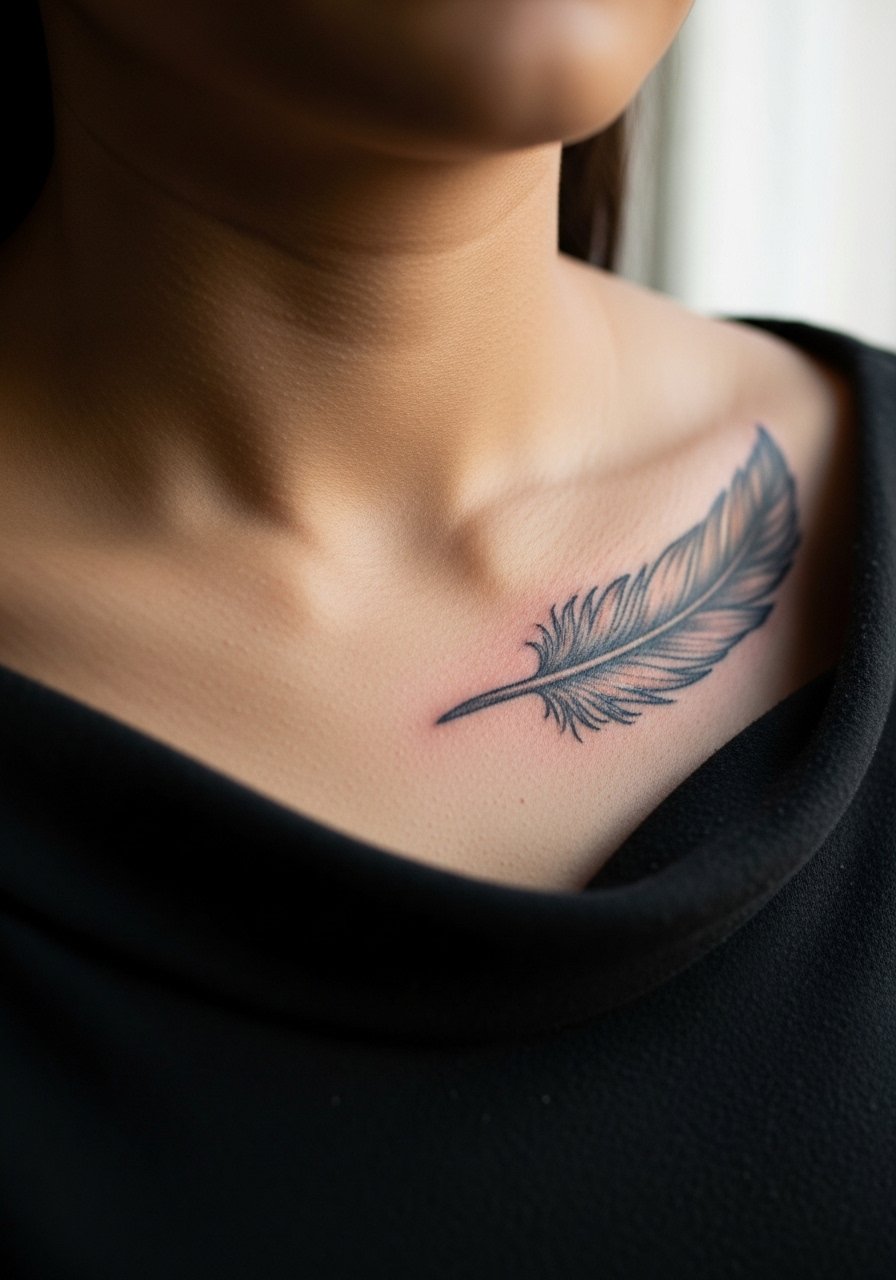
A feather overlay uses directional barbs and darker tips to redirect attention away from the under-ink. Ask for stipple shading along the shaft and a darker tip over the old work. Collarbone skin can be unforgiving for tiny detail, so avoid ultra-thin single-line barbs. The session feels quick but precise, and touch-ups can be needed at year three for lines near the bone. For outfits, V-neck tees show the collarbone cleanly. Pair the look with a v neck tee cotton when you want the feather to read as part of your neckline. If the underlying tattoo sits right on the bone, ask your artist how they will place the darkest values to mask the old lines.
6. Watercolor Butterfly for Lower Back Swaps

Watercolor edges soften transitions and help hide old small motifs without a heavy black block. For lower back pieces request saturated color near the original ink and softer washes outward. A mistake is treating watercolor like a tattoo-free zone that needs no dark anchor. Add a dark center or subtle outline where the old ink sits, and the cover will hold better. Lower back shows well with high-waisted crop tops or backless dresses for occasions. For sessions wear a loose tank top you can shift easily. If the prior work is very dark consider a short laser fade before the cover-up for a cleaner color read.
Studio Day Picks
The first six ideas above involve showy spots like wrists and the lower back that need prep and a few small tools to make the session and the first week easier.
-
Stencil transfer paper kit. Lets you see exact placement on skin before the needle starts, which is helpful for forearm mandalas and shoulder roses.
-
Topical numbing cream. Applied per instructions it takes the edge off sensitive ankle or collarbone sessions without smearing the stencil.
-
Thin protective film roll. Keeps wrist and lower back work clean during the first week of movement and showers.
-
Fragrance-free body wash. Gentle cleansing prevents irritation on fresh lines where detail matters.
-
Aquaphor healing ointment. A thin application in the early days helps lock in moisture for fine line and micro work without clogging.
7. Blackout Sleeve Extension for Heavy Tribal
Blackout sleeves turn thick tribal lines into a cohesive dark field and can create a fresh canvas for future whitework or negative-space designs. Be realistic with texture and session counts. People underestimate time and leave after the first pass expecting a finished look. This is large scale work and usually requires multiple sessions to reach solid saturation. Expect long appointments and plan wardrobe so a short-sleeve tee is comfortable while you sit. The downside is visibility of scarring or uneven skin texture beneath heavy black. If your old work is made of dense black, blackout can be the simplest path to a single visual outcome.
8. Skull with Texture Depth on the Upper Arm
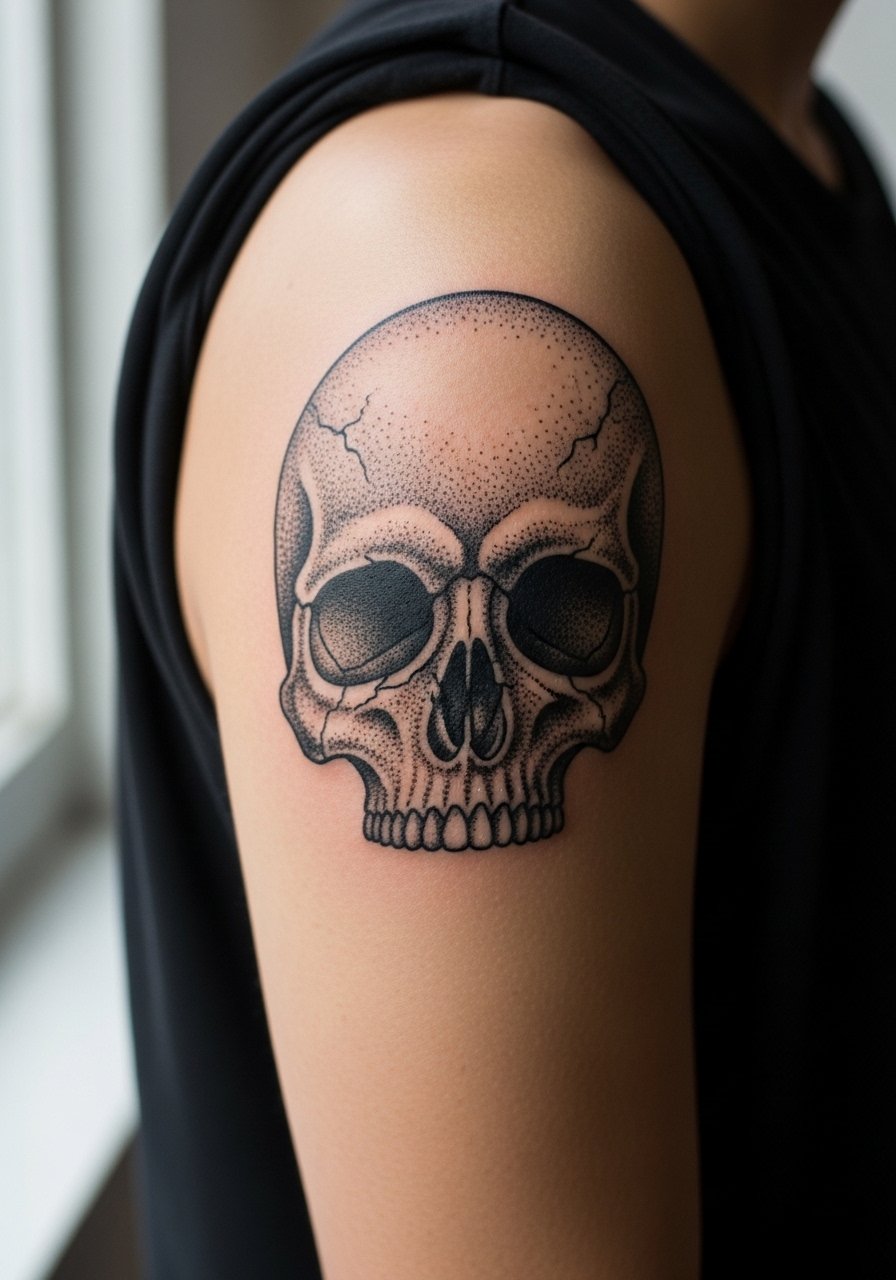
A skull uses deep eye sockets and layered texture to absorb old symbols, especially circular or coiled shapes. For this style ask for stipple shading in the midtones and heavier wash near the shadowed areas of the original ink. The upper arm tolerates dense shading well, and the session can run two hours for a medium skull. A common mistake is relying on thin gray wash alone without denser anchor areas. Artists debate color versus black and gray here. One viewpoint says full color provides additional opacity for complex covers, and the other insists traditional black and gray delivers classic depth. Ask how they plan to place the darkest values over the old lines.
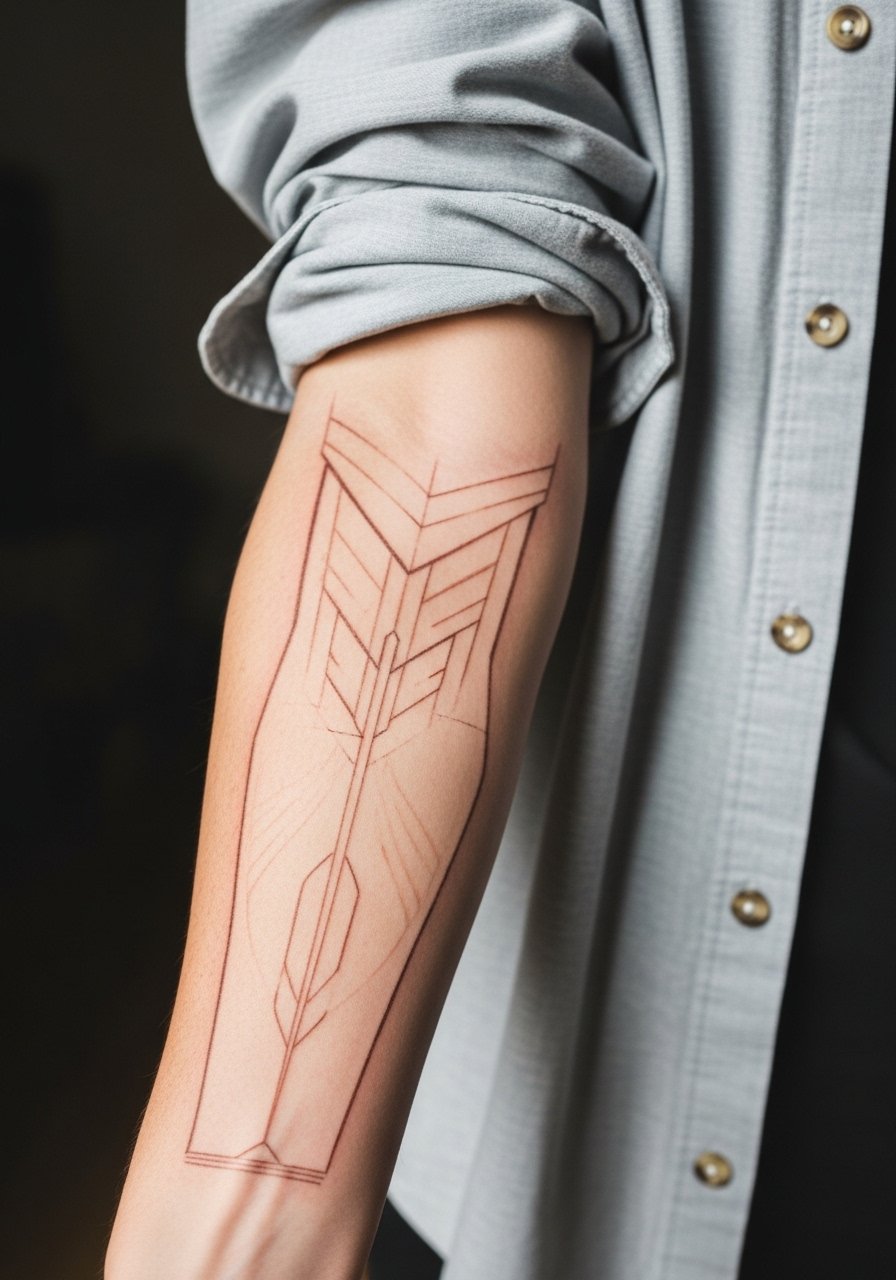
9. Biomech Over Tribal on the Forearm or Calf
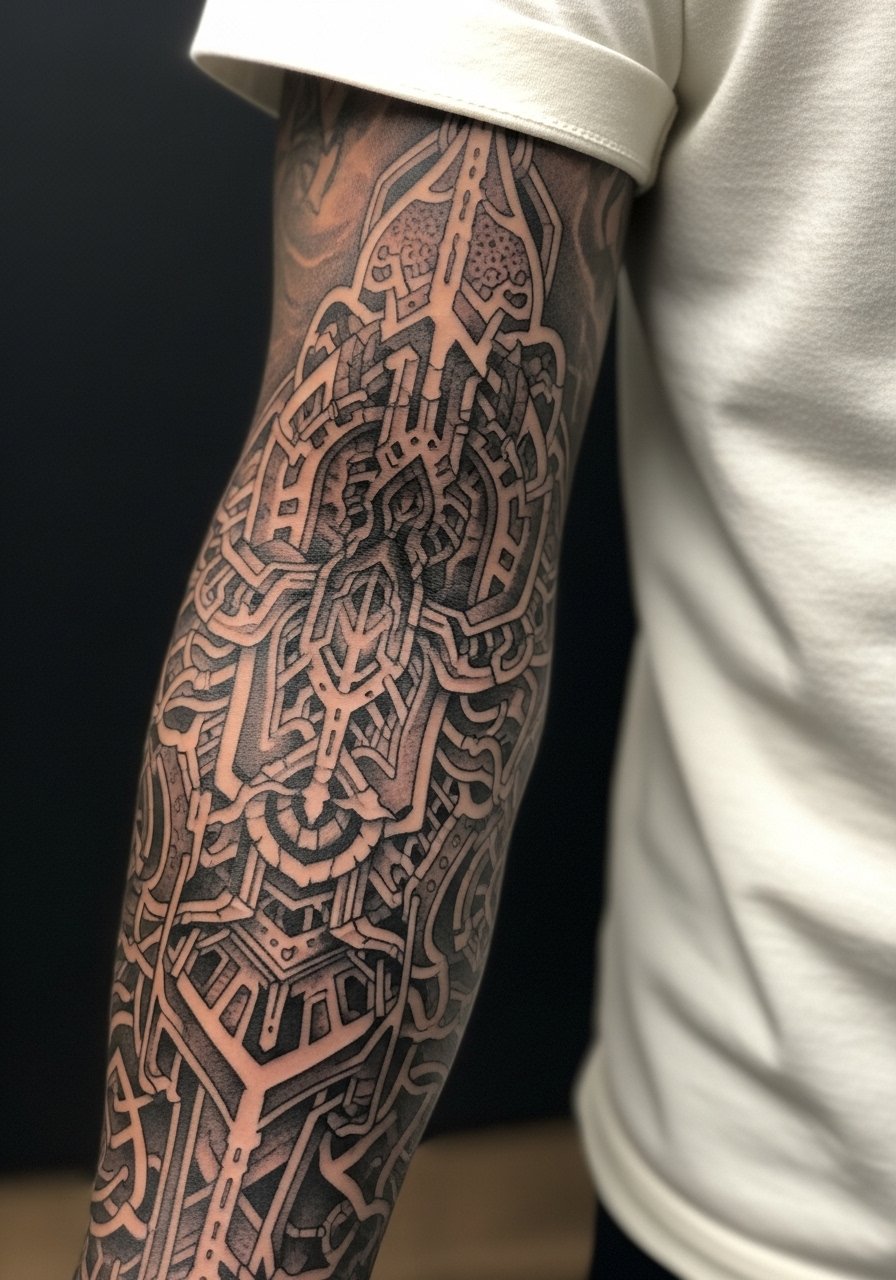
Biomech pieces break up thick 2000s tribal lines with mechanical plates, cables, and shadowed recesses. If the old work is bold and banded this is a smart route because texture creates visual breaks rather than a single mass. Tell your artist to design plates that overlap the strongest parts of the original, and to use negative-space seams to disguise edges. Sessions are medium length and can be physically intense where the needle traces large shaded areas. For the appointment wear a cotton rolled sleeve tee that lets the artist access the full forearm. Expect touch-ups after the first year if you tend to sun the skin.
10. Neo-Traditional Rose Sleeve to Mask Old Arm Work
A neo-traditional sleeve uses bold outlines, saturated fills, and layered elements to swallow older designs while bringing a fresh palette. This approach needs careful composition so the old shapes become part of the new story. A mistake is patching a sleeve together with unrelated motifs. Instead ask for a cohesive sketch that maps where the old lines will be absorbed. A sleeve is multi-session work spread across months. Plan your calendar around recovery and wear loose tops that let the artist roll your sleeve without friction.
11. Lion and Flower Hybrid on the Shoulder or Thigh
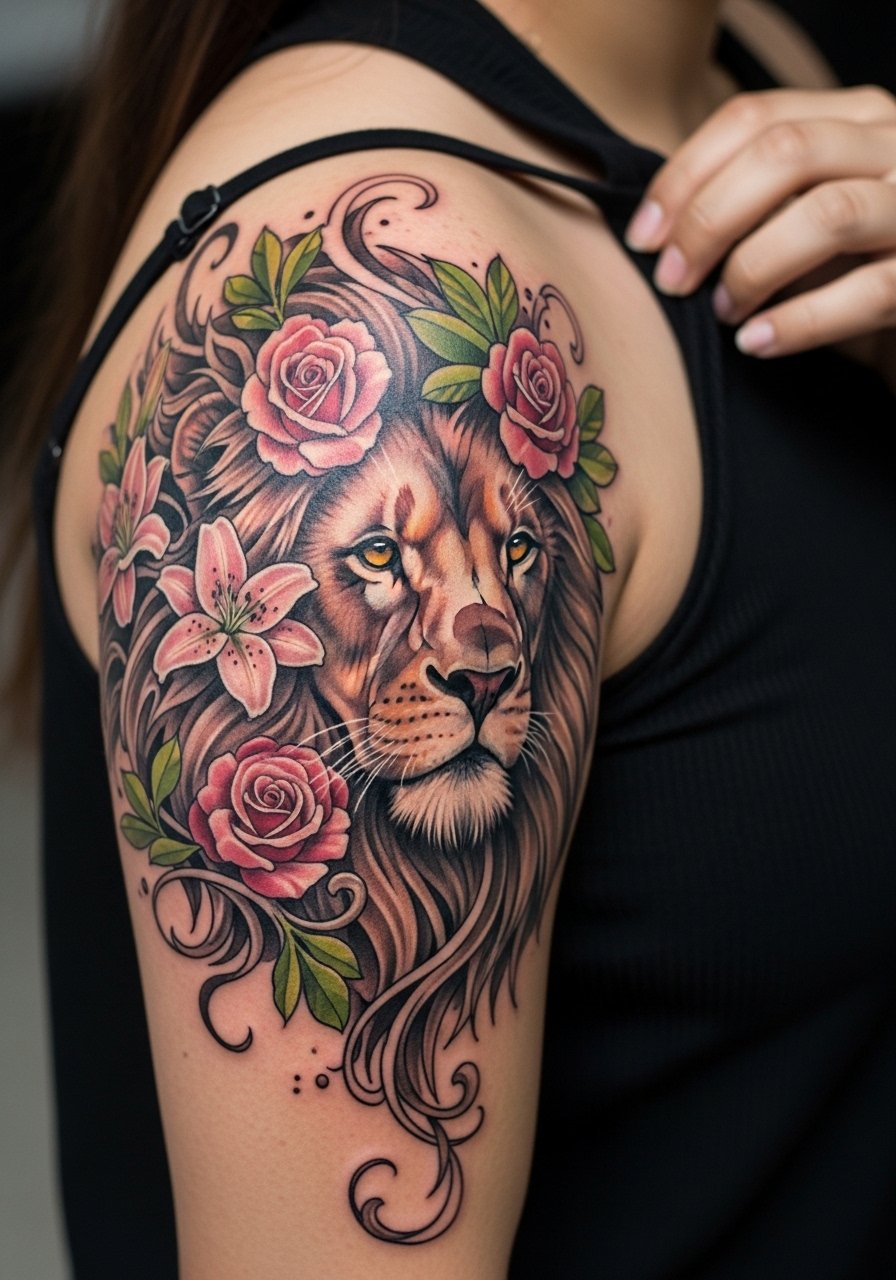
Merging an old animal outline into a detailed beast with blooms turns residual shapes into intentional anatomy. Ask your artist to trace the original contour and reuse it as a jawline or mane sweep. That turns the prior work into scaffolding rather than something to hide. Shoulder placements age well because muscle and skin movement is moderate. If you plan to show it off, an off shoulder blouse pairs well. Expect two sessions for good detail and a touch-up at year three if you spend lots of time in sunlight.
12. Japanese Wave Cover Over Abstract or Tribal
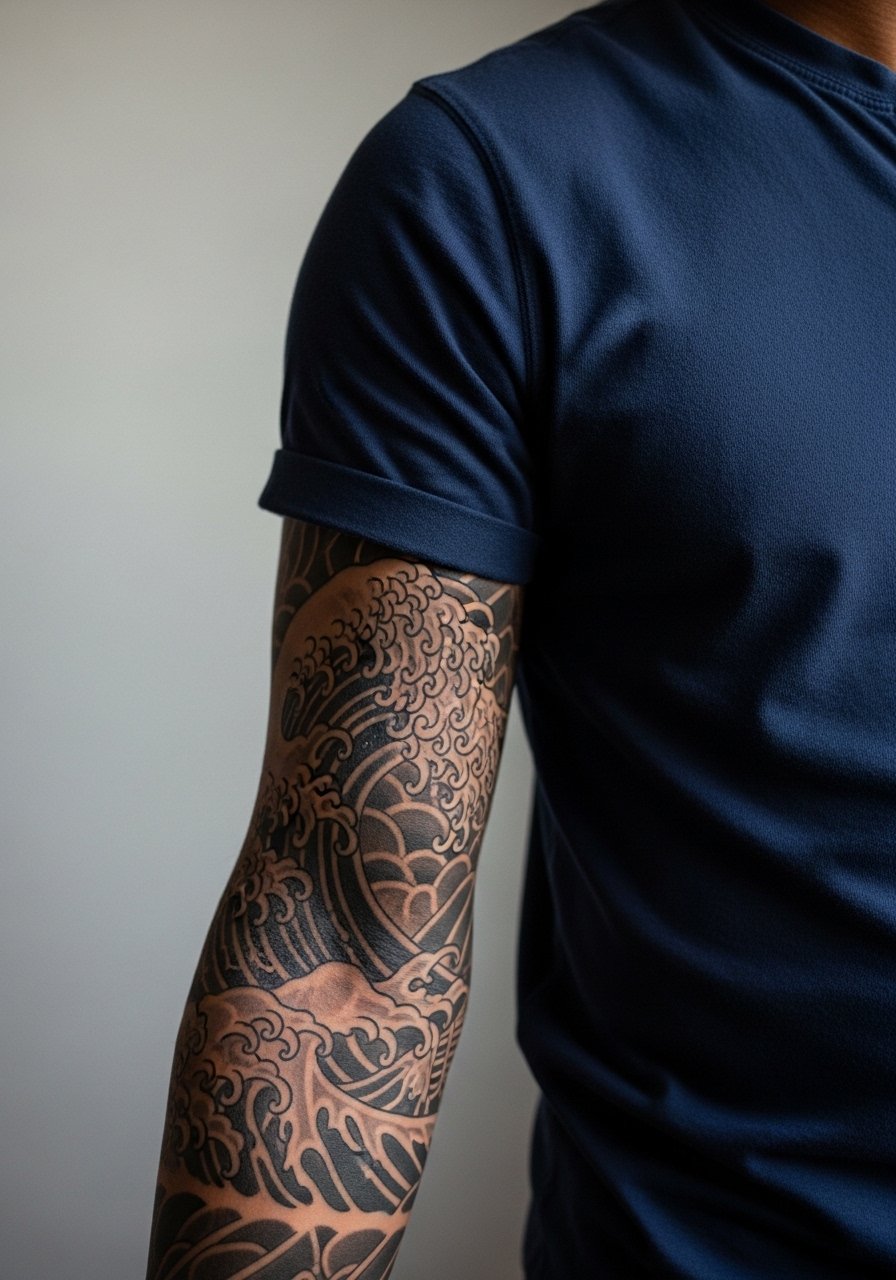
Japanese waves introduce motion and dense patterning that flow across previous abstract marks. The idea is to weave rhythm and heavy shaded troughs exactly over the old ink. During consult request larger wave elements and darker troughs where the original has the most contrast. A classic error is shrinking motifs so they do not reach the old ink. For session comfort wear a navy short sleeve henley you can pull slightly aside. This style holds up because the pattern reads as one continuous motion rather than a patch.
13. Grape Cluster Transformation for Ankle or Wrist
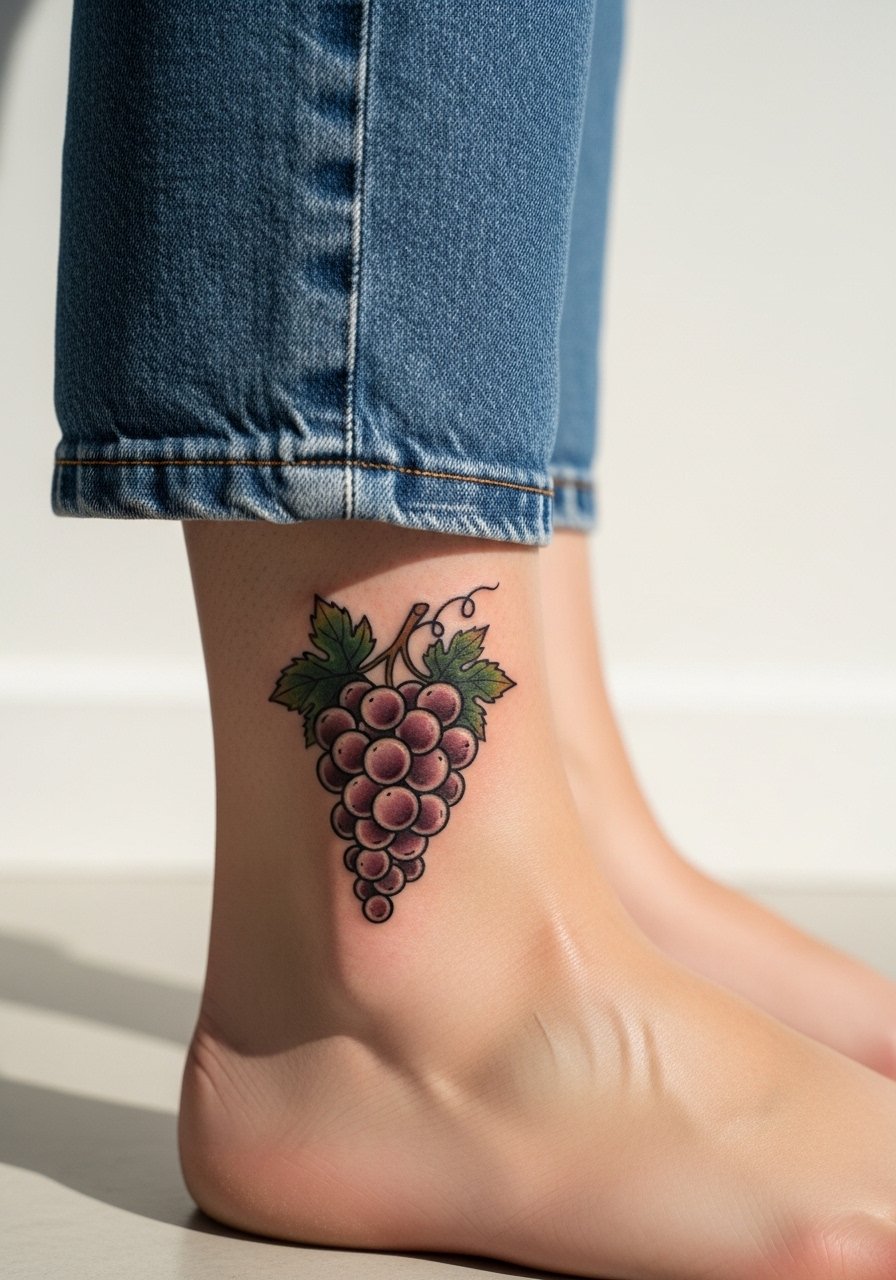
Turning small stamps or logos into a bunch of grapes is a playful way to camouflage shapes into a recognizable object. Ask for darker grape cores and leaf shading over the existing lines so the eye reads fruit, not a patch. Ankle sessions are quick but sensitive near bone. People sometimes ask for tiny grapes with too much detail, which blurs after healing. For outfits pair this with cropped straight-leg jeans or a midi skirt flowy when you want the ankle to peek out. Plan for a single session and a possible touch-up if the original ink was very dark.
14. Micro Script Framed by Tiny Florals on the Wrist

If the regret is a name or short word, reframing it with tiny florals and bolder stems can make the lettering read as intentional calligraphy. Ask your artist to thicken select letter strokes and to weave small flowers where the older letters are heaviest. The wrist will always be more touch-up prone than the forearm. People often request ultra-fine script and then see early blurring. Plan for a touch-up at year two for script-heavy wraps. For the session wear a sleeveless tank or pull a shirt sleeve up to give the artist clear access.
15. Ouroboros Into a Wreath Black Fill
Using the original contour as positive space can be clever and efficient. Turning a circular or serpent shape into a wreath with heavy black fills lets the old outline become a compositional asset. When you discuss this, ask your artist to sketch negative-space highlights that follow the old curve. A pitfall is treating the original shape as disposable instead of an element to work with. This technique often shortens session time since the artist has a sculptural guide to follow. If the original ink is layered, planning a brief laser fade may still help, but many covers succeed by thoughtful composition alone.
16. Pre-Fade Then Neo-Black Sleeve for Dense Covers
For very dense or layered old work one route is a few laser sessions to lighten the darkest areas, then a neo-black sleeve that blends remaining lines. The controversy here is clear. One camp prefers immediate cover-up with heavy saturation and more sessions. The other recommends several pre-fade laser sessions to reduce the risk of color muddiness. Both approaches work when you and your artist agree on timing and expectations. Laser fades add time and cost but can lead to cleaner color reads later. For the appointment wear a loose button-down shirt you can shift so the artist accesses the full arm.
17. Minimalist Peony with Dark Core for Small Regrets

A minimalist peony uses a denser dark center to cover a name or tiny icon while keeping overall scale small. Ask for the core to be the darkest spot and for petal edges to have gentle spacing so the design does not compact as it heals. Wrist placement means quicker fading and more friction from sleeves and watches, so consider gentle over-saturation in the center. People often request thin petal outlines that later merge. Expect a short session and a touch-up at year two. For showing it off try a delicate stacked bracelet and keep any watch on the opposite wrist.
Frequently Asked Questions
Q: How much do cover-up tattoos usually cost?
A: Costs vary by scale and technique. Small covers often fall under $250, medium single-site covers typically range between $250 and $800, and large sleeves or multi-session blackouts commonly exceed $1,000. Expect consultations to clarify how many sessions you will need.
Q: When should I consider laser fading before a cover-up?
A: Laser fading helps when the original ink is very dark or layered. If your artist wants a cleaner color read for a multi-color cover or a neo-traditional sleeve, plan on several short laser sessions spaced weeks apart. It adds time and expense but can reduce the risk of muddy color later.
Q: Do black and gray covers hide old work as well as full color?
A: Artists are split on this. One camp favors full color with deep saturation for opacity, and the other trusts black and gray to build contrast and texture. The right choice depends on your skin tone, the old ink, and the artist's technique. Ask for healed examples on similar skin tones.
Q: What should I wear to a shoulder or chest session?
A: Bring clothes that let the artist access the area easily. For shoulders a sleeveless or button-front top is best. For collarbone or upper chest wear a wide-neck shirt or a sports bra that can be shifted so only the tattoo zone is exposed.
Q: How soon can I go back to work after a visible wrist or hand cover-up?
A: Healing timelines vary but plan for a few days of lighter duties and avoid heavy hand washing or friction that first week. If your job involves manual labor, discuss schedule adjustments with your employer and your artist before booking.
Q: Where can I find artists who specialize in cover-ups if I do not know anyone locally?
A: Search style-specific hashtags like #coveruptattoo and #floralcoverup, look up location tags with phrases like "[city] cover up tattoo," and check tattoo directories for cover-up specialists. Community threads and appointment platforms also list guest spots for artists who do larger transformations.
