
Bold black lines and woodcut texture age into something that reads like a page from an old book, not a trend that blurs into obscurity. If you want tattoos that keep graphic contrast and dramatic linework years down the road, medieval woodcut motifs in saturated blackwork are a strong candidate. Below are 21 design directions, practical consultation notes, and wardrobe pairing ideas to make sure your piece looks deliberate in the chair and ten years later.
1. Engraved Knight Portrait on Upper Arm
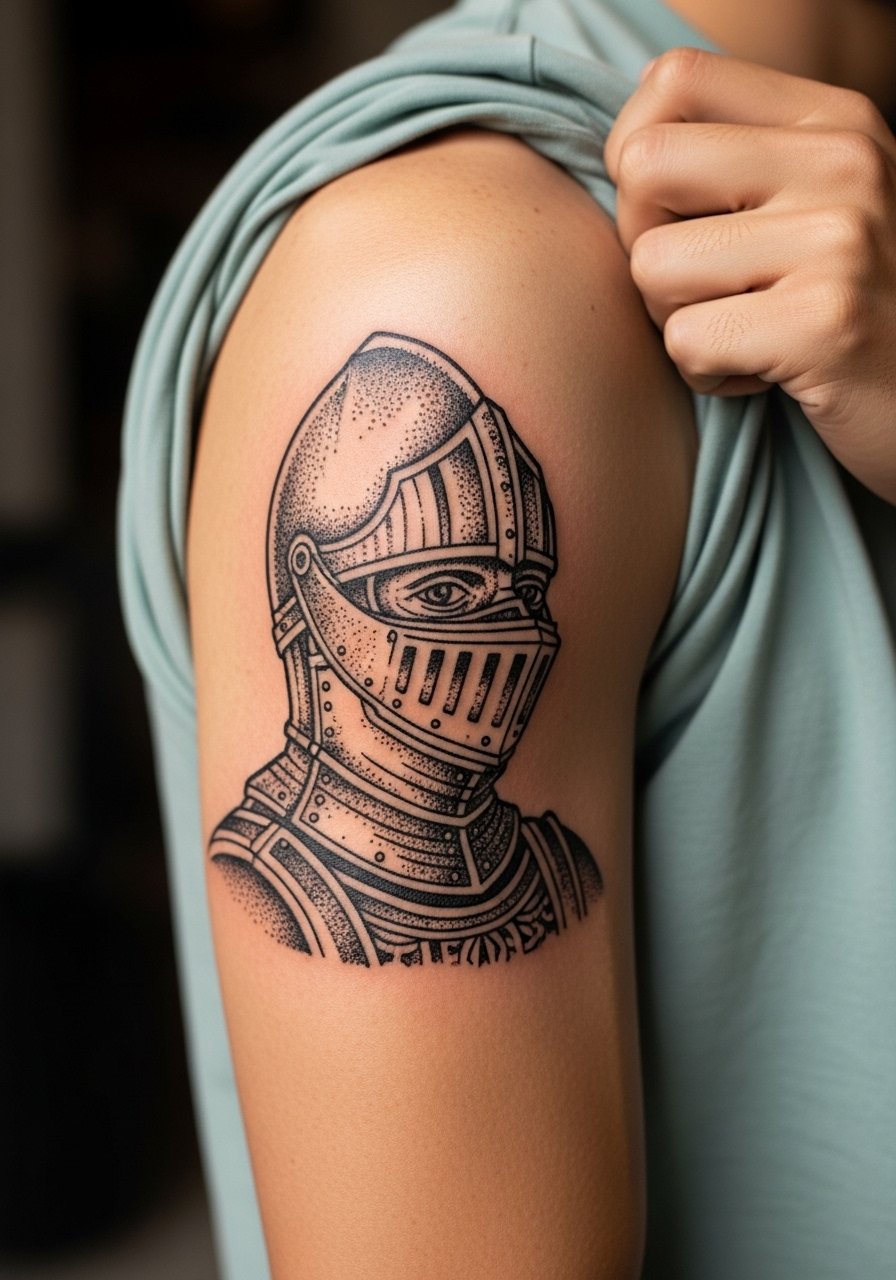
I've seen engraved-facing portraits hold up well on the upper arm because the skin there resists blowout. Ask your artist for bold contour lines, high-contrast crosshatching in the shadow areas, and limited fine hairlines that might blur over time. Fair warning, the biggest mistake is requesting tiny facial detail, which softens into muddiness after a few years. Session usually runs two to three hours and feels like steady machine work with short breaks. For showing this off, roll up sleeves or wear a short-sleeve linen shirt to frame the piece without competing with the blackwork.
2. Heraldic Shield Across the Chest
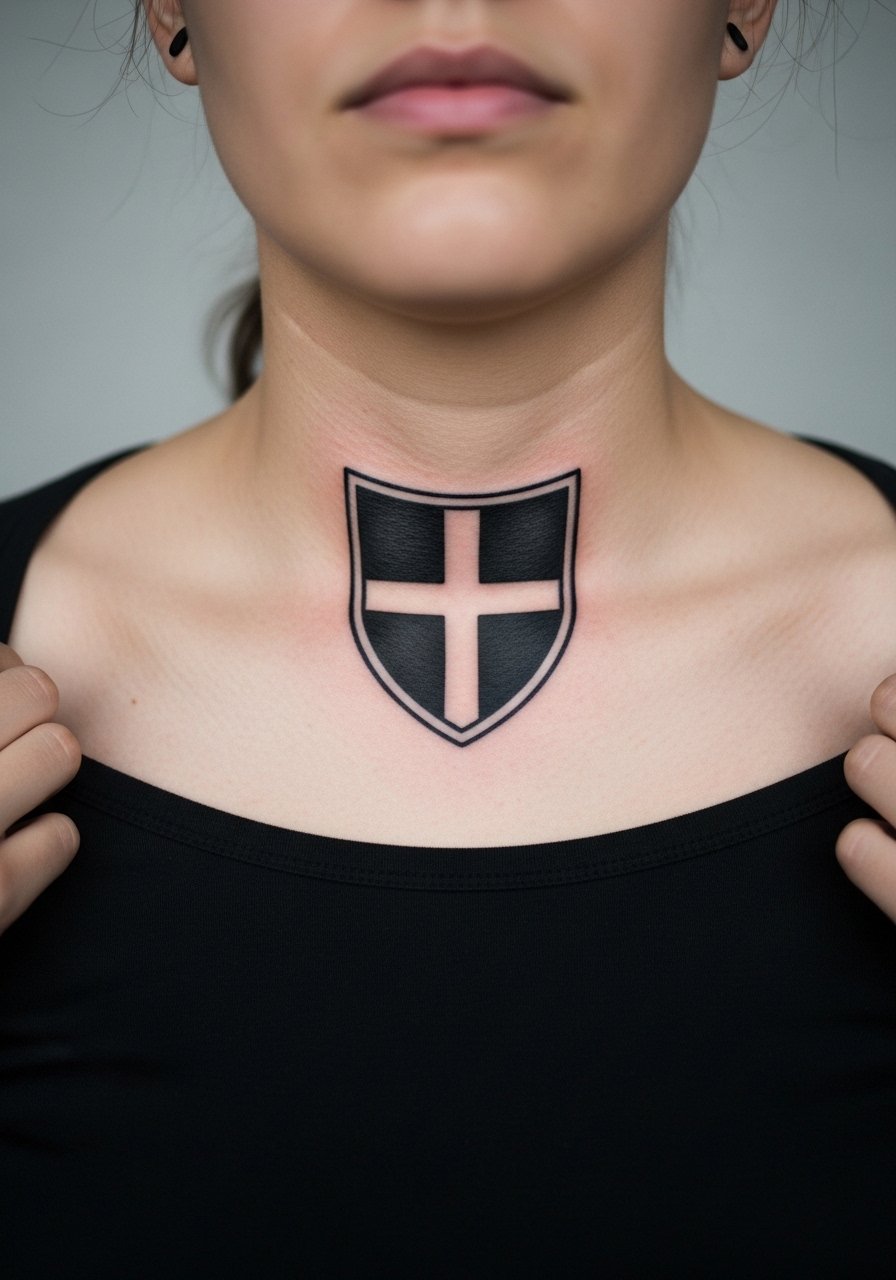
Pain on the upper chest is moderate and comes in waves during shading. When you consult, specify crisp negative space inside the shield and ask for thicker border lines to prevent the emblem from softening. Artists split on chest fine detail. One camp says dense hatchwork holds because the chest sits flat; the other camp worries skin flex from breathing blurs tight crosshatching. Name both views to your artist and decide which they can execute cleanly. For session access, bring a wide-neck shirt you can pull aside without getting cold.
3. Memento Mori Skull on the Ribcage
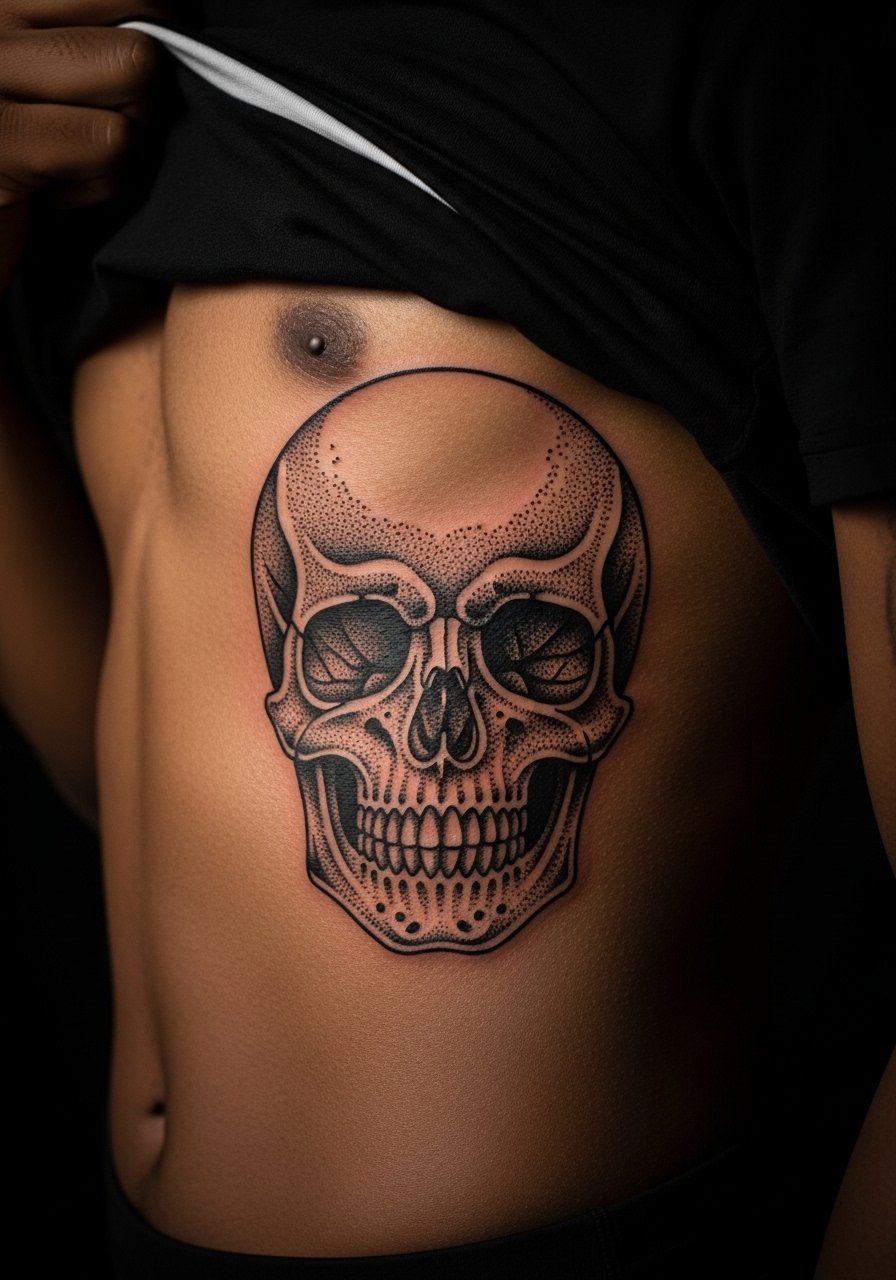
Fair warning, the ribcage rates high on most pain scales but rewards with dramatic placement. The common version that ages poorly uses tiny teeth and feathered shading. Instead ask for strong jawline contours and clustered stippling for shadows so the design reads from a distance as well as up close. Expect one long session and a touch-up at year two for saturation. For the appointment wear a cropped athletic top so the artist can lift fabric without you getting chilly.
4. Heraldic Stag With Crossed Spears on Thigh
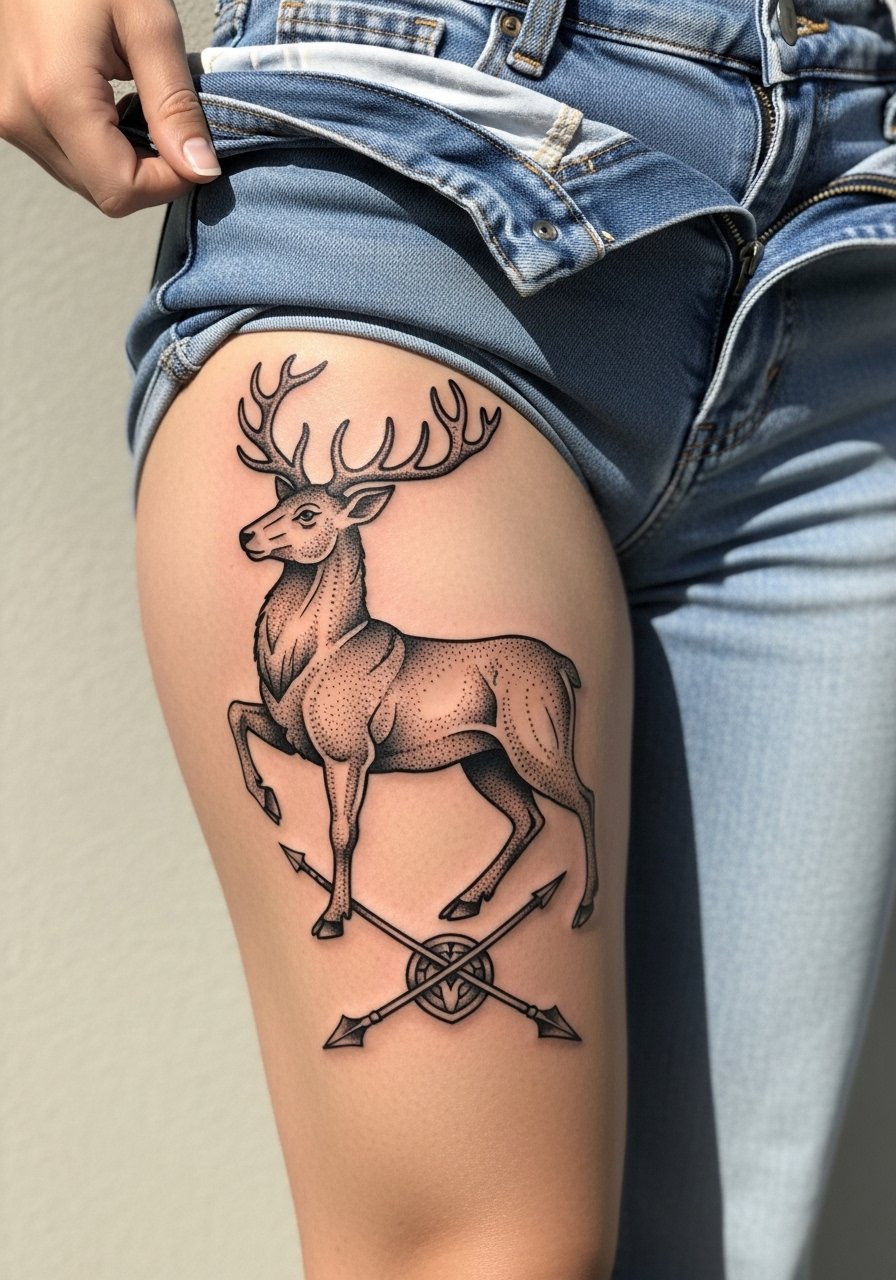
There is real visual impact in bold black silhouettes on the thigh because the canvas is expansive. In consultation, ask for slightly exaggerated antler negative space and bold interior hatching so the piece keeps its graphic silhouette when sitting or moving. Common mistake is packing too much fine hatch in a small thigh patch. Session time is usually two to three hours and feels low on sharp pain but high on duration fatigue. For the session, pull on high-waisted shorts that let the artist work without tugging at seams.
5. Woodcut Basilisk Coil on the Calf
I've noticed calf placements tolerate dense blackwork and heavy stippling exceptionally well. Tell your artist you want thick outlines and layered dot work in shadow bands to maintain contrast as the skin ages. The usual mistake is trying to cram tiny scale detail that blurs under compression from socks and shoes. Expect two shorter sessions and minimal blowout risk compared with thin-line work. For showing it off, wear rolled-up jeans or a midi skirt with side slit that keeps the calf visible without rubbing.
6. Blackletter Script Banner on the Collarbone
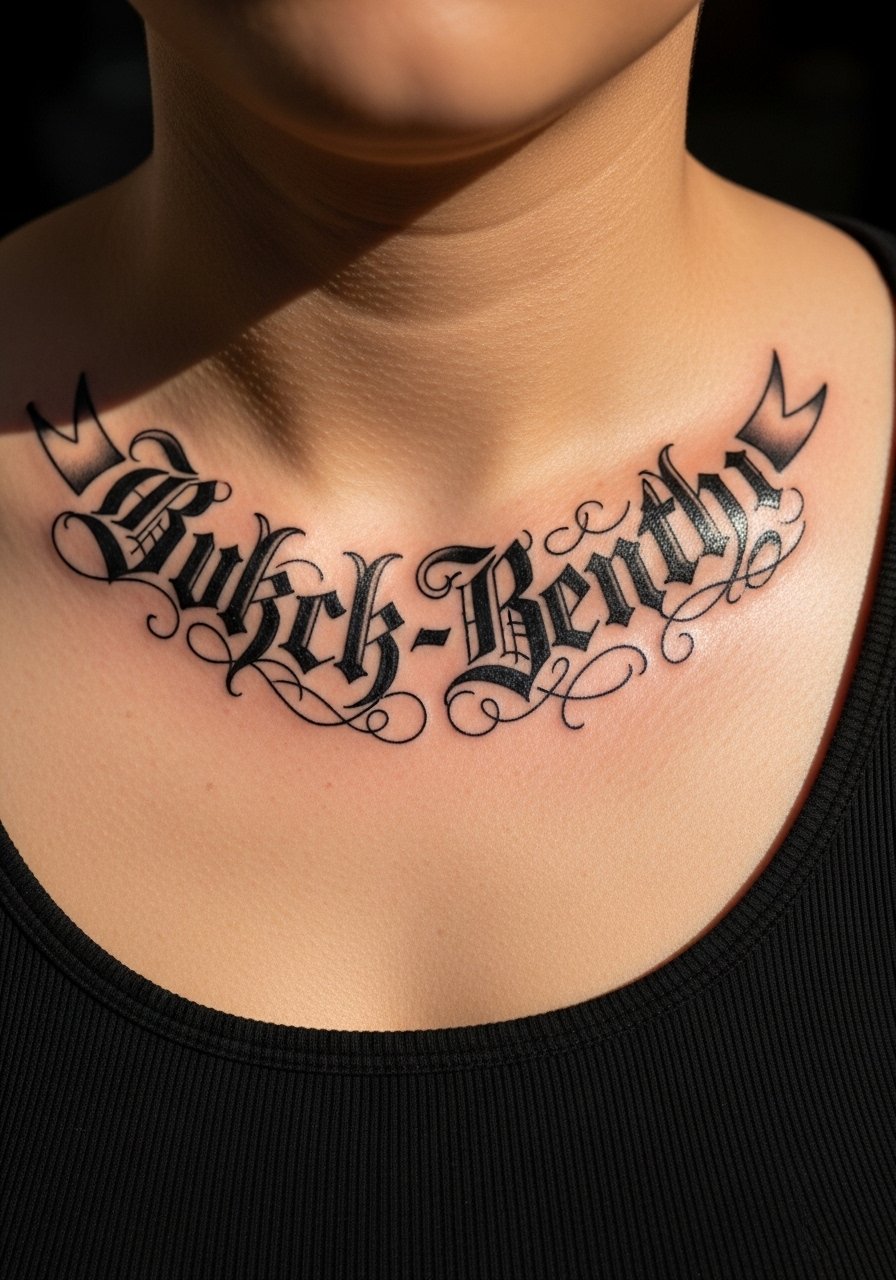
Consultation tip, bring exact lettering and spelling because blackletter needs precise spacing to read well. The common aging issue is letters with hairline serifs that vanish into blurred edges, so request heavier weight strokes and open counters. Expect a one-hour session with some sting during the crossing of clavicle bone. For evening outfits, a scoop-neck top shows the banner without distracting jewelry.
Studio Day Picks
The chest, ribcage, and thigh pieces above demand different prep than wrist work, so these picks smooth the session and early healing.
- Stencil transfer paper kit. Lets you preview how bold linework sits on curved surfaces, helpful for the knight portrait and heraldic shield above.
- Topical numbing cream. Applied per instructions it reduces the sting for long ribcage and thigh sessions without altering saturation.
- Thin protective film roll. Keeps calf and foot tattoos clean from friction during the first days of healing.
- Fragrance-free body wash. Gentle cleansing protects dense blackwork pieces from irritation while lines settle.
- Aquaphor healing ointment. Thin application in the first days locks in moisture for high-contrast blackwork without clogging.
7. Medieval Map Back Panel
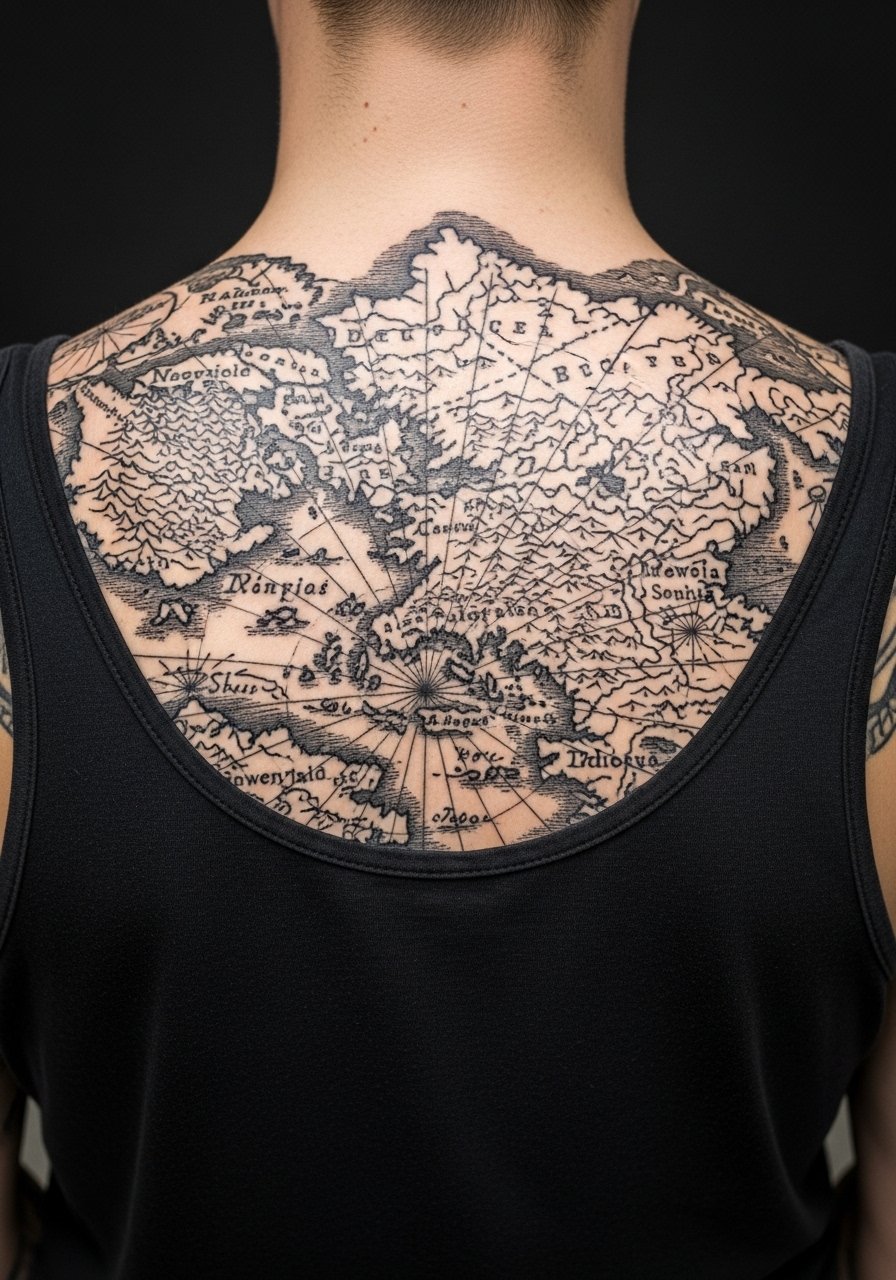
Visual impact lead works here because a back panel reads like a single print on cloth. In consultation, ask for bold coastlines and simplified iconography rather than minute labels. The common mistake is insisting on tiny text across the back which fades into visual noise with movement. Session time can be split across multiple visits. For showing this off at events, an open-back dress or a low-backed tank highlights the panel cleanly.
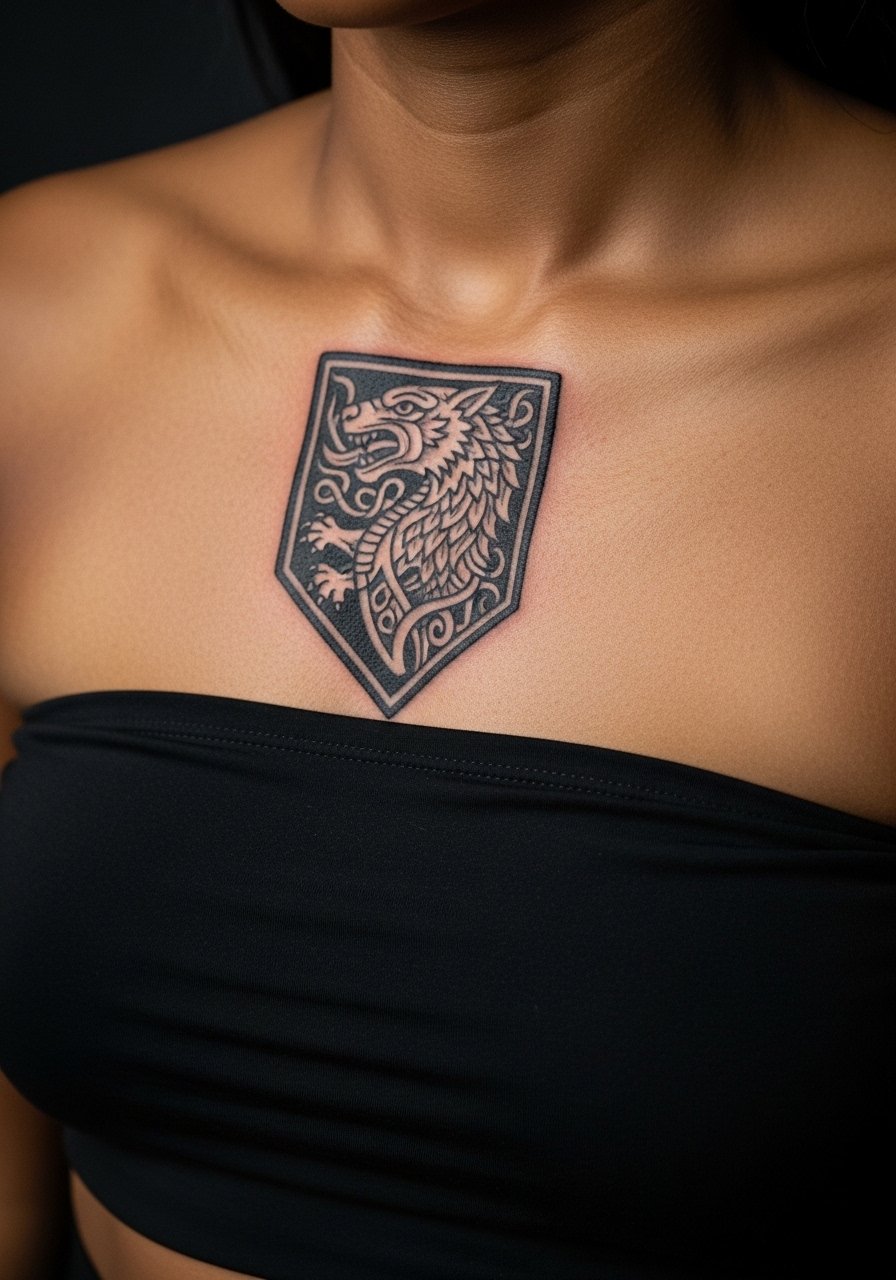
8. Heraldic Falcon on the Shoulder Blade
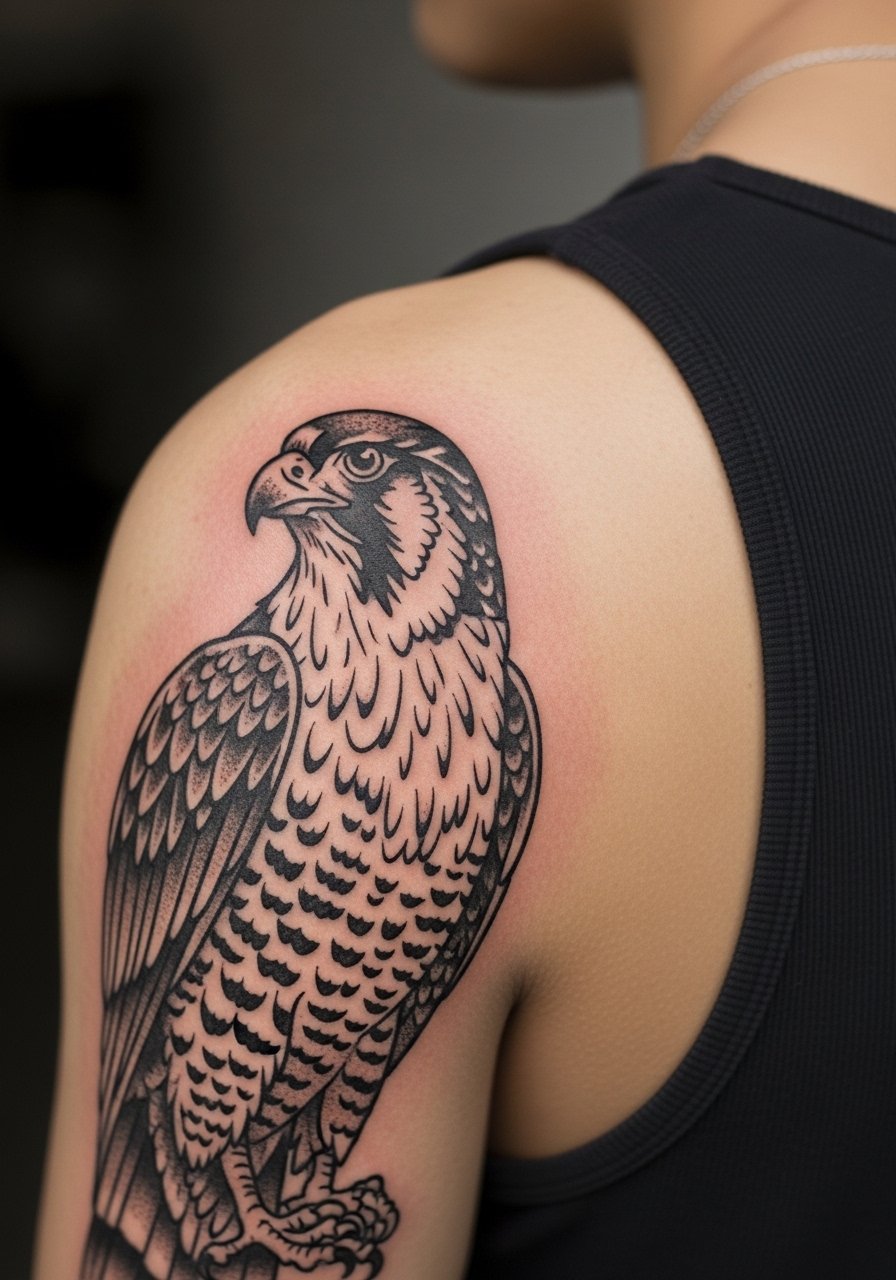
Aging lead: shoulder blade skin stays stable so the heavy feather hatch holds for years if you prioritize bold outer lines. Tell your artist to avoid ultra-fine feather tips and to use staggered stipple for texture. The session feels like medium pressure across contour changes. For session comfort wear a tank top you can shift without exposing more than needed.
9. Woodcut Tree Spine Column
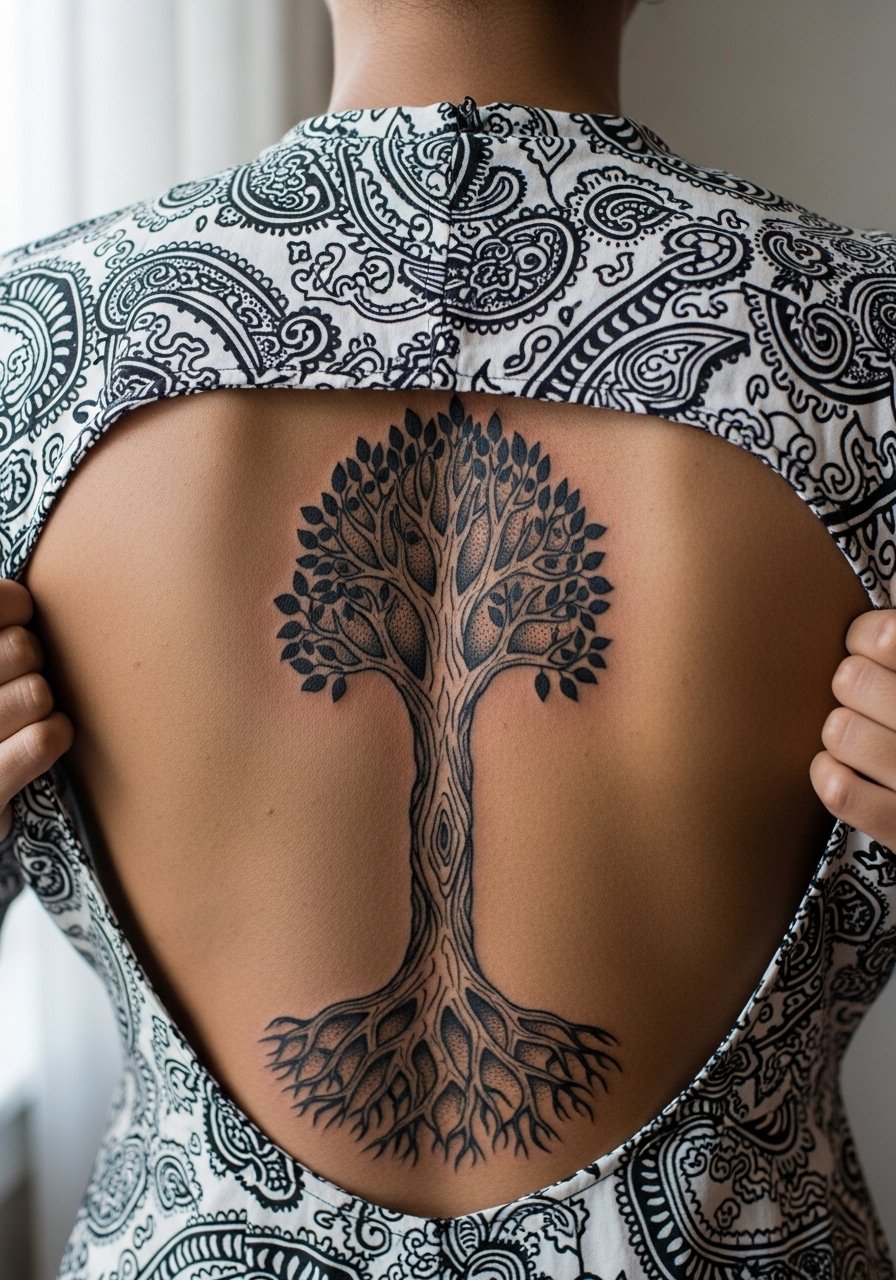
Consultation lead: discuss where you want visual breaks so the tree reads whether clothed or bare. The spine is sensitive and some artists avoid dense dot work near the vertebrae because of motion. A real mistake is over-detailing branches that become indistinct when the back moves. Expect longer sessions and schedule a touch-up once the lines settle. For show-off outfits, try a back-cutout dress that frames the central column.
10. Crow and Candle on the Forearm
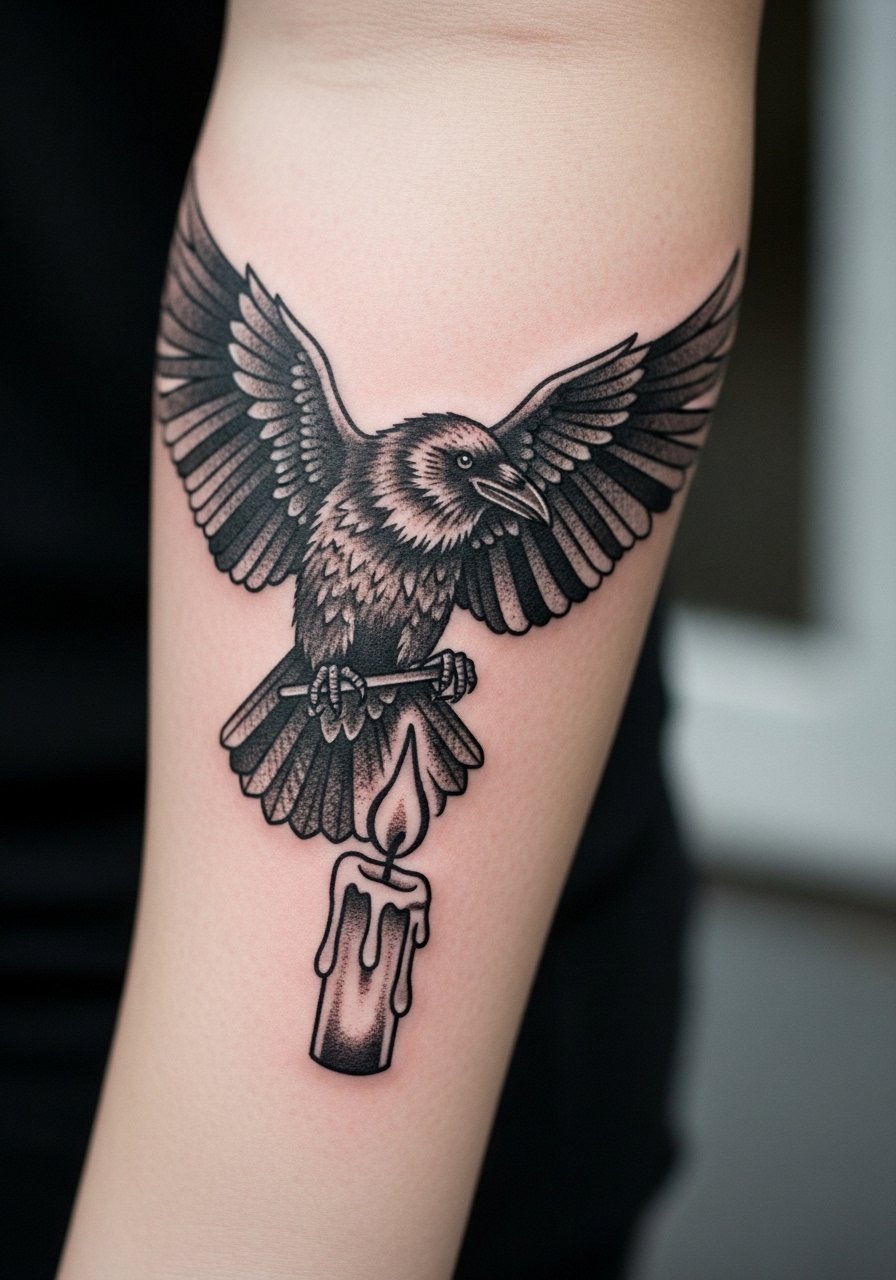
Personal observation: forearms showcase woodcut textures well because the canvas is flat and visible. Tell your artist to place the candle so flame-negative space separates the crow silhouette. Mistakes include asking for feather micro-detail that softens in high-motion zones. Session takes one to two hours with mild discomfort near the inner forearm. Pair this with a rolled-sleeve shirt to keep the design visible without competing prints.
11. Witch in a Cauldron on the Lower Leg
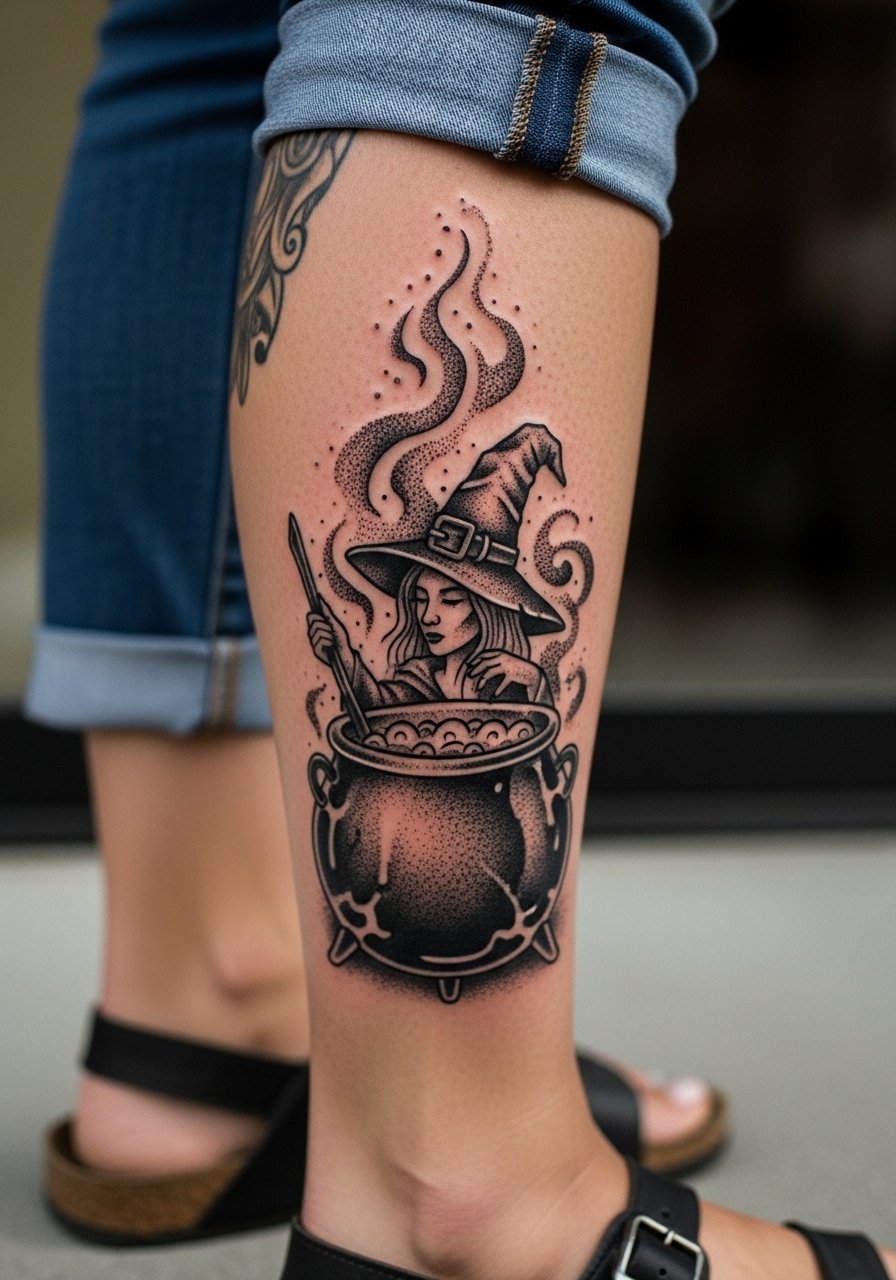
Mistake lead: the lower leg often gets tiny decorative fills that age poorly under friction from pants. Ask for strong silhouette and negative-space steam shapes that keep the witch readable. Pain is low on the outer calf but can spike near the shin. Two short sessions usually cover this area. For summer show-off, sandals and rolled jeans work with a pair of sandals that keep the artwork visible.
12. Blackwork Reliquary on the Sternum
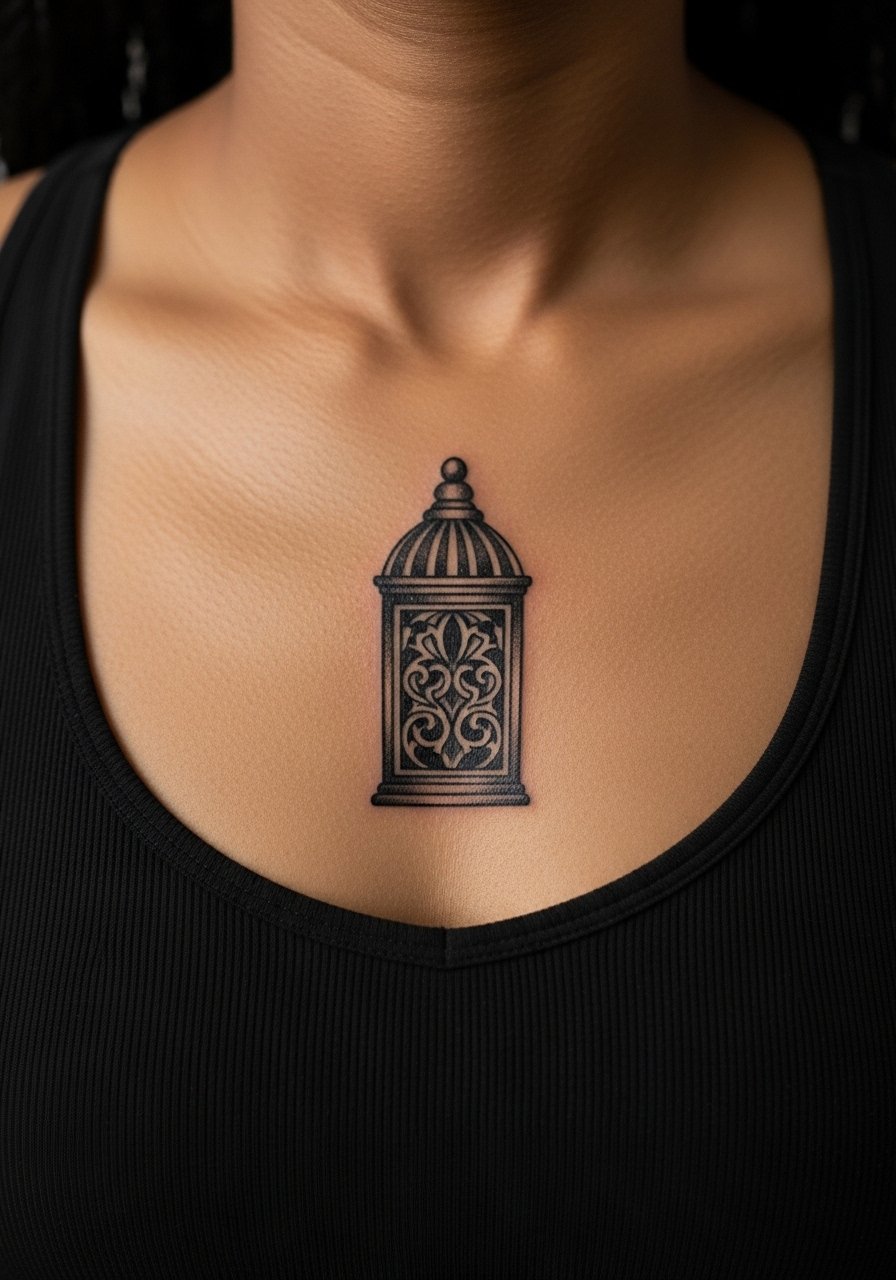
Pain warning: sternum is a sensitive spot and shading across the bone can be intense. Artists disagree on dense central detail here. One camp advises strong negative gaps to prevent muddiness; the other argues skilled shading maintains texture. Name both stances and ask which your artist prefers. Sessions are short but focused. Bring a fitted sports bra that allows access while keeping you comfortable.
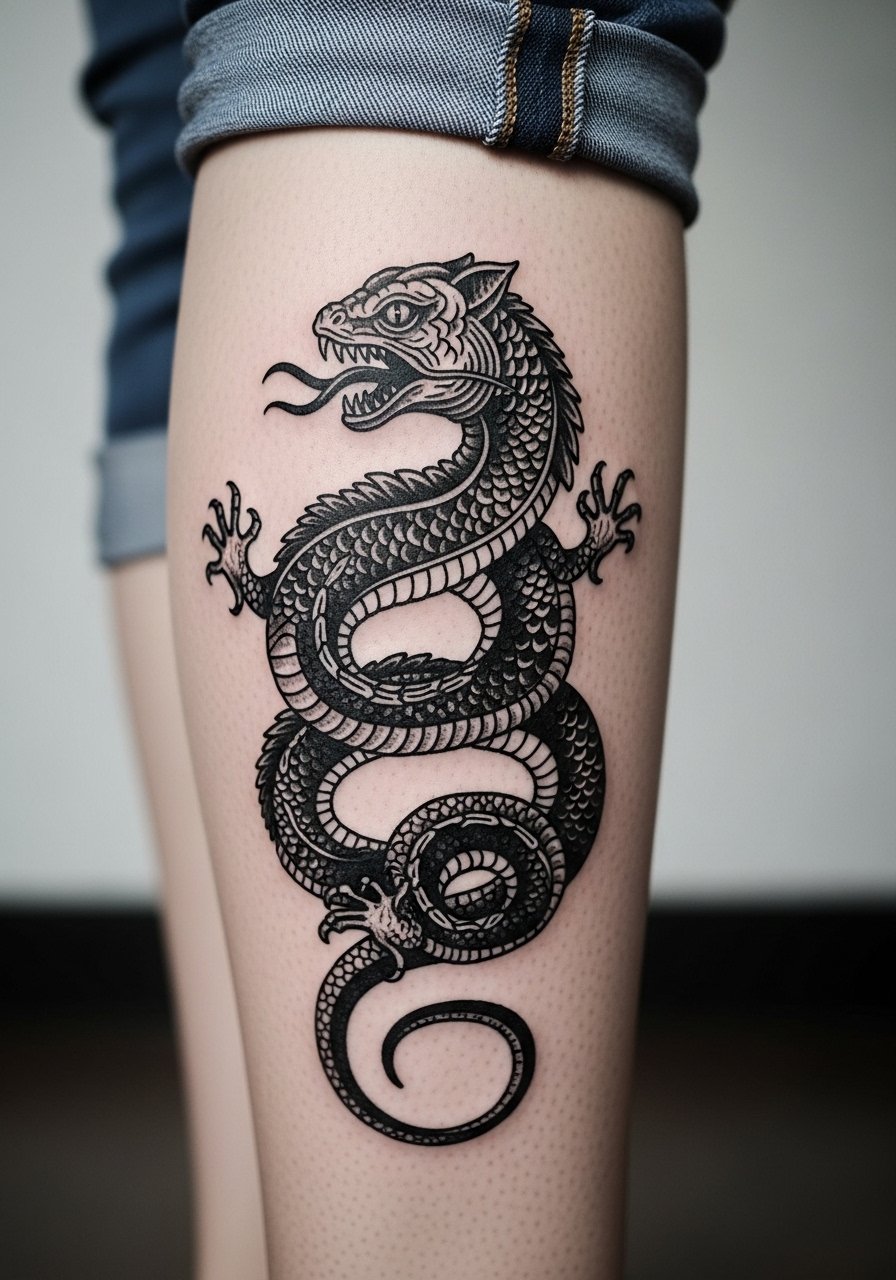
13. Knight and Dragon Sleeve Fragment on the Inner Bicep
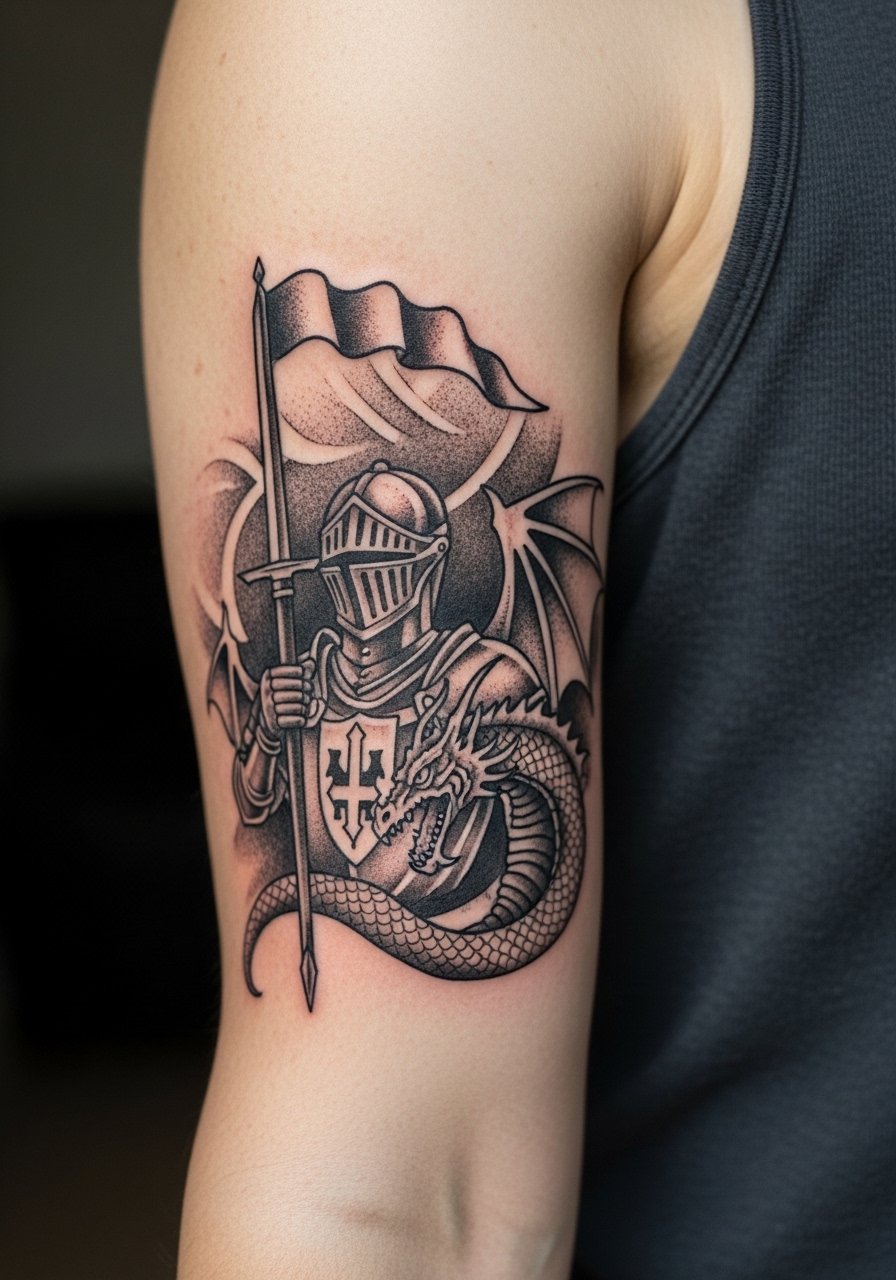
Pain warning lead: inner bicep can be tender and the skin there is softer, so talk about needle depth and spacing. A common error is packing minute scales in that area. Recommend broader hatch strokes and defined negative spaces so the dragon holds its silhouette. Expect moderate pain and the feeling of prolonged pressure. For session wear a wide-strap tank to keep the area accessible.
14. Black Raven on the Hand

Consultation lead: hand tattoos are controversial for career reasons and longevity. One camp accepts hand work as a statement and schedules frequent touch-ups. The other warns hands fade fast and blur from constant washing and friction. Be explicit in your appointment about wanting dense, bold outlines and realistic touch-up expectations. Pain is sharp but short. Keep in mind some workplaces still restrict visible hand ink.
15. Medieval Rose with Banner on the Wrist
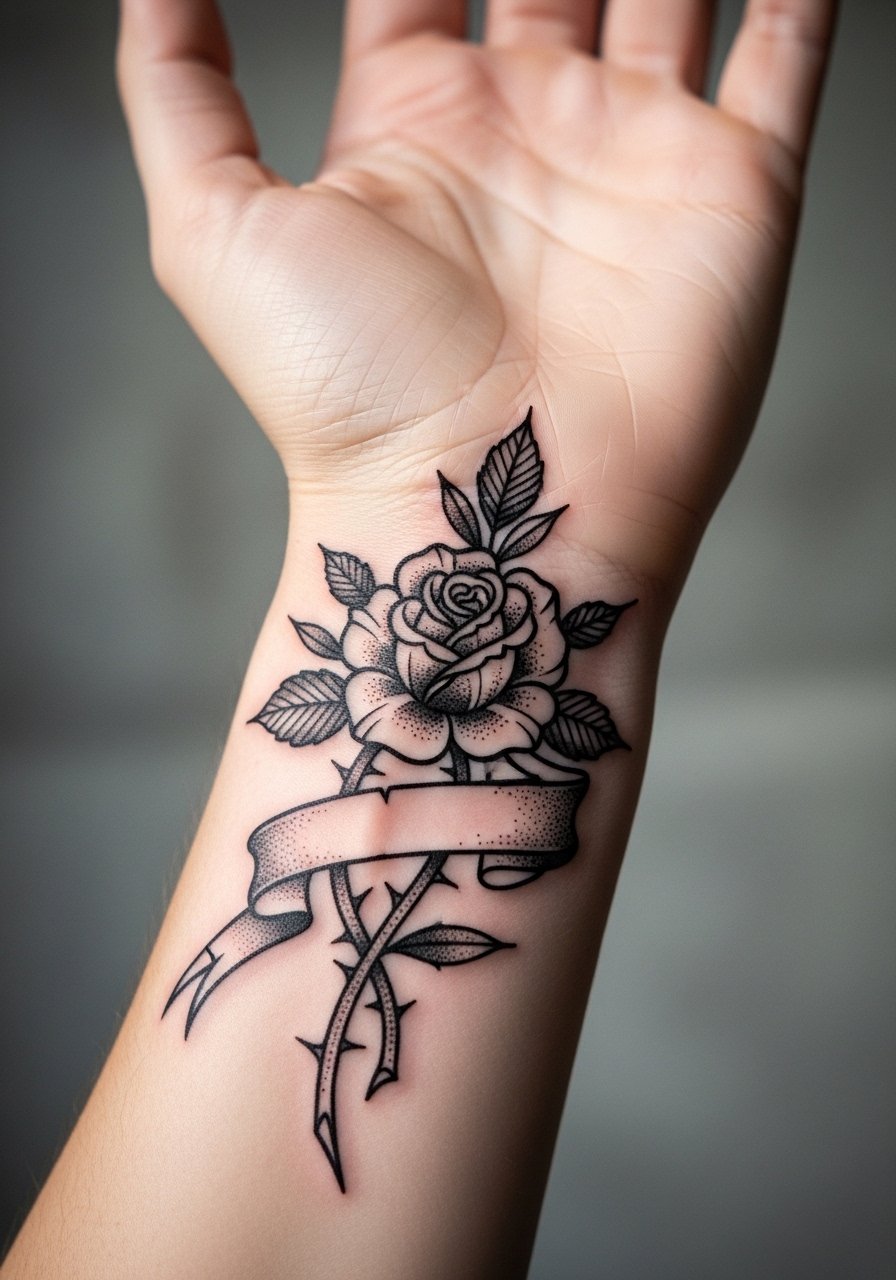
Mistake lead: tiny banner lettering on the wrist often spreads. Ask for heavier letter strokes and increased spacing inside the banner so names or dates stay legible. The wrist feels tingly during lining and shading. Session is brief but may need a touch-up at year two. For jewelry pairings, try a thin chain bracelet that frames the wrist without rubbing the piece.
16. Medieval Ship and Waves on the Side Thigh

Visual impact lead: the side thigh gives room for dramatic horizon lines that read even under clothing. Tell the artist to use layered stipple for the waves so motion reads at a glance. Common mistake is fine-detail rigging that disappears when clothing presses on the thigh. Sessions are comfortable but long. For the session bring loose shorts that let the artist access the area without pulling tight fabrics.
17. Alchemical Symbols Cluster on the Forearm

Consultation lead: clusters need intentional spacing so symbols do not merge as they age. Ask your artist to keep at least a few millimeters of clear skin around each symbol and to use bold primary strokes. Mistakes include packing symbols too close together. Sessions are quick and tolerable. Pair with a rolled-sleeve button-down to show the forearm work without covering it completely.
18. Blackwork Saint Icon on the Upper Thigh
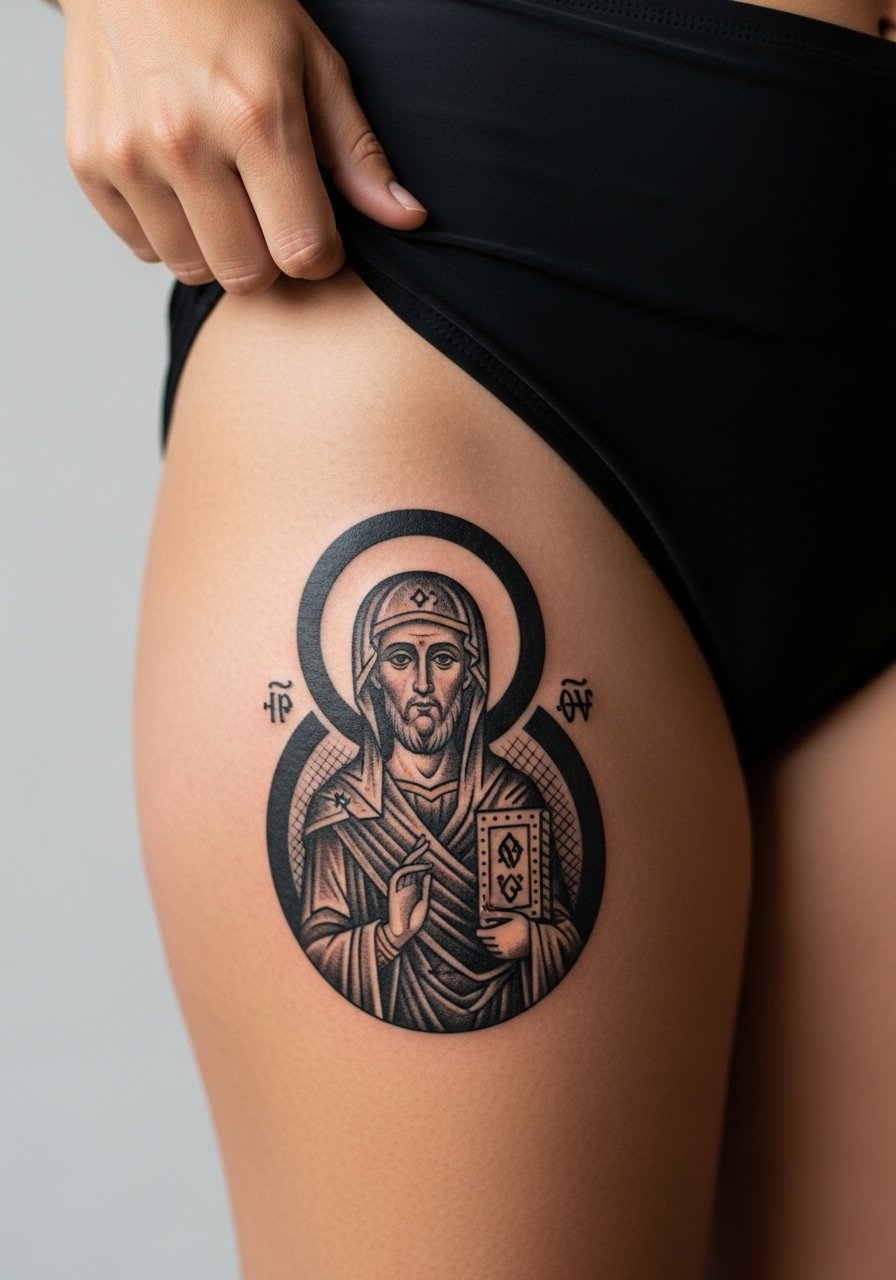
Controversy lead: religious iconography can be sensitive. One camp sees replication as homage when done respectfully. The other recommends adapting motifs rather than direct replicas. Note the origin, ask permission from your artist to stylize, and consider slight alterations. Session time is moderate and feel varies with placement. For the appointment wear high-waisted swimwear you can adjust so only the area in question is exposed.
19. Medieval Beast Chest Patch Near the Sternum
Mistake lead: packing dense detail near the sternum without open negative space creates muddiness fast. Ask for broad shapes with textured interior hatching and reserve tiny details for less mobile zones. Pain is high near the bone and sessions are focused. For showing the piece off try a bandeau top that frames the patch without exposing more than needed.
20. Woodcut Rose on the Inner Arm
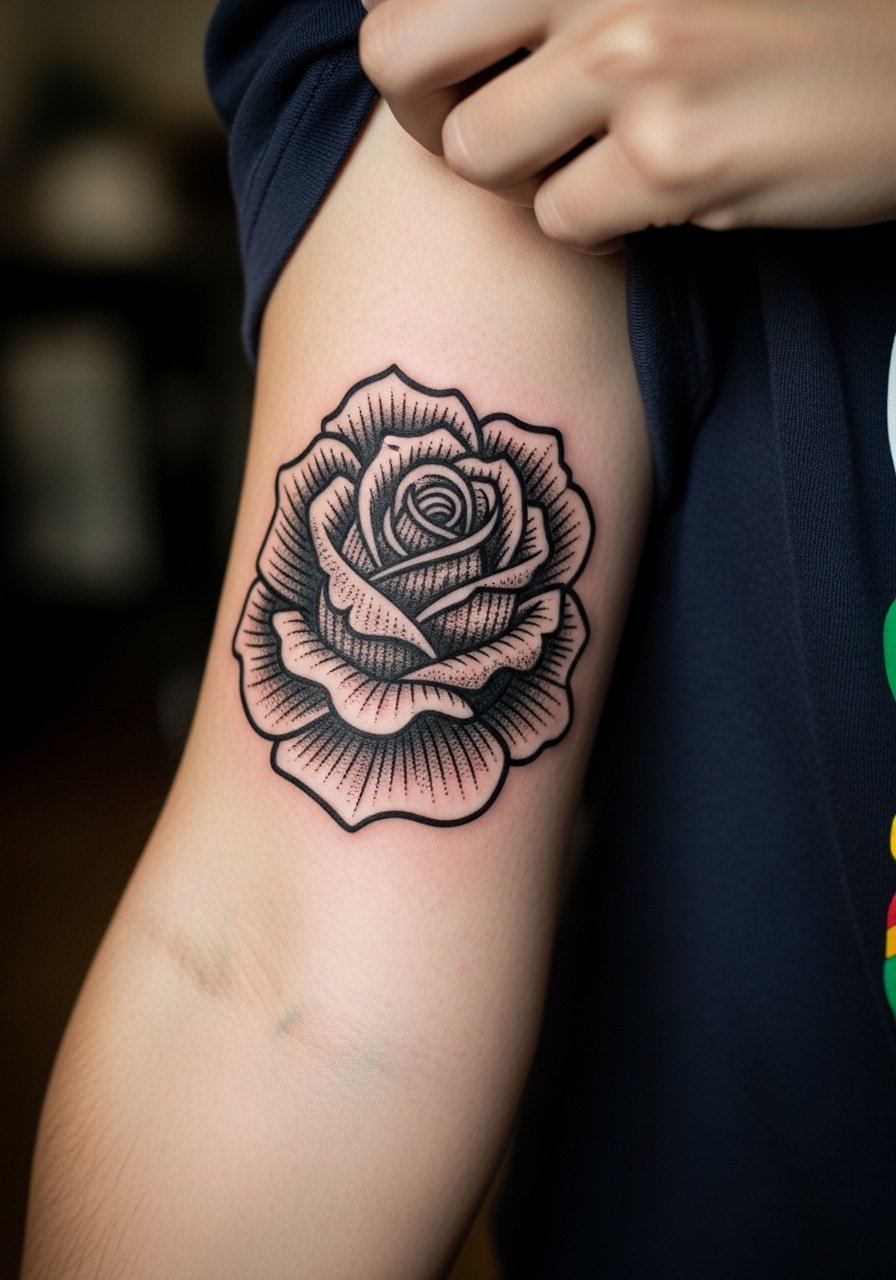
Personal observation: inner arm ink can fade faster from sun exposure, so plan for heavier saturation and occasional touch-ups. Tell your artist to avoid ultra-fine petal veins and instead use layered stippling for depth. The inner arm feels sensitive during long shading runs. For the session wear a short-sleeve shirt that you can push up without binding.
21. Blackwork Marginalia Bracelet Around the Wrist
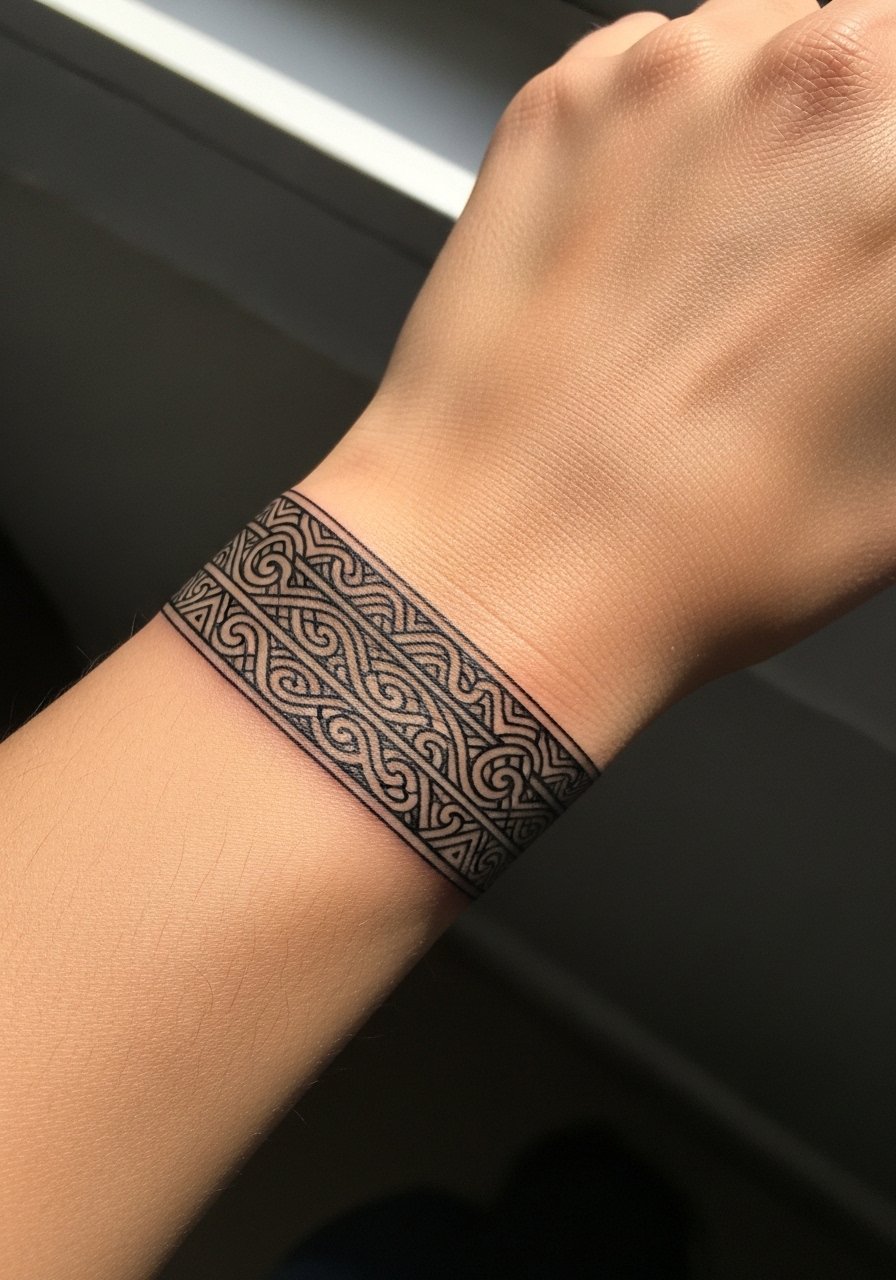
Consultation lead: wrap-around designs can shift with joint movement so plan overlaps and clear start-stop points. The biggest mistake is continuous tiny flourishes that blur where the wrist flexes. Expect a short but precise session and schedule a follow-up check after initial healing. For styling, pair this with a minimal leather cuff that sits beside the bracelet without rubbing it.
Frequently Asked Questions
Q: Will heavy blackwork woodcut pieces need frequent touch-ups?
A: It depends on placement and sun exposure. Dense blackwork holds pigment well but areas with constant friction like hands, wrists, and ankles often need touch-ups every few years. For chest, back, and thigh pieces touch-ups are less frequent unless you spend a lot of time in direct sunlight.
Q: Are medieval woodcut designs okay for workplaces with strict dress codes?
A: Placement matters. Hand and neck tattoos can still affect job prospects in some fields, while upper arm, thigh, and back pieces are easy to conceal. If career flexibility is important, choose a location you can cover or plan designs that fit within professional expectations.
Q: How should I phrase my request to an artist to get authentic woodcut texture?
A: Ask for bold contour lines, layered crosshatching, and stipple shading rather than micro-realistic tiny details. Bring references that show the level of grain and contrast you want and ask the artist to adapt negative space for long-term legibility.
Q: Do I need special clothing for session comfort depending on placement?
A: Yes. For chest and sternum pieces opt for a fitted sports bra or wide-neck shirt you can adjust. For thigh or hip work bring loose shorts. For shoulder and back pieces wear a tank top you can shift. These small choices make the session more efficient and keep fabric away from fresh ink.
Q: Will blackwork woodcut tattoos fade into a gray wash over time?
A: They can if they are placed where skin stretches or rubs a lot, or if you skip sun protection. Thick outlines and dense saturation slow that process. Plan for occasional touch-ups instead of expecting permanent perfection.
