
Bold black silhouettes and heavy saturation are not just for flash sheets. They age into graphic shapes that still read from across a room, while the most intricate feather detail often softens first. If you want a bird that reads strong at year five and year ten, blackwork choices and placement matter more than tiny feathers. Start with these specific designs and the notes you should bring to your consultation.
1. Bold Swallow on Inner Forearm
A blackwork swallow reads like a badge on the inner forearm. I recommend slightly larger negative space between wing feathers so the silhouette keeps its edge as it settles. Tell your artist you want dense saturation in the silhouette but a clear edge and no single-needle feather detail. Common mistake is shrinking the bird to wrist-size, which invites early crowding and blur by year three. Expect a mid-level pain and a single two-hour session for a medium-sized piece. For showing it off, roll up sleeves and pair the piece with a loose button-down shirt so the forearm sits in plain view without looking like you tried too hard. The session feels steady, mostly buzzing under the needle, and touch-up is often needed around year three if you live outdoors a lot.

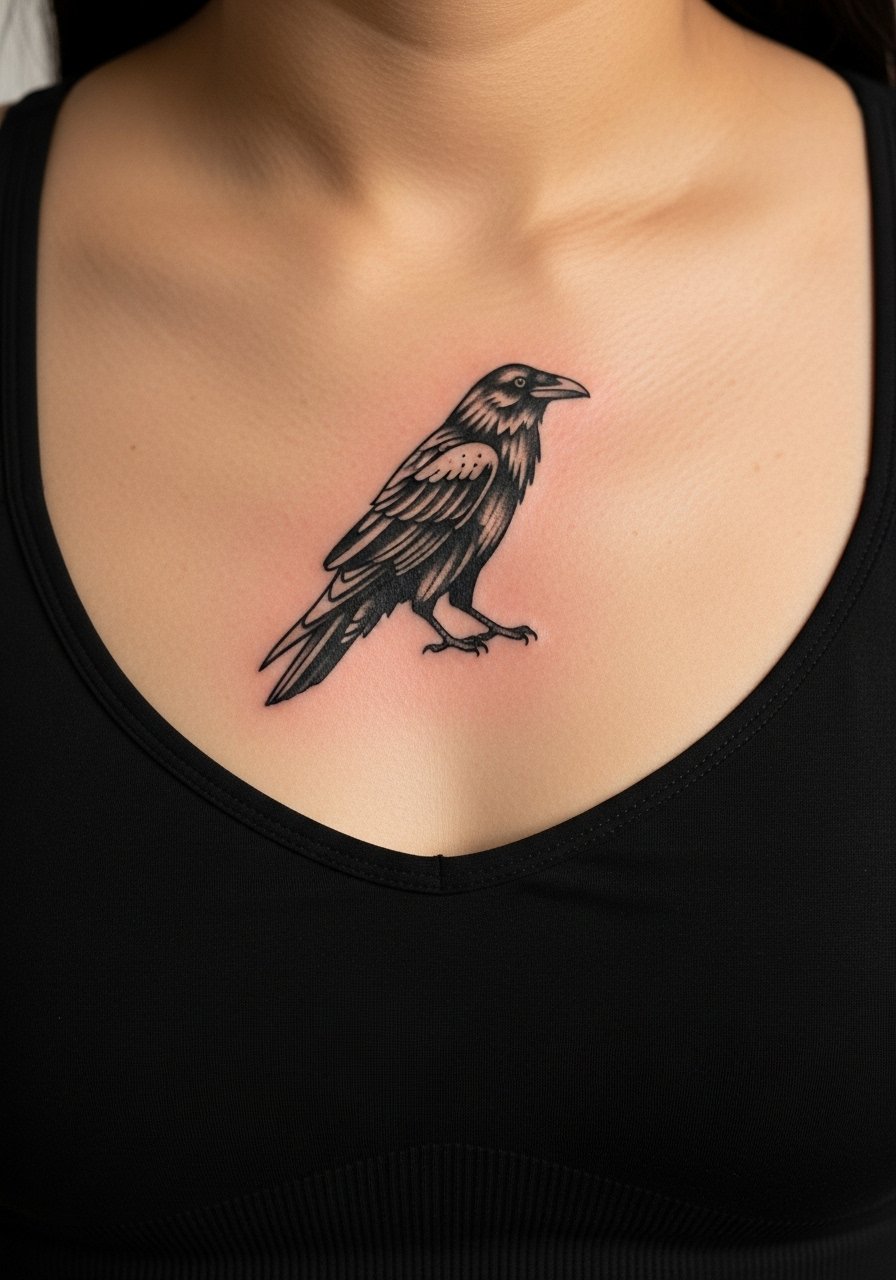
2. Raven Silhouette Across the Sternum
A broad raven silhouette across the sternum uses negative space to read bold and simple. For this area I advise a flatter, slightly wider composition so the grain of the skin and movement do not collapse thin tails into blotches over time. Pain is higher on the sternum and many artists split the work into shorter sessions to keep saturation even. One camp says sternum placements need extra spacing because the skin stretches when you breathe. The other camp argues that with deep, consistent saturation those edges will hold. Ask your artist where they land on that debate before booking. For the session, wear a fitted sports bra or bandeau so the artist only exposes the sternum zone and you stay comfortable.
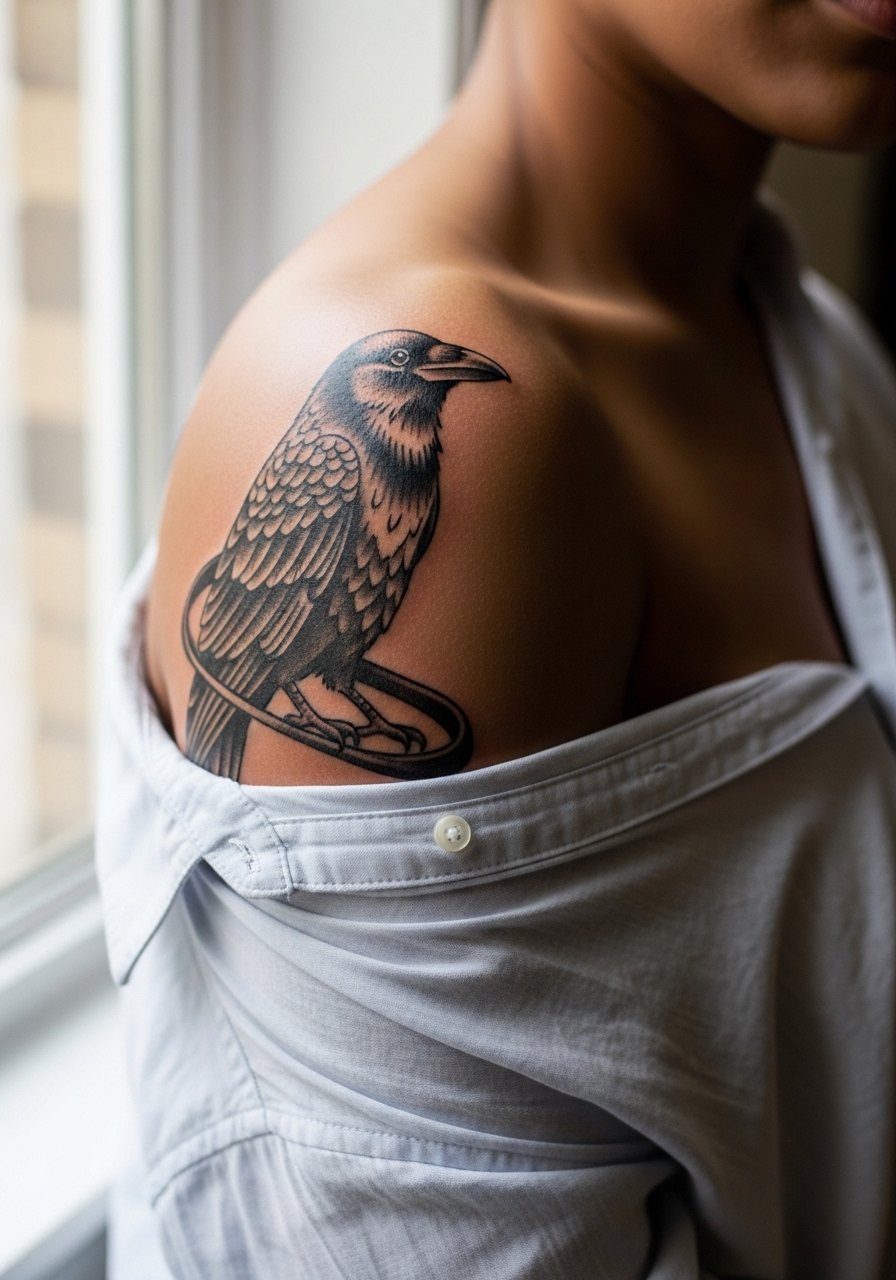
3. Graphic Crow on the Shoulder Cap
A solid black crow that wraps the shoulder cap reads like armor. Shoulder skin tolerates saturation well and the area handles touch-ups with low fuss. During consultation ask for clean, bold linework around the wing edges and stipple shading inside the body rather than tiny feather lines. Common aging issue is adding too much small detail near the shoulder seam which tends to merge after a few years. Session time is usually three to four hours depending on the wrap and any fine fill. For easy access on session day, throw on a loose button-down shirt you can pull aside. Pair the finished piece with a minimalist leather bracelet to balance the visual weight without covering the bird.
4. Stacked Swifts on the Side Ribcage
Stacked swifts that follow the rib curve use bold silhouettes to complement the torso shape. Fair warning, the ribcage is a higher pain area. The main mistake is going too small and trying to capture feather micro-detail there. One group of artists believes fine line on ribs will blur within two years because of skin movement. The other group says deep, consistent blackwork spacing keeps the shapes readable. Both points are valid. For longevity I suggest larger, simplified silhouettes with a millimeter or two of breathing room between birds. Wear a cropped athletic top to your session so the artist can expose the rib area cleanly.

5. Minimal Blackwork Hummingbird on the Collarbone
A tiny black hummingbird perched along the collarbone can be delicate and masculine when done with confident saturation. Keep the composition horizontal and slightly larger than a coin for long-term readability. Tell the artist you want a crisp outer edge and a filled belly rather than feather micro-lines that will soften. Common mistake is placing it too close to the sternum where contour distorts the silhouette when you move. Session time for this placement is short and pain is moderate. For evening wear that frames the collarbone try a thin chain pendant necklace. During the session wear a wide-neck shirt you can pull to the side for clear access.

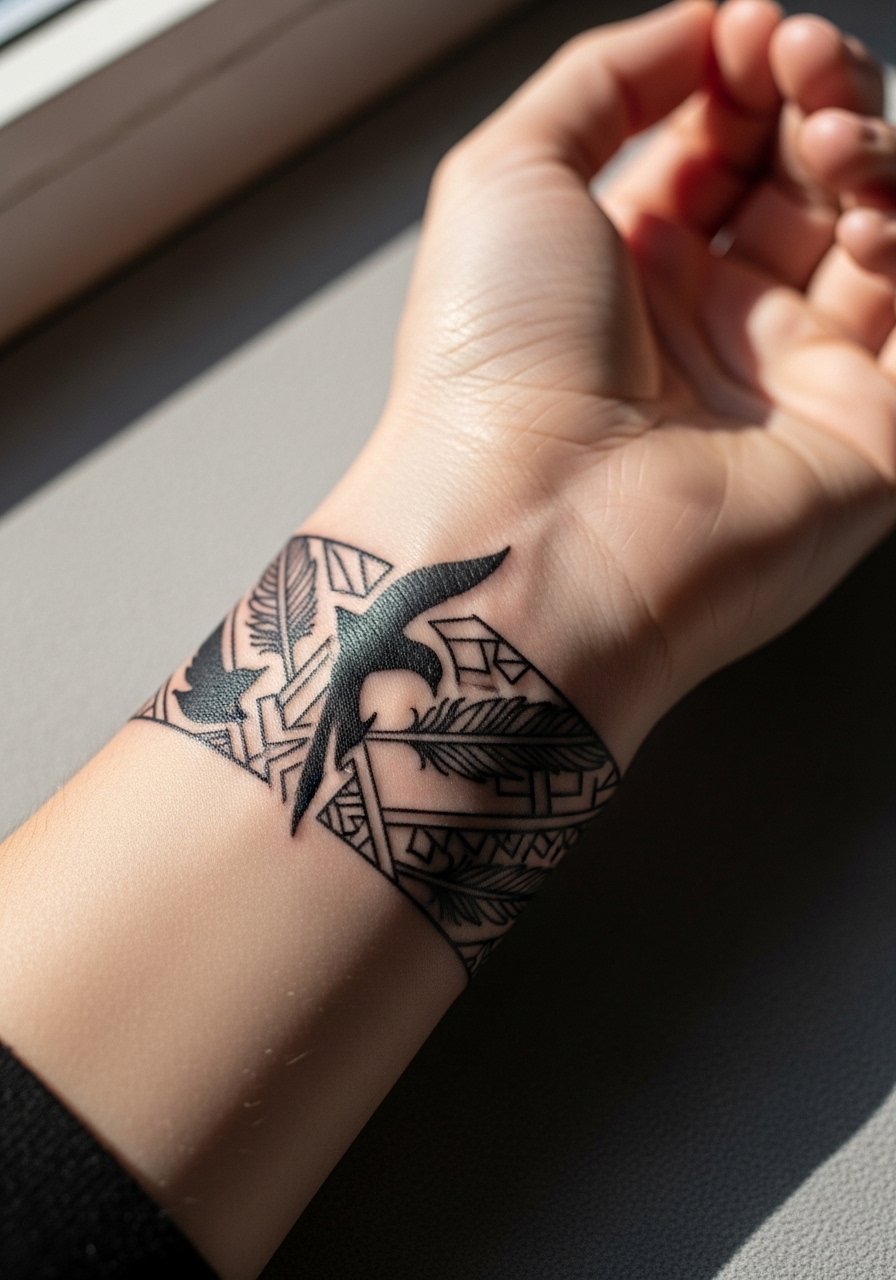
6. Solid Blackbird Wrist Band
A continuous blackwork bird band that circles the wrist reads bold without needing intense detail. The wrist is a high-wear zone from washing and bracelets so thicker edges and strong saturation make this style last. A common error is single-needle border lines that disappear by year two. Expect a short, sharp session and plan for a touch-up before year three if you use your hands for work. For showing this off, stack it with a minimalist leather bracelet or a simple metal watch that keeps the area visible without crowding the band. The wrist tolerates saturation but needs protection from friction in the first week.
Pre-Session Essentials
The forearm, collarbone, and wrist pieces above ask for different prep on session day, and a few targeted items smooth the process for both you and the artist.
-
Stencil transfer paper kit. Lets you preview placement on skin before the needle work, handy for the swallow and hummingbird pieces above.
-
Topical numbing cream. Applied under a plastic wrap 30 to 45 minutes before the session takes the edge off sensitive ribs and sternum work.
-
Thin protective film roll. Useful for wrist bands and finger-area pieces that face constant friction in the first week.
-
Fragrance-free body wash. Cleans the area without irritating fresh linework on forearms and shoulders.
-
Aquaphor healing ointment. A thin layer in the initial days helps hold moisture for solid blackwork without clogging the skin.
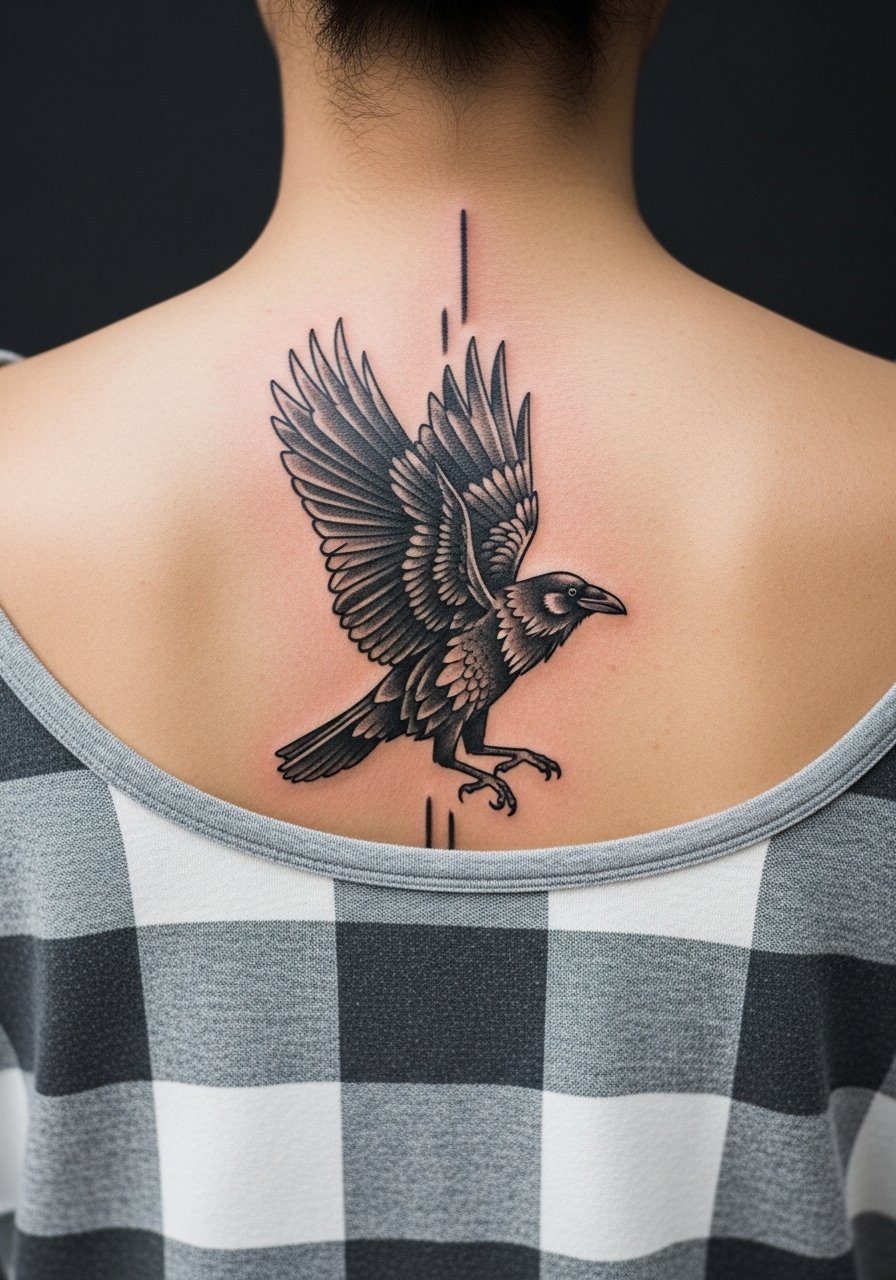
7. Single-Line Raven Along the Spine
A vertical raven in bold black down the spine reads architectural and strong when kept simple. Spinal work moves a lot so I advise against tiny feather detail near the vertebrae. Ask for confident edge saturation and a subtle inner stipple to break flatness without tiny lines. Sessions are longer and the pain varies by proximity to the bone. The biggest mistake is stacking too many small elements in the same vertical column which makes touch-ups a chore later on. For showing it off on warm days try an open-back shirt so the vertical line can be seen without exposing too much skin. This placement takes well to bold black because the area is rarely rubbed by clothing.
8. Geometric Kite Bird on the Calf
A geometric black bird on the calf can be both graphic and athletic. Calf skin accepts saturation well and holds contrast for longer than inner-arm placements. During consultation show examples of the exact geometric balance you want and ask for spacing in the wing facets rather than tiny parallel lines. The session is medium in length and pain is moderate. Common aging issue is stacking detailed geometry too tightly so facets smudge together. Pair the finished calf piece with rolled-up pants or shorts when you want to display it, and wear loose drawstring linen pants to the session so the area is easy to roll up and stay comfortable.

9. Bold Mockingbird Over the Shoulder Blade
A mockingly simple blackbird across the shoulder blade sits well under shirts and shows when you want it to. Keep the silhouette bold and avoid interior feather micro-lines which lose clarity when the scapula moves. Tell your artist you want dense black fill with a crisp border and only subtle internal shading. The area tolerates touch-ups easily and is lower on the pain scale than ribs. For session day wear a loose tank top you can pull aside to expose the blade. At six months the edge might soften a touch and a simple touch-up can restore the initial contrast.

10. Traditional Blackwork Sparrow on the Hand
Hand tattoos are a separate conversation because of constant use and sunlight exposure. A solid black sparrow on the back of the hand looks bold early and needs a thicker border to survive daily wear. One camp says hand pieces age too fast to be worth it for most people. The other camp points to careful placement and honest touch-up expectations. Both are right. If you choose a hand bird, request heavier edge saturation and plan an annual check and possible touch-up. During session consider that hands sting more. For showing the piece while keeping it visible without overdoing it, pair with a minimalist ring set. Also keep in mind some workplaces still frown on visible hand tattoos.

11. Winged Skull in Chest Blackwork Panel
A chest panel that pairs a winged skull silhouette with bold blackwork creates a heavy, masculine composition. Upper chest skin takes saturation well but choose spacing so heavy black areas do not fuse into a single dark mass over time. A common mistake is compressing wings too close to the center, which makes breathing and movement distort the image. Ask your artist to test the stencil in different torso positions so you can see how the piece moves with breath and flex. Session time can be long. For the appointment wear a wide-neck shirt you can pull down slightly so only the upper chest is exposed.

12. Abstract Flock Across the Thigh
An abstract flock of black birds that cascades down the thigh reads bold and modern when the shapes are simplified. Thighs are forgiving for saturation and large shapes age predictably there. One frequent error is making the negative spaces too thin between birds which invites merging if you gain or lose weight. On session day wear loose shorts you can pull up and a pair of loose drawstring linen pants afterward to avoid friction. The session usually runs long but is physically easier than rib work. Thigh graphite-style placement is a smart choice for a piece you want to keep private most of the time.

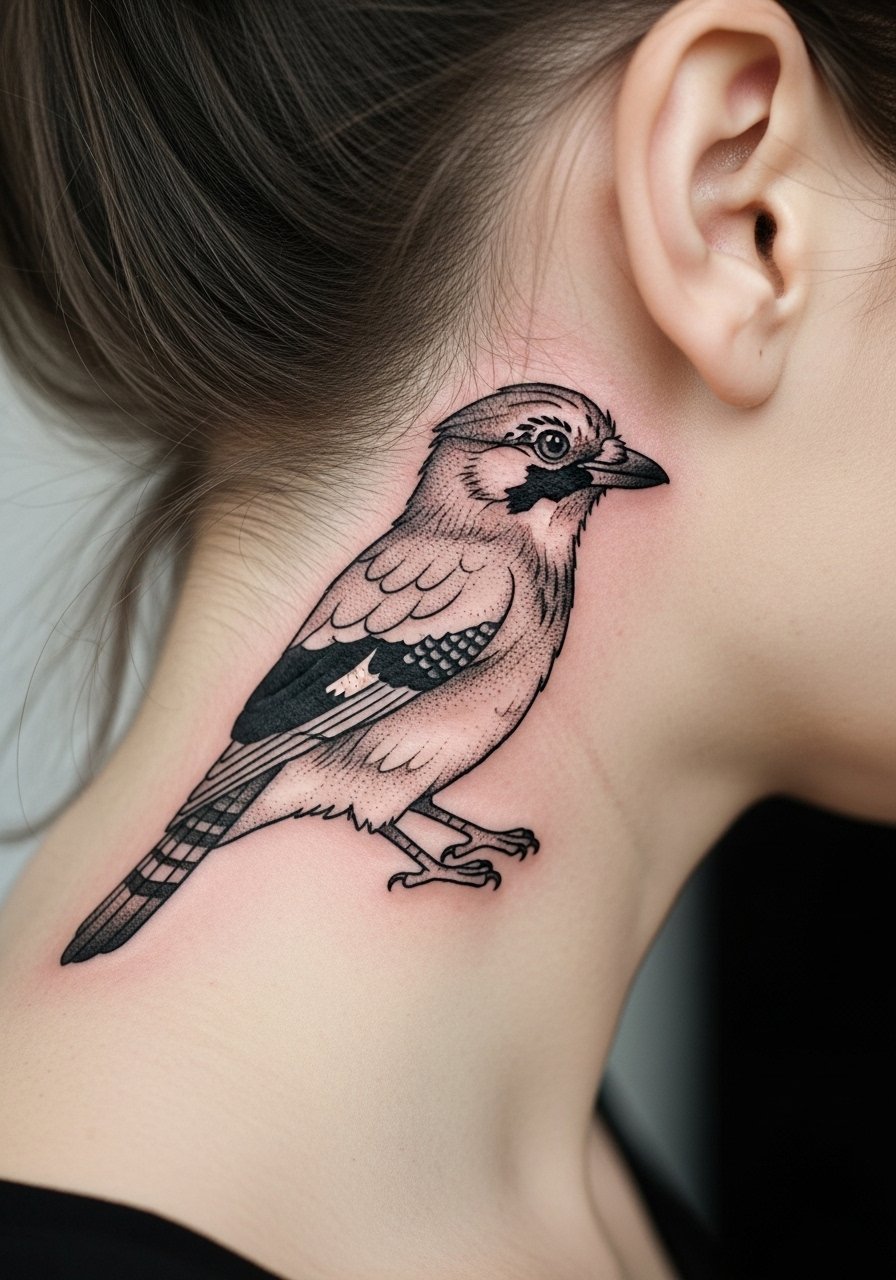
13. Single-Line Black Jay Behind the Ear Area
A small black jay tucked behind the ear can look discreet and crisp if handled correctly. For safety and privacy the prompt calls for skin behind the ear below the hairline on the neck. Size and placement are crucial because the skin there is thin and the area moves with hair and jaw motion. The common mistake is treating it like a tiny wrist tattoo and requesting single-needle detail. If you want this spot, ask for slightly bolder edges and schedule a consult to check stencil adherence. Wear hair up on session day so the artist has clear access. Note that small tattoos behind the ear require a delicate hand and a touch-up plan.
14. Blackwork Falcon Sleeve Accent
An accent falcon that anchors a sleeve in heavy blackwork ties well with existing black elements. Placement along the outer bicep or upper forearm helps the bird maintain structure when the arm moves. When working with sleeves avoid overlapping the falcon's border with other tight linework. Ask for clear negative margins around the bird so it can be retouched separately if needed. Sessions vary, this could be part of a multi-session sleeve plan. For the session wear a loose button-down shirt you can slide the sleeve up easily. Over time the heavy black will likely need less frequent touch-ups than fine detail would.

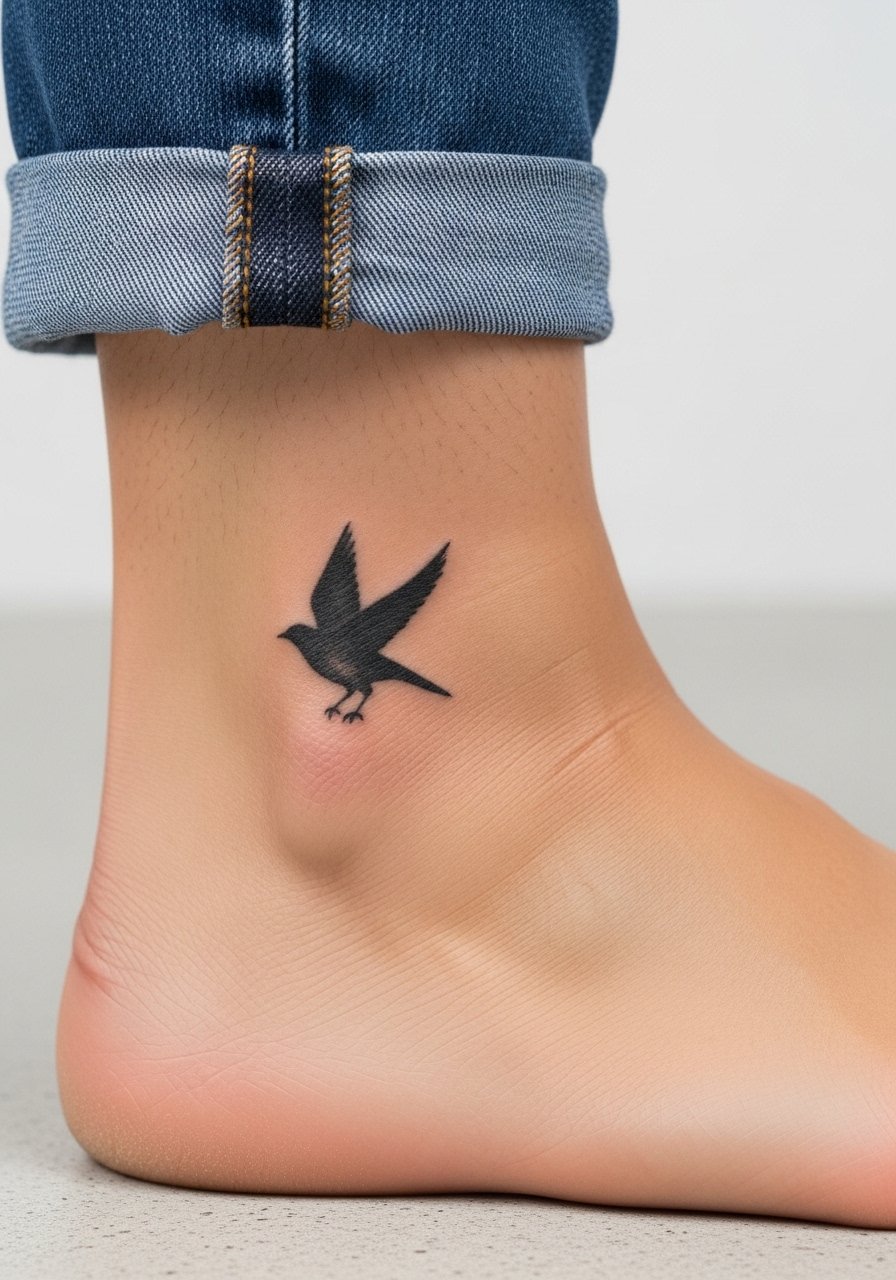
15. Minimalist Blackbird on the Ankle
A compact blackbird on the ankle is a low-visibility, high-impact choice. Ankle skin sees a lot of friction from socks and shoes so thicker borders and a clean silhouette are key. The common error is adding feet or tiny claws that get lost quickly. Plan for a quick touch-up around year two if you are active outdoors. For showing it off wear sandals or roll up jeans, and on session day choose jeans to roll up or loose shorts so the artist can work without pressure. The session is short and the pain is low to moderate.
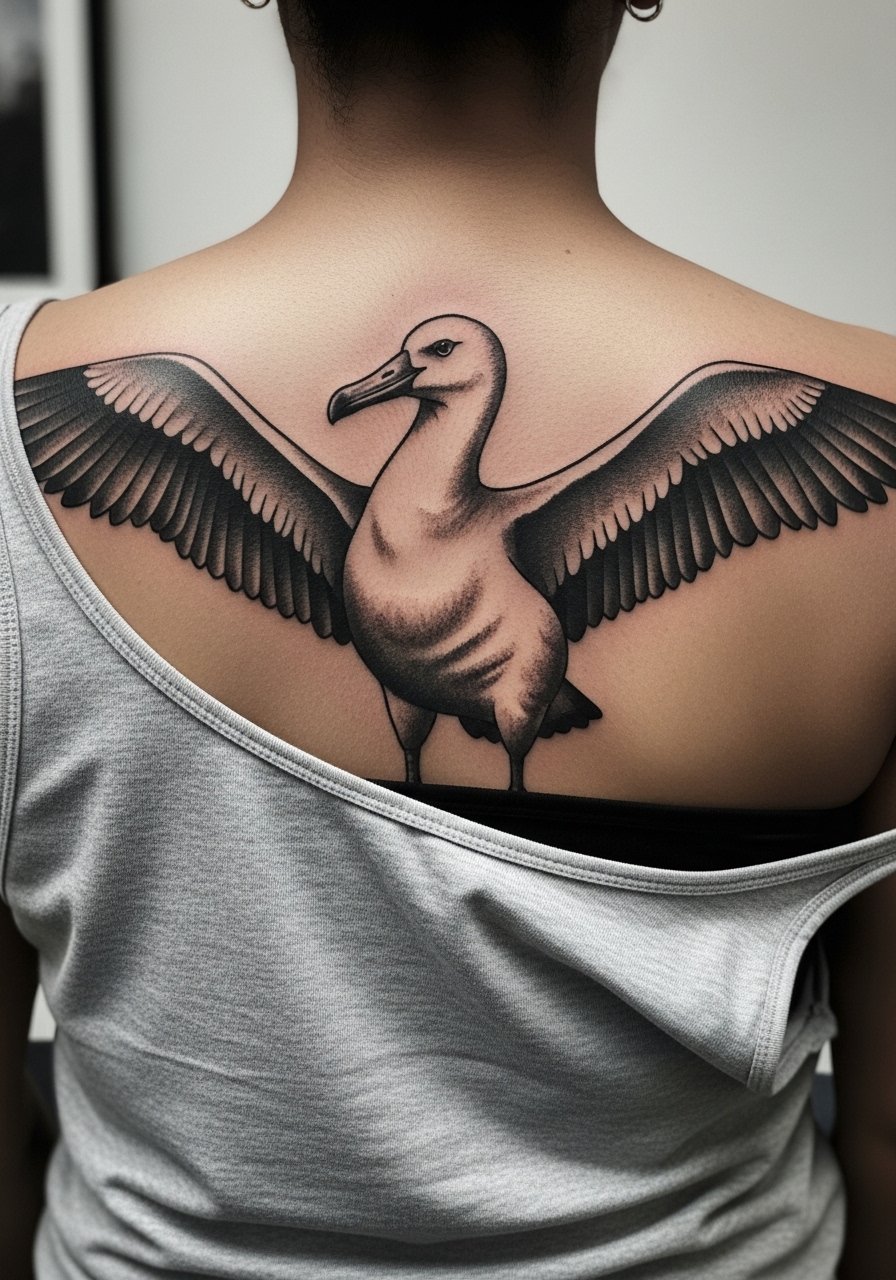
16. Noir Albatross Across the Upper Back
A broad black albatross spread across the upper back makes a dramatic statement while staying inside the shirt line. Upper back skin takes saturation well and the area is sheltered from daily sun, which helps longevity. Ask for balanced negative space under each wing panel so the large black areas do not merge with mid-back shading over time. A common mistake is centering the bird too low which makes it look disconnected from the shoulders. For the session wear a button-down that you can pull aside or a tank top to expose only the upper back area. Touch-ups are straightforward because the skin is stable there.
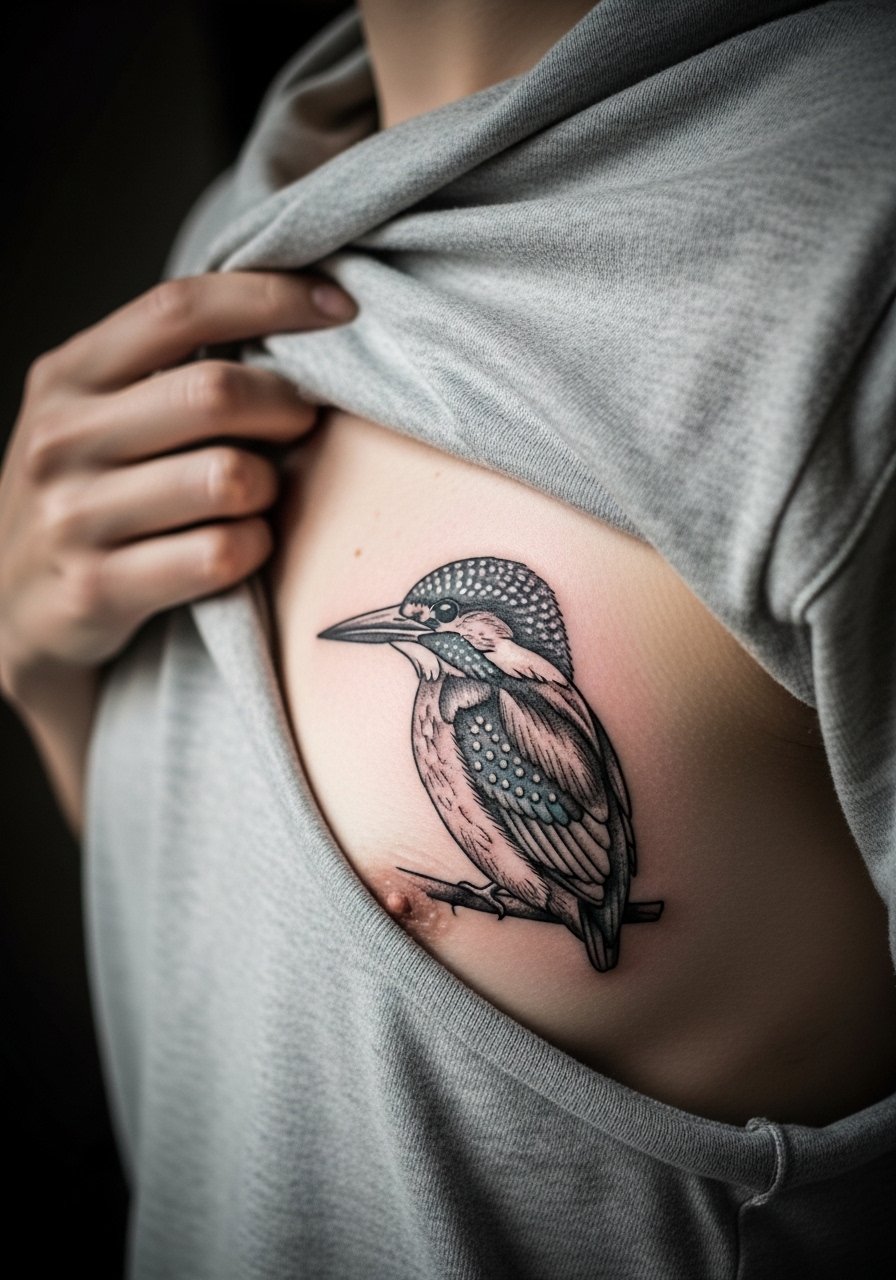
17. Blackwork Kingfisher on the Chest Side
A kingfisher placed on the side of the chest combines a strong silhouette with a curved body form that follows the rib line. This placement asks for larger simple blocks of black and a clean outer edge to resist blur from movement. The mistake many make is adding too much fine internal texture which the skin will not keep over years. For the session wear a wide-neck shirt pulled aside so only the chest side is revealed, and be prepared for moderate pain. If you work in a professional environment that watches visibility, consider how the piece sits under standard shirts. A touch-up at year three is typical for chest-side saturation if you live in sun-exposed climates.
Frequently Asked Questions
Q: Will bold blackwork birds fade faster on hands and wrists than on the shoulder or back?
A: Hands and wrists face more washing, sunlight, and friction so expect faster edge softening there. Shoulders and backs are sheltered and keep contrast longer. Plan for more frequent touch-ups on hand and wrist pieces and thicker edges at the outset.
Q: How should I describe spacing and edge weight to my artist for a ribcage bird?
A: Ask for simplified silhouettes with a clear millimeter of negative space between elements and a defined border rather than feather micro-detail. Mention you want the artist to preview the stencil in breathing positions so you can see movement. That helps avoid the common problem of compressed design that blurs over time.
Q: Are half-sleeve blackwork birds compatible with existing realistic tattoos?
A: They can be if the artist blends contrast and keeps borders clean so the blackwork reads as its own language next to realism. Discuss whether you want the bird to sit on top of existing darks or to be separated by a buffer of negative space. Most experienced artists will propose a plan that keeps touch-ups manageable.
Q: Can I get a blackwork bird tattoo if my job has conservative dress rules?
A: Yes, but placement matters. Chest, upper back, and thigh pieces are easy to hide under typical shirts and pants. Wrist and hand pieces are harder to conceal. Think about visibility during the consultation and choose a placement that matches how often you want the design seen.
Q: How long should I expect between touch-ups for bold black silhouettes?
A: It depends on placement and sun exposure. Sheltered areas like the upper back might need touch-ups every five to seven years. High-wear spots like hands and wrists often need attention every one to three years. Your artist can give a placement-specific estimate after seeing your skin and lifestyle.
