
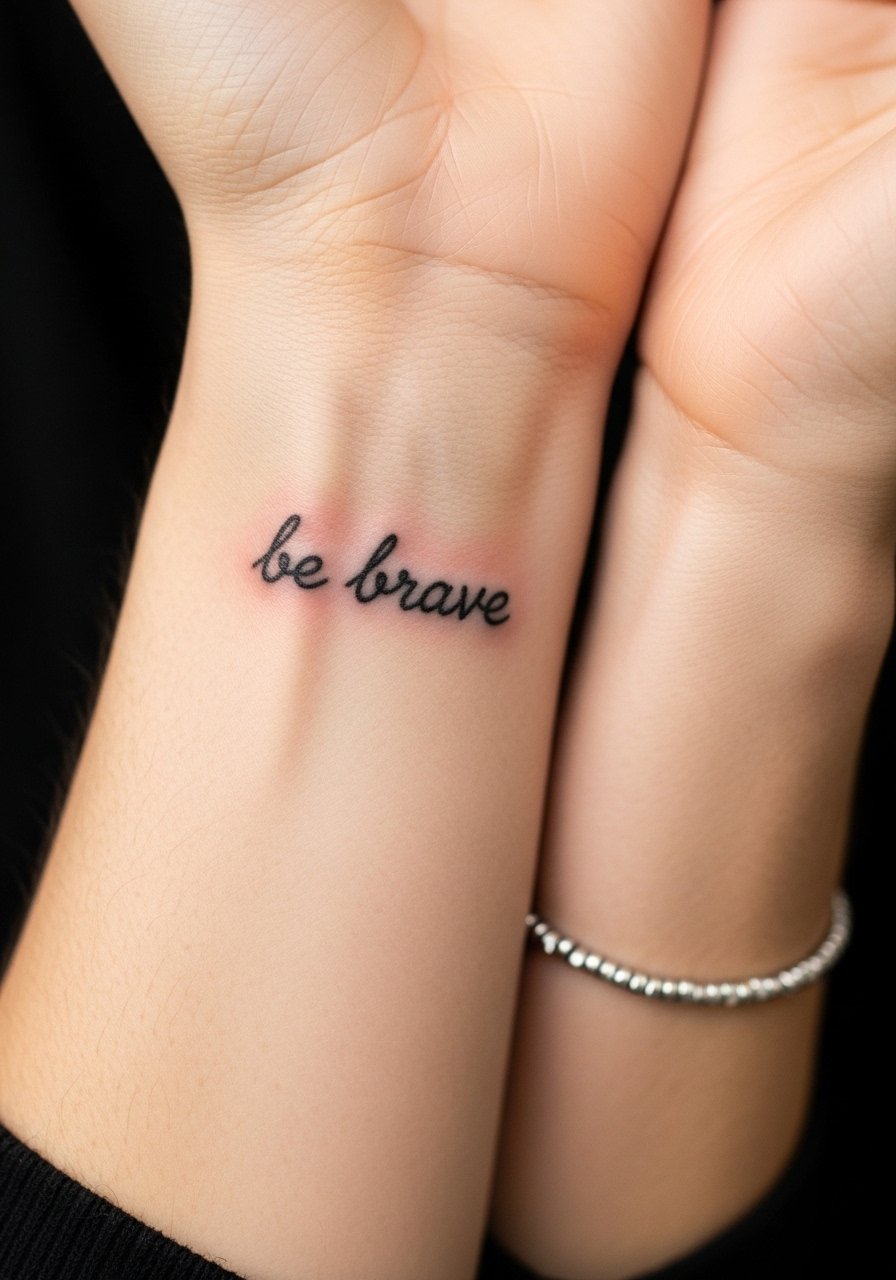
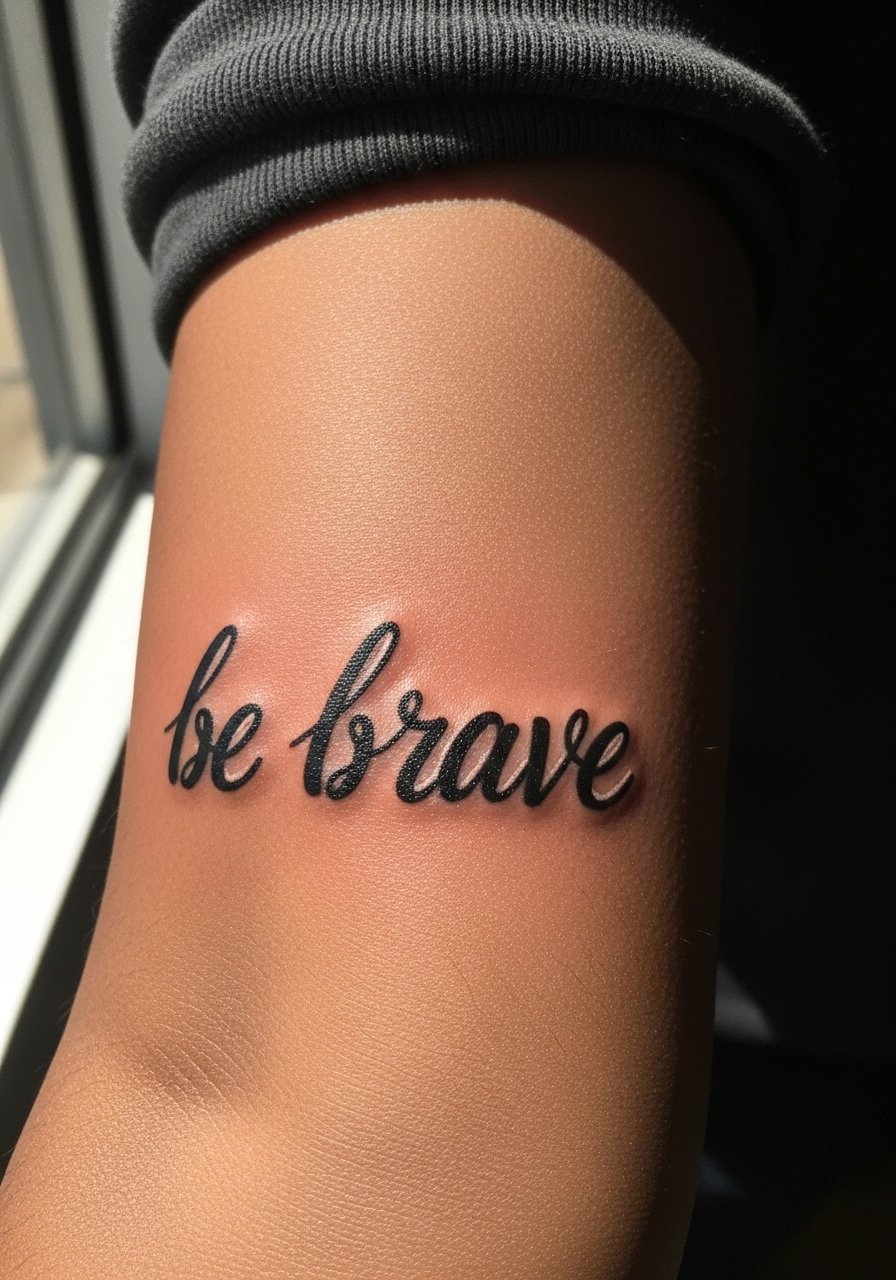
Fine line "be brave" scripts are everywhere on feeds, but the ones that still look sharp after a few years tend to start bolder or sit somewhere the sun and friction can't bully. I’ve sat in consultations at five shops across Brooklyn and watched artists nudge clients toward slightly heavier line weight or a collarbone placement for longer life. Start with a wrist-friendly approach that balances the look you want with how ink actually ages, then move through designs that hold up.
1. Fine Line "Be Brave" Script on Inner Wrist
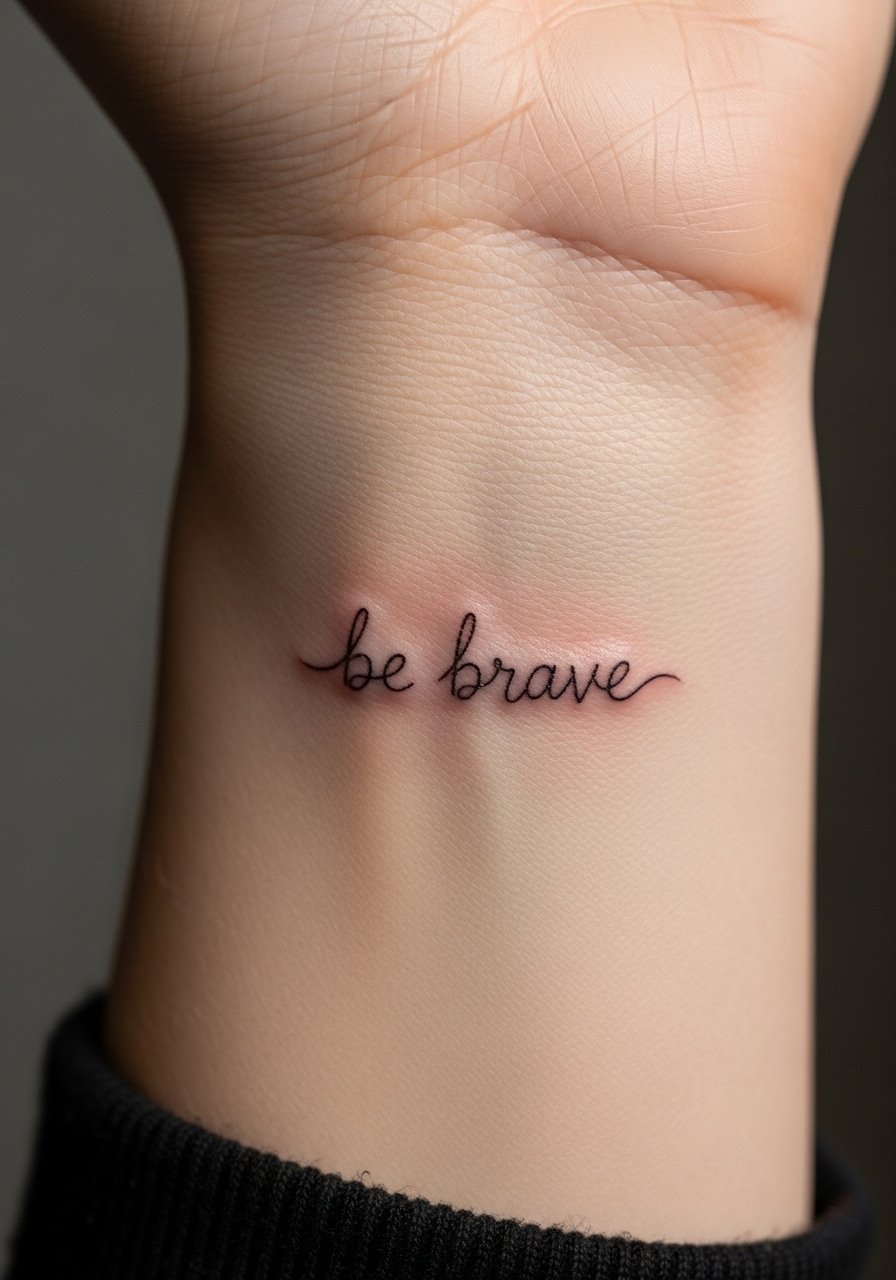
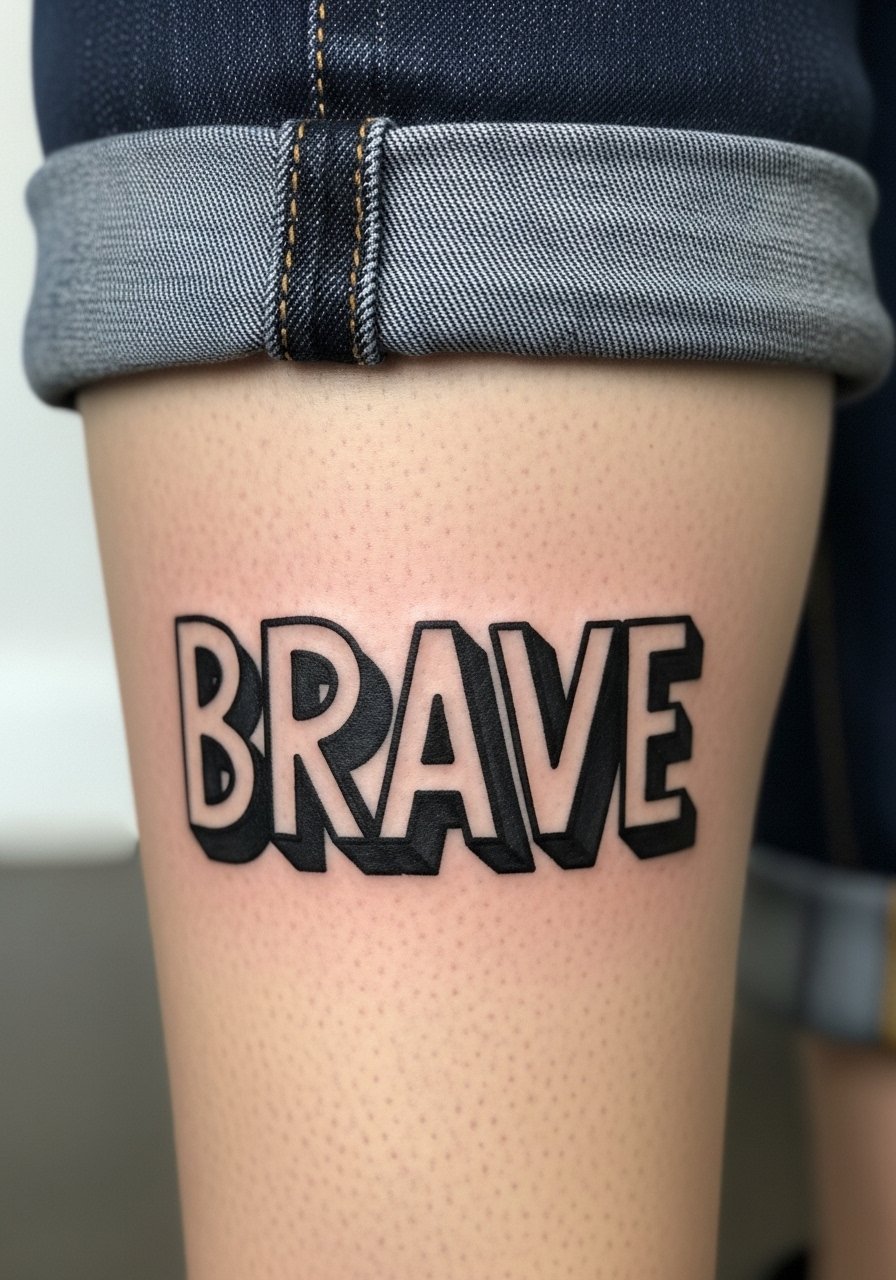
The inner wrist is the go-to for a daily mantra and the session is short and social. Expect low pain, a 30-45 minute appointment for a 1- to 2-inch script, and a likely touch-up window around year two if you stay with single-needle weight. I've seen the biggest mistake is asking for a hairline one-needle script and then wondering why it blurred fast. Tell your artist you want slightly heavier line weight than the reference photo and ask to test a thin-but-solid stroke on similar skin. For showing it off, pair the piece with a rolled cuff chambray shirt and a thin silver chain bracelet. For the session wear bring a sleeveless linen tank so the artist has full access.
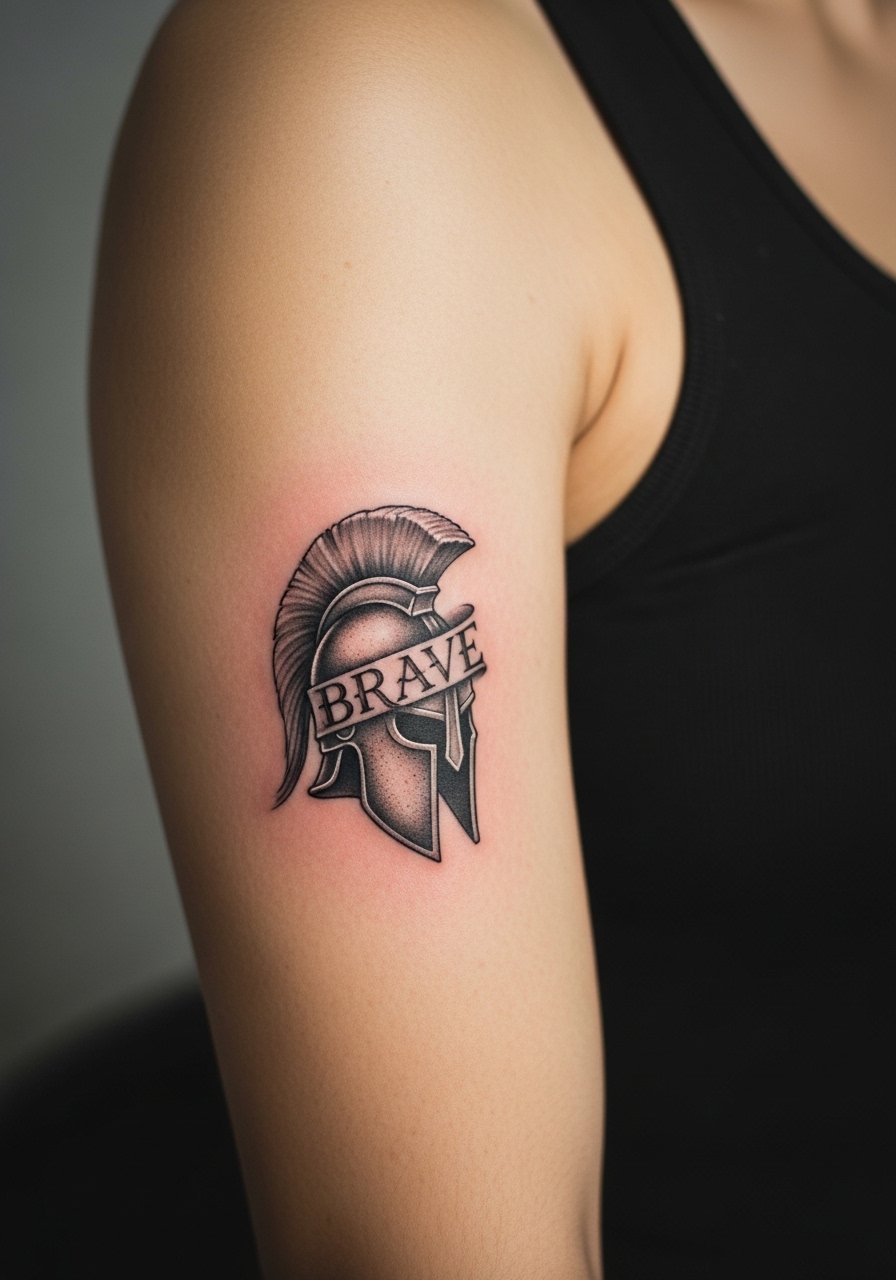
2. Minimalist Lion Outline with "Brave" Banner on Outer Forearm
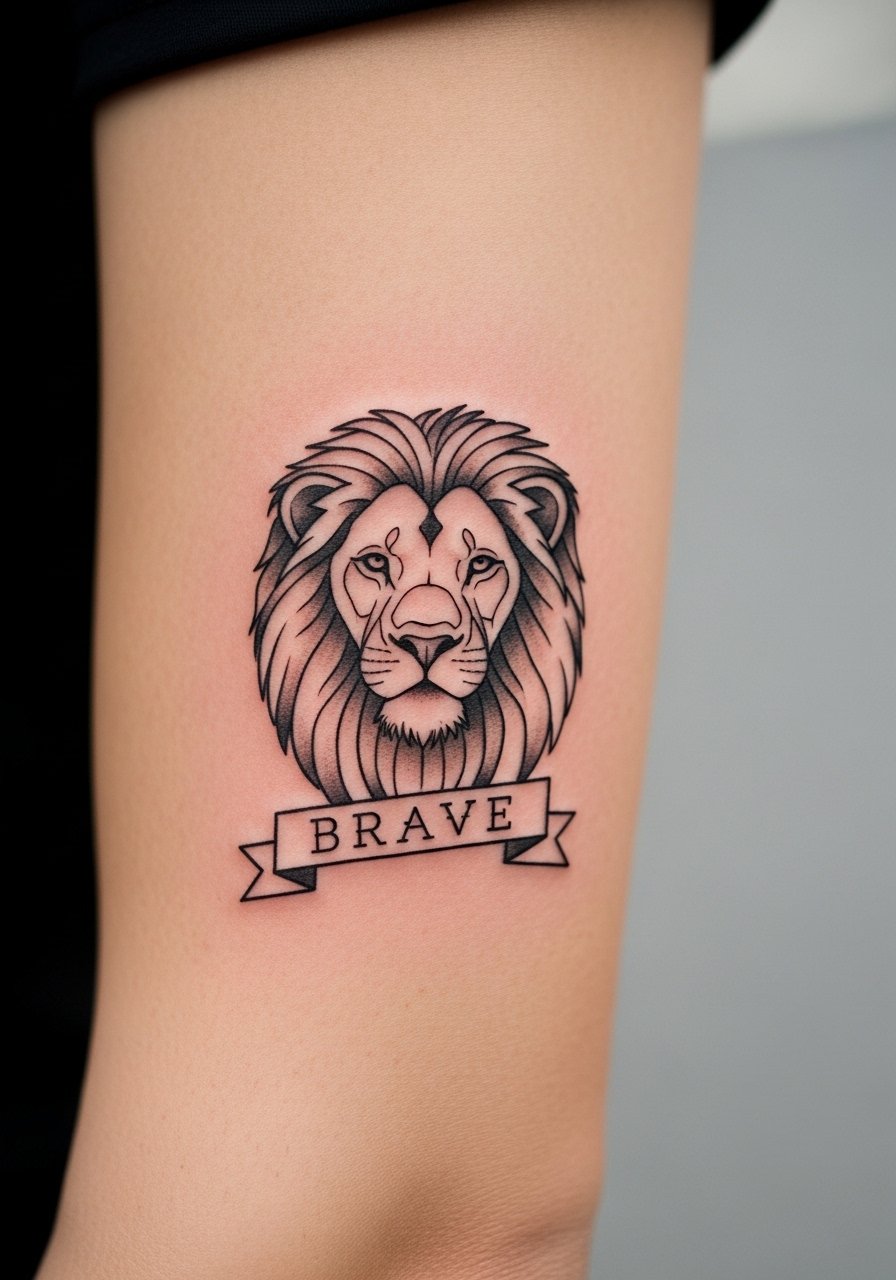
The outer forearm is forgiving when the body changes and it photographs well. This minimalist lion works for people who want strength imagery without heavy saturation. Ask your artist to keep the lion 3 inches tall and use light gray shading to avoid a flat silhouette. A common misstep is cramming too much detail into a small outline, which ages into a muddy shape. Expect moderate session discomfort and a single session for a clean minimalist piece. Roll sleeves to show it off with a fitted olive crewneck tee men or add an edge with a leather cuff bracelet. Wear a loose button up shirt to the appointment so the artist can work freely.
3. Watercolor Feather Script on Collarbone
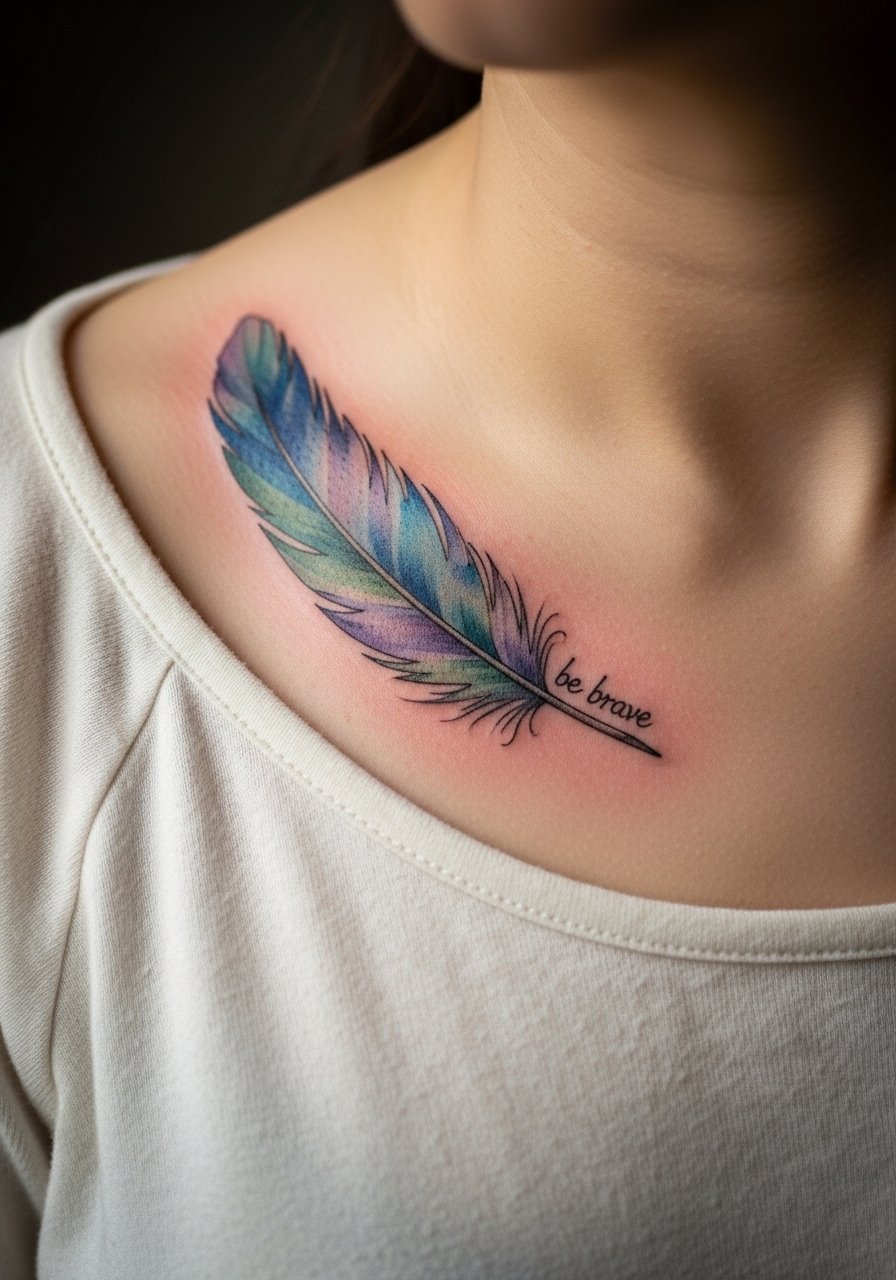
Collarbone pieces are flattering and photograph well in off-shoulder outfits, though the skin there shifts with posture. The watercolor feather blends blues and soft gray, so tell your artist you want saturated pigment near the quill and gradual feathering outward. The biggest aging issue for watercolor is low saturation too close to the surface, which fades into a bruise-like haze in a year. This design usually takes a single session if you keep the palette tight. For showing it off pick an off shoulder sweater women or a delicate pendant necklace. Bring a strapless bralette to the appointment so straps don’t interfere.
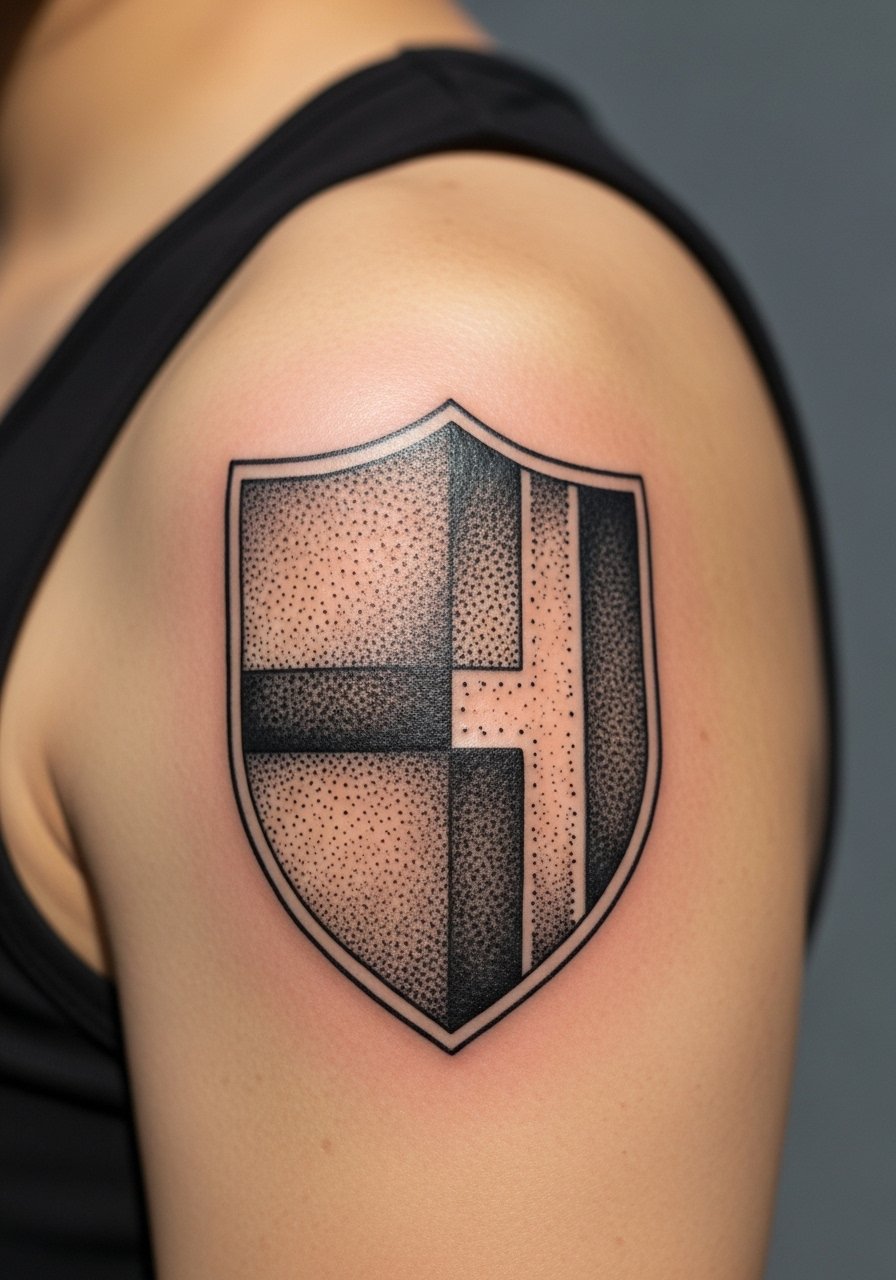
4. Blackwork Geometric Shield with "Brave Heart" on Shoulder Blade
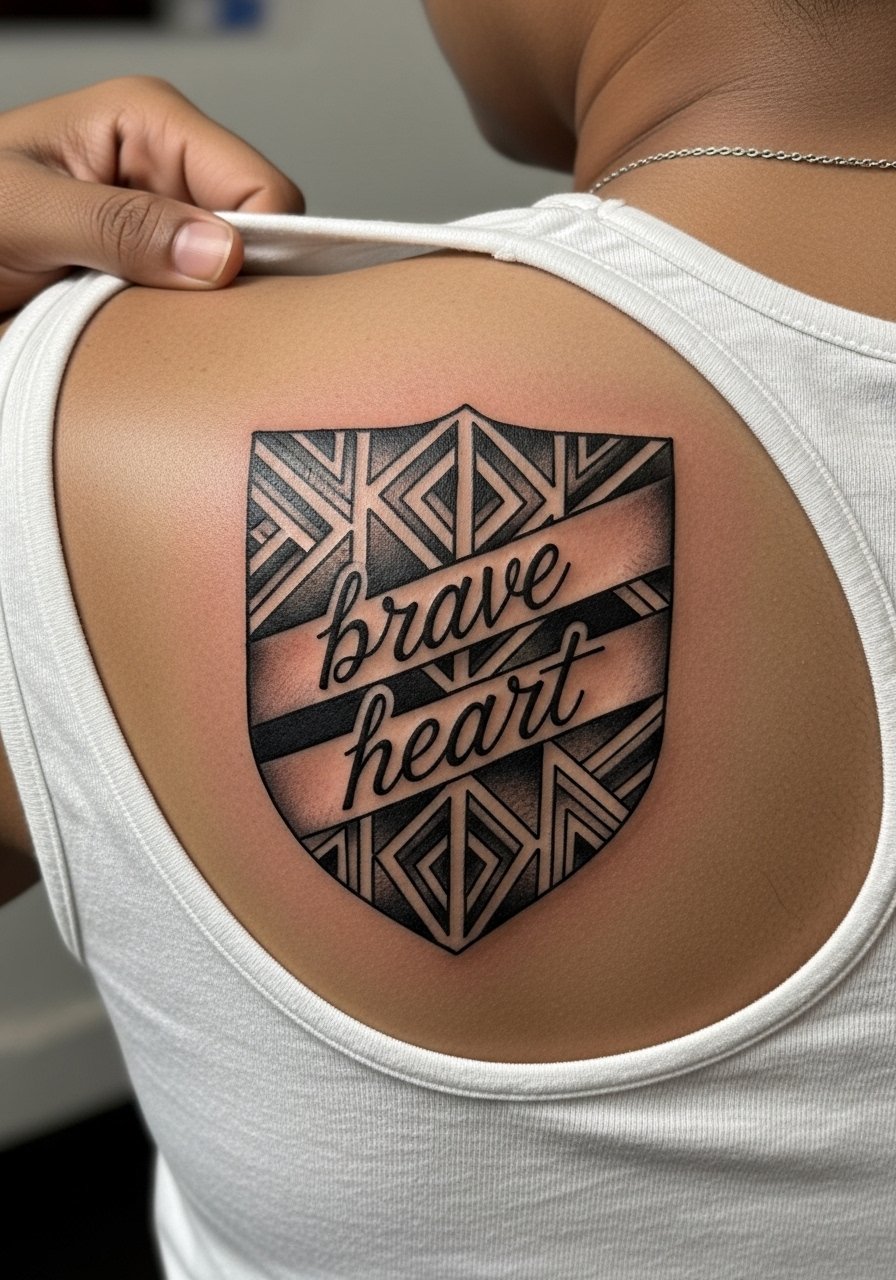
Bold blackwork shields photograph clean and hold up on darker skin tones because saturation reads more consistently. For the shoulder blade request solid fills and clear negative space so the pattern reads at a distance. A typical mistake is over-detailing dense geometry at small scale, which leads to lines merging over time. Plan for a one- to two-hour session depending on size and expect solid longevity with minimal touch-ups. For evenings pair it with a sleeveless muscle tank and a black choker necklace to draw the eye upward. Wear an open back tank top to the studio so the artist can access the blade cleanly.
5. Ignorant Style Stacked "BRAVE" on Calf
If you want a raw, punk edge pick ignorant style stacked lettering. The calf gives you room for four-inch tall letters and tolerates bold outline work that ages into a confident statement. The session is typically quick and painful in short bursts because the calf can be sensitive near the bone. Avoid asking for ultra-tight letter spacing or tiny serifs since they blur unevenly after healing. Style the look with cuffed joggers and summer shorts. Pair it with cuffed joggers men or khaki slim joggers and an ankle crew socks for contrast. Wear loose shorts to the appointment so the artist can prop the leg without tight fabric.
6. Neo-Traditional Roaring Bear with Subtle "be brave" on Upper Arm

Neo-traditional animals read as artistic statements and age well if the color saturation is dense and the outlines are confident. An upper-arm bear at 4 to 6 inches gives the artist room for facial detail and color contrast. Tell your artist you want saturated pigments and clean black outlines to avoid early washout. One common error is asking for too fine details in the fur when placing the piece near joints where movement softens definition over time. Expect two sessions if you want layered color. For session comfort wear a loose short-sleeve button-up so the artist can roll the sleeve. For show-off looks, roll to the elbow with a fitted tee.
Pre-Session Essentials
The wrist, collarbone, and upper-arm pieces above ask for different prep. These small-access placements benefit from a few targeted items that smooth the day and the first week.
-
Lush Oat Tattoo Balm. Reddit users praise this over heavier ointments for winter wrist pieces because it moisturizes without a greasy film that traps debris.
-
Australian Gold After-Tat Balm. Alcohol-free formula that reviewers note keeps blackwork crisp on shoulder and upper-arm areas without stinging.
-
InkSafe Healing Spray. Spray-on option for micro-realism zones that lets you refresh without rubbing delicate linework.
-
Nip + Fab Tattoo Fix Serum. Used by some as a pre-touch-up prep to support pigment before re-inking finer scripts.
-
Hustle Butter. A thinner alternative to heavier ointments for the first few days that many artists and clients prefer to avoid pore clogging on fine line work.
7. Micro-Realism Warrior Helmet "Brave" on Inner Bicep
Micro-realism on the inner bicep is a collector move and it rewards patience. Expect higher session time and more careful aftercare because the inner arm moves and stretches with daily motion. Tell the artist you want crisp contrast and ask to see healed examples on the inner bicep for similar skin tones. A common mistake is forcing hyper-detail into a tiny two-inch piece; the result can look muddy after a year. Plan for a two- to three-session build if you want layered depth. Artists disagree on whether protective film speeds recovery or traps moisture. One camp favors protective film for cleanliness and faster recovery. The other camp prefers dry healing for natural scab formation. Ask your artist which approach they use and why before you book.
8. Ornamental Mandala with Integrated "be brave" on Spine
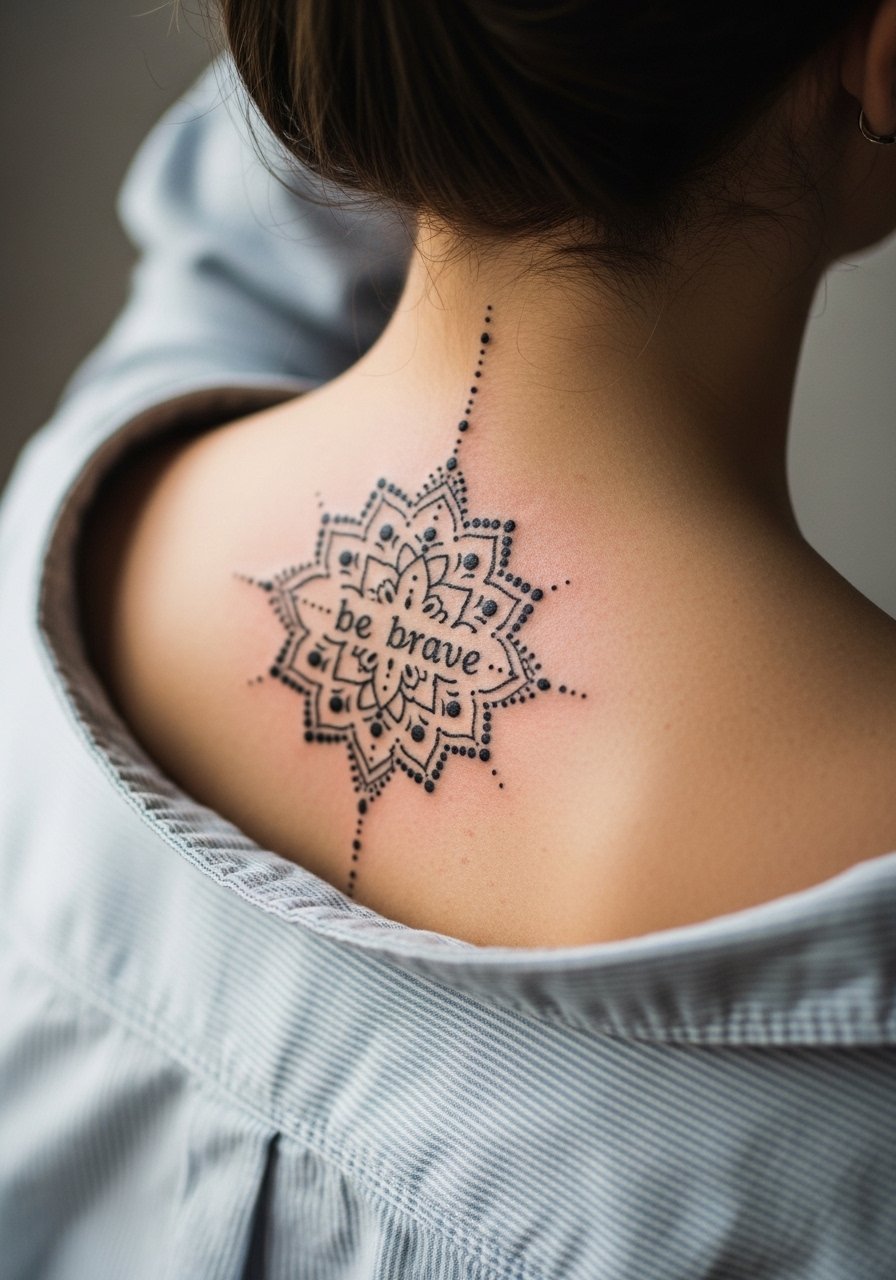
Spine mandalas take time but they produce a meditative silhouette that scales with size. For a five-inch design request dot work spacing that gives the pattern breathing room so the dots do not merge over time. The typical error is compressing too many concentric rings in a small area, which leads to loss of negative space at year two. Expect two sessions and mention any past back scarring in consults since texture changes the way dot work settles. For session wear bring a button-down to lift aside without stretching skin. Many people treat this as a keepsake piece that can take more time and touch-ups over the first year.
9. Fine Line Phoenix Rising "brave soul" on Ribcage
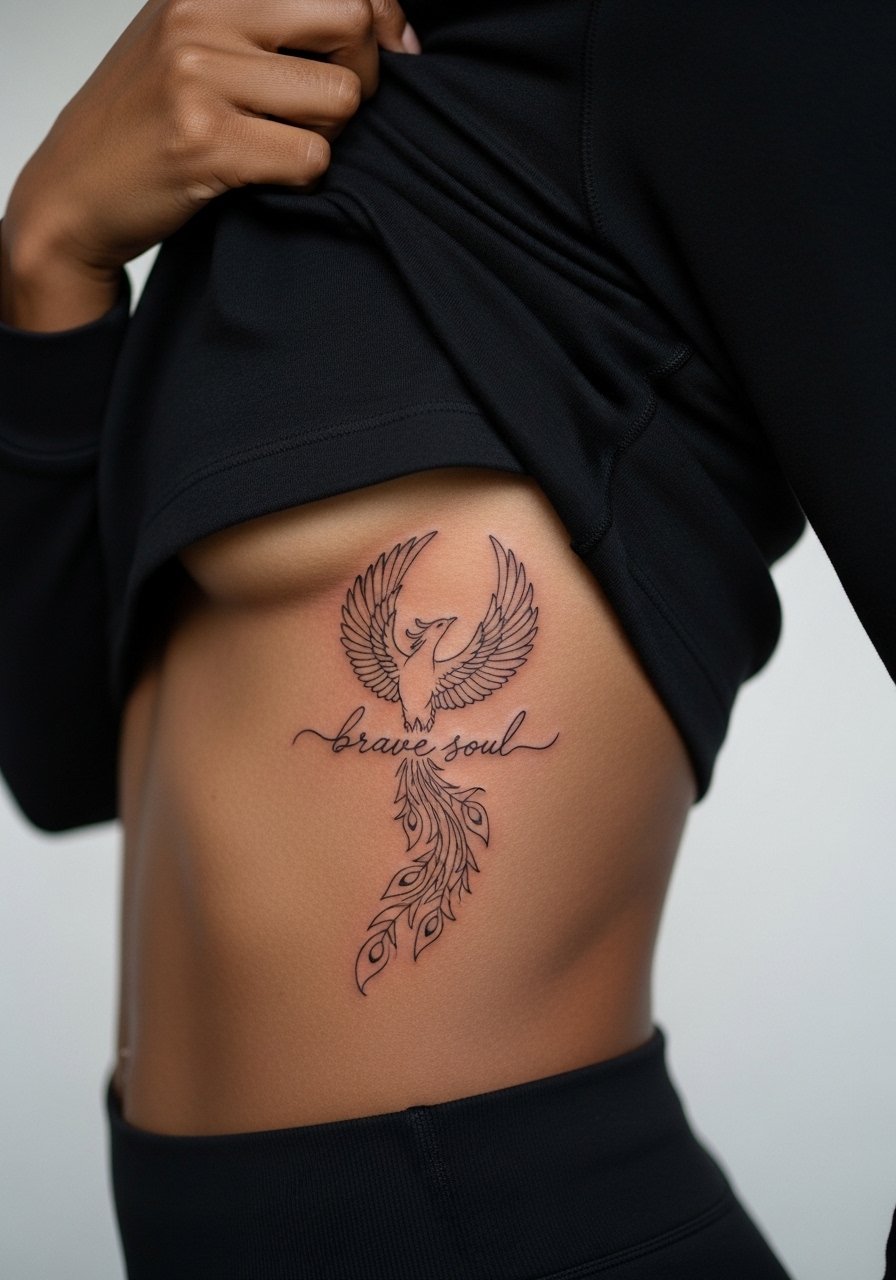
Fair warning: ribs are subjectively one of the top pain zones, and fine line there divides artists into two camps. One group argues the skin stretch and thin tissue blur lines within two years. The other group contends that with precise depth and spacing fine line can settle cleanly on ribs. If you want a phoenix on the ribs, ask to scale the wings and space the feather lines wider than your Pinterest reference. The piece usually needs one to two sessions depending on size. Expect a higher pain rating and a touch-up timeline of 1 to 3 years depending on sun exposure and movement.
10. Black and Gray Wolf Silhouette "Be Brave" on Outer Thigh
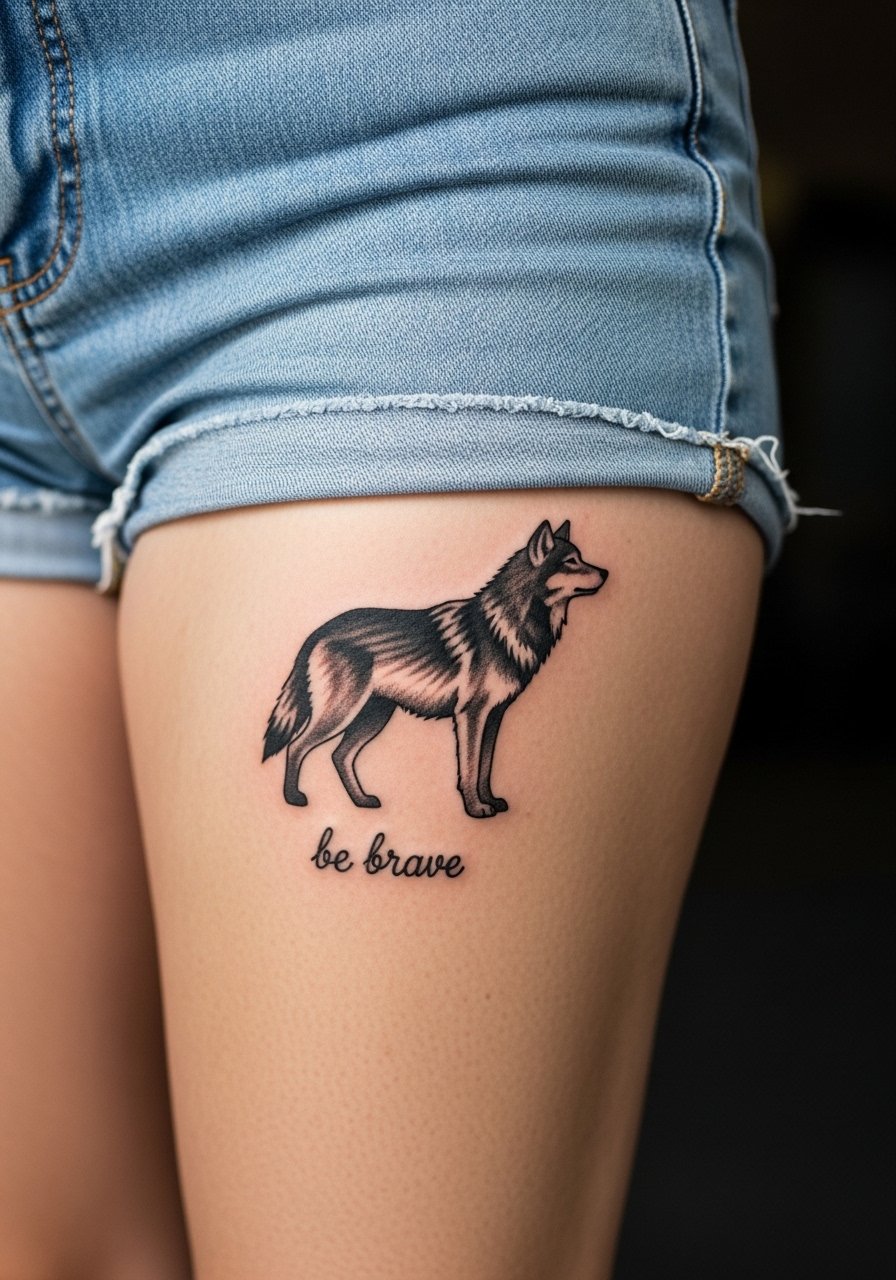
Thigh placements are forgiving if you want larger, more detailed realism. A five-inch wolf silhouette allows for layered shading and a strong presence without daily friction from clothing. The common mistake is putting extremely detailed facial work too small, which can blur as the skin shifts. For summer healing plan loose shorts and layer with black bike shorts under outfits. Wear high waisted denim shorts to show it off. Session time is usually two sessions for full gradient work and touch-ups are less frequent than fine line wrist pieces.
11. Traditional Anchor with "Be Brave" Ribbon on Ankle
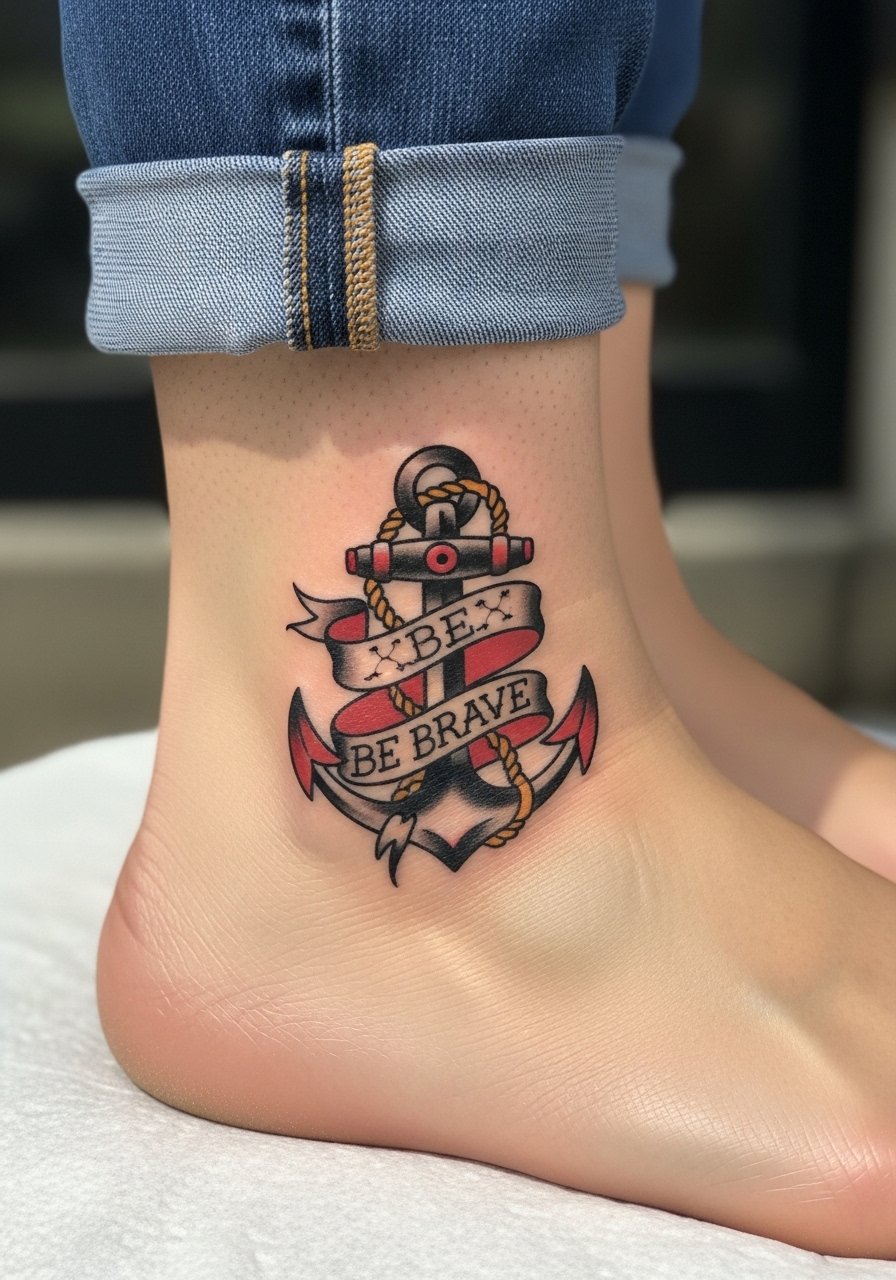
Ankle traditional designs age predictably if you use solid outlines and strong color fields. The ankle handles dense pigment well but expect friction from shoes and socks during week one. Keep the anchor around three inches and ask your artist for bold outlines to protect the silhouette. Style it with summer shorts or rolled jeans and consider pairing with a simple anklet or cuff for frames. For showing it off pick summer-ready looks and a casual shoe line that keeps the area visible. Bring loose pants to the session so you can roll them without rubbing the fresh work.
12. Inside Ear Cartilage Mini Script "be brave"
An inside-ear or behind-ear placement is ultra-discreet and reads like a private mantra. The curved surface makes stencil placement the trickiest part, so ask to see healed examples on curved placements. Expect short sharp discomfort and a fast session length. A real mistake is asking for extremely thin single-needle script without seeing healed photos on curved skin. Because the area is small, this is a piece that benefits from a clean, slightly heavier single-stroke to avoid early feathering. If you need discretion for work or family settings this placement delivers.
13. Thigh Negative Space "Be Brave" Around Scar
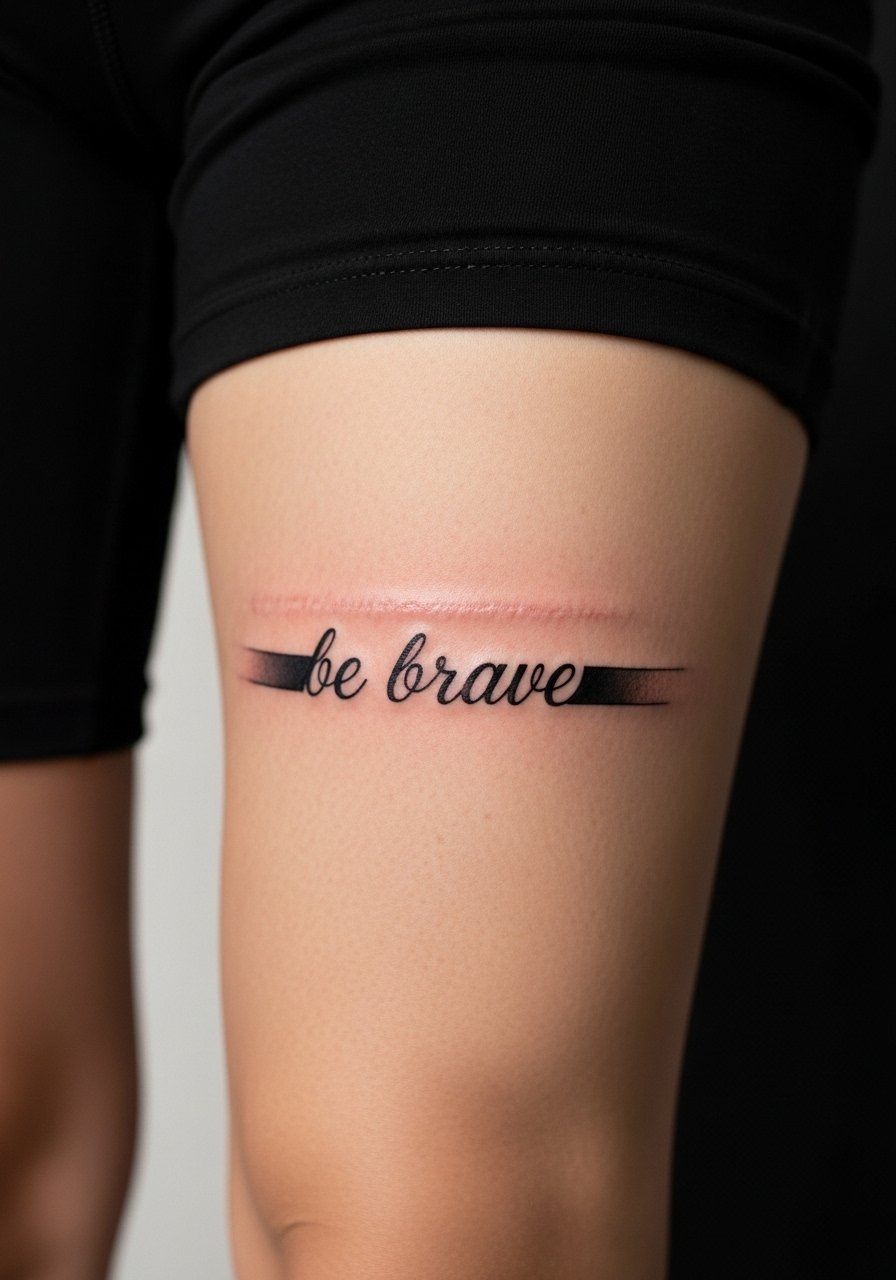
Using negative space around a scar can turn a healing narrative into an elegant graphic. The outer thigh is a forgiving canvas and adapting shapes around scar texture avoids direct rework of scar tissue. During consult, ask the artist to map how the negative space will read when you move or sit. A common error is trying to tattoo directly over a fresh or hypertrophic scar without medical clearance. For summer showing choose high-waisted shorts and layer with black bike shorts so the piece reads clean in photos. Session wear should be loose athletic shorts for comfort and easy access.
14. Coordinates + Tiny "be brave" Micro-Realism on Inner Forearm
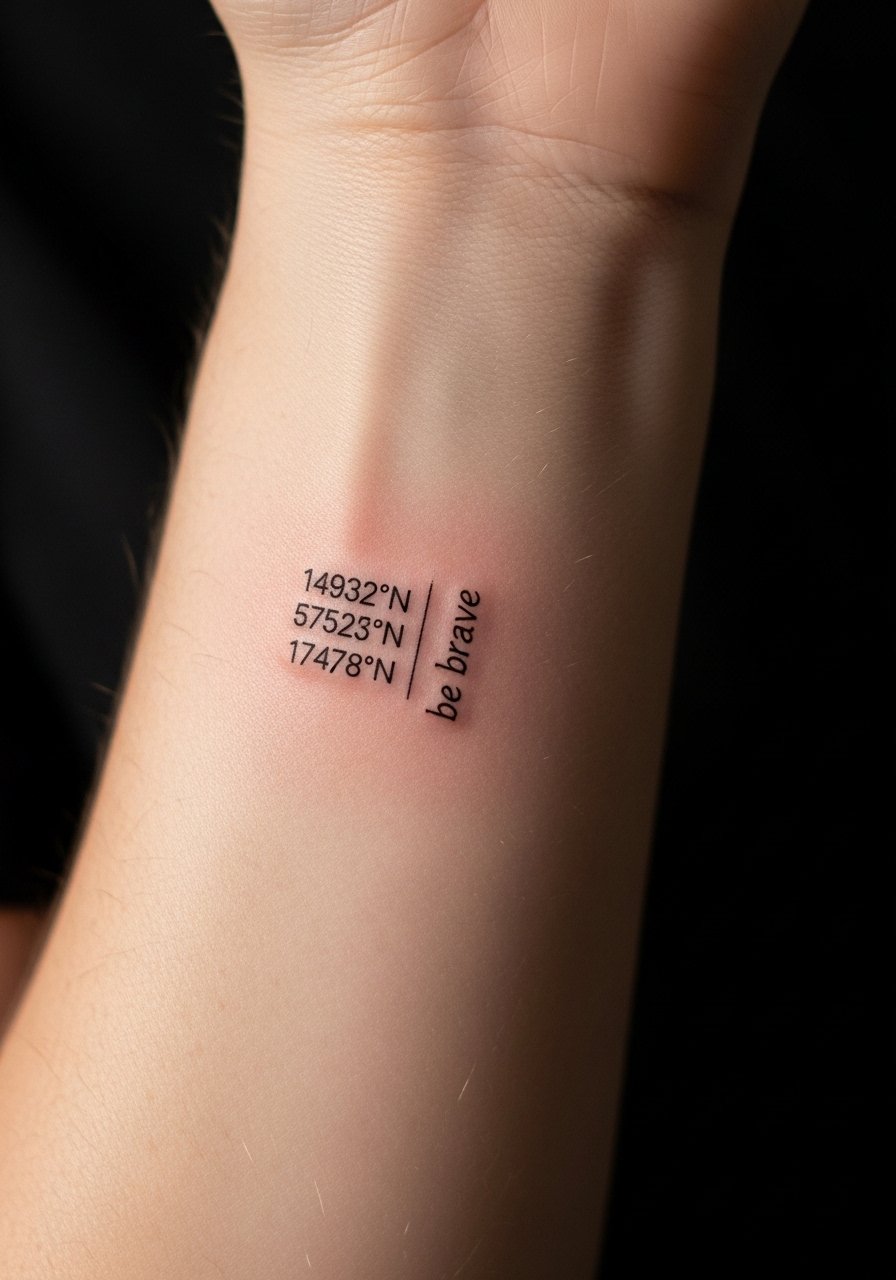
Pairing coordinates with a micro "be brave" script reads like a private anchor and stays subtle across seasons. The inner forearm shows detail well and tolerates tight layouts if you keep spacing intentional. Ask the artist to place the numbers on a single line and the script beneath so each element breathes. A common mistake is making numbers too small and then losing legibility after a year. For show-off outfits roll sleeves to reveal the forearm and pair with a sleeveless linen tank. Session time is typically under an hour but plan for a precise stencil check.
15. Guest-Spot Tiny Script for First-Timers on Wrist
If price is the main blocker consider a guest spot artist or an apprentice booking. Many first-timers get solid wrist scripts from guest spots at lower costs and the experience is similar to a regular appointment. Use discovery pathways like searching hashtags, Tattoodo filters, Booksy for guest spots, and Reddit city threads to find reliable options. When you book ask for healed photos specifically on wrists and for work on comparable skin tones. The biggest mistake is chasing the cheapest walk-in without checking healed results. For studio day wear a simple sleeve you can roll and bring a small soft snack for longer waits.
16. Dark Skin Optimized Bold "be brave" with White Ink Highlights on Forearm
Dark skin often benefits from strong black outlines and higher saturation. For clients with Fitzpatrick 4 to 6, ask for bold line weight and controlled white ink highlights used sparingly for photo pop. A common complaint is fine line scripts disappearing quickly on darker tones. The fix is heavier line weight and healed portfolio examples from the artist on similar skin. Session time mirrors standard forearm scripts but ask for a healed photo check before booking. For showing off pick rolled sleeves or fitted tees to frame the forearm and a simple leather cuff to balance the look.
17. Minimalist Block Lettering "BRAVE" on Back of Hand
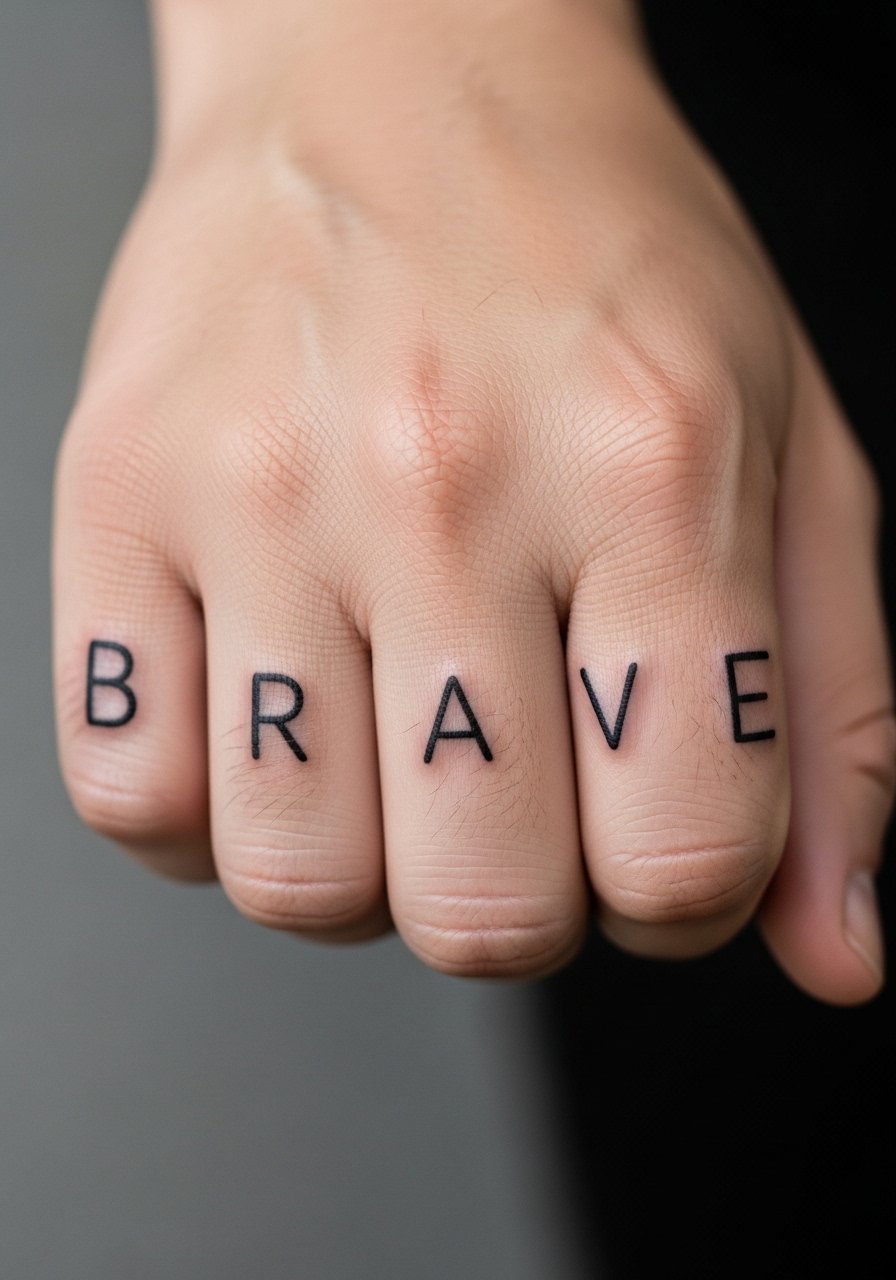
Hand tattoos are high-friction and still affect some hiring decisions, so treat placement with career context in mind. The hand also ages faster due to constant washing and exposure. If you want block "BRAVE" here, request thicker strokes and bold spacing to resist early fading. The biggest mistake is asking for ultra-fine script on the hand. Expect touch-ups more frequently, perhaps every 12 to 18 months, and discuss that with the artist. For session wear bring short sleeves, and for going out style with minimal rings or a clean watch to keep focus on the piece.
18. Stipple-Shaded Shield on Shoulder for Bold Protection
Stipple shading gives a textured, timeless feel without relying on saturated color. The outer shoulder yields a strong photographic silhouette and tolerates dot work spacing meant to hold up. A common error is compressing dots too closely at small scale which leads to blotchiness after healing. Tell your artist you want deliberate negative space and ask to see healed stipple examples. Session time is typically moderate. Wear an open-shoulder top or a loose button-down to the appointment so the area can be exposed without tugging.
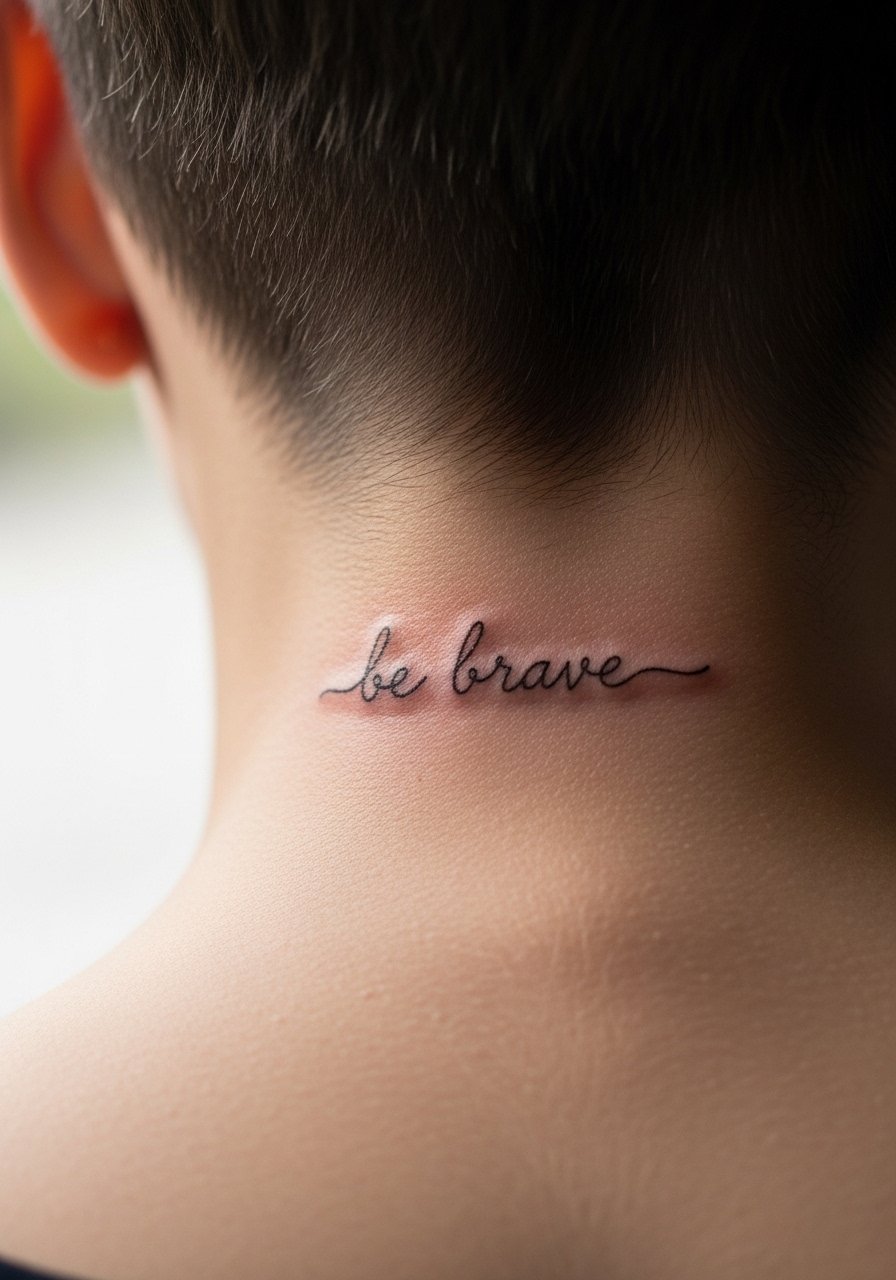
19. Back of Neck Subtle Script "be brave"
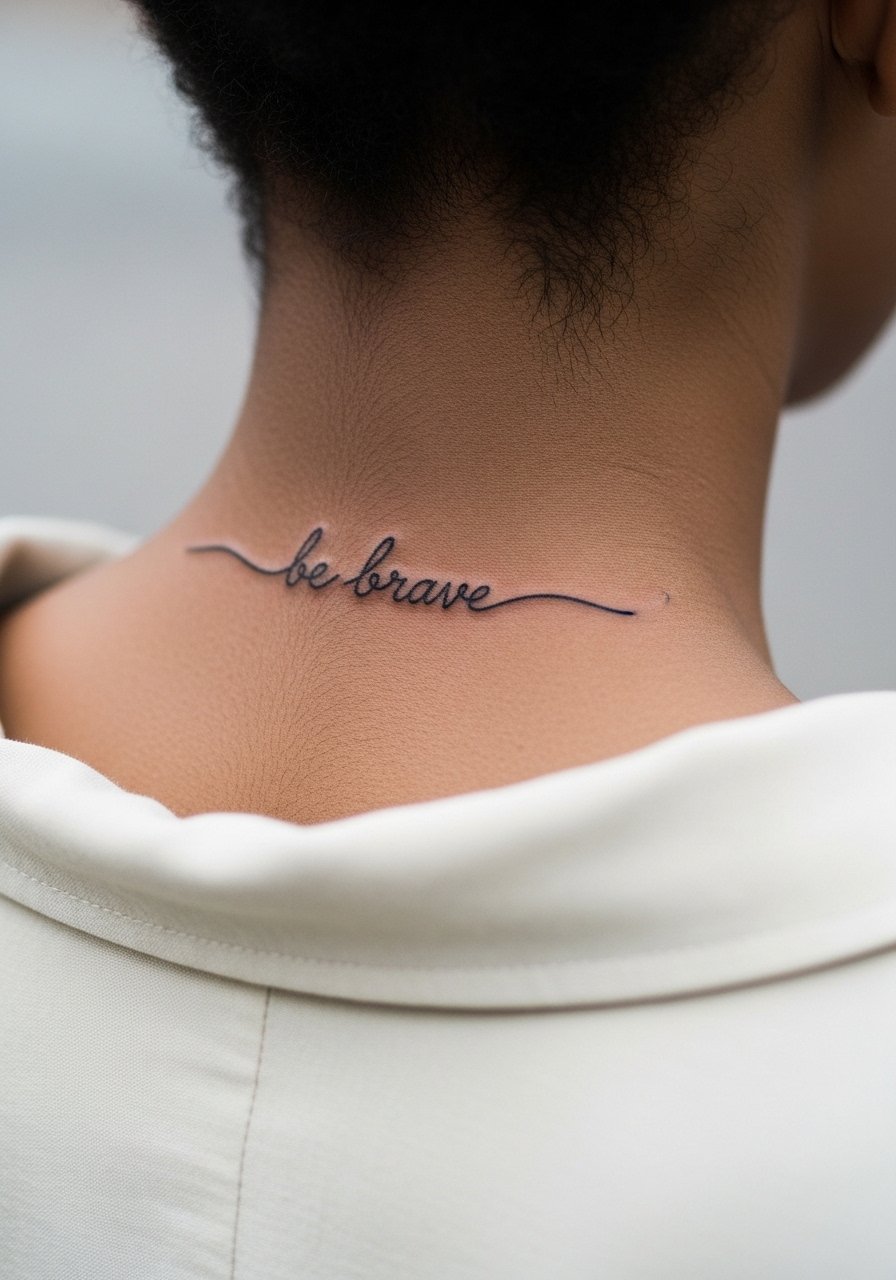
Neck placements are visible and personal, and the skin there takes ink differently from the torso. For a subtle script request a slightly heavier single-stroke and check healed images on comparable neck placements. The main regret people report is choosing an overly ornate font that looks dated when hair grows out. The session is short but discuss career visibility. For session comfort wear a wide-neck shirt you can move aside easily. For showing off pick a hairstyle that tucks behind the ear to reveal the piece.
20. High-Contrast Black and Gray Chest Band with "Be Brave"
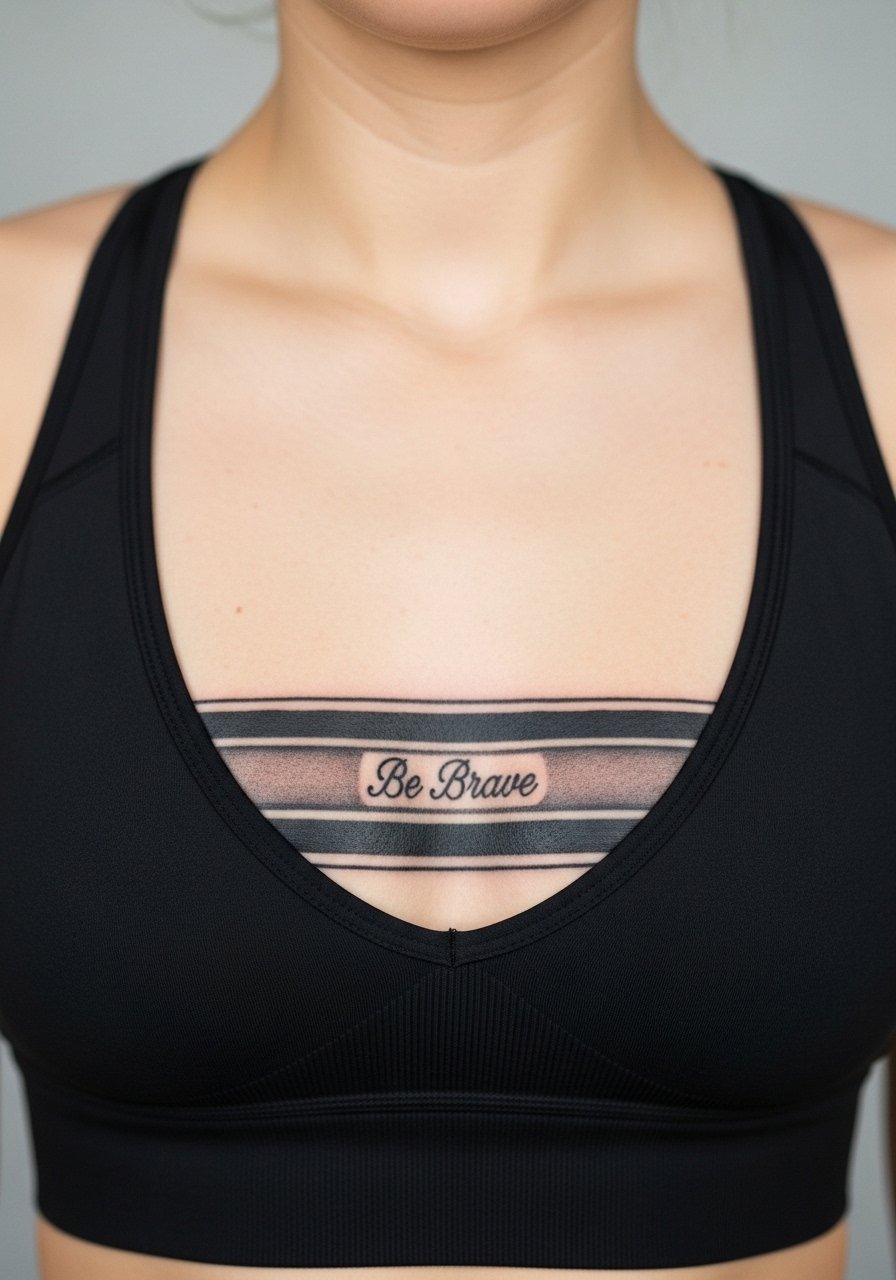
Chest bands read strong and age predictably when lines are bold and shading is dense. For sternum-adjacent work request the artist to place the band so it sits on stable horizontal anatomy rather than over soft tissue that shifts with breathing. A classic mistake is making the band too thin for the chest span, which blurs quickly. This placement asks for careful consults and usually a single long session or two shorter ones. Wear a fitted sports bra to the appointment so fabric lines are consistent while the artist works.
21. Ornamental Mandala Wrist Cuff with Tiny "be brave" Integration
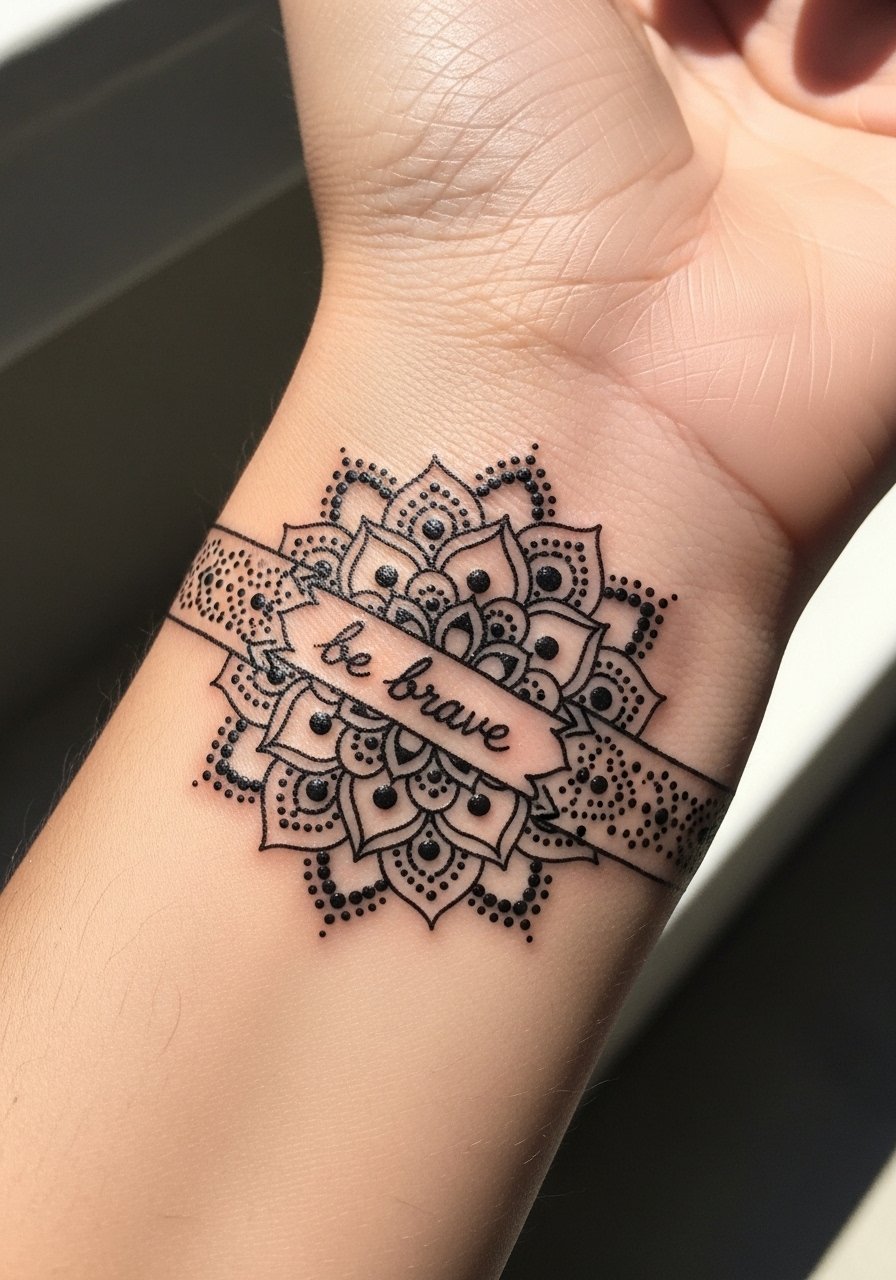
A wrist cuff mandala reads like a bracelet and plays well with stacked jewelry. Because wrists face the most washing and wear, ask for slightly thicker outlines in the dense areas and clear spacing between dot clusters. The mistake is over-detailing a very small cuff, which causes the pattern to lose definition after a year. Expect a single session for modest sizes and plan for touch-ups depending on daily abrasion. Pair the design with a thin watch or dainty bracelets for evenings out.
Frequently Asked Questions
Q: Will a fine line "be brave" on my wrist blur faster than a bolder script?
A: Fine line tends to soften sooner on high-friction areas like the wrist, so many artists will recommend slightly heavier single-needle work or an upsized line weight to preserve legibility. If your priority is long-term clarity pick a bolder stroke and plan for a touch-up around year two.
Q: How can I find an affordable guest spot or apprentice for a small "be brave" script?
A: Search the hashtag communities and directory filters like the #BeBraveTattoo tag, Tattoodo style filters, Booksy guest-spot listings, and local Reddit threads for city-specific recs. Ask to see healed wrist examples and confirm the apprentice’s supervision before booking.
Q: Saniderm versus dry healing — which camp should I trust for small scripts?
A: Artists split into two camps. One camp prefers barrier film like Saniderm for a sealed, cleaner early window. The other camp trusts dry healing to let scabs form and peel naturally. The right choice depends on your skin type, the placement, and what your artist uses consistently, so ask them how they handle similar small scripts.
Q: I’m worried "be brave" will feel cheesy in five years. Any advice to avoid that?
A: Customize the script by using a handwriting-based font or integrating the words into another motif like coordinates or a subtle band. Ask the artist to create a version that feels personal rather than lifted wholesale from a trending feed.
Q: Which placements make "be brave" read best on darker skin tones?
A: Bold blackwork with clear outlines shows best on darker tones, especially on forearms, shoulder blades, and calves. Request healed examples on Fitzpatrick 4 to 6 skin and consider sparing, tasteful white highlights only where the artist has proven success.
