
Fine line abstract owl tattoos can look like private emblems or loud statements depending on placement and spacing. Trends push micro detail and layered geometry, but what holds up years later is deliberate spacing and confident linework. Read these ideas with the parts you care about in mind, and start your consultation knowing which elements to keep tight and which to give room to breathe.
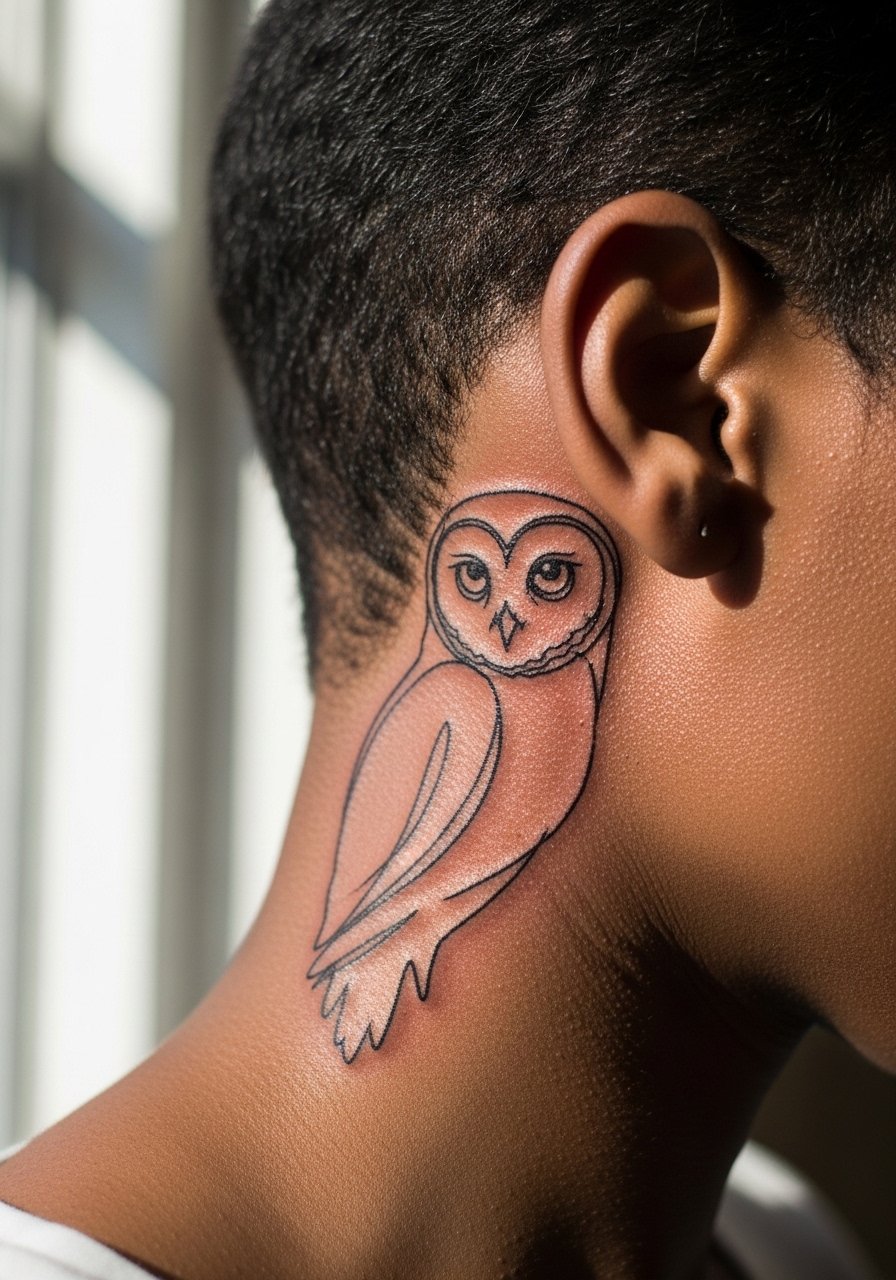
1. Inner Forearm Fine Line Owl with Negative Space

I’ve seen fine line owls on the inner forearm that read like jewelry when done with confident, single-pass linework. Fair warning this area is a 3 to 4 on most pain scales but it is easy to sit through in one short session. Ask your artist for slightly bolder primary outlines and open internal spacing so the negative space survives into year three. Common mistakes include packing tiny details too close, which leads to merging and loss of the geometric elements. Touch-up is often needed at year two for micro detail. For showing it off, roll sleeves or pick a loose button-down shirt that you can push up to frame the forearm.
2. Ankle Minimal Abstract Owl in Dot Work

Ankle placements are subtle and move with footwear, so expect friction from socks and shoes during the first week. The session typically runs 45 to 90 minutes for a small stipple piece. Tell your artist you want dot work with varied density instead of continuous shading to keep the owl readable from a short distance. A common mistake is asking for heavy saturation near the bone which can speed up fade and cause a dull look. Plan for a touch-up between years two and four if you walk a lot. This placement heals differently than forearms, so wear easy slip-on shoes and rolled jeans to avoid rubbing while it peels.
3. Upper Shoulder Abstract Owl with Geometric Wings
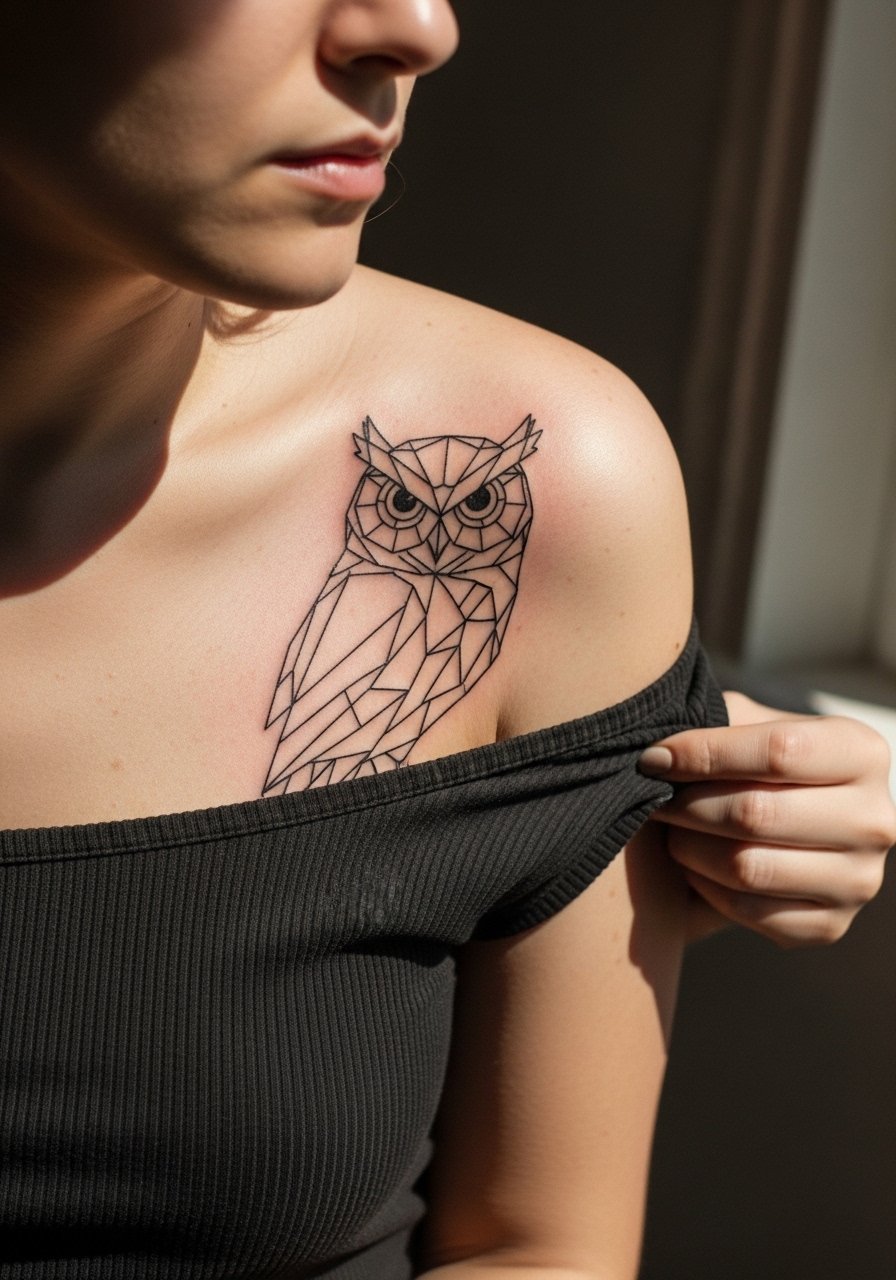
There is something about broad shapes on the shoulder that reads from across a room, and the upper shoulder gives the owl room to breathe. Pain is moderate and the session can be a single two-hour block for a medium-sized geometric composition. During the consultation ask for whisker-like feather hints with spacing that favors open triangles over dense detail. A frequent mistake is compressing too many concentric shapes into a small zone, which creates muddiness with time. Expect natural softening by year three and a possible touch-up for line crispness. For wearing this one, a loose tank top gives access during the session and looks good when you want to show it off.
4. Collarbone Abstract Owl with Stipple Shading

Most collarbone work reads fragile at first and then gains character as it heals. Fair warning this placement can be a 6 out of 10 on pain scales because of the thin tissue over bone. Keep the owl’s main lines slightly heavier so the silhouette remains crisp when tiny stipples fade. During consultation ask your artist to map the main shapes over your collarbone curve so the design flows with your bone structure. A common mistake is placing dense stipple across the collarbone so it loses contour later. For session wear bring a wide-neck shirt you can shift aside without exposing more than the immediate area.
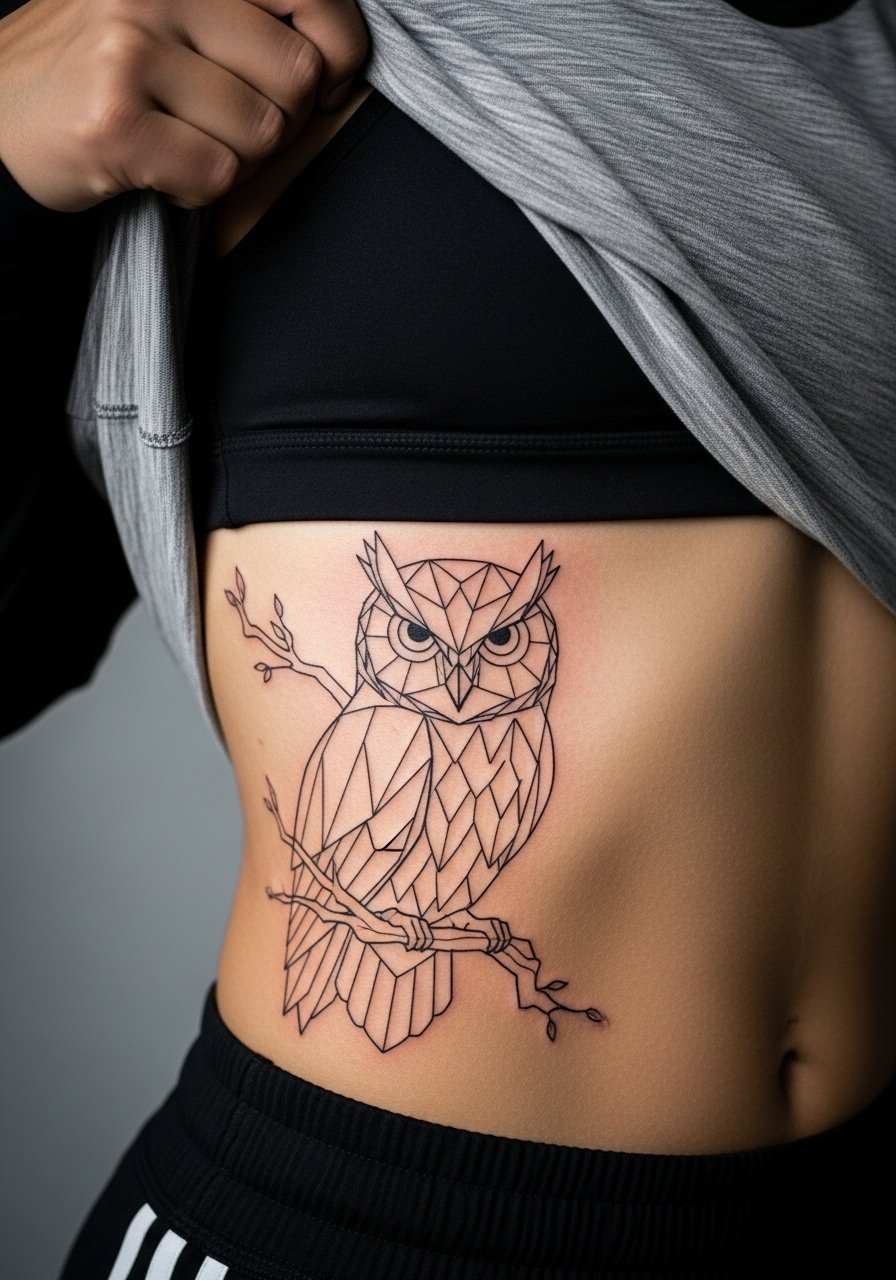
5. Ribcage Abstract Owl in Layered Geometry
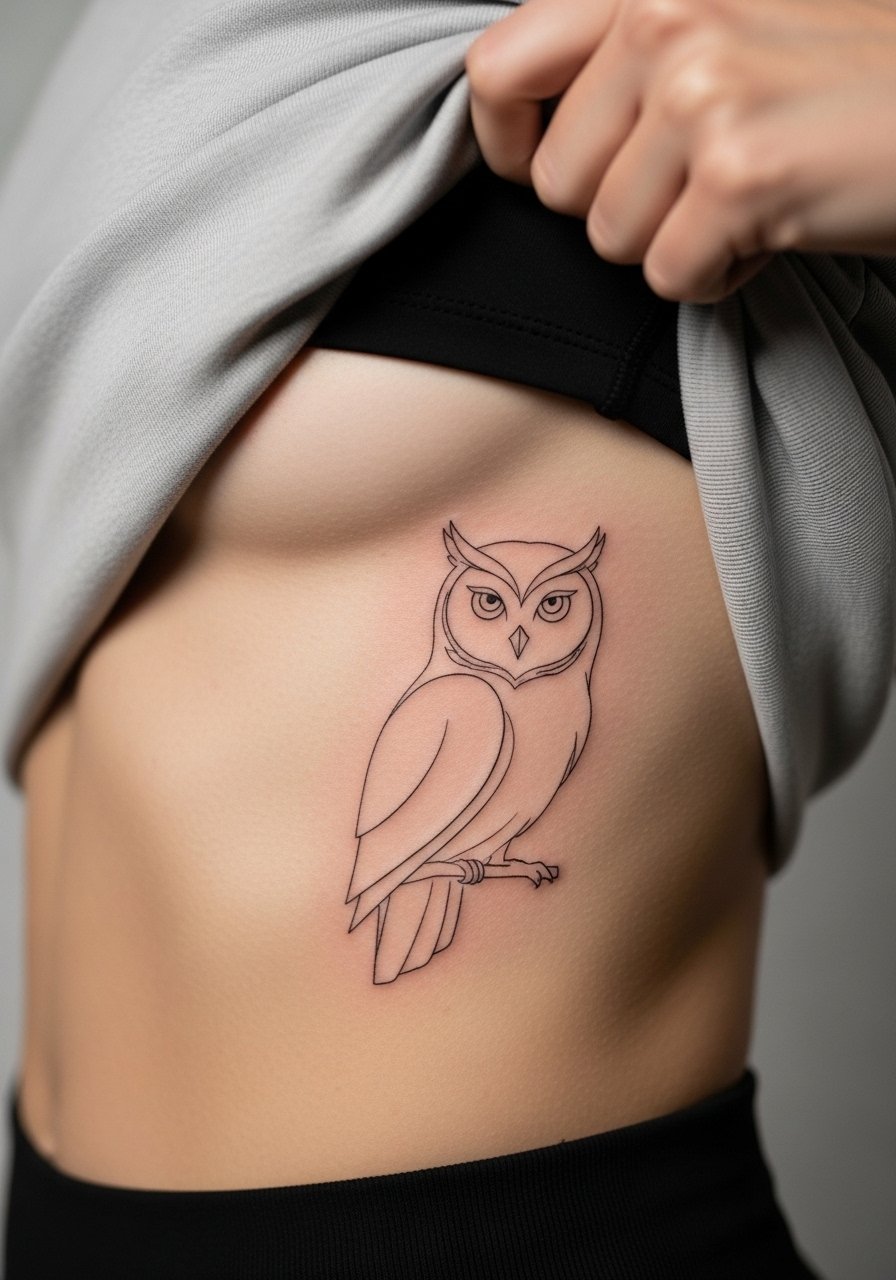
Artists are split on fine line on ribs. One camp warns that the skin there stretches and lines blur within two years. The other camp says proper needle depth and spacing can make fine line settle well. The truth depends on the artist and your movement patterns. The ribcage is a high-pain area so sessions are often spaced into shorter appointments. Ask for more breathing room between concentric shapes and avoid ultra-small micro detail near the sternum. A common regret is asking for full saturation on the ribs which ages unevenly. Expect touch-ups sooner than forearm work if you pick ultra-fine detail. For the session wear a cropped top you can shift aside so only the rib area is exposed.
6. Small Hand Owl with Abstract Linework
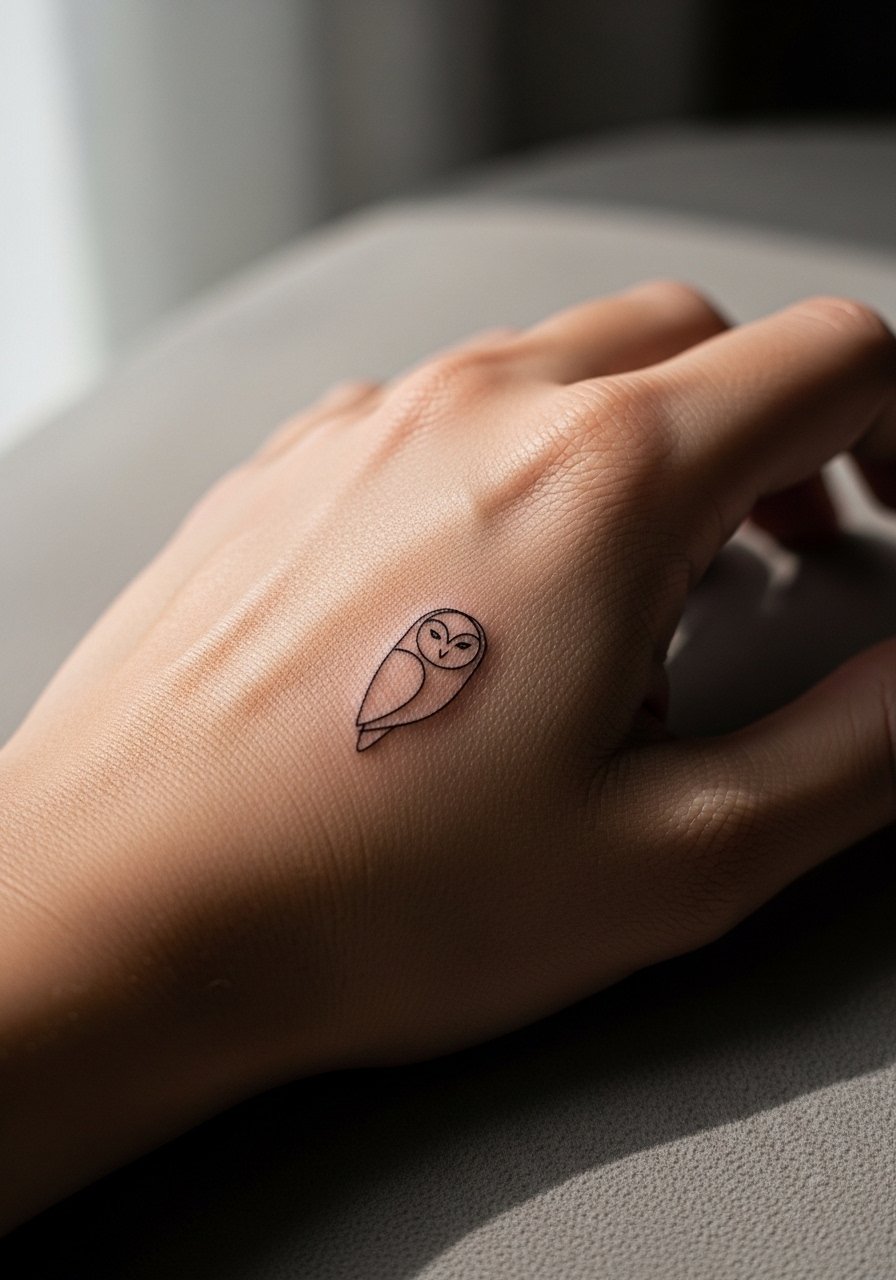
Hand tattoos age differently because of constant washing and sun exposure, and they still affect hiring in some industries so think about career path before committing. The back of the hand is high on the pain scale and often done in short sessions. Specify that you want consolidated shapes instead of a scattering of tiny marks which blur quickly with hand use. Blowout risk is higher here, so ask your artist about line spacing and needle technique. Touch-ups are common by year two to keep the abstract shapes readable. For the session choose clothing that leaves the wrist free, like a short-sleeve shirt, so the artist has unencumbered access.
Studio Day Picks
The first six pieces above include wrists, hands, ribs, and collarbones so a few prep and healing items make those sessions and the first week easier.
-
Alcohol-free stencil transfer paper kit. Helps you preview line placement on skin before the needle touches down, especially useful for ribcage and collarbone mapping.
-
Topical numbing cream for tattoos. Used before high-pain areas like ribs this can make the chair time more manageable without dulling the artist’s feel.
-
Thin protective film roll for tattoos. Keeps hand and wrist pieces protected during the first week of frequent washing and reduces friction.
-
Fragrance-free gentle body wash. Cleanses sensitive spots like collarbone and inner forearm without stripping ink or irritating fresh linework.
-
Aquaphor healing ointment. Thin layers during the first few days lock in moisture and support the initial healing window for fine line and stipple work.
7. Upper Thigh Abstract Owl with Flowing Lines

The upper thigh is forgiving for size and detail and the area is great for building larger abstract compositions. Pain is typically low to moderate and sessions run longer because artists can work larger pieces at once. Ask your artist for flowing lines that follow muscle contours instead of strict symmetry so the owl moves with you. People sometimes ask for ultra-dense detail here which can look crowded after healing. For session comfort wear loose drawstring shorts or high-waisted bottoms that you can shift without rubbing the fresh ink. Touch-ups are less frequent here than on hands.
8. Nape of Neck Geometric Owl Accent

Neck placements are visible and attract attention, and they age under sun exposure. The nape is moderate pain and often finished in one session if small. Ask for bold primary lines and reduced micro detail because thin script there softens quickly. A common mistake is crowding long rows of tiny shapes that merge as the skin stretches. Expect some softening by year three and plan for a refresh then. If you work in a conservative environment consider placement or coverage options. For the session wear a shirt with a loose collar you can pull aside without exposing your shoulders.
9. Spine Center Abstract Owl in Linear Blackwork

There is a visual thrill when a vertical abstract owl runs the length of the spine, but the session can be intense because of the area’s sensitivity near bone. Pain ranges high and sessions are often split into several hours. Tell the artist you want strong vertical anchors and open negative shapes to prevent the central linework from turning into an indistinct column. One mistake is packing too many fine cross-hatches near the vertebrae which can blur. Expect gradual softening by year four and possible touch-up for the main spine line. For showing it off open-back tops or halter styles highlight the vertical composition while keeping the rest covered.
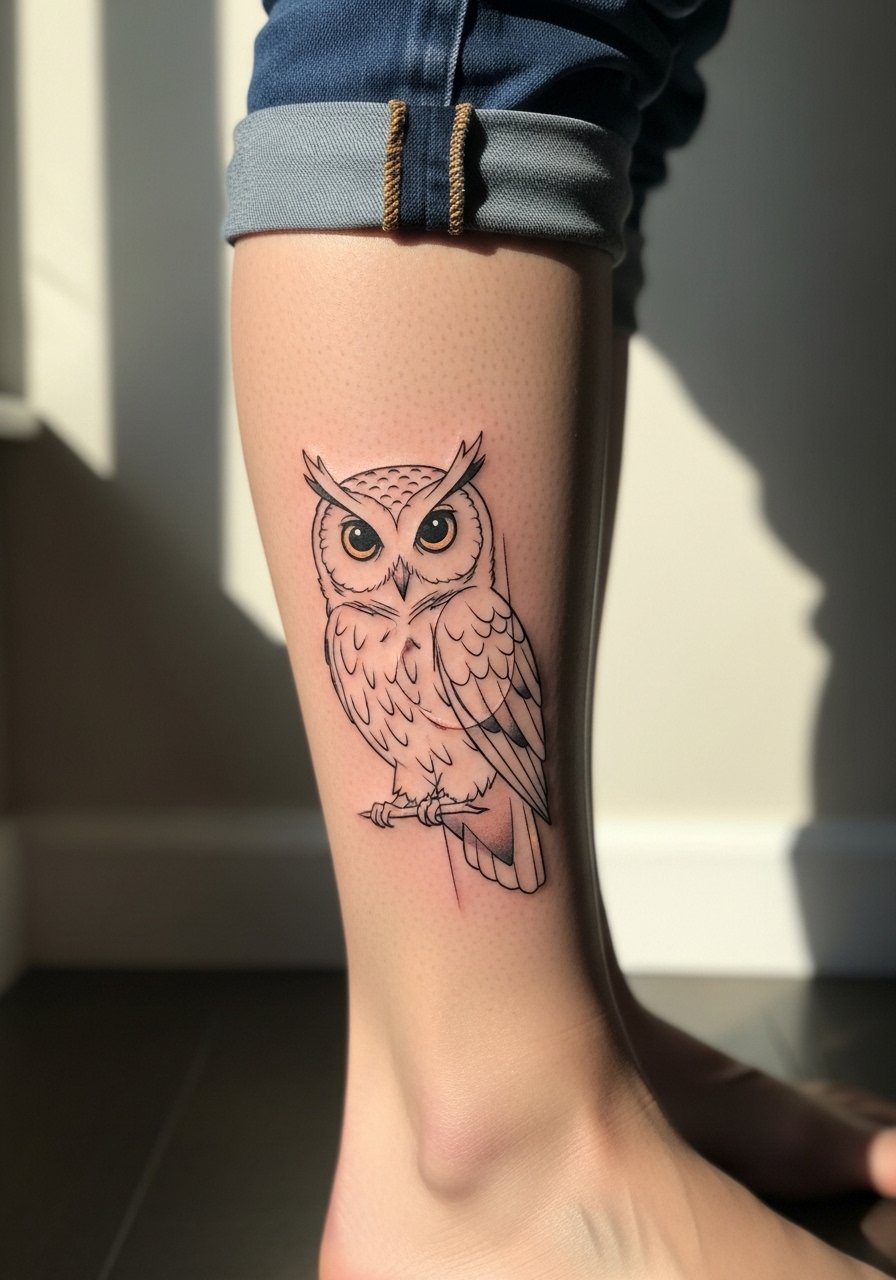
10. Calf Abstract Owl with Whip Shading

Calf pieces sit nicely for medium-sized abstract owls and the area tolerates saturation well. Pain is moderate and sessions can run one to two hours depending on size. Ask your artist for whip shading to create motion in the owl’s form rather than dense block shading. A common error is asking for very small interior details on a curved muscle which can distort when the leg moves. Touch-ups are moderate and often only needed in five or more years if you avoid heavy sun. For the session wear pants you can easily roll up and a pair of slip-on shoes to avoid rubbing during the first week.
11. Inner Bicep Abstract Owl with Micro-Realism Accents

This placement reads intimate and the inner bicep can be surprisingly forgiving for micro-realism touches in an abstract composition. Pain is moderate to high as the area is softer and often more sensitive. Ask your artist to anchor micro-realism accents to bolder surrounding linework so they have room to age. The mistake I see most is pressing ultra-fine hairline elements against soft tissue without allowance for spread. Expect the micro spots to soften by year three and discuss a touch-up timeline during booking. For the session wear a sleeveless shirt so your arm lifts easily and the artist has clear access.
12. Sternum Abstract Owl with Minimal Linework
Sternum placements are sensitive and dramatic but they age with the torso’s movement. This is a higher pain session and artists usually split work into smaller appointments. The debate about very fine lines on the sternum mirrors ribcage arguments. One camp says the constant stretching blurs ultra-fine work. The other camp points to technique and placement precision to make lines last. When you consult ask for slightly heavier anchor lines and sparse interior detail. A common mistake is requesting tight filigree over the sternum which can vanish into a gray mass. Session wear like a strapless or fitted sports bra makes access clean and dignified.
13. Behind-the-Ear Mini Abstract Owl Motif
Behind-the-ear motifs are small and discreet, good for symbolic pieces. The area is sensitive but sessions are brief. Specify exact placement below the hairline and keep the design compact with a single anchor line. Artists sometimes argue over how visible to make the piece. One mistake is asking for dense interior dots which vanish under hair regrowth and sleep friction. Expect a touch-up within two years if you sleep on that side frequently. For the session tuck hair back and bring a hair tie so the artist can work without obstruction.
14. Full Sleeve Abstract Owl Composition in Mixed Techniques

Sleeves are a commitment and they let you combine geometry, stipple, and bold linework into a cohesive narrative. Pain varies with placement as you move around the arm and sessions are typically staged over several months. For a sleeve ask for intentional negative space between clustered motifs so the design does not age into a noisy block. A frequent mistake is trying to crowd five different styles together without clear transitions. Expect some areas to need touch-ups earlier depending on sun exposure. For wearing this, rolled sleeves and short-sleeve shirts show layers without overwhelming the design, and a simple racerback tank highlights upper-arm detail.
15. Finger Abstract Owl Band in Minimalist Linework

Finger tattoos are notoriously susceptible to rapid wear and fade because of skin turnover and handling. Pain is sharp and sessions are short but may require multiple passes. Tell your artist you want a simplified band with spaced elements rather than a continuous tiny script. A common mistake is requesting dense detail that disappears after normal use. Touch-ups are routine and often yearly depending on wear. For the session avoid rings and wear a glove-compatible sleeve so the finger is exposed but the rest of the hand remains comfortable. If you want it to show, pair with thin stackable rings after healing.
16. Upper Back Abstract Owl with Negative Space Mandala
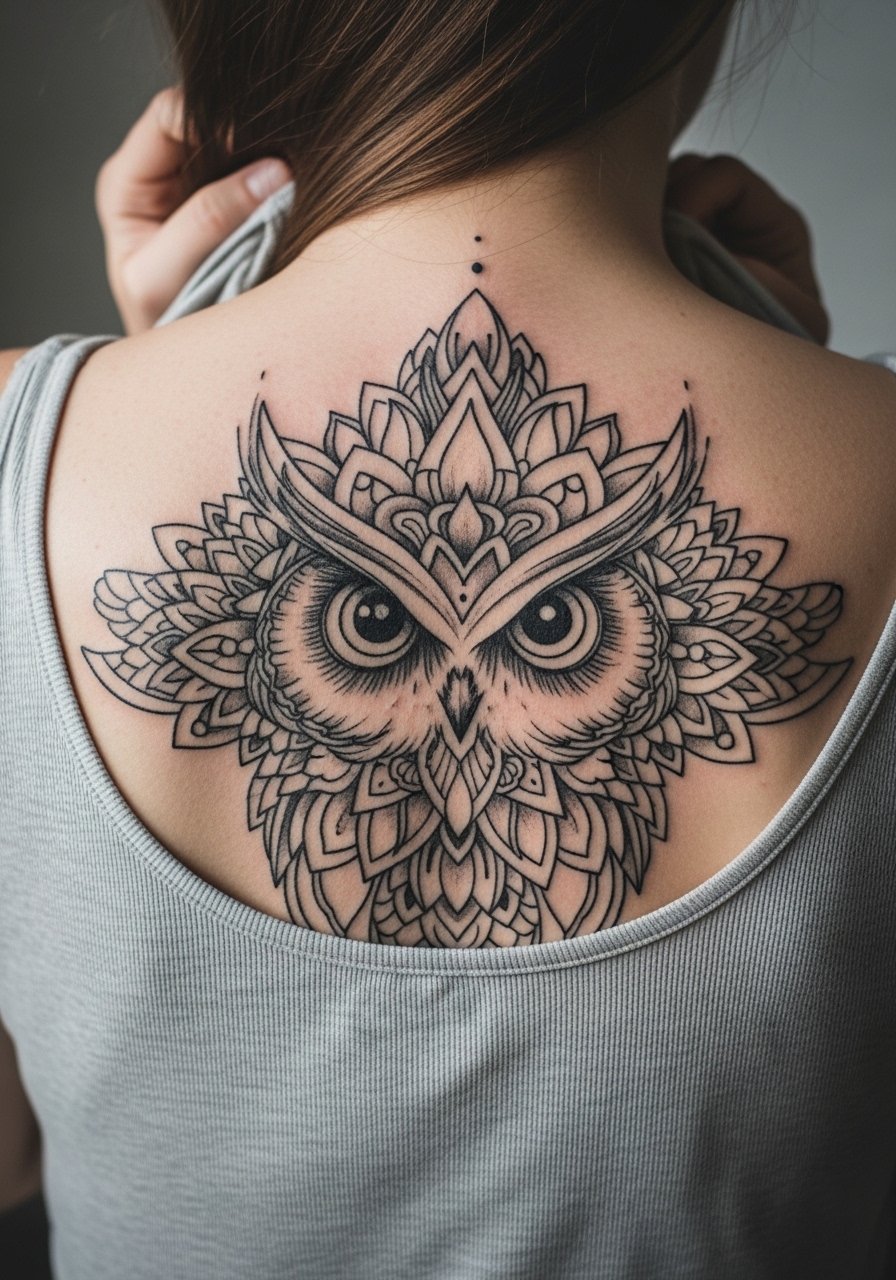
Upper back pieces offer a broad canvas and the mandala framing can give an abstract owl a strong silhouette. Pain is moderate and sessions can be long for larger coverage. Ask your artist to design mandala spacing with clear gaps to prevent dense center collapse as the piece ages. One mistake is pushing tight concentric rings too close to the spine which can blur. Expect reliable longevity with targeted touch-ups if you limit heavy sun exposure. For the session wear a button-down or tank you can shift without exposing the lower back.
17. Hip Bone Abstract Owl Accent
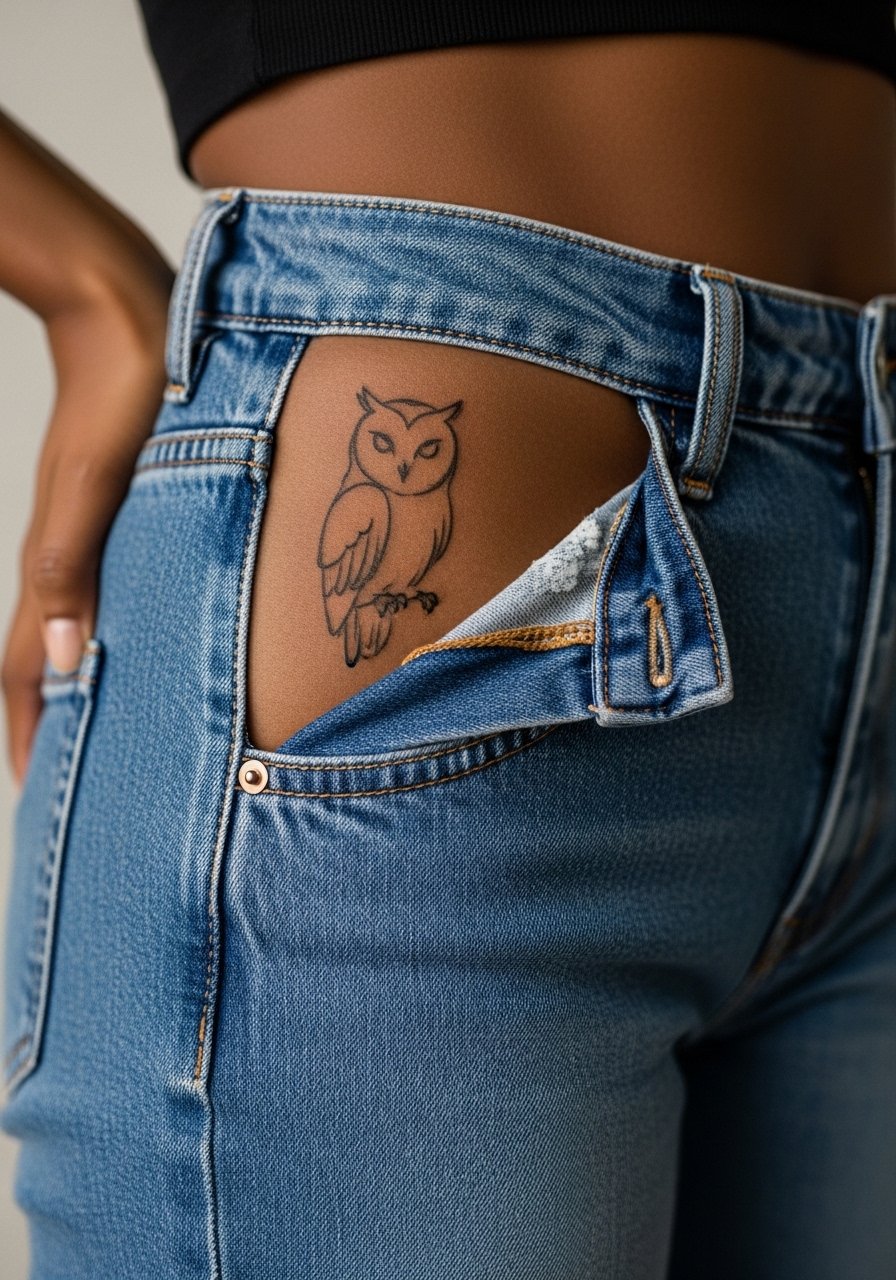
Hip tattoos sit at the intersection of intimacy and show-off potential and the area handles curves well. Pain is moderate to high close to the bone and sessions run 45 to 90 minutes for small pieces. Request that the owl’s main strokes follow the hip curve and avoid tiny radial details that stretch when you move. Artists sometimes misjudge how clothing will sit and cause added friction during healing. Expect slower fade than hand or fingers but plan for a touch-up after pregnancy or major weight changes. During the session wear high-cut shorts or jeans you can lower slightly without full exposure.
18. Calf Wrap Abstract Owl with Color Accents
Introducing restrained color can give an abstract owl a pop without risking heavy fade. The calf tolerates color well and sessions are comfortable for longer runtimes. Tell your artist to keep saturation localized so the color serves as an accent around strong black anchors. A common mistake is asking for large swaths of pastel that migrate into gray over time. Expect color retouching in five years depending on sun exposure and leg friction. For the session wear pants you can roll up and breathable socks that do not rub the fresh ink.
19. Ribcage Wrap with Geometric Negative Space Owl
Ribcage wraps are dramatic and flattering but the area is very sensitive. Sessions are usually split and take patience. Artists are divided on how fine to run linework here. One group warns that ultra-fine geometry blurs quickly. The other group points to spacing and depth as the fix. Bring up both camps in your consultation and ask to see healed rib pieces in the artist’s portfolio. A common mistake is squeezing too many concentric shapes into a narrow band. Expect touch-ups earlier than for arm work and plan session-day clothing that allows the artist clean access.
20. Clavicle-to-Shoulder Abstract Owl in Blackwork

This placement reads bold across the collar and shoulder line and can be designed to follow clothing lines. Pain is moderate and a session of one to two hours is common. Ask for clear transitions between saturated black anchors and airy negative spaces to prevent a heavy wall of ink as it ages. A frequent mistake is asking for complete black fills against fine bordering lines which creates a gray halo later. Expect good longevity with sun protection and a possible touch-up after heavy exposure. For showing it off pair with open-back midi dresses or simple tank tops.
21. Full Back Abstract Owl Panel in Layered Geometry

A full back panel gives you the space to build a narrative with repeated owl motifs and layered geometry. Sessions are multiple and can be emotionally intense because of the duration. When you consult, talk about anchor points and a staged plan to keep long sessions manageable. The biggest mistake is starting without a clear roadmap which leads to style mismatch across sessions. Expect excellent longevity for bold sections and spotty softening in finely detailed zones. For the session wear a button-down or tank so the artist can work on upper and mid back without full torso exposure. Pair finished work with open-back pieces to show scale.
Frequently Asked Questions
Q: How long do fine line abstract owl tattoos usually stay sharp before needing a touch-up?
A: It depends on placement, skin type, and sun habits. In my experience fine line on hands and fingers often needs attention by year one to two. Forearms and upper back usually keep clarity for three to five years before a touch-up refresh is useful.
Q: Are ribs and sternum a bad idea for detailed abstract owls because of aging?
A: Artists split into two camps on this. One side says ultra-fine detail blurs quickly because of stretch and movement. The other side says correct needle depth and deliberate spacing let detail last. If you want ribs or sternum, ask to see healed examples and pick spacing over micro-detail.
Q: What should I wear to my appointment for a shoulder to clavicle owl?
A: Wear a loose button-down or a wide-neck shirt you can pull slightly aside so only the area in work is exposed. That keeps the rest of your torso covered while giving the artist clean access.
Q: Do color accents in abstract owls fade faster than blackwork?
A: From what I have seen, pastel and pale tones need more frequent touch-ups than solid black. Keep color small and well-saturated, and commit to sunscreen for longevity.
Q: Will a finger or hand abstract owl affect my job prospects?
A: It can in some industries. If you work in a conservative field consider placement alternatives or plan for discreet options. Small rings or sleeves can conceal finger work while it heals or during formal occasions.
