
Fine line work looks incredible on saved boards and in café windows. The catch is that what reads as flawless on a bright phone screen can blur faster on wrists and hands, or sit differently across skin tones. This list pulls 27 minimal line ideas from book-style flash, with practical notes on how each version will age, what to ask your artist, and which wardrobe choices show it off best.
1. Single-needle Peony Outline on Inner Forearm
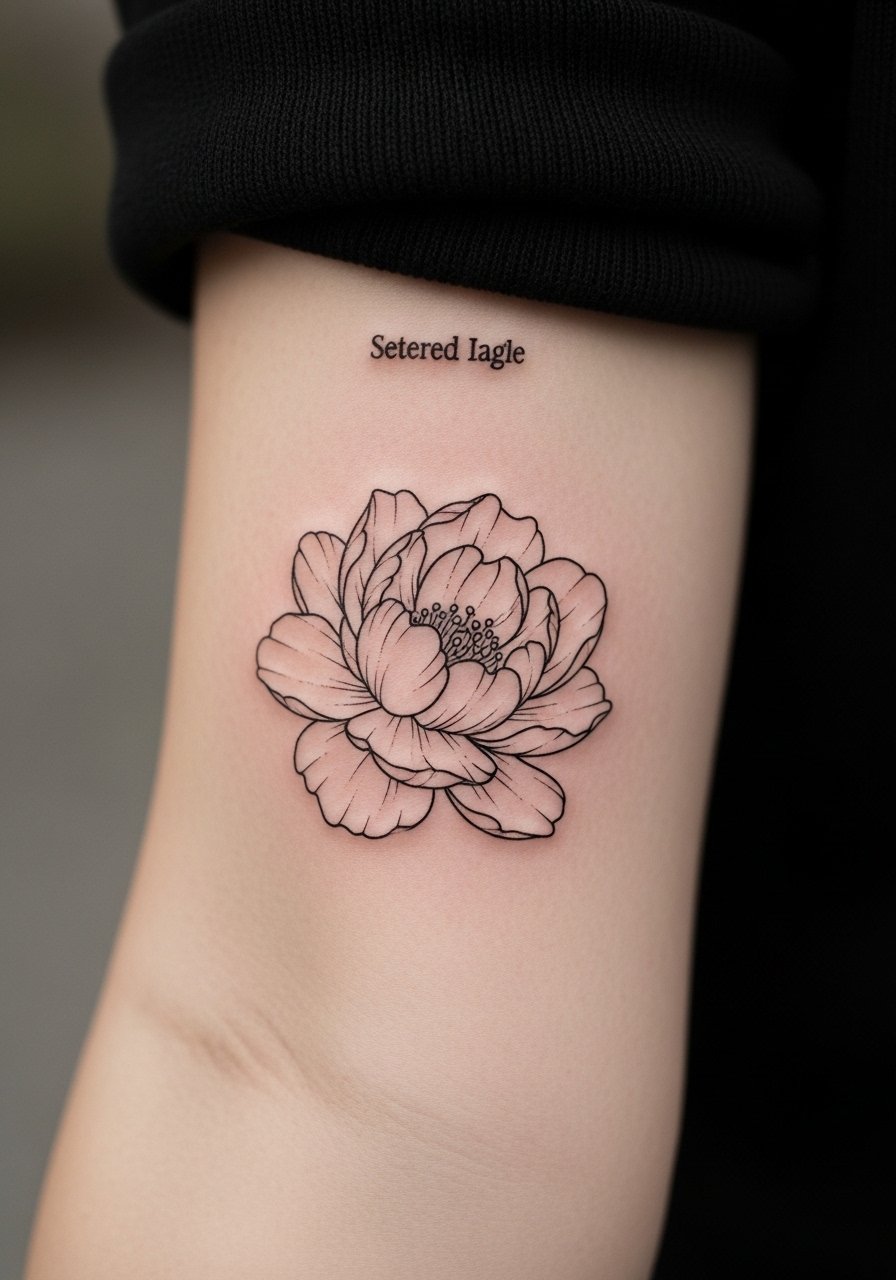
I've seen peony outlines on forearms keep their shape longer than similar micro-florals because the skin there moves less. Tell your artist you want a 1.5mm minimum line thickness and a little spacing between petals so the silhouette keeps breathing at year two and five. Common mistakes are asking for too many micro veins and expecting them to last. The session feels low on sharp pain and higher on vibration. For show-off styling try a chambray rolled cuff shirt so the bloom sits framed when you push sleeves up.
2. Minimalist Line Wave on the Wrist
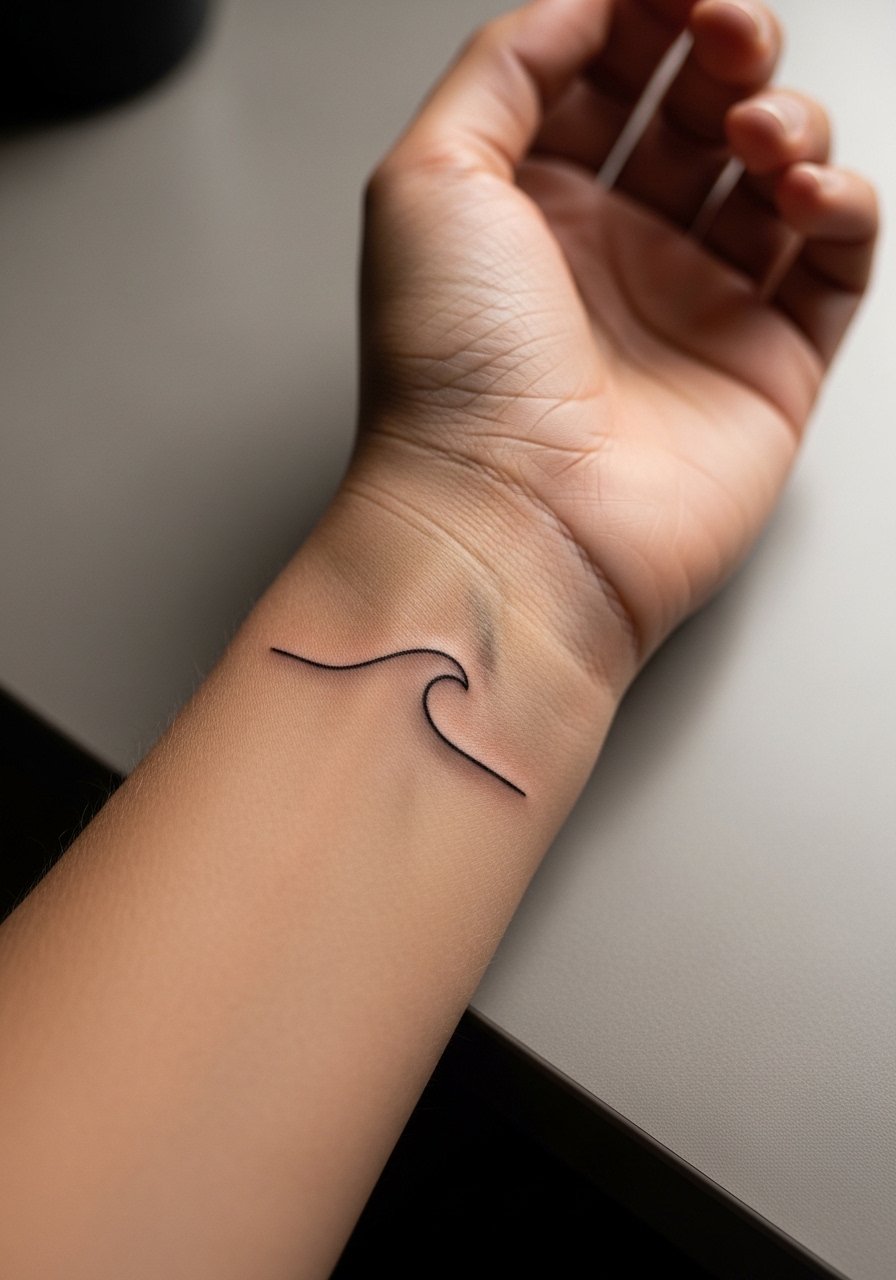
Fair warning, wrists face constant friction from watches and bracelets. I recommend slightly heavier linework than the flash sheet shows, and ask for a single continuous curve rather than multiple tiny waves. The most common aging issue is softening where bands rub. Plan a six-month touch-up if you type or wear a watch daily. For wearing out, a thin silver cuff keeps attention on the motif while avoiding leather wraps that crowd the area. Use a thin silver cuff bracelet to highlight the wave without overwhelming it.
3. Geometric Triangle Stack at the Ankle

Ankle pieces show well with open footwear but they live in a high-friction zone. Ask your artist to space the triangles so the negative bars remain visible after settling. The typical mistake is shrinking the stack down too small, which leads to merging lines in year two. Expect a one-session appointment and moderate discomfort when the needle nears bone. Pair the finished piece with cuffed slim chinos or strappy sandals for summer visibility. Find cuffed options with a quick search for cuffed slim chinos.
4. Vine Tendril Wrap Along the Outer Calf
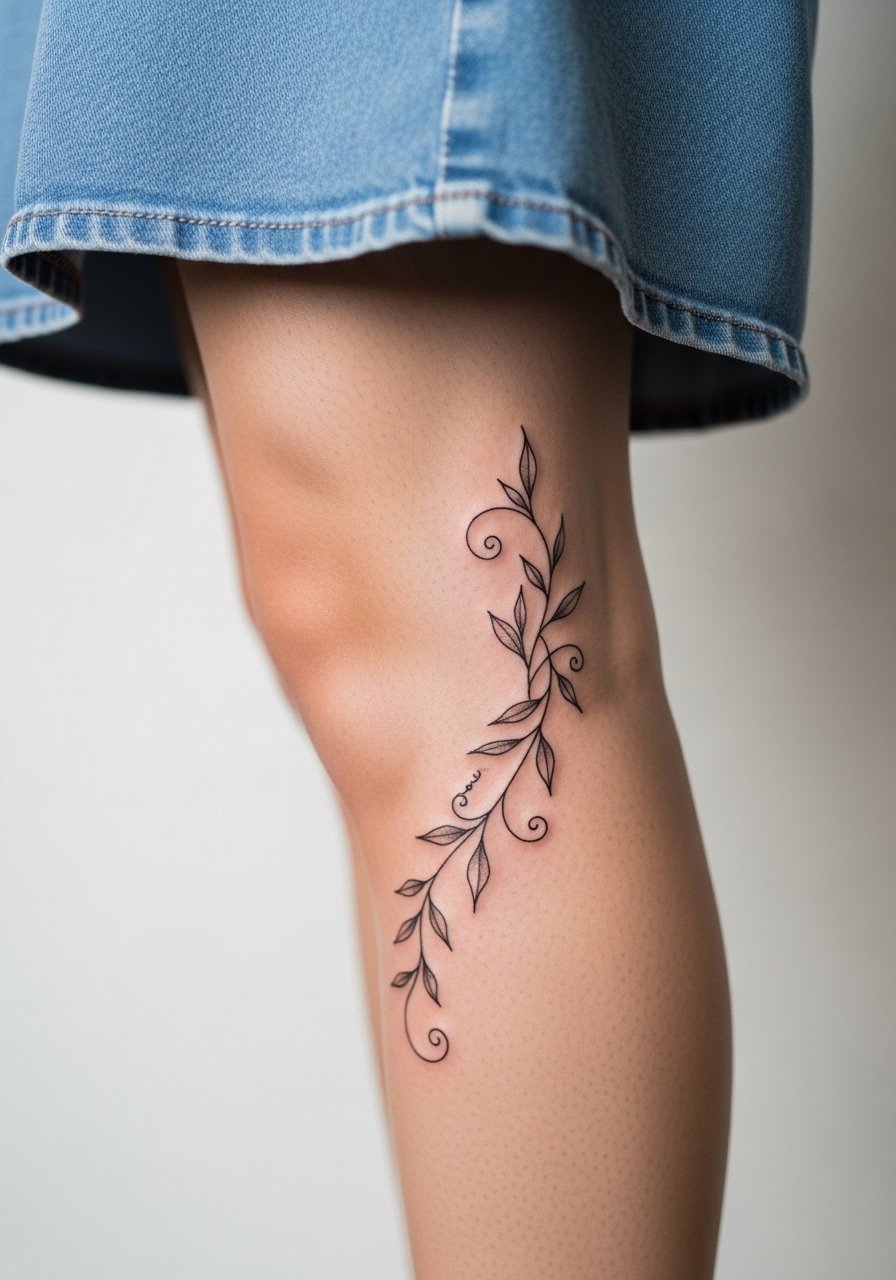
Most clients choose a tendril wrap to elongate the leg visually. In my experience the outer calf holds fine line well if the artist spaces tendrils and keeps line density low. Tell the artist you want flow and negative spacing more than tiny filler leaves. A common mistake is packing too many tiny curls which age into a soft mass. The session is relaxed because the calf is easy to access and you can lie comfortably. Show it off with high-waisted shorts or a skirt for a clean reveal.
5. Single-needle Constellation Map at the Collarbone
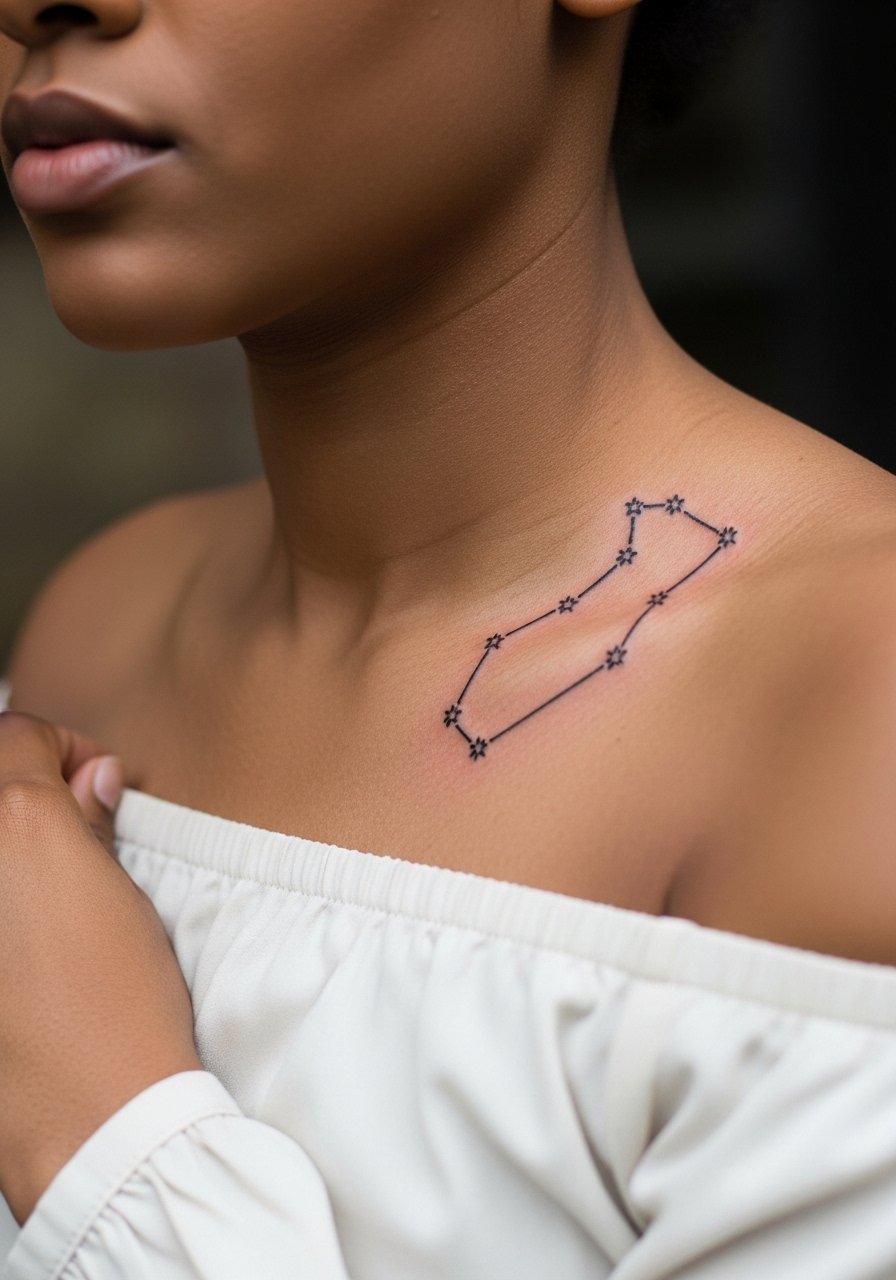
Collarbone work looks delicate but the area reads strongly in photos. When booking, bring a clear map of star placements and ask for slightly heavier dots for contrast on medium and dark skin tones. One common regret is asking for micro dots that vanish in camera shots after a few months. The collarbone is a moderate pain because of the bone proximity but it heals predictably. Pair with an off-shoulder blouse to let the arc sit beneath layered thin necklaces. Try an off shoulder linen blouse to frame the map.
6. Thin-Line Feather Quill on Inner Bicep
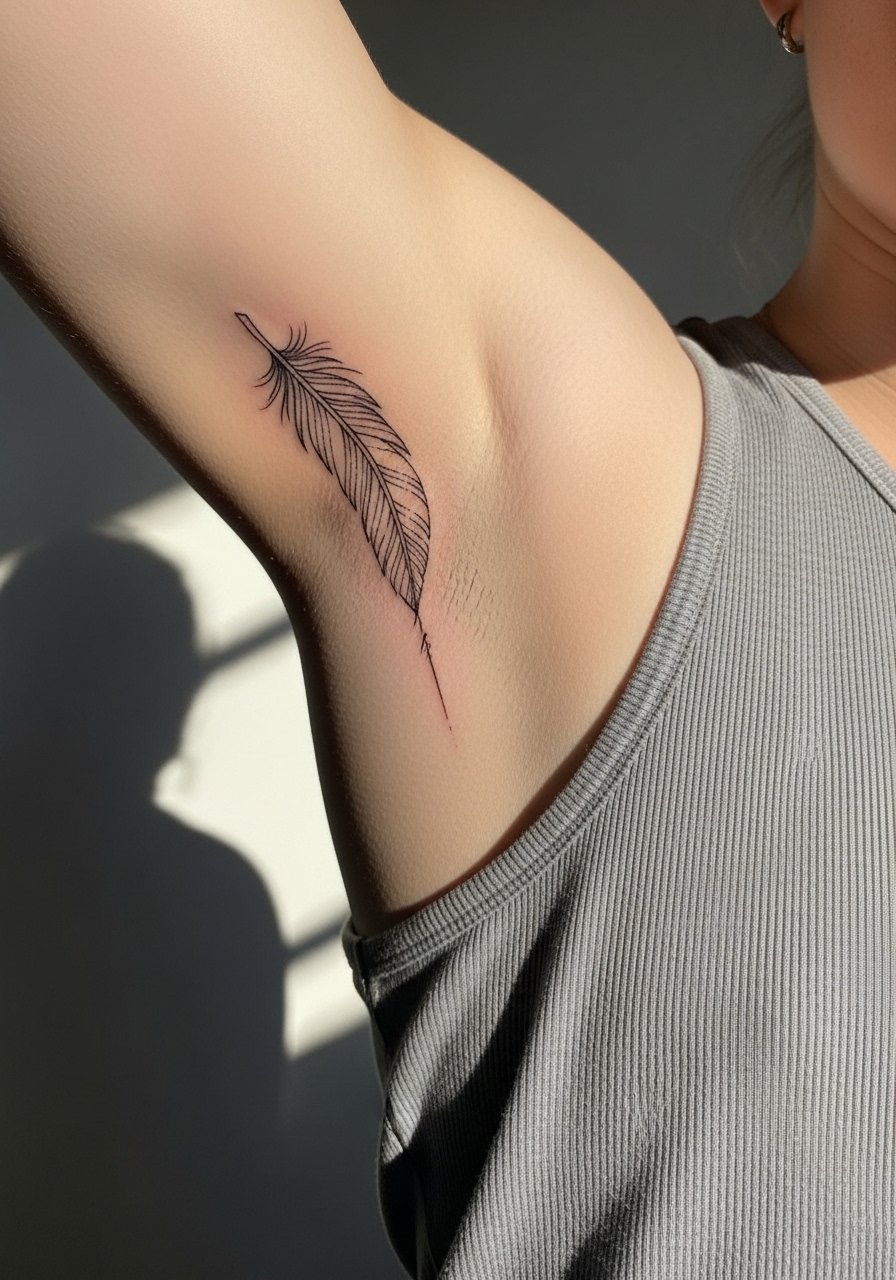
When the quill sits on the inner bicep it catches movement from hugging or shoulder rotation. Ask for a slightly denser spine line so the feather retains definition as it settles. The common mistake is asking for ultra-fine barbs that blur into a gray smudge by year three. Session pain is lower but expect slight tenderness when the artist works near the armpit. For the day of, wear a loose tank so the artist can access the area without pulling fabric tight.
Studio Day Picks
The wrist, collarbone, and inner-arm pieces above each demand different prep and a few specific items make the session and the first week easier.
- Stencil transfer paper kit. Lets you and the artist preview line placement on the skin before committing, which is handy for the constellation and peony layouts above.
- Topical numbing cream. Applied 30 to 45 minutes before reduces wrist and collarbone sting without affecting the artist's linework.
- Thin protective film roll. Helps keep ankle and wrist pieces clean during the first week of daily movement and washing.
- Fragrance-free gentle body wash. A mild cleanser avoids irritating fresh linework on forearms and the inner bicep.
- Aquaphor healing ointment. Thin layers the first few days lock in moisture for tight single-needle channels without clogging.
7. Micro Line Lotus Bloom on the Ribcage
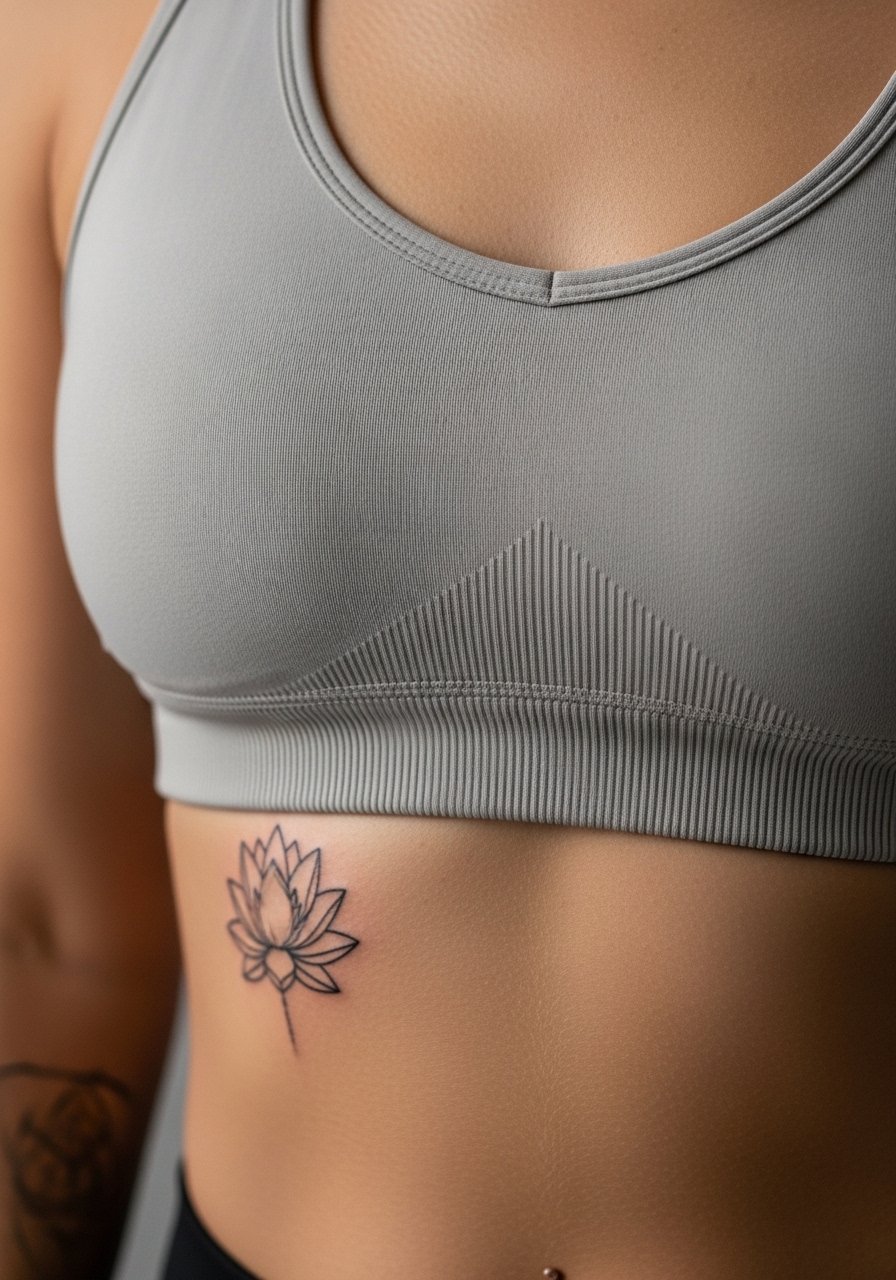
Fair warning about ribs, the area splits opinions in the community. One camp says fine line on ribs blurs quickly because the skin stretches and moves a lot. The other camp insists that with correct needle depth and spacing fine line can settle well. Ask the artist where they stand and show healed photos from their portfolio. The ribcage is a higher pain zone but it makes for a very private, symbolic placement. For session wear bring a loose top or sports bra that exposes only the tattoo area for comfort and modesty.
8. Arrow Cluster on the Shoulder Blade

I've noticed arrow clusters read best when each shaft has distinct spacing and a small amount of gray shading for depth. Tell your artist you want clear directionality rather than identical mini-arrows stacked too tight. Shoulder blade pieces age well because the skin there is stable. The session is medium comfort if you lean forward slightly, and touch-ups are rarely needed unless you sunbathe the area heavily. For showing off try a loose button-down pulled aside for a casual reveal.
9. Micro Script Mantra on the Inner Wrist
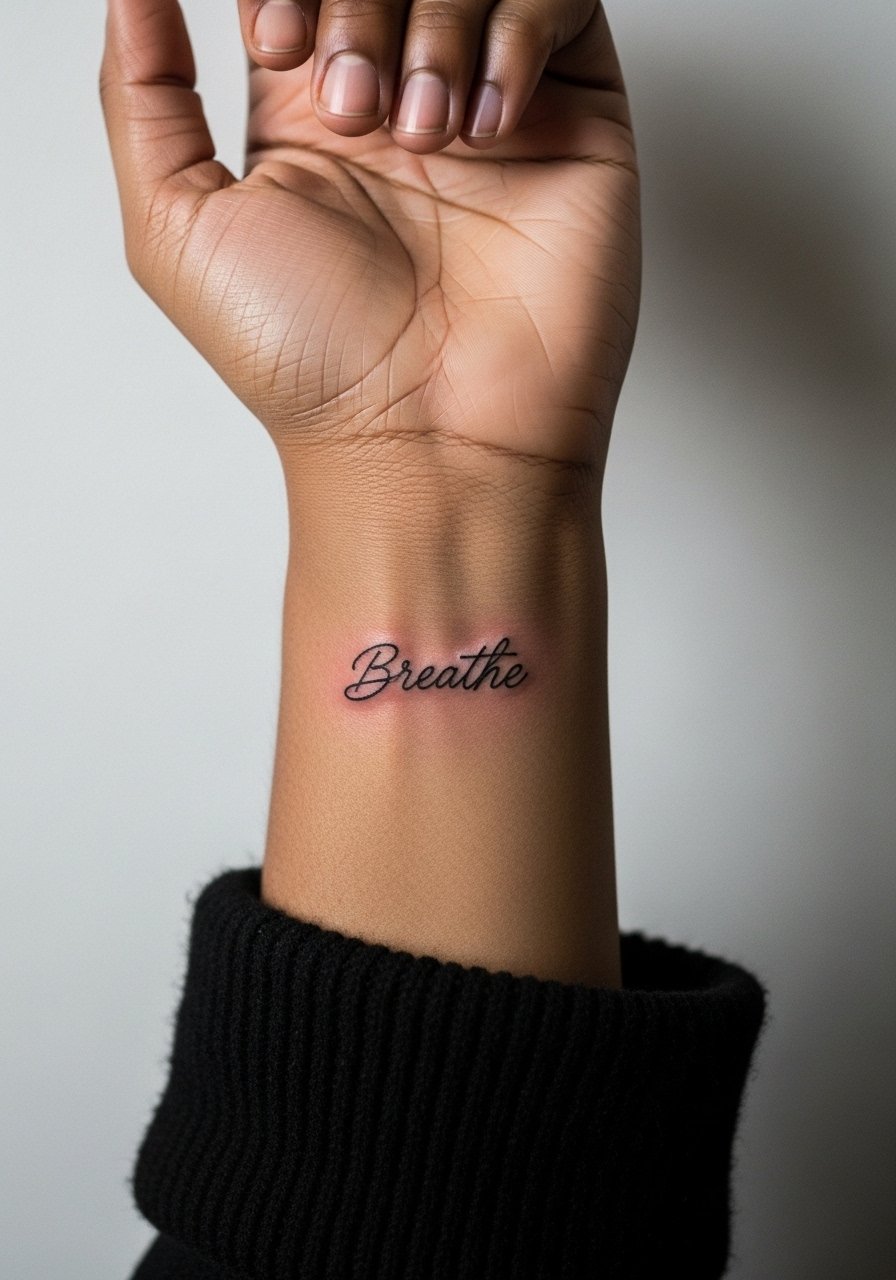
Most micro-script pieces on wrists benefit from slightly bolder letterforms for longevity, especially on medium and dark skin tones. In my experience, ask the artist to use a tiny baseline gap between letters so the words stay legible at year two. A common mistake is requesting hairline cursive that dissolves into a slur. The inner wrist can be tender but short sessions and a topical numbing cream ease the process. Stack a thin bracelet on the opposite wrist to balance attention and use a thin silver cuff bracelet when you want the script to stand out.
10. Thin Outline Butterfly Migration on the Thigh
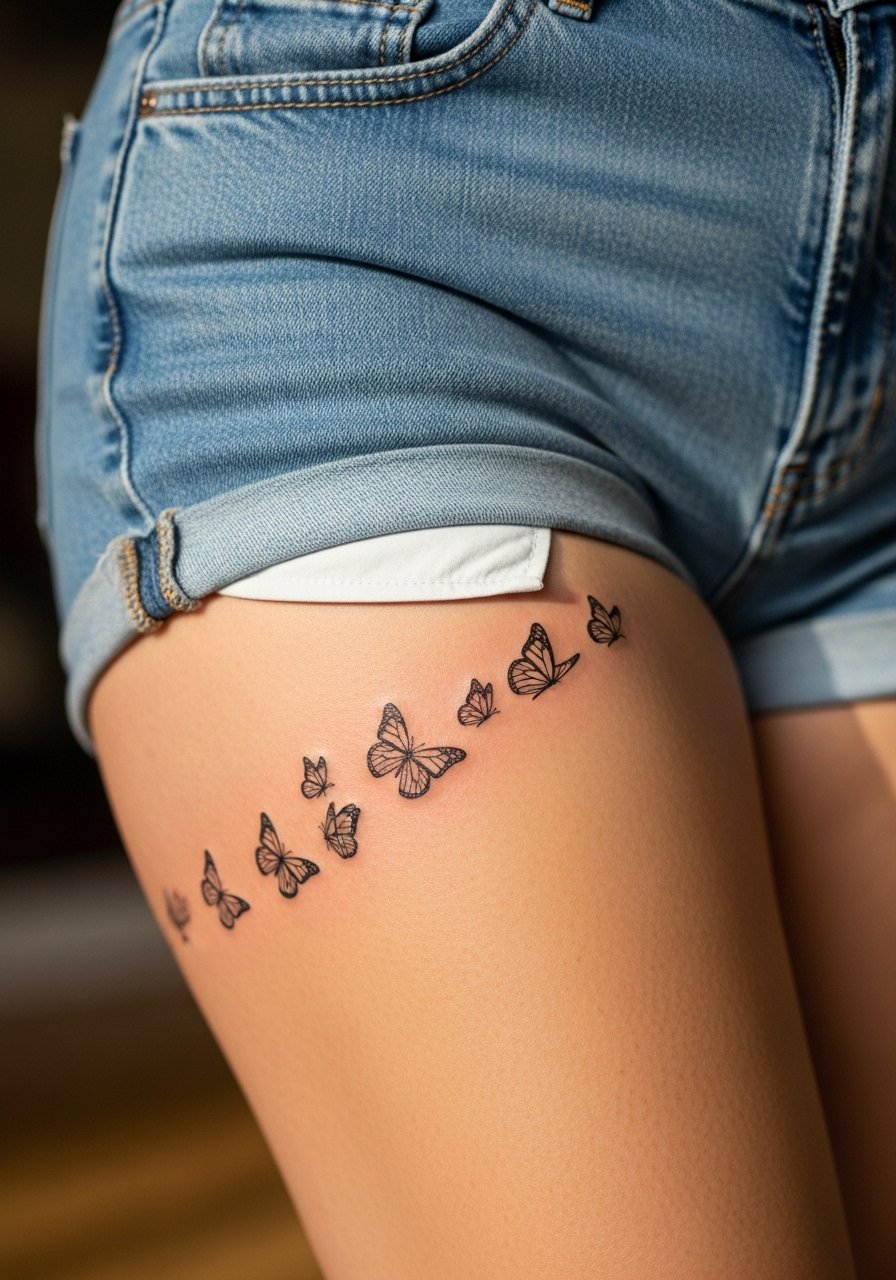
Thigh placements are forgiving for size and spacing and they tolerate very fine work better than hands. Tell your artist you want clear gaps between each wing so the migration reads as motion even after settling. The main mistake is compressing too many tiny butterflies into a small block. Sessions are comfortable because you can lie on your back or side. For summer wear, pair the piece with high-waisted shorts or a skirt for a clean reveal. Search for high waist denim shorts to coordinate outfits.
11. Single-needle Moon Phase Arc on the Back of the Neck
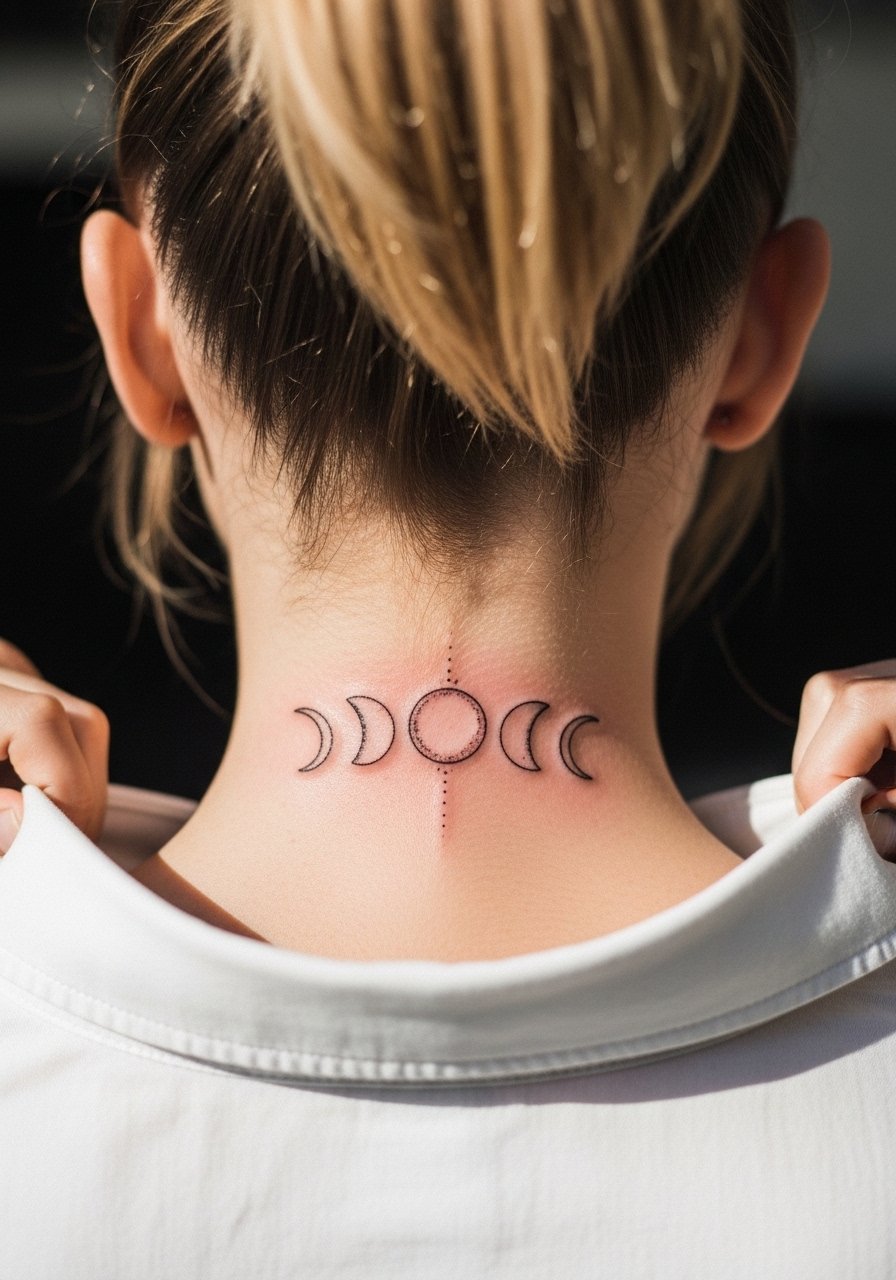
Back-of-neck arcs are trending because they peek out from pulled-up hair. Ask for slightly bolder crescents so contrast keeps showing in photos. Pain is moderate because of thin skin and proximity to bone. A common error is choosing too small an arc that disappears under hair or collars. For session wear, bring an open-neck shirt and tie your hair up so the artist can work cleanly. Small stud earrings complement the placement without competing.
12. Minimalist Mountain Range on the Forearm
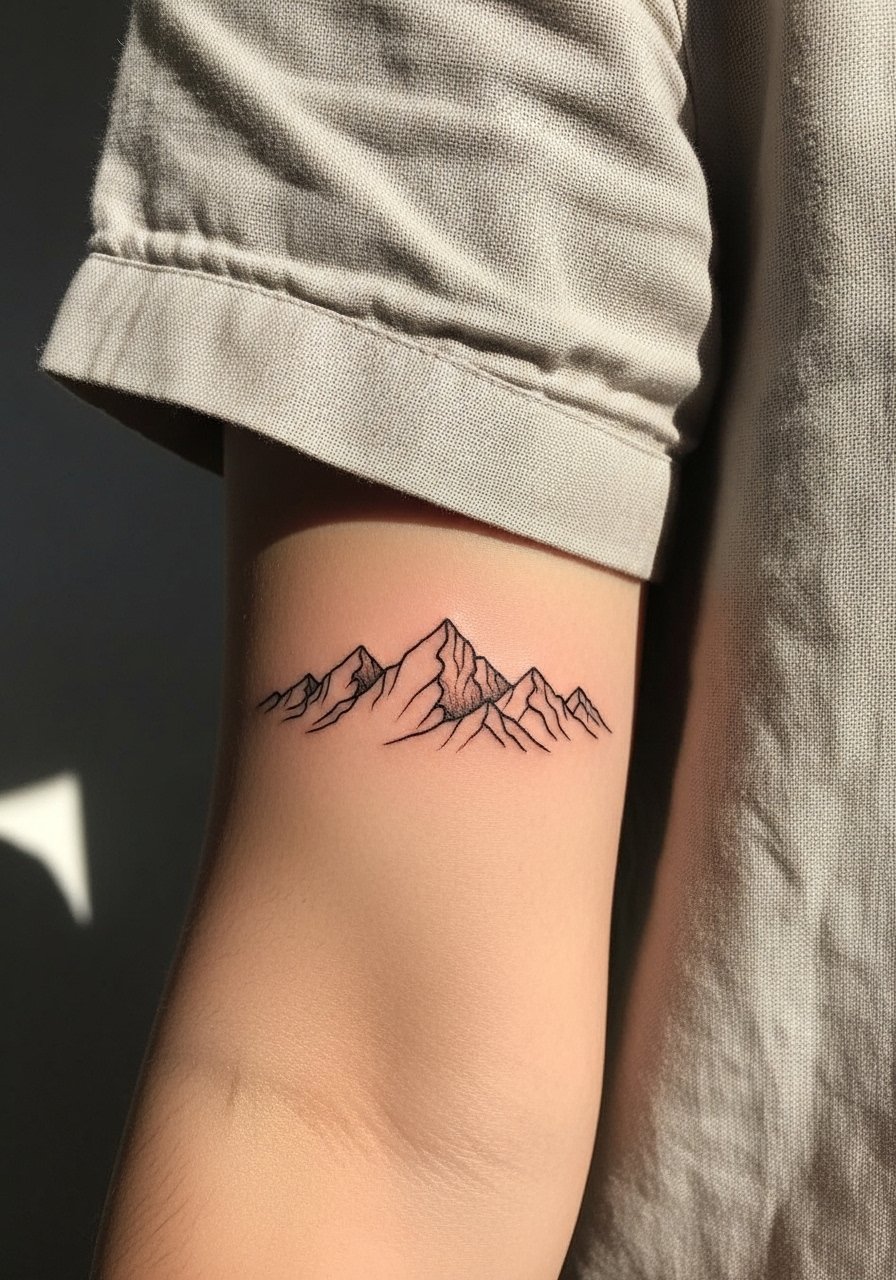
I've seen mountain ranges age well when artists use layered line weight and maintain negative space between ridges. Ask for spacing that suggests distance rather than cramming all ridges into one plane. The inner and outer forearm both score good longevity because they avoid constant abrasion. The session is comfortable and quick for a three-inch horizon. For daily wear rolled-up linen shirts in light neutrals showcase the horizon and keep the arm uncovered for casual visibility. A search for sage linen short sleeve pulls similar styles.
13. Hourglass Silhouette at the Anklebone
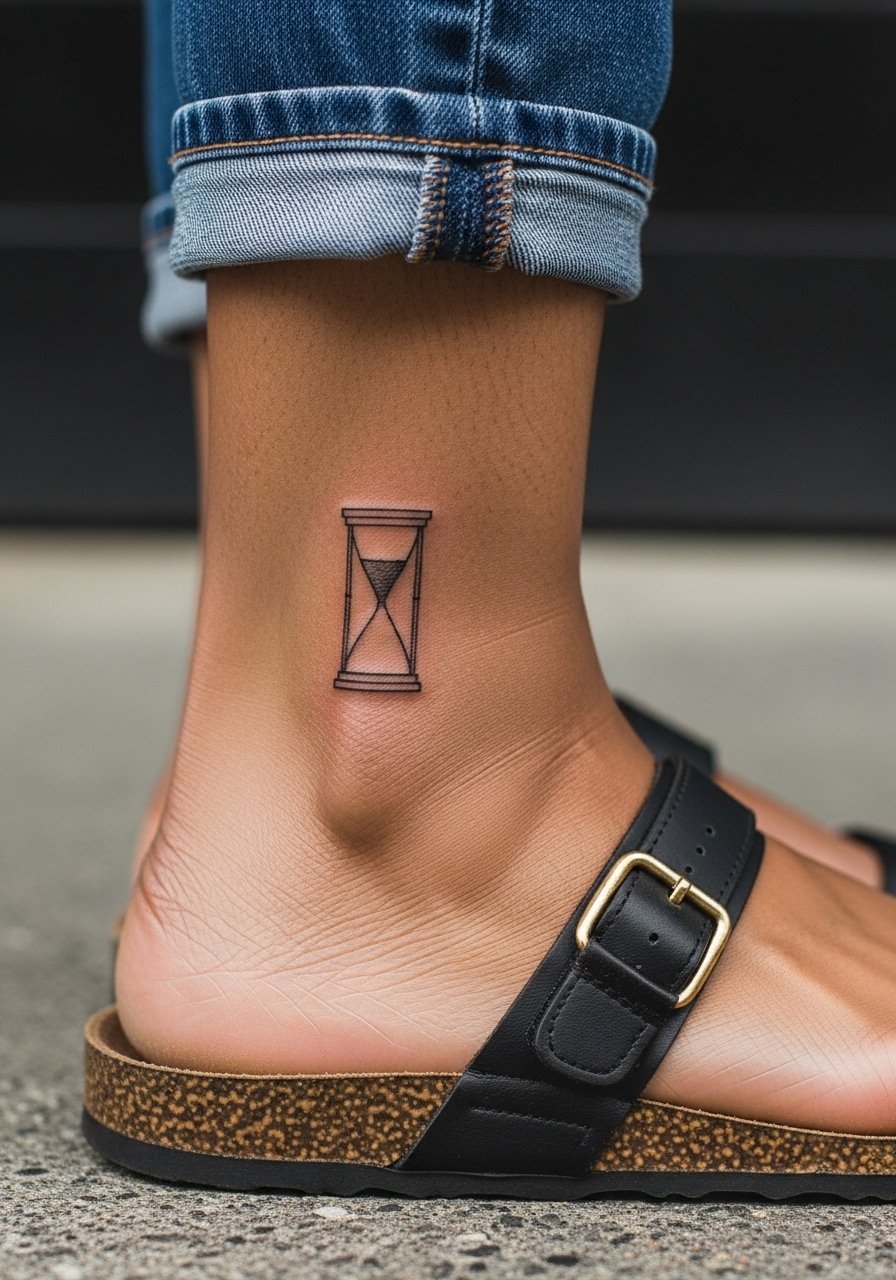
The anklebone can hold clean silhouettes if spacing is generous and the inner lines are not too close. Tell your artist you want the negative space inside the hourglass emphasized so the shape stays readable. A common mistake is asking for overly thin inner contours that close up over time. Expect mild pain near bone and plan for one session. Pair with strappy sandals or cropped pants to show it off in warm months.
14. Single-line Continuous Face on the Collarbone
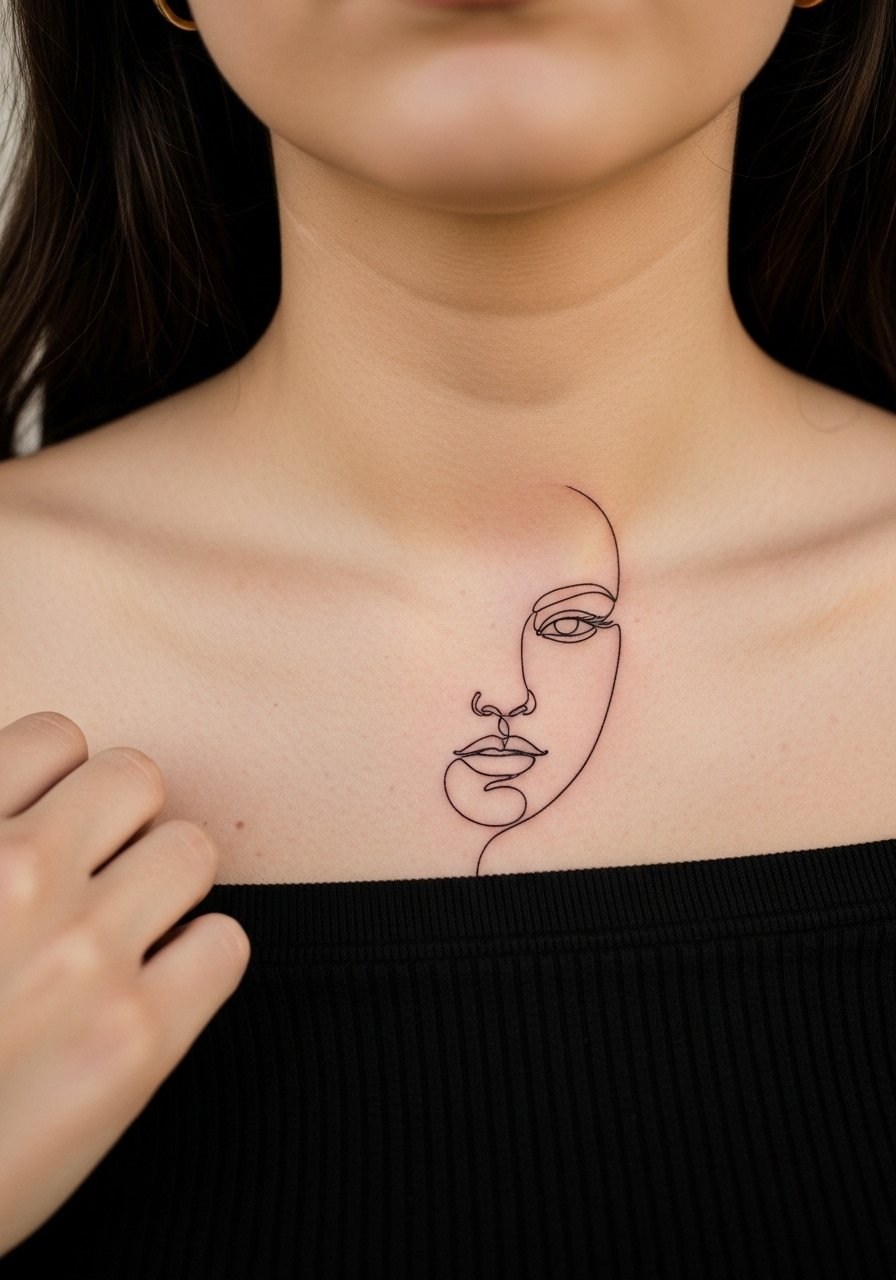
Continuous line faces translate surprisingly well to collarbones because the natural curve complements the flow. Ask for a single uninterrupted stroke with intentional pauses rather than jittery loops. The common mistake is demanding portrait detail in a tiny footprint. Collarbone sensitivity is moderate so sessions are brief. An off-shoulder blouse highlights the line and lets necklaces sit below the piece. Try an off shoulder linen blouse for clean framing.
15. Micro Geometric Diamond on the Hand
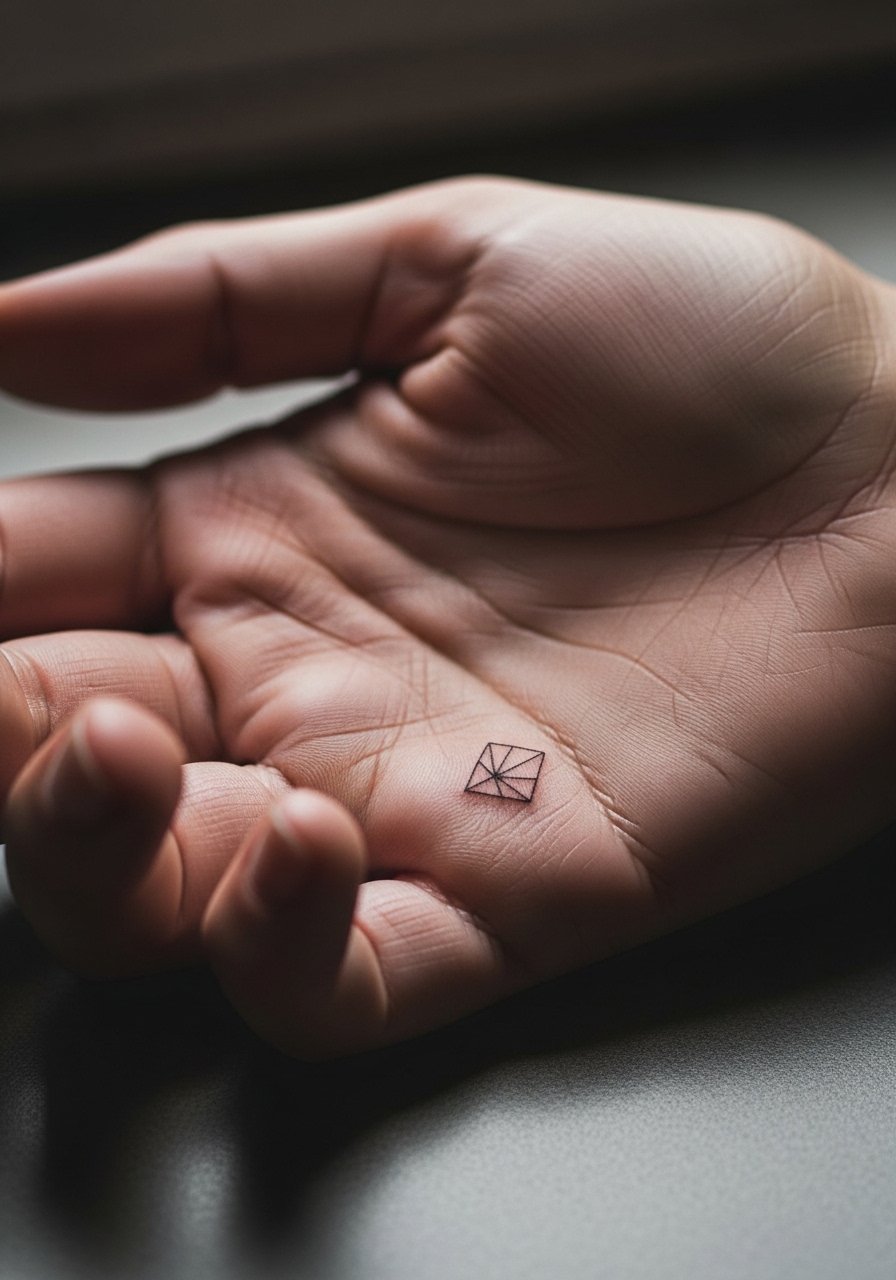
Hand and finger work remains controversial because of rapid fading and higher touch-up rates. One camp says single-needle detail on hands blurs in one to two years. The other camp says with bold enough line weight and regular touch-ups it can last much longer. Ask your artist for realistic expectations and a touch-up plan before booking. Hands also face workplace considerations, so think about career visibility. The session is more painful and the piece will likely need a touch-up at six to twelve months.
16. Minimalist Compass on the Shoulder
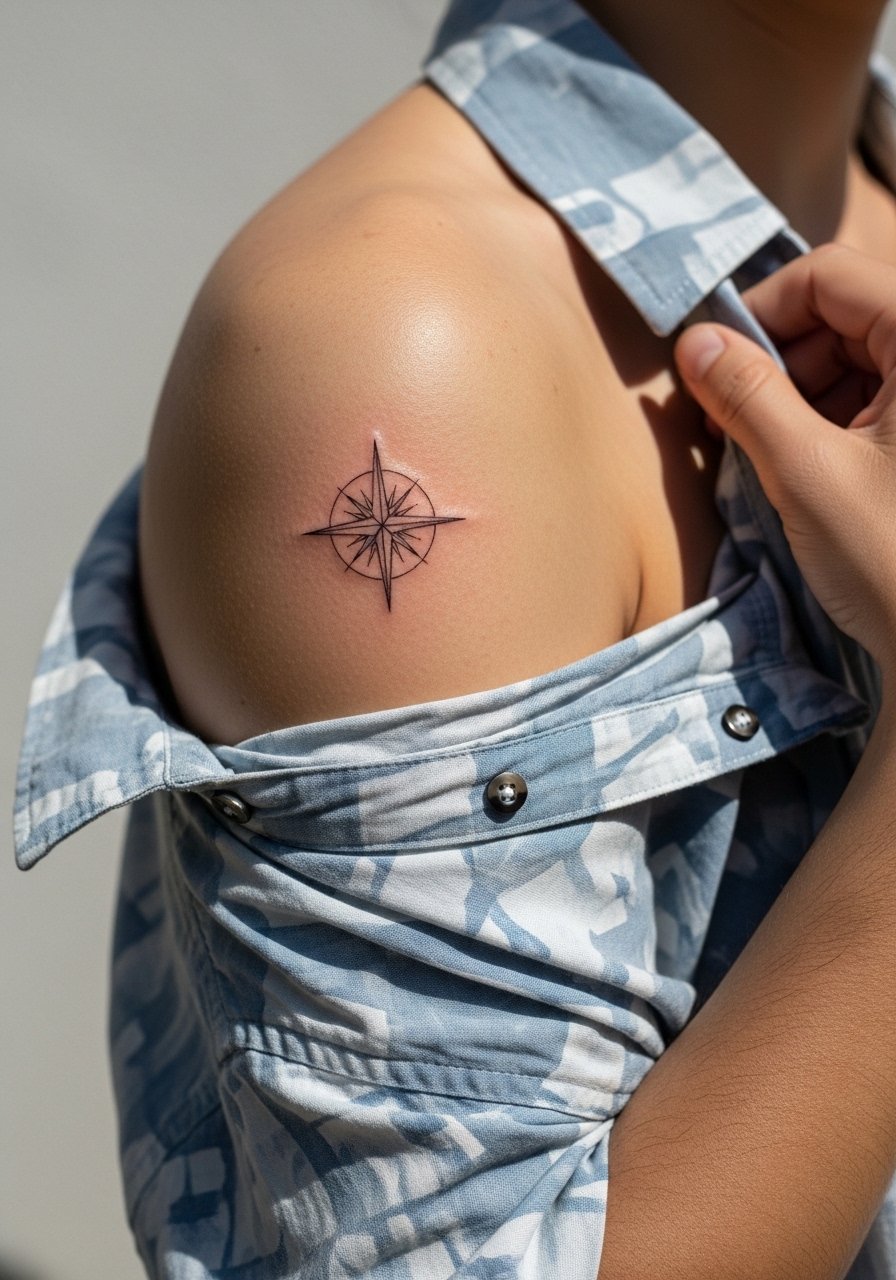
Shoulder placements tolerate detail and keep linework crisp longer than high-movement zones. For compasses, request clear cardinal points and a slightly heavier outer ring to retain silhouette after settling. The biggest mistake is shrinking the compass so fine ticks merge. Sessions are comfortable and fast because the area is stable. For showing off, wear a loose button-down you can slide aside so the compass reads as a subtle anchor.
17. Micro Leaf Sprig Behind the Ear

Behind-ear pieces are discreet and work well for tiny motifs. When you request this spot, describe exact placement below the hairline so the artist can stencil precisely. The main mistake is asking for too many tiny details that blur on such a small patch. Pain is low but the area is sensitive to pressure. Tie your hair up for the session and plan for a hairstyle that reveals the sprig when you want to show it.
18. Minimalist Key on the Ribcage
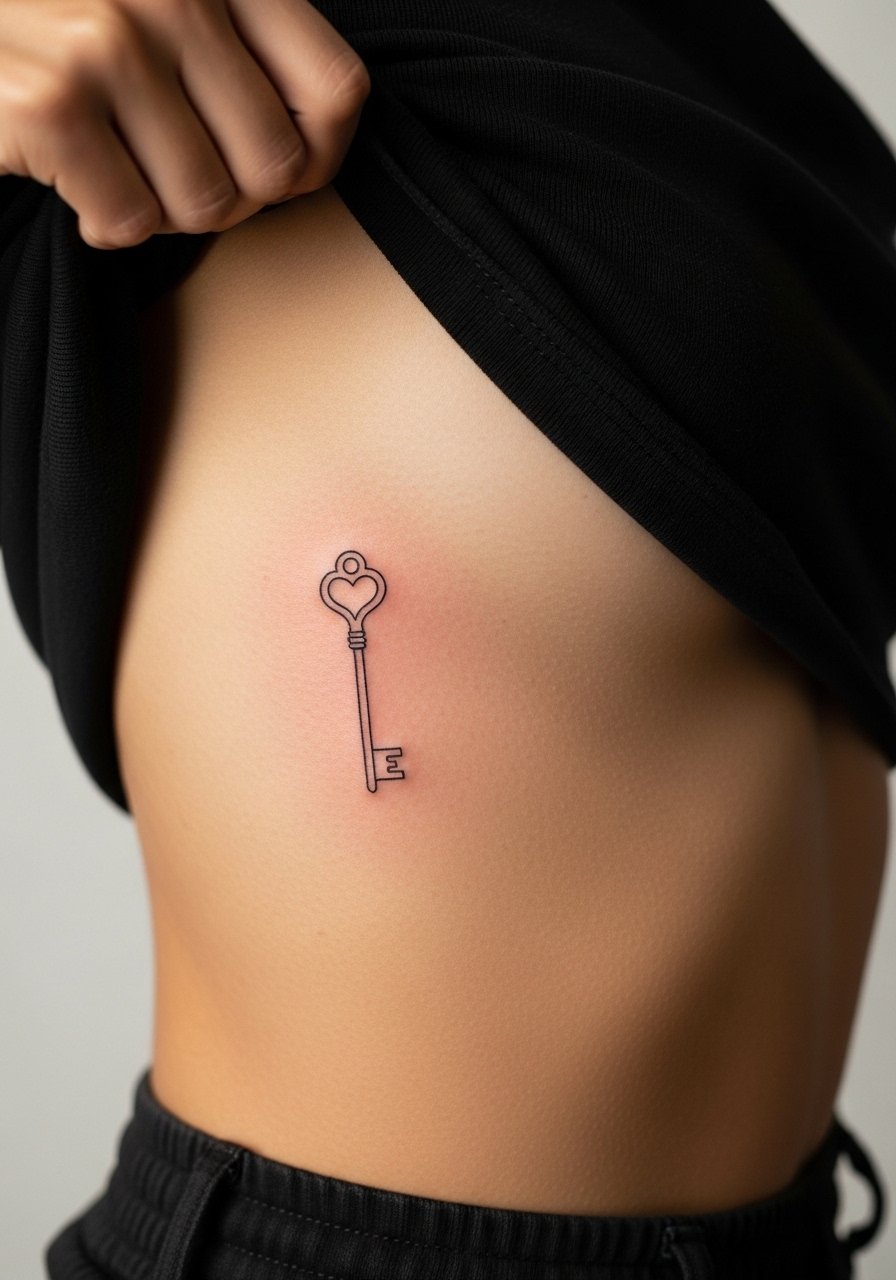
Ribcage placement gives privacy but demands honest discussion about pain and long-term stretching. Ask your artist to avoid super-fine crossbars in the key and instead emphasize silhouette so the shape holds up. The biggest mistake is shrinking the design so detail dissolves within a couple of years. Sessions on ribs are higher on the pain scale, so plan accordingly and wear a loose top that is easy to lift for the artist.
19. Minimalist Anchor on the Wrist
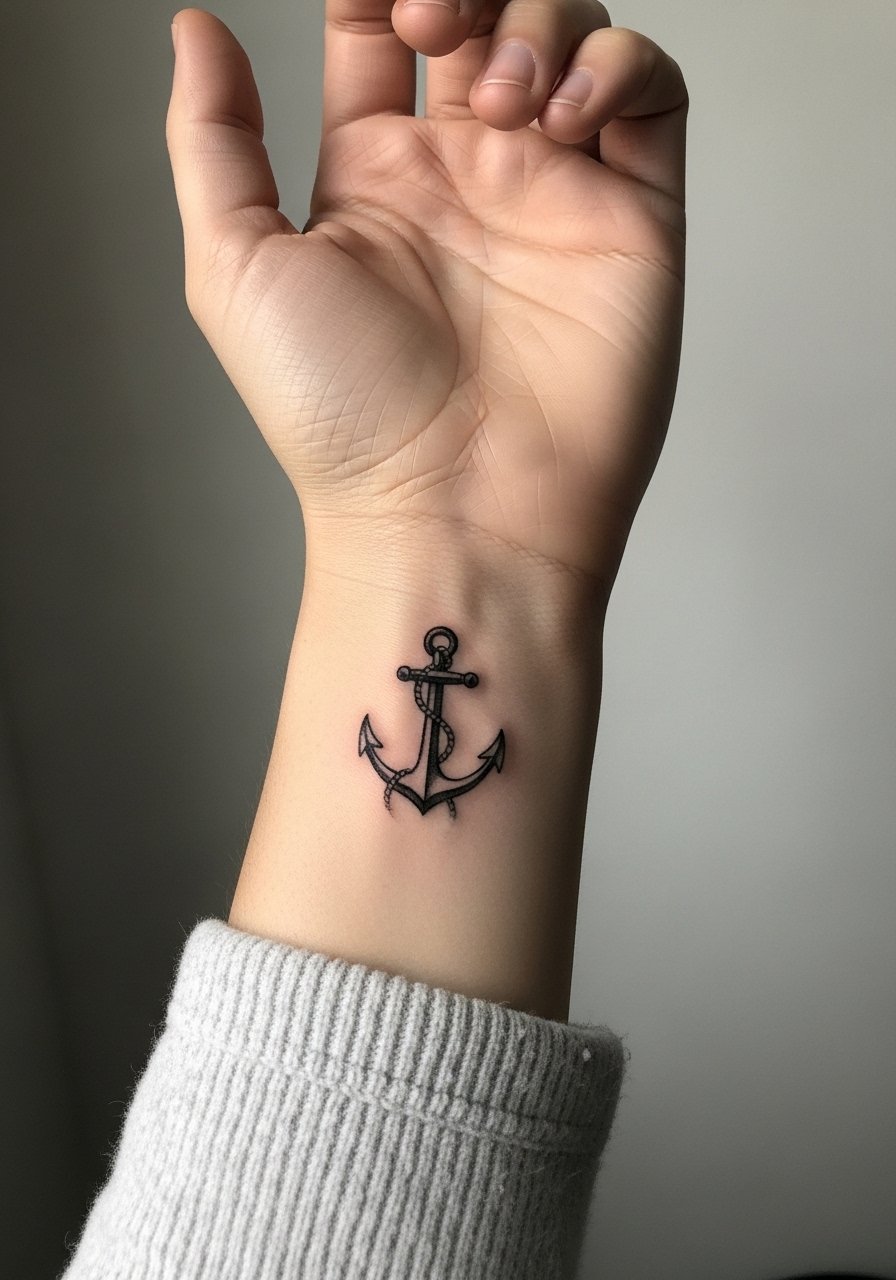
Anchors on wrists are classic because the motif reads well at small scale. Tell the artist you want defined bars and a reinforced anchor base so it keeps proportion after settling. The common mistake is making the shank too thin which leads to soft edges in photos. Wrist sessions are short but expect scabbing if you move the joint a lot. Pair the symbol with a minimalist watch or thin bracelet to balance the area. Search for thin silver cuff bracelet for a simple complement.
20. Micro Concentric Circles on the Back of the Arm
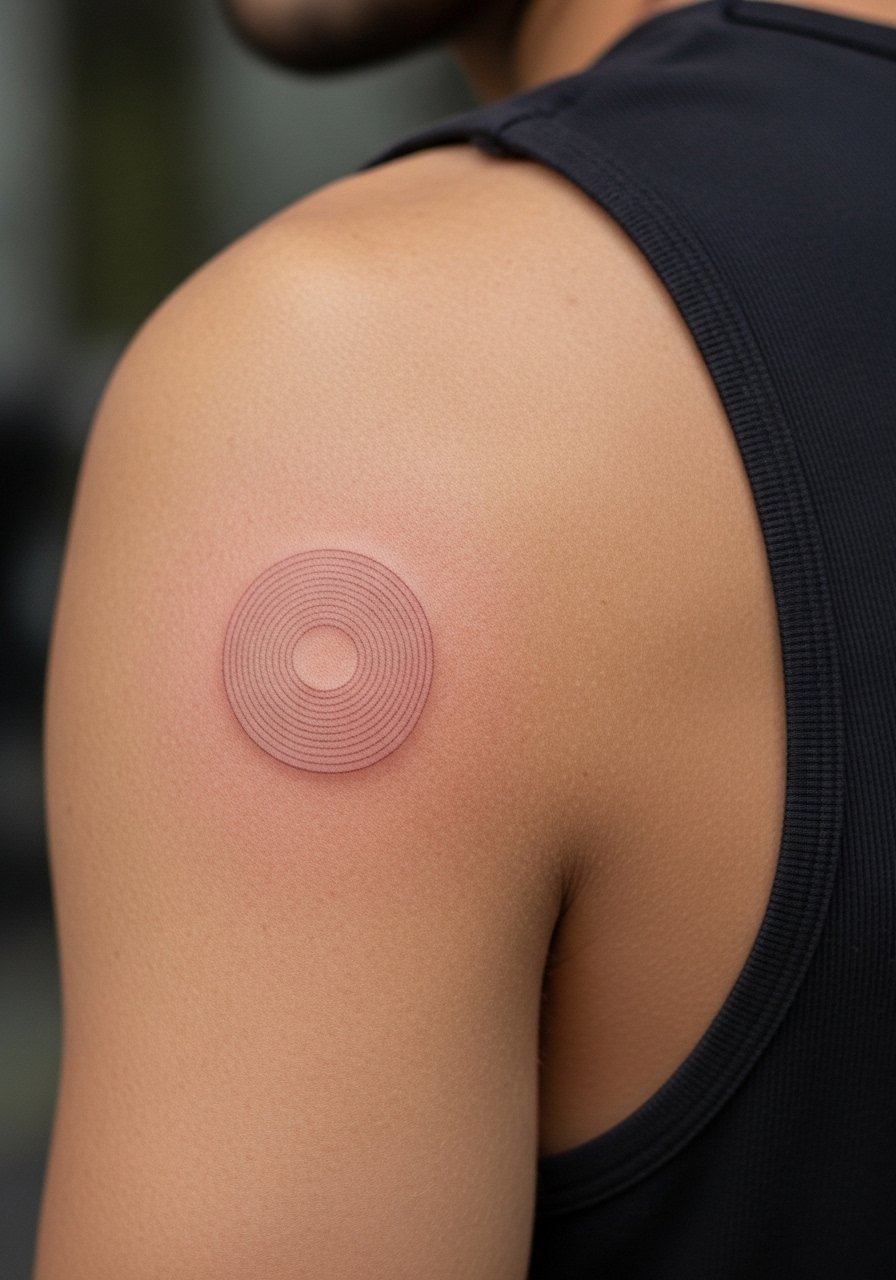
Back-of-arm placements avoid frequent abrasion and keep tight geometry crisp longer than hands. For concentric work, ask for small but deliberate gaps between rings to prevent merging. The common mistake is stacking rings with minimal spacing. Session pain is low and touch-ups are uncommon unless you sun the area. Wear a loose sleeveless top for comfortable access during the appointment.
21. Single-needle Clover Near the Anklebone
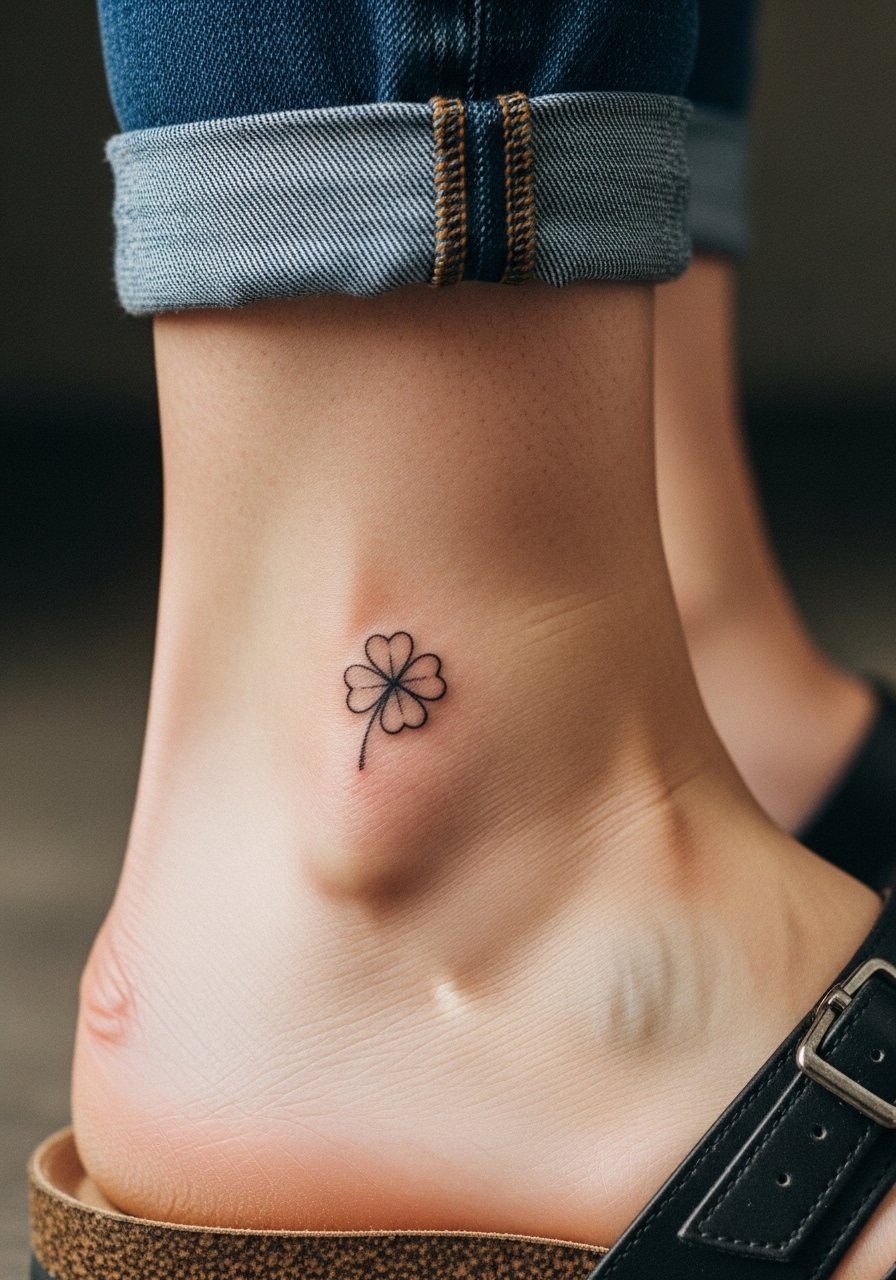
Anklebone placements work for sentimental micro pieces because they can still keep shape if the clover has clear leaf separation. Tell your artist you want each leaf edge defined with small negative space. The usual mistake is compressing all leaves into the same area which blurs. Pain is mild around the bone. Pair with sandals and cropped pants to let the clover show on warm days.
22. Micro Compass Rose on the Sternum
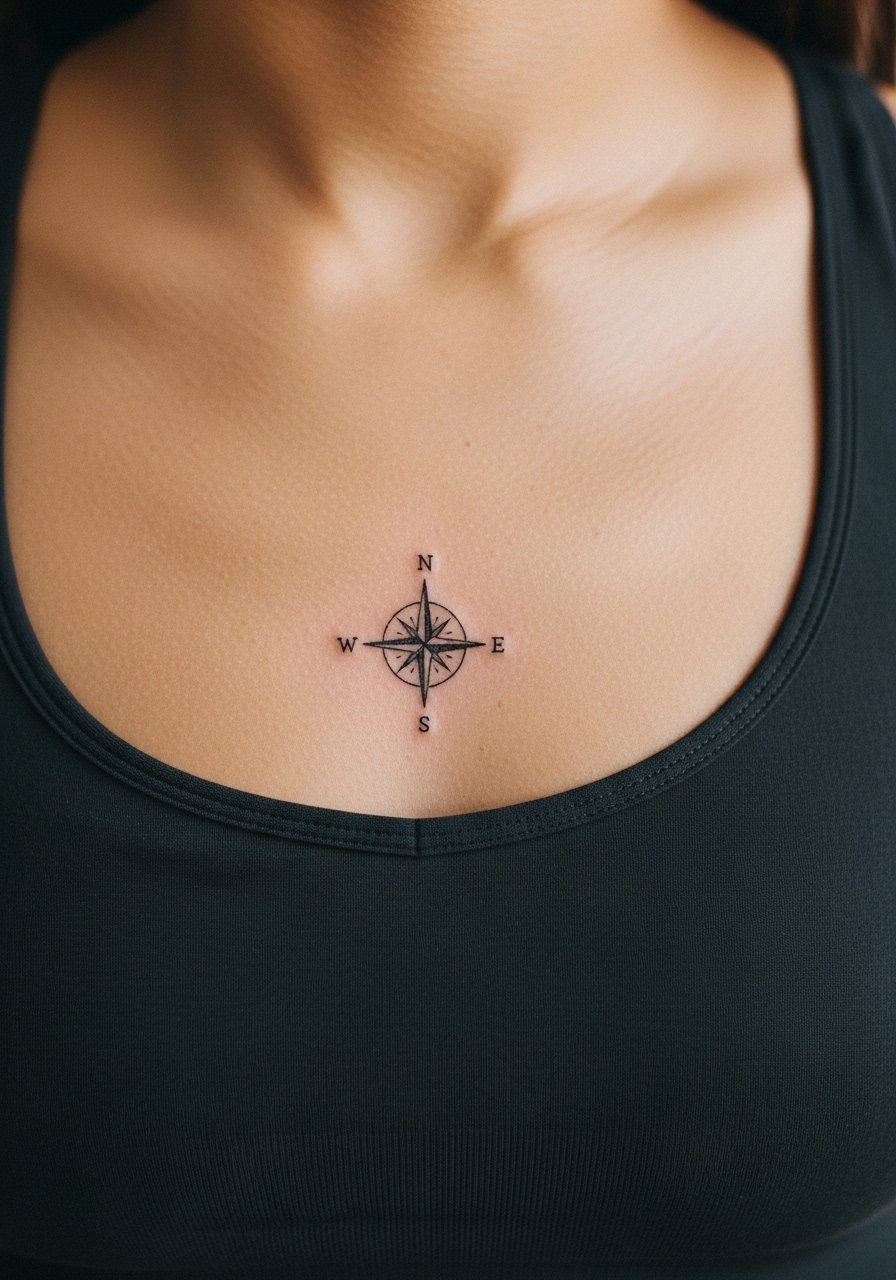
Sternum pieces are intimate and require a practitioner experienced with torso work. Ask the artist about needle depth because the sternum and ribs face different tissue tensions. The common error is expecting fine dial detail in a very small footprint. Pain is higher and sessions may be broken into shorter passes. For modesty and access bring a fitted sports bra that reveals only what the artist needs.
23. Simplified Zodiac Glyph on the Collarbone
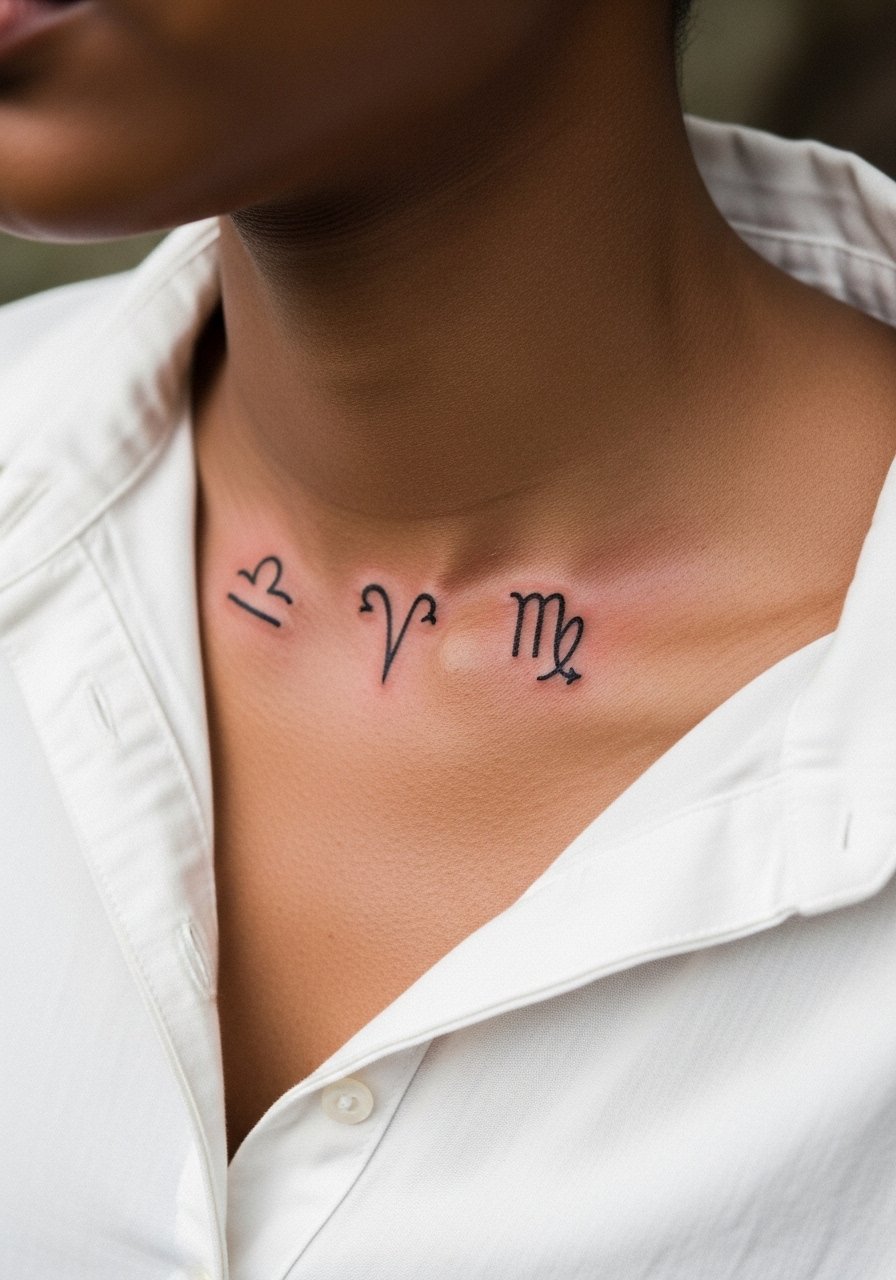
Glyphs translate well into tiny shapes if you ask for bold, single-stroke forms that avoid micro curls. On darker tones request a touch more saturation for contrast so the glyph photographs clearly. Common mistakes include overly thin strokes that vanish. The collarbone is a showy spot, so plan jewelry that sits below the mark. Try a thin chain pendant necklace to frame the glyph without hiding it.
24. Micro Bar Code Coordinates on the Side of the Finger
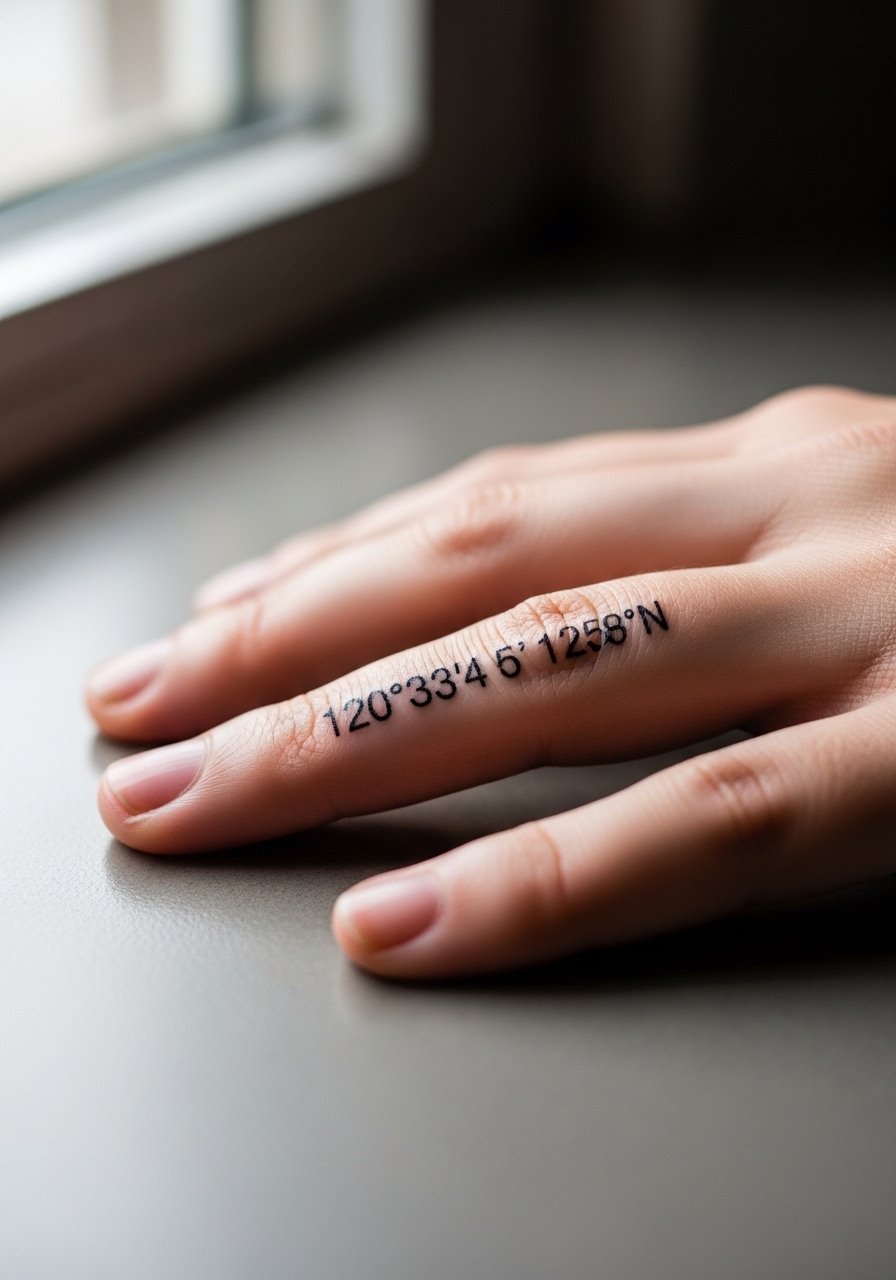
Finger-side work is high maintenance because of constant washing and use. Ask the artist for slightly bolder numerals or bars so they stand a better chance after daily friction. The typical mistake is treating finger strips like forearm lines. Expect faster fading and plan touch-ups in the first year. The session is brief but more painful than a wrist piece. Think about placement and the likelihood of needing a refresh.
25. Minimalist Line Pine Tree on the Thigh
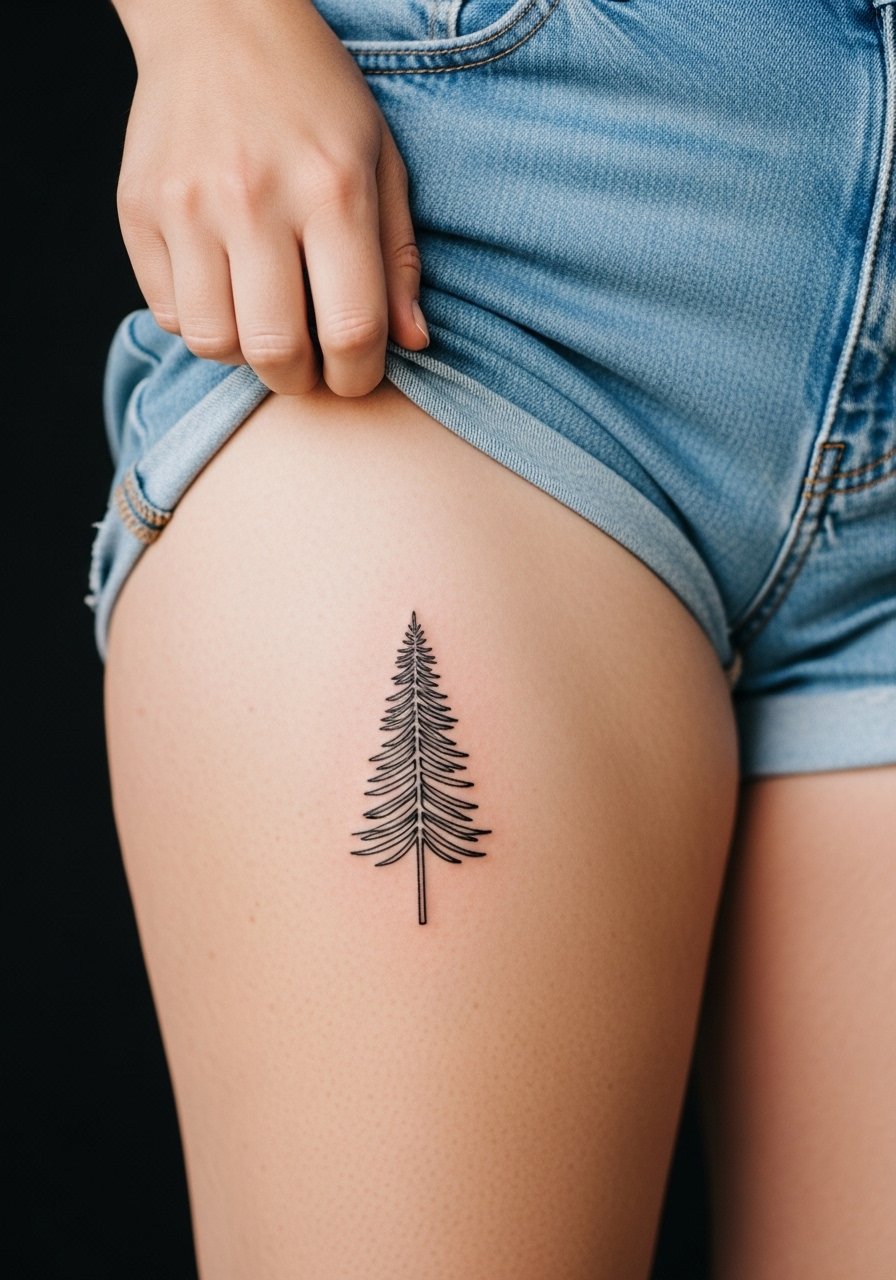
Thighs tolerate fine vertical designs beautifully because the skin is stable and larger. Tell your artist you want a single trunk line and spaced branch lines to avoid crowding. The common mistake is compressing branches into a dense block that blends over time. Sessions are comfortable since you can position the leg easily. Pair with high-waisted shorts or a skirt to let the tree peek out on warm days. Search for high waist denim shorts for outfit ideas.
26. Micro Crescent Trio on the Back of the Neck

Back-of-neck crescents are subtle and photograph nicely when hair is up. Ask for slightly heavier crescents to give contrast and avoid losing crescents into hair shadows. The common mistake is choosing tiny crescents with minimal contrast. Pain is moderate and session time is short. For showing off, wear a high ponytail and a loose collar so the moons peek through.
27. Single-line Paper Airplane on the Shoulder
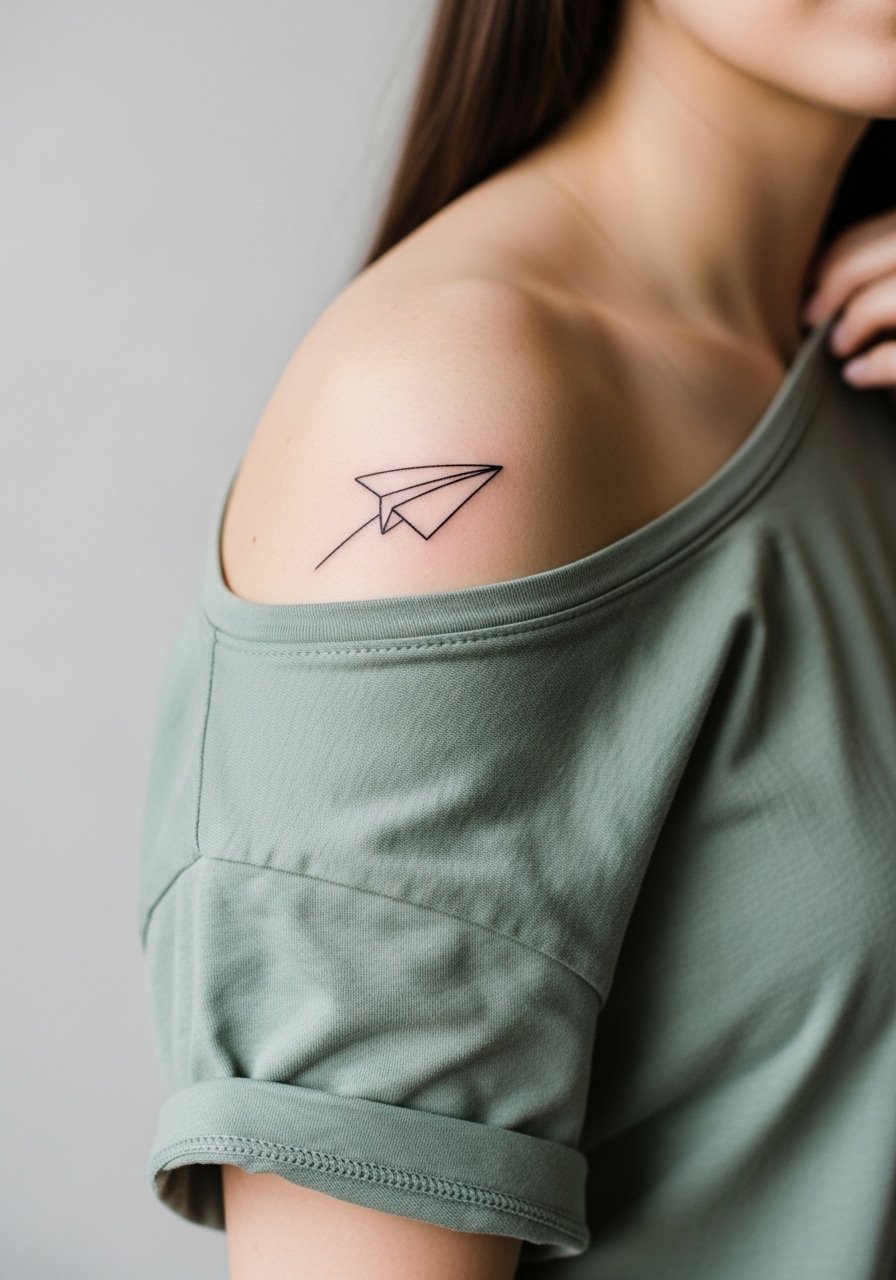
Paper airplanes are playful minimal pieces that age well on shoulders because the skin is stable. Request a single confident stroke with one or two reinforcing contour lines for durability. The usual mistake is adding tiny flight trails that clutter the silhouette. Sessions are quick and low on pain. A loose short-sleeve button-up pulled aside makes a nice staged reveal without overexposing the area.
Frequently Asked Questions
Q: Will my fine line wrist piece blur faster than a forearm piece?
A: In my experience wrists face more abrasion and washing which accelerates softening. Forearms generally keep linework crisper longer. If you want a wrist piece, ask for a slightly heavier line and plan a touch-up at six to twelve months.
Q: Are micro florals a bad idea on medium or dark skin tones?
A: Not necessarily, but they need contrast. I've seen micro florals work well when artists add a touch more saturation or subtle gray shading so petals read in photos. Ask for healed photos on similar skin tones from the artist and consider slightly larger spacing.
Q: How do ribcage fine lines compare with chest or collarbone work for longevity?
A: Ribcage moves more with breathing and changing body composition, which can blur the tightest lines faster. Collarbone and upper chest are more stable. There is a split in opinion among artists so ask which approach they prefer and whether they recommend spacing or depth adjustments.
Q: Should I use numbing cream for a first fine line tattoo?
A: Numbing cream helps many first-timers, especially on wrists and collarbones. Some artists avoid it because they prefer the natural feedback during linework. If you plan to use it, tell the studio in advance and follow their timing guidance so it does not interfere with stencil adhesion.
Q: Can I adapt book flash into a custom piece that suits my placement and skin tone?
A: Yes. Bring the flash page and explain which elements you want to keep and which to scale or space differently. A good artist will redraw parts to suit your anatomy and suggest line weight changes for longevity. Request mockups on the skin when possible.
Q: How often do single-needle hand or finger pieces need touch-ups?
A: Expect hand and finger work to require touch-ups sooner than arm pieces. From what I've seen, a touch-up within the first year is common, and another refresh every two to three years can keep lines crisp depending on your lifestyle.
Q: What should I wear to a collarbone or sternum session for comfort and modesty?
A: For collarbones bring an off-shoulder or wide-neck top you can slide down on one side. For sternum wear a fitted sports bra you can lift slightly. The goal is to expose only the work area while staying comfortable.
