
Fine line phoenix work has exploded online, but trends and longevity do not always match. The pieces that look ethereal at first can blur unless you plan spacing, line weight, and placement from the start. Read these geometric phoenix ideas with real advice on what to ask for, how they heal over time, and which wardrobe choices keep the linework visible when you want to show it off.
1. Geometric Phoenix Mandala on the Forearm
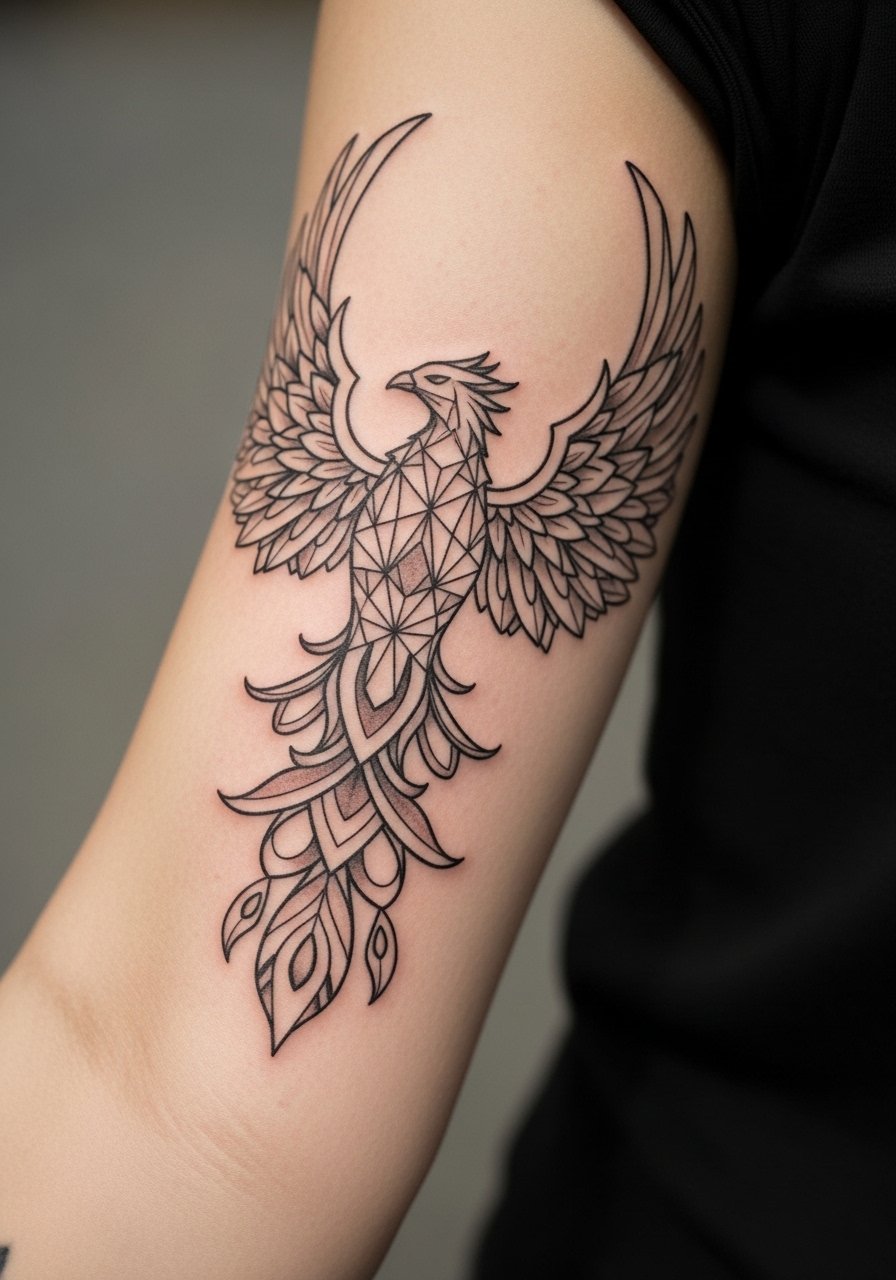
I recommend this for anyone who wants a balanced composition that reads from the sleeve down. Tell your artist you want broader linework inside the mandala, not ultra-fine micro lines, so the dense pattern has room to breathe and avoids merge at year two. Expect a one- to two-hour session with medium pain for the outer forearm. A common mistake is shrinking a mandala to wrist size, which causes the lines to drown each other as it heals. For showing it off, roll up a loose cotton button shirt and wear a thin silver cuff on the opposite arm to frame the forearm art.
2. Ignorant Style Geometric Phoenix Burst on the Calf
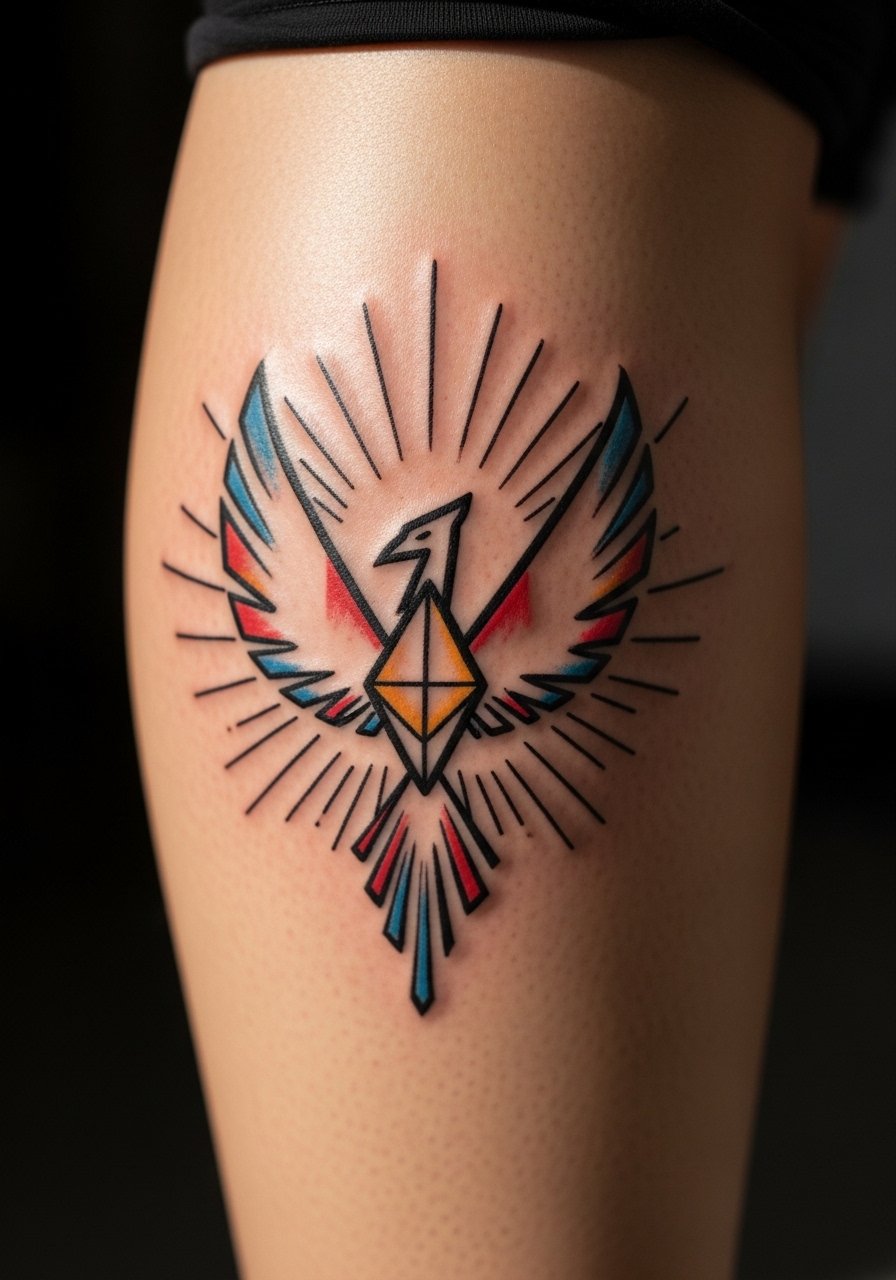
The ignorant style favors spontaneity and imperfect linework that reads lively rather than polished. It is a good pick if you want an energetic phoenix that feels handmade and bold right away. Calf sessions are relatively comfortable compared with ribs, so it often finishes in a single session. The pitfall is asking for tiny, sketchy lines inside a small burst; those details can thin out or blur over time. If body changes worry you, avoid extremely curved wraps near the knee because stretching there alters the geometry. Expect touch-ups at two to four years for line refresh.
3. Fine Line Geometric Phoenix Outline on the Inner Wrist
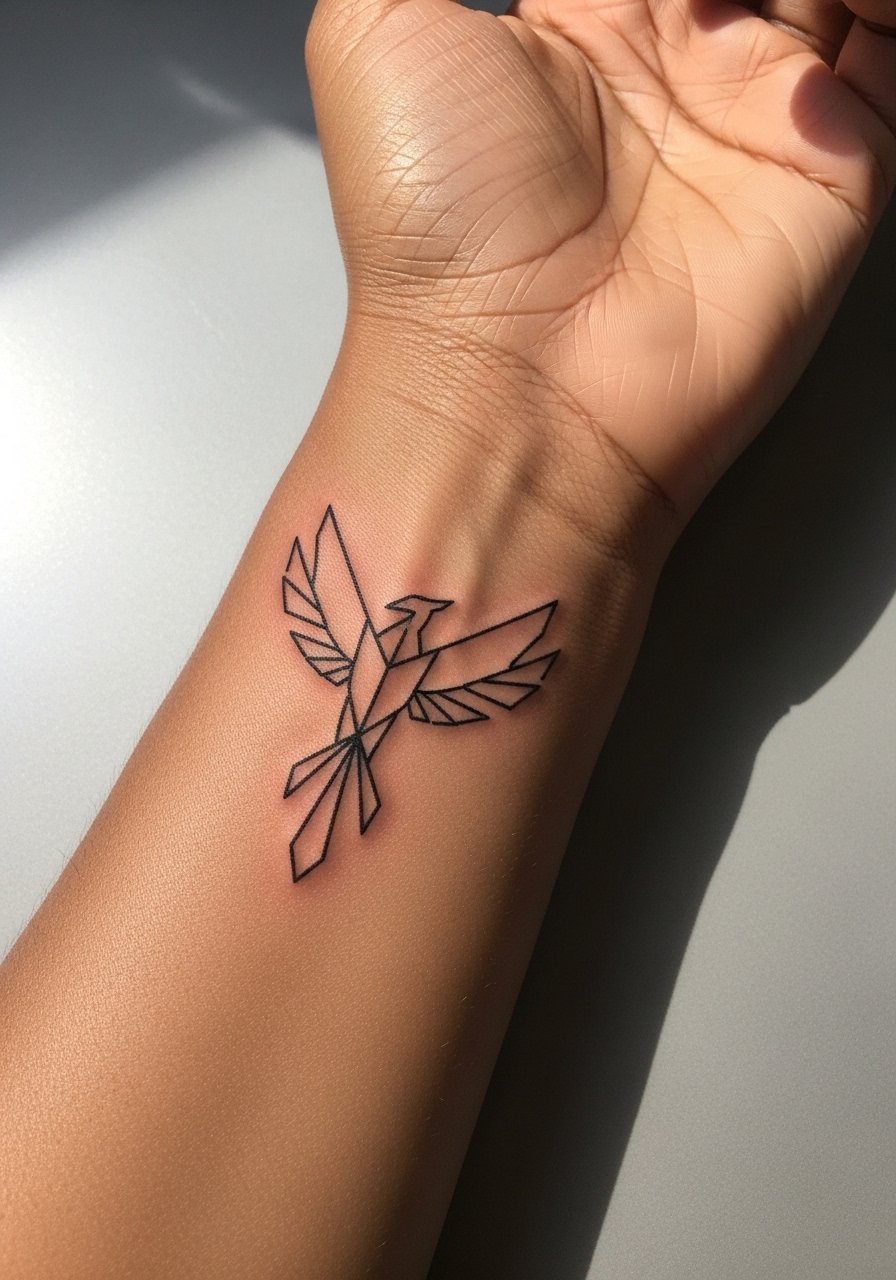
Most folks choose the inner wrist for subtle visibility, but fair warning: fine line on wrists is one of the areas artists debate most. One camp says wrists can handle delicate work with careful depth and spacing. The other camp argues thin lines on wrists fade or feather faster because of constant washing and movement. When you consult, ask for slightly heavier outline weight than what the photo shows and plan a touch-up around year one or two. Session feel is quick but sensitive. Pair it with a thin chain bracelet on the opposite wrist to balance attention without crowding the lines.
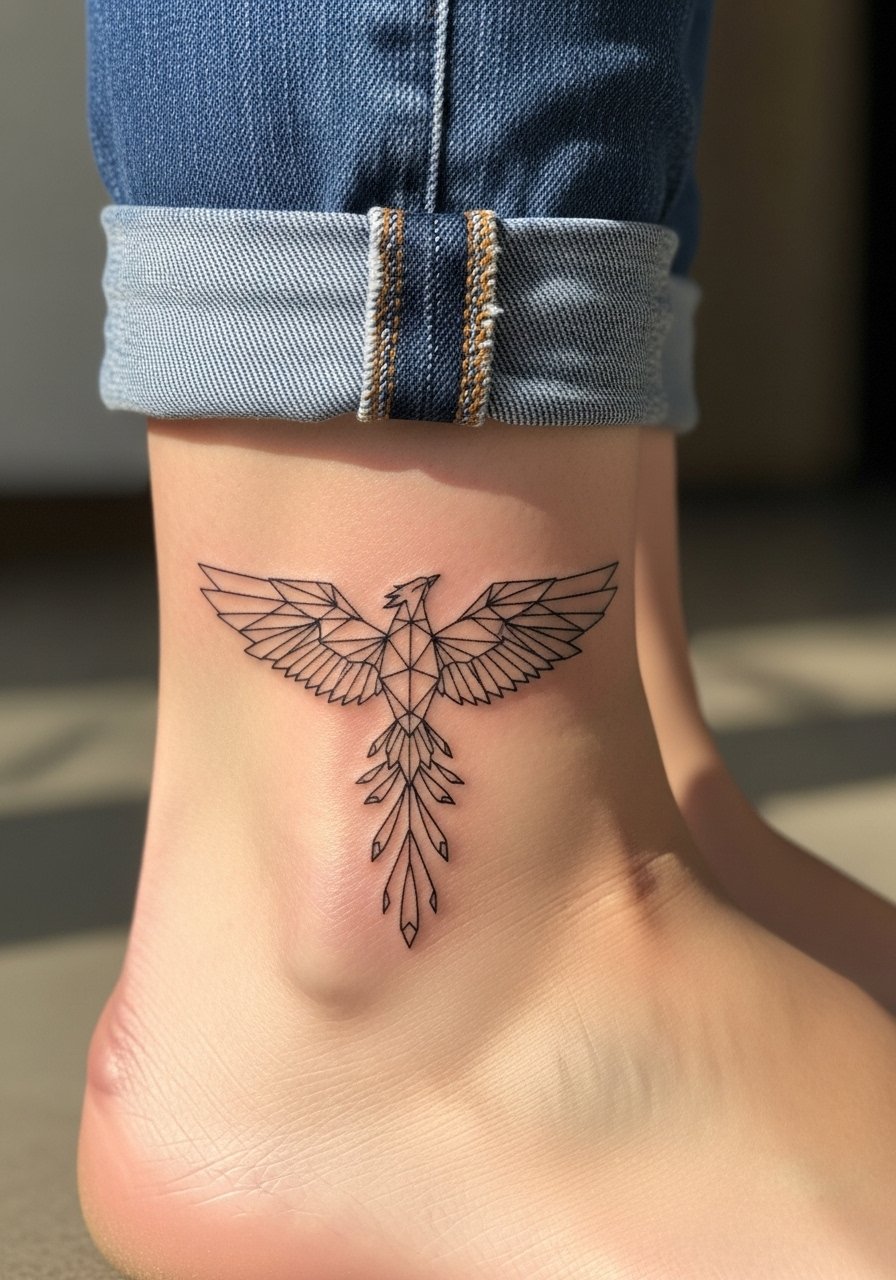
4. Minimalist Geometric Phoenix Silhouette on the Ankle
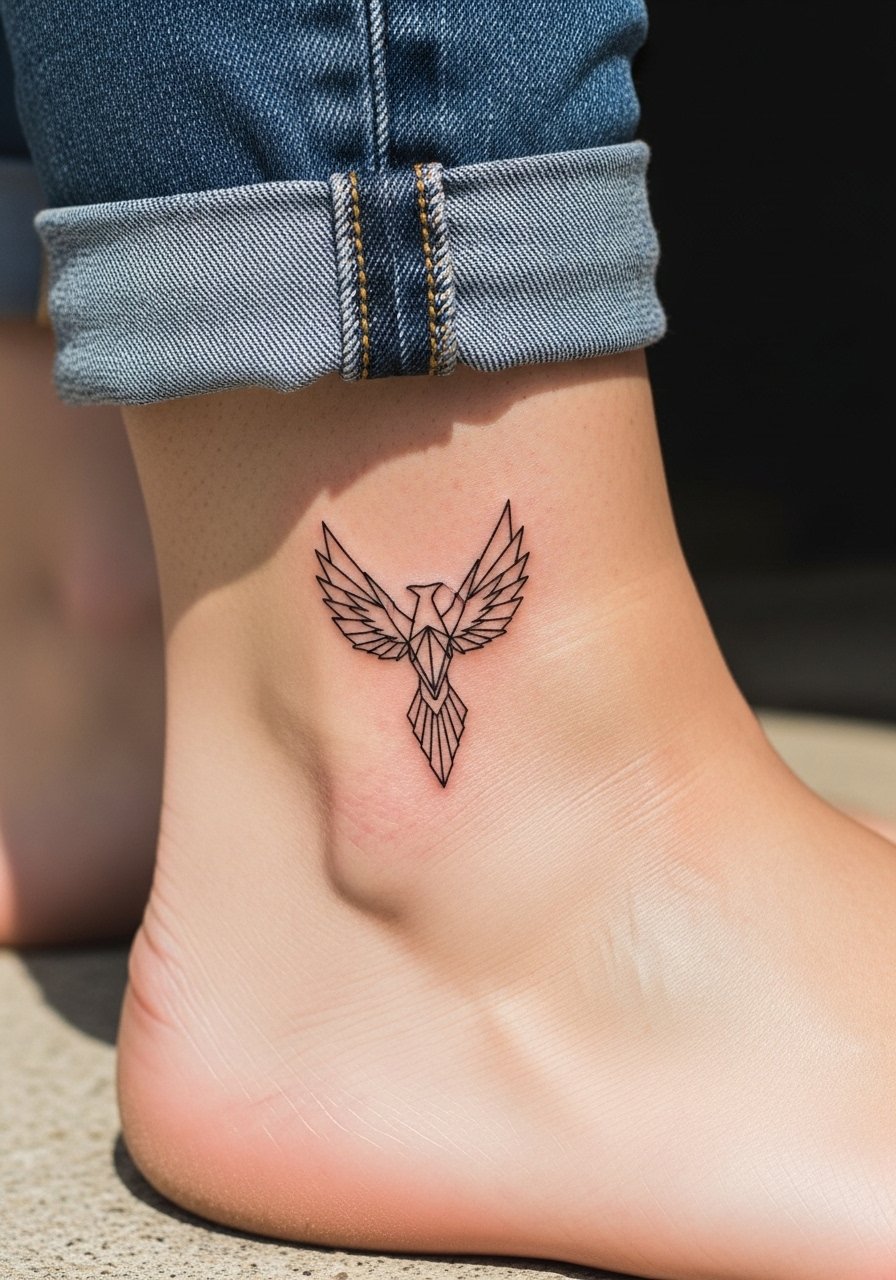
Ankle placements suit tiny silhouettes when you want a hint of phoenix symbolism without loud color. The biggest mistake is packing too much interior detail into a micro silhouette, which reads like smudging after a year. For the session wear, bring shoes you can easily slip off and pants you can roll up. Expect medium pain near the bone and a short single session. Over time the silhouette keeps its shape best with a modest line weight and space around the motif. For casual show-off looks, slip into sandals and cuffed denim so the ankle design has breathing room.
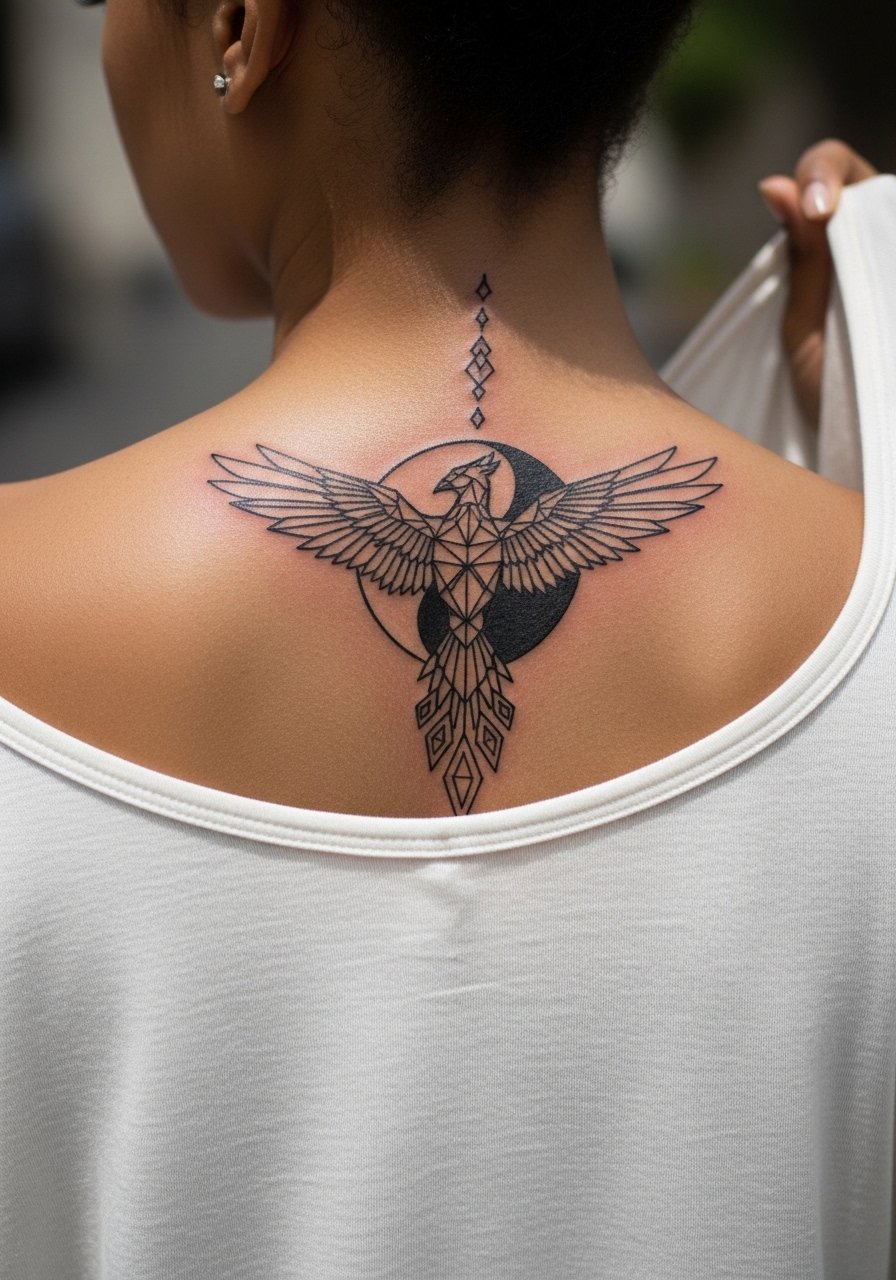
5. Neo-Traditional Phoenix with Geometric Feathers on the Upper Back
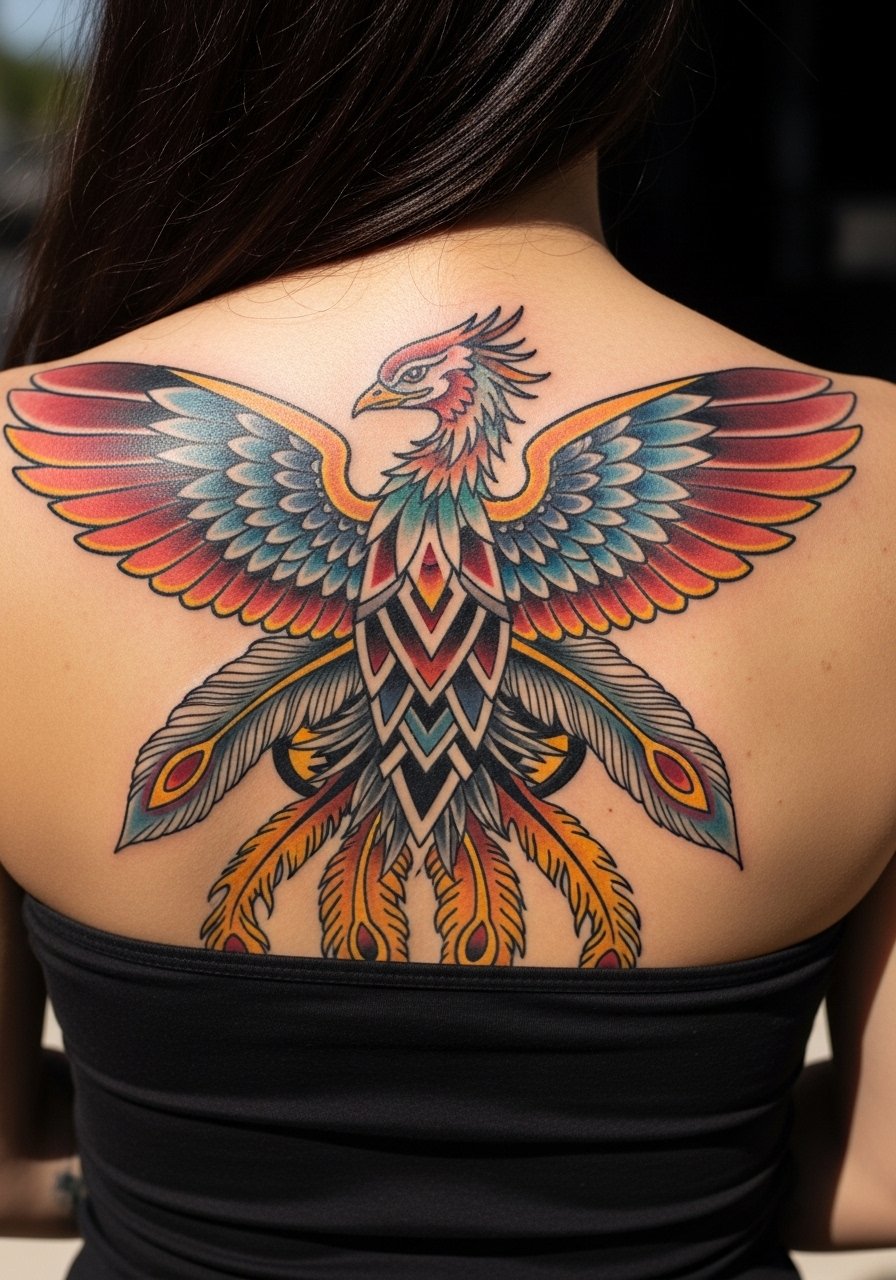
Upper back pieces let you combine saturated neo-traditional fills with geometric feather motifs that hold structure. Tell your artist you want strong black anchors for the geometry, then place color as accents, not a wash. That approach ages better than watercolor washes alone because the black keeps the design readable as color fades. Sessions run longer and you may need two or three visits. For booking, plan a strapless or sports-bra top so the artist can access the back without fabric interference. Low-back halter tops later showcase the piece nicely for evenings out.
6. Micro-Realism Geometric Phoenix Head on the Inner Wrist
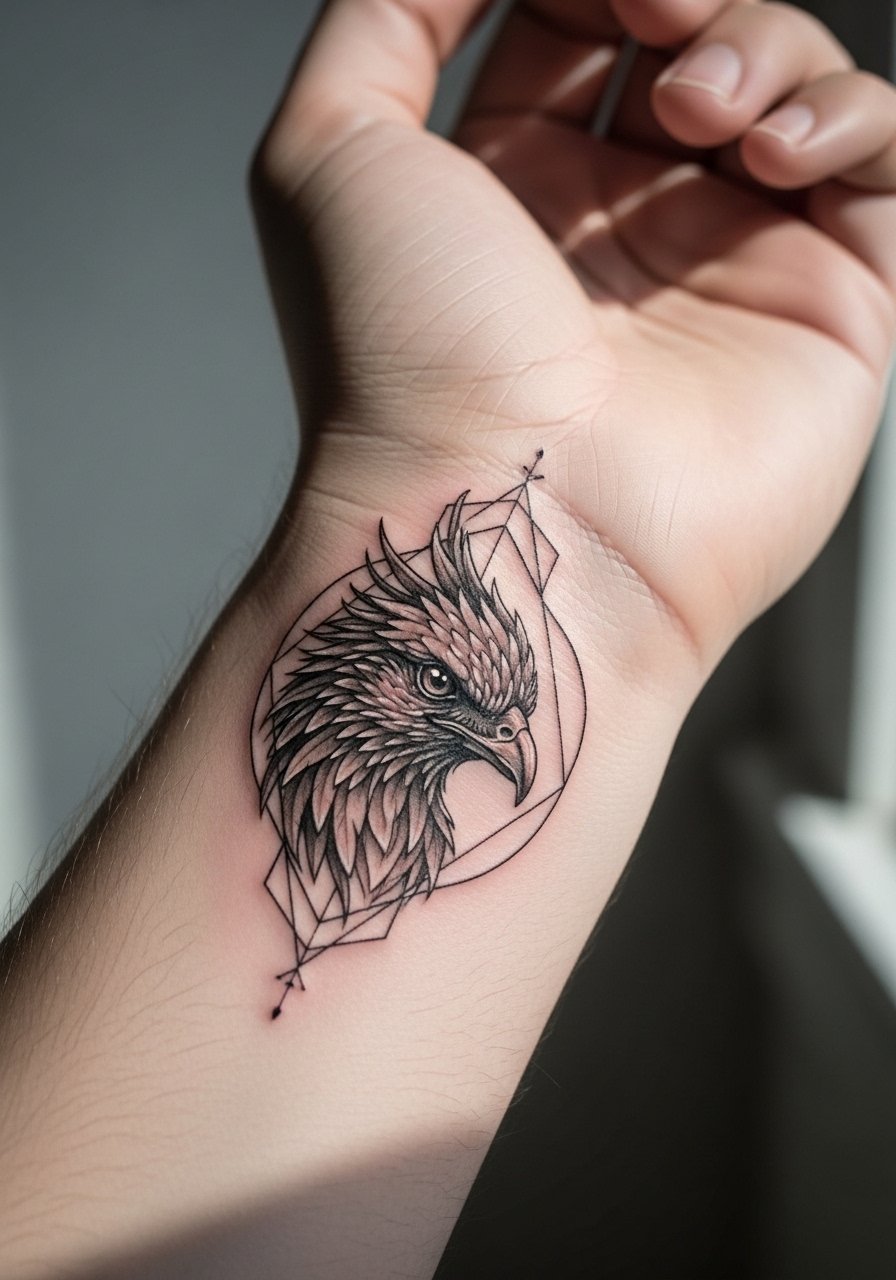
Micro-realism frames combine detailed feather work with tight geometric borders to create a jewel-like effect. The consultation should include reference close-ups of feather texture and clear notes on how dense you want stipple shading versus smooth gray wash. Inner wrist is sensitive, so expect a short but intense session and plan for a possible touch-up at year one if shading softens. A common mistake is asking for micro shading too close to the frame edge, which can make the border look dull as the shading settles. For showing it off, a minimalist chain watch on the opposite wrist complements the micro detail.
Studio Day Picks
The wrist and inner-wrist pieces above heal differently from larger back and thigh work, so a few small items make the session and the first week more manageable.
-
Stencil transfer paper kit. Use this to preview how the mandala or framed head sits on skin before you commit, especially helpful for forearm and wrist placements.
-
Topical numbing cream. Apply as directed about 45 minutes before to take the edge off inner-wrist sensitivity without changing how the artist reads the stencil.
-
Thin protective film roll. Keeps wrist and ankle pieces clean during the busiest first week of hand washing and movement.
-
Fragrance-free gentle body wash. A mild wash reduces irritation for fine line and micro-realism areas that depend on crisp edges.
-
Aquaphor healing ointment. A thin layer in the first day or two helps maintain moisture for delicate linework without suffocating the tiny needle channels.
7. Ornamental Geometric Phoenix with Floral Accents on the Outer Forearm

Ornamental phoenixes pair geometric repetition with vines or flowers that soften the structure. Tell the artist you want the flowers to sit outside the geometric core so they do not fill into the dense pattern. The outer forearm tolerates moderate detail without frequent blowout risk if the linework is given space. A common aging problem is over-detailing the flowers near the geometric border, which becomes muddled at year three. For the session, roll up a women rolled sleeve blouse so the artist has clear access and you can relax in a loose sleeve between passes.
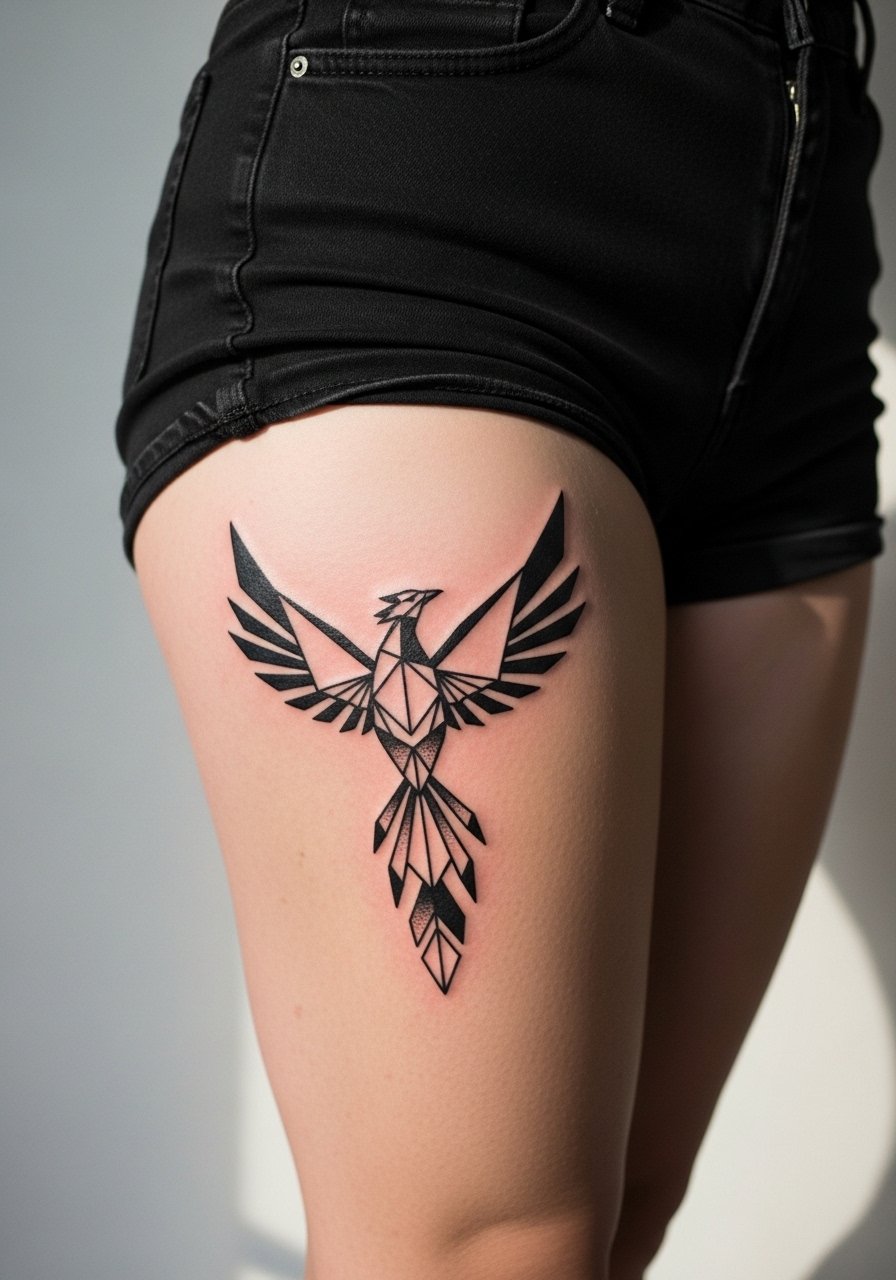
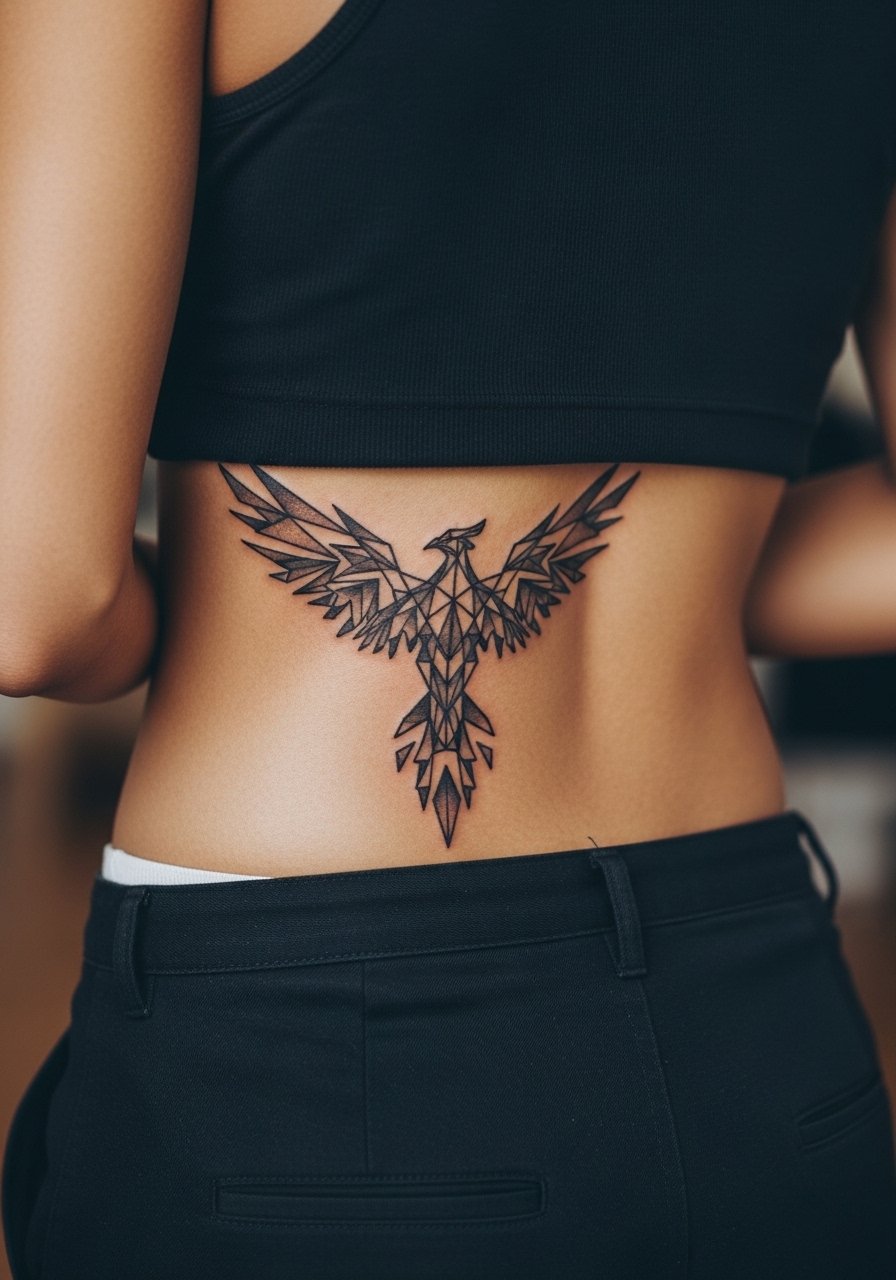
8. Blackwork Geometric Phoenix Abstract on the Thigh
Thigh placements are forgiving for large blackwork because they let artists use solid fills that maintain contrast over years. If you want the bold abstract look, insist on crisp negative-space areas so the phoenix silhouette remains legible as the black ages. Sessions are longer and may require three visits for saturation. A typical mistake is compressing the design too far to the outer thigh edge, which warps with clothing friction and weight shifts. Show it off in high-waist shorts or slit skirts so the bold black shapes sit against clean fabric.
9. Watercolor Geometric Phoenix Wings on the Shoulder Blade
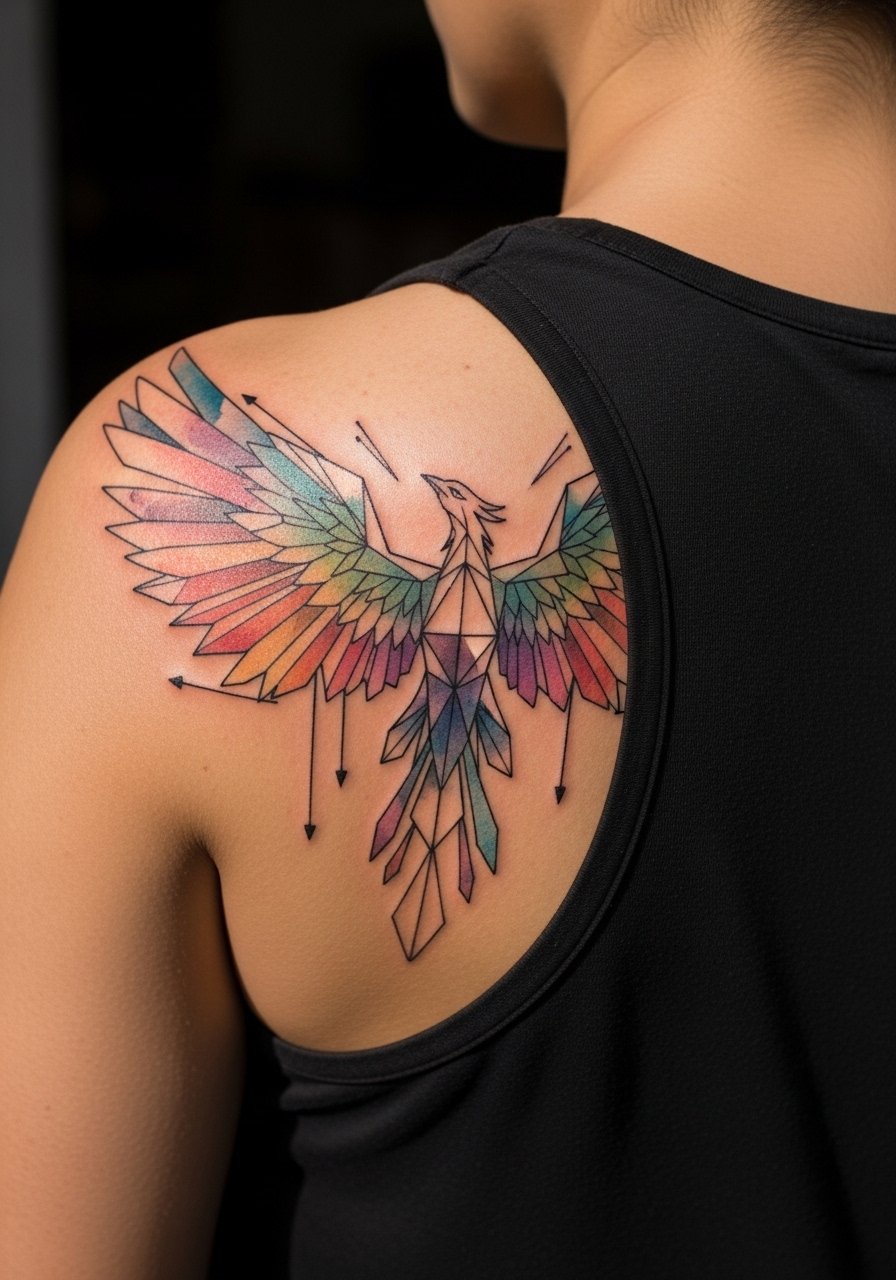
Watercolor washes add ethereal motion next to hard geometry, but the trade-off is touch-up need as pigments shift. For shoulder blade work choose saturated edge anchors where the geometry meets color, so the wings keep definition over time. The session feel is spread out and relaxed because you can lie prone for access. Artists split on watercolor longevity versus neo-traditional saturation, and the decision matters for long-term clarity. Wear an off shoulder sweater or a loose tank to show the wings without rubbing the ink under clothing.
10. Geometric Phoenix Yin-Yang Fusion Along the Spine
Spine placements emphasize symmetry and the yin-yang motif fits the vertical line naturally. The spine is a sensitive zone and shifts with posture, so ask your artist to plan for slightly expanded spacing between opposite elements to avoid merging as the body moves. Pain here tends to be higher on a scale, but sessions are short if the piece is small. A frequent error is putting too much tiny detail right over the spine where skin movement blurs it. If career visibility matters, consider how much of the spine the piece will show when you wear wide-neck tops.
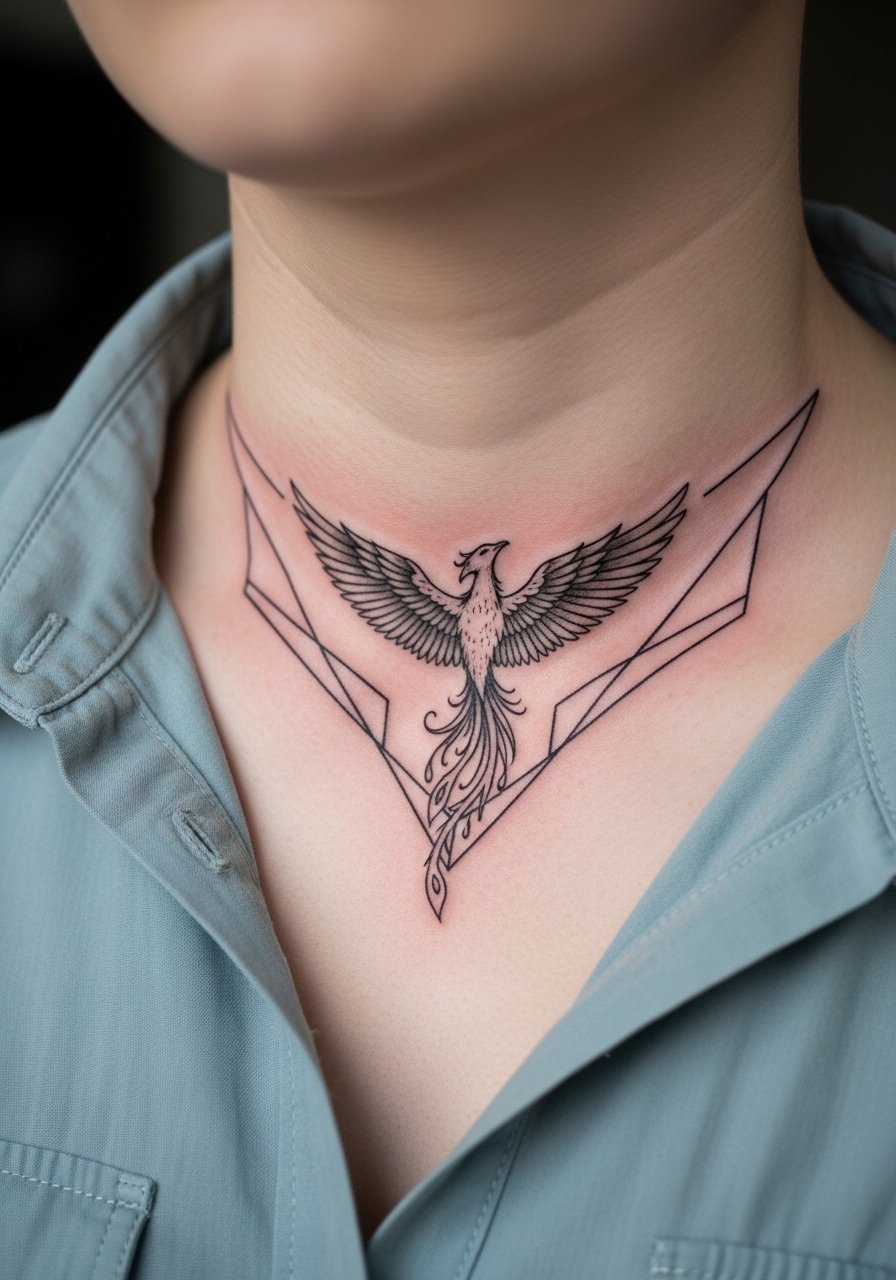
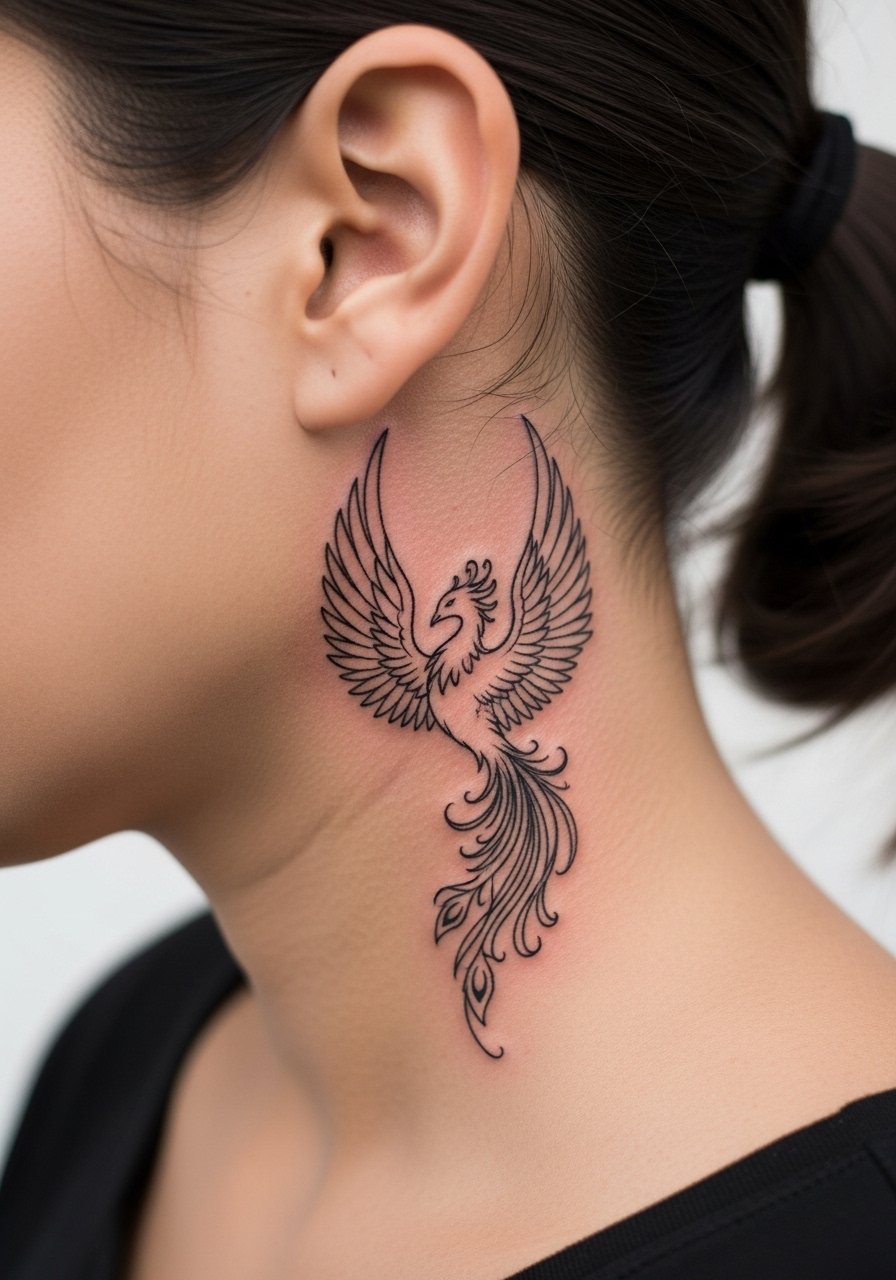
11. Micro-Feather Geometric Accent Near the Collarbone
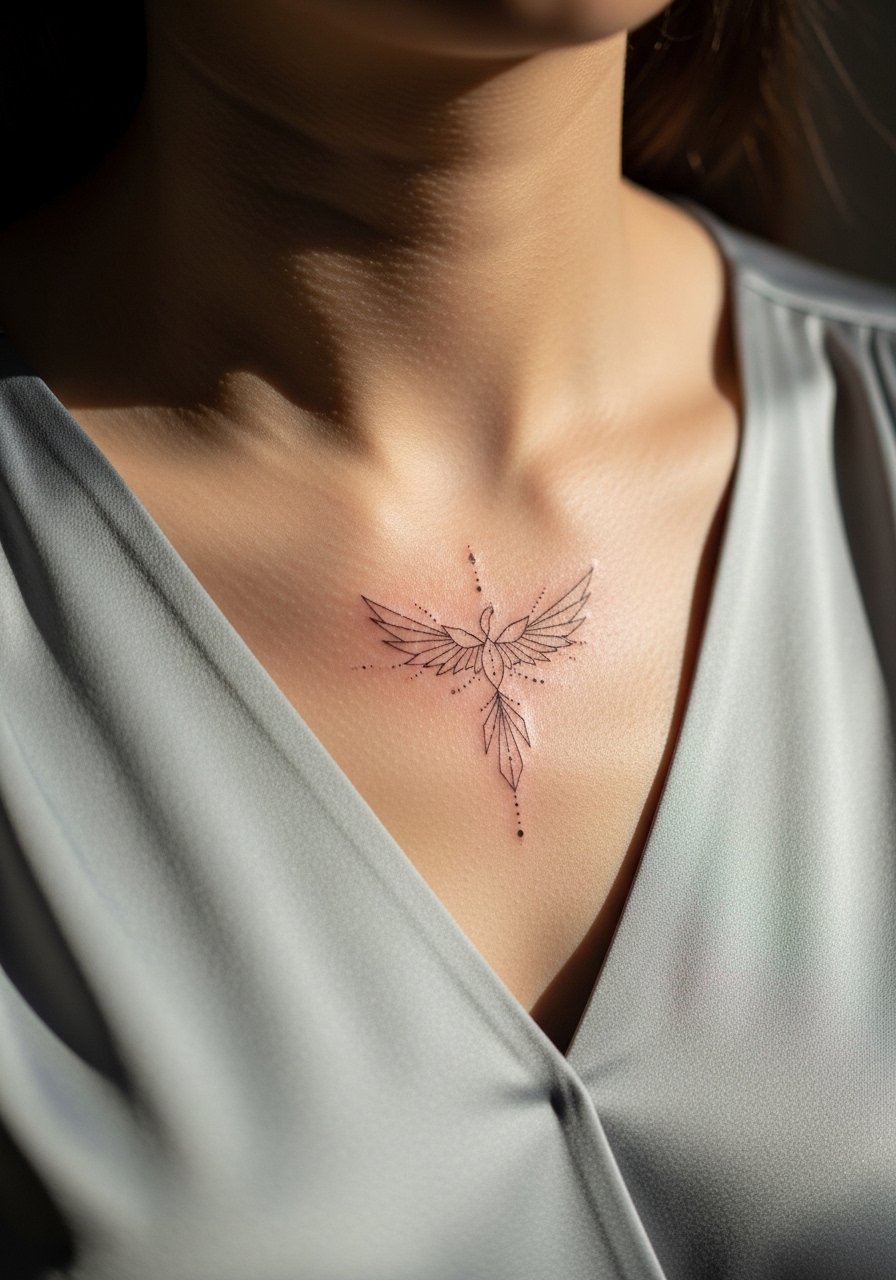
Collarbone placements read delicate and intimate, which makes micro-feather details very appealing. The trick is to request dot work or stipple shading rather than continuous gray fills so the tiny geometry keeps texture without smudging. Expect a single short session and sensitivity due to bone proximity. A common mistake is asking for heavy shading that sits right on the clavicle, which can feel and age poorly. Pair the piece with a v neck silk blouse or a dainty choker when you want to frame the detail gently.
12. Minimal Dot-Work Phoenix on the Ribcage
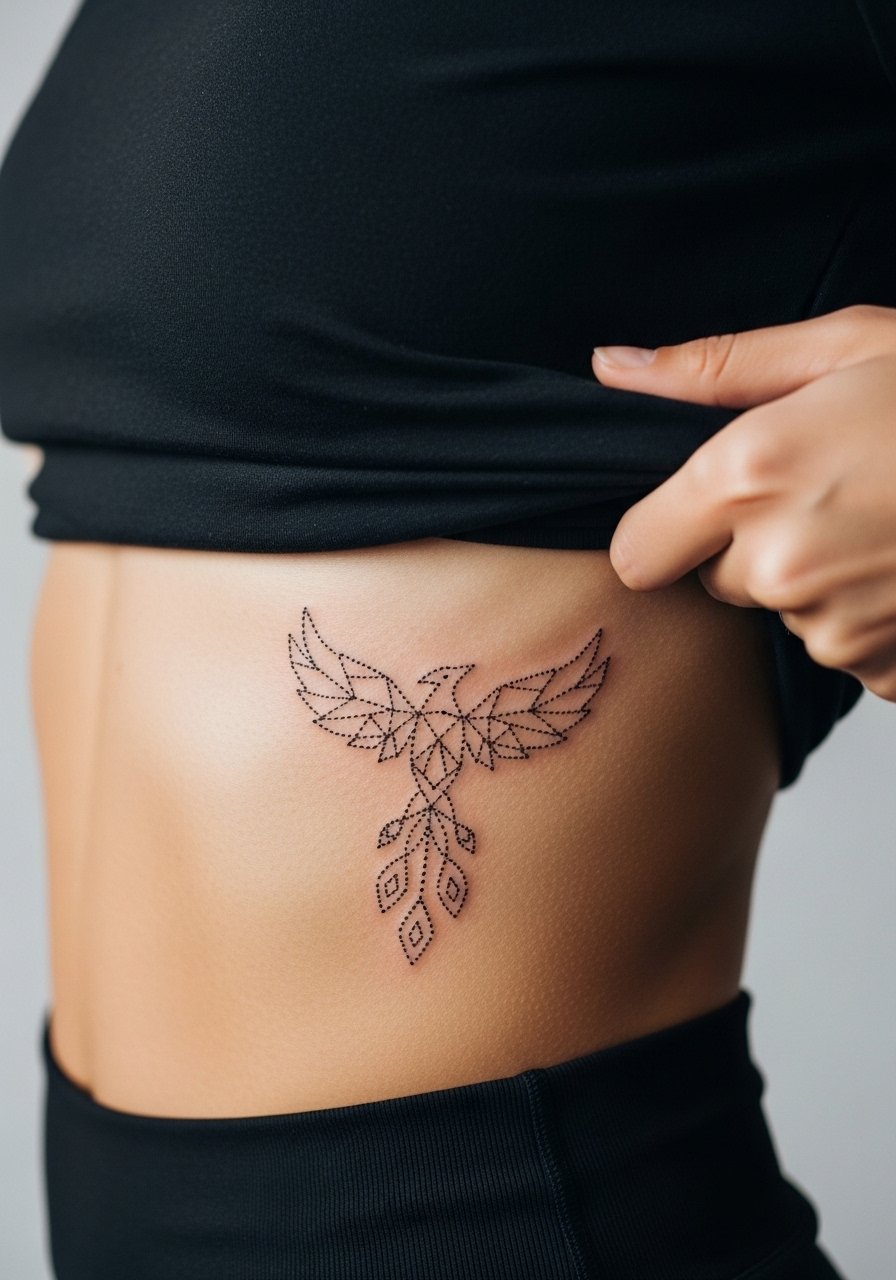
Ribcage work is famously painful and the skin moves a lot while breathing. Dot work can look exquisite here, but avoid cramming dots into tight geometry near the underbust where stretching causes blurring. When you consult, mention breathing patterns so the artist times passes for steadier lines. Expect a longer, more tolerable session if you schedule breaks. Also note the controversy about fine line on ribs: one camp says the stretch blurs thin work within two years, the other says careful depth control prevents that. Ask your artist where they stand and plan any touch-ups with that answer in mind.
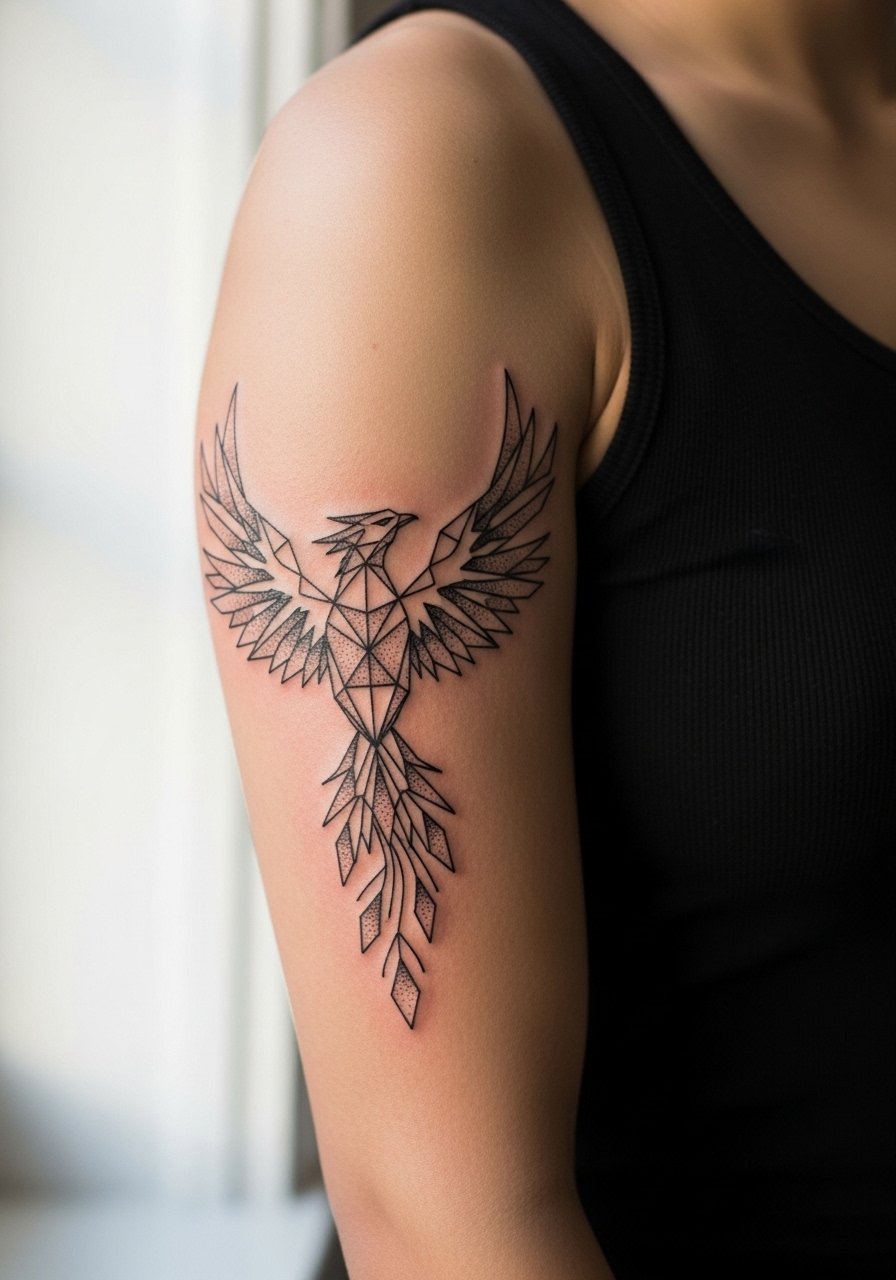
13. Geometric Phoenix Half-Sleeve on the Upper Arm
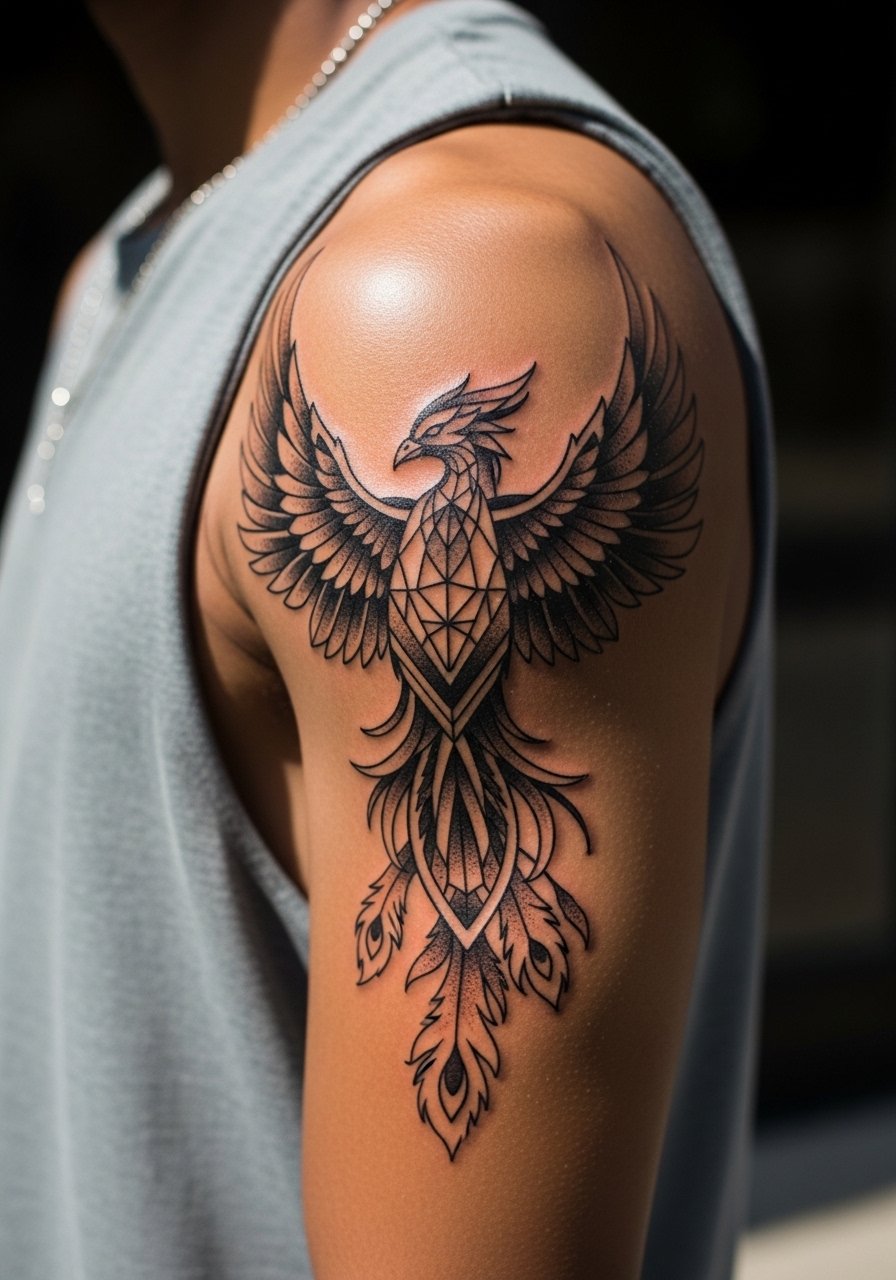
Half-sleeves let you layer geometric motifs so the phoenix can transition across forearm and bicep. The upper arm is forgiving for both fine line and bolder blackwork, but a common mistake is trying to mix too many small styles into one sleeve. Tell your artist which element should remain the visual anchor so the rest supports it. Sessions will likely span multiple visits. Expect the inner bicep and underside to age differently from the outer arm because of friction and sun exposure. Plan for a touch-up schedule tied to the most delicate area.
14. Micro-Feather Collarbone Runner with Geometric Framing
This collarbone runner is about rhythm more than scale, using micro-feathers inside geometric bars to create flow. Tell your artist to keep the framing lines slightly bolder than the feathering so the overall silhouette holds up as the micro detail softens. Sensitivity near the collarbone means a quick but sharp session. A frequent error is asking for mirror-perfect symmetry in a single pass; slight asymmetry planned into the stencil helps the piece age more organically. Style it with a dainty choker or a V-neck to give the runner space.
15. Stipple-Shaded Phoenix on the Inner Bicep
Inner bicep placements give a private canvas that only shows in certain outfits. Stipple shading looks soft there, but the inner arm skin is prone to stretching and friction, so spacing matters. Sessions can be comfortable if you position the arm right, but expect sensitive moments. A common mistake is asking for dense stipple too close to the underarm crease, which tends to blur. Also consider career context since inner-arm work can peek out with sleeveless tops.
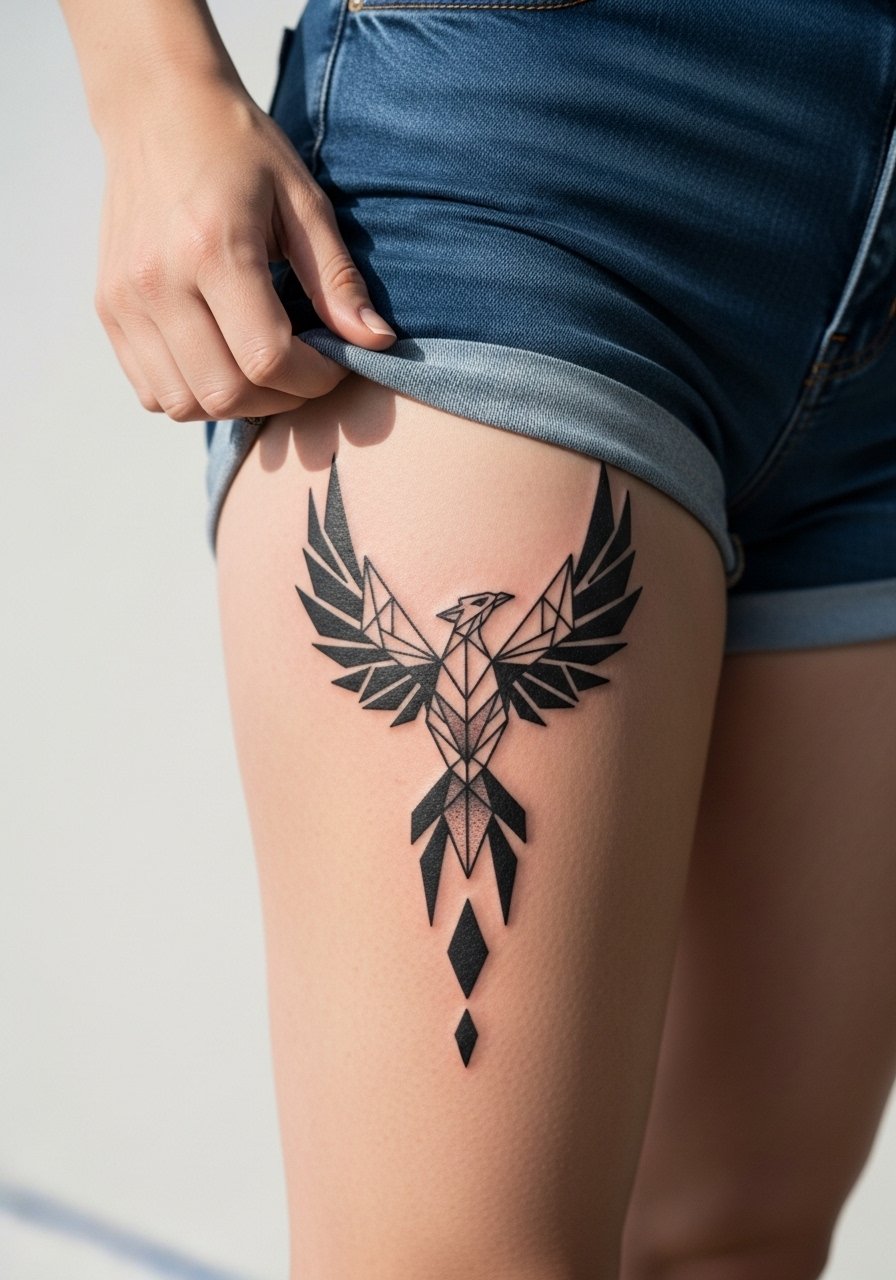
16. Abstract Negative Space Phoenix on the Outer Thigh
Negative-space designs use the skin as a shape, which makes them resilient visually over years. For thigh work, ask the artist to map the largest cutouts first so the eye reads the phoenix even if small edge details soften. Large black blocks age into texture rather than patchy fades, so this is a longevity-forward choice. Sessions are longer and may need two saturations. Wear high-waist shorts when showing this piece so the negative shapes remain the focal point against clean fabric.
17. Chain-Link Geometric Phoenix Wrap on the Forearm
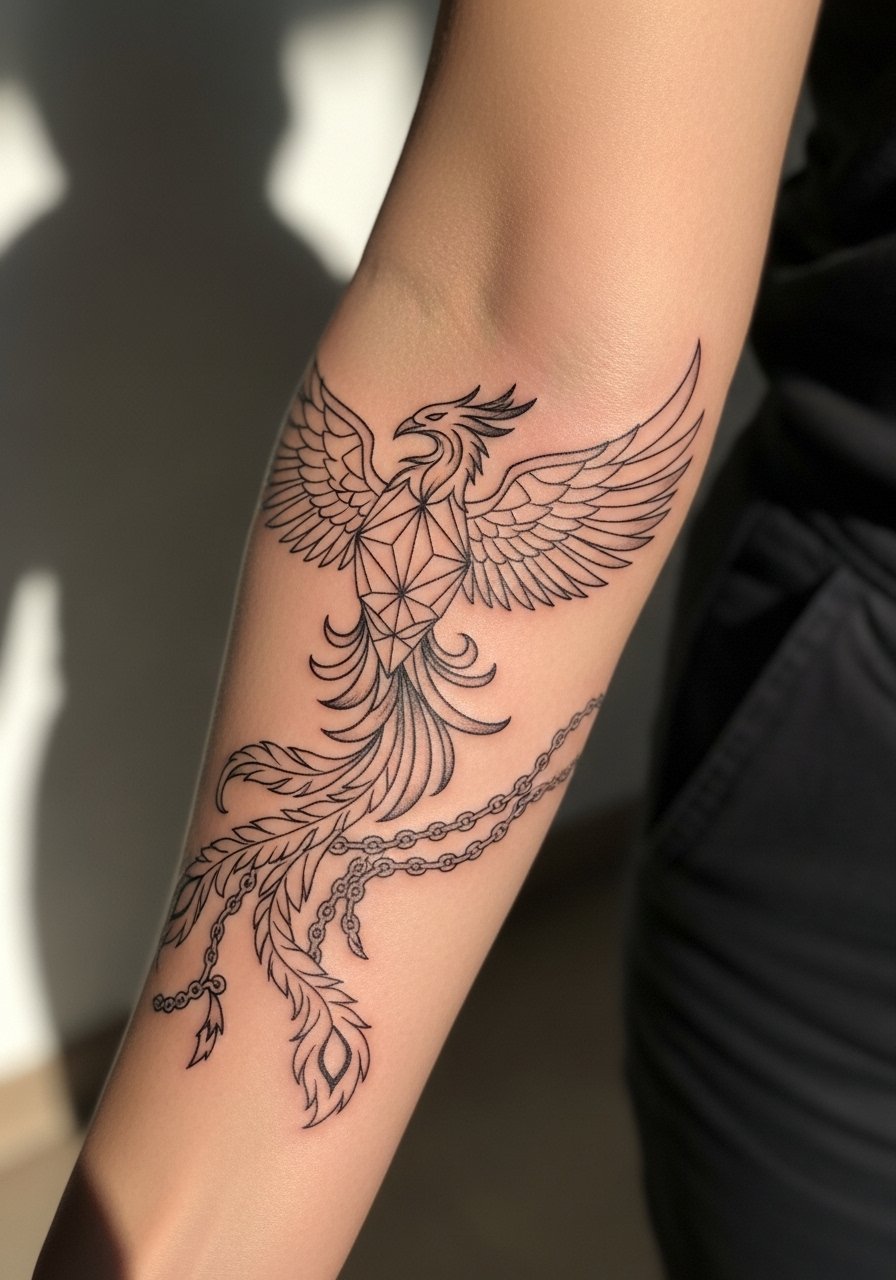
Wraps demand consistent repeat units so the phoenix reads continuous as the arm moves. The biggest mistake is misaligned link spacing that looks fine on the stencil but distorts in motion. Tell your artist you want consistent intervals measured on your arm, not on paper, so the pattern flows. Forearm wraps can feel long in a session but are usually tolerable. Pair the wrap with a thin silver cuff bracelet on the opposite wrist to divide visual attention.
18. Tiny Geometric Ankle Band Phoenix
Ankle bands are subtle and travel-friendly, but they take bone-near precision. The common error is squeezing too many angles into a hairline band, which leads to soft edges after healing. Plan for a modest line weight and keep the band width steady so circulation and movement do not distort the geometry. Sessions are quick but stinging near the ankle bone. For footwear, pick flats or sandals on session day to avoid pressure post-ink.
19. Tiny Phoenix Behind the Ear, Geometric Accent
Behind-the-ear placements are discreet and delicate. Always describe this placement as on the skin behind the ear, below the hairline, and plan for the artist to use short sessions because of nerve sensitivity. The mistake is asking for heavy shading close to the hairline which can look patchy as hair growth and washing interact with the ink. If you need more definition, ask for a tiny geometric frame rather than full shading. Consider career visibility and the time you can commit to short touch-ups.
20. Low Back Geometric Phoenix Accent
Lower back placements let bold geometry sit horizontally for easy show-off with low-back garments. Ask for the main anchors to align with your natural waistline so movement, weight shifts, and clothing sit well against the design. A common aging issue is friction from waistbands wearing at the top edge, so keep the highest geometric lines a bit further from the belt line. For display, low-back halter dresses or sheer blouses frame the shape without crowding the pattern. Prepare for longer sessions and multiple passes for saturation.
21. Spinal Runner Geometric Phoenix

A spinal runner plays with vertical rhythm and can be minimal or ornate. The spine is sensitive and the skin shifts with movement, so ask your artist to add deliberate spacing between stacked geometric elements to avoid merging over time. Expect higher pain spots at vertebrae, and plan for shorter passes. The mistake is trying to match too many tiny repeats over a long span without allowing breathing space. If you later want to expand, plan the lower and upper anchors now so any sleeve or back piece fits.
Frequently Asked Questions
Q: Do fine line geometric phoenix tattoos really fade faster than blackwork, and what should I expect for touch-ups?
A: From what I've seen, fine line pieces often need touch-ups sooner because the individual thin lines can soften with sun and movement. Blackwork holds contrast longer, but that does not mean it always looks better stylistically. Expect possible touch-ups around year one to three for fine line work, while bold black pieces may go longer between sessions.
Q: Will a geometric mandala phoenix on the forearm survive weight changes and stretching?
A: Forearm skin is relatively stable compared with the abdomen, but large weight fluctuations can still alter how dense geometry sits. If you expect body changes choose slightly larger spacing and avoid ultra-fine internal details so the mandala keeps its structure.
Q: Is Saniderm or dry healing better for geometric and fine line phoenix work?
A: Artists split into two camps. One group argues second-skin products reduce scabbing and protect micro lines in the first week. The other group worries about trapping moisture and suggests careful dry healing with short ointment periods. Follow your artist's recommended protocol and watch how your skin reacts in that first week.
Q: What should I wear to a back or shoulder session so the artist has easy access and I stay comfortable?
A: For back pieces, a strapless sports bra or a button-down you can pull aside is practical. For shoulders, a loose tank or an open-front cardigan makes positioning easy and limits fabric creases while you sit or lie down.
Q: Are there career or visibility concerns with collarbone and behind-the-ear placements?
A: Collarbone tattoos are often visible depending on neckline and may show in professional settings. Behind-the-ear tattoos are discreet but can peek out with certain hairstyles. Think about outfits you wear daily and how often you want the tattoo to be seen before you commit.
