
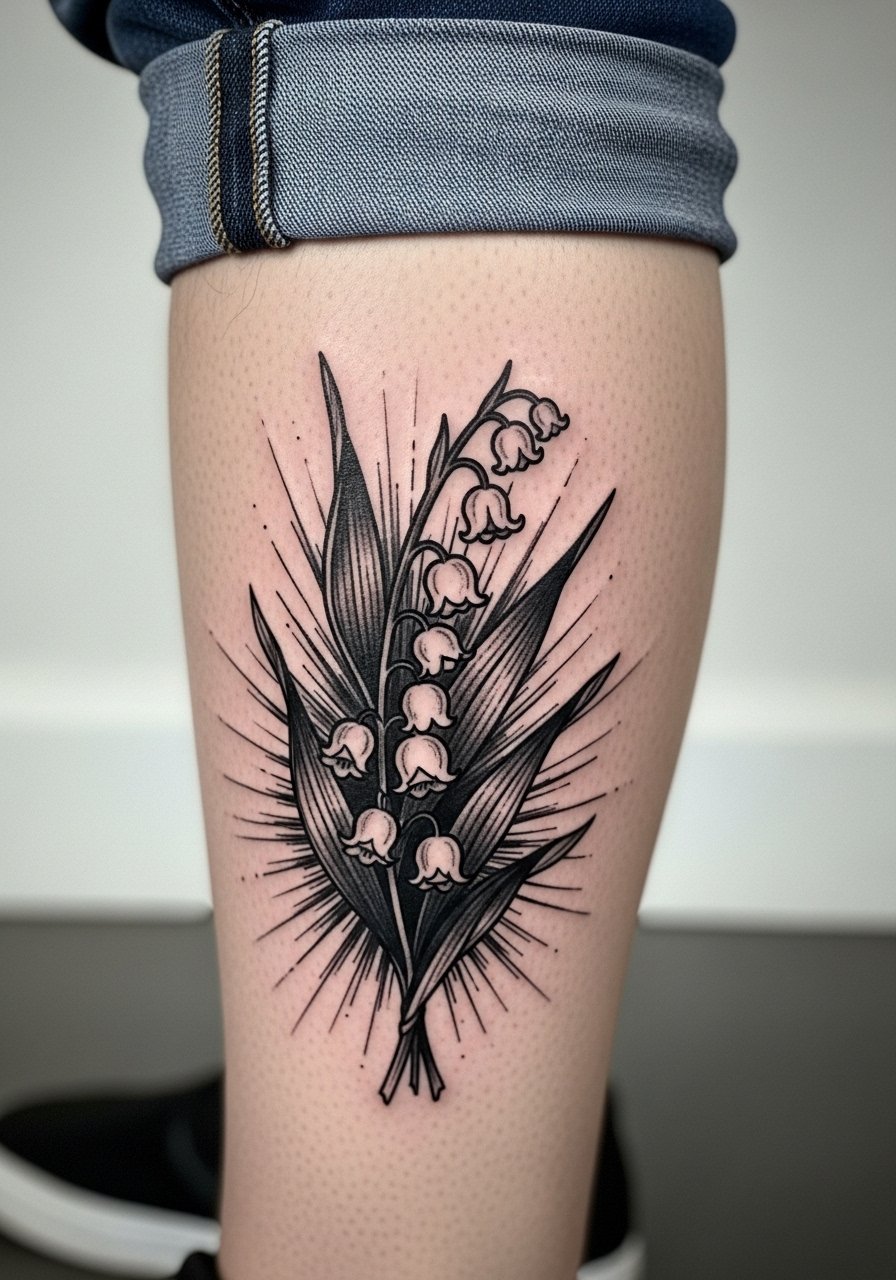
Fine line lily designs are everywhere online right now, but the ones that still read clean after a few years are not always the prettiest fresh photos. The trick is balancing needle depth, spacing, and placement so stems and tiny bells keep shape as skin stretches and washes. Read on for 21 abstract takes on lily of the valley that favor longevity, wardrobe pairings, and realistic touch-up timelines.
1. Abstract Fine Line Wrist Band
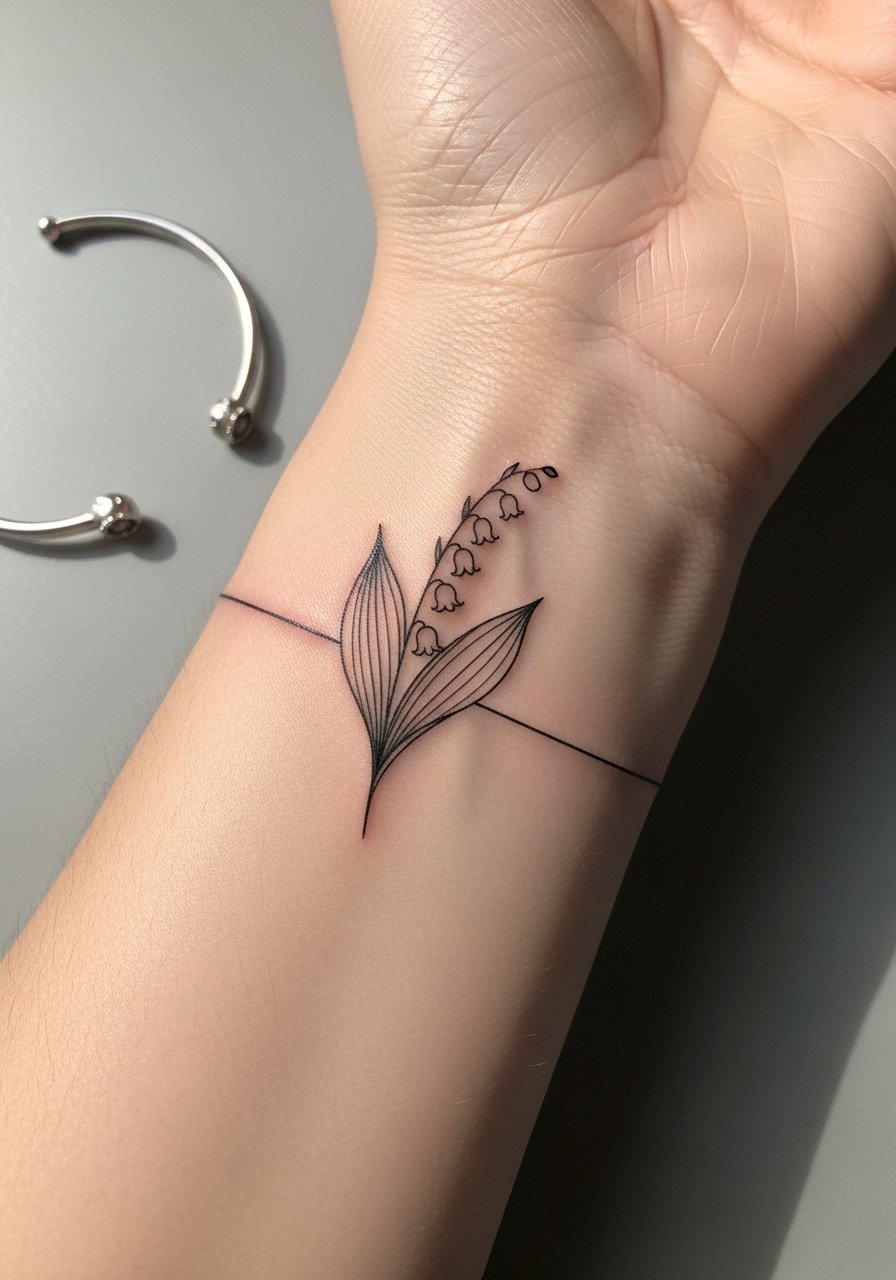
I recommend this when you want the symbol but not a full floral piece. The wrist band reads like a tiny scene that wraps with gentle negative space between stems. Pain is low for most people and session time is usually one brief appointment. The common mistake is asking for hairline single-needle lines too close together, which merge after a year. Ask your artist for slightly heavier linework where stems cross and plan for a light touch-up at year two. For showing this off, pair with a thin silver cuff bracelet opposite the tattoo and wear a chiffon blouse with sleeves rolled once during cooler months.
2. Watercolor Bloom Cluster on Inner Forearm
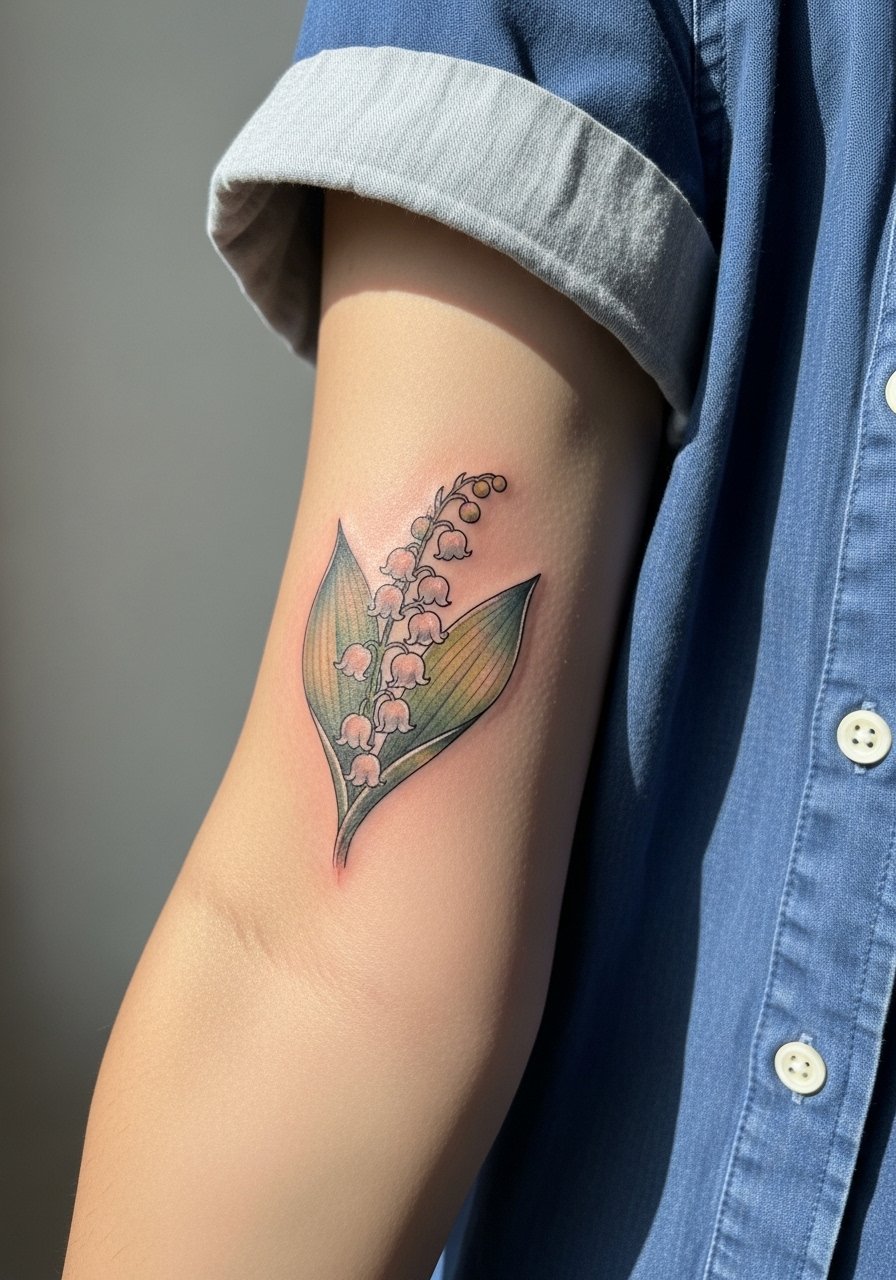
This version uses soft painterly fades for bells and leaves. Expect low to moderate pain and one to two sessions depending on size. Watercolor looks breathtaking fresh but can lose vibrancy on darker tones, so request stronger color saturation from the start and discuss placement to avoid constant sun exposure. People often pick this style without asking about touch-ups, and the colors may need a refresh at year two to maintain that painterly pop. For outfits, rolled linen sleeves help the arm look intentional, and I recommend wearing a linen shirt you can roll the day of the session.
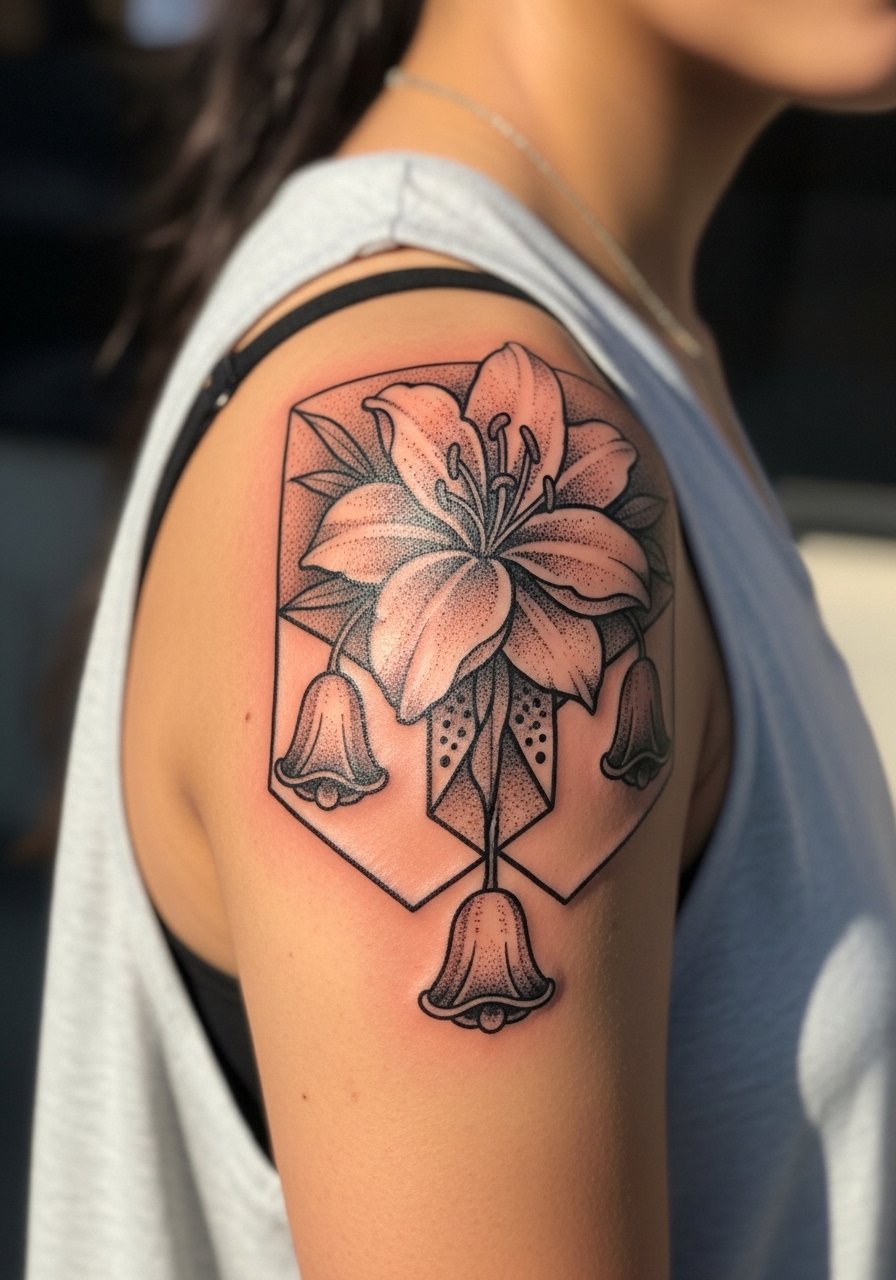
3. Blackwork Geometric Mandala on Shoulder Blade
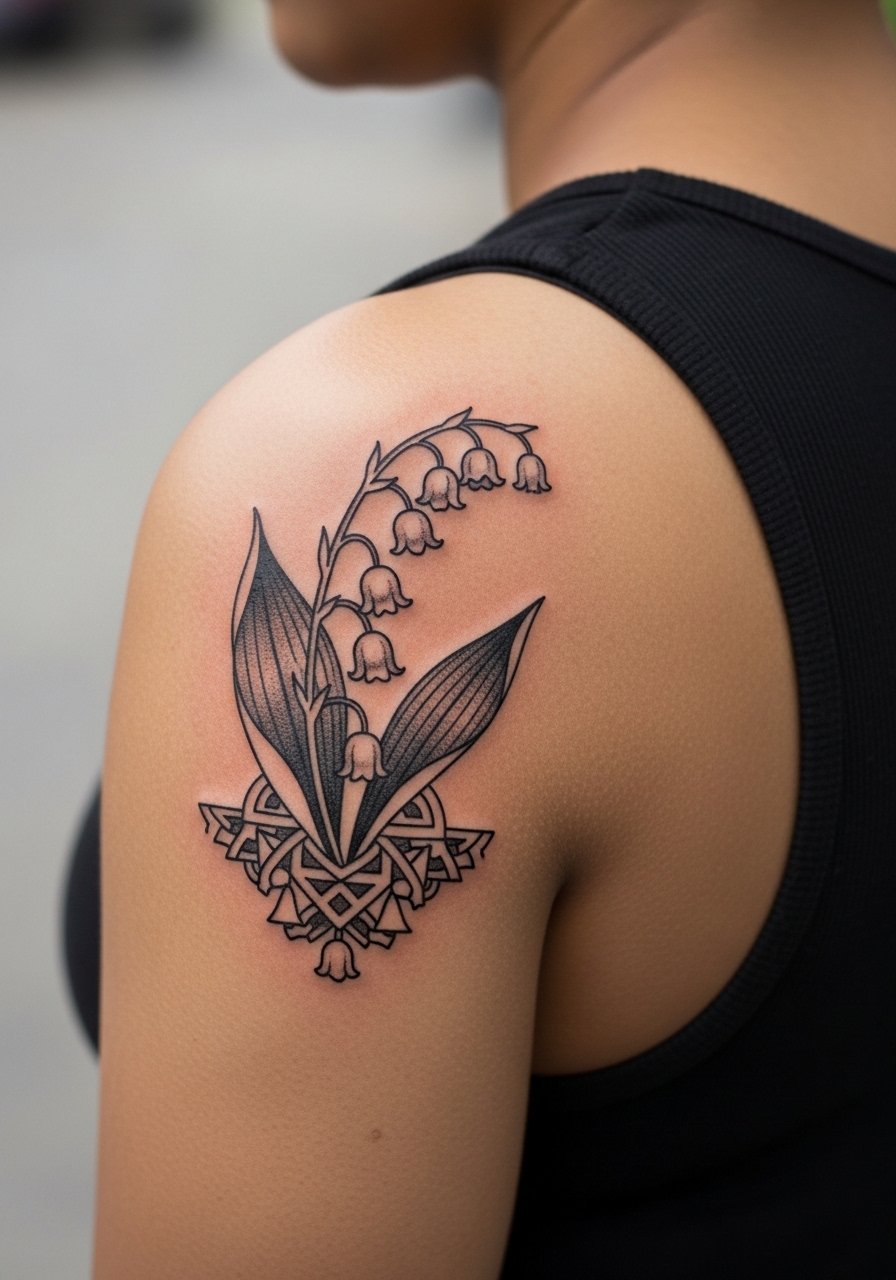
Bold blackwork holds up better long term on areas that get sun and friction. This piece has dense shapes that read at distance. Sessions usually run two shorter visits to keep saturation even. The mistake is packing too many tiny intersections into a small circle, which later looks muddy. Tell your artist you want clear negative-space bells and ask about spacing to protect against blowout on mobile shoulder flesh. For the session wear, pull on a racerback tank so the artist can access the area without you tugging at clothing.
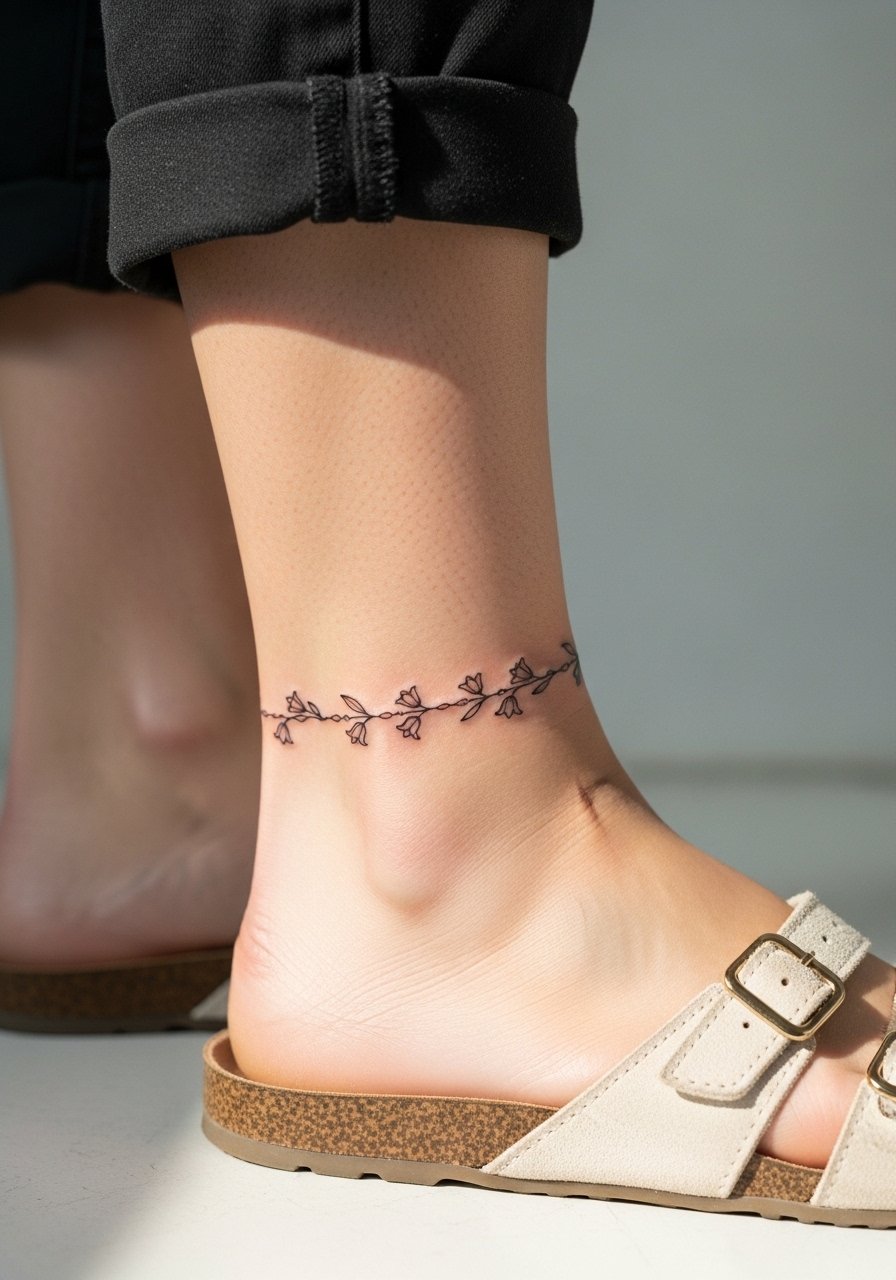
4. Minimalist Single Stem on Ankle
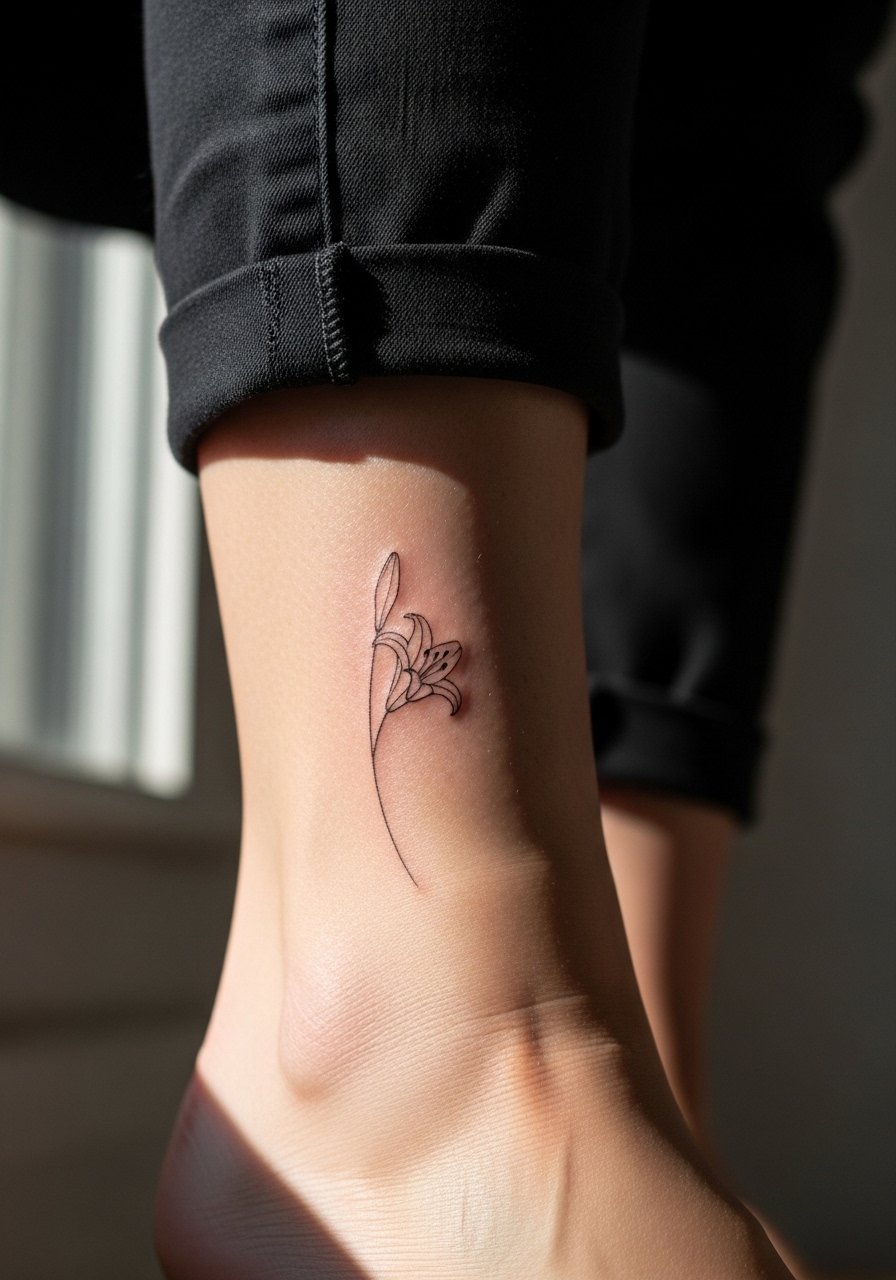
Ankle stems are a classic for first-timers who want subtle placement. The pain on the ankle is moderate for most and the session is short. People often ask for the thinnest possible line which is vulnerable to fading and blurring in this high-friction spot. Ask for slightly more line weight near the base to preserve the silhouette, and plan a touch-up around year two as needed. To show it off, pair the healed line with strappy heeled sandals and cropped pants, and wear loose joggers to your appointment so the ankle is fully accessible.
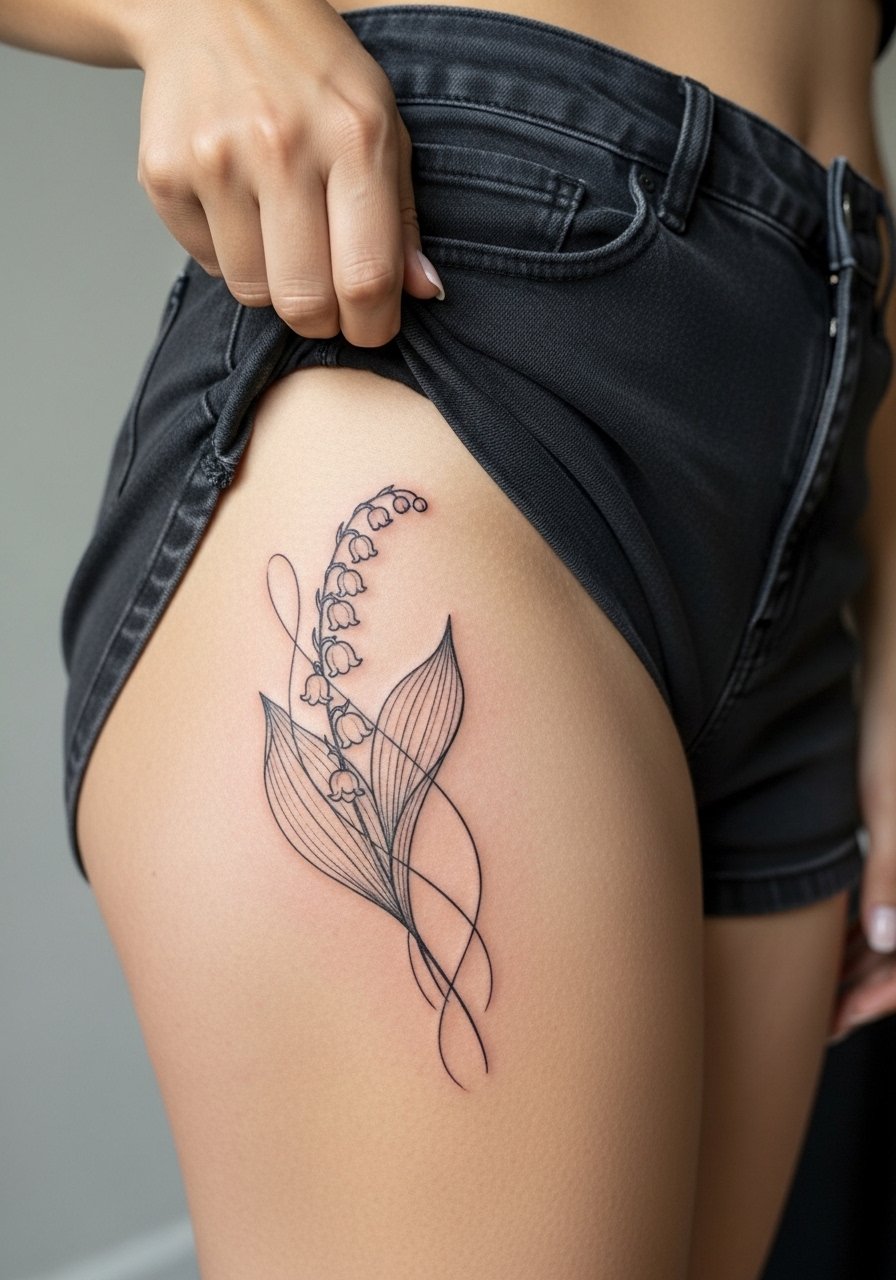
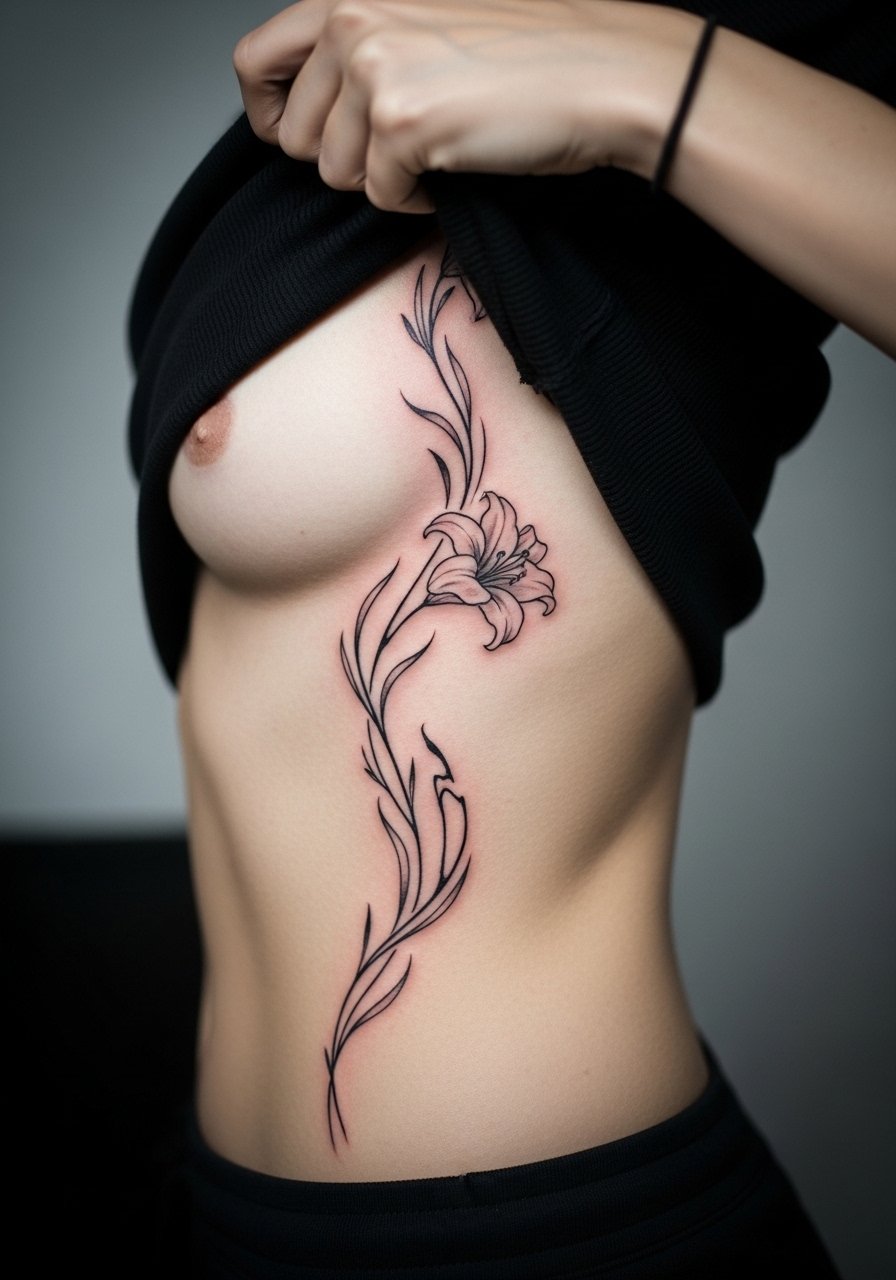
5. Neo-Traditional Thigh Piece with Drip Elements
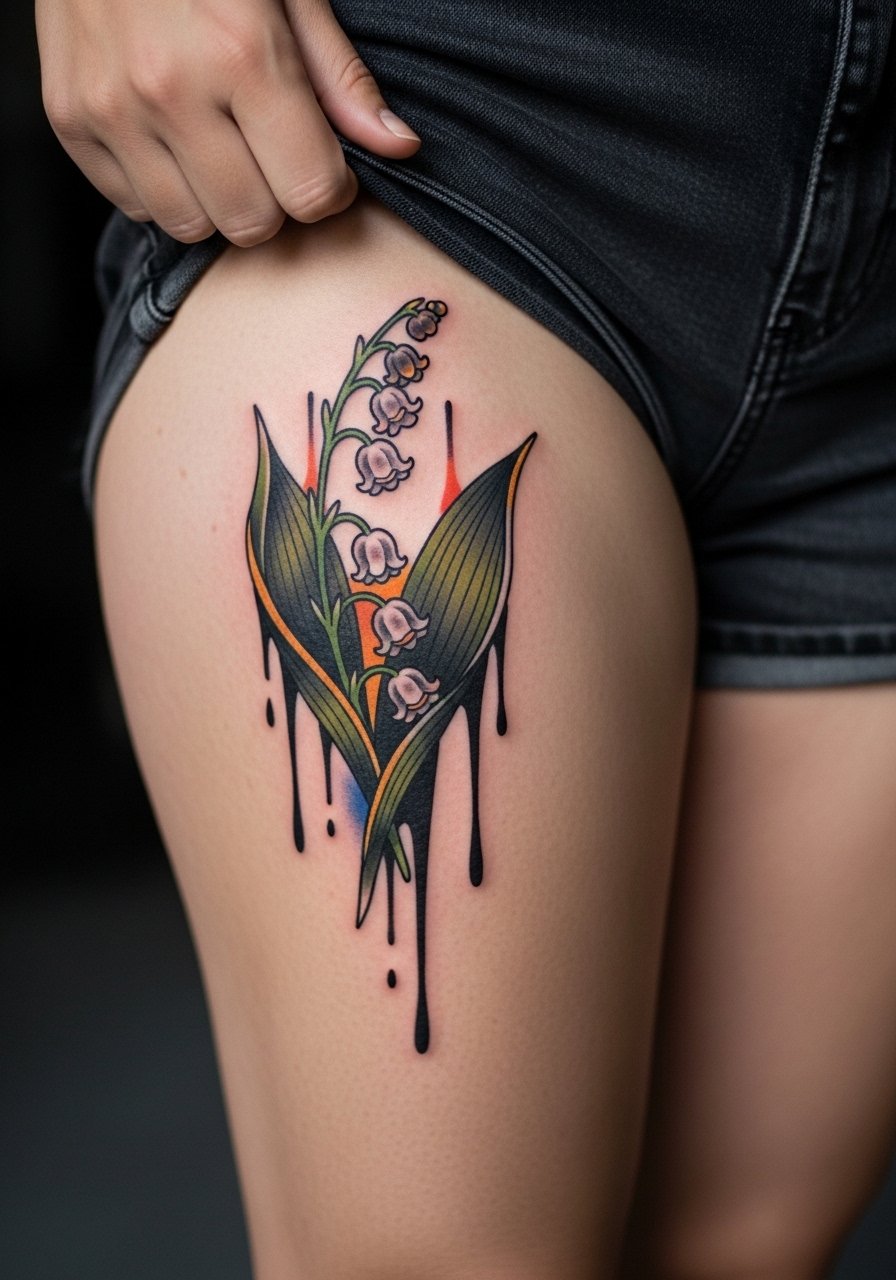
Thigh placements tolerate saturation and larger scale, which is why collectors love neo-traditional drips there. Sessions usually last two to three sittings. The usual error is placing too close to the groin crease where shifts in fabric and movement can distort the drips. Consider a higher placement on the outer thigh to let the design stretch with leg motion. Expect low blowout risk due to thicker skin and a touch-up window around year three for color refresh. For after the piece heals, high-waist shorts or a slit maxi skirt frames the art.
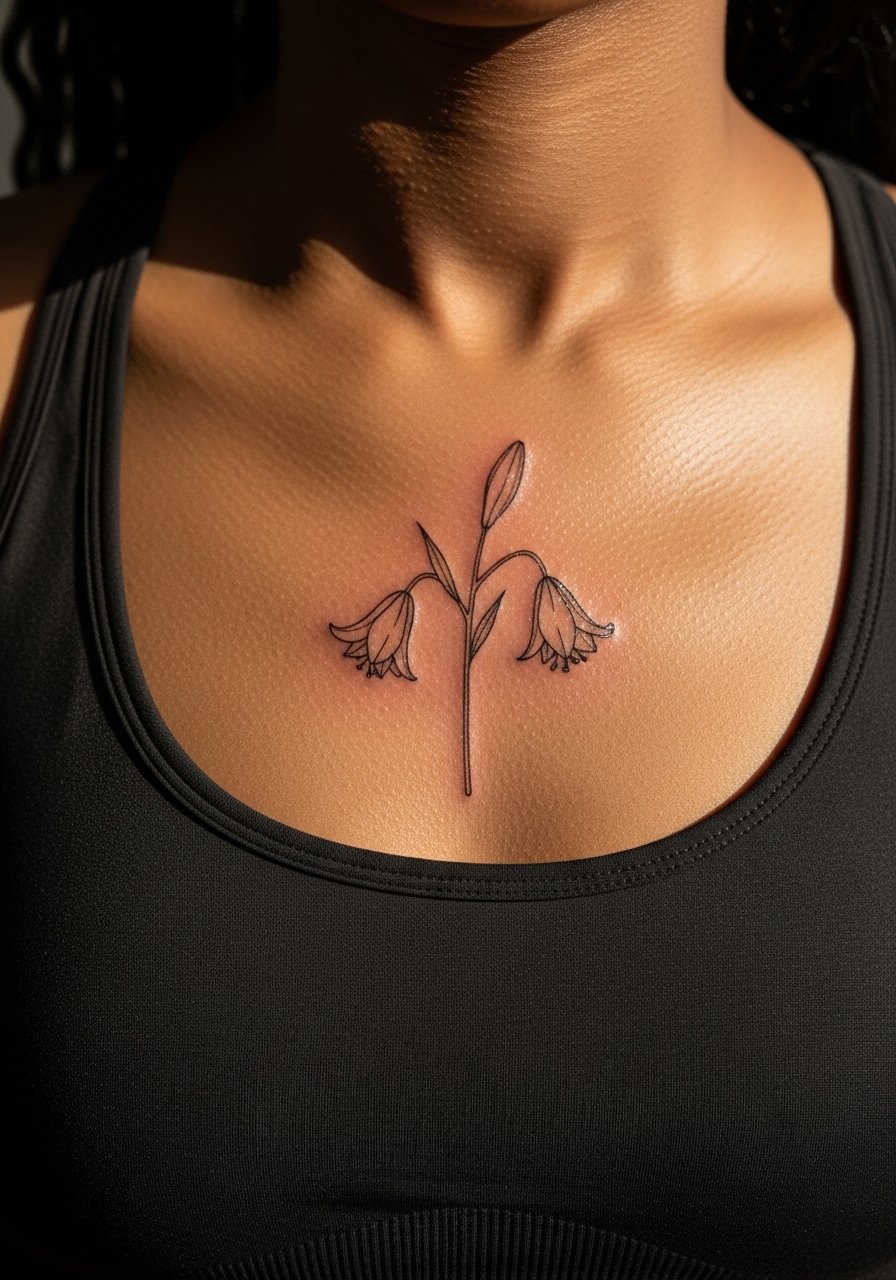
6. Micro-Realism Dew Drops on Collarbone
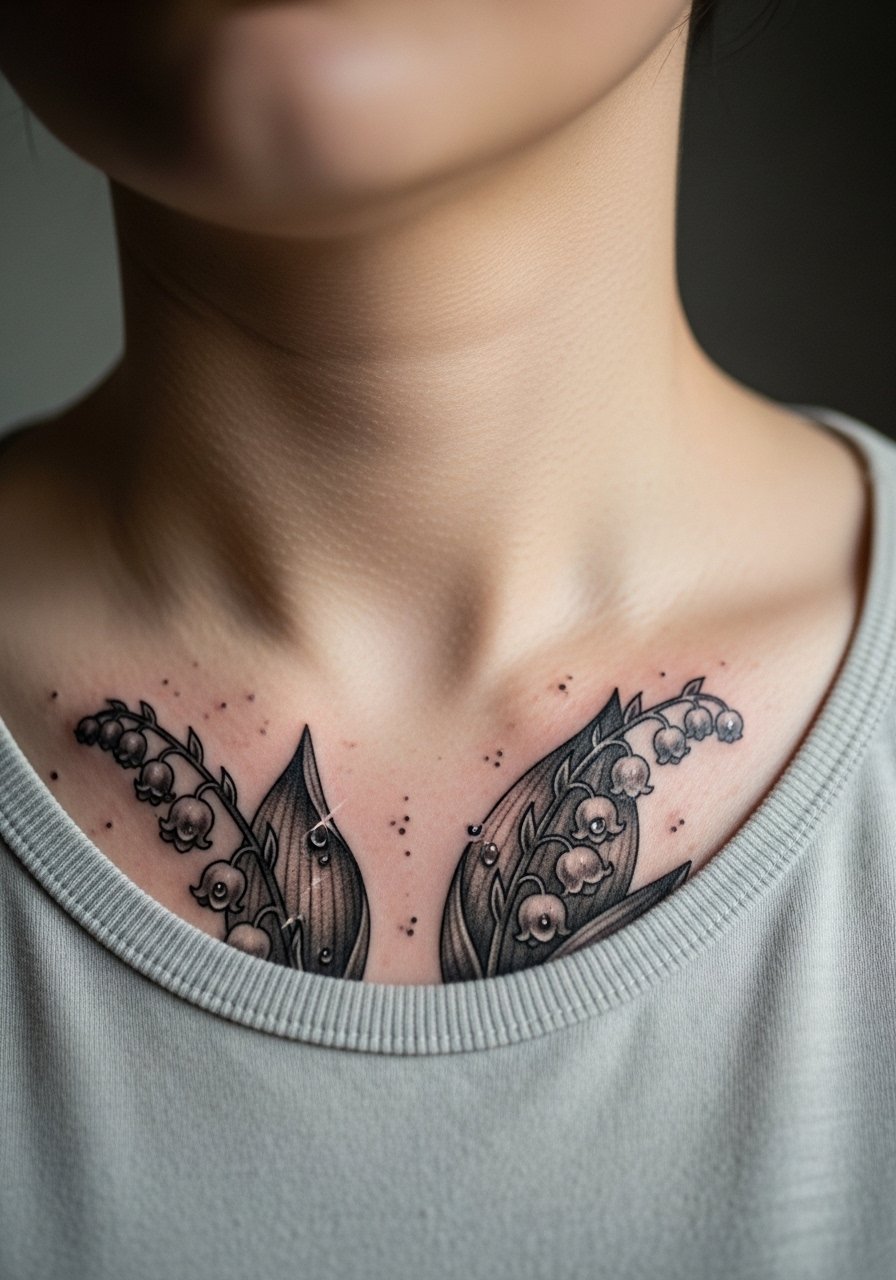
Micro-realism needs exact needle control and a calm placement like the collarbone. Expect a focused single session and higher hourly rate because of the detail. The common complaint is that tiny highlights can disappear on darker skin unless contrast is planned. Ask the artist to map out relative contrast and bring healed photos of similar skin tones. This style ages into a soft texture rather than a hard blur, and touch-ups at year three keep highlights crisp. For session wear, a strapless tank or wide-neck top makes access simple.
Studio Day Picks
The wrist and collarbone pieces above demand different prep than the thigh and shoulder pieces, so a short kit smooths the session and the first week.
-
Tea tree salve. A thinner balm that can soothe itching on fine line work without smothering tiny needle channels.
-
Green Sheep style breathable balm. Lighter than some greasier options and good for lines that need moisture without clogging.
-
Thin protective film roll. Useful for ankle and wrist pieces that rub against socks and cuffs in the first 48 hours.
-
Fragrance free gentle body wash. Cleans the area during showers without stripping pigment, which matters for watercolors and fine line items.
-
Aquaphor healing ointment. Thin layers in the first few days control dryness for high-detail work while staying broadly accessible.
7. Ornamental Abstract Vine Sleeve Starter on Inner Bicep
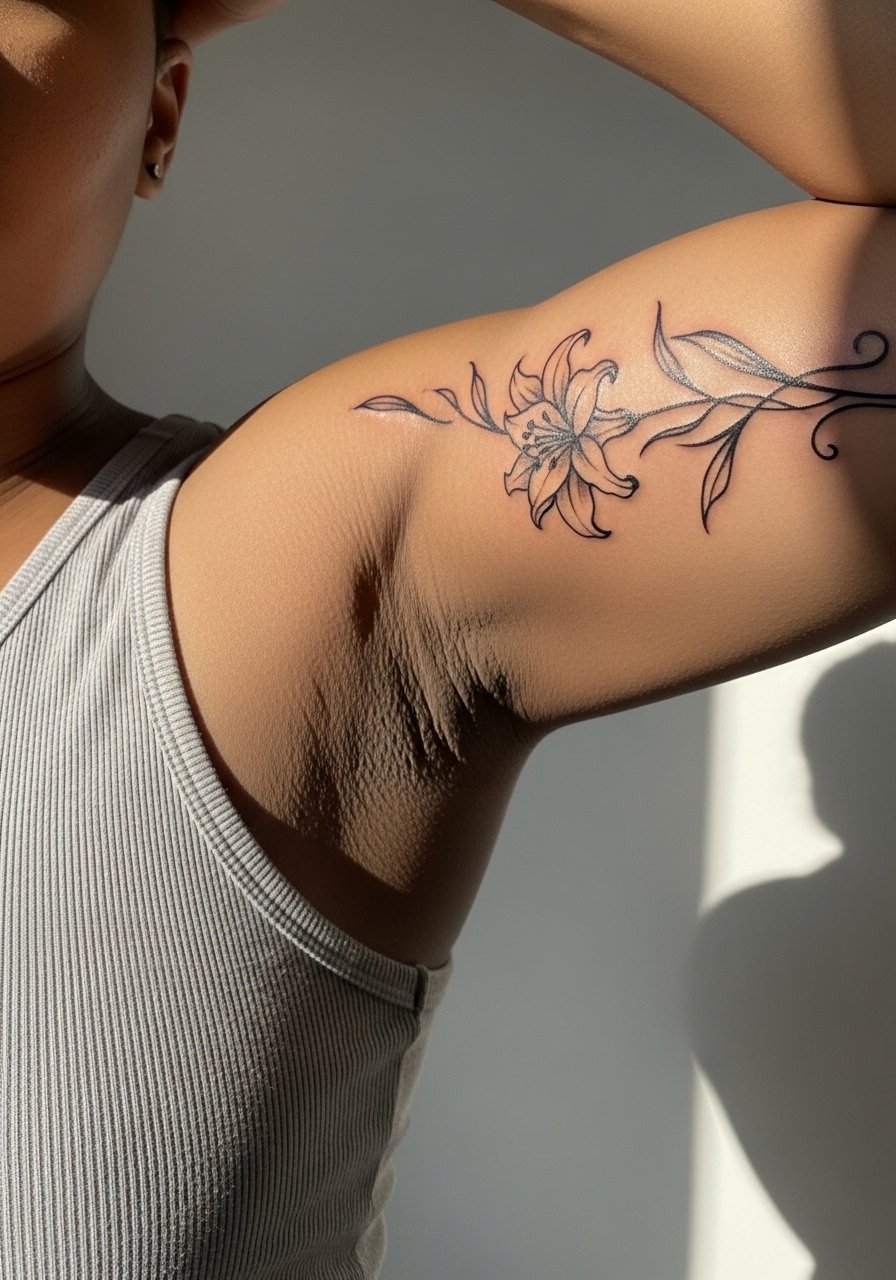
Sleeve starters are about expandability. The inner bicep placement hurts more than the outer arm but it is a great anchor for a vine that can grow around the arm later. Artists often get asked to compress too many bells into a narrow strip which leads to early blurring. Tell your artist you want negative space for future panels and ask for staging lines that read from both front and back angles. Expect multiple sessions down the road as you build. For the session, wear a tank top so the artist can access the area without you pulling clothing.
8. Ignorant Style Chaos Burst on Calf
Ignorant style trades precision for raw energy, and the calf tolerates bold scribbles well. Sessions are fast and the pain is moderate. The pitfall is asking for "messy" without clear composition, which can read random rather than intentional. Bring a few reference photos showing layout and ask the artist to block in negative shapes first. This style ages into a graphic texture that rarely needs touch-ups if saturation is solid. Pair this with ankle boots or a high waist denim short when you want to show it off.
9. Fine Line with Abstract Swirls on Ribcage

Fair warning, the ribcage is a high-pain zone for many and it moves a lot with breathing, which affects healing. Artists split on whether fine line holds up on ribs. One camp says skin stretch blurs hairline work within two years. The other camp argues that with careful depth and spacing the lines settle fine. Ask where your artist stands and request slightly increased spacing between swirls so the piece keeps definition. Plan for a touch-up at year two to restore crispness. For the session wear, a cropped athletic top that you can lift easily is best.
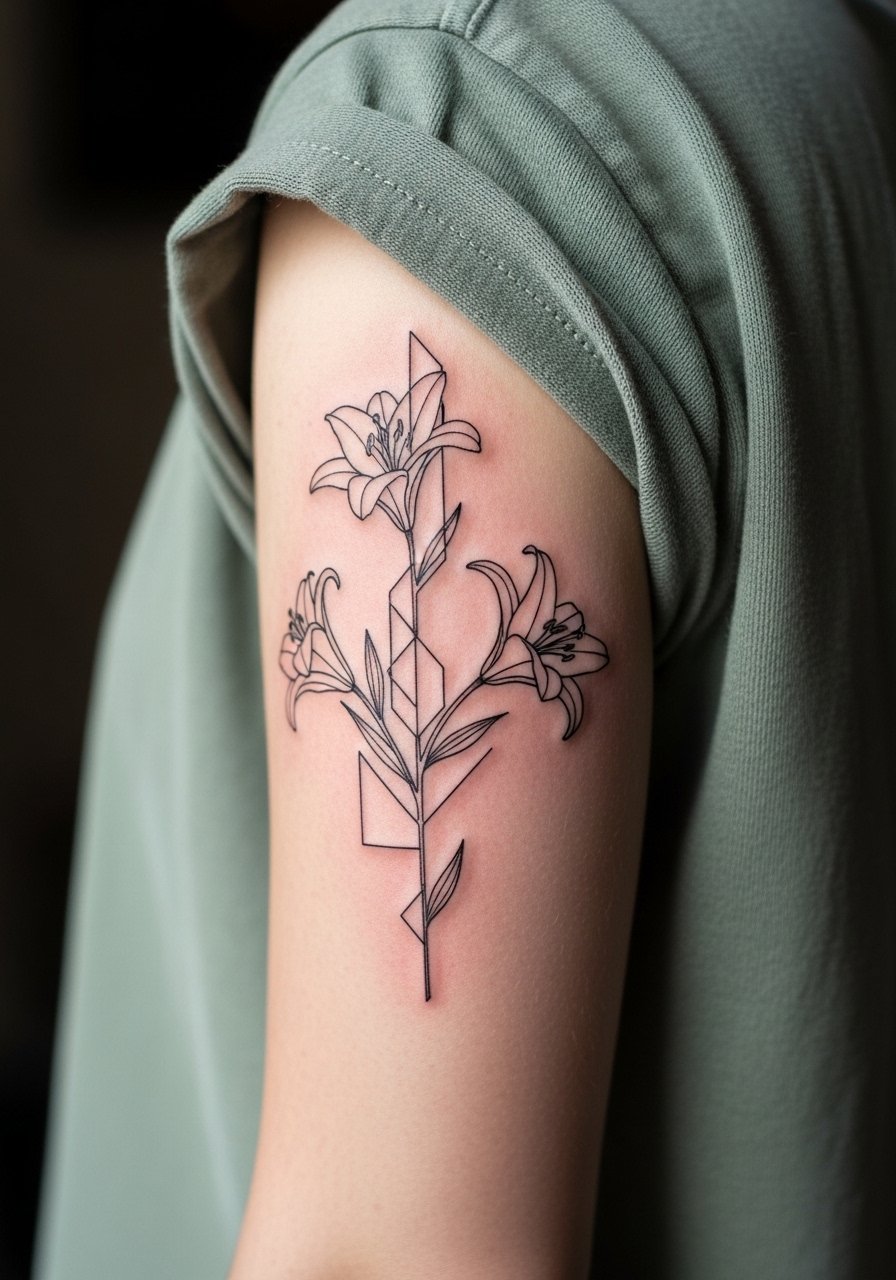
10. Negative Space Geometric Frame with Lilies
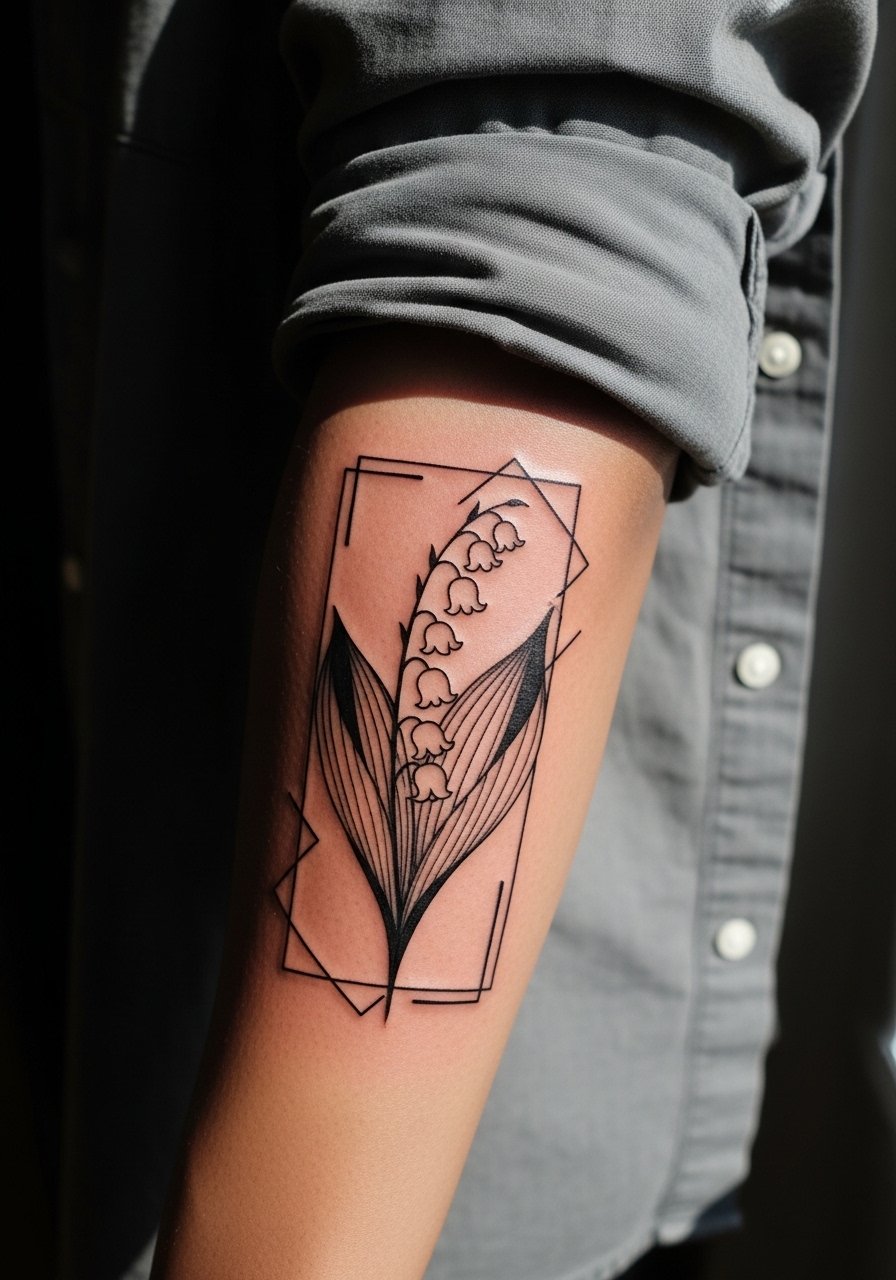
Negative space tricks give optical depth while protecting fine elements from overcrowding. Forearm placement shows clearly and has moderate pain. A common error is enclosing too many tiny features inside a small frame. Request a larger frame or wider gaps so negative bells stay distinct as they heal. The benefit is that geometric borders age into a stable silhouette, and the negative lilies keep the piece readable without frequent touch-ups. For show-off outfits, roll up a loose button-down shirt so the forearm reads cleanly.
11. Abstract Clock Twist for Memorial Motif on Upper Arm
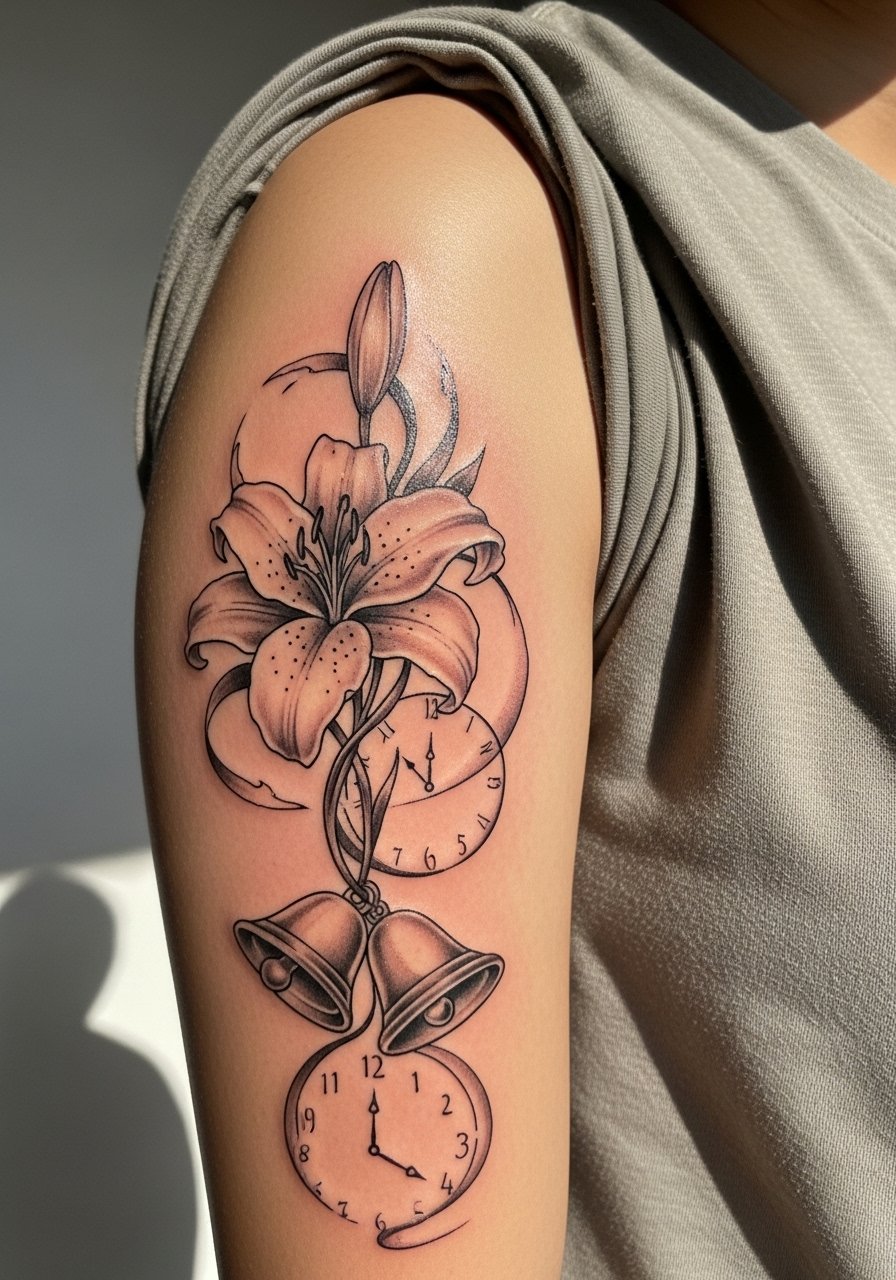
Pairing clock elements with lilies is a fresh way to signal time healing without explicit symbolism. Upper arm skin takes saturation well and sessions are comfortable for most. The trap is adding tiny numerals or tiny hands that blur; keep any clock details bold or use suggestive lines instead of literal parts. Ask your artist to sketch clock elements as abstract hints so the lily remains the focus. Expect minimal need for touch-ups if shapes are bold. Wear a loose t-shirt to the appointment so the sleeve does not pull on fresh work.
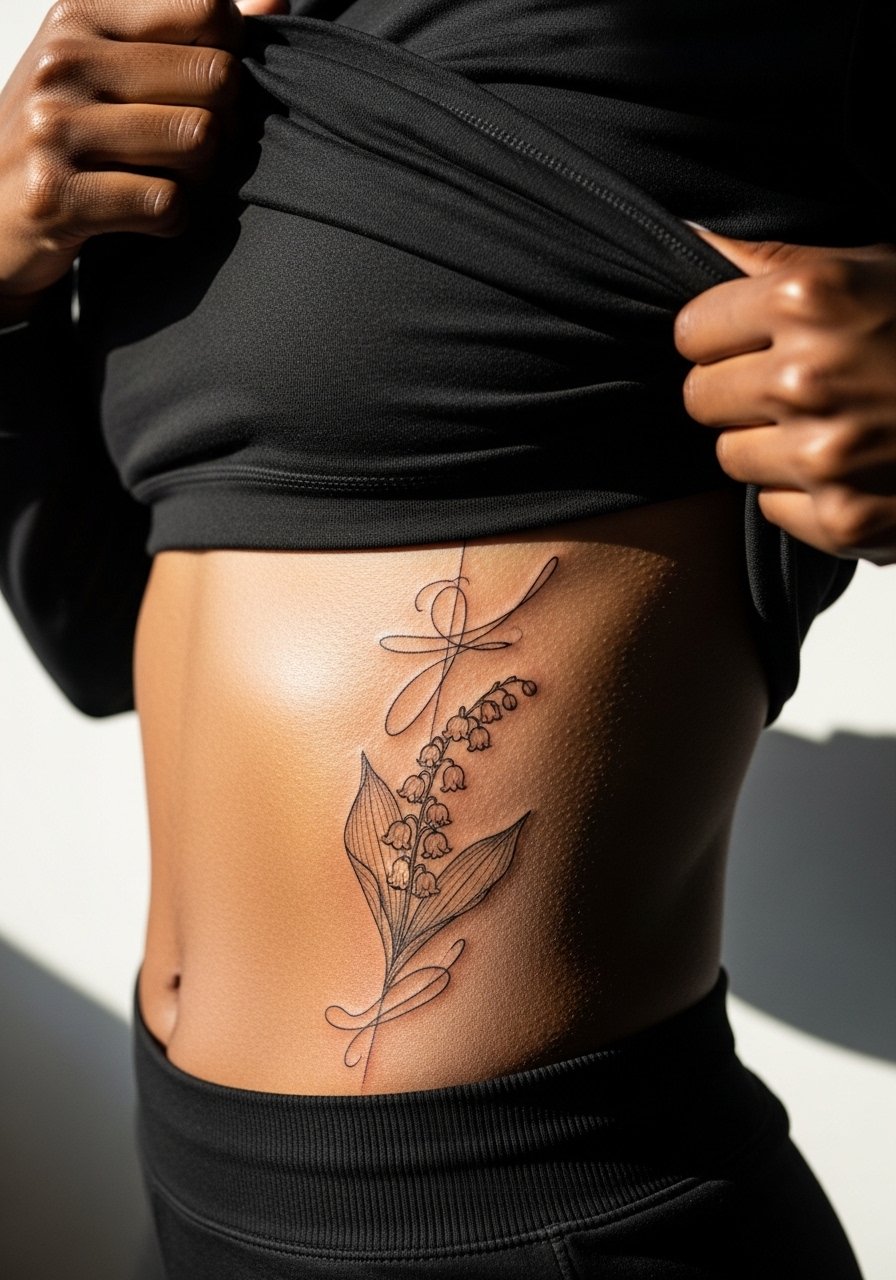
12. Black and Gray Bells on Lower Back
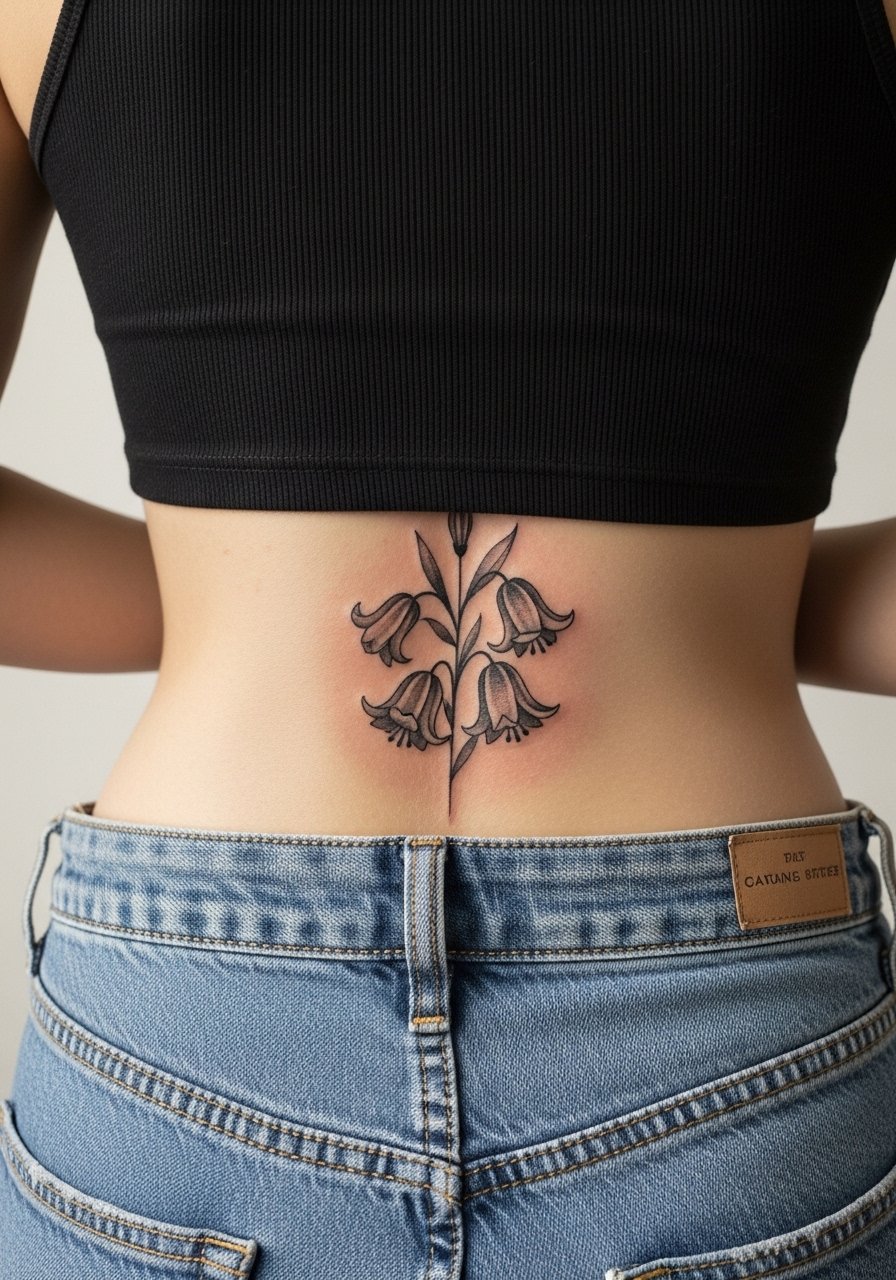
Lower back pieces handle shading and scale, and this area sees less sun than forearms. Sessions can be one or two visits depending on size. Avoid placing the design too close to the waistband or it will experience constant friction from clothing. Practically, ask for the main mass to sit above pant lines and request conservative shading near edges that meet fabric. This placement ages well for color retention but may lose crisp outer edges after several years, so plan a check-in at year three.
13. Micro-Realism Cluster Behind the Ear
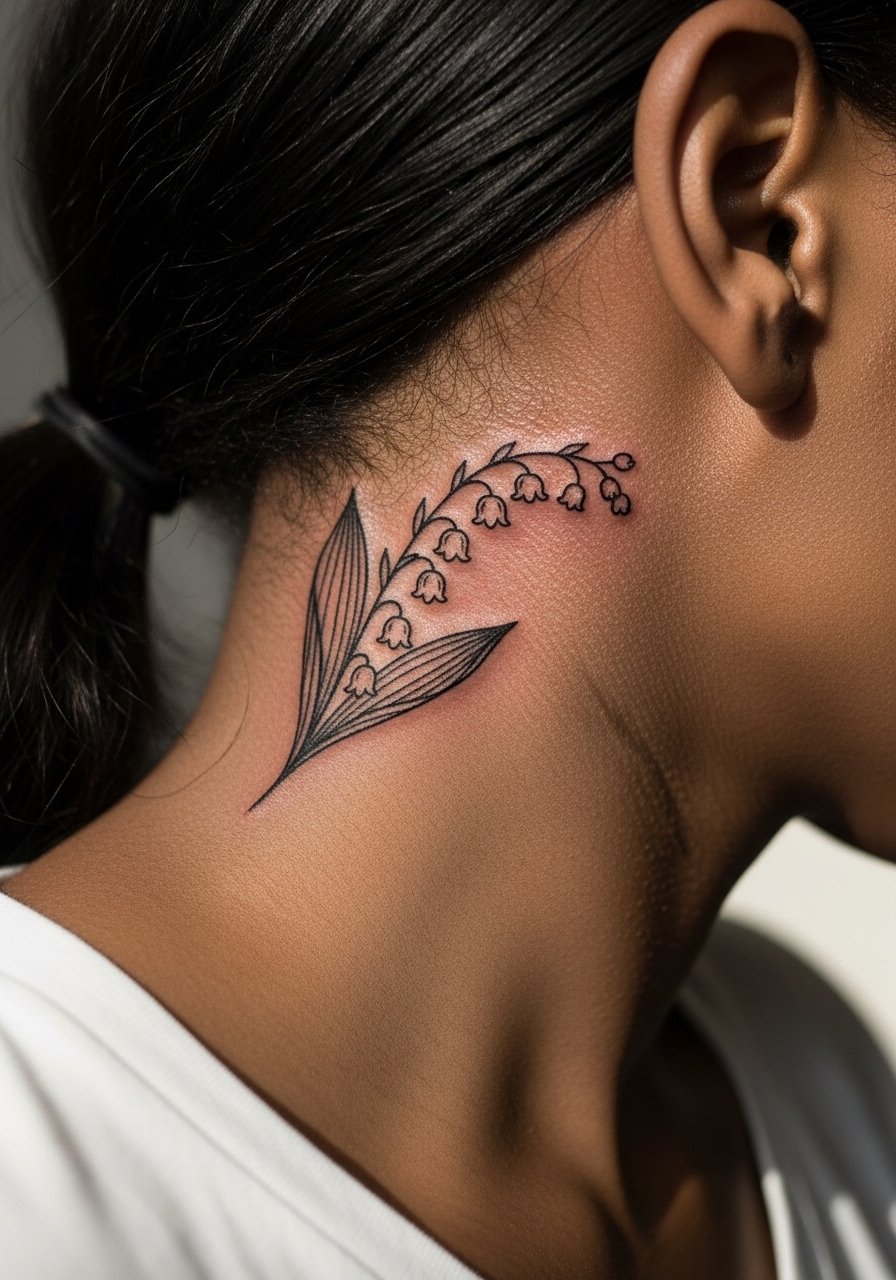
Behind-the-ear micro pieces are discreet and delicate. The area is sensitive and can tingle during the session. The mistake is asking for too much micro detail in a space that heals with scab tissue easily. Ask your artist for a simplified composition that keeps three or four bells and clear stems. This placement usually reads as a soft, subtle mark over time and rarely needs aggressive touch-ups. Consider how hair will frame the healed piece and mention hairstyle in consultation.
14. Broad Shoulder Panel with Stipple Shading
Stipple and dot work add texture while avoiding heavy blowout risk when done at scale. The shoulder is forgiving and sessions can be split into shading and linework visits. A common error is compressing stipple into a tiny area where dots merge. Ask for broader, airy stippling and check healed dot examples from the artist. This technique builds depth without dense saturation, so it ages into a soft tonal field that still reads as pattern.
15. Ankle Chain of Abstract Bells
A linked chain of bells makes a bracelet-like statement. The ankle is a high-friction zone so slightly heavier initial lines preserve shape. People ask for hairline chains that vanish after heavy use. Request marginally thicker links and expect a touch-up around year two if you wear lots of socks or boots. For the appointment, loose pants and a pair of open toe flats keep the ankle accessible and comfortable.
16. Collarbone Cluster with Subtle Highlights

Collarbones photograph well and small clusters sit elegantly there. The main technical note is that white highlights may not read equally across skin tones, so ask how highlights will translate. The piece heals into soft grayscale texture, and many clients appreciate a light touch-up at year three to restore any lost pinprick highlights. For the session wear, a wide-neck shirt pulled slightly aside is ideal.
17. Geometric Stem Arranged on the Back of the Arm
The back of the arm gets sun but is a less abused spot than the wrist. Geometric arrangement keeps the lilies readable by giving each bell defined negative space. A common misstep is making the grid too tight which causes merging when lines settle. Ask your artist to sketch the negative spaces larger than they might seem necessary. Sessions run moderate time and a single touch-up at year three is common.
18. Hidden Thigh Panel that Moves with the Skin
Thigh placements are forgiving and perfect if you want a piece that interacts with motion. The trick is anticipating how the design stretches when sitting. The mistake is centering too close to fold lines so the piece distorts during daily movement. Ask the artist to test the pose and check how lines look when you sit and stand. Healing is straightforward and color retention is strong, though large pieces may require a second session for full saturation.
19. Chest-Side Sternum Accent with Minimal Bells
Sternum work needs careful access and clothing planning. Pain varies, and the area reacts to breathing so small compositions fare best. Some artists prefer dry healing for sternum work while others recommend protective film. Name both camps in your consultation and ask where your artist stands. The safest approach is a tiny composition placed off-center, and you can plan for a touch-up if the skin texture shifts during healing. Wear a fitted sports bra to the appointment so the fabric edge does not rub on fresh ink.
20. Rib-to-Back Flowing Vine
Long flowing vines that cross the side torso work best when artists plan for motion. Skin stretch from twisting can soften hairline details so give stems room. The usual issue is compressing too many small bells into a flowing strip. Ask for staged breaks where the vine can breathe and discuss staged sessions so you can assess how the first pass settles. Pain is higher at the rib section and lower toward the back, so plan session timing accordingly.
21. Fine Line Ribcage Panel with Abstract Swirls
This final idea revisits the debate over fine line on ribs in a direct way. One camp says fine line will blur too quickly because of constant movement and thin skin. The other camp says deliberate spacing and slightly increased depth make fine line survive even on ribs. I recommend asking your artist which approach they favor and requesting a slightly wider spacing between swirls. Expect higher pain, a single cautious session, and a likely touch-up at year two to keep the lines crisp.
Frequently Asked Questions
Q: Will fine line abstract lilies on wrists blur faster than blackwork versions?
A: From what I have seen, fine line generally softens sooner because the stitches of ink are smaller and sit closer to the surface. Blackwork holds shape longer because of saturation. If you want the fine line look, plan on a light touch-up around year two and ask for modestly increased line weight in high-friction spots.
Q: How should I prep for a ribcage or sternum lily session to reduce pain and swelling?
A: Eat a good meal, hydrate, and wear clothing that exposes only the area, like a cropped athletic top or a strapless layer you can lift easily. Discuss numbing beforehand with the artist if you are anxious and ask which post-session method they prefer, protective film or dry healing, since shops split on that practice.
Q: Are watercolor lilies visible on medium and dark skin tones?
A: Watercolor can read differently on darker tones. Saturation and contrast planning make the biggest difference. Ask the artist to show healed examples on similar skin tones and consider using stronger outlines or black accents to keep the forms legible.
Q: How often should I expect touch-ups for a fine line sleeve starter vine?
A: For a sleeve that mixes fine line with negative space, expect light touch-ups around year two to three as the earliest timeline. Larger sleeves with denser blackwork often need less frequent maintenance.
Q: Where can I find artists who specialize in abstract lily work without naming individuals?
A: Search Instagram for tags like #AbstractLilyTattoo and #FineLineFloral, filter by location, and check local Tattoodo listings with style filters. Reddit communities and Booksy filters for "fine line" plus "floral" also surface reliable leads. Look for healed photos on their feed, not just fresh work.
Q: Do I need to change my wardrobe while a wrist or ankle lily heals?
A: Yes, try to avoid tight socks, boots, or bracelets that press on fresh ink during the first week. Lightweight sandals, cropped pants, or rolled sleeves that leave the area exposed reduce friction and speed comfortable healing.
